Buildings with an attic floor are the optimal solution for those who want to rationally use the space on the site. You do not have to compromise between a spacious bathhouse and other facilities - a garage, barbecue, flower bed or fruit trees. Price frame bath with an attic is only slightly higher than that of one-story options. And you get the area, as on two full floors!
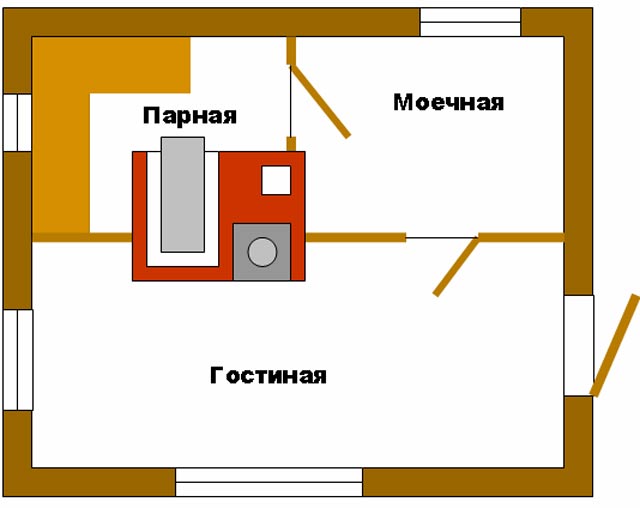
The construction company "Pomestye" offers several projects of the most demanded footage 6 by 6. On the ground floor there is a spacious steam room, a washing room and a relaxation room. If you reduce them a little, there will be space for a bathroom and a vestibule. Upstairs, there is one large room that can be used as a bedroom, billiard room or home theater. Projects of frame baths with an attic 7.5 by 6 or 8 by 6 differ slightly in price, but are more comfortable for large family or a friendly company. Sloping roof increases the area of the attic.
We have been engaged in suburban low-rise construction for over 6 years and have gained significant experience in this area. Our houses and saunas are comfortable and durable, as evidenced by numerous reviews. Call us to place an order or get a free consultation!
Many adherents to take a steam bath from the bottom of their hearts dream of getting a good, but inexpensive bath of their own. A place where you can wash and relax, and get a good boost of vivacity. One of the available and budget options- do-it-yourself frame bath: step-by-step instruction construction will reveal secrets frame technology, will become an example for self-construction, starting from the foundation and ending with the correct selection of thermal insulation materials.
Having the skill of assembling frame structures, you can quite simply and quickly do it yourself
Before you build a frame bath with your own hands, many ask the question: what material to use for its construction? Indeed, many people associate baths with structures made of log or brick. But such buildings are quite expensive for their owners, and the time required to warm up, for example, a chopped bath, is about 6 hours.

The construction of a frame bath solves several problems at once, since it is: a simple construction technique, the availability of materials used and fast speed erection. The advantages of frame technology include the following:

All these advantages contribute to the increasing popularity of frame baths. Reviews of the owners who used such technology in the construction indicate that such structures are economical and, if properly erected, can create excellent conditions for comfortable use.
To weigh the pros and cons of the technology for building a frame bath, you can ask the owners for feedback. On the Internet forums there is a lot of information from those who already have such a bath and have been using it for some time. Some leave negative reviews: frame baths, in their opinion, tend to quickly lose appearance due to the formation of fungus on the walls. This is due to the rapid cooling of the room, no matter how well it is insulated.
This disadvantage can be eliminated by using only high-quality heaters for thermal insulation. It is necessary to approach the choice of thermal insulation material with all seriousness. After all, cheap foam or mineral wool will not perform their functions properly. The use of economy-class foam can cause a fire in the structure due to the flammability of the insulation.

To one of negative points, described in the reviews, refers to the shrinkage of the bath. Many testify that over time (approximately 1.5-2 years) frame structure shrinks, the value of which reaches 8-10 cm.This, in turn, can cause deformation of the internal and exterior decoration buildings.
Useful advice! To minimize the consequences of the shrinkage of the frame bath, chamber-dried sawn timber should be used during construction.
Summarizing what has been said, we can conclude that the main disadvantages are the significant costs of insulating the walls of the frame bath, the need for careful antiseptic treatment and low fire resistance. However, given the huge list of advantages, the construction of frame baths is not inferior in popularity to structures made of log or brick.
You can familiarize yourself with some of the nuances of the assembly and reviews of the owners by watching the video of the construction of a frame bath with your own hands.
Getting acquainted with the photos and videos of frame baths with their own hands, many decide to build a structure on their own. Having some experience in construction and taking into account the positive practice of erecting objects using frame technology, you can build such a bath quite quickly. However, as in any construction, a competent project is required to avoid serious mistakes.
When building a 3x4 m frame bath with your own hands, it must be borne in mind that the space inside the room should be used as ergonomically as possible. Such mini-baths can be built on small cottage or section with country house where there is a need to save territory. No more than two people will be able to indulge in bath procedures.
Before building a frame bath quickly and inexpensively, you must have a ready-made project that you can focus on during construction. In principle, a bathhouse can consist of one room, which will combine a steam room, a shower room and a changing room. This is not very convenient, since dressing after taking procedures in a room with high temperature air and high humidity are not very comfortable.

Typical designs of 3x4 m frame baths provide for such layouts where separate rooms are allocated for a steam room, a washing room and a rest room. Heating such a bath can be done with one wood-burning stove or boiler. Drawings of a frame bath can also take into account the presence of a modest veranda.
Do-it-yourself construction of 4x4 or 3x4 frame baths, due to their small size, has its advantages:

Useful advice! Any new construction on your site, even a small bathhouse, is subject to mandatory registration in the cadastral register.
To get acquainted with the projects and choose an option to your liking, an overview of photos of frame baths of a small area will help.
If you are the owner of a large personal plot, it makes sense to build a beautiful and spacious bath. In it you can take a steam bath yourself and invite friends - there is enough space for everyone. In the projects of frame baths with an attic, a layout has been developed, where a relaxation room, as a rule, takes up to 20 sq. m. In the same room there is a staircase leading to attic floor, which is usually used as a bedroom.
Many users post online photos of the stages of building a frame bath with their own hands. Photo reports will help you to visually familiarize yourself with the nuances of self-construction.
One of important points in the assembly of a frame bath is its thermal insulation. Both the selection of material and its installation should be approached with all responsibility. Mineral wool can be used as insulation. This material is characterized by high vapor permeability, it is non-combustible and walls with such insulation "breathe". This achieves the effect of a log bath.
It is possible to lay mineral fibers formed into slabs or rolls, but the first option is preferable. Insulation plates are placed between the racks. If in the corners of the frame niche the sheets are deformed and do not fit tightly, it is necessary to straighten the sheets with a knife. The insulation should be in close contact with the wooden elements of the frame along the entire perimeter, as well as with each other.
Useful advice! Experts recommend insulating the frame bath in two layers of 5 cm: the first layer is made of insulation in the slabs, the second is made of rolled material. Thus, all the connecting lines will be covered.

A layer of waterproofing is placed between the insulation plates and the outer skin of the frame. For this, you can use, for example, Tectoten film. The fact is that during operation, the open insulation is partially blown through the ventilation gap, which leads to a decrease in the thickness of the insulation and a deterioration in its thermal insulation properties. Laying windproofing protection from a vapor-permeable membrane will guarantee the effectiveness of the heat-insulating layer.
On the inside, a vapor barrier is made of polyethylene aluminum foil. The joints of the film are glued with tape, after which they proceed to interior decoration... The process of insulating the frame is quite laborious and requires careful execution. If you do not withstand the technology, over time, mineral wool can shrink, which will affect the thermal insulation parameters of the entire structure.
The video posted below will demonstrate in more detail the technology of thermal insulation of the structure during the construction of a frame bath.
For small bath a gable or hipped roof is suitable. More simple in execution - gable. The rafter system of such a roof is made of wooden beams 15x5 cm. For convenience and safety, all structural elements should be assembled on the ground. In order to avoid mistakes during assembly, it is recommended to make a layout, the shape of which will repeat all the rafter elements.
In order to make a layout, it is necessary to connect the upper ends of the two rafters with a nail. The lower edges of the rafter legs are placed and secured at the points where the supports are planned. The resulting figure is secured with a transverse crosspiece - a crossbar. The crossbar is connected to the rafter legs with screws.
When all the roof trusses are assembled, start installing them in place. The first step is to fix the front elements, between which the construction cord is pulled for a reference point. Its location will coincide with the line of passage of the roof ridge. The rest of the elements are mounted according to its level. The step between the trusses is usually 1.2 m, although it can be changed up or down.

Useful advice! When taking the step of the rafter legs, it is necessary to take into account the location of the chimney. It should be centered between the rafters.
When installing each of the trusses, the verticality of the installation should be checked using a plumb line. If there are deviations from the vertical, it is necessary to align their position with a lining under the rafter leg of pieces of the board of the appropriate thickness. Next, arrange a crate. If as roofing will be used ondulin or another soft material, the distance between the elements of the lathing should be no more than 1 cm.
Roof insulation is carried out with the materials used for thermal insulation of the frame. The roof is covered with roofing material. The ridge is protected with a corner made of galvanized sheet or a factory-made element.

A feature of the floors in the bath is that their design can be different depending on the purpose of the room in which they are laid. In rooms that are in direct contact with water, a pouring floor is arranged. Its design is a flooring of boards, between which gaps are left for the passage of drains into the ground. There is no need to insulate such floors.
The construction of the floor of the frame bath begins with laying the logs. If the distance between the control points is more than 3 m, it is recommended to erect the support posts. In places of contact between the lag and the tape base and posts, waterproofing from several layers of roofing material is used. Boards are mounted on the logs.
Useful advice! To be able to dry the pouring floor, its floorboards are not fixed to the logs.

Boards in the construction of a pouring floor are placed with a gap of 3 to 4 mm. The spacing should also be between the flooring line and the bathhouse wall (about 2 cm). If the soil under the structure is sandy, you can limit yourself to backfilling a layer of gravel 25 cm. The distance from the surface of the gravel to the subfloor should be 10-12 cm. If the soil is clayey, it is necessary to build a sump from which water will be directed into the drain pit.
For recreation premises, a floor of a "leak-proof" structure is installed. His device begins with a subfloor of two rows of planks. A continuous flooring of pine boards is laid on top. At first, they are simply baited. And only when all the interior finishing work is completed and the room is thoroughly dried, the floor boards are finally adjusted and fully fixed.
It should be noted that the floorboards should be sloped towards the collection point for waste water and drainage. At the lowest point wood flooring make a hole, connect it to the drain siphon. A non-leaking floor needs insulation, which is placed in front of the finishing coating.

For those who first encountered the construction of a frame bath, it is very important not only to get acquainted with the step-by-step installation instructions, but also to get a clear idea of all the stages of construction. On the Internet, you can find dozens of training videos on how to build a frame bath with your own hands. Video materials contain a lot of useful information and can become a kind of reference point in the production of work.
By studying the video instructions, you can learn about the features of laying and types of foundations for the construction of a bath, as well as the advisability of using one or another type of foundation. Here you can get answers to all the questions that arise regarding the strapping, installation of the frame, roofing and equipping the bath with one or another heating equipment.
Watching video tutorials will help you find out useful recommendations regarding the use of material for insulation and its installation. After all, the main thing for a bath is heat, which must be retained inside the structure. Professional advice will help you correctly distribute and install the insulation, depending on the seasonal use of the bath, which will affect the durability and appearance of the structure.

Many videos are devoted to the section of finishing the frame bath. Here are the pros and cons various materials for decoration. Consulting experienced craftsmen will reveal the features and performance properties each type of material. Will be useful and practical advice from those who built and uses their own frame bath.
Although construction using frame technology is not particularly difficult, it is worth familiarizing yourself with the basic recommendations. Some videos contain information about the most common mistakes when building a bath. Viewing the material will help to avoid them in the future. This will be a guarantee of quick construction of a reliable and durable structure.
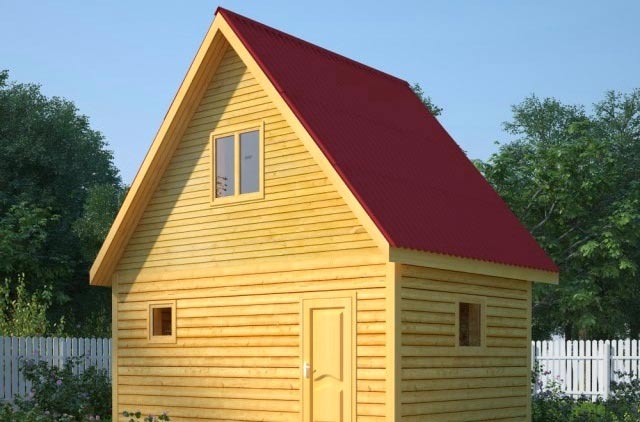
A bath with an attic belongs to one of the types. These baths are especially popular in garden and small ones, since it can be used not only for its intended purpose, but also as a living space.
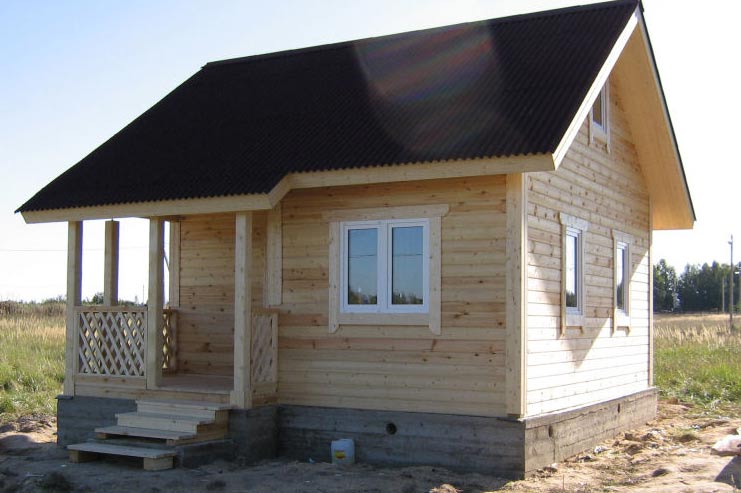
Finished project frame bath with attic and veranda
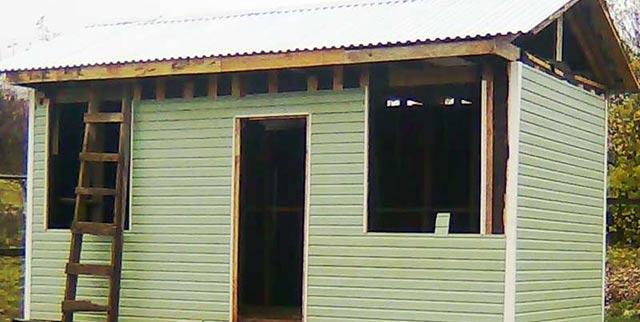
 An example of planking a frame bath and an attic
Distinctive feature of these structures is a structure frame made of wooden beams, as well as the presence of an attic.
Frame baths, in comparison with or, have their own undoubted advantages. These advantages include:
 Project and layout of a small bath
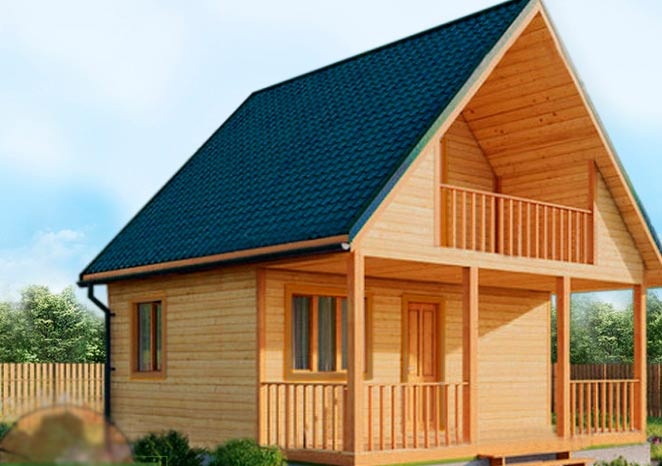
On its site, a frame bath with an attic can be afforded by almost everyone. The price of such a structure is not so high. In addition, having once built such a bath in your home according to a standard project, you can further expand it by adding more than one room to it.
Frame baths with mansards, their projects, assume the typical placement of all rooms inside the building. Namely:

The first floor is connected to the second by an internal staircase, usually located at. 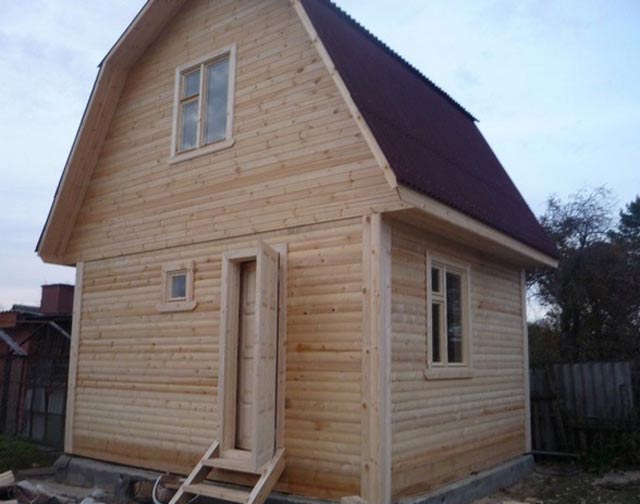

The easiest way to install a bath on the site is, of course, ordering it from a company specializing in turnkey.
This will be the optimal and correct decision on the part of the site owner. This choice can be supported by facts such as:
The most common version of the project is a frame bath with a 6 * 6 attic. These baths are inexpensive, and they take up very little space on the site.
Whoever has a rather large plot of land can put themselves a frame bath with an attic 6 * 8.
Both of these projects are capable of satisfying all human needs.  Project wooden structure and roofing with slate
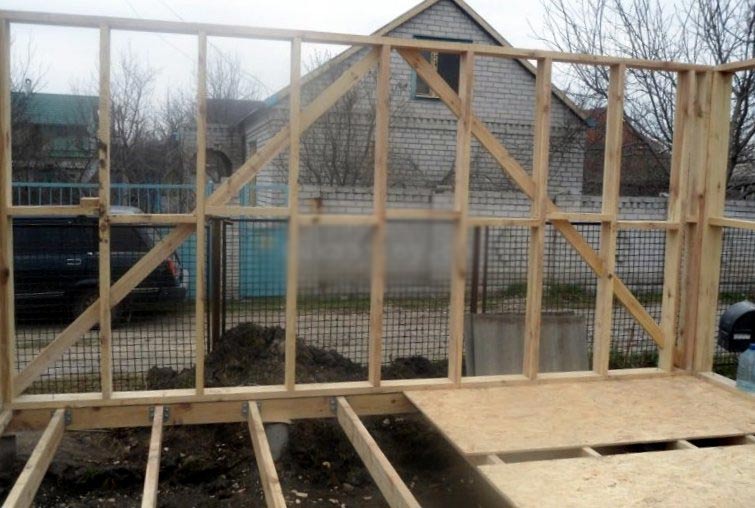
The construction of a frame bath with an attic is not as difficult and time-consuming as it might seem at first glance. Anyone who is at least a little familiar with the basics of construction can handle this. That is why many people prefer to build baths on their own site with their own hands.  The process of erecting a frame bath with an attic
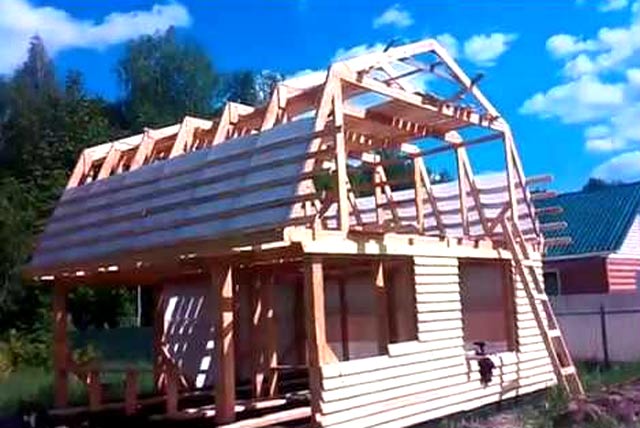


In this case, the material for construction can be prepared by yourself, rather than ordering a ready-made kit at the factory.
When choosing wood for construction, you must first of all pay attention to its moisture content. It should not exceed 20%, otherwise the bath may soon give unnecessary deformation or it will have to be completely redone. 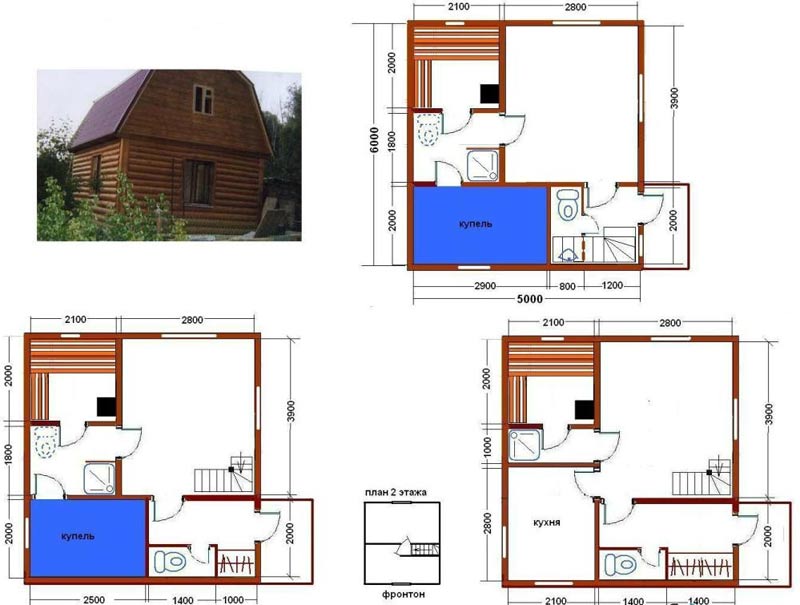 Original project and the layout of all floors of the bathhouse and attic
Before the beginning construction works it is necessary to consider the following points:
Read also
Ways to insulate the floor and walls in the dressing room for a long time
All types of baths, including the frame type, belong to small structures.  An example of clapboarding a bath with an attic
Therefore, when erecting it, you can use the following types of foundation: pile,. The choice of the foundation depends on what kind of communications will be connected to the bath, as well as on the method of supplying them.
When independently developing a project for a frame bath, you need to pay attention to such nuances as:

A detailed video review of a frame bath with an attic.
The construction of a frame bath is carried out according to the scheme usual for such types of work: base, racks, both angular and wall, piping, ceiling, roof. All work can be divided into several stages:
 The process of installing frame racks

After carrying out the main work on the construction of the frame of the bath and all internal partitions you can start building an attic and.
Installation of the attic begins with laying the floor beams and securing the U-shaped frames. As a result, it turns out, as it were. This type of roof allows you to make the attic more spacious. From the outside, it looks very beautiful and unusual. In addition, it can significantly reduce the load on the frame walls.  Diagram of the structure of the roof and attic of the bath
  Drawing of the construction of the roof frame for the bathhouse On the beams, they make a flooring of boards and immediately proceed to the installation of rafters and ridge.
All rafters must be the same. To achieve this, you must first assemble one rafter, and then collect the rest along it. In this case, to eliminate the difference in size and possible displacement of parts, all roof assemblies are finalized on the spot.
As for the roof of the bath, the block installation method is used to speed up and facilitate the procedure. In this case, the beams are laid across from each other. In this case, an element such as a pusher is additionally used. 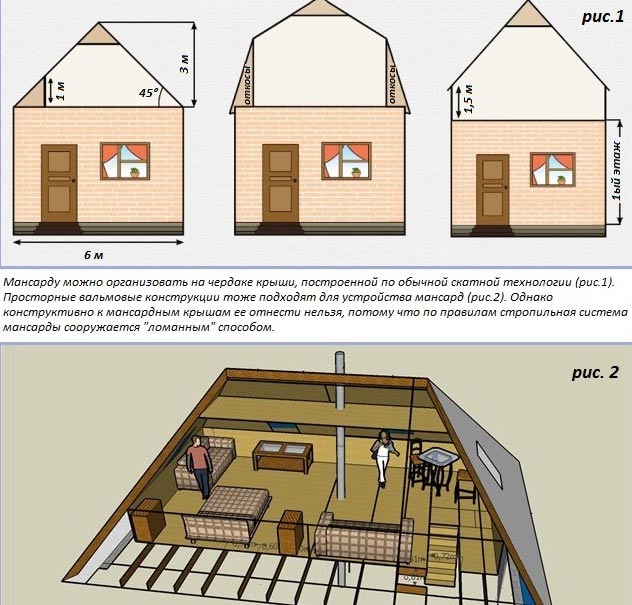 An example of the design and layout of the attic of a frame bath

It is fixed above the center of gravity, and also firmly connected to the uprights with a screw - a wood grouse. It has a bolt that acts as an axle. In order to avoid displacement of the frame along the laid boards, a wire clamp is additionally used.
With the help of these devices, you can easily lift all roof frames upward yourself, without resorting to the help of special equipment, and fix them in place.
The roof can be closed different kinds roofing materials.  Dimensional drawing for the construction of a frame bath with an attic
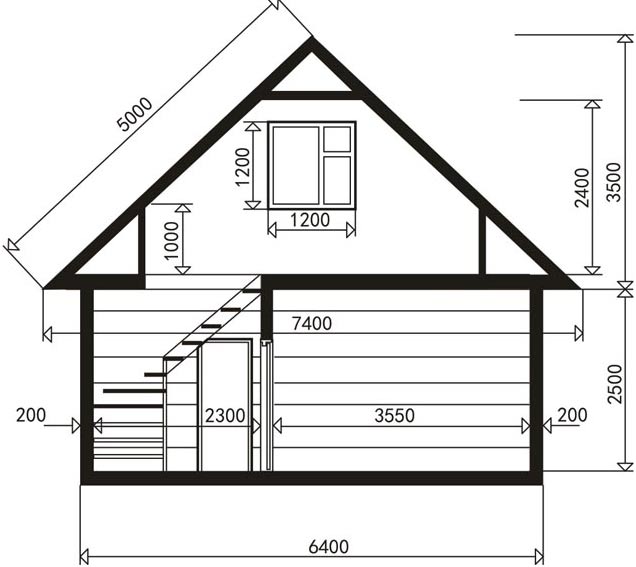
For example, such as slate, metal tiles, soft or sheet ondulin. But before using these materials, roofing material is laid on the crate in two layers. From above, roofing materials are covered with a ridge. No attic is complete without windows. They can be of completely different sizes and shapes. Modern windows can be installed anywhere, even in the plane of the roof itself.  The process of assembly and sheathing of attic rafters
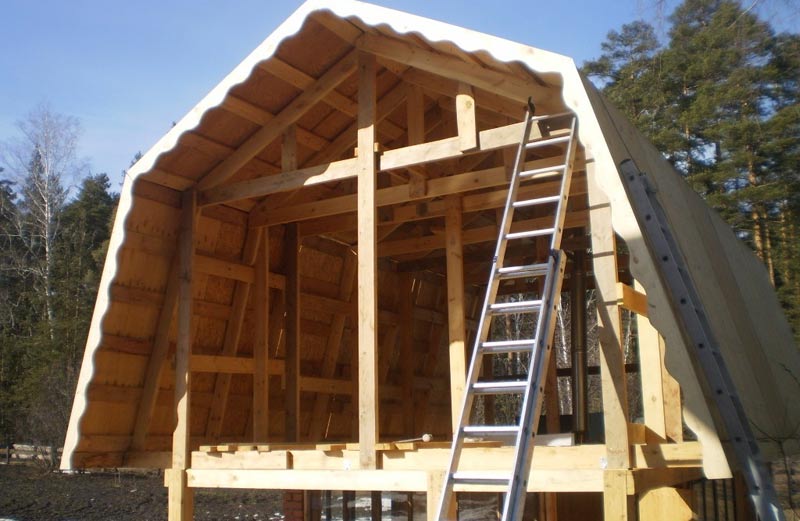

It is easy to build a wooden bathhouse with an attic room on your own, if you take into account all the nuances when designing and choosing a location on the site. It is in these subtleties that we will figure it out.
Content:
Equipment additional room over a steam room has many advantages. In the attic, you can equip a billiard room or a guest room. To build a bathhouse with an attic with your own hands, you must initially decide on its location on the site and choose a project. Please note that according to the rules fire safety it cannot be placed closer than 10 meters to other buildings, if planned wood heating and closer than 5 - if gas or electric. The bathhouse needs to be built at a distance of more than 2.5 meters from the neighboring site and 20 meters from wells and wells.

Consider the technology of building a bath with an attic from a bar. Such a building is considered "classic". Glued laminated timber gained popularity due to high performance characteristics and relatively low cost. A construction from such material will be much cheaper than, for example, from a rounded log. Manufacturers use coniferous wood as a raw material for timber, which is carefully sanded and treated with antiseptic solutions. For gluing finished lamellas, a hydrophobic non-toxic glue is used. The construction of laminated veneer lumber is characterized by moisture and heat resistance. You can order the production of material of the required shape and size.

We act in this way:

The walls of the bath are assembled in the following sequence:

The broken rafter system is quite difficult to perform:
IMPORTANT! Parameters rafter system it is necessary to clearly calculate, because the attic is planned for a living space in which you can stand in full height and carry out some movements.

Remember that the attic of a bathhouse is different from the attic of any other living space. This is due to the high temperature in the lower room and high humidity. To avoid high humidity in the attic room, you should take care of a special layer between the two floors. To make the interfloor overlap, we lay a layer of vapor barrier in the attic, then a heater. We mount the finished floor from a grooved floorboard.
You should also take care of artificial lighting in the attic, since there may not be enough windows. Before starting finishing work, conduct the wiring to the second floor.

For construction, you can use coniferous and deciduous tree... Pay attention to the fact that the lumber is well dried and even.
Before proceeding with the installation of the structure, decide on the location of its placement. Note that the staircase to the attic in the bathhouse should be located exclusively indoors. It cannot be installed outdoors. The future structure should be located along the gable part of the roof. Usually the place of its installation is the dressing room.
The simplest option staircase executions - by stringers:
If attic staircase has a width of more than 120 cm, a railing is not needed for it. Otherwise, additional vertical racks should be made, which are attached to the stringers. Railings are attached to them.

The plating procedure is performed as follows:

The interior decoration instructions look like this:
Frame bath with an attic, made by hand, is one advantageous structure for a summer cottage. Such a structure will allow you to enjoy your stay in the steam room and use the building as summer cottage for 3-4 people. Existing projects of frame baths with an attic allow you to choose any type of structure, but not every one of them can be accommodated on summer cottage in 6 acres or harmoniously fit into the number of farm buildings. Therefore, the most optimal design A 6x6 frame bath with an attic is considered satisfying in terms of cost and comfort.
A 6x6 bath with an attic and a terrace is easy to build with your own hands without the involvement of professional builders. If you want to achieve the strength and durability of the structure, then you need to develop a project thanks to which the bath will stand for a very long time.
As building material for the construction of a 6x6 frame bath, a 150x50 mm board or a 100x100 mm bar is used. When self-procurement of materials, you need to choose only well-dried material, since if the moisture content of the wood is more than 20%, there is a certain percentage of the probability that in the process of using the bath, the structure will "lead" and a quick additional repair will be needed. Frame bath 6x6 is built with a steam room and washing compartments on the first floor. The dressing room and dressing room are also located here. For more comfortable use, the stove is heated from the dressing room. It will be possible to get into the attic by going up from the dressing room along the inner flight of stairs... Some designers, in addition to a rest room in the attic, place a veranda or terrace.
The bath should be equipped with partitions between the steam room, the pre-bath room and the wet section. Inside all partitions, there should be insulation, which is sewn up between the outer layers. The insulation material should be covered with layers of hydro and vapor barrier material. Frame bath regardless of type finishing works has a small load on the soil, so for the construction of a building it is enough to build a shallow strip base. This type of foundation will save time building materials.
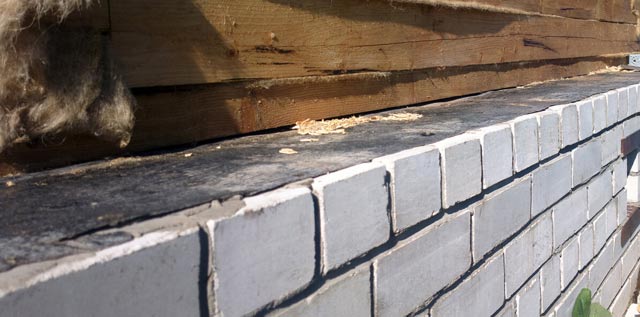
Before erecting the foundation, you need to prepare the site: clean it of debris and level the surface. The base of the bath will be tape, so you need to leave holes for supplying, draining water, ventilation, etc. Next, you need to mark the tape base, and for this you need to drive in wooden pegs around the entire perimeter of the structure. The foundation area must be level. If the soil on the site has sufficient density, you can not waste time making the internal formwork, and dig a trench according to the width indicated in the plan. In the process of arranging the base for a bath, you need to prepare a foundation for a stove, and at the same time a place for a small septic tank, which will collect moisture from the steam room and washing rooms.
From reinforcing rods you need to tie metal carcass for pouring concrete. Next, you need to dig a trench no more than 80 cm deep, the bottom of which will be covered with sand (no more than 30 cm) and tamped. The sand cushion will compensate for changes in soil during the winter cold and summer heat. Place in the finished trench reinforced mesh and pour concrete evenly around the entire perimeter. Pouring concrete throughout the day is considered ideal. The next day, it is necessary to level the upper part of the foundation, since the base should be even around the entire perimeter. After the solution is completely dry, and this will happen no earlier than 2 weeks later, cover the base with 2 layers of roofing material and attach with stones.

Sewer system in the bath, it consists of pipelines and septic tanks, therefore, it is best to prepare a place for a sewage system at the stage of work on preparing the foundation. First of all, you need to decide on the location of the septic tank. It is desirable that its location be at a slight slope relative to the bath. If a natural slope is not possible, it can be achieved by a trench dug under the slope. Next, pull a cord between the bath and the place for the septic tank and check the horizontalness of the surface using a water level. According to technical requirements, slope sewer pipes must be at least 3%. If the washroom will only be used in summer period, then the depth of the pipes does not matter, but it is better to approach this thoroughly and place the pipes at a depth below the freezing point of the soil.
You should not purchase expensive industrial septic tanks, since for a small family, an ordinary barrel with a capacity of 200 liters is enough.

The construction of the frame is made of boards, insulated mineral wool... Make bottom rail from boards measuring 50x150 mm. Typically, the standard boards have a length of 6 m, so you will not have to connect anywhere except for the corner parts. To fix them, you can use nails or screws. Immediately install the floor beams in 80 cm increments.After that, mark the window and doorways... Next, prepare vertical posts in all corners of the room and install them on the upper harness. Check the height again using the water level and level the supports if necessary. From the bottom, they can be fixed with metal corners, and from the top - with temporary side struts. After completing the upper strapping, check the strength of the structure, install the floor beams of the second floor and do not forget to mark the openings for windows and doors. After that, you need to lay a temporary attic floor, which will help facilitate the installation of the rafter system.

The roof for the attic requires a special approach, since it must be warm, besides, it must be stable. You also need to take care that the location of the rafter legs can be hidden under the skin. interior partitions... The most common roof option for a 6x6 bath is gable roof under the ondulin. To build it, on the ground you need to collect a template of rafter legs with the right angle, which will greatly help with the further construction of the system. Prepare the entire rafter system on the ground. Next, install the 2 outer rafter legs and secure them. Pull a rope between them, which will become a guideline for installing the entire structure. After the construction of the rafter system, you can proceed to the installation of the lathing.
Ondulin is attached to a lathing made of wooden slats with a size of 20x50 mm with a pitch recommended by the manufacturer roofing material... Considering that the attic will be insulated with mineral wool, it is necessary to qualitatively strengthen the waterproofing material. It doesn't matter which one is chosen, the main thing is the reliability of the material. At this stage, it is advisable to install roof windows... After the whole structure is ready, it remains to lay the floor, complete the inner and outer sheathing of the bath and insert the doors.


