The presence of sidelines of canopies testifies not only about the good taste of the owners, but also about their desire to improve the comfort of recreation and residence. It looks very original with your own hands, gives space an exclusive view, it serves a long time, can be used to create closed zones various destination. The appearance among polycarbonate building materials made it possible to create original structures With minimal loss of time and money, while the actual performance indicators are much superior to the previously used materials.
The use of modern equipment and innovative additives allows you to create material with unique properties.
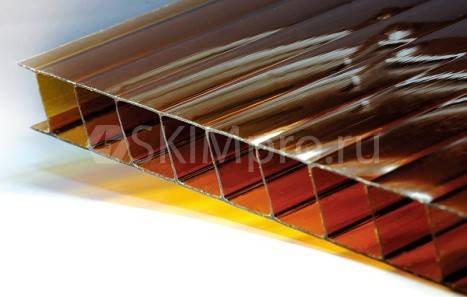
1. The transparent polycarbonate transparency reaches 90%. The value may vary depending on the presence of mineral dyes of various shades. Due to large transparency, it is possible to save electrical energy to lighting. Canopies can be used to arrange flower beds, greenhouses, etc. The development of plants under sheds is no different from development in open areas.

Light Polycarbonate 90%
2. High performance of mechanical strength. The material is plastic, which allows it to exhaust sharp dynamic loads without cracking. It does not have the effect of residual deformation, after removal of loads completely restores linear dimensions and geometric shape.
3. Excellent indicators of mechanical strength in relation to the specific weight. Polycarbonate has special rigidity ribs, which increases bending resistance. High-resistance to the order exceeds the glass indicators. It may be standard one or two-chamber, reinforced, four-chamber.
 Single-chamber polycarbonate sheet
 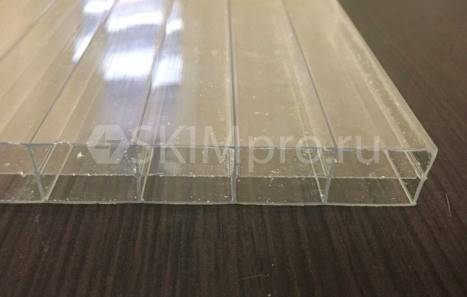 Twin-chamber polycarbonate sheet
 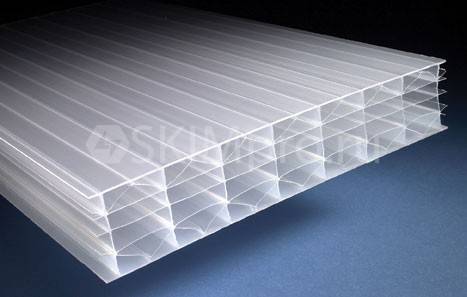 Four-chamber polycarbonate sheet
4. Low specific gravity makes it possible to seek noticeable savings on foundations and supporting structures.
5. Innovative additives make it unresponsive to hard ultraviolet radiation. The strength of intermolecular bonds remains unchanged the entire period of operation - microcracks do not appear, the values \u200b\u200bof strength and sustainability do not deteriorate.
6. High ductility allows us to use materials at temperatures up to -50 ° C, the strength indicators do not deteriorate at temperatures up to + 115 ° C.
7. A wide range of thickness, sizes of plates and color solutions. It makes it possible to designers correctly embody their most bold projects.

8. Lower life exceeds 25 years. Polycarbonate has excellent technological characteristics, it is easily cut and processed by ordinary tools. During use, the number of unproductive waste is minimized.
With the use of polycarbonate you can do the following canopies:
Visor over the balcony canopy for several cars canopy for patio canopy for the pool
Dina panels 6 and 12 m. For connecting together individual panels, a special aluminum profile is used, a standard length of 6 meters is applied. The profile may be inconclined (panels are inserted into technological grooves from both sides) or detachable. The detachable has a universal purpose, can be applied to different types constructions. It consists of the upper and lower clamping parts, tightened with each other with special screws. Used on various panel thickness, it is possible to manually adjust the compression force. If the panels for some reason reduced the thickness, then the profile can be fastened stronger and eliminate the leakage of the connections.

The ends should necessarily close the ease profile, close to silicone before closing the cell. This prevents reproduction in the cavities of microorganisms, moss and mold. Such microorganisms deteriorate significantly appearance Constructions. In some cases, there may be a negative impact on the magnitude of the transmitted light, which is one of the disadvantages of polycarbonate canopies.
 Sun-unclosed profile
 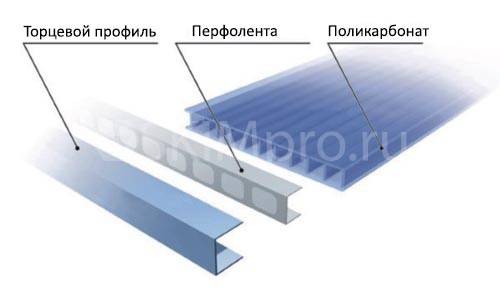 Forest profile for polycarbonate
For fixing polycarbonate sheets to metallic or wooden frames Special self-tapping screws apply with rubber gaskets. How to make a canopy shown on the video. Self-tapping heads can be covered with decorative hats. The carrier frame for a canopy can be made of square and round pipes, corners, ducts, channels, or wooden BruschevThe dimensions are selected based on the maximum loads, the area and the type of the roof of the canopy.
What is better - polycarbonate or professional flooring for a canopyThere is no definite answer. Professional flooring is made of sheet steel, can withstand increased loads. But polycarbonate has universal applicationMainting a canopy from polycarbonate is cost-effective.
Stages of design of canopiesA sketch project to start construction of canopies with their own hands is needed from the preparation of a draft project carrier structures. To do this, we should have theoretical knowledge by calculating the maximum loads in the design sites, calculate each element to bending and compression. Maximum wind and snow loads are taken into account, the types of roofs and the angle of slopes are determined.
Types of the rafter system of canopiesDepending on the engineering features and specific operating conditions, the canopy may be:


After determining the roof types you need to start design foundations
Types of foundationsThe small weight of the structures allows the use of the most simple and cheap foundations. Due to this, the construction time is significantly reduced and their cost is reduced. Taking into account the physical characteristics of the soils and the possible load for canopies, such foundations can be used:
Screw pile. Metal piles are screwed into the ground according to the pile field plan (watch the video). Depth and dimeter is selected individually. The ends of the piles are aligned horizontally, metal platforms are welded to fasten the vertical supports of the canopy. Dignity - Fully prepare foundations within one day are used in any climatic zones and on any soils, including wetlands. Have positive user feedback. Screeching under the canopy do not necessarily.

Greenhouse on screw piles
Stilled. The depth of occurrence is approximately 60 cm, a sand pillow is embanked to compensate for the swelling efforts. The dimensions around the perimeter are not more than 40 × 40 cm. Can be made from concrete (reinforced or unarmed), cement blocks or ready-made factory structures. Advantages - the lowest cost, there is no need to align the platform. Making time, taking into account the pouring of the concrete no more than 14 days.

Bearing support with location in the soil 60cm
Fine breeding tapes. Used for large heavy structures, allow you to put the side walls for canopies to protect against wind, snow and rain. The cost of the expensive category, the time of manufacture of at least three weeks.

Fine-breeding foundation
The choice of foundation can have a significant impact on the cost of the structure, when making a decision, the maximum number of factors should be taken into account.
Bearing vertical supportsMove from round and square pipes, varietal rolled products or wooden bars. With their help, you can build a wooden canopy. Installed on the foundations, serve to fix the rafter system of the canopy. During the manufacture, height and possible efforts are taken into account. The distance between farms and supports should take into account the total area of \u200b\u200bthe canopy.
Building and installation technologyBuild construction begins with the installation of vertical supports on ready-made foundations. During the fill of the concrete, anchor bolts are installed in them, the distance between them should correspond to the distance between the holes of the lower platform of the supports. Each pore is constantly controlled by a vertical position, the deviation of the vertices in any direction is prohibited. The distance between the supports corresponds to the length of the roof elements. The assembly can be carried out with welds (not collapsible) or with hardware (collapsible option). The collapsible canopy of polycarbonate makes it possible, if necessary, dismantle the construction and install it in a new place. After dismantling, all designs retain their initial indicators and are ready for re-installation without prior preparation.
 Concreting Stand
  Fastening struts anchor bolts
  Arch mount
If the canopy is made on industrial enterprise, It has workers for mounting, each detail is numbered, its position in the node and the fixation method. Independent manufacture metal structures of the canopy requires care and fulfillment of existing sectoral requirements, construction norms and rules.
The elements of the canopy after installation are checked for matching position, the assembly stages provide a gradual fastening of structures. If deformations occur, it turns out and the cause is eliminated. Before fastening the polycarbonate on the canopy, tests should be performed. During the tests, the design is loaded with efforts twice as large. Due to this, the safety reserve coefficient is achieved, long-term and safe operation cargo.
How to fix polycarbonate to metal carcass sowingSheets are cut in an eclectic jigsaw, a grinder with a cutting thin disc or mounting knife. A specific tool is selected depending on the thickness of the material. Installation of polycarbonate begins with one of the sides, only after complete fixation of the previous sheet can begin fixing the following. For fastening, special self-tapping screws are used with rubber washers. The washers seal the coating, compensate for the difference in the change of linear dimensions due to thermal extensions, do not allow the appearance of microcracks. Tighten the screws should be careful, it is impossible to damage surfaces. If there is a desire, then self-tapping heads can be covered with decorative hats.

Void from the ends of polycarbonate sheets must be sealing. Otherwise, in them in several years, MAY and mold will begin to grow, it will deteriorate not only appearance, but also performance features. During the attachment of sheets, you should pay attention to the front and reverse moan. Laying polycarbonate on the canopy is performed only facial sideIt has a special protection against the harmful effects of ultraviolet rays, the installation of the laying is indicated on the packaging of each sheet. During production, it is covered with a protective polyethylene film, which has instructions and drawings. It is recommended to remove it before installing the sheet on the landing place. Otherwise, the self-tapping screws will hold the film, in these places it will not break down, but bulls. The pieces will remain, remove which is very difficult. In addition, the protective film is much easier to shoot when the sheet is on Earth. If it is installed on a canopy, work is significantly complicated.
Practical advice
Compliance with the recommended rules ensures that the installation will be carried out taking into account the construction norms, the canopy will be reliable and serve a long period of time.
Video instructions for installing a carport of polycarbonate with their own hands
Polycarbonate canopies can be used for a variety of needs. These are mounted visors over a balcony and a porch; Indoor parking for passenger cars and agricultural machinery; Covered transitions between the house and the bath, summer kitchen, the sheds, etc.
This article will be considered different types Carports to the house of polycarbonate, features of the choice of materials for the frame, calculations of buildings. Also you will find here. phased guide on the construction of a construction based on a metal profile.


The most popular options for visors and canopies from polycarbonate are arched, cascade, single and two-tight. All of them possess their advantages and disadvantages.
Arched canopies made of polycarbonate in the yard today are considered the most popular, especially for the organization of parking lots and galleries between the house and the surviving buildings.
The lack of arched polycarbonate canopy has one - with its independent making, it may be the problem of flexing profiles.

Arched Polycarbonate Canopy: The photo shows the covered parking lot
Cascade canopies are essentially a system of several arched. This design is selected for installation over the staircase spans, where the tilt of the roof is obtained very large. And the reasons for that two:
Disadvantages of such a system - the complexity of the design, large temporary and material costs.

Arched canopy from polycarbonate attached to the house: photo of a three-stage system
Single carport of polycarbonate is the easiest in construction option:
Single designs are often used with a canopy to the wall of the house or garage. The disadvantage is a small roof slope, snow on it will accumulate snow.

Polycarbonate wooden canopy: Photo single construction
In construction, a bit more complicated for a single one, as it requires the information of two slopes at a certain angle. However, in operation, such a building is more convenient:
A two-tight polycarbonate canopy can be used for various purposes: for parking lots, mangals, barbecue stoves, porches, pavilions between the surviving buildings.

Glue roof over a barbecue oven
At the stage of creating a project, before the start of calculating the carport of polycarbonate from the profile pipe should be found for themselves as follows:
Armed with this information proceed to the calculation and drawing up of a carport of polycarbonate. Here you already specify: the dimensions of the construction and the shape of the roof; specifications Material supports, frame and roofing; The number and nature of the fasteners.
Note: When determining the features of the framework framework, it is necessary to take into account that polycarbonate is produced by sheets standard sizes. Their joints must come to transverse profiles - crate.
How to make a carport of polycarbonate: the width of the runs between the profiles of the crate depends on the parameters of the roofing material
And now about the height of polycarbonate canopies. In principle, it can be any - it all depends on your needs and wishes. However, for comfortable use, the construction will be better if the lowest point of its roof will be at least 180 cm above the ground.
The parameters of the support racks for the manufacture of canopies and visors from polycarbonate should be calculated based on the following numbers:

How to make a carport of polycarbonate with your own hands: the drawings should be very detailed
Note: Designing designs area from 8 m 2 better entrust to experts. The area of \u200b\u200bthe roof will be big here, which means here it will be necessary to accurately calculate the level of snow and wind loads. Errors can lead to deformation or collapse of construction.Typically, the following materials are taken from polycarbonate canopies:

Wooden frame
The longest part of the construction site is the creation of a foundation. The frame itself and the fastening of roofing sheets will take, at most and a half business days.
The reference pillars set in the following way:

Concreting support
Supports on the vertices bandage with a single beam, then the front part of the canopy will then be relying. It is better to perform this dressing from a square or rectangular profile. Using round pipe It is undesirable here, since the area of \u200b\u200badjoining elements with welding works It will be too small.

Polycarbonate canopy attached to the house: the photo shows the location of the front part
Note: Binding a canopy to the wall is carried out on the beam attached to the surface with anchor bolts. In the desired height, turning to construction level, We note the line along which the holes under fasteners are drilled. Next, we screw the beam on the wall, well tightening the bolts.
We make a canopy to the house of polycarbonate: the photo of the installation of the binding is displayed in the photo
If a canopy for giving from polycarbonate will have an arched roof, then we will have to think about how to bend the profiled pipe. This can be done in several ways:

Manual pipe bending machine
The welding of the frame is beginning with the assembly of rafting farms. This is done on Earth, with the mandatory use of the construction level. Diagonal rails on parallel profiles are starting to weld from the edges, gradually moving towards the center. The work will greatly facilitate magnets for welding - it is good to set the corners between the details.
In the next video, you can consider how welding magnets are used.
Finished farms for canopy from polycarbonate put on binding and on the opposite support. Speedly implant, and then weld. All elements should stand strictly vertically, so after the injection, check the correctness of the installation of the construction level. If necessary - I correct the location with a sledgehammer.

Canopy attached to the house, from polycarbonate: photo installation of rafting farms
Across rafting farms can be boiled runs from a fine rectangular profile. The distance between the details is made from 50 to 60 cm.

Installation of runs
Next, proceed to the installation of sidewall. To the bases of the extreme farms, we weld the profile segments and screw them along the entire length to the walls. From the lower edges of the segments to the end of the farms, stretch and weld the profiles of the same thickness. We make a pair of transverse jumpers. See how it looks like the next photo. The frame is ready, you can start the installation of polycarbonate.

Working with sidewalls
And now, how to fix polycarbonate to the metal carcass of the canopy. Installation is carried out using special fasteners - thermoshab. They consist of sealing and plastic washers, as well as plugs to them. It is tightened by all this ordinary self-drawing. Special attention should be paid to three moments:

How to fix polycarbonate on a canopy: you need to use special thermoshabs
In addition to the thermoshab, this accessure is used in the installation of polycarbonate:

Additional accessories
When refrming a country house, it is worth considering each item that as a result you had a good place to relax. For example, when organizing a recreation area, it is worth building a canopy. For this purpose, you can use polycarbonate. This material has sufficient strength, so it is worth learn some details of the construction of the construction of it from it. This article can be familiar with the step-by-step instruction of how to make a carport of polycarbonate. You can also view several drawings on which options for arranging this design are offered. Therefore, even if you are new to construction, then this article will help you get a general idea of \u200b\u200bwork, as well as try your strength.
For the manufacture of transparent roofs, the polycarbonate has proven itself from a positive side. Unlike glass and plastic, this material is convenient in operation. The edges of the product are equipped with rigidity ribs, due to which the sheets can be bend without bad consequences. Therefore, it is given the opportunity to build a canopy of any planes, even semicircular. Another advantage of the material in a variety of coloring. Plus, the transparency of the material enhances the lighting of the closed area.
Sheets with one or another shade muffle the sun rays. So even in the hottest weather, it will be safe under a canopy of polycarbonate.

First of all, it is worth considering the design of the future canopy over the porch or another place. For the manufacture of the project, you will need to think about the following parameters:
As for the drawings, at the end of the article, you can familiarize yourself with some of the options. For example, some can be taken as a basis and add something.

To work with such a material, you should have the next set of tools and material at hand:
If the entire material / tool is assembled by the first preparatory stage. To install the supports, it is necessary to dig a hole with a depth of 600 mm. This is the case if the canopy is planned to build a big one. Supports should be located at a distance of 1-1.5 m. Having done such work, the further framework can be attached to the supports.
If the canopy is small and planned to be installed above the porch, then maybe the supports will not be required. It will be enough for a few anchor fasteners to the wall.

As mentioned above, it is possible to make a frame of both wood and from a metal profile. The choice depends on the required strength of the final product. For example, if the canopy is manufactured for a picnic and rest, you can build a frame from a bar. If the shelter is required for the car, then preferably produce a reliable metal frame. In the latter case, without the skills of the welder could not do. If you do not have any, then the help of a qualified welder will be required.

In order to save it, you can buy a ready-made frame that is collected by bolts. Such a design, a clear case, will not be so durable as the welded frame, but in some cases the only correct solution.
So, for the manufacture of such a frame, you will need a metal profile with a cross section of 60 × 60 mm or 100 × 100 mm. The profile selection depends on the load. For example, for a run, you can choose a profile with a smaller cross section - 40 × 40 or 60 × 60 mm. For the crate and less, you can use 20 × 20 mm.

Previously concreted racks first need to be tied up. This will ensure the construction of greater rigidity. Additionally, the strapping can be made from below and in the middle. If the canopy is above the porch, the part of the support will be on the wall, and the other on the support pillars (in case the size is large enough).
For the top of the design, the arch is constructed. To make bent items, the pipe bender will be required. So, it will be possible to make an arc from a metal profile. The finished frame is covered with an anti-corrosion composition, and after the desired paint color is covered.

It is worth noting some features of the polycarbonate attachment to the frame. For the arch should be purchased with a thickness of 8 mm. The more the leaf should be unhappy, the smaller should be its thickness. If the roof of the canopy is straight, then the sheets of coating can have 10 mm thick.
Separate billets must be cut into with a hacksaw or circular saw. But consider when cutting, the length of the sheets should be such that they look out for the edges of the design by 100-150 mm. In the process of cutting, it is impossible to allow vibration products. This can cause the appearance of cracks on the material.
Some experts perform cutting polycarbonate directly in the protective film. Due to this, there is a smaller risk of leaf damage during its preparation.

Moreover, when laying a sheet, do not confuse the side. That side that has a protective film should be directed up, as it has protection against ultraviolet.
To connect the sheets using a docking profile. Before spinning the self-tapping screw, pre-drill in the polycarbonate of the holes. They should be slightly larger than the diameter of the self-press. Screw the screws should be screwed through special washers having a rubber gasket. It is also important to organize a small gap in the places of docking sheets. It is enough to leave 3 mm to expand the material when heated. As for the ends of the sheet, it closes the end profile.

We present you short step-by-step instructions For the manufacture of a canopy of polycarbonate over the porch and with support racks based on a wooden frame:

This simple instruction confirms the words said at the beginning of this article. Even without special construction skills, you will work if you wish to make all the work on the manufacture of a canopy yourself. If you have personal experience in such construction, then leave your comments at the end of this article.
Several variations of polycarbonate canopies:


The schemes provided will help you choose a project suitable in your case:


Send the material to you on E-mail
An important part of the exterior of the country house is a canopy. It is designed to protect part of the yard from precipitation and ultraviolet rays, and also performs a decorative function. Small plot, closed on top of the material, are canopies attached to the house. Photos of such structures can be seen in this review. In this case, the structures are derived to the desired height. Attachment to the ground structure implies the mount of one side of the structure to the wall of the house.
Attachment allows you to create a magnificent outdoor recreation area
Canopies attached to the house can be made with their own hands. The photo displays the main stages of mounting. Framework is often performed from a profiled tube or bar. A similar design adjoins the wall and takes on the load from the snow accumulated on the roof.
The roof is usually covered by a straightened, slate or galvanized material. Metal for frame design has plasticity and durability. It is suitable for different design styles. Similar structures can be erected with your own hands.

The frame system of wood is remarkably combined with other materials. The tree is suitable for most architectural solutions. Before use, this material should be treated with protective drugs. Most of polycarbonate attached to the house, which can be found on the Internet, are becoming increasingly popular.

Polycarbonate is distinguished by the simplicity of assembly and a variety of color palette
Polycarbonate enjoys the following advantages:
Helpful information!Purchasing a design kit for self-assemblyIt is necessary to check the integrity and strength of all connections.

Sheds attached to the house, as shown in the photo, there may be two types. These are console models and canopies on supports. The console variant can be any length, but its width should not be more than two meters. Support structures can be used for different purposes.

Sheds can have a different purpose:


Article on the topic:
Often homeowners choose wood canopies. Such structures have an excellent set of characteristics:
Helpful information!For comfortable use, the canopy should take care of the light and installation of lighting devices.

Awning from a professional flooring can be performed in various configurations. Single, double and arched structures are created from the corrugated. In addition, the construction of this material has the following features:
Important!A strand floor carp is mounted only by galvanized self-drawing, which have sealing rubber.

Choosing a design project, it is worth defining the following parameters:

Before assembly work Be sure to draw a drawing. Based on the size of the construction, the required amount of material is determined.
Helpful information!When creating a canopy under the car, it is worth considering the passage of a car with a cargo.
Before the planned canopies attached to the house, which can be found on the site, must be made. preparatory work. For this, there is a suitable playground, and trees are hardened on it. Pure plot is aligned. At the same time, sand and crushed stone sweep.

Under the supports of the canopies are recessed. And at this stage it is worth considering cable gasket for lighting sources. The definite layout step is selected. It depends on the severity of the roof and the framework.

In the prepared pits, racks are lowered concrete mixture. Poles are exhibited by level.
Important information!If close is located groundwaterThe ends of the columns are required to additionally hydroize. Metal supports are pre-treated with primer.
After 12-15 days after the complete pouring of the concrete, you can start the construction assembly. The brackets are mounted on the wall, and then on top of the transverse beam.

Performed top strapping. The end parts of the racks are connected using the transverse beam and among themselves. At the same time, parallel laid profiles are used. The metal frame system is welded with each other, and the wooden is tightened with steel corners.

Welding places are cleaned, processed by primer and color. The rafters are mounted in transverse parts with a pitch of 600 mm. To the carrier beam, the design is attached using steel corners. The lamp is laid across rafters and mounted by self-draws.
Roofing sheets are cut in size. Then attach to the crate. Previously in polycarbonate are done by the holes for the self-tapping screw.

To facilitate water removal, cells should be directed down. Working with plastic, do not forget to leave the gaps between. The dimensions of the holes should be made with a reserve of 2-3 mm. There are some features of the installation of the roof from other materials.

Brooks can be used by wood bars. Over time, cracks may appear in the material, which will reduce the stiffness of the structure. After mounting the beams, transverse boards are installed, and the metal tile is fixed. Installation of this material is made from the lower sheets. It should be borne in mind that there must be the backstage of the upper sheets to the bottom.
Provide protection from the rain or the scorching sun will allow the installation of a polycarbonate canopy: the carcass adjacent to the house usually relies on the rack. Another part of the canopy is strengthened to the wall of the structure. In general, the construction should harmonize with the common style of the structure, at the same time fit into the design of the landscape.
Designing a canopy style, the designer must take into account architectural forms of buildings. There are different types of structures from which you can choose the most appropriate option:
More familiar is a canopy having single roof. Its installation technology is quite simple. To correctly calculate the angle of inclination, it is necessary to take into account that it is possible to quickly gather from the roof of snow cover in winter. A common form of a duplex design has 2 slopes, with an angle of inclination of 35-45 °. If, when arming a canopy, it will take into account this, the snow will go under its own weight, and the rain water will not be stated. Raw beads are quite popular.
Arched facilities with a semicircular form roofing are considered functional and original. Plastic materials are successfully used to create canopies above the entrance of homes. The roof having a semicircular shape does not prevent snow removal.
The arch can have a bend radius, which depends on the norm allowed by the manufacturer for the material used.
Canopies of the dome or wave-like type are protective or decorative elements. Multi-level canopy can have a scope or arched roof shape. In any case, this design consists of several tiers. A more complex is the installation of bathing or arched structures from polycarbonate, as it is required to take into account the following parameters:
Installation with your own hands on the inlet of polycarbonate requires skills and skills.
The construction of a carport of polycarbonate attached to the house can be installed on the support racks from the following materials:
The frame assembly is performed using profile and timber. Materials used as a coating are quite varied. Give the design The necessary appearance allows the roof. It can be made of the following types of materials:
If you pay attention to polycarbonate, i.e. its aesthetic component, then the sheets can not only be transparent, but also color. Visors and canopies from these materials always have a spectacular appearance.
When choosing a polycarbonate color, tones are preferred that do not distort the natural color of items located under the canopy.
For example, if the panel color is red or orange, then the shade of objects will be appropriate. If plastic fit into the stylistics of the structure, similar to silicate glass, the monolithic polycarbonate of various shades is applied.
For cellular or monolithic polycarbonate, their advantages are characteristic. To choose one or another variety of material is needed depending on the requirements that are presented to the construction. The solid type polycarbonate has an incredible light-effect capacity that reaches 90%.

The unique properties of polycarbonate make it possible to create canopies of almost any form.
The translucent quality of cellular samples is slightly smaller, but this type of material is able to excellently dispel the light and create a barrier to ultraviolet radiation. The following properties are listed, due to which cellular polycarbonate is widely used for the manufacture of canopies:
Due to the range of properties, the polycarbonate is considered in demand by the material used for the manufacture of canopies. It exceeds the metal and glass operational qualities, is not inferior to them in strength. Longitudinal ribs of the hardness of the cellular polycarbonate provide increased strength of the material.
The structure of polycarbonate has a big impact on its characteristics. For example, cellular panels are hollow, they have a smaller specific weight than solid sheets. Their cost is lower. Among the parameters that are accounted for when the material is selected, the following are noted:
To determine the optimal size of the thickness of the cellular panels, one should take into account the purpose of the canopy and the degree of load on it.
Monolithic polycarbonate has a thickness of 4-12 mm. If in the process of work it is planned to use panels having a cellular structure, then it is necessary to take into account the following:
The monolithic polycarbonate is more durable than the cellular panels of its analogue, 2 times. The most commonly used solid leaf has a thickness of 4-6 mm. The strength of the design of such material can be guaranteed under all weather conditions.
For the manufacture of supports for canopies, bars of different sections can be used. The shap is made from the board. The tree is an eco-friendly material that is easy to process.
Working with wood involves the use of appropriate tools. Here you do not need a device for welding and skills to work with it. The lack of wood is easy flammability. Behind wooden supports, it is necessary to constantly monitor and process them in a timely manner with special compositions.
Constructions can be made from a profile pipe having a different cross section. The material must have a thickness of at least 2 mm. Metallic canopies have high strength, resistance to moisture, long service life.
To prevent corrosion, the metal surface must be treated with primer and paint. The connection of parts is made by welding or bolted fastening. Canopy can be made openwork, using forging elements.
We should not forget that the cost of the whole design increases.
Single supports in certain cases are made of stone or brick supports. These types of supporting racks are quite expensive, and their appearance can justify the invested financial resources, given that the stone structures are not terrible increased humidity, Sun and Temperature oscillations.
To make a canopy to the house of polycarbonate with your own hands, you will need to make a choice of a construct having a single bed. It is simple enough in the installation, so it is easy to cope with installation and without special skills. Before installation, the design drawing is being developed, which facilitates the manufacture, assembly and installation of the structure.

The right choice of additional frame elements allows timely preparation of all materials. This will exclude their possible overrun. When creating thumbnails of the future structures, it is necessary to take into account all the design characteristics of the selected shape of the canopy.
For the structure, which should be adjusted to the house, certain parameters are provided. At the same time, cutting material and cutting pipes for canopy are made with the least amount of waste. When choosing arched structures, the framework of which is performed from profile pipes, special equipment will be required. It should allow flexing pipes depending on how it is provided in the drawing. Specific skills are required to work with the pipe bend, since it is very difficult to give the pipe correct form.
In the process of cutting polycarbonate for the manufacture of semicircular design it is impossible to avoid some difficulties. If the installation is performed independently, the preference should be preferred from the polycarbonate sheets.
Before installing the frame, you will need to calculate the required amount of the profile pipe to cut the polycarbonate panel of the desired dimensions.
Schemes of canopies usually provide for the transverse parts of the crates such a distance so that the joints between the sheets occurred on the frame profile tube. As a result, the coating of polycarbonate sheets will be enshrined enough.
Before installing a carport of polycarbonate attached to the house, it should be determined to determine which materials will be used when performing supports and framework frames. Based on the drawings and sketches, you will need to calculate the amount of material. It should be purchased with a reserve by 5-10% more computational quantity. This will allow the replacement of damaged or prepared by the error materials. Their list should include:
Supports and horizontal frame beams must be performed from the bar. When calculating the amount of material, the width and length of the structure is taken into account. The board is taken in an amount determined by the distance between the rafters. If the canopy is planned to be created from polycarbonate, then the step should be equal to 0.5-0.7 m.
Start the work should begin with the markup of the site. It is necessary to outline the points where the vertical structural supports will be required. The height of the racks should correspond to the height of the structure. It takes into account the blocking racks by 55-60 cm. The roof of the canopy is usually taken out of the outside, which is 15-20 cm.
Place the supports are required at a distance of 1-2 m from each other. There is a step between them, which depends on the length of the entire structure, including the roof coverage thickness. First, the supports near the wall of the house are mounted, and then a row of the exterior of the structure is installed. Racks are usually located exactly opposite each other.
The height of the support is selected taking into account the provided slope.
Before concreting, the supports should be cut off, the width and depth of which will be 0.5 m. It is covered with a layer of sand and rubble. After that, the support is installed, which is previously treated with an antiseptic. Support must be wrapped in waterproofing material. Next it is necessary to check the verticality of the installation. After that, the support is poured by concrete solution.
Montage of wood frame is better to start from the inner row from the wall. Length wooden beamsMounted to the support racks, you must docile with metal plates. Beams should be located strictly horizontally. Strengthen them to supports should be self-drawing. They are used for additional mounting of the beams to the wall surface.
When installing a canopy in front of the house from polycarbonate, a coolet and level will be required. This will make it possible to more accurately identify verticals and horizontals, as well as identify the correctness of the corners.
After attaching the beams in the horizontal direction, go to the installation of transverse parts, the installation of which is carried out with the help of fasteners. To give the stiffness of the entire design, it will be necessary to strengthen the beams with spacers. This is carried out on both sides of the supports. The struts must be fixed with self-assembly at an angle of 45 °.
After that, you can proceed to the device of transverse elements. Initially, the beams should be mounted on the edges. You can then install the middle beam, as well as intermediate transverse. After the installation of the edge beam installation should be closed using an end board.
Actual strength can be attached to the construction in the event that it is used by substropic legs. With their help, you can strengthen the extreme beams on the left and right. As a result, the design will be resistant to possible excess snow loads.
Start covering the frame with polycarbonate follows from the material cutting process. To do this, the marker is used. The material is then cut along the markup line using a circular saw having small blades teeth. Sheets should not vibrate in the process of cutting, so they must be pre-fixed.
It is then possible to clean the channels of the cellular polycarbonate from sawdust and chips. Cutting material is made taking into account the location of the channels within it. They must be located so that moisture flows free from polycarbonate. When laying this material, it is necessary to ensure that the manufacturer's logo is always from above, otherwise the polycarbonate will lose its useful qualities.
After cutting the material, it should be placed on the frame, running the place of fasteners. Next, it is necessary to consider that the distance from the edge of the panel to the first hole should be more than 40 mm. Fastenings should be located in 35-45 cm increments. The connection of polycarbonate panels is made using a plastic profile selected by the color of the sheet. The mounting of the panels is carried out using self-tapping and thermoshab.


