Drywall is a durable and affordable material that absolutely everyone can learn to work with, even without building experience. Today, plasterboard is used to make decorative elements, all kinds of shelves and niches. With its help, walls are aligned, multilevel floors and ceilings are created. Therefore, it is not surprising that drywall began to be used for the construction of interior partitions. How to independently make a partition from gypsum plasterboard with a doorway - read below.
Manufacturing interior partition with a doorway may be needed in case of uneven walls in the room. In addition, a plasterboard frame with an opening allows you to make two small rooms from one large room quite budget and efficiently. With the help of a plasterboard structure, you can easily change the dimensions (for example, make it narrower) and the location of the doorway in panel house, make a round or asymmetrical arch instead of the standard passage.
Before carrying out construction work, without fail, a drawing of the future structure should be made, taking into account GOST and SNiP.
This will allow you to correctly calculate the volume of material and outline the front of the upcoming work. When drawing up a drawing plan, one should take into account standard sizes drywall sheets and metal profiles. So, standard gypsum boards are made in the size of 250x120 cm, and the standard metal profile has a length of 300-400 cm.

If you plan to make any changes to the load-bearing walls, you need to contact the appropriate authorities (BTI, MES, SES, architecture department, housing inspection, operating organizations), and obtain permission for redevelopment.
If this is your first time working with drywall, then you should study the types and purposes of metal profiles. The durability of the structure depends on them.
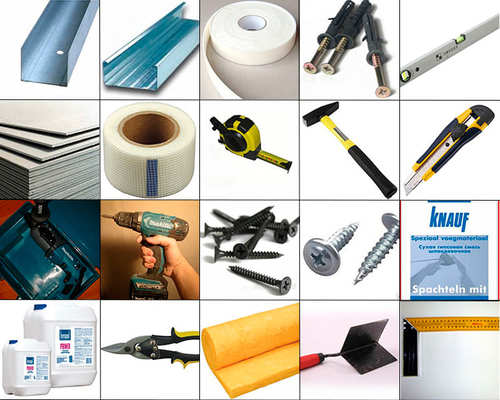
In order to assemble a frame with an opening based on an interior wall and sheathe it with plasterboard, you will need: metal profiles (guide and rack-mount partition walls), sheathing material, basalt mineral wool, scissors or a circular saw for metal, a puncher and a screwdriver, a jigsaw, an edge planer , dowels 8 mm, self-tapping screws for metal in the size of 25-35 mm and self-tapping screws with a press washer.

Making a frame with a doorway includes the following steps:
Subject to the design rules and regulations, a plasterboard doorway will last for many years. A properly assembled structure will be able to withstand a fairly large load: it will be possible to finish the opening even with decorative artificial stone, brick.
In addition to observing the technology for installing the doorway, you should take into account some of the nuances that will help extend the service life of the structure.

So that the structure comes out strong and even, experienced drywall workers advise:
To bend a sheet of drywall for an arch, you should walk over it with a needle roller and slightly moisten it with water. After the fox becomes pliable, you can fix it in the desired position. The main thing is to make sure that the leaf does not soften, otherwise it will crumble and crumble in the future.
It may be necessary to align the doorway if it is moved or expanded. In addition, doorways are often located in the area of the junction of two panels, and can be skewed due to a mismatch between the two lengths of the vertical sides. The choice of the method of finishing the opening is influenced by the degree of its curvature, the repair budget.
You can level the doorway without the involvement of professional builders, you can do it yourself using plaster.

Today, openings can be finished with both wet and dry plaster. In the first option, the opening is finished with gypsum, cement and polymer mixtures. In the second - sheets of the Civil Code.
The easiest way will be to apply a moisture-resistant polymer mixture, which is distinguished by high performance.
Drywall can be mounted either without profiles or with a frame. The first case should be chosen if the relief differences in the opening are insignificant. In addition, methods can be combined to achieve the best decorative effect.
The scope of application of drywall is extremely wide. One of the options for using the material is the creation of artificial interior partitions and design doorways... It is quite simple to make and align the doorway using the gypsum board yourself. To do this, you just need to make the markup correctly, perform the work in the desired sequence, observe building rules, and take into account the recommendations of experienced builders. And then you will have a solid and beautiful design!
During redevelopment, they try to equip the living space to the maximum by transferring the interior partitions. After the destruction of the old structure, it is easier to make a new partition from drywall sheets. Be sure to arrange a passage between the rooms. Making a drywall doorway consists of two stages: assembly of the frame and its sheathing.
In construction, drywall (gypsum plasterboard) is considered a versatile material. From the gypsum board, you can build new structures or use sheets for cladding instead of plaster. It is impossible to build a load-bearing wall made of plasterboard, but the material is excellent for interior partitions. Lightweight walls are used for zoning a room, making false walls for sliding doors. Arrangement of a doorway in a plasterboard partition can be done with imagination by making an arch of a classic, asymmetric or other shape.
GKL walls have a lot advantages:
In offices, plasterboard walls can be installed temporarily to create a separate office or for other purposes. Designers use the structure when arranging decorative aisles of unusual configurations.
To equip a drywall opening in the interior partition, you will need the following tools:
From materials prepare for work:
The main material in the manufacture of a partition with a doorway is drywall.

Before making a doorway from drywall, they think over the dimensions and shape of the structure with their own hands. It is determined in advance whether the sash will be hung.
When installing a custom door, it is not necessary to destroy the partition. Simply resizing the doorway is enough. To reduce the height or width, a frame is constructed from a rack-mount and starting profile. At the construction stage, do not forget about the sash. The galvanized profile will not withstand heavy door leaf... If it is decided to hang the doors, then a wooden bar is laid inside the rack profile.

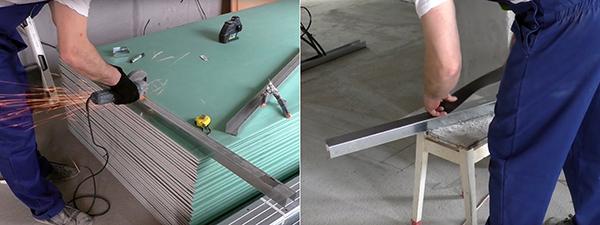
When it is planned to move the passage to one side, part of the wall is first cut out. It is better to use a grinder, since the blows of a perforator can disrupt the integrity of the entire partition. After preparing the contour of the opening from below and from above, the starting profile is fixed, vertical elements are placed along the edges, as well as additional racks from the side of the wall. The starting and rack profile are connected with self-tapping screws. The frame is stiffened with additional cross members.
When it is required to reduce the height of the passage, only wall profiles are installed. They will support the headrails.
After making the frame, the gypsum board is cut out. All fragments are connected so that the joints are located in the middle of the profile. Fix the cladding with self-tapping screws.
To make a drywall wall with a doorway from scratch, a project is preliminarily drawn up. Calculate the dimensions of the structure, the location of the passage, the shape. The easiest way is to build a rectangular classic opening... When calculating the dimensions, it is important to take into account that after finishing, the thickness of the partition will increase.

To erect a wall and a drywall opening begin with a marking. The location of the starting profile is marked on the ceiling. From it, an accurate projection is made onto the floor with a plumb line, where the lower starting element is installed. Outline the location of the rack profile. They put vertical elements every 40 cm. Be sure to fix the extreme racks to the adjacent load-bearing walls. Additionally, racks are installed that form the doorway. Between themselves, the vertical parts of the frame are reinforced with horizontal crossbars.
When the frame is ready, basalt wool insulation is placed inside. The structure is sheathed with gypsum board, fixing the sheets with self-tapping screws.

It is difficult to make an arch. It is important to bend the elements equally to obtain a symmetrical design. Arches are different forms, but in the absence of experience, it is better to stop at the classic semicircle. The process consists of the following actions:


After sheathing, the corners of the arch are reinforced with a perforated corner. Further actions are aimed at finishing the doorway: primer, putty, sanding, painting or wallpapering.
When you only need to correct the contours of the passage, it is enough just to level the doorway with plasterboard without constructing a frame from a galvanized profile. Fragments of the required size are cut from the sheets. GKL on the slopes and in the inner part of the opening are glued with a special glue for drywall, putty or fixed with self-tapping screws. The corners are protected with a perforated corner.

After sheathing, drywall openings are finished. The work is carried out in the following order:
For better adhesion, the sanded surface can be treated with a primer. After it dries, the new doorway is painted, pasted over with wallpaper or other material you like.
Working with GKL is so simple that you can equip even the most difficult doorway in 1-2 days.
Unfortunately, today not everyone can afford to purchase spacious housing, but most of us still strive to create maximum comfort and comfort in what it has. Is there a way out of the situation when the number of rooms in an apartment is not enough to fully meet the needs of all family members? What if one room has to be used as a living room, study and bedroom? Despite the complexity of the question, the answer is quite simple - any living space can be divided into functional zones with your own hands, dividing with frame partitions sheathed with plasterboard, and installing a door.
Despite the peculiarities of the interior, your design idea, as well as the location and size of drywall partitions, all these structures, as a rule, have a standard structure. They are based on a rigid metal frame made of galvanized profiles, which can be reinforced with a wooden beam at the point of installation of the doorway. To increase the heat and sound insulation properties, the crate is filled with a special insulator, the choice of which depends on the characteristics of the room and the requirements for the structure. The assembled and insulated frame is sheathed on both sides drywall sheets(GKL) is a reliable, environmentally friendly and easy-to-install material, completely ready for any type of finishing.
The frame from the profile is filled with insulation and sheathed with gypsum board sheets
Frame partitions, sheathed with gypsum board, are used to divide or zoning space in rooms of various layouts and purposes. These structures are installed in industrial and office buildings, residential buildings and apartments, garages and outbuildings. The variety of types of drywall allows you to install partitions in rooms with high humidity and special requirements for fire safety.
Frame structures sheathed with plasterboard sheets have long and with great success been replacing partitions made of brick or wood due to a number of characteristic advantages:
Be sure to note the design flaws that must be taken into account when making the final decision on its creation:
Despite some disadvantages of gypsum board, we note that the competent creation and correct operation of partitions from this material will help to quickly, easily and inexpensively transform the interior of the room, giving it comfort and increasing its functionality.
That's it, this is the end of the short "theory course", we pass on to solving practical issues. First, we will consider a list of the necessary tools, we will list the materials that we will need for the construction of the structure, and we will also perform an approximate calculation of their number.
To install the partition, you need to prepare a set of special, but fairly common and simple tools:
To install the partition, you will need a simple construction tool
Attention! To mount the structure on the upper levels, you will need a solid step ladder. Work with a metal profile and drywall implies the mandatory use of personal protective equipment - glasses or masks, heavy gloves, and a respirator.
At self-assembly partitions the following materials will be used:
1 - metal profile; 2 - material for heat and sound insulation; 3 - drywall
When choosing the basic materials for the construction of a partition, you need to take into account its individual parameters and the requirements that it must meet. Let's consider this issue in more detail:
In addition to the main structural elements, you will need to create it:
The entire structure will be mounted using three types of fasteners
Expert's advice: When purchasing everything you need, at the same time purchase materials for sealing the joints between sheets and masking the zones of screwing the caps of screws on the surface of the sheathing - reinforcing tape-serpyanka, primer for gypsum board, finishing putty.
To avoid unnecessary financial costs and to eliminate the need for additional purchase of material, you should correctly calculate its required amount. There is no difficulty in this event - you need to measure the height and length of the proposed structure and determine its main parameters (profile width and number of sheathing layers). Consider the calculation of the material, taking as an example a partition 5 meters long and 3 meters high with a doorway 0.8 meters wide and 2.1 meters high, with a frame made of a 75 mm wide profile and single-layer sheathing with gypsum board sheets.
The UW profile is marked in black, shaping the outline of the structure
The frame posts should be mounted at a distance of no more than 600 mm from each other.
The vertical pillars of the partition frame made of the CW profile are marked in gray
Two load-bearing reinforced pillars are highlighted in green, the lintel (upper beam) of the doorway is highlighted in blue
Lintels from the UW profile, which increase the overall rigidity of the structure, are marked in blue
On one side of the frame, the sheathing sheets will be positioned in this way
The second side of the frame should be closed with the sheets offset by one stand or 600 mm
Expert advice: Double-sided installation of gypsum board sheets with an offset of the joints will increase the rigidity of the structure, significantly reducing the possibility of deformation and reducing the likelihood of cracks on the surface of the material. If you need a more durable partition, use two layers of drywall when sheathing it.
Summing up the calculations, we can conclude that to create a 5x3 m plasterboard partition with a doorway, we need:
The number of hardware (fasteners) is calculated based on the step of their installation. The maximum distance between the dowels that fix the guide profile to the ceilings should not exceed 500 mm, and self-tapping drywall screws are installed every 250–300 mm.
Engineers of the German company KNAUF - the world leader in the production of materials and technologies for frame construction- prepared a table that will help us with the calculations.
| Position | Name | Unit measurements | Quantity per sq. m |
| 1 | KNAUF-list (GKL, GKLV, GKLO) | sq. m | 2,0 |
| 2 | Knauf profile PN 50/40 (75/40, 100/40) | pog. m | 0,7 |
| 3 | Knauf-profile PS 50/50 (75/50, 100/50) | pog. m | 2,0 |
| 4 | Screw TN 25 | PC. | 29 |
| 5 | Putty Knauf-Fugen | kg | 0,6 |
| 6 | Reinforcing tape | pog. m | 1,5 |
| 7 | Dowel K 6/35 | PC. | 1,6 |
| 8 | Sealing tape | pog. m | 1,2 |
| 9 | Primer Knauf-Tiefengrund | l | 0,2 |
| 10 | Mineral wool thermal insulation Knauf | sq. m | 1,0 |
| 11 | Knauf-profile PU | PC. | * |
* Note that the number of corner profiles (PU) depends on the size of the doorway and is not related to the area of the structure.
Attention! To simplify calculations when building a drywall partition, you can use a special online calculator that shows the approximate consumption of the main material and all other components.
So, all the important stages of preparation for work are completed, we will be patient, enlist the support of loved ones, get the approval of our neighbors and proceed with the installation of the structure.
Craftsman's Advice: Any construction works with the use of drywall should be carried out at an air temperature in the room not lower than +15 C. It is better to install structures before finishing the floors and painting works... Before the measures to create the partition, the surface of the main floors should be leveled by sealing the potholes, seams and cracks with putty.
Before proceeding with the installation of the structure, we will determine the place of its installation and draw up a schematic plan, according to which the marking will be carried out. This stage of work is as follows:

Attention! It should be remembered that the line we have drawn is a mark for attaching the guide profile. To determine the exact boundary of the structure itself, here you need to add the thickness of the drywall slabs and the layer of its finishing.
Having finished with the markup, we will carefully check the correctness of its application and start manufacturing metal frame our partition:
Sealing damper tape will protect the structure from sound vibrations and vibrations
We drill holes for dowel-nails with a puncher and hammer the fasteners with a hammer
By mounting the guides to the load-bearing walls, we check the vertical with the help of a building level
Insert the rack profile into the guide and fasten the structure with self-tapping screws for metal
When installing the rack, first install it in the lower rail, then carefully put it in the upper
The rack profile is attached to the guides with self-tapping screws for metal
A wooden beam can be inserted inside the upper beam of the opening, which additionally reinforces the structure
Variant of the location of the transverse jumpers in the frame with a height of more than 3 m
Wooden beams must be fixed in places where heavy wall cabinets and other massive interior elements are installed.
This completes the installation of the frame, you can proceed to the next, no less important stage in creating the partition.
In order for the structure to reliably store heat and protect peace from extraneous noise, its insides must be filled with a special insulating material. Long-term practice shows that an inexpensive, but high-quality heat and sound insulator - mineral (stone or basalt) wool is quite suitable for these purposes.
Mineral wool slabs reliably retain heat, and also isolate the room from extraneous noise
Expert advice: In order to fill the frame of the interior partition, purchase slabs or mats of mineral wool of the required thickness - the material of this form of manufacture is easily cut to size and fits comfortably between the elements of the crate.
Before installing a layer of heat and sound insulation inside the structure, we will perform the following steps:
Installation of cladding is performed from a whole sheet from the wall where the set of racks began
The caps of self-tapping screws must be slightly recessed into the surface of the drywall
We join sheets of drywall exactly in the middle of the profile
Place the cut-to-size slabs of mineral wool between the racks of the crate
We close the other side of the frame with gypsum board, shifting the sheet by one rack (600 mm)
Attention! When assembling the plasterboard cladding, remember that the sheet must be fixed around the entire perimeter - to attach an extension or non-standard size parts, you will have to insert additional profile elements into the frame.
Having finished the sheathing of the partition frame, insert into it door block and we will solve the issue with the surface finish of the drywall. If a strict vertical was observed during the installation of the opening, installation of the unit will not cause any difficulties.

The issue with the surface finish of the cladding is also solved quite simply:

Now the partition with the door is ready for any kind of finishing - it can be pasted over with wallpaper, painted, applied ceramic tiles or decorative plaster- it only depends on your imagination and financial capabilities. For a more detailed acquaintance with the installation process of a frame structure sheathed with plasterboard, we bring to your attention the following video.
Many years of professional experience shows that our fellow citizens are increasingly choosing drywall for the installation of additional load-bearing walls or interior partitions in their homes. This material is easy to use and allows you to create such structures without resorting to the help of a team of builders, whose services are not cheap at all. We hope that now you can do this work yourself without any problems.
Many modern apartments do not have a layout and therefore the owners independently divide the total area into rooms using interior partitions, or use decorative ones.
The simplest, fastest and in an accessible way creating interior partitions are plasterboard structures... Such partitions can be either solid or with a door, and if you have the desire and time, then you can make them yourself.
Drywall is universal building material, which is used both for decorating a room and for creating new structures in it, including interior partitions, and for creating an apartment. Only the following can compete with it in terms of characteristics: or
Benefits of using drywall if it is necessary to create an interior partition with a door, they will be as follows:
 There is different types drywall, therefore, before buying it, you need to decide which one you need:
Normal sheet thickness is 12.5mm, and to create arches, sheets with a thickness of 6.5 mm are used; to give them flexibility, they are pre-moistened.
At the first stage of the work, it is necessary to determine the location of the future partition. To carry out the marking, use a plumb line and a cord, parallel lines are applied on the floor and on the ceiling.
 Much easier to work with laser level, but buying it only to create a drywall wall is impractical.
Given the presence of a door, the profile is not laid on the floor for the entire length of the partition, but space is left for the doorway. When laying the profile, keep in mind that the distance left for the door is 1-2 cm larger than its width in order to be able to install the door frame.
When marking, the width of the partition is also taken into account., if it is sheathed in one sheet, then add 2.5 cm to the thickness of the frame, and if the gypsum board is laid in two layers, then add 5 cm.

To carry out the specified work, you will need the following tools:
 After marking, we cut off the profile of the required length, we glue the back walls with sealing tape.
 Work begins with laying and securing the guide rail to the floor., after which it is installed around the entire perimeter of the future partition. The profile is fixed using screws or dowel nails, it all depends on the material of the walls.
 Now using the rack profile we form a doorway, this must be done carefully and carefully, so that the distance between the posts above and below is the same... The verticality of the racks is checked by level, after which they are fixed.
To increase the strength of the doorway, it is recommended to put wooden blocks of the appropriate size in the racks and fix them with self-tapping screws.
At the next stage, the rest of the rack profiles are mounted. if you have GKL standard width, then the distance between them is 60 cm. 
To increase the strength of the future partition, between the vertical posts, it is necessary to fix horizontal jumpers, which are cut from the same profile.
A wooden block is also installed and fixed in the transverse profile located above the doorway, it should easily enter it, so as not to disturb the shape, using a square check that the angles are 90 degrees.
Rest transverse profiles fastened to the racks, for this, special short self-tapping screws are used.
After the frame is created, you will see that its structure is quite rigid and strong, start laying electrical wiring... The rack profiles have holes through which it will be convenient to thread the wires.
The wiring is placed in a special corrugated non-combustible insulation.
At home you can use a utility knife to cut drywall and a long ruler or rail. To do this, a ruler is applied to the sheet, a cut is made several times along the line, the deeper it is, the better, and then gently break the gypsum board and get the required size.
 To simplify Finishing work, at the cut point, make a chamfer at an angle of about 45 degrees, for this use a plane or knife.
During settlements, it is necessary to foresee in advance the places where it is planned to mount hinged furniture or equipment.
Here additional profiles, reinforced wooden blocks, it all depends on the weight of the hinged structures.
 Left attach the sheet to the racks, and fix it, this is done using self-tapping screws, they are installed with a step of 20 cm and slightly recessed in the sheet.
If you forgot to make chamfers on the sheets before installing them, then this is done with a knife when they are installed on the wall.
Installation of the frame and gypsum board is only the beginning of creating a drywall partition. In the next step all seams are sealed. To do this, use a serpyanka tape and putty. Putty is also carried out on the entire surface of the wall. 
After the base is dry, they begin to level the surface. The wall is covered with a primer, which will allow the plaster to anchor better and provide additional protection GKL. Leveling is carried out with a wide trowel and finishing plaster. 
In the prepared opening, door frame installation, do it with wedges, self-tapping screws and polyurethane foam ... First, the frame is exposed with wedges and fixed with self-tapping screws, after which they proceed to the installation of the door leaf.
The correctness of the work is being checked, while the door should be easy to open and close. If everything is normal, then the remaining gaps are filled with polyurethane foam.
 At this time, the door is in a closed position, or spacers are inserted into the frame so that when the foam hardens, it does not deform it.
Cut off the foam after it has completely solidified, if the canvas was removed, then hang it only a day after the installation of the box.
At the last stage of creating a drywall wall, it is carried out finishing, for this usually use paint or wallpaper. The frame is trimmed with platbands, which help to hide the door attachment points.
It is not recommended to leave the hollow partition; it will be filled with sheet or roll insulation. They are laid after one side of the wall is sheathed with plasterboard., and only then it is sheathed on the other side. 
If you plan to install utilities in such a wall, or sliding door, then in the place where they are located, the insulation is not laid.
To create sound insulation, use mineral wool or isover. At the bottom, when installing the sheet, you need to leave a small gap, therefore, stands of the appropriate thickness are installed.
In order for you to independently create a drywall wall with an opening for doors, you must adhere to the following expert advice:
Now you see that there is nothing complicated in the construction of drywall partitions and all the work can be done independently. Having studied the technology of work performance, expert advice and preparing necessary tool, feel free to start performing the specified work.
How to make a plasterboard partition with your own hands, step-by-step instruction on video:
In contact with
People do redevelopment in their homes not so rarely. Especially in modern new buildings, where space is not as problematic as, for example, in Khrushchev buildings. And if you remember the options for boxes with a free layout, it immediately becomes clear how wide you can swing in your "architectural" ideas. However, when planning to block off too large an area, you should immediately think about a drywall doorway. Otherwise, you can get into a situation where the two rooms do not communicate in any way, and it is easy to move from one to the other, and there is simply no way.
Another situation is likely, especially in old houses: there is a huge and inconvenient passage between the rooms. In this case, you need to think about how to reduce the doorway - and with drywall it is easiest and most convenient to do this.
Let us first consider a more complex and laborious process, in which it is supposed to install a partition dividing a room into two rooms, with the placement of a doorway from hl in it.

When calculating, do not forget to lay an additional 2 cm in the width of the opening: they are hidden when sheathing with sheets.
If you decide how to refine and reduce the doorway using drywall, then the actions will be the same, only the frame is set in size in which you see the passage between the rooms. If there is no intention to close up the gypsum board the entire room, the rack-mount profiles are attached directly to the sidewalls of the existing opening.
The general principles of cladding remain traditional, with minor additions.

The step between the fasteners in the sheets is recommended to be done within 20-30 cm. The self-tapping screws are screwed into drywall with the head deepening by 1 millimeter. If you overdid it, and the hardware has gone too deep (this is well defined with your fingers to the touch: a hole is felt, and not a smooth section, which means that the fasteners are too deep), it is unscrewed, an indent of 5 cm is made, and the self-tapping screw is screwed in again. The unnecessary hole is putty when the doorway is finished - this is also done by hand. The joints of adjacent sheets must fit on one rack-mount profile - this must also be taken into account when erecting the frame.

Before installing the door, the usual finishing works are carried out:
When she dries up, the slopes are sanded. Since you are unlikely to paint (or otherwise finish) them under the door frame, you do not need to prime the surface again.
The approach to solving the issue is similar to installing a door in any other material.
After the assembly hardens, the excess is cut off with a sharp knife, the pegs are removed, and the final plastering and finishing are performed. And those who are looking for ways to ennoble a doorway without closing it with doors, just for visual zoning of a room, can make it in the form of an arch without a canvas.


