The material from which they make the staircase can be different - wood, iron, concrete or a combination of these materials. But most often, we use a tree for the construction of stairs.
Any design should be safe for movement on it. For this, before the construction of the stairs, it is necessary to perform its calculations, based on what type of design stairs is assumed.

To calculate the wooden staircase, the following should be done:
Before performing any drawings in DWG format, you must select the type of stairs.

It is necessary to perform certain measurements and calculations, and determine the general parameters of the stairs:
After determining all the parameters, you need to draw a room plan on which it is necessary to mark the location of the stairs and all its dimensions with reference to the room plan. Separately, it is worth making a general drawing of the entire staircase for a better understanding of all the necessary parameters.
All drawings can be done manually, but in order to avoid mistakes, it is best to make all drawings using a special calculator.
If a person finds it difficult to create a drawing of the stairs, you can take advantage of the prepared drawings and ladder schemes, printing them, and choose the most optimal option. But, it is necessary to do this at the stage of building a house, since under the finished structure it will be difficult to choose the drawing.
To calculate all the necessary parameters to create with your own hands, it is necessary to remove all sizes, such as the height between the ceilings, the area that will be ladder, the angle of inclination, the length of the opening, the number of steps.

To calculate the staircase from the tree, it is best to take advantage of special online calculators or special utilities:
That's why you should use special online calculators or special utilities, which is much more profitable and easier even to beginner builders.
The main advantage of the wooden staircase is its relative ease, environmental friendliness, besides, the tree is easy to handle, and the wooden staircase will look optimally in the country wooden house.

But, before making a staircase to the second floor of the house, you need to make a drawing of the stairs on which all parameters will be taken into account:
Before making the drawing, it is necessary to measure the place in the room where the staircase will be located. This is a height from the floor to the ceiling, the width of the overlap, and the type of stairs, the angle of its inclination, the fastening system, etc.
Without this data, make a drawing of the stairs, and even more so, to make it, it will be almost unreal.
Houses build two-story, three-story, and, to move between floors, it is necessary to equip the staircase.

The manufacture of any staircase begins with the definition of its type, it may be:
Therefore, before you start, you need to choose its type, after that it is schematically to draw a plan of the house, the staircase itself and see how one or another type of stairs will look at the scheme. If a person suits everything, you can start creating detailed drawings of the stairs.
When creating a drawing, all previously made measurements should be taken into account, the angle of inclination, width and height of the steps, the width of the ladder itself, if it is supposed to make a fence, then it should also be portrayed in the drawing.
The staircase is a mandatory element of houses, it provides a link between the floors, also the staircase should provide comfortable movement over it, be safe and fit into the interior of the room. Plan and build a staircase leaning on construction normsAlso, accurate calculation and drawings are required, since if this is not done, then errors may be detected.

Nuances that will prevent reworking the entire design, excess consumption of materials and time:
Also worth drawing general scheme Houses on which the location of the staircase indicates the occupied area will be displayed.
Such a scheme will allow you to better understand how it will look ready staircaseand will allow you to once again rewepen all the calculations before the manufacture of the stairs.
The novice builder on the basis of the drawings is best to start making the most simple staircase using the carrier beam - Koooo. Their number in the stairs can vary from 1 to 3.
During construction multi-storey houseThe arrangement of stairs is necessary to get from the floor to the floor comfortably and safe for the health of tenants.
Very often, country houses are erected in two floors or even more. Yes, and on dumart siteswhere it is often acute the need to save an area for landings, a pool or resting place, two-storey buildings also cease to be rare. But any building above one floor already requires the installation of the ladder.
Wooden staircase It can be made after selecting one of the existing structures, a thorough calculation of all parameters, and, if there is a high-resistant work with carpentry and plumbing tools.
If this element is not installed in the country little house, and in a large country mansion, you need to immediately choose and qualitatively mount reliable and sturdy construction. It should calmly withstand the rise of massive on a very overall furniture size. In addition, the staircase must be convenient for lifting and descent, especially if there are small children or people with disabilities in the house. Therefore, it is recommended to do if possible as possible as possible, of course, if the area is allowed, where it will be installed. In addition, for safety reasons, the staircase must be necessarily equipped with a fence.
To do right choice , It is necessary to repel not only from its design and square area, where it is planned to be installed. It is necessary to understand in typical structures, in the names and destinations of all major parts and nodes.
The staircase consists of one or more marches or spans. Marsh call the staircase department between two sites.

Any flight march (span) consists of a number of major elements, each of which has its name and functional purpose.
| Miniature | Name of element | Functional purpose element |
|---|---|---|
 | This is a carrier beam with a swelken bought from above, on which steps and risers are fixed. This element must have a special strength, since heavy loads fall on it. | |
 | Instead of a rower, a string is sometimes used, which also performs a carrier function. If the valuation is selected for fixing the steps, it is carefully placed in order for the steps to be installed perfectly horizontally. The stand under them is remote sleeves or transverse bars. Most often this support is used if one side of the staircase will be adjusted to the wall. | |
 | Stage | Any staircase will not be able to do without steps that are fixed on one of the selected beams (Kosur or the Tutor). |
 | Radius steps | This type of stage has a non-smooth, but a curvilinear front edge. Details can be semi-circles, have rounded corners or be drinking "wave". |
 | Stage running | This type of stage has a non-standard form and is installed at the beginning of the staircase march. |
 | Treaty | This element is optional, but need to be taken into account that it gives the stairs to increased strength, as it is supporting the middle stage the part. They close the space under the step. The risers on the remote sleeve are fixed. |
 | Radiuskets | The radius type of the riser is installed under the step having a semicircular shape. |
 | Radius curved upcoming | The curved risers are installed under the platform between marches or under steps that have the appropriate form. |
 | Balaasins are retaining for handrails, which create a side fence for flying stairs. They can have different forms, depending on the style of the stairs. | |
 | Support Poll | The support pillars are installed at the beginning and at the end of the stairs, as well as along the edges of the playgrounds between marchs. They are extreme supports for handrails and attach strength to the whole fence. |
 | Ball | Balls are installed on top of reference pillars. They are decorative elements. In addition, they close the sharp edges of the bar from which the pillar is made. |
 | Handrail | Without this element, during the construction of the stairs, it is impossible to do, especially if the design has several marches. Rapid supports are support poles and balusters. This item must have a perfectly smooth surface, so that, keeping for it, not to injure went to do not drink hand palm |
 | Remote sleeve, bar | Stand-bars are needed in the design of any staircase having two or more marches. If even for mounting, the boosters are used, supporting bushings are needed when installing platforms between marchs. |
Elements of stairs
Always the first thing that needs to be considered, choosing the design of the staircase is the size of the platform allotted for it. And the second criterion can be called the convenience of design, the comfort of lifting and descent on it, especially if the staircase is used in everyday life more than once, and constantly. The third, which should affect the choice is the aesthetic appearance of this element of the interior, as it should be perfectly fit into the style of the room.
Ladders made of wood are divided into two main groups - marching and. To figure out how they look and what imagine themselves, you need to look briefly each of the options.
Screw stairs have a rather complicated design, but their main advantage is that they are at a minimum of a useful place in the room.
 Screw stairs - a minimum of the place occupied, but not always easy to use
 It must be said that they are not installed enough, compared with the march. It is simply explained - because they are much more complicated in the assembly, and they are not very comfortable to rise and go down and descend, and even more so - to raise large-scale furniture or household appliances.
At the same time, they have a mass of adherents - screw structures can be a real interior decoration, because they have very elegant compact forms.
For the reliable construction of the design of the screw staircase, it is necessary to produce many complex accurate calculations, otherwise it is possible to obtain serious injuries.
The article is more devoted to the Marseysha Staircases. And yet, for lovers of independent home creativity - detailed video instructions about the assembly of the screw staircase. By the way, the author shares his first experience in this area - there is an opportunity to subside with it.
The marching design is characterized by higher reliability than spiral. Although Any of the marching stairs occupies a much larger area, they build them much more often.

Such stairs may have several marches, however, in small private homes, one and two-time options are most often installed. These interior elements are also distinguished by a large variety of structures.
So that the staircase occupy as little as possible useful Square Premises, often choose swivel two-year designs. Turns of stairs can be arranged at an angle ranging from 90 degrees and ending 180.
If the layout of the room allows (and sometimes even "requires") then the staircase can have a curvilinear design. When planning the location of the stairs, the main thing is to create comfortable conditions for entering her tenants at home.
Smooth turn in the design of the curved staircase is ensured by installing rotary steps.
Such steps are also sometimes installed in two-hours stairs instead of sites between them.
To represent how such stairs and their elements look like, you need to consider the most popular types in the interior.
Normal single-sighted staircase
Single-hour staircase is the most simple optionSince it has a rather simple design. The staircase can be located at the wall or in the middle of the room.

As a rule, the area located staircase is also used functionally. For example, if the staircase is fixed on the wall, then closing the platform under it by partition and installing the door, it is quite possible to get a small business building for storing old things or tools.
It should be noted that such a type of staircase on the second floor is the most durable, as it has a reliable support in the form of walls.
Single-hour curvilinear design
This type of stairs is mainly used in premises with a large area, as it must even emphasize the spaciousness of the hall. For small country houses This design will not suit, as it takes a lot of space and is unlikely to fit into the interior.

The staircase is large due to smooth turn and expanded from the external side of the steps (it even "looks like" with this one on the screw), but it is these features that give it respectability, so this element of the interior will decorate the spacious Hall of a large mansion.
Single-sample curvilinear staircase in rectangular emmery
If the location of the ladder is taken into account when planning the building of the house, then for lifting to the second floor, the best option will be the single-sample curvilinear design, which fits well into the rectangular opening. It is compact and aesthetic, as well as quite comfortable for lifting and descent. In addition, a small storage room may also be arranged on its sides on the first floor.

Single-sieves with lower swivel steps
Single-hour staircase with rotary bottom steps is sometimes necessary in the room due to the features of the room layout, or to maintain the selected architectural style. For example, in the event that a window is located on the wall located to set the landing, which does not want to close the two-time design.

Due to the smooth rotation of the lower steps, and repeating this direction of fences and handrails, the staircase becomes a real decorative decoration interior createdHowever, at the same time without losing in functionality.
Two-storey simple design.
A staircase having two march with a turntable between them is convenient because it can be installed above entrance doorThus, - saving the place and limiting the hallway zone.
 Compact two-hours staircase - convenient with a lack of space
 In addition, it is compact enough, and the space below it can also be used to arrange a small chulane.
This design is quite reliable, simple and suitable for almost any interior, if you correctly pick up the color and shape of the balasine fence for it.
Mr. Two-Page Design
This staircase also has two march, but its location saves the place in the room, since the entire design is compactly located in a rectangular opening, along two perpendicular to each other walls. It can be used to install one of the furniture items or for the input door device.

The staircase is convenient to operate, compact, and perfectly fits into the interior design of the room.
P-shaped batch staircase with swivel steps and top pad.
This design is installed in luxurious country mansions having very large square Hall. As can be seen from the massiveness of the design, it is not suitable for dacha DomikovAnd its device in them will look at simply ridiculous.
 It's rather from the interior of some palaces
 Three-page staircase with two platforms
The three-page staircase is often installed in order to save space in the halls, but that its angle of lifting is convenient, a large ceiling height is necessary.

If there is no overlap between the floors, the area, the second floor will be absent.
This version of the staircase is also more suitable for mansion with spacious rooms.
If the place to set the staircase is defined, then before you begin to make parts for the selected option, you must make accurate calculations, make the drawing and apply all the resulting parameters on it. If there is no confidence that everything will work out perfectly, then you can entrust this work to the construction and manufacture of wooden stairs working in specialists working in profile companies.
To determine this value, you need to measure the distance between the floor levels of the first and second floors. Suppose the height of the ceiling on the first floor is 2700 mm, and the thickness of the overlap between the floors is 300 mm. So, the overall height of the stairs will be:
N \u003d. 2700 + 300 = 3000 mm.
Specialists calculated the estimated standard height of the risk, which is based on the sizes of the man's step, most convenient from the point of view of anatomy. This height can vary between 150 and 200 mm. Optimal it is considered because if the stage is to be done below, then when the stairs lifted the staircase, it will be easy to stumble, and fall. At greater height, the riser on the stairs will be much more difficult to climb up and uncomfortable down.
The table shows these calculations - if desired, you can simply use them:
The height of the risk depending on the overall height of the stairs and the planned number of steps
| Floor height in mm | Number of steps (pieces) | |||||||||||||||
|---|---|---|---|---|---|---|---|---|---|---|---|---|---|---|---|---|
| 11 | 12 | 13 | 14 | 15 | 16 | 17 | 18 | 19 | 20 | 21 | 22 | 23 | 24 | 25 | 26 | |
| 2100 | 191 | 175 | 162 | 150 | 140 | 131 | 124 | |||||||||
| 2400 | 200 | 185 | 171 | 160 | 150 | 141 | 133 | 126 | 120 | |||||||
| 2700 | 193 | 180 | 169 | 159 | 150 | 142 | 135 | 129 | 123 | |||||||
| 3000 | 200 | 188 | 177 | 167 | 158 | 150 | 143 | 137 | 130 | 125 | 120 | |||||
| 3300 | 194 | 183 | 174 | 165 | 157 | 150 | 144 | 138 | 132 | 127 | ||||||

If you can restore to install the stairs on the floor of the first floor at least 1.5 square meters. m, then suitable, which will not take much space (it has already been mentioned above).
 With a clear disadvantage of the place - you have to build a screw or close to it by design
 From the corner under which the staircase march is installed, the size of the opening in the ceiling will be dependent. For example, for an appropriate or folding staircase, we need a very small opening for the hatch. For the same, most comfortable slope, the opening will have to do quite large, since the distance at any point throughout the lift between the ceiling and the surface of the stairs should be at least 1.95 ÷ 2 meters.

It is necessary that a person having a high height of SV arranged on the flight marchs, without a risk to hit his head
To do this, with the layout of the location of the one-hour staircase, which will be installed in the wall, the following measurements are carried out:

To calculate the length of the Kouryer, you need to use everything with a school bench familiar formula of the Pythagora theorem, precisely determining the relationship between the sides of the rectangular triangle:
L² \u003dF² +.H²., that is L \u003d √ (F² +.H²)
L. - Defined Length of the Kourow;
F.- the length of the stairs in the plan (determined above);
N. - The height of the stairs (also found earlier)
Taking advantage of previously defined parameters and substituting them instead of designations in the formula, you can set the desired length.
L \u003d √ (4930² + 3000 ²) \u003d 5771
As a result, it turns out that the length of the Kouryer will be 5771 mm or 5.77 m.
After the calculations are fully carried out and the drawing of the future construction is drawn up, you can proceed to the purchase of materials.
For work you will need:
- for the manufacture of cosomers or the tetiv - the width, about 250, 50 mm thick, and the required length is determined by the above formula;
- for steps - thickness, at least 20 ÷ 25 mm;
- For risers, we will need a material having a thickness of 30 ÷ 40 mm.
Building boards
Using the prepared and carefully calculated drawing, according to the dimensions specified in it, it is alternately made and immediately installed elements of the staircase.
 Marking of the Kooowa for drinking "Comb
 Kosomers should be placed taking into account the angle under which the staircase will be mounted. Therefore, the basis for the first step and the lower cut is for installation on the floor, you need to be compared with the linen marked on the wall. It is important that they were placed in horizontal planes, without "duties" inside or out.

Then, focusing on these parameters, is placed and all the comb is cut down - for this, on the first step, you can make a template that will simplify work.
In order to install the boosters to the beam, you can use in two ways - making a guide in the form of grooves in the beam itself or vice versa - on the Koser.

It should be noted that sometimes not two, and three or even four couffers are required for stiffness, and three or even four couffers - their number will depend on the selected width of the stairs.
Bruks, which will rely on and leaving the basis of the stairs, should be "tight" are fixed to the floor and in the ceiling opening.
On the on thedenially installed booms primarily mounted risers. They are made by such a long, which should be equal to the width of the stairs.

After the risers are fixed, the installation of previously disconnected occupy (steps) is started. The length of the boards for them should be greater than the width of the distance between two extreme boosters by 10 ÷ 20 mm, and the width exceed the protrusion of the ridge at 20 ÷ 30 mm.
The adoptions are fixed to the boosters and risers with self-drawers, so that the heads of the fastening elements are completely deepened in the thickness of the wood.
And pillars - not such an easy task, as it may seem initially. Its solution requires very accurate markup and fit.
The next step on the stored steps drove holes. The seeds prepared in size are pasted into the arranged holes. The wanking should perform from the surface of the stage by 10 ÷ 15 mm.

Balyasits are exhibited vertically in terms of level and well pressed to steps, fixed, and then left until the glue is completely drying.

Then, the railing is stacked on balasins, lubricated on top of glue. Due to the siner, the balusters will be firmly fixed in the desired position from the bottom. But, nevertheless, the next step with the help of thin screws of the balusters is screwed to the railing below.

Finishing mounting workAnd after the joinery adhesive is dry, the staircase is covered with a special primer. After its complete absorption and drying, the tree is covered with a transparent varnish, preferably on a water basis, or the paint of the selected shade.
Make and mounted even the simplest staircase - it is quite difficult, especially if there is no proper experience in this work. With the slightest uncertainty in own power It is recommended to seek help from specialists - at least in order to carry out and independent workBut under their emergency leadership. Errors here absolutely not allowed - Incorrectly calculated or negligently mounted design can lead to serious injury.
Make the ladder itself on the second floor - the task is complicated only at first glance. If you correctly perform calculations and carefully and consistently perform all the assembly stages, it is safe to guarantee the success of such an event, how to make the staircase in the house with your own hands.
The first step is the choice of material, work with which will be the least problematic. All houses with more than 2 floors are made exclusively with metal or concrete inter-storey stairs. These are the requirements of fire safety.
But the manufacture of metal stairs for the house requires significant skills in welding works, availability of the welding machine itself. Yes, and its calculation is a rather complicated procedure.
The construction of a concrete staircase for the house is the process of time consuming, requiring a constant participation of several people.
But the skills of working with wood has each, this material is lightweight and processed by a simple tool. Therefore, if your home has 2 or more floors, then the wooden staircase is the most optimal option both by complexity and cost.
The designs of wooden stairs for home are different. Screws take up little space, but inconvenient to use, and the technology of their manufacturing is quite complicated, because of which, when it is assembling it is assembling, a beginner master will allow catastrophic errors. Therefore, the screw model in a private house makes the necrophresseal will be extremely difficult. Straight although they take more space, but they are very convenient for walking and have a decisive advantage in our case - simple manufacturing technology.
If non-stalks occurred when assembly, they were allowed at the design stage. Clear detailed drawing With properly calculated details, it will be a guarantee that the assembly will pass quickly and without hoist.
Note! FROMhemo to make the easiest way according to the principle of the following relation: the height of the stairs to the length of the span is equal to the height of the stage to its depth.
This ratio follows from the similarity of the triangles, one of which form a staircase, the length of the span and the height of the span, and the other is the height and depth of the stage.

Dependence of the shape of steps from the angle of inclination
Angle \u003d 30 °; sin \u003d 0.5; cos \u003d 0.8660254; TG \u003d 0.5773503; CTG \u003d 1.7320508.
Deciphering ratios:
From this it follows to make a complete calculation, it is enough to know the two sizes - the height of the stairs and the length of the span, which you yourself choose based on the conditions of the room. In the considered example, with height, allow, 2m, the length of the staircase march will be equal to 4M, and with a standard depth of a sharpening 30cm, the approach height will be 30x0.5773503 \u003d 17.32cm. The span will be equal to 2x1,7320508 \u003d 3.46m.
For the manufacture of cosomers, a pine planed board with a thickness of 4 cm is used. It depends on the length of the staircase march. What he is longer, the wider there must be Kosur. For this example, a 1-cm width board is applied. If the shelves for the steps are performed, the width of the board should be made even more wider so that after cutting the shelves for steps, the site is preserved all over the entire length of the site at least 15 cm wide. Such shelves are cut off after marking.

It is done using a template, taking into account the slope of the staircase. The template may be the first drinking triangle. Marking is done using the transport and ruler.

Important! When calculating the length of the Kourow, the thickness of the overlapping should be taken into account. At the same time, the upper and lower steps of the stairs are not made. The role of the lower step will perform the supporting timber, and the uppermost - the floor of the second floor.
There is another way to perform shelves for steps. At the same time, they are not cut down, but formulate the ending of triangular mares to the end of the carrier brass. It uses the timing of 15 cm widths, as it will not be relaxed.

Fastening scheme
Next you need to make compensation and risers. For the oppomme care, you can use the same pine. Sometimes the staircase for the house makes open, without risers. For compensation, it is recommended to use solid wood species, as more resistant to abrasion. If there is no such possibility, you can use glued pine. Such commendments will not at least crack, and they will not be "twist" over time.
To install the booms at the bottom of the laid place, the support bar is fixed, and they are fixed to the ceiling beam on top to which they are based on.

Fastening elements
After installing the platforms, the steps are fixed to them. Steps are screwed by self-drawing, missing shelves with glue.
The railing is often made from the finished balusin. Balasins are attached to steps, two on the step, with the help of self-tapping screws passing through the holes in the bottom of the bottom up. The railing is attached to the balusters of self-drawing shrewd in the balasins of the neglection, with the winding of the cap and sealing the holes with putty or decorative plugs.
In conclusion, everything is burned, it is ground, it is painted or vague.
Knowing the rules for calculating the parameters and using a minimum of material, you can easily make a staircase to the second floor yourself.
Make a staircase with your own hands.
You can do everything with your own hands, if you have hands from where you need, there is a set of tool and the most important thing - you want to make wooden stairs with your own hands. In this case, this article will allow you to try the manufacture of stairs with your own hands and make a simple staircase on the veranda, which costs the cost as a budget staircase, when you make a simple staircase, your own staircase will also be forces. In the course of the process of "Stairs do it yourself" you have to decide, a number of questions: the technical calculation of the stairs, it would be nice to draw a simple scheme of the staircase with your own hands the drawing of what you will do when decide to make wooden stairs with your own hands. To make the staircase you yourself will need tools: wooden hacksaw, building level, plans, sandpaper, metal ruler, pencil, hammer, paint brushes, drill, screwdriver. From materials for the process of the "Staircase in the House of Hand" process will be required: wooden boards 100x20x2,5cm, Bar 150x25x5cm, Bar 100x5x5cm to make balusters with their own hands, nails 10cm, 7cm, screws L \u003d 10.15 cm, Olife, Morilka, varnish, impregnation against rotting, impregnation against woodworks. In the course of the work, some other tool may need, but in the construction of the ladder does not apply a very complex and special tool, so that you will not have any special problems (not provided). If you cannot independently make a drawing for the construction of a concrete staircase with your own hands And the concrete staircase you "not on the teeth", use the projects of wooden stairs Kiev, with their help you can make stairs wooden with your own hands, including you can get a wonderful modular staircase.
Stairs photo.  So, we build a staircase with your own hands. First of all, it is necessary to make the calculation of the stairs, consider the size of the stairs, the design of stairs and determine the terms. The calculation of the ladder for the wooden house is needed in order for it to be convenient to rise, in addition, the staircase must meet the well-defined security requirements that are written in regulatory documents. We will not hammer your head with studying these documents, and we give the basic requirements in the course of the story as make a staircase with your own hands. Now about the terms. Here are the main components that have any staircase detail: degree, under steps, Kosor, handrails. Kosur is the main carrier part of the stairs, it is the main load that people take place when people walk on the stairs, there are options for the staircase without under the steps, but it strongly weakens the design, so we will look at the option stairs in the house do it yourself (photo) under steps. Vividly about the elements of wooden stairs Photos below, you can immediately see the approximate design of the staircase.
Stairs photo.
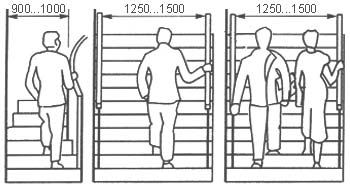
We decided with the terms. Now we need to set up wood stairs with their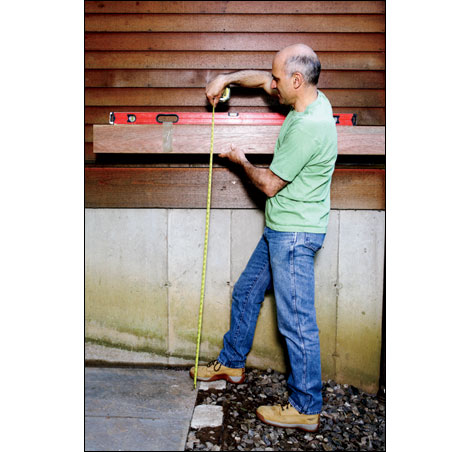 hands (photo): The width of the stairs, the width of the stage, the angle of inclination and height at the steps. If we talk about the width of the stairs, then there is usually a width of at least a meter, it is necessary to put furniture in the house, household appliances etc. In our case, the width is set by the departure of the terrace or veranda. We recommend reading an article about the design of the bathroom.
Calculation of the angle of inclination of the stairs, widths and heights of steps wooden staircase with your own hands (photo).
We define the height of the stairs. To do this, on the terrace, the straight board is on the terrace, as the beginning of the photo stairs are shown below, check the horizontal, adjust the horizontal when necessary and measure the height of our stairs. To the level did not fall, it is fixed with a scotch on the board. In our example, the height of the stairs is 145 centimeters.
Production of the stairs do it yourself  On the angle of inclination of the stairs. The angle of inclination of any staircase is regulated by the norms and has a range of angles from 30 to 45 degrees. If you start to retreat from these rules, then when you make a staircase, notice - an angle is less than 30 degrees, it is dangerous to walk, an angle is more than 45 degrees a staircase hire a lot of space. The angle of inclination of a particular staircase is determined individually, depending on the number of steps and their height. The approximate ratio is reduced to the ladder table for the house.
Go rosemiri convergent.
As practice shows, Lestnica with steps height in the 140/170 mm range with a sticking width 300 / 370mm is the most convenient and safest for movement. This is explained by this. The width of the stage is taken along the length of the step of the average person, and the height of the stage - corresponds to the height of the step of the middle man. The higher you will make steps, the more it will be its width and vice versa. But there is a rule - width 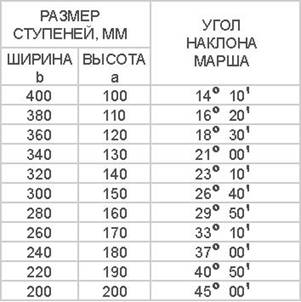 The level of minimum corresponds to its height.
If you have very narrow standard round steps, it is not quite good for security, but their width can be added another 20/40 mm at the expense of the protrusions. Do not forget that we spoke at the beginning of this article about the width of the entire staircase, the most comfortable width is 1 meter, but if you do not allow the conditions, it is possible to reduce it up to 70 centimeters, it is usually done under the projects at home on a narrow site, to make a width less Recommended. Our staircase has seven steps, the eighth step of the stairs in the cottages do the surface of the terrace.
Staircase with her hands. Photo and drawings scheme.
Making Kosource stairs in a wooden house do it yourself.
 It is necessary to see how you will mount the Koshor to the terrace. Mono opens it on the terrace beams, or make the departure of the beams from nearby. It must be done at the place. In addition, the best option under the platform to which the wooden staircase concrete will be relying. Need to take wooden bar., To post it as shown in the first photo, and cut the grooves under the step, in no case do not kill them, the locations are the stress concentrators, the staircase can collapse over them. First, make one Kosuor and then, using them as a lecturer, place the rest, in our example four cosuer. As can be seen from the photo, the more Kososorov, the stronger will be the design. Corners of seats
 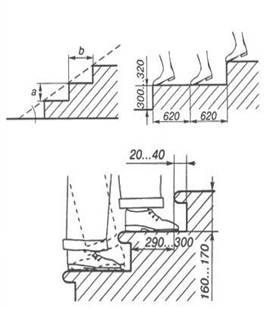 Under the steps, run off the plane for 4/5 mm. This is necessary for a good fit of the steps and under the steps to the coskora. By installing the boosters in place, you can mount the steps into the house, not forgetting about the departures of the steps, if they are narrow.
Stairs pictures.
Installing a baluster.
Balaasins from wood Drawings The sizes of options that are very much and handrail to mock the last place, you can make bales from metal, but this is another topic. How the sicks are very clearly visible on the second photo of the article there is also visible to the Balyasin installation scheme.  Finally, I note, it is necessary to impregnate all the wooden pieces of impregnation from the forever, rotting, to handle the planer and squeak the surface, to impregnate them with oil and after installation, open with varnish. Tree under Kosur, under steps, handrails - pine. Under steps and bales and pillars, the best way - Oak board and bars. The volume of our article can not include various options Wooden stairs in the interior photo can be found online.
If you have already built two-storey house Either you are the owner of a two-level apartment, then the theme of the structure of the ladder of the second floor will be not essential for you.
In order to acquire a comfortable and high-quality staircase system, you have only three ways: buy an already ready-made design in a specialized store, order the necessary model of a carpentest, make a staircase with his own hands.
For those who chose the third option and is devoted to this article. In it you will learn a lot useful information On the staircase, and also familiarize yourself with step-by-step detailed instructions For the manufacture of stairs in the photo and video.
For owners of the two-level dwelling, the second floor staircase is the necessary interior attribute
Before you begin the construction of the stairs with your own hands, you need to decide on the type of design that will be most suitable for your home.
We will choose the system from three species:
Tell a little bit from each of them.
This type is most simple in production and therefore, if you decide to make a staircase with your own hands, then this option It will be the most suitable for you.
 Single-handed structures, despite the seeming simplicity, can be beautiful and effectively
 The marching stairs, in turn, are divided into types:

Both the first and the second type are considered not difficult in manufacturing and enjoy the greatest demand.
Such stairs are a spiral that goes up to the second floor. This species Saves a lot of space space, but it is laborious in production.
 The spiral staircase is original and beautiful, but its manufacturer better entrust professionals
 These systems combine two previous views. Their manufacturing is most difficult and therefore does not fit for independent erection.
 Combined systems are more complex in production and newcomer to mount them quite difficult
 Initially, we will define the material material and prepare the tool required for work.
For the production of staircase, you can choose:
 For the manufacture of the ladder, you can use the most various materials
 Most. suitable material for independent manufacture The stairs are definitely natural tree. His advantages are obvious:
Therefore, to build our stairs, we will choose a natural tree. Best of all, if it is wood of pine breeds - ate, pine. You can also use ash, beech, maple, oak, birch and other breeds.
 Natural tree - the most the best choice For the production of the stairs do it yourself
 So, we have decided on the type of construction erected - this is a marching staircase. Also chose the easiest in the processing and eco-friendly material - natural wood. As follows You should prepare the necessary tool.
For the manufacture of a wooden staircase with their own hands we need:
 Optimal set required tools
 Before mounting the staircase system, you must prepare the following details:
 This figure shows all the components of the design.
 In order to make a high-quality staircase with your own hands, use the following instructions for making in the photo and video.
Draw a drawing, on which we denote the basic elements of the future design.

Performing design calculations, probably the most exhausting process, but still it must be done. You can do it in a few steps:
 Before making the stairs, it must be calculated
The beam prepared for this part is cutting off to the desired dimensions and cut off the jar desired size To install steps.

To do this, put it to the place where the staircase will be, if necessary, we produce the adjustment of the part.
 This scheme contains detailed calculations of the Kooowar
 Attach the Kosouras and secure them with each other to the upper beam with the help of anchor bolts.
 Kosouras reliably fix anchor bolts
 Attaching the risers to the Kosouro is carried out using self-tapping screws.


