Many want to have a bath on their summer cottages. But for use only in summer period It makes no sense to make a capital building. A lightweight compact steam room corresponding to the sizes of the country area will quite cope with its functions.
Summer bath is a lightweight construction with a metal stove, a pre-banker and a watered branch. It is practically no different from the capital Russian wage, unless the size and lack of enhanced insulation. In small summer baths to save space, the washing machine is equipped in a steam room, not separating these rooms by partitions.
Of course, the size of the structure depends on the possibilities and desire of the owner. Baths are installed as a separate structure and combine with country house, workshop, greenhouse, summer kitchen and other buildings. The lounge in the summer building is not needed. It is enough just to install a comfortable gazebo or just a canopy, place a table and several benches there. In the summer, it is pleasant to sit in the fresh air, and the walls of the gazebo can be closed with mosquito nets.
If on cottage plot Water pipes are not laid, then you need to equip the summer water supply. It is somewhat different from the winter, namely what needs mandatory conservation (draining water from pipes) so that the frozen water does not destroy the water supply system.
The benefits of summer country baths include:
The main drawback of the country bath is the lack of the opportunity to "turn around the Russian soul": the construction quickly cools, as it is perfectly holding heat, but does not accumulate it.
When the hosts are coloring construction They want a lightweight option for steam room only for the warm pore threshold, buildings from brick are infrequently used. For such a heavy bath, a strong foundation is needed. Accordingly, making a summer wage brick - it is inappropriate.
Based on the construction materials, there are such
Often, if the site under the cottage recently acquired, then it does not have the most elementary amenities. In such cases, the bath-former can be output, which contains everything you need to use.
You can also purchase a baroch-consisting of a wage. But in it, if you wish, you can find a place for a shower and remove the drain from the pallet to the street. Such a bath will not take much space.
Sometimes dackets, not wanting to spend time and money for the construction of an expensive bath, acquire mobile baths. It can be on the wheels and move using the trailer. For such a bath, it is not necessary to build a foundation, but a fairly stand and extension cords to heat the electrical oven.
A cheap, reliable bath called "Glinocurka" can be built from the car of firewood, straw and clay dump trucks.
The first step in the preparation of the construction of a summer bath is to create a project. In parallel, there is a location. The distance of the summer bath from neighboring sites is taken into account. It must be at least a meter.
Marking and preparation of the construction site. Possible roots of trees are hardened, the site is cleaned from the construction trash. Next is driven strictly vertically first count (so the corner of the bath is noted). From it, through the planned length of the walls, the second, third and fourth pegs are clogged, which are binding to the cord. After checking the equality of the diagonals of the markup, we begin to dig a trench or pit for the foundation. Then go to the construction of the foundation. Next is the construction of the scene, 120-150 cm wide, from clay or concrete.
The base for the summer bath in the country can be raised of different typesDepending on the weight of the structure. Ribbon foundation is durable and reliable, despite the ease of its structure. For its construction, on the bottom of the trenched trench, it is necessary to pour a large sand with a thickness of 20 cm, shedding it with water and the tampering board, with a handle attached to it. Next, you need to float the layer of crushed stone as the same height as sand, install the reinforcement frame (2-3 metal rods fixed with a piece of wire) and pour the entire design of concrete.
If your site is not in seismic regions, then from reinforcing the foundation of the summer bath you can refuse. But it must be remembered that over time there is a sediment of the structure, and if the soil is clay, then the foundation may not withstand and collapse. And reinforcement gives the structure elasticity and protection against sudden collapse. It is important to remember: for a set of maximum strength, the foundation requires time. Usually this period is 28 days. For proper bruising, the erected part is covered with film and moisturized within a few days. Only on the 3rd or 4th day they open and give to dry finally.
The column foundation is simple in the construction. It is necessary to dig out the shallow pit in increments of 1.5-2.5 m and install in them concrete pillars. For the uniform load of the bath on the poles and the possible uneven shrinkage, they are binding to the beam, a bar or a finely breed ribbon. This type of foundation is not suitable for clay and swampy soils.
The pile foundation is rarely applied. It is needed in the case of complex soil at your summer cottage or during the construction of a bath near the reservoir. In this case, the structure is installed on metal, wooden or concrete piles.
The clay foundation is a reality that has come down to this day.
Trench rolls out, the depth of which should be below the level of the fertile layer, and the width is 3 times the width of the foundation itself. In a separate open pit, there is a barefoot solution, consisting of clay, water, sand, sawdust or straw, to the state of the plastic mass and is left for several hours. A ready-made foundation solution from clay (necessarily tamping) is placed in the installed formwork from the board or metal sheet (necessarily tamping) and left until complete drying. After removal of formwork, the foundation is wetted with water and rubs into small sand.
And then the most important thing begins: firewood is stacked between the walls of the foundation and the walls of the trench. This is done in order to under high temperatures The foundation has occurred - to gain high strength them. In order for this process to occur intensively and high quality, the trench should be covered with a metal sheet. Such a foundation will have a very long time. Do not forget to close it with waterproofing materials before laying the walls. Sometimes the owners of the plots are building a simplified base of the base under a summer bath: from flat stones and clay.
It is necessary to immediately determine the location of the stove and make the foundation for it. It is important to remember that the base under the furnace should not touch the base of the bath itself by a single side: it must be a separate element.
Then you need to do communications and finishing works.
The construction of a summer own bath in the garden is to perform the task. The lack of work on insulation will simplify the task. Time and forces spent on construction will pay off convenience and comfort during the adoption of bath procedures. After all, it's so nice to get into the Banke, built with your own hands.
Fruitfully speaking all day at the country area, it is appropriate to start resting from a visit to the bathhouses, where you can get into the way and in such a way to remove the accumulated fatigue. Needless to talk about the benefits of such procedures for the human body, it has long been proven fact. It's small things to determine where the bath should be located in the country and build it with their own hands. How to do this correctly, you will learn from our article with step-by-step instructions on the construction of this popular facilities.
To independently make a bath, you need to outline a clear procedure:
Best Bath option - separately standing building, an extension to the house is economical, but uncomfortable. There are no strict requirements for the placement of the structure, except for one - compliance with the rules fire safety. Stripping from them and considering the common wishes of the owners of Dacha, we will give such recommendations on the choice of the place:

Plan of the site with the location of the bath
Note. If you decide to start building a bath near the reservoir, then you need to provide for the likelihood of flooding and take action in advance, for example, higher raising the level of pure floor.
Unlike such structures, 2 main requirements are put forward to the dachastle structure:

Reference. For those who do not want to deal with construction in principle, there are options for ready mini baths. For example, a mobile bathhouse in the form of a trailer to a car or a finished product in the shape of a barrel depicted in the photo.
In order for the steam room quickly, its sizes need to be optimized for the number of people who are constantly living in the country and receiving bath procedures. It will not create special problems for guests that can wash in turn. Below in the drawing shows a mini-bath plan 3 x 3 m, designed for the simultaneous stay of two people:

As you can see, a small house is divided into 2 rooms - a relaxing room and a steam room, combined with a shower. Since that a budget option Saunas, then the height of the ceilings is small - up to 2.7 m. If it is necessary to divide the rooms and increase the size, then you can take the layout of the building 5 x 3 m as follows in the next drawing.

Note. The terrace is shown in the picture conditionally and is built according to your desire and sizes.
For a comfortable wash and rest, 4 people are the total area of \u200b\u200ball rooms of the bathhouse should be 20 m², 5 m² per each. Then you will fit the structure of the structure of 5 x 4 m with a large outdoor terrace:

In general, the baths are made from various building materials - bricks, blocks, and even sandwich panels. But the best option is a tree and that's why:

Bath, built by framework technology
When erecting the bath, the environmental purity of the components of the elements plays a special role. It's all about high temperatures, due to which construction materials harmless under normal conditions begin to allocate compounds that adversely affect the health of washable. Therefore, it is extremely undesirable to apply any artificial insulation in the bathhouse - minvatu and polymers. What you need to use:

Log Banaka
Note. For the device of vapor and waterproofing, polyethylene films and special membranes passing moisture in one direction are allowed.
A few words about how to better build a bath from sawn timber, more precisely, about the design of the walls. There are 3 ways to choose from:
The preferred option is a bathhouse, designed by the bar, shown below in the photo. It meets all the requirements and costs relatively inexpensively. Yes, the frame building is cheaper, but it uses in it for insulation basalt Wat.excreted when heated carcinogenic substances. A chopped house is suitable for ecology, but requires a device of a belt foundation, and this is the rise in the cost of the project. In addition, the logs should be able to correctly connect so that the structure is working beautiful and warm.

Council. If you want your bath to look like a log house, nothing prevents from building it from a bar, and then separate a block house, imitating a log.
Before the beginning construction work It is necessary to prepare the selected platform. Remove extra objects from it, stones and remove vegetation to get quietly to mark up. If the site has a small slope, then the site is preferably aligned.
With the help of pegs, ropes and measurement tools, perform marking, indicating the contours of the future building. Make sure that the indents from other buildings correspond to your calculations, after which you will accommodate the installation points of the foundation supports. They are usually placed as follows: 4 angular columns, and between them - intermediate supports with an interval of not more than 1.5 m. For mounting inland partitions And the lag in the middle is scheduled for several more columns.

As a basis, we took the foundation of a columnar type as the easiest and cheap performed. It makes no sense to pour under a small country bath with a concrete tape, except that it is built from the log and is therefore distinguished by a decent weight. The work algorithm is the following:

If the soil is oversaturated at the cottage and is susceptible to frosty beagle, then the column and the ribbon foundation will not last long. In winter, the freezing soil will push it out and the structure turns. Since the depth of the unstable horizon sometimes reaches 3 m, a robust base here will serve as a pile-screw foundation shown in the photo. Lay so much concrete is simply unreal, and even pointless.

The essence of the idea is to screw in the land of piles with blades on the necessary depth so that they reach the dense soil, which does not give drawdown. Pump them back the wet soil will not be able - the blades will interfere. In detail about the device of the pile screw foundation tells on the video:
Responsible moment - setting the first crown. The bars are stacked on supports, evaporate horizontally and in the corners, and then fixed. If you need to connect 2 beams for extension of length, then the dock is performed on one of the foundation columns by writing in the Poltera.

Attention! Before erection wooden structures Baths All items should be impregnated with an antiseptic agent.

Bruck connection in the corners perform the simplest way - "in the paw". To speed up the process, make a template for cutting the ends, depicted in the diagram:

Before combining sustained bars, launch the joke with a pantry - jute or linen fiber. The same action repeat before laying subsequent crowns so that there are no cracks between the elements. Each 3 rows of bars connect steel brackets - brazening, as prescribed scheme:

For the word of the internal partitions in the outer walls, it is necessary to drink each bar to get a connection in the Poltera, as shown in the figure. There also depicts other ways to live, but the beginning carpenter is more difficult to implement them.

Note. Using the presented connection scheme, you can assemble the walls with flip, how it is done in log houses. But consider that the flow of timber will increase.
In the installation process, check the vertical and, if necessary, correct the position of the items before putting the berth. Having reached the project height, put on the perimeter of the board (on the technical language - Mauerlat) and go to the assembly rafter system Duscate roof, whose design is reflected in the photo:

The installation order is:

Thermal insulation of ceilings sawdust
So that the heat does not go through the roof, be sure to warm the ceiling. Use sawdust intersmending with clay, vermiculite or clayzit. Floors do not fill until you spend in the Communication Building - water supply and sewage. Very detailed and available on the construction of a bath from a bar told on the video:
The organization of water supply and debate of the drains begins at the stage of construction of the foundation. While freezing the solution brick masonry Poles, you should dug trenches for communications, as is done in the example in the Scheme:
![]()
For full equipment Baths in the country you need to perform the following work:

Device inclined underground in steam
Separate question - installation of a bath furnace. You do not need brick build, it is too long and expensive. It is better to put the metallic (can be self-made) with a firebox made in the pre-banker. On the installation of the chimney, the recommendation is this: Take warmed sandwich pipes and try to immediately remove the channel to the street so that you do not have to go through the attic and roof. Wooden walls of the steam wall need to be protected from the stove with steel sheets - this is a fire safety requirement.

Installation of a bath furnace and intersection of chimney of wooden floors
Of the foregoing, it is suggested: to build even a simple bath in the country, you will need to make a lot of effort. But let it confuse you, imagine that to fulfill all the works you have attracted the builders brigade who will give you an impressive bill. Add the time spent on the construction of construction and the unknown number of errors made by employees. It is worth remembering the adapted to the case of the saying: you want to make a bath good - build it yourself.

Designer engineer with experience in construction for more than 8 years ..
He graduated from the Eastern Ukrainian National University. Vladimir Dalya in the specialty "Equipment of the Electronic Industry" in 2011.
Related records:

Often, land plots suggest only the construction of only vital buildings. A small area of \u200b\u200bthe plot, the use of each block of land landing or thoughtful simply leaves no place for additional buildings. In this case, there is only one way out for lovers of bath procedures: the construction of a miniban. What is a mini-bath for giving, how to build it and what you need to build it - let's be able to understand.
Read in the article
The main advantage of the mini-bath is the area of \u200b\u200bthe plot occupied when it is built. Second, not less an important parameter It is the cost of building a miniban in the country.

The finished projects of the frame mini-bath are on the network, in addition, it is possible to create such a project on request in construction organizations. But sometimes, in the project of mini-bath with their own hands, projects of frame and combined baths are simply combined.
We offer for watching video buildings of a frame miniban quickly and cheap:
Important! When purchasing lumber, pay attention to its quality. Lumber for construction should be well dried and not to have defects of geometry.
Summer bath from boards is an option frame bath, to be used. Like a frame, the bath from the boards with their own hands is being built quickly and simply. Building technology is similar to a conventional frame bath, with one exception: instead of panels, an OSP for outdoor clamping is used. Budget savings are rather significant, especially if used to cover the unedged board. At the same time, such a structure is less durable than using composites and has large heat loss than assembled using panels.

When building a bath, it is worth paying attention to heat and vaporizolation. The more high-quality materials are used in construction, the longer the steam room will serve.
Stacking board on the wall should be carried out. Such an order of laying will allow you to make the wall more dense and reduce heat loss when used.
Before building a bath from the boards with their own hands, it is worth the selection of sawn timber. To cover the bath from the inside it is better to use wood coniferous rocks Tree (pine or larch), while for outdoor sheat it is better to use aspen. She has low enough, which will allow the bath longer to keep warm. Particular attention should be paid to vaporizolation. The dampness is the most terrible enemy of the tree.

Usually, mini-furnaces for small volumes are metal structures designed to generate steam. As an example, you can consider the furnace for Bathroom Babor "Mini".

Bath furnace Barbara Kamenka Mini
This is a wood stove with overall dimensions 48x66 cm and 88 cm high. Steel construction The insertion itself is covered with a casing, inside of which there are convection channels. The air, heating in the field of firebox, through the holes in the casing goes to the heater, thereby quickly pulling the stones. As a result, the furnace heats up very quickly, warming small premises For a very short time.
In addition, there are more simple designs The furnaces in which the heating of the heating is carried out directly, the effect of heat from the combustion of fuel. Using in the steam room, it is necessary to provide a place for the storage of fuel, or canopy near the bath.
With small pairs, in some cases it is advisable to use electric bath furnaces and electrocamenakes.

On a note! The installation of the heat exchanger on the chimney will allow you to quickly warm the air into the pair. But this option is possible with the corresponding bath dimensions.
An additional installation in the bath will allow you to expand the functionality of the bath and add comfort. It is worth noting that the basin bookmark is better initially foreseen in the Bani project, as the mini pools for the bath require water supply systems, water drain, heating.

For this reason, embedding the pool in ready bath The case is quite troublesome and costly. There are several varieties of basins intended for installation in a bath:
Pools can be equipped with water heating systems, hydromassage equipment, but in this case they require the help of qualified specialists.
Bathrooms features a view of steam and temperature. In order to make a steam sauna, it is enough to install an electric steam generator inside the steam marker, an electric camera or a sauna on firewood. When using a steam room under the sauna, an interior decoration from one tree of wood is recommended: pines, limes or alder. A mini-sauna in the country should be as closed as possible, almost hermetic. Special attention should be paid to its thermal insulation. This is necessary to maintain inside the high temperature sauna for a long time, with minimal energy costs.

portable sauna
Before the construction, you should familiarize yourself with the projects of the already built bath and choose the most optimal option. The projects of a mini-bath for giving with their own hands (and frame, and barn) are quite widespread, and it does not represent their work. Before building a small bath, you need to decide on the type of bath, material for its construction and location.
 Foundation by screw piles do it yourself. This technology is used to accelerate the construction of not too heavy buildings, other architectural structures. In the article you will find step-by-step instructions construction of the design I. useful advice specialists.
 The main requirement during construction is accuracy. Everything needs to be done calmly and not rushing. This will build a bath in a short time without excesses in work.
Helpful advice! When purchasing materials for construction, focus on the medium and high price range. Soft materials For the roof, insulation, and vaporizolator, take a predetermined estimate, + 10% on the material of the material.

Important moment When building a bath - do not forget about. For a pair of small volume, enough channel in the wall, for larger premises, the fan installation will be required. It is necessary so that our little bath in the cottage is a place of comfortable rest, not a friendly miasm.
Article
Washing in the country bath - pleasure accessible to everyone. It does not need large cash investments for its construction. In minimal layout, such a structure is being built in a few days.
In this article we will consider the topic how to build a simple bathhouse in the country quickly and inexpensively.
Let's start with the study ready-made options, We will discuss popular wall, floor, stove and sewage designs.
The main conditions for the comfort of any bath are:
In the photo №1, we see the simplest bath, resembling a diogen barrel. You can only go to it. It will not be afraid here, because there is no sewage in the structure. However, if desired it is easy to do. To do this, install a standard shower tray in the corner of the bath and remove the drain pipe into the septic tank.

Photo №1 Building such a "bath bar" in the country and worry about
The important advantage of this design is low weight, allowing it to put it on a platform terrace.
The device of the simplest bath from the category of container is represented in photo №2.
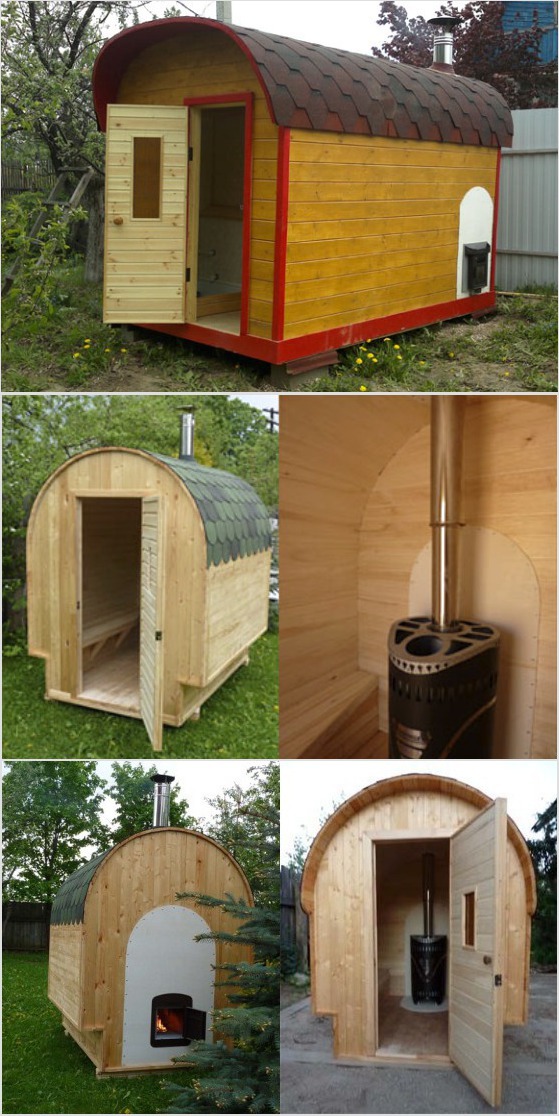
Photo №2 version of the container dacha bath
It consists of one parile compartment. To wash the owner, you need to attach a canopy with the summer shower or supplement the room by sewer, and the stove is a tank for heating water.

Improving on the topic of the barrel bath, we will pay attention to the cellular polycarbonate. From it you can quickly and just collect original design. In order for it well to keep warm, you will need two large sheets of this material and a metal frame or wooden bars. The insulation from the Minvaty, a thickness of 10 cm, is stacked between them.

The ends of the building can be made from the boards, stabbing them on a wooden warmed frame. Put such a bath wherever: at the cottage, on the polar ice ice or on the top of Everest, and you will always be comfortable in her steam room (photo №5).
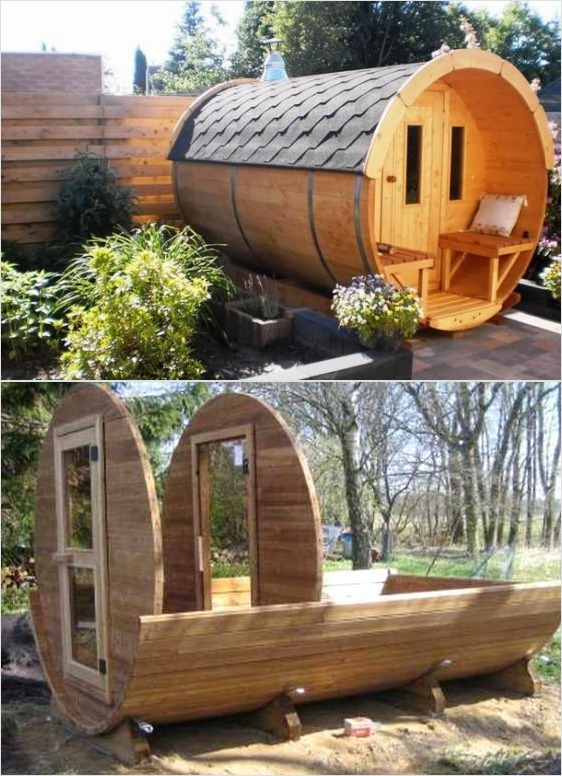
Photo №5 Simple bath of barrel-shaped
A small Russian bath made of crashes can be installed on oak columns. An example of such a facility we see in the photo number 6.

Photo No. 6 Oak Stakes - Excellent Support for Small Wooden Bath
Larger structures need their own foundation. Here are three options:
Do not forget that the foundation type affects the choice of material and the design of the walls. The pile and columnar bases are used to install a wooden frame, as well as for baths from a bar or logs (photo №7 and №8).

Photo №7 Balca of sip panels on screw piles

Photo №8 Brick columns - the best option for the brusade, log and frame design
"Tape" from the booton is suitable for any walls (from gas-silicate blocks, logs and frames).

The cheap, reliable and simple version of the bath is obtained by technology. For such a structure, a little will be required: the car of firewood, the WHO straw and the dump truck of clay (photo №10).
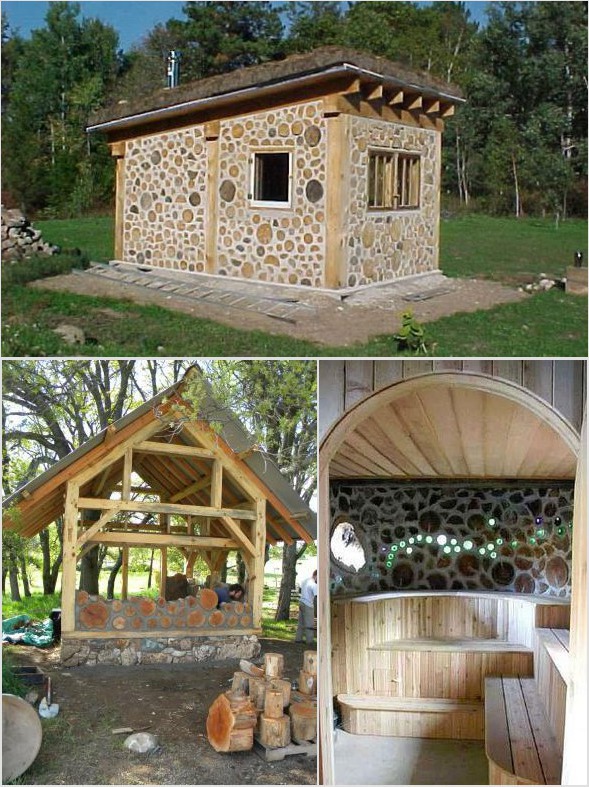
The best shape of the wood structure is round. It eliminates the need to enhance the masonry of the corners, looks aesthetic and original.
Borrowing from the birds technology construction of nests from branches and clay, you can build this simple and warm bathhouse (photo No. 11).

Photo №11 Wicker frame, unwinding clay - "know-how" inexpensive bath construction
For outdoor decoration The frame bath can be recommended such materials:

Photo №12 is simple, but at the same time a very pretty option of the outdoor decoration of the bath with umbered
As a heater, it is best to use EcoWhat. It does not accumulate moisture, does not rot and does not burn. If the eco-houses in your region are not, you can buy an ordinary mineral insulation in the form of a half-row plate. It is easy and simply put in the intervals between the frame racks.
To protect the minvati from water vapor and decrease the wall heat loss, the walls are lined with sheets of foil polyethylene. After that, they are fixed with a frame from the rails and finish its wood: alder, lime or pine clapboard (photo №13).

Photo №13 Paro- and thermal insulation of the walls of the country bath built from any material
OSB plate put indoors we do not recommend. This material under the action of high temperatures is distinguished to toxic gases.
Variants of steam and thermal insulation walls of a frame structure, as well as a bath built from blocks or logs, are presented in Figure No. 1.

Construction of a simple bath with their own hands includes sewage. It can be made from standard plastic pipesReleased into a cesspool or drainage well.
The water intake funnel is located in the center or in the corner of the room, and the floor is performed in the form of a clay-concrete screed with a slope toward the drain. Before concreting, you need to compact soil and close it with several layers of waterproofing. Wooden floor - excellent optionBut in the bath he quickly rotates and requires replacement. Instead, we recommend making lattices from wooden plates and put them on concrete screed. After washing, they can be removed, put out on the street and dry.

Constructive bath ceiling standard. At first, the steamer films "shoot" the steam insulation film and pierce the counterbours (3x4 cm). They fix cladding from the lining. The intervals between the rafters are filled with insulation and covers it with a guide film. It protects it from weathering and atmospheric moisture (Fig. No. 2).

Figure No. 2 Constructive Ceiling Ceiling Bath
A counterclaim that creates a ventilated gap between the roof and insulation is fed to the film. Work is completed on the ceiling and roof device with the installation of the main crate and laying roofing material (slate or metal tile).
The main "detail" of any country bath is a furnace. It should provide quick air heating and maintain high temperature. Faster all the metal stove is heated.
To accumulate heat and creating a couple, it must be supplied with a separation for stones. There are a lot of oversequo chambers for simple baths, so we will not stop on them in detail. We only say that the easiest of the heat generator can be made from a steel pipe of a large diameter, an old gas cylinder or barrel (photo No. 15). Another material convenient in the work is a steel sheet with a thickness of 3-5 mm (photo №16).

Picture №15-16 Simple oven made of pipes and stove-stone from ferrous metal
Owning the simplest techniques of welding work, you will be able to assemble such a design without any assistance.
Since ancient times, the bath chased and was an integral part of Russian folklore. It is often referred to as a place to clean the body and soul. It is especially pleasant to have their own pair on the country area or in a private house, which is quite easy to build with your own hands without attracting assistance.


The bath is a place with a special comfort and aura, which requires careful compliance with the conditions, rules and stages during construction. On the modern market There is a wide variety of materials, thanks to which the construction of a pair can be carried out very quickly and rather cheap.
To build it with your own hands, you need to think about a few moments.


You can start working only when the owner decided with all the stages.Otherwise, this process can delay for a long time without accurate dates to end.
Experienced masters in the construction of the bath advise carefully think over all the details and do not rush during construction. Especially when you do it with your own hands. It is necessary to make a lot of effort so that this place has become a truly real bath, and not just a room where you can wash.


The location of the bath is one of the most important issues. Convenience and comfort depends on it. It is also important where it is planned. Many people think that this can be any plot at the cottage, the basement of the private house, the roof or the basement in the high-rise building.
Exists large row Rules, which is primarily aimed at the safety of man and his dwelling (if it is near the future bath).


The bath is a high temperature indoor inside, unfortunately, not rare cases of its fire. In this regard, the choice of space for its location should depend on the material from which the foundation and bearing walls. According to the rules of fire safety, if the construction is made of non-combustible building materials, it can be in 5-6 m from the residential premises (at home). If this is a solid tree or part of the steam room has a wooden base or finish, then the distance increases to 8-12 m.


Do not forget about the fact that there are neighboring houses and buildings. With their location, it also needs to be considered, since non-compliance of the norms can lead to unpleasant proceedings, and, as a result, demolition of the installed bath.
Not every person boasts a large house and a huge land plot. But having modest possessions or big, always want to have a private bath or at least a mini-steam room.
If there is a sufficient territory, you can create a reference bathwhich should have a steam room, a pre-tribbon, a lounge (sometimes there they make a pool) and shower or washing. There you can wash off the remnants of soap and shampoo, or prepare the body to the heat (people take a warming shower with warm water). Owners of truly large areas can equip the bathhouse with a room for jacuzzi, massage, billiards and others.


But in the conditions of a small area, the construction can easily combine several rooms (the pre-tribades and a rest room, the pre-tribbon and shower). It is worth noting that it does not disappear from this comfort and comfort in the bath.
Depending on the quadrature, you can find the perfect solution. For example, if it turns out to build a 3-square meter bath. M, then there may be a small wage (approximately 1.8 square meters. m) and the premium (1.2 sq. M). This space can be quite enough to visit one or two people without any discomfort.


In the construction of 6.5 square meters. M placed the same number of rooms, but they will be spacious. Under the steam room is better to highlight 3.5 square meters. m, and the rest is under the pre-banner. Some owners put a small shower in the corner.
If there are 9 or 10 square meters. m You can plan the territory more interesting. Under the most "roast place" is better to give 5 square meters. M, where comfortably can well accommodate 2-3 people. The rest is easily divided into place under disguise and a small shower.


Bath with dimensions of 12-15 square meters. M to equip much easier, because you do not need to paint each meter. Here you can already give more squares under the pair to walk there with a small company (3-4 people), or combine it with a washing room (1 square meters. M) and make a large living room with a table to drink tea. It is also easy to divide the room for 3 separate rooms: the steam room, shower and pre-banker.
When there is where to turn around, much easier to divide the space.It all depends on the preferences of the owner of the bath. If he loves big companies, of course, it is better to emphasize on the size of the steam room, because it is possible to relax in the house after all the procedures. But when privacy and bath romance are more appreciated, it is worth considering a rest room. There, a person can sit in a chair with hot tea, think about life, sincerely communicate with the other, read the book.


The selection and purchase of material for the construction of the bath is best to do it yourself, as it will be possible to check its quality before installing. The market is filled various options. Thanks to this, it is easy to build a beautiful, high-quality and budget steam room with a pre-program. Most of the masters argue that the material from which the Bani Constructive is made (its foundation) does not affect the bath procedures. In this regard, greater attention should be paid to the choice of the inner component, namely the material that will be inside the steam.
In the consciousness of most people, the bath is only from the chiros of the tree or of the stone. But it is not so. Materials are improved by their qualities, as well as combine depending on the region of residence.
For the southern regions, it is not advisable to use a bar or a tree for the frame, as there are a lot of pests (core, beetle grinder, Usach and others). A fungus and mold appear from high temperature and humidity. Therefore, the service life is very short - 2-4 years. For the southern part of Russia, the use of stone or brick is recommended. Most often, arbolite blocks, polycarbonate (for summer bath), aerated concrete, sandwich panels are used there.


For the northern regions, the wood is more preferred. Due to natural features, it is not necessary to process chemistry from pests. For this reason, the bath will be more environmentally friendly.
If it was decided to make a skeleton bath from a tree, then for the walls it will be necessary directly wooden bar (the number is purchased on the basis of the project) or wooden sleepers (rather cheap building materials), insulation and casing material. It can be OSB plate. They are pressed sawdust with resin, wax and boric acid.
For internal sheat, they take more pre-prepared boards, and for exterior - lining or eurvagra. Sometimes (for the purpose of saving) people use wooden pallets. Thanks to their form, quite durable walls can be folded. Of course, they will need to warm. This option is the most successful for the summer wage. To build a frame and walls in a brick or stone bath, you will need silicate brick, rikushnyak or boot. Increasingly began to use slagoblock. As for the external and interior decoration, the materials can be different.


Sometimes, when there is such an opportunity, skillful masters make the base of the metal container. Construction is going very quickly. But here there are your nuances (it is necessary to cut holes for the door, make an additional partition for the steam room and others). All walls are also thoroughly insulated and trimmed.
Interior decoration The ceiling in the pre-tribbon can be made of such wood species, like alder, linden or pine. If we talk about the ceiling in the steam room, then specialists are recommended to mount the lining (it will better tolerate high temperatures). It should be from the tree of trees that do not emit strongly smelling resins (spruce, pine, fir). The best option For this there will be Lipa, Alder, Cedar. In no case cannot use chipboard or fiberboard. When heated, they secrete substances that harm the human body.
Special attention also requires insulation for walls. Insulate the bath, as a rule, only inside, but may still lay out the outer layer this material (in the framework of the structure itself). If the construction is made of a tree cut, then the insulation is placed on the grille frame (inches). To do this, use minvatu or other organic insulation. In the case of a stone or brick bath, the same is taken mineral woolBut it is stacked with a thicker layer (5-6 cm).


In the steam room after the insulation layer, the Parobarrier is defined. To this end, a dense foil can be used or a special self-adhesive three-layer film. It consists of a polyvinyl chloride mesh with two layers of films with fine holes for steam removal. For the floor in the steam room, the same tree is suitable, which was used to cover the walls and the ceiling, and in the pre-tribades are usually a steeter of the tile. It is convenient to wash and disinfect from fungus and mold.


Bath is not just a steam room, but also a place to relax and relaxation. To fully restore the strength and spiritually clear, there must be such zones as steam, domestic (pre-tribades), shower. Of course, when the small territory is not particularly enough space for any extensions, but you can always find a way out. For example, combine functional zones in one room.
The bath without a pre-banker is uncomfortable to use, especially if the house is 10-15 meters away.It is necessary in order for a person to quietly undress, prepare for the procedure. Also this room plays a big role in thermal balance. Movie helps not "get lost" heat from the steam, and also blocks the way with cold air flows in winter time. In addition, all bath accessories are kept here: buckets, buckets, various gels and shampoos, bathrobes, hats to protect hair from overheating, slippers and much more. Without this room, the use of the bath will be uncomfortable and uncomfortable. With sufficient sizes there you can put a small table to drink herbal tea, dry and cool to exit the street.


If we talk about the shower, then according to the recommendations of doctors, it must be.Before entering the roast room, it is necessary to prepare your body - take a warm shower. The body will be easier to transfer sharp temperature differences, and the pores for active sweating and further purification will be reproduced much faster. This zone does not have to be large (in the form of a shower or installed "standing bath"). Enough and one square meter, which can be drilled by a curtain. In the case when it is possible to make a big and full-fledged bath, then it can be equipped with a separate room under the sauna or put a jacuzzi. It all depends on the preferences of the owner.
The most important thing when building a bath with your own hands is to make it most comfortable for your use.


By itself, the construction of the bath is simple, if you have a clear action plan. To get high quality and beautiful building, you must perform a number of steps step by step.


Strictly adhering to the work plan, it will be able to build good bath. Experienced builders advise in advance to invest on each stage so that the construction is not delayed for a long month or year.


In the case where a small bath is planned, then it is advisable and cheaper to make a regular belt foundation. The most important thing is to produce good thermal insulation, otherwise the floor will take the heat out of the room. As a result, condensate may form, and further a number of unpleasant consequences.
Creating a foundation includes several stages.


If it is planned to build a large bath, and the area has a complex barride and uneven shape, it is better to establish the foundation on the piles. They are a few species: some curl, and others "twist" into the ground. Baths are suitable both options.
Before installing it, similar preparatory work is carried out on the site as with a belt foundation. Particular attention should be paid to the issue of the freezing of the Earth in the winter. Typically, this data is checked by SNiP. Based on the information received purchased metal pipe With the wall thickness of 3-5mm.
Its length should be folded from the following values:


To make it easier to insert the pipe, it is sharpened. Each element is installed in the ground at a distance of 1 m from each other around the perimeter of the building. It is very important that piles stood smoothly. To do this, each pipe is aligned with the level (line with liquid and scale).
For each pile, a square "hat" (625 square meters) should be welded. At its ends, holes are made to install a reinforced concrete frame. All metal elements are necessarily coated with a solution that prevents corrosion. After that, the sand layer, gravel and everything is poured and trambered cement mortar According to the tape base technology. After installing the foundation, you can start setting walls.


In its species variety, the walls are:
For installation framework wooden walls It is necessary to establish a frame on the frame (under it must be a waterproofing film). After that, the racks at the corners of the future bath are mounted. They are attached with the help of metal corners, and for greater strength to them bonds (beams standing at an angle of 45º).


Wooden bar. Each half-meter is installed throughout the perimeter with mandatory oblique spacers. Do not forget about door and window openings that do not need to overlap. Between themselves vertical beams are sealed along with one line horizontal. After the frame of the walls is ready, they can be shattered. But before that, all the wood is covered with impregnation from rotting and mold (especially terrible black mold).
The insulation, the hydrobaric film and facing material is laid.If brick was chosen for the construction of the walls, it is better to take red. He possesses the most suitable properties - does not "pull" heat, as it makes a white brick.
As a rule, the wall is made two layers of bricks. The start of work is carried out from the corners, since they will be set to the level. The layer of the fastening cement should not exceed 2 cm. For the convenience of masonry, the wizard advise to pull the line as a level. A jumper from reinforced concrete is laid on the place of the future window and the door. Next, the walls are increasing to the necessary height.


The construction of walls from foam block is made in a similar way, like a brick. The only difference is that every 4 rows need to lay metal grid. It will give greater rigidity and fortress wall.
The most interesting, in terms of work, there will be an installation of walls from a tree cut. It is very important that all trunks have the same diameter (a small error is allowed in 1-3 cm). Before installing, each of them is viewed for the presence of defects (the bones, bark remained), and also processed by an antiseptic. Next, on each element, the "wells" of 1 radius are made. The very first trunks that are found at the base, one side is made direct so that they do not "ride." Further bar is laid as a puzzle. In the corners, they make binding with a rope, ranging from the floor itself, and all the joints between the bars are paved in the insulation in the form of a tape.


Following the construction guide, the next step after installing the walls will be the installation of the roof. This process will not take a lot of time and effort.
Highlight 3 large groups of roofs:
The remaining species are a kind of typical groups. Professionals advise installed single roof For small baths. If the construction is an impressive size, then the functional side of the roof is already selected here (for example, 2 floor for the recreation area, made of attic).
If the walls are built of brick, the first layer (before laying the beams) will go a layer of rubberoid as waterproofing. Next is mounted wooden frame around the perimeter of walls with anchors. It will serve as a support for all further structures constituting the "backbone" of the roof. On the top of the wooden chosen of the selected shape. Inserter "inserted" in it and requires a sheet of parobac fellow. After these works are completed, you can proceed to the outer and internal trim. Inside, it is better to wash the ceiling with clapboels or prepared boards.


Floors in the bath need to pay due attention, as a person has a direct and frequent contact with them.
Like walls, floors are 3 types:


Brick is undesirable as a floor because of his physical properties (Small heat transfer). It is very heated and can cause serious burns in the footsteps. The most commonly used, gradual and durable material is concrete. But it is worth understanding that such a floor is very cold and requires an additional layer of insulation from above.
This option is installed very simple.


The most practical and comfortable floors for the bath are wooden. They are two types.


It is worth noting that only the person who has knowledge and skills in the field of electricians can independently make the wiring. A newcomer on this issue will be very difficult, even if it follows the step-by-step instruction.
Installing wiring should be made in a strict and clear sequence.


When connecting electrical wiring to the bath you should select the cable In accordance with the installed equipment, it is necessary to take into account its power and consumption of electricity. All work is carried out necessarily in rubber shoes, a dry room and rubber gloves.


To date, it is very profitable to independently make finishing work. If you order this service in the company, it may turn out a rather large amount. Finishing works are a complex of construction measures aimed at the external and internal improvement of the construction. The material is selected in advance. It is worth the choice very seriously and responsibly, since under the influence of heat and water, it can highlight odors or change the shape.
Masters advise work in parallel, not in parts (first the facade, then the steam room and so on). But there must be a certain sequence. First, we finish the ceiling, then the walls, and then the floor is already. At the time of the finishing repairs, windows and the door should already be inserted (at least blacks).


Internal (as the external) finish is carried out in a number of stages that must be observed.
Similar works are carried out from the outside.


The external decor of the bath is also important as internal. It is always nice when the house and next to the built parilla harmonize with each other, creating a single style of the plot.
How and from what to do the external trim the bath depends on such factors:
The walls of the classic Russian bath are usually performed on old traditions - whole logs. This is truly one of the most cozy and pleasant designs. Such walls do not need additional finishes, but sometimes on the seams are paved with a cable rope, which is soaked in the resin.


Today exists big choice Materials that can be beautiful and quickly draw up the facade of the bath. It can be lining, siding (metallic, plastic), fiber cement panels and others.
The most common type of facing is siding panels. Recommend to choose vinyl or wooden. They are most suitable for the themes of the bath. It is necessary to mount them on a specially installed fragment from the bar with the laid layers of the insulation. Sometimes it is fixed with a metal profile. Next, it is installed in a circle of the joint into the joint.


The second most popular material for external decoration is - lining.It is convenient because it has different rack width (they can be selected for any structure), which can be made of plastic, MDF or wood. The last option is chosen most often. The most important thing is that all the boards are well processed by a special solution that protects material from refurbishment and rotting. The lining of plastic (vinyl) will also serve a long period, but it fits pretty quickly due to the actions of direct sunlight. But her plus is that it is not afraid of moisture and sharp temperature differences. The lining is installed in the same way as the siding panels.
If the bath is built out of the brick, and I wanted to look out onto the wooden, then in this case you can make a facing from block house. This is a finishing lumber, which has similarity with the Euro woman. It is made according to special technology - it is cut in a circle of 4 boards from a round tree trunk. As a result, the boards are perfectly smooth and flat on one side, and convex-semicircular on the other. With their help, it is easy to create a imitation of a house built from a tree cut.


Since childhood, an image of a simple Russian bath is laid in the head of each person. As a rule, the interior of this room is entirely made of natural wood (alder, linden), there are wooden chairs with wrought-iron legs behind the same table, self-made new brooms from birch or oak hang on the walls, and most importantly - it is the smell of wood resin, safer Leaf, soap.
To preserve the atmosphere of a real traditional Russian bath, it is best to acquire wood furniture (table, chairs, benches). Very nice when it has carved elements. On the seats sometimes put homemade knitted or wicker litters. They are made with a bright ornament to supplement the room with comfort and joy.


On the floor in the pre-tribades, it is desirable not to roll the carpet. It will multiply the fungus and mold due to high humidity. It is best to use the usual tile or wooden boardstreated with a special solution. Do not superfluous shelves on the walls. They are also made of wood. There perfectly lay mugs under beer, kettle or beautiful houses' figures. It all depends on the imagination of the owner.
In the steam room, too, should be cozy. Usually in the corners there are lighting with lampshade of beered, on the walls - forged hooks that keep buckets and buckets. Buckets can also be in ethnic style. They have carved handles or metal rim in the middle. On the upper rim, the ceiling very often install a decorative panel of wood. It cuts ethnic ornament, animals, a bath process and so on.


The pre-tribbon or recreation room also fill accessories. They are often made independently, looking for flea markets or folk fairs. There is easy to find wooden spoons, lapties, carved articles of houses, paintings on Bereste and other accessories. With the help of them, it is easy to add coziness and spiritual heat into this room.
An integral part of the interior of the Russian bath is the smell.Thanks to him, a person relaxes as much as possible and rests entirely (soul and body). Each of the rooms dominates its smell. In a steam room, it is an aroma of gasy oak or birch brooms. In the household, it is good to put the aromalamp, and every time you change the mood.


In the XXI century there is a huge variety of baths. Their main difference lies in the effects of human body, as well as the quantity and quality of the pair in the indoors itself (steam room).


The heart of any bath or any wage is a heating boiler or oven. Without it, in principle, the functioning of this room cannot be implemented. The most important thing is that the heating boiler can heat up to sufficient temperature, and respectively have good thermal power. Additionally, it is necessary that the person can regulate the level of heating with tangible gaps at the temperature. All these parameters depend on the material from which the boiler is made, as well as from the competent feed of the power and the size of the steam room.
Bath boilers are made of metal. As a rule, it is common or specially processed steel. In more expensive models, its thickness can be 1-1.5 cm. During the long-term operation of such furnaces, the so-called "metal fatigue" may appear. This phenomenon is manifested in a small deformation of the form. Because of this, you may begin to eat the door for laying fuel, or "sprawling" welding seams. For this reason, the masters recommend using pig iron boilers. They are much stronger and have a longer service life.


The main function of the boiler is to heat the room as quickly as possible to the required temperature.This ability largely elevates it over a conventional brick stove. In turn, metal furnaces may be ordinary or long burning. It is better to choose the second option, since such a boiler is much slower thanks and holds heat for a long time, and will also save on the fuel.
Picking the furnace for the steam room must be considered her constructive features and amenities for a person. Each boiler has a door where firewood is put or coal. In some models it is inside the parley room. On the one hand it is convenient, since there is no need to leave the room to add temperatures. But at the same time in the steam room always wet, and firewood or coal referred. It turns out that at first the fuel is dried in the furnace, and only then gives the desired temperature. A plus to everything from wood and coal will be accumulated in chips and rubbish, which can be painful steaming gentle feet.


Kamenka must be on the boiler. There are medium-sized stones there (it can pebble brought from the sea). Since they lie on the hot metal, they also warm up. During the bath procedure, water is poured there, and the pairs are formed, which is necessary in the steam room.
Kamenka can be on top of the boiler or is located on the side. The side option is better, as water falls only on stones. Such couples is considered softer and correct. Ideally, when this design (reminds the wrought-down bucket) does not concern the walls of the boiler. This is explained by the fact that the stone holds the temperature for a long time, therefore, it can deform the adjacent heater wall, thereby reducing the service life of the boiler.


Most models have a special container where water is heated. She is buried with a brush and pour on the stones to add heat to the room. It can be on any side of the boiler, but best, if it is suspended on the pipe (chimney). So water will not boil, but it will always be warm. Plus, the risk of fuses part of the body decreases.
Special attention should be paid to the weight and dimensions of the boiler. If the steamer is big, then it must correspond to the size of the room. If you do not prepare the floor in advance, then he can simply come up under his weight. Usually the future place under the boiler is poured by concrete in the construction of the foundation. When the furnace is small, it can be installed directly on the floor, but it is better to pave a layer of bricks, as the tree from high temperature dries and deformed.


The above lists the main reasons for which part of the heat from the boiler goes.If you clearly know these data, then the calculations will be more accurate and correct. Then, all this information is substituted into the formula. By itself, it is very big, and without knowledge in the field of physics and mathematics it will be difficult to calculate the correct answer. It is best to come with famous data to a specialist. Usually in any store specializing in boilers and heating system, There is always such a person.
The most important thing when choosing a boiler is not to focus on the price, but on the quality and characteristics of the product. Dear - this does not mean good. It is worthwhile that with a breakdown of almost any part in the boiler, you will have to change it entirely.


Even experienced Master In the field of construction and repair will not be easy to build a bath absolutely correctly. As in any other case, there are nuances and subtlety of work, and they can be found only from a person who is professionally dealing with this business.
The first thing that the Masters advises is to keep the bathroom in the dry and warm period of the year.This is due to the fact that all solutions, grouts and impregnations must dry to the end. Otherwise, there is a risk of installing poorly treated wood, which will serve only half of the deadline.
Before starting construction, it is necessary to create a detailed project of the future bath. It should indicate exact dimensions, the diagram of conducting pipes for the drain and water flow. For wiring it is better to make a separate drawing. Based on the plan, it will be easier to calculate the number required material, as well as the Novice-builder immediately understand what work he will not be able to do without additional help of professionals. He will be able to put the costs of supporting work on the part.


If you want to build a comfortable and spacious bath, and there are not so many places on the plot, then it can be done as an extension to the house. Thus, it will be possible to save on the "4 wall" and space.
So that the bath serves a long time, the masters advise to ventilate it as often as possible. Due to this, wooden and metal coatings will dry and not be subjected to mold and fungus.


