Wallpaper sticker was and remains the cheapest and most beautiful way to finish the walls. He can master their own beginners of beginners, with pleasure it is used by masters. Easy-sensitive and simple process takes a little time. But, as in any repair work, you should have a minimum of knowledge and master some skills, without which the result obtained may distort a diligent worker. The question is how to glorify the wallpaper in the corners of the room, worries already at the initial stage of work and requires careful preliminary preparation.
Even if visually angles seem smooth, the picture is not as rainbow. The slightest irregularities on the walls and the curve line of the angle will be the reason that the canvas imposed on the surface will lay crookedly on the adjacent wall and will cause the discontinuity of wallpaper and ugly chances. The next lane of wallpapers, glued jack, does not lay down strictly vertically, the picture will be shown - as a result, the wallpaper will have to be dying away from the wall and start work again. So that this does not happen, you need:

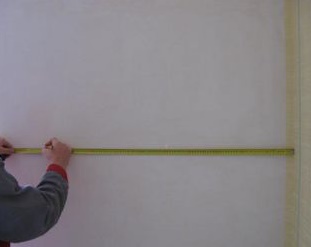
Casting corners, as well as the walls, should not be made on the eye.
In order not to break your head once again, how to glue the wallpaper in the corners of the room, you need to cook tools:
A large number of wallpapers offered for sale have to glue an online jack, and not a mustache, therefore, making a decision, from which angle to glue the wallpaper, it is better to navigate on strict vertical lines. Since perfectly smooth angles in modern premises Practically does not happen, wallpaper can be launched from the door or from the window.
Before glueing the wallpaper with a pattern in the corners, you need to prepare a web such a width so that it begged the edge of the outer angle and fell on the adjacent wall with it several centimeters. To do this, it is necessary to measure the distance from the edge of the previous strip to the angle and add to the obtained value of 2-3 cm, move the measurements on the wallpaper canvas, cut off the excess, and only then proceed to the corners. At the edge that was wrapped in an angle, chances may form. In these places, cuts are made by a construction knife. The canvas carefully smoothes and tightly pressed against the wall.
Tip! When using heavy wallpapers (for example, vinyl) glue is applied to the wall, and on the wallpaper cloth. To stick the lungs (for example, phlizelin) wallpapers just lubricate only the wall. But in fact, and in another case, the films of walls and wallpapers need additional lubrication with glue.
The adjacent wall is drawn with a plumb vertical line. The width of this section is determined from the angle and is equal to the width of the next panel with adding 0.6-1 cm. The second strip falls the right side Strictly in the outlined vertical line, and its left side overlaps the edge of the previous strip. It is necessary to carefully monitor the motifs of the drawing on both canvases coincided. It is necessary not only to know how to glue the wallpaper to the outer corner and skillfully use it, but also to prevent the chaotic elements of the ornament. After the cloth is pasted, the brush needs to be hushed into the glue, rinse the root edges and tightly press them with the roller.

But, one thing - to figure out how to quickly stick the wallpaper, the other is to achieve that in external corners they do not have lost themselves and did not break away. It looks like it, to put it mildly, is not eaten. To solve this problem, the corners on the wallpaper are used. Long stripsreaching for a length of 3 m., It is completely easy to fit into size. To do this, you can use the metal hacksaw. The following question arises: how to wallpaper? On the wallpaper glue, they will not hold on, and after using liquid nails of ugly traces on a wall cloth, not avoid. For these purposes, silicone sealant is perfect.
The workflow is in full swing, and the vertical canvases smoothly fall on the wall, but the adjacent wall is closer and closer and you have to pose: what is needed to shove the wallpaper in the inner corners? It is not as difficult as it seems at first glance, and certainly no more difficult than pasting external corners.

After the next strip is pasted in front of the inner angle, you need to measure the distance from its edge to the right to the angle, add to this value 1-2 cm.

The dimensions are transferred to the next strip, it is neatly clipped vertically (on the eye). And for confident movement use a spatula.
On a carefully blurred glue, the wall is superimposed. A small strip width will also be on the adjacent wall. From the races you can get rid of a building knife. In the corner of the canvas very carefully pressed against the wall. A spatula is applied to the wall. The flat part it is pressed against the wall and point to the corner. The construction knife repeats the direction of the spatula. A narrow strip, which founded on the adjacent wall, is neatly cut.
Tip! The blot parts of the building knife must be launched in a timely manner to avoid breaks and inaccurate circumcision of wallpaper.
That part of the strip that was cropped, you can put on the move. It is necessary to measure its width, from this value 1-2 cm., To move the dimensions on the wall, outset the vertical line. The perfectly smooth side of the wallpaper panels should lie strictly along the vertical line, and the left edge will fall into the first strip. The sharp blade of the building knife is neatly circumcised surplus, as in the previous stage of work.
If the novice masters, with thought about how to glue the wallpaper in the corners of the room, begin to worry and break their heads, then people who have mastered the simple technique with any wallpaper - whether heavy vinyl or light flieslinic - cope with the same ease and speed. It is worth the work properly to do once - and then she begins to argue.
When repairing an apartment with their own hands, wall decoration with wallpaper is the easiest type of work. Minor difficulties occur only when the battery, a window, door and angle are placed only when it is saved. But if you know simple techniques, then everything can be performed quickly and with high quality. At the same time, the greatest number of secrets lies in the angle stack technology. After all, it can be an external and inner - from here and different solutions. To help beginners - finishing in this article we will analyze in detail how to properly glue the wallpaper in the corners.
For sticking wallpapers in the corners, the following materials and tools will be required (basic materials and tools for work on the walls of the walls, the trellis are listed in the ""):
Putting the corners with wallpaper, it is difficult to ensure that they fit tightly to adjacent walls without folds, air pockets and excessive tension. Blame in this joints of the adjacent walls. They are either uneven, zigzag, if the walls are placed, or donate if the house is panel.
Therefore, an important task is to align the corners before the work on the finishing of the room with wallpaper. Professional builders have several methods for this. The most common are shown below.
Method number 1. To one of the walls is strictly vertically, control is carried out with a plumb, closely applied the rule, and even better - metal profile. Thus, there is the most protruding point of the surface of the adjacent wall.
A corner spatula is applied to the point closely, and the profile is a profile. Again, with the help of a plumb, the profile is given in a strictly vertical position, after which there are 3-4 marks for mounting the dowels on the wall. The perforator drill holes for them, after which the profile brains is mounted on the wall.
The angle is wetted by water, after which a gypsum putty is applied to it. Angular spatula, pressed to the profile, is formed perfectly even angle. Surplus Gypsum are cleaned, the procedure is repeated in the next corner.
After drying the putty, it is processed with zero sandpaper.
Method number 2. For this method, the countercultuary will be needed (plastering corner), which is a metal or plastic corner with a mesh attached to the edges.
It is installed in the corner strictly vertically (helps a plumb or laser level) And attached to the wall putty, applied on the grid. After complete drying, the layer of putty is polished by a special grid or sandpaper.
The above methods of alignment of angles make it possible to solve any disorders of the geometry of the joints of the adjacent walls.
When working with wallpaper, novice finishers will surely meet with pasting inner angles and, possibly, external. The methods of their pasting are different, regardless of whether the paper, vinyl or flieslinic type of the choler is applied.
ATTENTION: In this section, we are talking about monophonic wallpaper that do not require color fit. On how to stick the wallpaper in the corners of the room with a pattern, the conversation will go at the end of the work.
So how to beat the wallpaper in the corners?
In the apartments of modern buildings there are practically no outer corners that you want to have a bit. Exception - window slips, but they are usually painted, and not glue. If you still have to stick outdoor corner, Below we give to help the instructions on how to glue the wallpaper in the corners of the room in this case.
Step by step algorithm of action Next:
When pasting inner cornerThe last lane of the wallpaper should capture the adjacent wall by 2-3 cm. For this, it is given in the size of the width - is measured, and the extra part is cut off. After gluing it, the vertical is watched at a distance of 4-5 mm from the corner on the strip.
This uses a plumb and pencil. The next wobbly sheet is pasted with braziness, strictly along the vertical line. If the seam is weakly visible, on this, the corner becomes ends. Otherwise, a cut is made to remove the parts of the wallpaper pasted on each other and form a seam of jack.
Note that the use of wide, meter wallpaper reduces the number of seams, which speeds up the whole technological processBut sharply complicates work in the corners.
With a relatively small wallowing of the wall, deviation from vertical up to 2 cm, it is possible to docile the wallpaper canvas with a clear geometric pattern so that the seam location can be detected only as a result of a careful study of the seamless wall.
Immediately, we note that the pattern shift is possible, but very insignificant, therefore, and a little careful, if everything is done in accordance with the instructions.
For reference: Wallpaper with different pattern is not needed. They glue along the simplified scheme.
In the materials responsible for how to glue the wallpaper in the corners of the room, there is nothing complicated. Work can be easily done independently.
Each wizard in any field of activity is always their small secrets. It is not an exception and blowing corners with wallpaper. There are also their secrets here.
Fliselin wallpaper is a wallpaper, in the manufacture of which is used non-woven cellulose material Flizelin. In contrast to paper analogues, such wallpapers are perfectly clean, allowed to hide even enough noticeable irregularities of the walls and remain attractive for a long time. appearance. Yes, and the process of sticking phlizelin wallpaper is quite simple - the material is quite obedient, not "tightened" or horizontally, nor vertically and practically neither gives "bubbles". And even in such "problem" places. As external and internal angles, flieslinic wallpapers are glued without any problems - for this, when sticking, it suffices to comply with some simple rules.
The first thing to be to say about the sticking of phlizelin wallpapers in the corners (both external and internal), - You can not try to salary the corner of the solid web wallpaper. In other words, do not try to overlap with one cannol, both adjacent to the corner of the wall. Otherwise, it is quite great that the wallpaper will "behave" in the corner, and the resulting folds will be almost impossible to smooth out without trimming, which will certainly spoil the appearance of the wallpaper. But even if this does not happen, the curvature of the angle (and most of the corners in our apartments in our apartments) will reflect on the location of the web, and since the flieslinic wallpaper is glued "online", all of the following canvas will also have to be glued at the level.
Proper technology of fliseline wallpapers for internal angles is as follows:
Since the angle can be a curve, then the distance is better to spend at three points: bottom, in the middle and above the wall. For calculations, naturally, you need to take the largest of the resulting values.
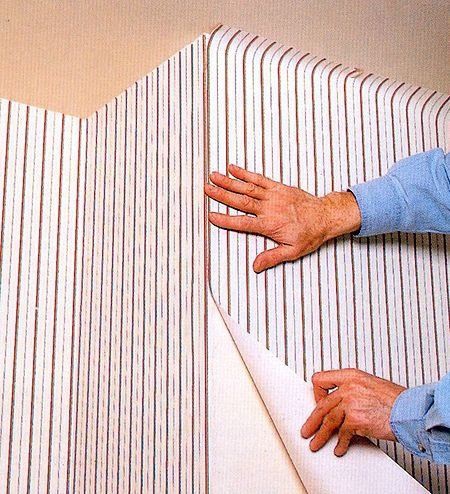
 With the help of a rubber roller or a dry cloth, smooth the wallpaper in the corner and on the next wall
 If the wallpaper in some places "frozen" can make several horizontal cuts at a distance of 5-10 centimeters from each other.
Note that it is necessary to glue this fabric to the previous cloth.
It is very important at the same time "in one reception" cutting over both wallpapers, since otherwise discrepancies in the section of the section may appear.
In order for incision to be smooth and wallpaper under the knife "did not stretch"? It is necessary to periodically dismiss the fastened tip of the wallpaper knife according to the label specifically applied on the blade.
If you are all done correctly, the panels form a practically imperceptible junction, which will remain thoroughly smooth using a rubber roller.
Outdoor or external angle are not found in all rooms, but, nevertheless, they can be found quite often. The technology of stickers of phlizelin wallpaper on such angles is practically no different from the method of pasting the angles of internal.
 The external angle paste technology is almost no different from the method of pasting internal angles.
 The first thing I measure the distance to the angle from the Far Pathnod, and we prepare a new sheet of wallpapers in such a way that after the stickers they "wrapped" with an angle of no more than 5 centimeters. From the closure closest to the corner, measure the distance for sticking the next web (roll width minus 1 centimeter). Adhesive the "Vangest" canopy to the resulting breakthrough, after which we produce a cutting seam with a bulletin knife and removing unnecessary parts of the wallpaper.
If the outer angle is quite smooth (it is possible to determine this using a plumb)) you can try to crack it with "one web". But note that the divergence of the level in this case should not exceed 0.2-0.4 centimeters. Otherwise, it is better to glue the phlizelin wallpaper according to the technology described above.
As you can see, there is nothing complicated in the fall of the corners of the corners, so after a short practice you can cope with this work. Good luck to you!
Flizelin wallpaper - Excellent finishing option building material, combining practicality, convenience and beauty. In the process of stickers such wallpapers, special attention should be paid to how glue fliesline wallpaper in the corners is exactly. Casting such material has a number of features that need to be considered when working. For example, in order to break the flieslinic scenery, a special flazelin-based adhesive is used. Also, phlizelin wallpaper do not require glue to the canvas itself, in addition, this species Finishing material does not give a shrinkage when working. Basically, their stagnation is carried out (with the exception of external).
Wallpaper sticking circuit in corners.
So, in order to shove the fliesline scenery, the following tools and materials are needed:

Fliseline wallpaper shock scheme.
It should be noted that there is one optimal and correct method, prompting how to glue the corners with phlizelin wallpaper. Before pasting the wall of the inner corner, it should be appropriately prepared: an old coating was removed, plastering works (if necessary), the walls are aligned, the primer is applied, etc. The glue must be prepared according to the instructions immediately before use.
In addition, the wall markup is made: with building level There is a straight vertical line at a distance equal to the width with a deduction of 1-1.5 cm. If the pasting starts not from the edge of the inner joint, then the web is cut off, the width of which is equal to the distance from the junction to the rib with the addition of 1-1.5 See. It should be noted that optimal option - This is a way in which each side of the inner angle is covered with a separate cloth. To do this, apply glue with a roller on the wall part of the wall. The area of \u200b\u200bapplication should correspond to the area of \u200b\u200bthe canvas that will be stuck.
Also additionally should be applied to the brush to apply another layer of glue through the edge itself, along the upper boundary of the wall and below, directly at the plinth.
Prepared by the web (with a 1-2 cm in length) is applied, starting from above, to the wall treated with glue, and strokes the construction spatula in the direction from top to bottom and from the center to the edges. Thus, the removal of surplus is carried out. At the same time, the left or right edge of the canvas (depending on which part of the parties is coincided with a previously applied markup line. Surplus are removed as follows: Starting from above, close to the past wall, a metal spatula of 350 mm long (with smooth walls) is applied or a length of 150 mm (in the case of uneven walls), then excessive cutting knife is removed by a knife with a knife blade along Metal plane spatula.
It should be noted that the blade knife for cutting should be sharp in order to avoid the appearance of defects when removing residues. Similarly, pasting the second part of the inner joint is performed. As a result, the edge of the cloth is obtained through the edge. Of course, if no angle is selected for the point of counting point, it is not an angle, but another landmark, then a variant of pasting is possible part of the canvas with the corresponding width with a deduction of 1-1.5 cm.
The trimming of surplus is carried out using a knife and spatula.
The joints on the horizontal surface after gluing are processed by a quadrup roller.
All of the above preparatory operations are carried out for pasting external corners: alignment of walls, glue preparation, etc. It is preferable that on the outer corner it was just a whole canvas. This variant of pasting is suitable for smooth external junctions that need to be glued taking into account the selection of the picture.
In the event that the whole cloth in the process of conducting the room passes is not turned out to be glued, then the outer angle is covered with a wall-mounted cloth so that the backstage is 1.5-2 cm. The other side is covered with a whole web, while the edge of the cloth is glued on the edge. This option is most preferable if the material is intended for painting, which will allow you to hide pasting defects. However, this option is not suitable for wallpapers that need to be glued taking into account the selection of the picture.
July 11, 2017First of all, let's look at how to glue wallpaper is not necessary. Most often, newcomers can see the following errors:

Quickly and simply align the outer joints of the walls will help plaster corners. When installing, they align in level, after which they are glued with plaster or putty. The price of corners begins from 30 rubles 2 meters.

The exceptions are paper canvases that can be cut vertically. The only thing in this case is to pre-at the wall of the walls you need to stick a thin strip of wallpaper in case if the joints disperse;

Newcomers are often interested - from which angle to start glue the wallpaper? If all of them are smooth, then it does not matter where you start shook. Otherwise, begin to glue with an even angle to avoid the skewers on the walls.
As you know, the corners are two types:

Each of their type requires its approach when pasting, so further separately consider the process of sticking wallpaper on the external and internal angles.
The sticker instruction looks like this:
| Illustrations | Description of action |
 |
Preparation of the surface.Newbies often carry out the grinding of the walls with their own hands only with the help of a roller, however, as in the case of glue, this tool is difficult to handle the corners. Therefore, after the progress of the walls, it is necessary to "walk" inaccessible places brush. |
 |
Applying glue. If the flieslinic wallpaper is glued, as mentioned above, the glue is applied onto the walls, not a canvas. |
 |
Gluing.
|
On this stick completed.
Now consider how to stick this finishing material On the exterior joints of the walls:
| Illustrations | Description of action |
 |
Preparation of the surface.As in the previous case, the surface must be projected and apply glue if the vinyl cannons on the flieslinic basis. |
 |
Print:
If the wallpaper with a pattern, with such a small break, it is possible to prevent the edge trimming of the second web to dock the pattern. |
Many people are interested in how to protect the wallpaper on outdoor corners? For these purposes there are special decorative cornerswhich are pasted on top of the finish.


