In the construction of small private banks today, few strictly adhere to the canons of their traditional construction. Sometimes the boundaries between different types baths are so blurred that it is already difficult to unambiguously determine its type. It is not blind adherence to standards that takes the upper hand, but the creation of a comfortable, individualized and often multifunctional structure. More than half of all baths are now equipped with universal steam rooms, in which you can carry out procedures with both "wet" steam, like Russian baths, and with "dry" steam. Finnish saunas... But for whipping with a broom or washing in the neighborhood through the wall, soap (washing) ones are provided. They can be equipped with massage beds, regular and shock showers, washstands, hot tubs, and even small pools. Such a functional layout raises a number of questions about how to make a floor in a bathhouse sink, of one or another workable design.
The washroom is the kingdom of water. After all, here it is found everywhere in the form of spills, streams and splashes. Therefore, regardless of whether there are local drain receivers near each of the plumbing fixtures or not, the floor of the room acts as an element sewer system... It can completely collect and drain spilled liquid or supplement the drain making it easier to maintain cleanliness. However, in any case, a properly installed floor in a washing bath must meet the following requirements:
In addition, according to construction requirements, the washing department should have a floor level lower by 20-30 mm relative to the coatings in non-humidified adjacent rooms.

It represents the most practical and durable structure, capable of playing the role of both an independent tiled floor and a base for leaking or non-leaking modern-type flooring made of planks. ... The arrangement of floors in a bath in a washing compartment made of concrete with a surface exposed to direct use must fully comply with all the requirements described above. Moreover, for each item on the list, there is some variability in the choice of the method of their implementation.
To collect Wastewater the floor surface in the soap compartment is equipped with a slope towards the receiving unit of the sewer system. Building codes this value is set at 0.01-0.015%. That is, after completion finishing slabs of concrete floors, the levels of the facing forming surfaces should have a deviation from the horizontal of 10-15 mm per 1 m. The grids of trap-type siphons act as receiving nodes for tiled coatings. They should be positioned so that neither they, nor water flows to them, cross the main and side passages.
Important! The floor in the washing bath is equipped with a ladder, proceeding, first of all, not from the form factor or the design of its lattice (round, square, elongated rectangular), but the throughput of the device. The performance of a plumbing fixture largely depends on the diameter of its release, which are made according to the standards of sizes 52, 62 and 90 mm. This factor should be taken into account so as not to stand in the shower ankle-deep in dirty water.
From the drainage receiving unit, the floor is discharged into the washing water through the sewer pipes outside the sauna building. For their disposal, especially with intensive operation of the bath, it is advisable to make a separate drive, drain pit or septic tank, and not to load general sanitary facilities. For more details about the construction of such systems for private users, see the section "".

When assembling a concrete floor in a washing bath with your own hands from the zero stage of construction, you should not neglect measures to reduce heat transfer through the ceiling. Concrete and tiles have a fairly high thermal conductivity, so if you do not take appropriate measures to insulate them, then in winter it will pull cold on your legs. Neither the use of wooden gratings nor powerful heating in the room can resist such discomfort.
The creation of a warm floor slab can be implemented in the following directions:
In terms of heating the flooring, the bath in the bath is not too different from any other household premises. You can read more about the installation of a water underfloor heating system, and about electric heating. However, when choosing a heating method, two important points should be taken into account:

Regardless of whether heated underfloor heating is assembled in a bathhouse in a washing room or not, concrete bases are insulated and waterproofed. The method of practical implementation of thermal hydroprotection is selected depending on the position of the overlap relative to the ground. The slab can be placed directly on the ground preparation or on the joists. Insulation of a concrete floor on the ground was discussed in detail in the article: "". At the same time, it is no different from creating a similar design in the soap compartment.
In the case when the bath box is placed on pillars, often, beam schemes (beams, logs) are used for floor overlaps in all rooms, equipping them with leaking or non-leaking planks. But sometimes, with a similar supporting structure, it is necessary to assemble the floor in a monolithic type washroom, for example, to lay ceramic tiles or install effective system heating the coating. Its schematic structure is shown in the figure below.

Logs and all other lumber are used only from well-dried wood, treated at least 2-3 times with antiseptic and hydrophobic impregnations.

Important! Only with this integrated approach heat and waterproofing of floors in a washing bath can provide you with the comfort of using the structure, as well as the long-term preservation of construction and finishing materials.
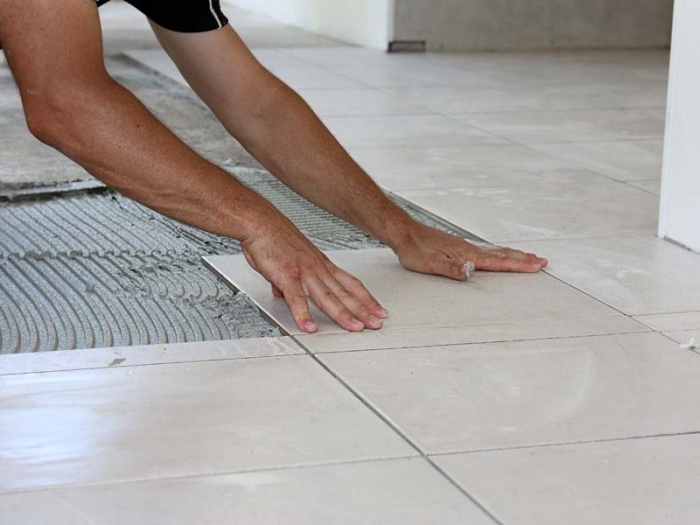
Construction requirements prescribe that floor coverings in rooms with wet operation should be made of hydrophobic materials with a corrugated surface. However, in practice, the number of critical parameters taken into account for floors in sinks is much wider. It also includes convenience, safety and comfort of use, resistance to water and temperature gradients, aesthetic perception. For the most part, all these characteristics are possessed by ceramic cladding with a profile set of properties. And if the bath in a tile bath is complemented by light removable lattices made of wooden slats, then the most practical floor covering is obtained. After all, the main decoration will be made of ceramics, which has an almost unlimited service life. The grates will ensure the safety of movement, will not interfere with cleaning, since they can always be lifted and taken out for drying.

The finishing of the bathhouse with floor tiles will only be done correctly when they are selected and installed in accordance with the specific operating conditions. It should be borne in mind that the tiles must be:
It is recommended to treat the concrete slab with penetrating cement compositions before gluing the ceramic material. They include components capable of penetrating deep into the porous mineral structure and completely sealing its capillary channels. As a result, the concrete surface becomes a reliable barrier to the migration of droplet liquid.
The tiles on the floor of the washing compartment must be placed on moisture-resistant adhesive mixtures. When using glue, one should also take into account the temperature loads on the reinforced concrete base and its decorative coating... For irregularly heated rooms, as well as ceilings with underfloor heating systems, an appropriate adhesive mixture of increased elasticity is selected that can withstand thermal deformations.

Traditionally, washing in wooden bath, namely, such buildings are still massively erected in Russia, equipped with plank floors. And, despite the fact that they are now seriously competing with concrete structures, lined ceramic tiles as more durable, wood flooring is still relevant. The arrangement of floors in the bathhouse in the washing compartment based on sawn timber can be leaky and leakproof.
The construction of a ceiling of this type can in fact be considered the same age as the emergence of the entire technology for the construction of baths. Today it has undergone some improvements, but its basic functional principles have remained unchanged. With its working coating, the pouring floor in the bath still has a surface made of boards, which are installed with drainage gaps. In the classical version, seeping into these cracks, water is absorbed directly into the soil or concentrated in an absorption pit, where it subsequently also goes into the ground. Now, under the boardwalks, concrete drainage surfaces with slopes are predominantly created, along which the liquid flows to the receiving unit of the sewer system.
It should be noted that there are also intermediate solutions, between the most primitive waste disposal method and the modern one. So, instead of concrete surfaces carefully compacted fatty clay is used, or drainage is carried out not just into the soil, but into a crushed stone pillow. The use of beddings made of clay and crushed stone, of course, significantly reduces the cost and speeds up the device washing in the bath, however, it has nothing to do with the concept of modern approaches to this issue. It is quite difficult to provide thermal comfort with such a scheme for arranging floors in a sink, as well as a feeling of freshness - in such a room there will almost always be a damp smell.

V simple version pouring decks are assembled quickly enough. Their bearing structures made on a log, guided by the choice of lumber in a similar installation. Finishing board sheathing is not insulated, but its packing is carried out with gaps between adjacent lamellas ≈10 mm. Leaving the drainage gaps too wide is not worth it, otherwise they will create problems when moving. If the boards are fastened too tightly, then, swelling under the influence of moisture, they can completely close together.
When assembling the pouring floor in the bath with your own hands, use nails to fix the flooring. Gradually, even taking into account the most effective hydrophobic treatment, the wood of the covering will become unusable, its lamellas will have to be replaced with new ones. Unscrewing a self-tapping screw after several years of being in raw material is an unrealistic task. If the floorboard was fastened with a nail, then it can always be easily pryed off and torn off from the support beam.
Important! When hammering in nails, their caps must be sunk into the material, and the formed depressions must be putty with moisture-resistant target compounds.
Arranging under the pouring floor concrete base, adopt the principles of water disposal organization described above. That is, observing the slopes, installing the sewerage receiving unit and, further, the entire waste disposal system. Instead of plumbing ladder, sometimes a rubber ball is used. When it floats up, it lets the liquid into the sewer, and when there is no inflow, it lays down on the hole in the drain funnel and blocks the reverse draft of cold air from the sewer pipe.

To ensure the thermal comfort of those who were washed in the bath, the durability of the structure of the wooden floor, they also resort to the following measures:
Produce high-quality leak-proof wood flooring the floor in the washing bath is a rather difficult task, since an almost perfect fit of the finishing board elements is required, as well as a 100% guarantee of the reliability of the waterproofing layer under it. However, general principles floor slab devices are identical, except for the following structural differences:
Regardless of the floor design you choose, the installation of a high-performance ventilation system is mandatory in the room. But in addition, the bath room should be additionally dried after each cycle of hygiene procedures - it is recommended to ventilate it by short-term opening of doors and windows. All this will extend the service life of not only the floors, but also other building elements of the building.
The fact that the floor would be cold had to be foreseen even at the stage of the construction of the bath. Therefore, if you wanted to make a leaking floor, then it was necessary to insulate well the foundation and the underground space. What can be done now?
If you do this right now, then the best, in my opinion, option is to make the floor not leaking. To do this, you must first disassemble the floorboards. If the floor beams are made of wood, then fill the subfloor bars along the bottom of the beams. Then lay sub-floor boards or boards on them to cover the underfloor space. Lay mineral wool mats on the boards at the height of the beams. Cover everything on top with a film or a hydro-barrier in two layers. Then tuck the floorboards of the finished floor tightly into the tongue to prevent water leakage. Make a drain hole in the floor through which water will drain onto the concrete trough. And be sure to make the floor slope towards the drain hole.
 The second option of a non-leaking floor is also possible: a warm water floor. The leaking floor must be covered with a solid board on top, it can even be unedged. Then cover the film or hydrobayer in two layers. On the boards to do concrete screed, in which to lay the pipes of the warm floor. Top the whole cake or with porcelain stoneware. Underfloor heating should be carried out from the existing stove or put another stove in the rest room. But even on a warm floor, it is still advisable to put wooden ladders on top to make it more pleasant to walk with bare feet.
Available  and the third option for insulation. Leave the floor leaking, but insulate the underfloor space. To do this, disassemble the floor, remove the concrete trough, deepen the earth inside the foundation by 30 - 40 cm. Make a sand pillow, spill it well, tamp it. Then lay sheets of polystyrene with a thickness of at least 10 cm.Cover on top with two layers of film or hydro-barrier. And pour a concrete screed on top, in which to make a depression for draining the water. It is imperative to provide a slope of the screed towards the drain. It is also advisable to insulate the walls of the foundation with polystyrene (or expanded polystyrene), which must be pre-waterproofed.
Which option to choose is up to you.
The design of a modern bath provides for the presence of several rooms: a steam room, a dressing room, a rest room, a shower (washroom). The bath room is of particular importance, everything should be as comfortable and functional as possible.
The main feature of this room is the active use of water. That is why the arrangement of floors and drainage is of particular importance here.
The floors in the wash bath must meet several basic requirements:
Washroom floors must be water permeable and dry quickly. It is important that the cover is warm so that you can walk on it without shoes. Changes in temperature and high humidity can provoke the formation of mold and mildew, so the floor covering must be resistant to these processes.

There are several options for arranging floors in the washing room. The covering can be: concrete with ceramic tiles, wooden with a lattice, solid with water outlet.
In public baths and saunas, the floors are often made of concrete, using a glass wool insulation system. Small home baths usually have softwood flooring. Larch has proven itself especially well.
For the device of wooden floors between the logs for insulation, it is laid mineral wool... Planks are used for flooring, they are covered with a polyethylene sheet with high edges and a drain hole.
Wooden floors in the washroom are easy to install and cost-effective, but they are not durable.
The concrete-ceramic floor covering will not be as warm, but it will last for several decades.

Tile flooring has a number of undeniable advantages:
The disadvantage of the ceramic coating in the bath is its fragility. If a glass shampoo bottle or metal basin falls into the washbasin, the tile may crack. Experts recommend making a small margin when buying tiles for subsequent repairs.
Owners of a home bath, which is heated once a week, should take into account that it is rather difficult to heat the bath in winter so that the ceramic floor in the washing room is warmed up. To solve this problem, you can apply the technology of "warm floor" or cover the floors in winter with rubber mats.

The quality of water drainage from the washroom depends on the correct concreting of the floor. For these purposes, the floor must be filled with a slope for drainage and a water receiver connected to the sewer pipe must be provided. Considering that in the future the floor will be covered with tiles, it is necessary to provide for its insulation.
At the point of water drainage, a water seal will be required so that odors from the sewage system do not enter the room, and there is no draft.
Stages of concreting the floor in the washroom:

With strict adherence to this technology, the floors in the washroom, covered with tiles, will not be icy. The screed surface will quickly warm up and retain heat for a long time. Water at correct slope will be able to completely leave, and the water seal will prevent the appearance of extraneous odors.
Important! Slope on concrete floors mounted from the moment of pouring.
In order to be able to walk barefoot on the tiled floor, a "warm floor" system is installed. This design will save on heating the bath room. Any type of floor heating is suitable for a washing bath: infrared, water or electric. The heating system is installed directly under the floor tiles.

For your information! Underfloor heating is ineffective with a wooden floor covering. Wood conducts heat poorly and retains it, preventing it from entering the room.
The most economical is the underfloor heating, based on water heating pipes, which are heated by sauna stove simultaneously heating water for the washing room. The thickness of the filling of such a floor must correspond to the thickness of the heating pipes.
The optimum angle of inclination of the floor in the washroom is 1: 100 to the center of the room. A ladder is installed in the center for arranging a drain in sewer pipe... Alternative drainage points can be at the entrance or in the corner.
To maintain the slope when pouring the floor, beacon cords are installed. The easiest way is to tilt towards the center of the room. For other options, the "envelope" fill is used:

For work, you will need the following materials: floor tiles, limiters-crosses for even joints between the coating elements, specialized waterproof tile adhesive, waterproof grout for joints.
Styling tools:

Facing the floor in the washing bath with ceramic tiles has some features:
The procedure for facing;
The bathhouse is a room with specific requirements, so it is important to choose the right tiles for the flooring. Floor tiles it can be glazed, double-fired, and unglazed. In the first case, the material is resistant to sudden temperature changes.
What you should pay attention to when buying material:

From misses in construction works no one is insured, especially if they get down to business home master... It is worth learning from the experience of others and avoiding major mistakes:
Even at the planning stage of the bath, I wanted it to become as comfortable as possible. So that no trifle interferes with enjoying the bath procedures. And I understood that the floor in the bath is not the last detail. I clearly did not want to see damp, rotting floors with fungi and mold spreading in the corners in my bathhouse. And I also thought that it would be nice if it was warm in the washing section, where you go to rinse yourself after the heat of the steam room. Therefore, I decided to make the floors in this part of the bath warm, that is, to lay a heating cable in the top layer of the floor screed.
The stages of installing a warm floor with waterproofing are as follows:
I want to make a reservation right away that I made the floors right on top of the ground - inside strip foundation... In principle, for baths, strip or columnar foundations are most often made, where the floor is originally a soil covering.
So, first we remove the fertile soil layer, preferably up to clay, that is, 15-20 cm. Pour sand into the resulting hole and lay the drain pipe. Make sure that the drain pipe has a water seal, otherwise the odors in the sink will still be there! Also, be sure to provide for the presence of a plug with which you could close the pipe outlet in winter.
The sandy pad should be spilled with water and tamped down thoroughly.
A layer of insulation should be laid on the sand pillow - I used roofing material, a dense film is also suitable. In no case, do not try to put roofing material under a sandy pillow, because inside the "pie" you will get a swamp, and this threatens with cracks and breaks in the floor.
On a layer of roofing material, I laid out sheets of EPS (extruded polystyrene foam) 50 mm thick. You can replace them with foam, but it should be more thick - at least 100mm. Insulating sheets will keep the heat coming from the underfloor heating cable, which we will put above. This means that the cable will not heat the ground, but will direct the energy in the right direction, that is, up to the floor covering.
Lay out on sheets of PPP or polystyrene reinforcing mesh for rigidity and on top, pour concrete with a layer of 7-10 cm. It turns out that a reinforced concrete slab will lie on the thermal insulation layer.
After the concrete has hardened, you can start leveling the surface cement screed 30-50mm thick. Incidentally, the screed should not be even. In order for water to flow freely over the surface to drain, provide a screed slope of about 1 cm per 1 running meter. We put it under the screed electrical cable warm floor.
Finishing layer flooring in my bath is porcelain stoneware tiles. I chose porcelain stoneware because of its special strength and frost resistance, as well as resistance to temperature extremes. In general, I am sure that my tile will not burst if I decide to heat the bath on a frosty day.
As for the surface of the tile, it must be rough - this is a prerequisite for your safety. Although, soapy water will still do its job and even such a rough surface can be slippery. In this case, place wooden grates made from beams on the floor. They can be dried after each visit to the bath, so they will serve for a very long time.
Flanging is necessary so that water during the washing process does not flow under the lower crown of the log house and does not lead to rotting of the wooden walls of the bath. However, flanging must be done in any case, even if the bath is brick, so that water does not fall directly on the walls.
I made a flanging with a height of a tile - this is the most optimal. You can make the base higher, but there is no particular sense in this.
First to wooden walls baths, we fix several bars with a thickness of 2-3 cm to ensure a ventilation gap. It is necessary so that the space between the wall of the bath and the inner surface of the flange can dry out during the period between washing. We fix the bars vertically along the height of the future base. We fix pieces of DSP or moisture-resistant drywall to the bars, and then we glue the tiles on them. We seal the joint between the flange and the floor with a sealant so that water does not flow out of the resulting "trough". Everything tile seams we also coat with a sealant to retain moisture. The base is covered with tiles from above so that water does not get behind the wall of the base.
Now you can splash around in the sink and pour water on the floor to the height of a whole tile! And the water won't seep out!
The floor design proposed by me, firstly, does not absorb moisture and does not cause an unpleasant odor in the sink, secondly, it is as hygienic as possible, thanks to the ceramic granite tiles, and, thirdly, it additionally warms the room with the energy of an electric cable.
Hope my advice is helpful.
Sincerely, Vladimir
An important part of any Russian bath is the washing room. It is here that the hosts and their guests spend their time relaxing after the next visit. And it is here that there is always a lot of water, which means that special requirements are imposed on the elements of this room. This is especially true for the floor. After all, he must ensure the drainage of water and at the same time withstand its harmful effects for a long time. In this article, we will just talk about how to make floors in a bathhouse sink with your own hands.
There are always special conditions in this part of the bath. Firstly, it is always here high humidity... Secondly, in the observed sharp drops temperature. The user can enter and leave adjacent rooms, visit the steam room. During this time, cold or hot air enters the sink.
All these factors can spoil even the main floor in a short time. To prevent this from happening or to happen as late as possible, the following characteristics should be taken into account during construction:

Considering all these factors, you can start choosing the material used and the floor structure itself. In this regard, three main options can be considered:
Which option to choose will depend on you. Wood can be more expensive concrete structures... And the latter are more labor-intensive during construction, and it can take a lot of time. The concrete screed does not gain full strength until after 4 weeks.

Now let's talk about how to make a concrete floor in a washing bath. This method will require physical effort from you, but it is done quite simply and quickly. The progress of work itself will look like this:

Note! Since concrete, even with insulation, still remains cold, many bath owners are satisfied with and. It is better to use water heating in the washing room. Since it will be constantly humid here, it is undesirable to use electric heating elements.

It is this type of flooring that can be most often found in the bathhouse and in the washing room today. The tree has an attractive appearance, it is warm and gives off a smell when heated, which creates a pleasant atmosphere.
Before starting work, it is worth deciding on the type of floor. You can make two varieties of it with your own hands:
Note! The most the best option a leak-proof design is considered. It does not create drafts, which means the floors will be warm. For greater effect in the underfloor space, you can lay insulation, protected by a layer of waterproofing.

When erecting a non-leaking wooden floor, the following work must be performed:

If you do not want to build such a complex "cake", you can simplify the task and build a leaking floor. First of all, it is worth deciding where the water will flow. If the soil under the bath is sandy, then you can simply dig a hole and strengthen its walls. In the case when the soil at the site does not allow water to pass through well, it is necessary to build a water intake to drain the wastewater. You can make a concrete screed with a slope or place a metal pallet.
The process of building a leaky floor does not take long and does not require a lot of building skills from you. First of all, as in the previous case, lags are laid. Then boards are nailed to them. At the same time, a space of 6–8 mm is left between them, so that water can freely and quickly penetrate into the underground space.

Note! In order for the tree to serve as long as possible, it must first be d.
It is worth remembering that the leaking floors are quite cold, because there is no insulation under them and the wind “walks” freely. To somehow reduce this effect, it is necessary to insulate the basement of the bath. Make sure that the wind does not fall into the underground space.
In this video, you will find answers to questions about the floor in the bath:


