Breeding colors, for most owners, is a very exciting occupation. A small fooling gradually develops into a large hobby, filling itself all the free space. Well, if the living area allows you to highlight the necessary territory to create a green oasis. But how to be with this spoil, to which there is no room on the windowsill, not to put on the closet, the table is busy, and on the floor among large vases it will simply be lost.
The solution, such a global problem, becomes the floor and wall shelves. Modern market It offers a wide range of finished designs. Variety of forms, structures and color decorations Amazing imagination and has no boundaries. However, made by their own hands, the shelves for flowers become unique designer decision And make an unusual atmosphere in the interior.

Before you take for work, you need to create an exemplary layout plan, based on which the dimensions and features of future shelves will be determined. Depending on the type of plants, two main options use:
The number of vases located on the selected structures, also divides them into several types:
All the proposed options can be constructed in the form of angular shelves, so you will get save space and additional features For designer innovation. Lovers of liana plants are offered to consideration ceiling shelves.
For the present invention of floral racks, you can choose and combine a wide variety of materials. Very often, many stop their choice on the tree. Despite environmental friendliness and versatility to use, do not forget that at hand you can always find other interesting options that have its advantages. Some of them we will look more in more detail.
Plywood is probably the easiest and cheap MaterialFrom which floral shelves are obtained in various shapes and sizes. If there was no plywood sheet in the house, a small amount of funds leaves for its acquisition. The process of creating a shelf of plywood is not complicated. In the presence of the necessary tools, the task set in a short time will turn into a work of art.
At the beginning, you need to make a sketch. Here you can show unlimited fantasy. The main thing is that the design obtained in the outcome corresponded to the initial purpose was durable and kept the intended number of pots.
When the canvas is ready, the edges of the spike are cleaned with sandpaper and the holes for future fastening are done. The entire surface is covered with a special solution, due to which the moisture resistance increases and the appearance of mold is prevented. After drying, the shelf opened with varnish.
Creative parts can be demonstrated by their talents, decorating the product with drawings, plane pebbles or shells, to show creative.
For consolidation wall-mounted options The plywood shelves use metal corners or brackets, at the expense of which they attached directly on the wall.
The most common place is the placement of flowers to the room - the windowsill. Using such a plastic canvas, floral racks are created. You can buy it almost in any construction store or order at the manufacturer's factory.
For the design, you will need several nickel-plated pipes, fasteners, flanges for fastening to the floor and a pair of brackets, do not forget about the necessary tools for work.
After the measurements made, they make a cut side of the window sill on the desired length. Next action Drilling holes for pipes, two along the edges, it is important that they are parallel to each other, and one in the center. The length of the pipes should be the same, otherwise the design will be unreliable and riding. Fastened collected Stellazh With the help of ceiling brackets and flanges for the floor.
The advantages of plastic racks are durability, they are not afraid of moisture, they are easy to care for them.
To create an angular shelf, you can use all the materials specified here. For small products there will be enough remnants of materials.
The technology of creating angular shelves is very simple. From the sheet chipboard cuts the desired surface size. In the prepared holes, the galvanized pipe and the entire invention combines the flanges. Using brackets is fixed on the selected surface.
The next stage is a treatment with varnish or paint.
To create a green corner, interesting decision There will be a kind of angular rack. As the shelf increases, it is reduced by representing a pyramid. On this design, the flowers can be placed in different sizes using curly plants on the sides.
Tree is one of the most reliable materials used in construction. Properly assembled and fixed wooden racks or shelves adapt under any number of plants, regardless of the size. In the choice of wall-mounted wooden shelves, it can be limited to the most simple option. For this, the necessary length of the bar is taken, is covered with varnish or paint and fastened with metal corners to the wall. If you replace the attachments with leather straps will be a creative designer approach, contributing to individuality.
For plants in large vases, wooden floor racks are manufactured. They are withstanding a lot of weight, allowing you to combine different types flowers.
From trimming, even if the angular shelf is easily assembled easily. Blooming bushes diversify the boring life of the corners, with their bright colors.
For lovers unusual options Offered for consideration wooden shelves, combining several different materials.
The method of assembling wooden shelves or racks is the same as in the version with plywood.
Combining materials for flower shelves, we advise you to choose a combination of metal - wood. Cooked metal carcass from wooden flooring Used for wall types of shelves and very harmonious fits into the modern interior.
For the manufacture, you will need a drawing with measurements, several rods, which will further create the base of the shelf, and a wooden board for the partition. After welding the main part, it must be treated with an anti-corrosion solution and paint into the selected color. Then the prepared wooden plate is installed, the finished product is attached to the wall using self-tapping screws.
Considering such a combination of materials in outdoor options Flower racks, basic work is made by the same plan. Preference is given to options in several tiers, and writhing floral stands will fall to taste to taste.
The main location of the glass shelves usually falls in the window space. On such shelves, all plants will receive the necessary portion of light. Preparing to work, you need to choose the right glass thickness. Optimal option 0.5 cm. Protecting the bottom of the tree, such a design with ease will end up to ten small pots with flowers.
If the handling with a glass cutter causes some difficulties, it is better to seek help to know the masters. By providing the desired dimensions, they will easily fulfill your task.
In addition to glasses, iron corners will be needed, with which rails are attached. Top on the rails put shelves.
An important value is attached to the competent location of flower racks and shelves. Observing a number of uncomplicated councils, harmony is achieved between the green space and the atmosphere of housing:
The use of floral shelves is not limited to the inside of the room. Houses, apartments having balconies or loggias accommodate whole greenhouses. Owners of household plots create incredible compositions on the territory. As racks use renovated stairs, bicycles and cars. Teapots, watering cans and other old utensils can serve as a suspended shelf. Such green corners become one whole with owners, and designed personnel racks and regiments for plants an integral part of a small flower paradise.
Shelves on the window: ideas for indoor flowers, dishes and triflesThis way of decor windows - original solution In the case when you have windows that are not fundamentally open due to the specific frame design. However, such windows can only be opened partially. You can "beat" such windows with the help of shelves, decorate which you can taste - indoor plants, dishes or compositions from small decor.
Besides decorative effectSuch a decision can have a fairly practical sense: hide an unsightly view from the window or "disguise" a room from curious views, if you live on the first floor.
If there is a lot of indoor colors in your house, - this window can be turned into a real winter Gardenwhere plants will be very comfortable.
If such windows are available in the kitchen or dining room, the shelves for dishes can be suspended. Especially spectacular - with vintage products or if you like to admire smooth white porcelain.
However, do not forget: if such a window is the only one in this room, do not overload the shelves with the contents so that the natural light is in sufficient.
shelves on the window for room colors:
Kevin Lee Jacobs Gardening Connoisseume Blog on Color and Landscape, shows how such shelves on the window and changes in the composition may look like this:
1.
2.
3.
4.
5.
6.
glass shelves for plants on the window:
The most "light" (thanks to the transparency of the glass) and for this reason - the most popular solution. Such shelves for indoor plants You can consolidate B. window noise With the help of ordinary "tukanov" (sheets for glass) or - on remote brackets that are suitable for glass shelves.
Optimal safety option is a collection of small plants. If the deaf window has a width of more than 60-70 cm, it is preferable to choose other shelves material, also for security reasons.
7.
8.
9.
10.
11.
12.
13.
14.
15.
shelves from chipboard and wooden:
Any brackets are suitable here, and there are much more ways: in the opening, to the walls around the window, to the ends of the hinged cabinets (if it comes to the kitchen) or even to the window frame, if it is wooden. The severity of the pots and the width of the window no longer has such a value as in the case of glass shelves.
16.
17.
18.
19.
20.
21.
shelves made of metal:
Such shelves can be found in the "kitchen" or "for the bathroom" departments. The only requirement - they should be resistant to moisture, as excess water in the pallet during irrigation - inevitability.
22.
23.
24.
shelves on the window for dishes and displays:
This idea, as a rule, like those who are fascinated by 2 solutions: (1) Open shelves + (2) Dining room dishes. If you have a deaf window in your kitchen, we safely implement this non-standard move.
25.
26.
27.
28.
29.
30.
31.
32.
33.
34.
35.
36.
displays for beautiful stuffings:
If you do not want to be limited only to dishes or only by plants, create an interesting composition on the shelves suspended to the deaf window.
37.
38.
39.
40.
41.
42.
43.
44.
45.
several windows in one line:
If there are several windows "in a row" on one wall, - try setting long shelves or connect a few in a single design.
46.
47.
48.
others creative ideas for shelves on the window:
Winter garden will be more impressive if you use the windowsill. On the "remote" window design, you can create a semblance of greenhouse. If there are other windows in the room, the winter garden can be arranged on a wide one. So that the pots do not fall because of the curiosity of the cat, stretch along the shelf rope or fishing line.
If you prefer the blinds, - they can be attached to the slope, and the shelves are "tied" to the wall. Want the curtains certainly - attach the cornice from the bottom side of the shelf. Two adjacent deaf windows can be issued with a single composition of the shelves.
If you are looking for super-original solutions - pay attention to 2 latest photos in this section: Rear walls are removed from mounted kitchen cabinets. And then the cabinets are suspended above the window. As a result, an interesting "Aquarium Effect" is born: you can see not only dishes on glass shelvesBut the landscape outside the window, while all this is perfectly protected from dust. And if you still add an internal illumination of the cabinet, - the spectacle will be incredible!
49.
50.
51.
52.
53.
54.
55.
56.
57.
shelves on the suspension:
And the shelves (or the shelf module) can be suspended on the rope - to the upper slope or on remote brackets attached to the wall - similar to those used for flower baskets on the terrace.
58.
59.
60.
in details:
And one more implementation in details are the shelves on the window for the smallest box + the way to hang curtains.
61.
62.
63.
What hostess do not want the view of the room to transform with the help of bright colors of blooming violets, begonia or geranium? It is aesthetically refreshing a little, and in general it is beautiful. But it is inevitably necessary to decide where these flowers in the pots are placed? Not on the semi. We need shelves. In the store it is not always possible to find what you need, and save me. The output one is to make the whole color aesthetics, as they say, decompose on the shelves.
In this article, we will tell how to make the shelves for flowers with their own hands from the tree and chipboard, consider the options for wall and floor shelves, as well as demonstrate the photos and video instructions.
What material can the shelves make? It can be plywood, chipboard, wood, metal, glass, plasterboard, etc. If wooden planks were fed in the farm, and you have not found proper application yet, make a shelf for flowers from wood.

It will be very good if you have about 6 pieces of these wooden slats, and at least two meters high and the size in the end of 35 × 5 mm. You will also need two brus of 20 × 20 mm, too, 2 meters high.
Arm yourself with a pencil, a screwdriver (cross-person) or a screwdriver, tape measure, saw and an electric lobby, as well as 25 and 40 mm screws. Also, you can not do without a helper, which will simply support the design when mounting the shelves to the racks. Now you can start making.
This is such a small floor shelf or rack for flowers.

If you have more like a chipboard shelf, then you probably have experience with this material. Here you have to tinker not so much with the manufacture of the design itself, how much preparatory work Before assembly. You will need:
From tools:
As you can see, the list is considerable, and it is all necessary to prepare for the assembly.
First, we define what the ends of the parts will be visible, after which we begin to shock them with the edge. We use the usual household iron and a shoe knife to trim the extra edge. A special adaptation is tightly smoothed the glued melamine edge and grind the end corners of the emery bar. These places that will be put together with each other are not worth it.

Elements of the rear basis for future shelves that we did not be covered with a paper edge, prepare for docking among themselves. Drill shallow two holes and pour glue into them. We score into the holes of the CHKETs (Speakers), and two holes are also drilled in the joined part of the adjacent element and fill them with glue.

So that the chips coincide with the holes of the neighboring element use special "conductors" or furniture taps under the sewage. "Conditions" dress up on the seasons and pressed against the interconnected details, the sharp testers will inevitably leave small recesses. There and drill.

We connect the parts between themselves and fastened hard. For this, a clamp will be an indispensable tool for us. Tight press the parts of the part and leave until complete drying.

The back of the shelves is made. Now our task fasten the shelves. To do this, first make marking for confirmates.

With a special confirmable drill drill holes, after which we get to the fastening of the shelves, alternating them on the right and left.
It is best to mount the attached planks from above and below that the shelf hung on the wall is strictly vertically, even if anyone accidentally falls.
It remains to be beautifully putting flowers and you can enjoy the work of your hands.
You can fantasize and make the shelves with multi-colored. Or another option: rounder the free corners of the shelves and cutting them with the T-shaped plastic edge. It will be much more beautiful.

Now is the time to talk about the angular shelves for colors.
Sometimes the place for flowers is only in the corner, therefore, we need an angular shelf. It can be either a shelf or a mounted shelf. Everything is simple, as mentioned above, the main thing is to prepare everything correctly. For example, if we want to make an angular shelf from chipboard with elements of chrome pipes, we will need:
From the tool:

Pre-prepare the shelves, making them radius. This we can do with the help of an electric bike and grinding machine. Lobzik cut off excess, and process the cutting place with grinding. It is worth noting that such a tool like an electrolybiz is mercilessly rocking laminate during cutting. After grinding, these chips are practically removed. The next step is the salary of smooth ends of the shelves with a melamine edge. Then we will deal with radius places of future shelves. We will need a milling mill and cutter, which in the end of the Listel sheet cutters a small groove, where we subsequently need to score by the rubber hammer T-shaped profile. Next, we make a marker mark and drill 3 holes in the chipboard under the 25th tube.
In the upper and lower shelves, the holes are not drilled at all.
Special pipe cutter cut off the size of the chromed pipe we need. To the bottom of the shelf in advance fasten the legs. Then we screw the flanges on the holes of the two shelves from both sides (it is better to do it before installing the shelves in the product) and do the tube. We record them with special screws on the flanges and, you can say that the shelf is ready. This corner product with flowers will become an excellent decor for your angle.

Now it is worth talking about light-minded plants that need to be installed closer to the window or even on the window. Naturally, we will talk not about the colors, but about the window shelves for flowers. Of course, your desire to arrange flowers on the window caused can not only be the light-mindedness of the plant, but also the growth structure of his shoots. They can be, for example, falling or curly. In this case, it will be better to think about how to arrange these colors higher. How to make the shelves for colors in this case? To do this, you can use different materials.

You can also make it so that the windows will be suspended plants in pots. To do this, we will need only a few anchor anchors with a crochet of 8 × 60.

An anchor mechanism is so arranged that when screwing out the spacer part expands it and, thus, it sits quite firmly in concrete.

And if we talk about literal window shelves, the following option is especially acceptable for those who want to do everything, first, quickly, secondly, reliably and, thirdly, beautiful. It is clear that it is not about accommodation flower Gorshkov On the windowsill. It is cumbersome, inconvenient, and in some cases not particularly and beautiful.
These shelves can be installed, provided that the window itself is wooden.
 In any furniture store where fittings are sold, you buy a chrome bracket for shelves (it is called an arched bracket, concave). On the economic market, you can purchase a half-one-meter speech with a width of about 3.5 cm and a thickness somewhere 1.5 cm. As a rule, there is a glass store next to the market and if you know the exact dimensions of your future shelf, then order a glass thickness 3 mm with grinding in a circle. For beauty, you can choose any tint, and if you have children, it will be important that the glass is necessarily hardened. Such glass when falling to the ground will fly into small pieces with non-footing ends, and your child will not be lit about them.
Next, measure the depth of the police holder and cut small planks for these sizes. On the bottom to small screws, we screw these planks to the brackets. A tree in this case will serve us with a lining material between glass and iron. Just be sure to ensure that the screws do not get out on the other side. Therefore, you have fasteners must be the corresponding sizes. It remains the case for small: Attach the brackets to the windows frame. After that, you can put the shelves on top and make sure that we are all done correctly and the plane is strictly horizontal (use for this building level). Shelves are not attached to the brackets, but will be pressed with floral pots. The convenience is that all this glass design can be easily dismantled in case of general cleaning when it is necessary to wash the windows.

As you notice, there are quite many variations on the topic of colors shelves. Which of them you prefer depends on your taste and your features. The main thing is in the other: beautiful flowers will decorate your home, and beautiful original shelves made by your own hands will tell a lot about the owner and the hostess of this house. Therefore, let in your house there will be many colors.
This video is about making the shelves for flowers to the windowsill from chipboard and pipes:
Learn how to make a multi-level wooden rack shelf for colors:


That happy day when you first brought the most first plant from the future rich collection in our stay, has long remained in the past. And now dozens of blooming and decorative-deciduous plants are placed on the windowsill, on the bookshedshes, on the tables, in the niches of the loggia or next to the walls of the balcony. Such a "green kingdom" looks, how to say, not at all aesthetically, and all sorts of diseases and pests are instantly distributed among plants tightly standing towards each other.
If you think about the question, how to streamline all this rabidly growing and blooming vegetation, how to make a cozy green corner, without overloading a limited space of the room, be sure to read useful advice and materials on this page. Here you will find a photo with interesting models Stands, floor racks, hinged shelves for indoor plants. And the video lessons and seven step-by-step master classes (with a photo of each stage of work) will help you make it yourself stylish stands for flowers and floor racks with the shelters.
If your collection of houseplants is constantly updated, then you should pay attention to practical flower standswhich can be easily made with their own hands from different girlfriends. There are a large number of models of floor stands for flowers, mounted racks with comfortable niches for vertical landscaping, suspended rods, with which you can organize space both in a spacious and small room (including on the balcony).
Having highlight the space for creating a green corner, we will use each square meter to compact all the pots with plants. On the floor, you can place the supports in which the durable metal racks are equipped with wide shelves for colors at different levels. Next to the floor stands will harmoniously look at the walls with long shelves made of wood on the wall, and on the junction - wooden angular racks that can be made mounted or put racks with angular colors shelves.
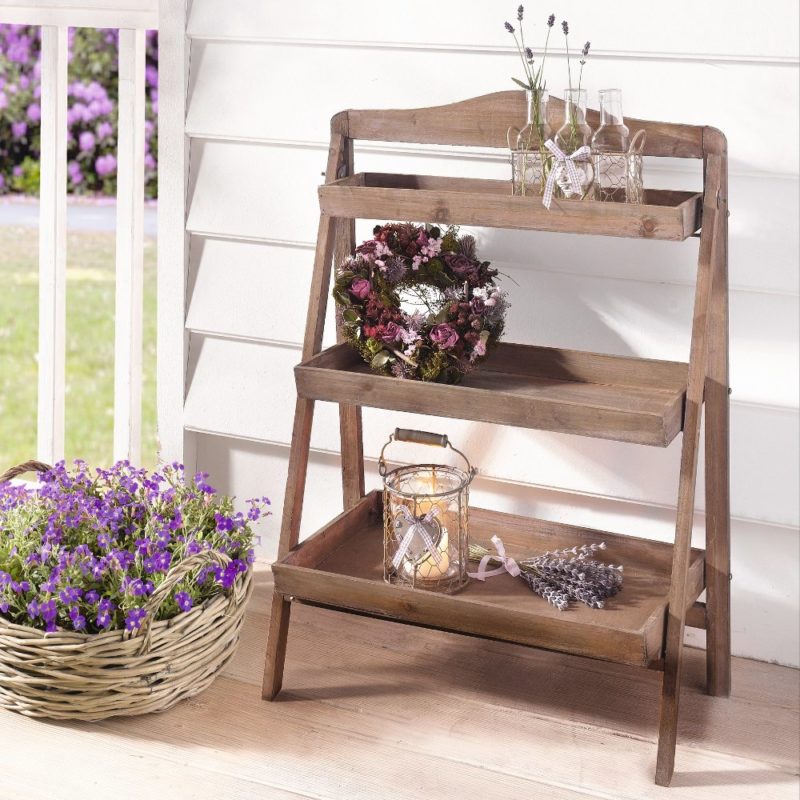
On the windowsill You can also place quite a few miniature plants, if you make lungs and compact racks with your own hands, strengthening on thin (but durable) metal racks the shelves from plexiglas in the width of the windowsill. Near the window you can put beautiful outdoor stand For flowers made of wood in the form of an elegant ladder, on which the shelves will be located on the level vertically or move forward.
Shelves On a multi-level shelving can be placed at different heights in a separate niche, and the shelves themselves are made different in length and width. In the lower large and advanced shelves, we can put pots with large plants (ficus of bendjamine, dusted marginat, azalea or fuchsia in the form of a tree), on medium and slightly advanced shelves, you can place plants with falling leaves (chlorophyteum, siegocactus, asparagus, miniature fern ), and on the upper shelves will be interested to look small flowers (Uzambar violets, potted hyacinths, orchid phalaenopsis or dendrobium) Ampelm forms with beautiful flowers On long shoots (the bell campaundul, homemade petunias, hay wax ivy). Such outdoor flower stands can be easily made with their own hands (including from the old staircase, from a wooden ladder, from the shelving for tools, from pallets).
- In the photo: Outdoor stands, metal and wooden racks, shelves with shelves on the windowsill
Also metal racks for homemade utensils, kitchen fingers, old racks for books can be slightly upgraded with their own hands and turn into excellent stands for your colors. Consider that the racks for outdoor structures should not be fragile, do not break and reliably hold the shelves. And for the wall suspension, it is necessary to install reliable fasteners and wide wooden shelves.
7 master classes for the manufacture of supports and suspended structures for flowers:
Nothing decorates the dwelling as flowers and green plantings. They give the little room comfort, and big house - sophistication and individuality. Plants are cleaning the air, fill the room with freshness and light aroma.
In order for the flowers to decorate the room, it is necessary that they are planted in interesting kashpo and, of course, are located on functional and attractive shelves. They can be bought, but in stores they, most often, monotonous. In order to save money on the purchase of another green pet and become the owner of an exclusive shelf, you need to work hard and make it with your own hands.

Green plants in the house must be arranged rationally so that they do not occupy the useful space and attracted attention to them, decorating the room. The shelves will allow them to be compact and beautiful, correctly selecting in groups of different colors and leaves, in size. A bowl of all plants are located on the windowsill, which is quite logical, because they need daylight. But there are a lot of colors that can feel great and away from the window. For example, curly plants can be comfortably comfortable on the wall, and large plants, like ficus or palm, will be located on the floor.
Therefore, shelves, depending on the location of the position, are divided into:

The shelves for the country room are characterized by the simplicity of the design and are often made of a girlfriend.
The shelf in the form of the letter A is suitable for the arrangement of the set of pots with flowers on the balcony in the apartment or growing seedlings in the country. This shelf, in the absence of colors, will become an excellent shelving for storing toys. In a private house, you can put shoes on it.

The shelf in the form of the letter l do even easier than the previous one. It does not have a special aesthetic species, but the seedlings are very good for cultivation, as it has large square. In the free time from young shoots, it will allow in the garage gently arrange a tool on it.

The rack without cutouts made of pipes, fasteners and wooden shelves is useful for the loggia or balcony. It can accommodate a collection of small colors, such as violets.

From the pipes going durable construction, type bunk bed, they are stacked wood or chipboard, in which it is done in the corners. Such shelves can be done as far as the tiers and place on them both green plantings and household utensils.

From pipes, you can assemble the shelf intended for mounting to the wall. Installation is simple. Depending on its location, you can make the required number of levels. Perfectly, not only flowers will be spread on it, but also a home library.

Conventional glass jars can be home for home plants. A simple flurarium can be made of transparent cans, then the design will have a natural natural look, which will especially be interested in children: they will be interested to observe the development of the plant.
For the foundation, a wooden board is useful to the size of which depends on the size of the wall. For a greater effect, it must be treated and painted in color, which will be combined with the interior of the room and the texture of plants. Better if it is natural colors.
The basis with the help of bolts are attached clamps that will cover banks. This version of the shelf is minimalized and suitable for youth apartment in Loft style.

Cable-channel - plastic mounting box, can turn into a shelf in skillful hands, which is not terrible moisture and for which it is easy to care for.
For its manufacture, you will need 2 cable channels 2 meters long and 4 and 6 cm wide. Depending on the width of the shelf, we make the workpiece:
In the corners of cuts, we make cuts for mounting. Installation of the shelf is simple: in the side walls that the cable cap is fixed by plastic cuts.
Such a regiment is useful for the bathroom, it can accommodate many women's stuffs: varnishes, cosmetic and leaving agents. You can use it in the kitchen for storing jars with spices.

For making a designer shelf in a room with modern interior may come in handy, which has become unnecessary, wooden staircase. Having done 4 steps:
You can use the staircase as a shelf in the style of minimalism, without any transformations.

If the sizes of the bathroom allow you can mount a reliable and original colors in the bathroom from the tree in the bathroom. It will come in handy for the placement of accessories, such as candles and aromatic compositions of oils and salts.
For its manufacture, you will need 3 things: wooden boards, selflessness and drill. Since the shelf will be located in a room with high humidity, it is necessary to protect its surface - to be treated with a special water-repellent impregnation.

To make a sliding rack for flowers from wood, you need to have certain knowledge. According to the drawing, you need to collect a mobile design, which is in a moment of a narrow canvas turn into a rack with a large area for colors, books, dishes. This option will interest the owners of small apartments and those who often change the dwelling.

Rustic country style is popular. Many kitchens make out mistresses in this style. Wooden eco-friendly shelf essential element of such a kitchen. To make it need to cook:
Perform the following procedure:

Shelf for flowers on the windowsill is a good solution for plant lovers in a small space. She will provide an opportunity to place up to several dozen porridge with different colors. And plants, thanks to good lighting, will be rewarded with lush flowering.
In order for the regiment to not look cumbersome and unluckled the light, it is better to make it from the glass. Not simple glass, but hardened so that it will sustain, sufficiently load.
In the economic store, purchase the desired size of nickel-plated tubes and fasteners. So that the shelf does not slip the legs need to "shut" into rubber shoes. It is not even a newcomer to assemble such a compact and durable shelf.
The advantage of such a shelf is its full water protection, and glass surfaces are easily cleaned.

The shelf for colors can be the decoration of the window, replacing the garardine, visually increasing the height of the ceiling. It can accommodate small flowers in the same pots or plant curly plants that will protect against direct sunlight.
Make it very simple: on a wooden board it is necessary to make holes with a diameter of equal diameter flower pot. Such a regiment is not necessary to paint brightly, it must be harmoniously merged with the color of the walls.

Suspended shelves for colors depending on the material:
The easiest option of the suspended shelf:
You can make a pendant shelf for colors in the form of a shelf:
Such a shelf can be fixed on the wall or hang over the window.

According to the same principle, a hanging stand is made, which represents a narrow vertical garland into one cachep. In a room with high ceilings, such a shelf will find a decent place.
Such a shelf is a single board attached to the wall and the impression of weightlessness. Farming shelves on the wall look in such a way as if they do not have any fasteners. Although it is desirable to use reinforcement pins with a diameter of 10-12 mm for their attachment. The hole will be drilled directly in the array of the board itself. Such shelves are better not to use under heavy flowers.
In the same way, using the KREG Jig knob and thick boards can be attached directly to the angular charging shelves directly to the wall, such a number that will allow the height of the wall.

For the manufacture of shelves can serve different materialas traditional and modern and even designer. Its selection depends on the style of the interior of the room and the massiveness or lightness of individual plants. Most often for the manufacture of shelves apply:
In addition, you can use metal, branches, spins of trees, rattan, old furniture and equipment, such as bicycles.
When choosing a material, it is important to take into account its moisture resistance, as the flowers need constant watering and it is impossible to avoid water from entering the shelf.
Interesting option Shelves glowing in the dark. This choice is for creative design premises. You can make a unique shelf with your own hands. This requires a board with cracks, about 1.5 m long. The creation process is:

For living colors, it is possible to make a floor stand from a simple natural material - spiked wood. You can take care and prepare them independently or purchase on the specialized market. Three steps and the stand is ready:
This is an option for the cottage, a country house in Eco-style, it is quite relevant to such a stand will be on the balcony or veranda.

Shirma is used to separate the space of a small room or studio. You can make a screen in form flower shelves. Shirma will thus acquire an additional function - decorative. You can make a flower shelf-screen mobile - mobile.
It will be necessary to prepare thoroughly:
And get started:
Amateur photos of interiors:

In order for the regiment to fulfill its function, it is necessary to pay attention to the technical side of the question - fastening the shelves on the wall. Mold options There are many, consider the simplest - method of fastening using metal corners.
For a small wooden shelf, you will need:
Procedure:
Flowers brings undoubted health and pleasure. In order for the collection of DVIDSBAR violets or exotic orchids, and maybe spicy medicinal plants adorned the house, did not interfere with everyday life and were in decent conditions - shelves are needed. Having spent some time, applying fantasy and skill can be created with your own hands design devices - shelves for colors.


