Almost every apartment has a chandelier. This is a multi-lamp luminaire that is most often suspended in the middle of the ceiling. This arrangement provides the most uniform lighting throughout the room.
At the location chosen for installation, a hook is attached to the ceiling. Some apartments do not have such a hook. This, perhaps, can cause some difficulties, because not everyone has a power tool at home. In this case, you will have to seek help from the master.
If there is a hook, the luminaire is hung on it using a ring or bracket located at the top of the luminaire structure.
Now you need to connect the chandelier to the electrical network of the apartment. There are usually two or three wires coming out of the center of the ceiling. Two or three wires are also brought out through the vertical tube on which the suspension is attached.
The presence of two wires in this tube means that the design allows all lamps to be turned on only at the same time. Three wires allow you to run in sections to change the level of illumination in the room.
Two wires coming out of the ceiling deprive us of this opportunity. Consider all cases of connecting electrical wires to a chandelier.
If there are two wires on the ceiling and on the luminaire to be connected, the connection process is the easiest. The wires are connected in pairs, the sequence in this case does not matter.
The figure below shows chandelier connection diagram via a one-button switch. Let's consider the diagram in more detail. As you can see from the figure, the luminaire consists of one lamp, in this case the connection is made in this way: the supply neutral wire (blue) in the junction box is connected immediately to the neutral wire of the chandelier.
The phase wire (brown) is first connected from the power source in the junction box to the switch, then from the switch to the phase wire of the chandelier.
The connection is best done with screw terminals. As a last resort, you can carefully twist the wires with pliers and insulate with special caps.
The use of PVC tape is undesirable, as it dries out over time, and the quality of the insulation decreases. In some luminaire designs, the lamps are not pre-connected, and pairs of wires come out of the vertical tube from each lamp separately.
If the luminaire does not consist of one lamp, but of several (for example, three), the connection in this case also does not pose any particular difficulties: all neutral wires in the chandelier are interconnected and connected to the neutral wire of the network.
All phase wires are also interconnected and connected to the phase wire that came from the switch.
When connecting, you need to twist wires of the same color together. The resulting twists are connected to the wires going through the ceiling to the one-button switch in the manner described above.
Modern electrical wiring in the apartment is carried out with a three-core cable with wires of different colors. Three wires from a two-button switch are also suitable for the place of the proposed fixing of the luminaire. How to connect a chandelier in this case?
Here, difficulties arise in determining the purpose of the wires. One of the three is the neutral conductor common to all lamps. The other two are phase, passing through the different keys of the switch.
Unfortunately, electricians do not adhere to a single color scheme for connecting wires, and the colors of wires in cables from different companies can also be different. Before connecting the luminaire, you need to determine the purpose of the wires. The easiest way to do this is by using the voltage indicator while pressing the switch keys. The conductor on which the indicator will not detect a phase and will be zero.
In the absence of such an indicator, you will have to de-energize the entire apartment and disassemble the switch. By removing the cover from the switch, you can see what color wires go from the keys to the chandelier. The neutral conductor does not pass through the keys, and the phase input wire is divided by the keys into two groups.

Connecting wires on a chandelier is similar to connecting to a one-button switch. The difference is that the wires coming from the lamps are pre-divided into two sections. One twist from each group of lamps is connected together to the neutral wire. The other two strands are connected separately to the two remaining wires.
Such way to connect the chandelier allows you to stepwise adjust the lighting in the room.
Chandelier wire connection when connected through a two-button switch, top view.

Today there will be a simple article about how to connect two lamps from one two-button switch. For electricians, this is a very simple thing, but I know for sure that more than half of the male population of Russia, when connecting a chandelier, will easily get entangled in three wires... No offense said. This article is for them.
In detail, step by step, with diagrams, I will consider all aspects of installation and connection of two ceiling lamps with 2 lamps.
What was the need for reworking the lighting in this case. The apartment was slightly renovated with redevelopment, and the configuration of the hall changed - it became more square, and the chandelier, which had previously hung in the middle of the room, is now on the edge.
Therefore, it was decided to install another chandelier (lamp). This solution has the following advantages:
Of the minuses, only the costs of construction works and the purchase of a lamp.
Anticipating comments about aluminum wiring, I will say that it makes no sense to change all the wiring in the apartment. The aluminum boxes are welded with high quality, sockets and switches are connected by me personally, and the whole apartment is divided into two lines, which are 16A each. And yes, the downside is that the sockets and lighting hang in parallel, now no one does that.
Let's start with the terminology. What is a chandelier and what is a lamp?
The luminaire is the broadest concept, it can be of any design, mounting and light source. It can be ceiling, point, wall (at the place of installation), LED, halogen (by type of lamps), indoor, outdoor (by type of design).
A chandelier is a lamp that has two features that make it stand out from the range of lamps:
I give a list of my articles in which different kinds lighting devices and a lot of photos are given:
I am leading this to the fact that there is very little difference between a chandelier and a lamp from an electrical point of view. Simply the concept of "chandelier" is included in the concept of "lamp".
So, at the beginning of the installation of two chandeliers, we have the following picture:
What kind of black things are screwed to the terminal block parallel to the light bulbs is described in detail in the article "". By the way, the switches are backlit;)
For the sake of completeness (if someone has forgotten the school physics course), I will give a classic diagram, which shows a lamp with two lamps (two lamps in parallel), which is turned on through a one-button switch:

Diagram 1. How to connect a chandelier with two lamps, connection diagram through a one-button switch
The luminaire is conventionally shown with a dotted line, zero is constantly applied to the lamps, and the phase is switched by a switch.
Here is a wiring diagram for a chandelier with two lamps, which was at the time of the start of the repair:

Such schemes are usually used in large rooms to turn on chandeliers containing two or more bulbs, to save energy and lamp resource.
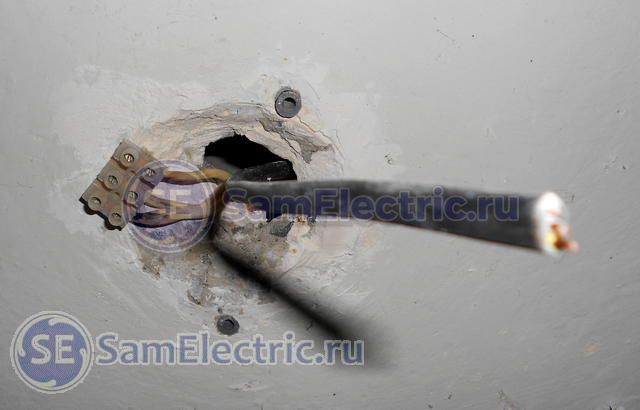
I remove the old chandelier, this is what remains on the ceiling - the terminal block (zero is marked with a marker), dowels for attaching the chandelier to the ceiling, and you can see the curved hook on which the previous chandelier hung:

Having ripped open the hole with a puncher and throwing out the old hook, we get the following hole:

Here we must once again return to theory. Ceiling slabs are designed in such a way that they have voids at a distance of 185 mm from each other:

In these voids, power is laid to all the lamps in the apartment, and sometimes power wires are also laid there.
A hole is drilled in the slab with a 12-16 mm drill, into which the cable enters from the wall, and exits where the chandelier should be. The wire, which I had freed from the old plaster, dangled freely in the void of the slab.
Now you need to make a hole through which the cable for the second chandelier will come out. In this, as always, my reliable friend and assistant helped me - perforator... We make a hole on one line along the slab:

Hole in the ceiling plate for the cable of the new luminaire
This is what the two dots look like; new and on the far right - old:

The VVG-ng 3x1.5 cable comes into the stove with a whistle:
Even when there is no plan to use a third wire, I try to use a three-wire cable. It has already happened many times that the backup wire came in handy!
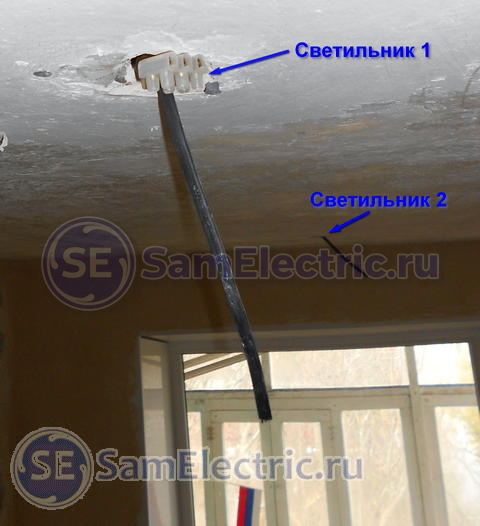
Place of the new lamp:

While the room was being renovated, I temporarily connected old sockets with lamps. And of course I used my favorites. Fast, reliable and easy.

A light bulb in a new location:

Closer, connection via Vago:

Now is the time to connect two new ceiling lights. Disconnecting the old temporary bulbs:

Such, for example, were used when connecting aluminum to copper at.

To simplify life, we use blue zero wires (with a blue stripe), the phases are white. We choose the length with a margin!
Here you need to insert a wiring diagram for two new lamps:
As you can see from the diagram, now each key turns on its own lamp with two lamps. Thus, the room is divided into lighting zones.
We carefully hide our terminal blocks in the channel in the plate, only copper comes out. Two phases and two zeros, each for its own light bulb of this luminaire.

Despite the fact that the diagram shows that a lamp with two lamps includes two wires (zero and a phase), in this case it is easier to make the wiring to the lamp, and bring 2 phases and 2 zeros into it, even if both lamps are connected in parallel ...

It was decided not to hang a bulky old-fashioned philistine chandelier on the ceiling, but to install compact neat lamps in a minimalist style.
It used to be fashionable in pious houses to hang in the hall a chandelier with many shades, glass and hanging, which was gathering dust, and on which children, sitting on their shoulders, were beaten. And I was beaten, and I was beaten :)
We attach the lamp to 2 self-tapping screws. Fortunately, there are many holes in it, and you can pick it up so as not to work with a puncher.
- The first rule, before doing any work: think about what you can do to avoid doing this work.
- The second rule: think about how to do this work easier, faster, better
- The third rule is to think about how to get the most out of your work.
It's not about laziness, but about work optimization. ;)

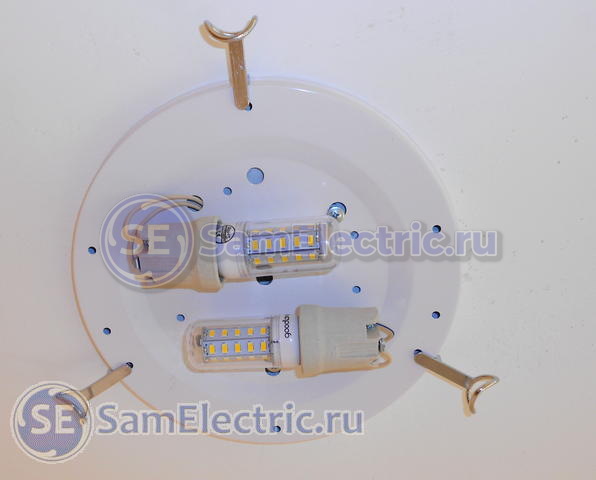
Near the terminals of both cartridges, we output the phase and zero, which we connected in advance. We connect so that the phase is at the central contact of the lamp holder, zero is at the lamp thread.

We screw in the bulbs:
Let there be light!


A chandelier is one of the main lighting devices that all Russians put on today. It can be connected to one or several switches. How is the chandelier connected to a double switch, what is used for this and what safety precautions are followed? More on this later.
To connect the luminaire to a double type of switch, you must strictly follow the rules and follow safety precautions. In this case, it is not necessary to study the documentation that is intended for professional electricians. You just need to know that the entire tool for performing electrical conductive work must be well insulated. Work must be carried out only on a de-energized network.
Tools for the job
To carry out the work, you must take a straight and Phillips screwdriver, a side cutter, pliers, a sharp knife, a digital or dial gauge, an indicator screwdriver and an insulating tape.
Note! A knife is needed in order to insulate a single-core cable element, side cutter or pliers. An indicator screwdriver is needed to detect the phase.
To make it easier to dial out and eliminate mistakes, you need to use color insulated cable markings. The generally accepted standard is the marking of a conductive element with a green strip. In no way can a green source be used to connect devices. This source is used to ground the contact.
A zero or neutral source has blue or light blue conductors. Charged conductive elements have different colors... Problems occur when working with wiring that has been operating in the network for a long time. Sometimes the conductor insulation was the same in the conductors, for this reason, a continuity test must be performed before starting work.

Conductor marking scheme
At the first moment, it is necessary to check the correctness of the connection. A screwdriver with an indicator shows the charge on some source when the switch is not working. If it is not possible to search for a charge, this means that the switch is incorrectly connected or there is a problem in a part of the switchboard.

Wiring diagram for a two-button type switch
Several elements can go from the ceiling covering, one of which is phase, and the other is zero. All lamps can be connected using this wiring diagram. If three cables go from it, then the first and the next are phase, and the third is zero. According to this scheme, you can distribute the connection of lamps in the chandelier. There is a moment when three elements come out of the ceiling, but there is no way to distribute the inclusion of the chandelier. The third has a yellow-green color and is considered zero.

Wiring diagram for a three-button switch
To connect the source to a switch that has two keys, you need to understand where of the two or three wires of the chandelier or the five-arm switch is the uncharged one, and where is the charged conductor. It doesn't take much knowledge to identify a common conductor; it has a different color from others. This means that the other two have multiple lighting sections. Then zero is connected to a common conductor, and each section, which has different phases of the conductors, goes through the two-key type of the switch.

Connection diagram for five-arm type
When making the connection, it is worth familiarizing yourself with the simple safety precautions of how to connect a chandelier with 5 lamps. According to it, you can not touch the bare types of cables that are located on the ceiling. When connecting the chandelier to the wiring, it is necessary to turn off the input automatic devices of the smoke shield. Further, careful insulation of bare wires is required, a careful study of the instructions of the device.
Important! It is also worth figuring out how to connect a chandelier to 2 switches safely. It is necessary to exclude the access of children to the place of work. At the moment of electric shock, you must immediately disconnect the network. It is advisable to work with a partner.

Working with rubber gloves as a guarantee of safety when connecting lighting equipment
As a result, in order to connect the chandelier to a double switch, you should prepare necessary tools, look at the markings of the wires and find the ones you need with a voltmeter and a ringing tone. At the same time, it is important to observe safety precautions and carefully study such an element as electrical circuit connecting the chandelier to two switches or several switches.
As a rule, the installation of a chandelier itself does not cause any particular difficulties for anyone - fortunately, there are more than enough various devices for fixing it. But the question of how to connect it to a double switch baffles many. We will tell you how to do it yourself, without the help of a professional electrician.
First you need to decide how many and which lamps we want to turn on with one or the second key. There are few options here. One key turns on one lamp, and the second - two at once. But what (left or right) key will turn on, for some it is very important (or convenient).
As a rule, 3 (or three-core wire) hang from the ceiling. In houses of new construction, there may be 4 wires. One is the "earth", according to the European standard. It is colored in yellow and a green stripe runs along it. The rest are checked by the indicator. You need to find a wire on which there is no voltage. This is zero. The rest are in phase. This is done when the keys are "on".

Wires also come out of the chandelier. If there is a ground wire on the ceiling, then the yellow-green ones can be safely connected. IN modern models chandeliers, all connections are made "inside" the chandelier, only wires from each light bulb to the "phase" go out, and one wire is their common zero. Moreover, inside the chandelier, the connection of the phase wires of some lamps has already been made. For models with 3 lamps, two are already connected and will turn on at the same time. In other words, the manufacturer decided for us how the chandelier should turn on.
So, 3 wires come out of the chandelier ("ground" does not count). We connect the zero of the "chandelier" to the zero of the "ceiling". Everything is clear here. Now the phases. Each of the “ceiling” phase conductors goes to the switch. We installed with two keys. Accordingly, we connect the wires of the phases of the chandelier and the switch.
Then we check. If there is a desire to make the right key turn on the lamps (or lamp) that the left one is now turning on, then the wires need to be swapped - nothing complicated. And when both keys are turned on simultaneously, all lamps will light up at once.
In any case, regardless of the color of the wires, they should be checked for voltage. Especially yellow-green. During the installation, electricians could make a mistake, so control is mandatory. The connection of the wires is done with the circuit breaker turned off.
Before connecting the wires from the chandelier, it is imperative to read the manufacturer's instructions and look. It can be different, like the number of wires coming out of the chandelier.
The replacement of lighting equipment in residential premises can be caused both by a malfunction of old devices, and by a desire to update the interior. In spacious rooms, devices with a large number of lamps are installed, which requires their distribution into groups. To do this, it is worth connecting the chandelier to a two-button switch.
Before starting the installation, you need to select the necessary tools. These include:

A store-bought device is supplied with an instruction manual. The rules require it to be in Russian. However, if there is no memo or there is no domestic translation, you should know the following rules:

If there is no marking, you can ring the circuit using the device. In any case, additional quality checks and correct assembly will not hurt.
When the luminaire is equipped with several lamps, and the wiring allows you to use the scheme for connecting a two-button switch to the chandelier, there are many options for the distribution of the luminous flux. You can choose any of the following:

If the room already has a suitable owner and suitable for the lighting fixture electrical network then this will reduce the time and material costs for installation. However, connecting from scratch is also common.

To do this, you need to choose the location of the future location of the chandelier. As a rule, this is the middle of the ceiling, although modern design solutions can offer its installation almost anywhere. Mounting is carried out on special brackets.
 Having chosen the point for placing the lighting fixture, you need to determine where the double switch will be installed to connect the chandelier. You will also need a junction box, which is mounted just below the ceiling on the wall. Its form can be any.
Having marked the installation places, it is necessary to prepare the route for laying the wire. This is a three-core (for grounded networks, the number of cores will be 4) cable of the appropriate cross-section, which depends on the power and number of lamps. You can calculate it using a special table. The channel is channeled from the intended place of installation of the luminaire to the splitter and further to the box where the switch will be located.
If voltage is not brought into the room, then a channel is laid from the central panel with a cable placement similar to the room one - to the connecting box. From it, the common zero and the ground (if any) go straight to the chandelier, and the phase wire is fed to the place of the intended switch. From it, it is necessary to lay a two-core cable, through which the phase will be supplied first to the junction box, and then to the lamp.
After the wire routing is completed, you need to connect them. The phase supplied from the box is attached to the common contact of the disconnecting device. The ends leading to the chandelier are to the outgoing terminals. Such fittings perform the function of a phase break. For safety reasons, it is impossible to lay a neutral wire through it.
 Before connecting a double switch to the chandelier, it is necessary to divide all the lamps in the device into the required groups. This crushing is performed depending on the desired lighting conditions. There may be several options, the choice is made arbitrarily. When connecting cartridges, the rule should be taken into account: the phase approaches the central contact, zero - to the side contact. All neutral wires are aligned with the corresponding core coming from the junction box.
After distribution, such ends are closed together separately: the first and second groups are connected to a double cable coming from the breaker through the connecting box. If a grounding conductor is provided, it must be aligned with the contact marked with PE or a special symbol.
Having connected the wires in the lighting fixture and in the switch, you need to assemble the circuit in the junction box. This can be done in several ways:

Having decided on the method of aligning the wires, you should connect them together. The order is as follows:

The last step will be to turn on the circuit in the switchboard. It is not difficult to do this, since all ends are connected to certain places: the phase to the circuit breaker, zero to the zero terminal, and the PE conductor to the ground bus. After a visual inspection of the correctness of the assembled circuit, it must be checked with a multimeter with the switch on and inoperative. After making sure that the circuit is working, you can apply voltage.
If you install a new chandelier in the old place, all the electrical fittings are already installed, there is a bracket and wires. It is necessary to determine their phasing. You can do it like this:
When carrying out such events, it is worth remembering that working with electric current is dangerous. Therefore, before installation, turn off the voltage and check its absence with a serviceable device. If you do not have the skills to perform electrical work, it is recommended to contact a specialist.


