In a human dwelling there are always - openings with the help of which natural lighting and, possibly, ventilation are organized. In most architectural projects, window openings are located in the walls. Of course, there are buildings into which sunlight enters through skylight tunnels, skylights, skylights, and other gadgets.
Up to 50% of all heat leaving the room falls on the windows. But, despite the enormous heat loss, humanity is not ready to "blind" with its home (in Russian the words "eye" and "window" are the same root), having abandoned traditional windows.

And the question: "How to install plastic windows in a wooden house" is not entirely correct. First, because the concept itself is everyday. It is usually understood as windows modern design, in which not single glasses are used as glazing, but double-glazed units (translucent structures of two or more glasses, hermetically connected with spacers and sealants).
Double-glazed windows can also be with wooden frames. And also aluminum, steel or fiberglass, which, by the way, are much better suited for the Russian climate than the widespread PVC ones. Just plastic (PVC) for the manufacture of frames is the most cheap stuff, which is why it has become the most common.

And secondly, the process of installing a window does not depend on the material from which it is made. The basic requirements for installation are set out in GOST 30971-2012 “Seams of assembly units for joining window blocks to wall openings. General technical conditions "and relate to any design - both modern and traditional.
And there is no particular difference where to install the window: in a brick, wooden or some other house. It is important that the wall opening is properly prepared. Since the most common window structures today are PVC profile windows, called plastic, the conversation will focus on their installation.

A well-designed opening also means mounting clearances fixed size around the perimeter. In the above-mentioned GOST, the compilers distinguish 2 types of mounting clearances:

The dimensions of the mounting gaps depend on the dimensions of the window and the material from which it is made. Refer to the following table for recommended clearances. 
When installing windows, remember that you will need mosquito nets as well. You can choose the right ones in our market, which unites major online stores. Take a look at the selection.
LUX-TOOLS Mosquito net LUX-TOOLS white 110x130 cm
249 rbl
OBI
Galichi Mosquito net Galichi to the window 1200x1200 mm white
569 rbl
OBI
LUX-TOOLS Mosquito net LUX-TOOLS white 100x100 cm
199 rbl
OBI
Galichi Mosquito net Galichi to the window 1130x1000 mm white
529 rbl
OBI

And this makes sense: the cost of branded installation will be from a third to half of the total cost. In most cases, anyone who has basic construction skills, a simple tool and has a partner, if the window is large, will be able to independently install a window in most cases.

It makes no sense to choose which method is better, because each has its own positive sides. Professionals usually use both, and even during the installation of one structure - depending on the circumstances.
For self-installation of a small window, it may be preferable to use mounting anchor plates. They are attached from the outside and there is no need to "unpack" the window - to remove the glazing beads so that you can remove the glass unit and get to the attachment point on the inside of the frame.

Professional installers, firstly, have a special tool - plastic spatulas of various shapes, and secondly, they have dexterity. With improvised means, you can damage both the frame and the glass unit itself.
Fastening to frame expansion dowels, in turn, is more reliable for installing a large window or for glazing experiencing significant wind loads, for example, in an apartment on a high floor. If you do not plan to remove the double-glazed windows, then the opening sashes must still be removed before installing the window.

Mounting options window frame... Drawing from GOST 30971-2012. Photo from the site docs.cntd.ru
Whichever method you choose, you need to choose a reliable fastener of the required length and in accordance with the wall material. So, for solid bricks, you can use a self-tapping anchor, for hollow bricks, Molly bolts, for concrete wall self-tapping screws with a plastic dowel are suitable.
For fixing the frame in wooden wall you need to pay attention to the following points:

The layout of fasteners and support blocks. Drawing from GOST 30971-2012. Photo from the site docs.cntd.ru
The number of attachment points and their location depends on the window design and dimensions. You need to adhere to the following parameters:

Holes are made in the marked places or plates are installed. Then the prepared frame is exposed in the opening, aligned horizontally and vertical planes using a level and fixed with spacers. Professional installers have special plastic wedges for this purpose. You can replace them with wooden ones - just bars or wedges. GOST recommends pre-soaking wooden wedge blocks with antiseptics. Holes are made in the wall according to the existing holes in the frame or mounting plates.
Installation in accordance with GOST is somewhat more complicated. I will quote GOST 30971-2012 clause 5.1.3: “The construction of the assembly seam includes 3 or 4 layers with different functional purposes:

To create the first waterproofing layer, PSUL tape (pre-compressed sealing tape) is used.

Also, waterproofing and vapor barrier tapes are used, which are glued to the frame from the outside and inside, respectively, and along the perimeter of the opening on the wall (see the diagram of the installation seam device above). For convenience, the tapes have 2 rows of adhesive layers: one is glued to the frame, the second to the opening.

Waterproof and vapor barrier tapes for the installation of adhesive-backed windows. Photo from the site chistoe-okno.ru
After equipping the opening and the frame with all layers of vapor and waterproofing, the frame is finally exposed in the opening, securely fixed, sashes and double-glazed windows are installed. And finally, the mounting gap "foams".

The use of steam and waterproofing materials when installing a plastic window will prevent destruction polyurethane foam under the influence of ultraviolet radiation and the effect of diffuse moisture on the insulation layer. That, in turn, will not only increase the service life of the insulation layer, but also save the window slopes from the appearance of spots of dampness and mold.

When installing a window in a wooden house, the slots of the junction of the window to the walls are blocked by decorative platbands. Do not forget that all finishing details (slopes, ebb, details of platbands) are also attached only to the casing bar, and not to the wall, so that the window with all the elements can be installed independently and not deformed when the frame shrinks. From the side of the premises, work is also being carried out on the final finishing - the installation of fittings, slopes, window sills.

Right installed window will delight you for more than one year, especially if you did it yourself.
Repair work in a wooden house is significantly different from similar buildings in a different form. Most companies do not provide guarantees for the installations carried out here, especially for windows. Is this not a reason to think about DIY installation? Armed with step by step video, you can achieve a high-quality result, significantly saving the family budget.
There are many prejudices about wooden houses... The service life of the windows installed here depends entirely on the quality of the structure itself and compliance with the technology of the installation process.
You cannot start working with a window opening in a new wooden house right away. In order to avoid deformation in the future, it is recommended to wait a while for the structure to stand, the wood dries up, excess moisture evaporates from it, and the walls become static. Thus, the chance of mowing the opening is minimized.
The outer part of a wooden house is not chosen as a place for a window. The opening can be in the center or closer to one of the corners, but not in contact with it.

Window cutout scheme
The installation process itself is not too laborious: it can be carried out in one pair of hands in a few hours. The subtleties of the preparatory work depend on whether the windows have already been installed before or whether the casing needs to be created from scratch. Similar technology can be used to PVC mounting into any wooden building: a bathhouse, a gazebo, etc.
For self-installation of plastic windows, you need a reliable base - a frame. If the previous windows were installed over the past few years, did not have time to acquire physical damage and they were not touched by rot, then you can use the box from them as a frame for new system... With this option, measurements are made in accordance with the new size of the opening, focusing on the remaining box.
If PVC is installed in a new building, then you will have to take care of the window. This is the name of the structure that prevents the window system from deforming. There are several types of it:

Window opening is one of the necessary stages of installing a plastic window in a wooden house
Using a rag, you can remove dirt, dust and start measuring. The reliability and expediency of all further work depends on their accuracy: carelessness at this stage can jeopardize the entire installation.
Advice. If the opening is distorted, then to create a plan diagram with measurements, they are guided by the supposedly correct geometric shape and right angles, and deformations are removed with a sealant or ordinary putty.
It is the basis of the entire window system, therefore, its installation must be carried out with a level: the horizontal surface should be ideal from both longitudinal and transverse locations.
To carry out work with your own hands, the following algorithm of actions is used:

In general, install pvc window in a wooden house does not cause any particular difficulties if you familiarize yourself with all the nuances of the work in advance
As for the window itself, it is necessary to attach the handle in the down position (closed state) before installation.
Attention! There is no need to completely remove the protective film: just open it slightly at the place where the handle is attached.
Installing a window into the prepared area of a wooden house does not differ from installing it into another structure. The process is performed in the following sequence:
Do-it-yourself PVC window installation can save up to 60% family budget... Following detailed instructions their installation will make the structure resistant to seasonal deformations of the tree, extending the service life of the system for a long time.


Plastic double-glazed windows have gained popularity because of their performance. But is it possible to use them in construction and repair wooden buildings? Of course, you can and should.
The installation of plastic windows in a wooden house has a lot of differences and features. The process includes a number of preparatory manipulations, primarily related to the fact that the structure tends to sink over time.
The features of the technology for installing PVC windows in a wooden house of a new or old building do not have much difference. In any case, experts recommend a technology using casing - time-tested, this technology allows you to avoid deformation, regardless of the material from which it is made.
Installing a plastic window in a wooden house or cottage with your own hands will require some knowledge and skills from the contractor. Of course, if there are none, then it is more advisable to contact specialists. Complexity self-assembly PVC systems in a wooden house consists in the fact that the frame is fastened using the “thorn-groove” mechanism. This design makes it possible to create such operating conditions in which the deformation and subsidence of wood does not directly affect the glass unit.
The system allows you to install plastic window independently, so that the window is fixed independently of the main structure of the wall and has a floating character. The window system is fixed by means of grooves on the side, which are mounted on spikes protruding from the end of the logs and beams.
To fix and seal the casing, only tow, linen or fiber insulation is used. In no case is polyurethane foam.
Attention! A gap is left on top from the calculation of the timber settlement.
Thus, the shrinkage of the walls wooden structure does not affect the window in any way, much less damage it. Depending on the mountings, casing can be classified into the following types:
The box is a floating mechanism that excludes deformation of the plastic window during operation, regardless of the type of casing installation.
Calculations should be made with high accuracy, since even a minor error can lead to deformation of the window frame or leaks in the structure. Besides, correct installation- this is a guarantee of the quality of the plastic window itself.
The design can be of two types: complex and simple. A simple jig is a system described above, with bars and grooves. The complex design is performed somewhat differently: a comb is cut out in the window opening, onto which a carriage with grooves is put on. This option is more reliable. When the walls are shrinking, the ridge can slide and does not allow vertical deviations, excluding pressure on the window frame.
The cage is usually made of timber. Using a chisel, a groove of 0.5 cm is knocked out on a tree in the center of the bar, and a thorn is cut out from one end (0.5x0.5x, 25 cm). A ridge with spikes 0.5x0.5 cm is cut from the end of the logs of the opening. To do this, you can use a saw or chisel.
Important! Ridge markings - important point... The quality and reliability of the structure depends on the accuracy of the marking.

After the ridge is ready, we proceed to the installation of the risers and the formation of the structure of the opening between them. The bars are set according to the level, taking into account the gaps for the shrinkage of the walls (1 cm on the sides and 0.5 cm from the top). The frame of the beams is reinforced with grooves with the main canvas of the walls and dowels between themselves. The gaps left are sealed with tow or other fiber. That's all, now you can start installing the plastic frame directly. You can see the process in more detail in this video:
After carrying out the necessary preparatory work and installation of the window, you can proceed to the installation of the window.
Attention! Installing plastic windows in a wooden house without casing is the wrong option.
To begin with, we check the dimensions and the location of the parallels, the gaps between the casing and the frame. The stock for foaming should be: 4-5 cm at the top, 2-3 cm in width and height, 3-4 cm in the area of the windowsill. After making sure that the stock corresponds to these indicators, we proceed directly to the installation of the plastic frame.
The window is fastened using special fasteners that are sold in any hardware store. They are metal plates with holes.
Installation of a plastic window should be done at a level. If you neglect this factor, then you run the risk of getting a tilted structure, which significantly reduces the operational and aesthetic tasks of the window.
Advice! Before installing the windows, the sashes are removed. This facilitates the construction and it is much more convenient to mount it in the opening.
After the window is fixed in the opening, it is necessary to fill the gap with polyurethane foam. To avoid displacement of the structure when foaming, put bars that will maintain the position of the frame without deviations. After drying, do not forget to remove it.
Anchoring the window to the casing is done with care. In this case, you must choose correct location tightening screws. Under no circumstances should the window be secured in the ridge area!
That's all, we end the process by completely foaming the opening. We put on the sashes and let the foam dry.
We presented The right way installation of plastic windows in a wooden house. This process can be difficult, so if you are unsure of your abilities, it is better to turn to professionals.
However, installing a plastic window with your own hands is a significant cost saving. We offer you to watch a video instruction on how to install a window with your own hands:
Reading time ≈ 12 minutes
Polyvinyl chloride (PVC) is currently very popular - it is available, keeps heat well and does not lose geometric parameters. Against the background of the rise in energy prices, such materials are almost a panacea, so the installation of a plastic window in a wooden house with their own hands is of interest to many people. In addition to installation instructions, in the article, you will find photo and video materials that will help you cope with the task at hand.
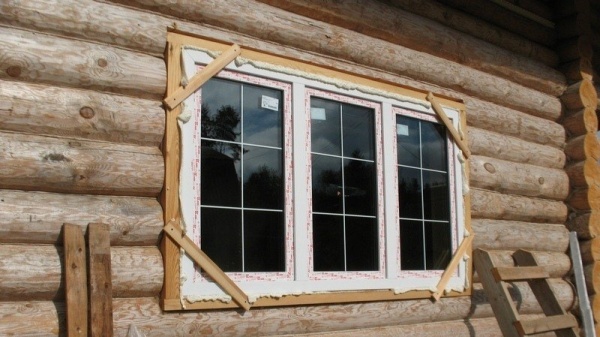
Log house with an attic in the process of glazing with PVC windows
In order to choose a good plastic window that is right for your case, you have to pay attention to several parameters. Do not neglect these indicators so that during operation you do not have complaints about the manufacturer or even force majeure.

Single-chamber (left) and three-chamber (right) glass unit
The production of double-glazed windows implies not only different technologies workmanship, but also different glass - this directly affects their performance characteristics... Below you will see what they are:
Note. Also, double-glazed windows are distinguished by the number of chambers. For regions with a temperate climate, one- and two-chamber packages are popular, in cold zones - three-chamber packages.
Video: The formula of an insulating glass unit determines the choice

Five-chamber profile made of metal-plastic
The functionality of PVC profile for windows can be determined by six parameters, including:
Below you will find step by step instructions for the installation of metal-plastic windows in a wooden house. This is not difficult, but it will require the presence of certain carpentry tools - I will not write them out separately and you will learn about them as you read.

Dismantling old windows
I offer special instructions for dismantling old windows from the opening, so as not to damage those elements that will remain in use. But this only applies to old houses, where there are already window openings with a window and they meet your needs - this item is irrelevant in a new building.
First of all, you should remove all the glass - for this, remove the glazing bead and all the carnations that did not come out during the elimination of this profile. Sometimes the carnations are invisible, therefore, to make sure they are present or not, run the glazing beads at the installation site with a knife or screwdriver, slightly resting on the glass. If there is fastening material left there, then the blade will surely stumble over it, and then, as they say, it is a matter of technology.
In some cases, in order to block the windows to the maximum and get rid of drafts, the glass is glued to the frame with silicone or silicone sealant. In such situations, all attempts to pick up the glass with a knife in order to tear it off the frame are doomed to failure. There is only one way out - to break the glass, but it can fly apart and injure you. To avoid this, they stick a wet newspaper on the glass and break it - all the fragments will fall nearby and not scatter.
The frame is supported by nails, which are also very difficult to pull out - it is much easier to saw the vertical frame profiles with a hacksaw, as shown in the top photo. After that, pick up a part of the cut vertical with a nail puller and tear it off. Perform a similar operation on the opposite side, and then tear off the diameters with a nail pusher. The opening is ready and you can insert a plastic window.

This is how they make a groove for the casing spike in the embedded block
First of all, you should cut out the window openings and here there are two options. If plastic windows are already ready, then, of course, you will have to focus on their size, but this is more the exception than the rule. Usually, first of all, window (door) openings are cut out and only after that the dimensions of the windows are removed or a representative of the company where the windows will be made is invited (this is a free service).

Siege in a mortgage bar (left) and in a deck (right)
First, let's take a look at the peculiarities of installing the casing (okosyachki). Seating in a deck clearly means cutting a thorn along the verticals of the opening, and in a box making a groove for this thorn, as shown in the image above on the right. But we will focus on a box with a mortgage bar - it is more popular.
With a mortgage bar more options... A groove is cut out in the opening according to the size of the bar (usually it is 50 × 50 mm) and the bar is driven there without nailing it, and a distance of 3 cm is left at the top for the shrinkage of the house. But sometimes a so-called monolith spike is made, this is when the spike is one piece with the vertical of the casing. In both cases, when the wall shrinks, the logs or timber will simply slide along the spike without deforming the window frame.
A jute or felt tape is nailed on both sides of the inserted bar with a stapler - this is necessary for sealing and. Now you can screw a draft box to the bar, which is most often assembled from a 50 × 100 mm pine board. In this case, it is best to use self-tapping screws for wood with a length of 75 mm - they are guaranteed not to pass through the block and will not reach the edge of the opening. If this happens, a log or timber can hang on the screw, which will lead to the formation of a gap between the logs.
Now the upper and lower crossbars are inserted, but if it is placed below it between the vertical boards, then it is placed on top of them at the top. The left gap should be 3 cm, which means that the distance from the end of the vertical to the top of the opening is 8 cm, that is, the jumper, having a 5-centimeter thickness, will leave 3 cm of free space after installation. It is best to fasten the rough box boards together with metal corners. Now we are talking about installing a plastic window in a wooden house with our own hands, so below you can watch a video on how to make a window.
Important! The use of polyurethane foam in this case is unacceptable! The foam will glue the box with the opening, which will prevent the logs from sliding freely along the bar during shrinkage.
Video: Okosyachka or casing of the opening - protection against building shrinkage

PVC window sill
After installing the rough frame (casing), you can proceed to the installation of the window sill - this is the first step for assembling the window within the opening. The fact is that the window sill does not adjoin transverse profile on the side, but the frame is placed on top - there is a special recess there. But for strength, a 5-8 mm cut should be made on the sides of the box and the window sill should be inserted there - this way it will hold up much better. To level the horizontal level, plastic plates are used as supports (mention them when ordering a window, if you will insert it yourself).

Self-tapping screws with a press washer
The window sill element must be attached to the bottom of the window opening with self-tapping screws, stepping back from the edge plastic panel 20-25 mm, and subsequently the heads will overlap with a frame profile. To prevent the screw head from pushing through the plastic, you need an option with a press washer without a rubber gasket, as in the top photo.

Installation of a plastic window in a wooden house
PVC frames are always covered with a protective film, but according to the installation technology, it is removed only when the window is finally inserted - this protects the plastic from scratches and dirt. To prevent the sash from opening (this interferes with installation), screw the window handles and put them in the "closed" position (vertically downward).
On vertical and horizontal window profiles, holes are drilled on the installation line of the glass unit with a diameter of 1 mm larger than the diameter of the fastening screw. Most often, the screw has 5 mm, and the hole is made 6 mm. The hats must be recessed into the plastic, therefore, a 10 mm drill is used to make a sweep to a depth of the metal profile. Three holes are needed on the sides, and two at the top and bottom, 50-60 mm indented from the corner.
At the bottom, the frame is placed directly on the windowsill, but a gap of about 10 mm or slightly less should remain at the top and sides. Therefore, in order to screw the frame evenly, use wooden spacers (they are easy to make yourself). When everything is screwed on, check the vertical and horizontal level, as well as the opening-closing function of the leaves, so that there is no distortion.
If the sash closes normally (there is no friction anywhere, and there is a tight abutment), then close the window and insert the double-glazed windows. It is unlikely that it will be possible to press the bead down with your hands, therefore, in order for this profile to sit tightly in the landing groove, it is finished off with a rubber hammer. Now it remains to blow out the gap between the frame and the draft box with polyurethane foam, and it will be possible to open the sash the next day (a precaution against skewing the profile). It remains to make the slopes inside and outside, as well as install the platbands, but this is after the final shrinkage of the house.
In fact, the installation of a plastic window in a wooden house, except for the device and installation of the casing, is done in the same way as in a brick, block or monolithic building. But attentiveness is needed in any case, so try to remember all your actions and, if necessary, read the article again. You can also print the setup process on a printer and store it in your pocket while you work for use as needed.
It is not as difficult to insert a plastic window into a wooden house as it might seem: if you know some technical subtleties it will be quite within the power of a non-professional. It must be remembered that wood is a special living material, and all work must be carried out taking into account the future shrinkage of the house. Therefore, the technology for installing a plastic window in this case will slightly differ from the standard installation. Let's consider each stage in detail.
How to correctly insert a plastic window in a wooden house? The success of the work depends, first of all, on a well-prepared opening: most often in a wooden house it is cut through after the assembly of the log house, but sometimes it is done even at the construction stage. In the first case, it is possible to proceed to the preparation of openings only after the completion of the main shrinkage, that is, a year and a half after construction. The contours of the hole are drawn using a plumb line and a level, after which they are extremely carefully cut with a chainsaw.

It is advisable to apply the markings at the stage of assembling the house so that there are no dowels in the openings. The calculation is made so that the upper and lower logs are cut in half: this will allow you to calmly set the casing to flat horizontal surfaces. When preparing the opening, the size of the casing must be taken into account. Therefore, in width it should be 14 cm larger than the frame size, at the top - at least 12-14 cm more, at the bottom - by 7 cm for installing a window sill and a layer of polyurethane foam.
If the opening is prepared at the assembly stage, it should be 10% less than planned in width. This is necessary, after the logs dry, it will take on a given value. If you immediately give it standard size, after shrinkage, it will turn out to be larger than necessary.
Before you insert plastic windows into a wooden house, you should carefully process all the end parts of the logs, cover them with an antiseptic to protect them from decay. In addition, the wood needs to be sanded so that the surface is smooth. Often it has to be leveled in height: wooden houses rarely remain perfectly level after shrinkage. To get the frame into place correctly, the hole must be aligned with laser level and a plumb line.
If you want to understand how to correctly insert plastic windows into a log house, it is important to understand the installation of the casing. This design is also commonly called a window: it is designed to protect the window opening from the effects of shrinkage. The box is an additional frame that is mounted to the end parts of the opening logs on a sliding principle: along it the logs will gradually lower and will not harm the frame.
To create a movable connection, several installation options are possible:
In all cases, vertical elements are first placed, the upper and lower horizontal boards are mounted to them. In some cases, the box is installed without a lower part. A gap of about 7 cm is left above the top board: it will gradually decrease as the walls are lowered and after a few years it will completely disappear. For a while, it is filled with insulation so that the heat does not go outside.
The casing box must not be placed on foam, nor can it be used to fill the upper gap. This is an inelastic material, it will not shrink, so the siege will simply lose its meaning and will go down with the house itself, breaking the frames.
The okosyachka, like other wooden elements, is treated with an antiseptic. After the protective layer has dried, it is ready to install the plastic block.
When deciding how to correctly insert plastic windows into a wooden house made of timber or logs, it is necessary to study the proposals of manufacturers. Plastic window systems are selected according to several parameters:
In addition to the frames themselves, you need to purchase handles, ebbs, window sills, additional accessories, as well as platbands that will close the assembly seam. Usually installers offer together with window block complete installation kit. It can be supplemented with anti-burglar fittings, special child restraints, a "comb" for ventilation, etc.
Dust and debris are removed from the opening with the already installed casing, the surface is cleaned. After that, a window sill is placed: it is the basis for the window, so you need to mount it as smoothly and accurately as possible. To install it, you need to make cuttings of 8 mm in the window box, the window sill itself is attached to the lower part of the casing or the lower log with self-tapping screws. It is advisable to put special washers under them so that the plastic does not start cracking.
The window sill should stand strictly horizontally, therefore, after installation, it is checked with a building level. If there are any deviations, plastic or wooden wedges are placed under it.
After mounting the frame, the attachment points of the self-tapping screws will be invisible, they will be completely hidden by the box. A window sill can be not only plastic: it is made of natural or artificial stone, wood, and other materials.
How to correctly insert plastic windows in a wooden house? When everything is over preparatory work, you can go directly to the installation of the window system. The protective film is not removed from it until the very end of the process, this is guaranteed to protect it from damage. A handle is preliminarily attached to the frame, as shown in the instructions attached by the manufacturers, the sash with double-glazed windows can be removed during installation, and it is much easier to work with an empty box.
The step-by-step installation process is as follows:
Important! Self-tapping screws should not go through the casing and twist into the wall. The block is attached exclusively to the casing, otherwise its installation will be useless, and the plastic block will suffer from the effect of shrinkage. The cage is connected to the house movably, and the logs will gradually take their places, while the window frame should be motionless.
Knowing how to properly insert double-glazed windows in a wooden house, you can completely glaze the building without resorting to the help of specialists. Window constructions made of plastic at correct installation they serve for a long time and perfectly protect the building from the cold, and it is not so difficult to cope with this work.
The thickness of the layer of polyurethane foam must be at least 2 cm, you cannot save on it. For greater reliability and tightness of the connection, the space under the windowsill can be coated with a special silicone sealant. It is good additional protection from blowing.
In any case, the polyurethane foam will have to be protected from sunlight: it is destroyed by ultraviolet rays. Carved platbands or decorative shutters, which can become an important element of home decoration, will help.
Everything assembly work it is recommended to carry out at positive temperatures. Plastic changes its structure in severe frosts: at –10 and below it becomes brittle and can be damaged very easily. To avoid unnecessary problems, choose the right time for the installation.
Installation of plastic window blocks requires increased attention to the correctness of the angles, observance of vertical and horizontal lines. Even a slight misalignment in the future can lead to an increased load on the fittings, which will negatively affect the operation of the entire structure. If the flaps turn out to be skewed, they will begin to creak and close poorly, and the hinges will quickly become unusable.
And again: the installation of windows cannot be done immediately after the construction of a wooden house, even if it is being built from dried lumber. It will take at least six months for the logs to finally take their places, then the installation will be safe.
Was this publication helpful to you?
You can find out detailed and extended information on the topic of the article from the book "Wooden Houses", which reflects all the stages of building a house, starting with laying the foundation and ending with the installation of a roof. Book price = 77 rubles.


