Everyone dreams of her own home. However, often, buying a ready-made home, you can buy some unpleasant "surprises" with him, and it is already difficult to remake it at your discretion.
It is quite another thing when the house is built from the very beginning to the end independently on a personal project. The construction of a bath from a bar is styardly carried out as well as at home, so you can consider it in the general case for these two buildings.
The whole process of construction of a bath or house from a bar or log consists of several consecutive stages:
We can safely say that the preparation does not obey any standards. In this case, every owner itself is, so it's not necessary to talk about any technology or rules.
As for materials and tools, then on the contrary, all according to the standard. For each hotel item necessary materials Will be considered separately. The same applies to the tools.
The house from the bar is presented in the smooth and prepared platform. But it is necessary not only to level the platform, but also to remove everything too much.
In rare cases, preparation includes a very laborious process - replacement of the soil layer. This is only necessary in cases where the soil has a very low resistance coefficient.
Now there are three types of foundations:
For a private house, the ribbon foundation is best suited.
He is more laborious and expensive, but he has its advantages:

These two benefits allow you to get rid of many difficulties that suggests a column foundation.
We will consider the construction technology specifically belt Fundament.
To calculate materials for a ribbon foundation, you can use the calculator:
This will require the following tool:

Tip!
If the bath is erected from the bar with their own hands in stages, then it is possible to do formwork for the foundation, as it is erected in order to give ribbon to a smooth form, and in this case this is not required.


Concrete is preparing for the proportion:
Such a relation is suitable only for cement M500 and higher cement.
If the formwork has not been erected, then the trench is completely filled, you should give it to dry. This may be required from several days to 2-3 weeks.
After that, in any case you need to build the base. It can be made of red bricks.
Smooth masonry can be easily made with your own hands using a plumb or water level.
After complete drying of the foundation, the waterproofing layer is satisfied. It can be represented by a layer of rubberoid.
If the formwork was erected, then it is removed only after 3-4 days with normal weather, but the foundation should not be exposed yet, since it will not have time to dial the necessary percentage of strength.
For this work, you will need the presence of the following materials:
It all begins with the fact that the first crown is erected.

Tip!
The first crown must be laid as much as possible, since it is precisely all the subsequent crowns will be laid.
In addition, the first crown is required to impregnate an Ansiseptic, as it is most exposed to moisture from the soil.
Bruses for walls should have a 150 mm cross section. For lag and inner walls - 100 by 50 mm.
To make the adjoining of brusons, that is, lag, you can use two ways to fasten the logs:
Bonding in the second way implies the coupling in such a way that both bars are in one horizontal plane.
This type of connection is shown in the following photo.

Compound "Skin"
This method is the most optimal, though more labor-intensive. To connect two vehicles among themselves, you can use the "thorn" method. For this purpose, a spike is cut into the end of one bar, and in the end of the second timber, the same in the size of the groove is cut.
Since sometimes lag length is large enough, then the pillars need to be erected. They can be made of bricks and cement mortar.
It is worth saying that the bars for lag better lay on the edge. Lags are located in increments of 40 to 100 cm, depending on the intended load.
After laying the lag on them, the blackboard boards are stuffed. From the bottom to the lags you can make a crate, and to lay the heat insulator. For roughing, 25 mm thick boards are used.
After this draft floor you can immediately hold cover coating, for example, rounded boards 28 by 36 mm.
Phased construction of a house from a bar with their own hands the next step implies the construction of walls. This is done by consistently erecting the crowns from the brusons.

All versions can be bonded on the corners to "in Polbrevna", or "in Ship", the speech about which was slightly higher.
It is worth saying a little about the profiled bar. It differs from the usual because it has ready-made grooves. Therefore, the stages of the construction of the house from the profiled timber, and specifically, the process of building walls, differ slightly from the same work from conventional timber.
The difference lies in the fact that the usual timber is required to fasten every 2-3 crown. This is done with the help. For them, a hole is drilled in the bars, which passes through several brusons, for example, after two. In this hole is clogged with angel, which can be either wooden or metal.
Otherwise, the stages of construction of a brusade house from a profiled and ordinary bar is no different.
As for the inner walls, they should be erected simultaneously with the construction of the main walls.
Each subsequent crown should fit on the MCH layer or pack.
The overlap is arranged from the same materials as the floor, that is, bruses 100 by 50 mm are used as beams. The beams are stacked in the same way as lagows.
They are lowered from below. A vapor barrier film is placed on the lower cover board, and the heat insulator is stacked upstairs. From above, brusie can also be seed with boards.

The rafter system is also made from 100 mm brus. The rafters are installed with the same frequency as the beams. The rafters must be attached to the beams.
From above, the rafter system is trimmed by boards that will perform the role of the crate. The further layer of waterproofer is laid, and the roofing material is up.
A full-fledged brusade house from solid wood was always not only considered a symbol of wealth and good taste, but showed the desire of the owner to take care of the health and health of their households. Building wooden house From the bar can be considered the most justified from the point of view of ecology, preserving a healthy atmosphere in the room and ensure good thermal insulation. Wide use of brusade materials always prevented a high price of timber and a rather complicated wooden house construction technology.
When using construction technology wooden houses from the bar need to take into account that the wood has always been capricious materialrequiring careful compliance with all technological operations:
Important! After laying the walls, the house from the brusade material is gradually gaining humidity, because of this, wood becomes softer and suppliant, which invariably leads to a sediment of the building box under its own weight.
Even glued brands of timber, whose wood is saturated with resins and adhesive compositions, can change their rigidity, which leads to the formation of slots and discrepancies of the joints.
In addition to the high sensitivity to the conditions and method of storage, wood has such an unpleasant disadvantage, as a different strength and rigidity of the wooden material in different areas Applications Efforts to Brusa. Therefore, during the construction of the building, for the maximum adhesion strength of individual beams, the side surfaces use special methods for connecting timber:
To seal the joints in the joints, especially if the construction is conducted from a regular bar, it is necessary to use linen fiber pads, the grated dry moss was put into the old days. Many builders consider moss more resistant to moisture and rotting and are often used in construction. wooden baths, cottages or country cottages from a bar.

Important! Immediately after buying a material and at least two weeks before the start of construction, the timber must be treated with high-quality antiseptic and antipiren on an organic solvent.
Simple construction technology and a relatively small weight of the material make it possible to collect wooden buildings of almost any complexity, provided that the project of the brusade house is previously calculated and has been worked out with the melting of all key elements of the wooden building.
The process of building the main box of the house consists of the following steps:
Building technology does not require the use of severe lifting and transport equipment. Moreover, a small wooden house can be built almost alone, but it is better to work as a brigade of two or three people, especially since the installation stropile carcass Roofs, 4x5 m, one do not master one.
It is believed that wooden design Building boxes from timber has a high rigidity, so it can be installed almost on any known type of foundation. In practice, only 50% rigidity has only 50% rigidity to the final construction and final strengthening of the walls. After completing construction in the joints and connections, there are considerable gaps and gaps scored by packles or moss. As a set of necessary moisture, the wood of the timber will swell and grabbing into a hard wooden box.

The most difficult time for the "fresh" brusade house is winter with strong frosts. At that time wooden Material The walls dries and partially loses the stiffness at the joints. If the construction of the house from the bar was performed on the insufficiently deep swirling piles with a weak lower crown or not enough rigid woodwork, the risk of disclosure of the walls of the walls with the formation of slots under the pressure of bunchy soils occurs.
Most often for construction wooden building use pile or pile-painted foundation, less often for small frame houses You can use a ribbon, low-profiled option of the foundation base. Bruce beams, like any wooden construction element, especially sensitive to moisture and dampness, therefore the best choice There will be the use of pile-scolding types of foundation. In addition, the competent arrangement of the production and ventilation of the base parts of the building will ensure good timber protection and a long service life.
After the arrangement of waterproofing, the first vents of the foundation is laid on the framework of the foundation. In the construction of the foundation tape in concrete surface With a step of 60-70 cm, the anchor bolts close up, with the help of which the first row of timber is attached.

When laying out the first crown, you will need to make maximum effort to accurately align the horizon. concrete base under the bar. If the horizon failed to do, it will be necessary to trim the surface of the bar, otherwise the following rows wooden beams They will lie unevenly, and the walls will turn out to be curves. The trimming procedure sometimes has to be used, especially if the beams themselves have small deviations. All cuts and planes have been driving need to be treated with antiseptics and preservatives. At the next step, with a step of 40-50 cm, lags are laid under the future floor.
Usually before construction, wooden material is sorted and selected to get rid of the most defective and curves of brusons. The discarded parts go to short inserts and sings.
The connection and docking of the bar is performed by the classic method, the corners and side joints are connected by the "hardwood" with a mandatory dressing of the one-piece of the next row, as in the photo.
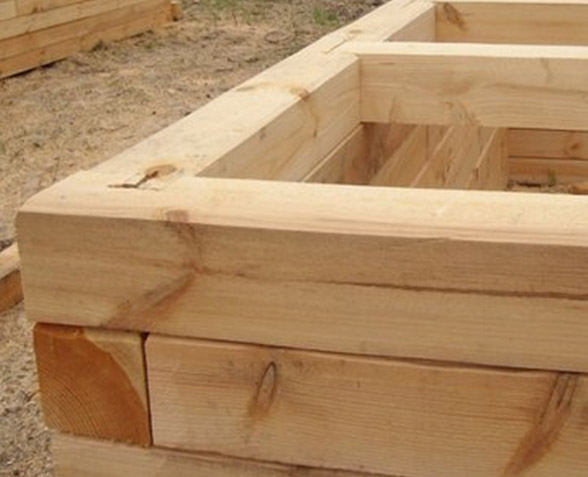
In the corners and at points of the inserts of the beams of ceiling overlap, lag and inner bulkheads are necessarily hammered by a heater connecting at least three brushes. In this case, it is possible not only a metallic, but also a two-liter option from the same wood as the material of the walls.
Sometimes the angular compounds are performed in the form of a castle connection "Lastochka Tail" or dressing with a dotted joint.
In the course of laying a bar on the walls at the same time, the crossbars of the transverse beams will be mounted on which they will be mounted internal partitions And overlapping. But as long as the construction and construction of a wooden box building is not completed, it is impossible to install partitions. Even temporary workflowers for moving along the walls are reduced to two or three boards.

In the process of construction of the walls, the framework of the frame and the vertical panels of the outer parts, the porch, the hallway, economic attacks are performed. They are also left uncovered too.
Only after the ceiling overlap beams will be laid and the liner system is mounted with a crate, you can move to flooring, installation of partitions and bulkheads.
If the construction of a wooden house from a bar is performed from a dry or high-quality glued material, you can mount the roof in half a year. Otherwise, they put a draft version. The installation of the roof usually assumes the use of a sliding compound at the plot point of the rafter to the top row of the bar used as Mauerlat. At the skate run, the pair of rafters are connected using steel lining and bolts. Thus, in the process of sedimentation and sedimentation of the walls, the rafting beams have the ability to change the tilt, thereby compensate for the formation of the slot between the roof and the upper timber. Immediately after the assembly, the rafter is stuffed with a crate, laid vaporizolation and waterproofing material.
The roofs are temporarily sewn with vertical clap and closed with plastic film until shrinkage processes. Finishing operations are transferred in the year of the building. The finish comes down to re-processing the antiseptic, the chasing of the slots, the installation of bulkheads and door loutock, windows. Interior surfaces wooden walls After thermal insulation, it is most often covered with plasterboard.
The construction of a brusade house requires at least skills to work with wood and good knowledge of methods and methods for docking timber. Having built a bath or a small barn with their own hands, you can move to the construction of cottages, and only after a successful building of a wooden country house worth a try to work in a professional carpenter's team, to fully assimilate the subtlety of the construction of the house from the bar.
In the recommendations, how to build a house from a bar with your own hands is cheap and beautiful, construction projects are offered a lot. The novice master can be confused by the abundance of descriptions of the methods of construction, but if you carefully analyze all the proposed techniques, we can see that the construction rules are described everywhere in the same way, and in order to build inexpensive, beautiful, eco-friendly housing itself, it is enough to have the skills of working with electric copper, hammer and screwdriver .
The person decides: "I want to build a house from a bar with your own hands," begins to look for information on how to do it cheap and beautiful, but the proposed projects seem not quite suitable, but I want something your own, individual. How to be in this case?
The problem is solved simply. Any construction, regardless of the size and features of the plan, consists of the following components:
To the choice of a kind of foundation you need to approach seriously, because this is the basis for the durability of the future structure. There are 3 main types of foundation:
The three-dimensional model of the pile foundation for future housing gives an exhaustive answer to the question about the strength of the structure
Beginner builders, if you allow the features of the soil (the soil is sufficiently dense and dry or moderately humid) it is recommended to give preference ribbon design. In addition to the ease of execution, this type of foundation has the following advantages:

The process of filling the foundation of a large area is carried out by special construction organizations.
Newbies will be convenient to use step-by-step guide:

Flood Foundation for Building House
After completing all the work, it is necessary to wait 4 weeks (the time of the complete froze of the concrete mix), after which you can begin to build inexpensive and practical brusade house with your own hands.
Building a house from a bar begins with laying 2 layers of rubberoid on the base around the perimeter. Such waterproofing will serve as reliable protection against moisture.

So looks like a foundation, waterproofed materials intended for this
For one-storey buildings, the construction of a church can be considered completed. If you plan to build a second floor, then you need to wall a draft floor and wait at least 4 months so that the wood gives shrinkage. If this is not done, then in the process of shrinkage, the design can be deformed and lose strength.
Before the construction of the roof, it is also necessary to give a bruse time for shrinkage.
Recommendations for the time of shrinkage are given to those who plan to take a whole bar for construction. But most of the masters advise building a house from a profiled bar with their own hands. Unlike solid, glued (profiled) bar does not give shrinkage, looks beautiful, but it is more expensive.
Those who doubt their ability to beautifully and correctly build a house with their own hands, it is recommended to purchase a ready-made log cabin from a bar. This option will no longer be cheap, and the possibilities of the internal premises will be less, but pre-marked bars are much easier to collect. In addition, you can always make an additional extension to the house from the bar with your own hands.
Phased construction of the roof includes:

Properly performed roofing system not only provides protection against moisture, but also contributes to air exchange
After installing the roof, the installation of the door and window boxes is carried out in the openings intended for them.
A layer of waterproofing is stacked on the draft floor, and the insulation is mounted on top of it. For insulation, you can apply:
On top of the insulation, the boards of the first floor are laid, and decorative decoration is carried out.
After completing the construction of the house, you can proceed to the outer and internal decorative finish.

Various sections of glued timber
Lower housing from one-piece bars or build a house from a glued bar with their own hands - this is an individual selection of builder. It should only be remembered that one-piece bars externally looks not very aesthetically needed further decoration.
After step by step consideration of all stages, the instruction, how to properly build a log house, no longer seems too complicated. If you comply with all the recommendations, you can cheaply build a durable, beautiful and durable housing.
The construction of the house is a rather complicated procedure. However, in the event of the construction of the construction of a bar, you can perform all the steps of this process yourself. To do this, it will be necessary to consider the rules, instructions for the construction of construction. In compliance with all the rules and recommendations, you can build a durable, durable object.
How to build a house from a bar is created, you should consider before starting work. This will allow you to fulfill all actions correctly.
Building a house from a bar (photo submitted below) produced by special technology. Wood features from which the building is erected, allow you to fulfill the entire procedure yourself. For this, it will not be necessary to apply special techniques. You can also cope with work with a small number of assistants (up to 4 people).
From the bar you can build a variety of facilities. It may be a small country house, which is operated in the summer, or a large cottage in which people constantly live. From the bar you can build a building not higher than 3 floors. At the same time, experts recommend choosing buildings that do not differ in complex design. Otherwise, creating the house will be difficult. You can make errors.
The bar is a more preferred building material than a log, with independent construction. It has a rectangular shape. Therefore, the walls will be perfectly smooth. Finish finish It will be done easier. The bars are tightly adjacent to each other, which avoids the appearance
Building a house from a wooden bar allows you to add additional design elements to the project. It can be a veranda or terrace. You can also provide a balcony. They harmoniously fit into the overall style of building.
The house from the bar may look very modern and stylish. Also from this material you can create a hut in ethnic style. The project selection depends on the taste of the owners of the house. It is easier to build one-story cottages. This will significantly reduce the period of work.
Holding construction work Maybe at any time of the year. However B. summer period It will make it more expedient. There are certain requirements for the choice and use of natural material, which is wood.
To build a house from a bar with their own hands apply different types of materials. Wood in this case can be different breeds. Bar for construction can be glued, conventional or profiled. The choice depends on the characteristics of the project, as well as the construction budget. The presented materials are characterized by the cost.
The glued bar is a material assembled from the board. From these elements is created construction material Certain profile. This is a relatively inexpensive type of timber, which is often used in the construction of houses today.
It should be said that the length of any variety of timber significantly exceeds the size of its cross-section. They are distinguished by certain standardized dimensions.

An ordinary timber is a calibrated log. His cross section It may be square or rectangular. From such a material to build at home is quite simple. Also, such buildings are easy to warm.
The most modern and expensive material is a profiled timber. Its surface is polished. She is external species Reminds the surface of the lining. Such a timber allows you to build up the most durable buildings. In this case, the elements of the design will not form foci of rotting. Moisture can not penetrate between tight fit bars.
One of the important stages of construction is to create a project of building a house from a bar. This will determine how many materials need to build at home.
Before proceeding with the construction of the building, you need to competently create from the bar. This work is better to entrust professionals. An unprepared person may allow mass errors in calculations. This will not allow to safely exploit the construction.

To have an idea of \u200b\u200bhow the project is drawn up, one should consider this procedure. At first, the specialist leaves for a plot where the cottage or cottage is planned. Next, it defines the geodetic features of the terrain. In some cases, it is necessary to evaluate how close water is close to the surface. Also evaluated the degree of irregular relief.
Further is determined which communications to the site and whether there is an opportunity and the need to equip, for example, a gas pipeline, a centralized plumbing, etc. After that, the project of the house is being developed. Building can be one-story or consist of two floors. From the bar more often build low cottages.
In some projects provided instead of the second floor of the attic. The size of the windows is determined door openings. Also in the plan can be added additional extensions (sauna, garage, cellar). It is possible to provide a spacious terrace or a closed veranda.
The right calculation of the construction of the house from the bar will create a solid building. At the same time, the specialist will calculate the weight of such a building, will give recommendations on the choice of the type of foundation, materials for finishing, etc. This will create a durable, durable structure.
Having created a construction plan, you can accurately determine how much a bar need to build at home. Next, you can procure in accordance with the needs of the project. When all building materials, communications and other materials are purchased, you can start building a house.
First creates a foundation. It should be said that the weight of the design will be quite large. Therefore, it is important to create a solid foundation. There are several types of foundations for home. If the project provides the arrangement of the basement, cellar, should create a tape foundation.
Before proceeding with construction, georamatic work is carried out. If the soil is or saturated, groundwater is close to the surface, the foundation should be pile type. Piles are screwed into the soil at great depth. This will allow maintaining the stability of the construction. This option is suitable for soil, which freezes for greater depth.

For small designs (for example, a small cottage house) you can stop the choice on the tile foundation. In this case, its surface will be the basis for flooring.
Building a house from a wooden bar requires the creation of an appropriate foundation. Ribbon of his varieties will be optimal option For overall structures. It can be created without the use of special equipment. This is the most common type of foundation in private construction.
Considering the stages of the construction of the house from the bar, it is necessary to pay special attention to the construction of the foundation. Safety, durability of the future building depends on its quality. In accordance with the previously compiled plan, we need to apply markup. They note both the outer walls and the inner partitions that will be carriers.
According to the created markup, trenches dig. The width of them should be more than 100 mm than the walls of the house. Trenches should have a depth of at least 60 cm. If the level of primer of the soil is even more, they will be required to deepen. If there is a basement in the house, you will need to drench the pit. For the cellar, it will be enough to dig a hole in the appropriate place.

At the bottom of the dug-in recesses, you need to create a sandy pillow. The gravel layer is poured on it. Each of these layers should have a thickness of at least 100 mm. Sand and gravel take carefully. Also, the lower layer will be required to be moistened and tamper. Next you need to apply concrete mix. In specialized stores you can buy ready-made compositions. They are simply bred with water to the desired consistency. The layer of concrete should be at least 5 cm.
Building a house from a profiled timber or other varieties involves when the foundation is established to create a formwork before the fill of concrete. To do this, it will be necessary to prepare boards with a thickness of about 2.5 cm. Shields are knocked out of this material. They must rise above the trench level by 40 cm. Special struts will allow the designs not to move.
The foundation needs to be reinforced using metal rods. Their cross section should be at least 10 mm. They are located along and across in accordance with the configuration of trenches. Rods in places of turns and intersections are fixed with the help of knitting wire.
Reinforcement and formwork should not come into contact. Between them leave a gap of at least 5 cm.
The construction technology of the house from the bar assumes the fulfillment of the correct Fouring Fouring Procedure. After carrying out preparatory work It is necessary to let the concrete. Its braziness should be no less than M400. Mix the cement with water is needed in the proportion, which the manufacturer specified on the package.

Experts recommend to acquire special dry mixes. In contrast to independently prepared solutions, such materials are in their composition special components. They increase the operational performance of concrete. It becomes not subject to temperature drops, is poured without the formation of voids, etc.
To disperse a cement mixture, you need to apply a concrete mixer. When the desired consistency of the solution is obtained, it is poured into the prepared formwork using the pump. In concrete, air bubbles should not appear. This is recommended to purchase special equipment. With vibration, it will make a layer homogeneous.
In the process of building a house from a glued timber or other varieties of this material, it is important to pay great attention to creating a foundation. Cement mix Dries about a month. In this case, periodically the surface of the concrete must be moisturized. This will avoid its cracking. The frequency of this process depends on the time of year and the ambient temperature. Only with proper drying concrete will type the required strength.
The construction of the house from the glued timber, as well as the profiled or ordinary variety, requires different labor costs. This is due to the features of its processing. If a ram from a solid wood massif is used, it will be necessary to cut it off from all sides. After that, the material will be with smooth surfaces.

The profiled bar does not need to be customized in size. He has a groove in his design. With their help, the mount is made. The bar must have a normal humidity. Otherwise, it cracks when dried. The glued varieties are practically not exposed to shrinkage.
Processing the house from the bar after the construction will not require a lot of effort. The material is distinguished by the natural beauty of the texture. Therefore, additional work on the shtclovation is not required.
When walls are created, you can proceed to install the roof. To do this, mount slinge system. Waterproofing and thermal insulation are stacked on it. The upper layer is performed from special roofing materials.
The roof must have a certain level of inclination, which corresponds to the climatic conditions of the area. Depending on this indicator, finishing materials are chosen. It can be Ondulin, professional flooring, metal tile, slate, etc.
Building a house from a bar with their own hands allows you to create window and doorways with such as the owner of the property will want. It needs to be discussed with the designer. You can choose the type of doors. They can be sliding, arched, ordinary. Windows can be panoramic or ordinary.
Capturing the floor and ceiling, you must mock the waterproofing layer. This material is placed on the base even before its fill. For this, the rolled, penetrating, coating or bay waterproofing is purchased. The choice depends on the features of the construction of the construction.
You also need to not forget to perform waterproofing in the basement, on the ground floor. Next, you can proceed to the floor finish. The aesthetic quality of the room depends on the choice of materials. Paul should be combined with a common interior. Therefore, it needs to be thought out in advance.
Paul can be separated by wooden boards (parquet, parquet board), cork panels, laminate, tiles. You can also be displayed with a concrete base with carpet or linoleum. Each of the listed materials is characterized by cost and aesthetic characteristics.
According to expert reviews, wooden house It looks best of the floor of boards or laminate. For modern styles The interior can be chosen by other varieties of materials.
Building a house from a fraction of a profiled type does not require additional finishes. It is a beautiful, durable and reliable material. If, when building a building, a simple bar is used, after installing windows and doors, you need to pay attention to the subsequent finish.
Wooden bars can with time you have destroyed. This process is less noticeable when using a glued variety. But if the construction used simple brusche, you need to wait until wood is dry.
The finish can be performed both outside and from the inside of the building. If a simple timber was used, you need to legish the gaps. This will reduce over time. It may be necessary to equip the heat insulation layer. To do this, it is recommended to apply mineral Wat. Insulation can be done from the inside of the room. However, in this case, it is necessary to take into account the many nuances. Exterior to perform insulation more expedient.
Wood inside the house will not need to be primed, painting, glue on the wall wallpaper. It is a beautiful natural materialwhose advantages just need to emphasize. To do this, the timing toning is carried out.
White wood will harmoniously look in a rural interior. If the decor is selected in the style of Provence, you can give preference to pastel colors. The ceiling should also be properly separated. You can choose tone for beams. It will also emphasize the indescribable atmosphere inside the wooden house.
Building a house from a bar ends with the arrangement of life support systems. First of all, you need to consider the type of sewerage and water supply. This system can be centralized or autonomous. The second option should be chosen if sewer and tap pipes are not connected to the site.
To create a water source, you will need to dug the well. This work is better to entrust specialized organizations. Sewer can be septic tank. Today there are many varieties of such systems. Selection of type septica depends on the number of people living in the house, as well as the construction budget.
After creating the sewage and water supply to the house you need to bring electricity. With the supplier of energy resources to the house, you will need to conclude a contract. After that, the cable is supplied from the nearest pillar of the power line to the house. It can be paved in the ground or stretch through the air.
If the house is planned to live in winterYou need to think over the heating system. The choice depends on the features of the supply and cost of energy resources, which are available for the locality. You can place convectors in the premises or make a warm floor system.
Heating can be equipped from the boiler. You can also create a stove type of room heating. Energy resources that will warm up the house in winter can be solid, liquid fuel, gas, electricity.
Also in the house you need to think over a high-quality ventilation system. It is developing a designer at the construction planning stage.
Having considered how the building was built from the bar, you can perform all the work with your own hands.
In order for the work to argue, the bars lay out to the stack at a distance of 5-6 meters from the structure with one or better - from his two sides. Each layer of BRUSEV in the stack is placed on gaskets from the boards.
Next to the stack tools workplace For marking and cutting Bruusyev. A variant of the device of such a workplace is shown in the figure.
The marking of the timber using the template is convenient to perform at an altitude of 0.9 - 1.1 meters in the markup zone, node A in the figure. After marking, the timber is lowered to low lining into the cutting zone. In this position, the timber is convenient and safely sawing with a chain saw.
Crawled timber raise the wall. To facilitate the lift, signs are suitable - inclined bars, which the top end relieve on the upper crown of the cut. The timber bar is moved using a rope.
Klion-shaped stops are navigated to the windows that make the ramp rise more secure. In addition to safety, the stops allow you to do small forces. Even one person can raise a bar if necessary, fixing it with the help of stops at intermediate points.
Works on the assembly of a log of timber is the most convenient to carry out a brigade of four. You can work together, just work will go slower.
For the installation of the upper crowns of the cut and roofs build forests.
 Three-tiered forests on the front of the house. 1
- extreme racks; 2
- M-shaped rack of forests of the first tier on the side facade; 3
- flooring; 4
- Central racks; 5
- Splits cruciform (shown conditionally); 6
- Baries
Three-tiered forests on the front of the house. 1
- extreme racks; 2
- M-shaped rack of forests of the first tier on the side facade; 3
- flooring; 4
- Central racks; 5
- Splits cruciform (shown conditionally); 6
- Baries The assembly of the upper crowns of the church leads from the level of the first tier. Flooring the first tier is laid on G - shaped racks, pos. 2 in the picture. Racks are installed around the walls of the house and attach to the walls with bobbies, pos.6.
At the end of the roof (attic), on the facades where the device is needed, it is necessary to make forests in three tiers. For the device racks of forests use boards 50 x 150 mm. Flooring the same boards.
Working from the forest is more convenient, faster and safer than with stairs - do not forget about it.
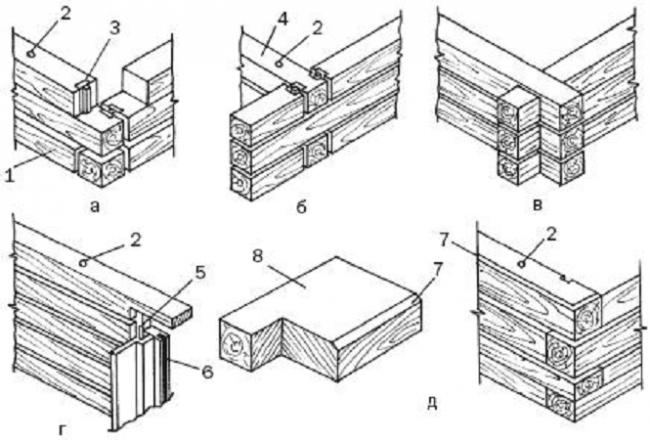
Practical construction experience shows that the sequence of the elements of angular connections in the head is not realistic.
Prior to the start of work, they draw a scheme of assembling the walls of the house, on which they denote: the sequence number of the crown, the type of connecting element at the ends of the blanks, the position of the openings in the wall.
An example of a wall assembly scheme of the house is shown in Figure:
 Scheme of marking angular joints of the bar and joints of the details of the longitudinal walls, for the house with overall dimensions 6x9 meters. BUT and FROM - longitudinal walls; D. and B. - transverse walls; E. - inner wall of timber - partition; 1
- Shakes of Bruusyev.
Scheme of marking angular joints of the bar and joints of the details of the longitudinal walls, for the house with overall dimensions 6x9 meters. BUT and FROM - longitudinal walls; D. and B. - transverse walls; E. - inner wall of timber - partition; 1
- Shakes of Bruusyev. At the house, which is shown in the diagram, each crown consists of 7 segments of bars long from 3 to 6 m.
The crown of the longitudinal wall consists of two parts: the main bar of the standard length is 6 meters and a dog, 3 meters long. On one crown lay on the left long bars, and on the right are good. In the next crown, the laying begins in a similar manner, but on the right.
The details of the crown of the transverse wall and partitions are made from one bar of standard length of 6 meters.
To eliminate cold bridges in the outer walls, joints of the bar of the longitudinal wall, pos.1, perform, making vertical cutouts "in the floor of a tree" with Faststom at 15 - 20 cm. The beam in the corners of the crowns is connected to the dressing with a native spike (see below).
How to quickly and quickly perform marking of thorns, grooves and other profiles, ensure the identity of the size of the bars blanks?
The easiest way to do this with the help of templates. The template is applied to the timber and transfer the pattern of the pattern profiles to the surface of the bar.
It is more convenient to place faster and there will be less errors if the template completely repeats the contour of the part, it has the same length with a locked part. I left the template on the bar and immediately moved all the sizes and profiles to the workpiece.
For our example, it will be necessary to make seven templates, according to the number of parts in the crown. One template is placed two mirror wall details.
If you think about, the number of templates can be reduced. Consider how to make universal templates for the markup of the details of the longitudinal walls of the house (for the wall assembly scheme, see above).
 Two templates (highlighted bright yellow) To mark the bar of longitudinal walls. 4
- groove for indigenous spike; 5
- PAZ for spike interior Wall; 6
- pattern; 7
- Bar of Dog.
Two templates (highlighted bright yellow) To mark the bar of longitudinal walls. 4
- groove for indigenous spike; 5
- PAZ for spike interior Wall; 6
- pattern; 7
- Bar of Dog. In the figure, at the top shows the template For the markup of the main bar in the crown, whose good is located on the right. On the wall markup scheme, these are the wints A1, A3, A5 and C1, C3, C5.
Lower pattern It serves to mark the main bar in the crowns with a good left - A2, A4, A6 and C2, C4, C6.
Templates at first glance are the same, but differ in that the grooves, pos.5, for connecting to the partition, are located in different places of templates.
The same patterns are used to mark up the details of the good. To do this, on templates at points b. and from drilled through holes, and at points but and d. Cuts are made.
For the markup of the problem, the template is applied to a bar and through the holes and cuts heating points on the surface of the workpiece.
Remember this reception with the device holes in the template. This will help you create universal templates in many other cases.
Templates are made of an arched "inches".
As a result, we manage to reduce the number of templates from seven to three (2 - for longitudinal walls and 1 - for transverse). Two longitudinal templates (right and left) provide the ability to get blanks for longitudinal walls, and one transverse pattern allows you to harvest parts for transverse walls and partitions.
And now consider how to apply templates. For the markup of the first vents of the crown (for example, starting on the left), the left template is laid on the bar and turn the end template to the marker on the left, then two grooves and, finally, the sample for the connection "in the floor of the tree". The marked timber is transferred to the opening site, where unnecessary fragments (they are better at the markup
Stroke) cut with a chain saw.
How to place details with spikes? Obviously, spikes and grooves are elements of the same assembly, which means they must correspond to each other in size and location. In the details with a spike at the place of the groove mark the spike.
If the size of the groove is 5 × 5 cm, then the spike must have dimensions - 4.5 × 4.5 cm. The clearance is filled with interventory insulation.
The profile of the template is transferred to the upper edge of the bar. The markup is transferred to the vertical face of timber with the help of a square. On this markup and carry out neat cuts.
The technical conditions (TU) for the manufacture of timber is allowed to deviate the size of the timber in one direction or another side of the standard value indicated in the documents.
If the purchase documents are indicated standard dimensions Bruus, for example, section 150x150 mm. and 6 meters long, the actual dimensions will differ from the standard.
Each bar, in the bar brought to the construction site, will differ from the dimensions specified in the documents, a few millimeters. Sizes in the section and the length of the bars will be different.
The size in size must be considered when developing templates, marking of the bar and assembly of walls.
How to collect smooth walls if the bar is different in width and length?
 b. - minimum timing width; delta B. - the difference between a narrow and wide bar.
 Obviously, from a bar of different widths, it is possible to make a smooth only one surface of the wall - or outside, or from the inside of the construction.
If you want to make a smooth wall of the house outside, then all bars in the wall are aligned along the outer face. Then inside the house the wide bars will perform from the wall on the value of "Delta b."(The difference between narrow and wide bars). The alignment of the outer face leads to an increase in the gaps in the corner connection of the BRUSEV (see Figure).
If the bars in the wall align on the inner face, then the "steps" of the repellent bars will be already on the outer surface of the wall. The wall is usually trimmed. And if the bar has to remove the chamfer from the outer edges, the steps on the wall will be invisible and without a sheaving. Corner connections BRUSEV is obtained more dense, "warm."
Each crown of a log is connected to the lower crown with metal or wooden brazers. Begroen placed at a distance of about 250-300 mM. From the end of the bar and then every 1-1.5 meters of the length of the bar.
Each detail of the crown is fixed at least two coppers. The length of the brazen must be at least 1.5 times, more than the height of the bar.
 cm., pos. one.
 Braided from round steel diameter 6-8 mm. - Pins with a pointed end or nails (6x200-250 mM.), just clog the hammer in the bars of the crowns, the option a. on the image.
The upper ends of the napillates from any material must be plugged into the bar on 2-4 cm. If this is not done, then during the drying of the bar and shrinkage, the cutting of the cut will be copied above the bar and raise the upper crown. Between the crowns are formed a large gap.
For the same reason it is impossible to make clogged berthed from reinforcement steel. The corrugated surface of such copiers will hold the bars of the crowns from moving during a shrink shrink, even if the heater is bold to the bar. The crowns will simply hang on such impudations.
Steel clogged gripped small diameter can not always provide the necessary wall rigidity, especially with a large length of the walls of the walls. Their use can be recommended for small-sized buildings - for example, bath. To increase the rigidity of the walls of large buildings, it is necessary to install the increased diameter.
Steel braided with a diameter of 10 and more than millimeters, as well as wooden brazers insert into the holes drilled in a bar. The diameter of the holes make a little less than the diameter of the heater.
With a dense landing of the heel into the hole, the rigidity of the wall increases, but the risk increases that the shrink shrinkage will be interferent.
Wooden braided with a diameter of 25-30 mM. Convenient to cut from round cuttings for the tool. Such cuttings are made of solid wood. From the bottom end of the brazen, it is recommended to remove the chamfer - it will be easier to score the brazen into the hole.
You can cut from a conventional "inch" boards. square cross section 25x25 mm. From one end of the workpiece shoot chamdes. Such stoles are clogged into a hole made by a drill with a diameter of 24 mm.
The ribs are made from relatively "soft" softwood When smoking smashed, the wood is compacted, providing a sufficiently dense landing of the heel in the hole.
The depth of the holes in the wall for the installation of napillates should exceed at least 4 cm. Begotten length. Moreover, the hole should be free from chips.
For drilling holes in a bar, sufficiently deep and large diameter, they usually use a low-speed electric floring (drill). In the passport of the power tool, it is usually indicated that the drill diameter in one or another material is calculated. Given the greater drilling depth, it is better to choose a drill with a reserve in power.
For drilling holes in a bar, it is convenient to equip the drill focus, as shown in the figure.
 The stop bar is attached to a drill with steel clamps.
 Emphasis wooden bar, attached to a drill, for example, clamps. Emphasis stops drilling on necessary depthBut the rotation of the drill after that does not stop. Continuing to rotate in one place, the drill cleans the hole from the chips, it turns into and, then, easily gets from the deep hole.
The drilling of the holes for connecting the crowns is convenient to produce in a bar, which is already installed on the wall in the project position on the interwetant insulation. But here usually The problem arises - the interventovaya gasket is not amenable to drilling. The fibers of the laying material are simply wound on the drill and clamp it.
You have to install a bar on the wall in two receptions. First, the timber is mounted without gasket and temporarily fix from the offset, for example, nails. Drill holes under bent. Then the timber is shifted from the wall and laid the interventic insulation.
In places of drills gasket cut out with a sharp knife. Then, the pace removed is re-installed in place, already on the gasket, and fastened with bellows.
Drilling holes in a bar laid on the wall should be produced, standing on a solid base - forests, suspensions, flooring. Stand on a narrow wall and drill dangerous. The drill can "eat", a powerful drill will unfold and easily throw an employee from the wall.
In the bar brought to the construction site, part of the bars may be curved. The bar may have a curvature in the same plane, or screw the screw and become a rhombid in cross section.
If there is an opportunity, then the curves of the bars are better not to use for the walls of the house or bath. Brux with curvature is recommended to cut into smaller parts and use in other, less responsible places.
A small amount of timber having a curvature in the same plane can be used for wall mounting. You should not put such a timber in the wall in bulk up or down, in the hope that it will straighten under the weight of the house - the bar will not straighten, even if it is placed in the lower crowns.
The curve bar is placed in the wall, straightening it in the horizontal plane as shown in the figure.
 Curve bar straighten consistently fixing it with brazers
 The curved timber is drilled, combining it at the drilling points with a direct bar. After laying the interventovate insulation, the curved timber is fixed with impudent at one end and the intake is consistently fixed with anticipation at the other points.
To extend the timber of great efforts. Easy work will help the lever and bracket
For and cold, gasket is laid between the crowns. Previously, for this was used moss or linen pass. Currently, there are special laying materials based on flank or flax. Material for sale in the form of roll ribbon 20 cm.
The tape of the gasket material is laid throughout the upper face of a bar in two or three layers and fastened with brackets using a construction stapler.
If the wall is not trimmed, the gasket must be 1-2 from the outer edge of the bar cm.Otherwise she will wet.
Some wizards lay the gasket material into one layer and offered after shrinkage to cut the jokes, adding an additional amount of material in the voids of the joints. In this embodiment, we have a smaller flow rate.
Work on the panties of the joints is quite time-consuming and tedious. It is better to immediately put the seal with a cessary, in several layers (three layers) to eliminate the need for horizontal jacks.
In the process of construction of the house or bath, it is necessary to regularly check the accuracy of the harness from the bar. To do this, it is enough to control the following five parameters:
For control vertical angles Apply the following method.
 To control the verticality of the angle on each side of the crown apply a vertical line. 1
— lower strapping; 2
- crowns; 3
- control lines; 4
- Cocol.
To control the verticality of the angle on each side of the crown apply a vertical line. 1
— lower strapping; 2
- crowns; 3
- control lines; 4
- Cocol. On each side of the crown at the same distance from the corner rib painted the vertical line.
For proper laying The crowns of this line should be direct and coincided with the vertical. The vertical of the line is checked with a plumb.
If deviations are detected, then the operation is suspended and eliminated by the cause.
The height of the corners and walls are measured roulette. The measurement lead from the base horizontal line, which is applied to the strapping bar using a water level.
Horizontal of the crowns and upper faces Bruus check by level.
Straightness of walls Determine visually by pulling along the cord wall.
Especially carefully and constantly check the verticality and height of the corners. Deviations from the verticality are eliminated, up to the replacement of the bar in the crown. The height of the angles is adjusted, increasing the thickness of the gasket between the crowns in the axial angles. Sometimes it helps, if you knock down a sledge hammer in a bar in a high corner.
The quality and thickness of laying interventory insulation check visually, examining the walls.
From the second crown, the doorways begin to form doorways. The distance from the floor to the window is selected in the range of 70 - 90 cm.
Laying timets in the crowns in the zone of openings has its own characteristics.
 but
- scheme arrangement of openings in the wall, where: 1
- wall; 2
- open doors; 3
- simpleness; 4
- open windows. in
- Scheme of cutting timber, where C is the balance of cutting. g.
- Option of the device of the opening in a chair with the installation of temporary bonding bars, pos.7. d.
- Option with installation in the opening of the deck, pos.6 - immediately get the opening ready for installation of the door or window.
but
- scheme arrangement of openings in the wall, where: 1
- wall; 2
- open doors; 3
- simpleness; 4
- open windows. in
- Scheme of cutting timber, where C is the balance of cutting. g.
- Option of the device of the opening in a chair with the installation of temporary bonding bars, pos.7. d.
- Option with installation in the opening of the deck, pos.6 - immediately get the opening ready for installation of the door or window. In practice, two options for the formation of openings are used when assembling a church.
One option - " g " on the image. The opening is done in the draft version, it is only preparation for creating an opening. The opening is preparing for the installation of doors and windows not immediately when assembling a log. This work is left for later - usually do after shrinking a church.
This option allows you to speed up the work on the grazing. In the opening, the bars are installed, bonding commonness with a log cabin, pos.7 in the figure. In the doorway, install at least two such bars.
In the process of shrinkage, the seaspler chub can "lead" inward or outward. To prevent it bar in stocks fasten up vertically installed boards.
In another embodiment - " d."In the picture, the openings immediately prepare for the installation of doors and windows. To do this, decks (soups) are installed in the openings - a vertical bar with a groove, pos.6 in the figure. The groove includes spikes of timber. In this way, the plain timber is fixed from the displacement. In this embodiment, the openings are immediately prepared for installation of doors and windows.
The decks (souls) traditionally serve not only for connecting timber in the opening, but also perform the role of window slopes, windowsill. To do this, they are carefully treated, relieve curly chamfer.
 Installation option Window in a wall of timber: 1 - finishing of slopes of the window; 2 - the board of vertical souls with a rail - spike, enters into the slide of the wall of the wall; 3 - frame of the plastic window; 4 - sealing ribbon psyl
 IN modern conditions, when installed plastic windows and the device of plastic slopes and window sills, decks (soup) can not be done. Brux in the opening fasten so. In the ends of the bars along the entire length of the opening, the vertical grooves drink and insert a railway there, which fixes the bars of simpleness from the offset.
The length of the deck (s) or racks should be less than the height of the opening by 5-7 cmnot to prevent the shrink shrink.
If the opening in the wall was made in the draft version (see above), then the installation of the window is starting from drinking the opening under the desired size. To do this, the rails are stuck, pos.2 in the figure, and the chain saw along the edge of the rails scolded bars.
 Proper installation Windows in the wall of the bar. 1
- wall; 2
- Rake; 3
- platband; 4
- window; 5
- window box; 6
- Bar wall above the window; 7
- interwidder insulation; 8
- Shrinking gap over the window and deck; 9
- window frames; 10
- Bar wall (simpleness); 11
- deck; 12
- Nail.
Proper installation Windows in the wall of the bar. 1
- wall; 2
- Rake; 3
- platband; 4
- window; 5
- window box; 6
- Bar wall above the window; 7
- interwidder insulation; 8
- Shrinking gap over the window and deck; 9
- window frames; 10
- Bar wall (simpleness); 11
- deck; 12
- Nail. Then the disk saw on the ends of the bars wall (simple) is cut out spikes. The spikes, pos.10, are planted with grooves, pos.11. The joints are sealing insulation. The deck is naked to the walls of the wall with nails clogged at an angle, pos. 12. So nails will not prevent the shrink shrink.
In the window prepared in this way, the window box is inserted, which is attached to the decks with self-draws. Above the window box be sure to leave the gap, pos. 8, to compensate for shrinkage. The magnitude of the gap 5-7 cm. The clearance is filled with soft insulation material.
Compensation clearance must be left over the top end of the deck.
Similarly prepare openings and insert the doors to the walls from the bar.
After completing the assembly of the first floor of the house, the log house is overlapped with inter-storey or attic beams (if the structure is one-story) overlap.
May be constructive element . And can perform and independent function.
The next page describes the structure of the broken roof of the house from the bar, where the beams of floor overlapping simultaneously serve as an element of a malicious roof filament frame.
Look at the video clip in which the logging technology from the construction bar is described in a detail.


