Any of the homeowners (baths, garages and other buildings are also considered) really want its structure as less as possible repairs. And first of all concerns the preservation of the foundation. For this, it is important not only to competently plan and construct correctly, you need to still take water - ground and precipitation. The drainage system is engaged in the drainage of groundwater, and the precipitates are removed using the scene. This snap is not the most complex device: the breakfast of any type is easy to make it yourself. Work and costs are not very much, but it solves several tasks.
We have long used to that there should be a walkway around the house: it gives all the layout a finished look. Especially if combined with finishing materialswhich formated the building. In addition, it is practical: you can walk along the track. And the fact that the track and there is a scene, and its main appointment is a water removal - this is a successful combination of properties and the qualities of materials and a thoughtful design.
The basic function of the basement of the foundation is to remove the precipitate from it
If you look from a utilitarian point of view, the scene takes the rain and melting water from the foundation. The second very important practical task that it can be solved with its help is to insulate the foundation. If the insulation is under the track, it will protect the house from the freezing, which is much reduced by heating costs.
When should I do a break? Immediately at the end of the finishes of the outer walls, but before the trim of the base is made. Why is that? Because between the decoration of the scene and the wall of the house, the compensation clearance is obliged. This is an excellent waterway for water that flows through the wall of the house (it falls on the walls with a braid rain, for example). But not to do this gap can not - the foundation collapses. It is too unrealistic to seal the gap to hermetically. The output is to make water in any case in the gap. This can be achieved only under the condition if the termination of the base will hang over the seam. Then the water will flock a few centimeters further from the seam, and then fall into the drainage grooves. You can do this only if you first organize a breakfast, and then bring the base to mind.
Why do you need a scene of the foundation when I do it, figured out, now it remains to understand how to do it correctly.
Distribute the rainfall from the foundation is necessary throughout the perimeter. Therefore, the protective belt makes around the house. The width of the scene is determined depending on the type of soils on the site and on the length of the cornese sweep. In the general case, it must be wider than the roof of the roof by 20 cm. But the minimum standards are installed in SNOP: on normal soils, the sideline is not less than 60 cm, at least 100 cm.

The width of the house of the house is at least 60 cm on normal soils and at least 100 cm on subsidence
Also in SNiP allowance 2.02.01-83 there is paragraph 3.182 .. there are such instructions:
The cessions around the perimeter of buildings should be prepared from the local compacted soil with a thickness of at least 0.15 m. The scene should be arranged with a slope in the transverse direction of at least 0.03. The blocking of the breakfast should exceed the planning no less than 0.05 m. Water falling into a breakfast should come unimpeded into a livnevase network or trays.
From this disbuild it is clear that the depth depends on the selected technology, but can not be less than 15 cm.
Any germination consists of a fitting layer and protective coating.
The task of the underlying layer is to create a smooth base for laying the protective coating. Its thickness is about 20 cm. For these purposes, sand and crushed stone often use, but you can also apply native soil or clay.

Sand and crushed stone apply on well-draining soils. In this case, first put sand, it is shed and trambed. Then - a layer of rubble, which is also compacted.
If the soil is on the clay or loam area, then use better native soil. If with such soils around the foundation to lay crushed stone or sand, then water will necessarily be present near the house. Because it turns out that the density of the soil outside the underlying layer will be higher. This will lead to the fact that the water will accumulate under the breakfast. If with such a design along the perimeter of the subfolder to lay a drainage pipe, the problem will solve. Moreover, effectively. But the work will be greater, and the cost of breakfast with drainage is higher.
The coating for the scene must meet many requirements:
It may be paving slabs or paving. Form and color can be very different - select based on the general design of the territory, the houses of nearby buildings. The thickness of these materials is at least 6 cm, only in this case they will withstand the hard mode of operation.

You can use stoves or tiles of natural or artificial stone, you can lay out the tracks with a large pebble or on top of all layers, pour rubn.
There is another kind that is becoming increasingly popular - this is a soft scene. It has some layers, but works efficiently. From above, no solid and waterproofing layer may not be: you can pour soil and put the grass or flowers. Interesting solution For cottage or country cottage.

All these options are not bad, but the cost of their arrangement is large enough. If there is a need or desire to make cheap and angry - your selection of concrete scene. Works will be a lot, but the total cost is low.
Depending on the soil on the site and destination of the building can be used different materials and the structure of the layers, but there are some points that are always present:

First, around the perimeter of the building with pegs and cords make marking. Next, the order of work is:
It is very short and schematically. Each coating has its own characteristics, and everyone needs to speak separately.
The most widespread coating is concrete. It turns out the most inexpensive. A traditionally, the underlying layer consists of spilled rammed sand (10 cm) of sand, on top of which a compacted crushed stone was laid (10 cm). As already wrote above, such a scheme works normally on well-draining soils.

If around the house is clay or loam, make the underlying layer from native soil. To reduce the effect of powered and avoid cracking over the compacted soil, pour 10 cm of sand, and already lay the concrete on it. So concrete will crack less, but completely from cracking you do not get rid of: especially in the regions with severe winters. In such conditions, it is better to make a breakfast from rubble or pebbles - there will be no problems with cracking. If you allow the means - make it from the tile. For harsh winters, with properly selected layers of the substrate, they are good.
In general, it is desirable to make drainage on bunny soils, which will divert water flowing from the tape. It will be an efficient and reliable solution. All others are only semi-dimensions. The drainage pipe is placed so that water from the coating falls into it.
On the perimeter of the zone marked and the formwork is installed and fixed. Most often, the board is sufficient height, fixed by pegs and struts.
To reduce surface cracking, reinforcement often use. To do this, on the finished underlying layer lay a grid of steel wire with a cell of 10-25 cm.

On top of the grid (if there is it) folded wooden planks treated with antiseptics. Plank thickness 2.5 cm, and you can handle them with hot oil. These planks are damped seams that will not give concrete to crack when temperatures change.
Planks are exhibited with the preservation of the lounge from the house. On them then "pull" the rule, equalizing the solution.
In order for the surface to be durable and smooth to carry out an iron. Almost immediately after the fill, while there is still cement milk on the surface, the concrete is sprinkled with cement (you can trigger several times) and rub the trimmer or plastering grater. From above, a thin, but durable, smooth and slightly shiny surface is formed. It is very resistant to abrasion.

The last stage is concrete care. The track is covered with a damp cloth. During the week, it is regularly wetted (splashes from the hose or watering can). The fabric should remain wet. In order not to suffer with watering, you can close the film, but it is more difficult to keep it in one place.
For breakfasts use standard sandy-gravel concrete. The darkness is preferably not lower than M150. It is possible above: the higher the brand, the more durable it turns out a protective coating. The proportions of the compilation of the solution for the scene can be chosen from the table. They are given for concrete M400 brand - not very expensive, according to the characteristics normally.

It makes sense only in a house with heating. In the buildings of seasonal living, in which the plus temperature is not supported in winter, this makes no sense. The point of adding the heater of the insulation double:

If the insulated scene of the house is laid at the design stage, then another reason is added: if this part is presented, lowering coefficients are applied. That is, the foundation has a smaller height, and therefore cost.
A variant of the device of a warmed concrete unit with a drainage system is demonstrated in the video. Everything is described normally, did not specify only what to do if the layer of loose soil is more than 40 cm, which are required for the breakfast. In this case, it is necessary to fall asleep it with a soil having a density above what is located on the site. If on the clay site, you can use only it. If it is a loam - you can take or clay or loam.
One moment: the clay is not soaked in a dry state, but diluted to the state of the paste. The technology is old, but nothing better has been invented. It is laying out layers, trying to avoid the formation of air pockets - water will necessarily be forced (or someone settling).
This is one of the types of soft scene. It is easy to make it yourself. Such a system is used if there is a drainage system or the soil relocates well, and the clay or loams are not under the vegetable layer.

The order of work is such. In the tired trench on the aligned and compacted bottom, the layer is stacked. This stater material, but very elastic. He will not give a crushed stone or pebbles into the ground. And the track will not do. Top is poured and crushed stone. The layer thickness is 10-15 cm, fraction 10-80 mm. Everything.
If desired, the gravel germination can also be done insulated. Then the trench on the compacted and the aligned soil is placed (extruded expanded polystyrene foam) with a thickness of 50 mm, the high density geomembrane is littered from above, and it is already possible to pebbles or crushed stone. But on such a path to walk undesirable.
There are several device options, but the most optimal and universal will be "pies" using geotextiles.
For example, one of them is presented in the figure. It can be used for a device of a breakfast on bunny soils with severe winters. Note:

It is desirable to use geomembranes as waterproofing. They are made from high density polyethylene. According to brands: You can take the Tefond, Izostud, Fundalin, TechnoNikol Planter Standart, etc. It is around 150-250 rubles / m 2.
Geotextile has different brands and different density, with different functional purposes. Choose based on the geology of the site. Their price is from 15 to 50 rubles / m 2.
With the device of the scene, with your own hands, the main thing is to make water leave from the foundation, and not going to the sand or crushed stone layer near the house. What will surely happen if the ground is powderable (clay or loam), the underlying layer is made of sand and rubble, and there is no drainage.
The right of the house is considered to be a great opportunity to ensure reliability and protection of the existing foundation part of the structure. Moreover, due to the following information described below, each willing can make a break around the house with their own hands from concrete. In this case, all the work can be easily and easy to perform with minimal cost. You can also avoid possible damage to the base of surface waters.
Concrete Skost
Deciding to do a break, first of all, it is necessary to determine the following important moments:
With the help of a cessation from concrete, it is possible to substantially protect the structure from the adverse effects of moisture. After all, it is impossible to achieve a similar effect with any other material. It is known that the following natural factors may affect the base of the facilities:
In order to effectively counteract these adverse factors, it is of great importance to the foundation of the structure. Therefore, it is necessary to protect it at a maximum of capital, and also reliably just with the help of the scene.

The process of filling the scene
Using the correct definition of basic parameters, you can count on receiving a durable and correct design as a result.
Regarding the product from concrete, you can allocate the following rules:
Consider how to do the design and which parameters are important in this process.
1. bias. The maximum permissible will become next indicator Embrelon of the surface - 1-10 cm / m. IMPORTANT: The angle of inclination should be directed strictly FROM foundation. Such a large gap in the indicators can be easily explained by the fact that the angle of inclination is calculated and dependent in the end of the type of soil cover. Also important is the amount of precipitation, which are characteristic of a particular region. Most often there is a slope equal to 2-3 cm / m (i.e. 2-3 degrees). If you can apply more importance, during the icing period, as well as freezing, the breakfast will not be used as a track.
2. Host from the soil level or the required level of breakfast over the Earth should be at least 5 cm. Thanks to this value, it is possible to avoid possible moisture accumulation at the edges of the structure. After all, water should not be able to accumulate on the edge of the scene and turn into unwanted puddles. In winter, it can lead to freezing and subsequent destruction of the existing design.
3. Highness of the base unit. There should be 50 cm (in the event of a rigid type of concrete design). In the case of a soft, this indicator is 30 cm. Rememberthat the scene around the house from concrete belongs to the hard type.
4. Border. Carries more decorative purposes. Therefore, it is possible to establish it, based on its own preferences and financial capabilities.
IMPORTANT! If the raspberry, blackberry or poplar, their roots can quickly and easily destroy the design will be located nearby. Therefore, in such a situation, the construction of the scene will be the most appropriate and useful.

Concrete Device Device Scheme
When the device of the scene around the house, the arrangement of competently executed is important reinforced beltwhich will be all over the perimeter of the residential structure.
What should this design consist of:

Reinforcement of Gamesost
What does the construction scheme look like in general:

There are several types of solesteps depending on the following characteristics:
Depending on the listed features, the following types of oscillation can be distinguished:
And each of the selected types has own features, as well as the technology of arrangement.

Options for Ozostki

Tool
The features of the scene around the house of the hard-type concrete can be attributed:
IMPORTANT! If you wish to warm the design in the future, it will be the best design for you the best design. After all, other options are simply ineffective and unreasonably insulating.
Such a design is distinguished by a number of significant drawbacks:

Ready Game
In this case, a multilayer pillow is the underlying layer. The top element has a form paving tile either paving stones. You can also meet other modern types of coatings:
Compared to harsh structures, semi-rigid options have a number of advantages:
The disadvantages include:

Paving slabs
In order to arrange the design of a soft type form a multilayer pillow. From above, it is covered with a layer made of rubble.
To the merits can be attributed:
The disadvantages include:

Options "soft" scene
For the construction of the scene around the house with their own hands, the use of the following materials is required:
So, we considered the fundamental moments and questions concerning the construction of a concrete from concrete on their own. In more detail and in detail different stages and important moments Describes in the following articles on the topic.
At the final stage of works on the construction of a private house, developers arises a feeling that the building is ready to operate. Wanting to plunge into solving issues on the improvement of residential premises and quickly accomplish, many do not give serious importance to some points. An important nuance is a mess around the house. It solves the task of preventing the conjunction of the foundation around the structure, ensures the durability of the building.
Private house breakfast is an integral element of the building. It is not necessary to prematurely sit down and celebrate a housewarming, moving "for tomorrow" its structure. After all, the strength of unprotected foundation is gradually reduced by moisture, uneven shrinkage occurs.
Experienced builders around the building always build edging that can be performed in various performance. Compliance with technological recommendations allows you to reliably protect the foundation of the structure over the period of operation. Only adhering to the technology, you can correctly make a break around the house. Consider the purpose of the protective edging, parameters and structural versions. We will define the choice of building materials to perform work, as well as study, as in accordance with the technological requirements there is a breakdown around the foundation of the structure.
Protecting the foundation, the private house is performed in the form of a kind of edging around a building having a small slope to the outer side.
Scene near the house, first of all, acts as a kind of protection along with a decorative function
It is designed to solve serious tasks:
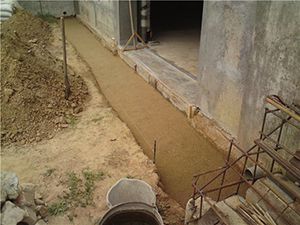
After the end of construction events, start doing the breakfast so that until autumn rains and winter frosts, to protect the adjacent soil from the convergence, and the foundation of the structure is from destruction.
In order to correctly make a break around the house, follow the recommendations of professional builders.
 Settleship is installed around the house with their own hands after the end of the wall layout when time comes exterior decoration
 They emphasize the attention of beginners of developers on the following nuances:
Fulfillment of requirements construction norms Create favorable conditions For long exploitation.
Consider from which building materials, the scene is performed around the house. Enjoy popular:
 In addition to its direct appointment, the scene "works" as insulation basement building
  The width of the strip should not be equal to the level of the protrusion of the roof, it also should not be of this protruding edge
 Most of the private developers perform concrete edging of the structure. For its construction, the following building materials and tools will be required:
Deciding with the coating and preparing building materials, proceed to further work.
 Initially, the layout of the future protective strip is carried out, for the arrangement of concrete protection
 The edging around the structure is distinguished by manufacturing methods, as well as constructive features. They include two layers performing various functions:
Answering the question of how to make a break around the house, we inform you that there are various solutions. The standard classification of silent surfaces provides for the following varieties:
 So that the future of the house of the house was strong, withstand the load on compression and stretching, it must be reinforced
 Choice optimal option It is made individually depending on the possibilities.
Standard technology provides the following operations:
We will try to answer the question of how to make a break at home.

Sequence of preliminary work:
When performing work, pay attention to the horizontality of the prepared surface.
For the device, the hydraulic device can be applied:
These building materials provide high level Waterproofing.
 The bolted concrete mix must be flushed to the house, slightly squeezing it
 The subference is made as follows:
For the drainage device, it is necessary to put pipes under the rubble layer, ensuring the slope of the highways.
Algorithm for action on the assembly of a wooden frame:
When performing work, form transverse seams with thin planks located in 2 m increments.
 Do not evaulting immediately after the construction of the base
 Install the insulation is easy:
Laying of reinforcement and fill concrete is the final stage. Sequencing:
After final hardening of concrete, dismantle the formwork.
The recommendations of the builders will help to correctly do the break. It is necessary to determine the design, comply with the recommended dimensions and technology. It is important to provide harmonious combination Edging and exterior decoration of the building.
The village of the house compared to its foundation has an incomparable smaller cost. Make a good break is much easier than to build a foundation. But all of the above does not mean that attention to this important detail should also be much smaller that often, alas, and happens. The scene compared to the whole structure of the house may seem like a small screw, but it strongly depends "health" and long service life of the whole structure.
In the article, we are going to consider in detail how to make a break around the house, and how to do it right, as well as consider different options and indicate in what cases it is advisable to apply them. Recommended will be considered construction MaterialsIt should be used to create a good scene of the house.
The breakfast is called a bandwidth of the waterproof coating, which is moving all the house around the perimeter. Most often, we are accustomed to observe the scene from concrete or asphalt, however, all the two materials are not limited. The main task of the classical breakfast is to not allow atmospheric water to enter the foundation and in the soils located near it. Why is this done?


The creation of a high-quality settlement of the house is included in the complex of measures for waterproofing the foundation and its drainage - a closed or ring. By itself, she "in the field is not a warrior" and will be able to fulfill its main protective destination along with other elements. Why do you need a scene at home?

Almost for all houses and buildings, the scene is needed. For a ribbon, slab, monolith-ribbon foundation, it is simply necessary. If the house is erected on the pile or, then the scene will only perform a decorative function.
Consider what types of scenes exist so that there was a "opportunity" to try on a particular option to its conditions and choose the most suitable.
This species of the scene is rooted in the distant past. It is this material that our distant ancestors used to protect the foundation of their home from moisture. And, despite the fact that such a way to create a mess may seem archaic, which it is time to send "to the dump of history," it can well be applied on modern buildings. Everyone knows the properties of clay - its plasticity, refractoriness and main quality - waterproof. This material is the best natural waterproofer. Almost all underground sources of artesian water are concluded between clay layers. Another useful property Clay - It is impossible to grow any plants. Of course, if the clay has a certain degree of its purity.

This deficiency is done very easily. A fertile layer of soil is removed on a given width and depth, and the clay is poured and the clay. It is better to use pure career clay. The profile of the scene is given a bias towards the wall to its edge, and then the clay is reinforced with gravel or rubble, which should be imprinted in its layer. An interesting composite coating is formed. Clay provides reliable waterproofing and plasticity, and crushed stone or gravel provide the desired stiffness of the scene and prevents water blur. The clay germination together with a crumb or gravel coating looks good and will even be able to even become an element of the decor of the house, especially wooden. The clay scene will never crack, it is easy to repair. She can serve dozens of years. Surely, many have met roads without coating on clay soils, which are strengthened by stones. They are already a lot and will serve even a lot. Even freight cars in rainy weather on the "progress" on such roads a rut.
A significant limitation of the widespread spread of clay food is their main disadvantage - with a direct, long-term and strong exposure of water, clay will still be gradually washed out. Therefore, in most cases, more modern materials use.
This type of ottostok is the most common. And it is not in vain. One of the most common materials and scenes from it have a set of advantages:

Concrete breakfasts, however, are not devotioned:

The thickness of the concrete slaughterhouse in its very thin part should be at least 5 cm, but, given that it is constantly under the influence of natural forces - it is better to do it minimally 7 cm. Naturally, the concrete deficiency is given a slope of 3-10 ° in the direction of Walls to her edge. The width must be at least 20-30 cm greater than the sink of the roof cornice, but in no case is at least 60 cm.

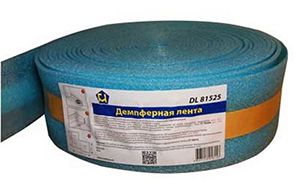
The scene must catch the entire house around the perimeter and not have a tight connection with the walls. The fact is that during seasonal moves of soils of the structure of the house and the scene will behave differently and the presence of a rigid connection will lead to the appearance of cracks. In addition, different materials have different coefficients of temperature expansion. Therefore, they make the so-called deformation or compensatory seam which, on the one hand, provides the desired seal to prevent water penetration, and on the other hand, allows mutual movements of the house and the scene. The deformation seams for a long time were made from the scenar sawboards, but now various synthetic materials can be applied. Very often, compensation seams are made of a folded halve of rubberoid or foamed polyethylene. There are also special damping tapes for screeds or warm floors that are also quite used for the compensation seam between the cabin and the base house.

In the concrete tape, the scenes also necessarily arrange compensation seams. They are made at the corners, and then every 1.5-2.5 meters. As seams, melt or spotted edged boards with a thickness of 20 mm, strips of laminated plywood or OSP. When filling gallery, they serve beacons for her alignment and in the future, after setting, they can be removed and filled with polyurethane-based sealants or left in their places.
Such gentlemen is also distributed quite widely, but mostly not in housing construction, but in industrial or commercial facilities. The asphalt compared to concrete is more plastic, the probability of the appearance of cracks on it is negligible. Asphalt malfunctions are less groundwater, as it is enough to create a solid and water-resistant water to the effects of water. They are strong enough and are able to serve dozens of years.
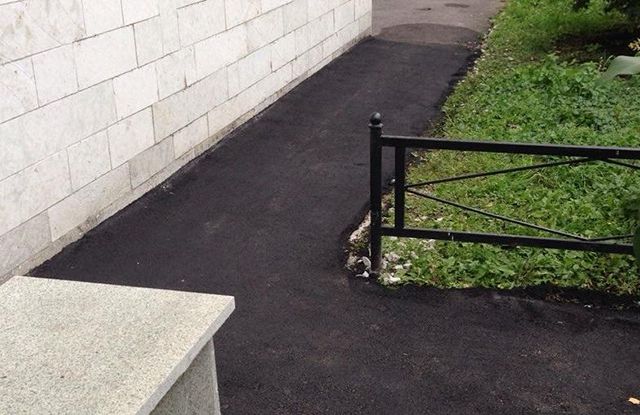
However, the widespread use of the gelatin from asphalt found only in the construction of a non-residential fund. When the asphalt heating, the asphalt can soften and hydrocarbons included in the bitumen, which is binding for this type of coating from it, begin to evaporate. In addition, laying asphalt requires the use of special road machinery.
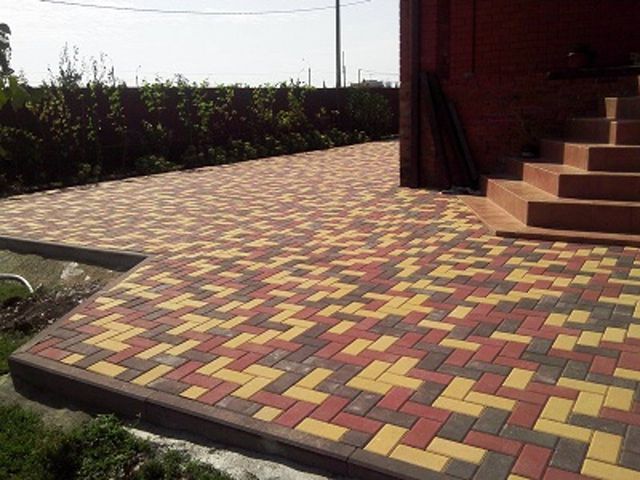
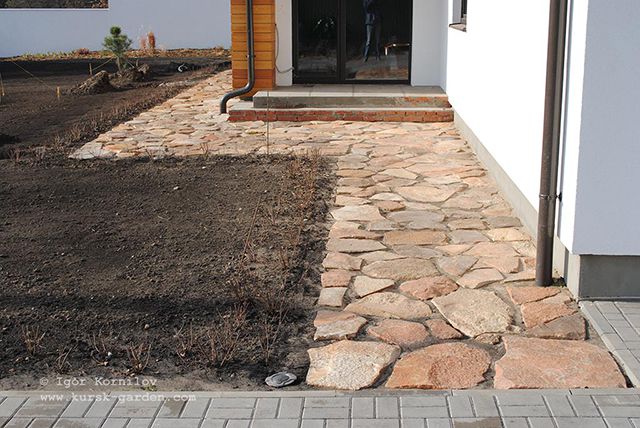
This type of scene will be most preferable if the house is planned to fit in harmoniously into the surrounding landscape. A cozy and beautiful garden with a paving tracks, separated by natural stone or its imitation base, will be it better to harmonize with sideways from a paving or paving slabs. Natural stone can be attributed to the same category, since in terms of the technology of preparing the base and laying differences in large. A natural stoneTrue, requires high qualification of the wizard.
What are the advantages of sideways from paving or paving slabs?

 Vibropressed blocks - excellent material for messy
The main disadvantage of the stern station from the paving is its relatively high cost compared to the concrete "classic". From this situation there is a good output - if in the breakfast will only walk, it can be brought by paving slabs, which is thinner, and cheaper by paving. The platforms and tracks that will be subjected to high loads can already be harmonious with a blocking paving slave. Most of the manufacturers of vibropressed paving slabs or paving slabs offer products of different thickness. After laying it is no longer possible to distinguish where the stones thicker, and where thinner. The device of the breakfast from the paving or paving slabs is shown in the figure.
brushetka

Paving or paving slabs still has one an important featurewhich can manifest like in good videoand in the opposite. Such coatings are stacked on the sandy base and have gaps between adjacent elements. If water gets into a paving slave most of Will be accepted by rainmakers, given the mandatory slope, drain on the grooves and surface into the water driving trays of the surface drainage system. But some part will still be able to leak between blocking elements into the underlying layers. Now consider how this feature can manifest in good and bad form.

On the thematic forums dedicated to construction, there are a lot of questions about the blocking and paving slabs in general and the scenes of them in particular. The developers sometimes are simply in bewilderment because the good and flawlessly laid scene from the paving slabs begins to get worn after the first winter experience. And this is most often due to the fact that the crushed stone and sand when melting snow are saturated with water, which is simply nowhere to leave due to clay soils around. This problem is solved very simply, but not for free:
The scene around the house, except for the vibropressed concrete paving, can be made from more expensive natural materials.
We will consider in detail in one of the following sections of our article in detail about how to make a breakfast from a pavement or paving slabs in one of the following sections of our article.
It may seem that in the title is hidden by some trick. We are subconsciously accustomed to perceive the scene as hard and reliable designAnd the word "soft" seems inappropriate. However, everything is wrong. Such devices are applied very long and successfully. For many decades, soft gentlemen serve without repair, and in such climatic belts, where they are affected in different seasons and water, and snow, and severe frosts, and heat.
Some varieties of soft messages are also called Finnish, thanks to the country where they got wide use. The inhabitants of Finland are difficult to end in stupidity and impracticality, they live in more hard climatic conditions than most of the regions of Russia, build a lot of good and comfortable homes. No wonder the Finnish builders consider one of the best in the world. It is possible that we make sense to take into some experience in the Finns.
As noted earlier, the scene must solve two main tasks. The first is the prevention of water from entering the design of the foundation and soil near it, and the second is the preservation of the integrity of the gentlestation itself in order to preserve her presentable look and solve the first task. That is, the integrity of the scene is one of the main tasks and a person is forced to constantly fight for this by the reinforcement, creating deformation seams, drainage and other activities. Wise Finns decided to stop the fight and make a gentle-soft. One of the embodiments of this approach is shown in the figure.

The main thing in the construction of soft messages is a very interesting approach - it is not necessary to "bother" on the integrity, monolithic and waterproof design of the upper decorative layer, and it is better to focus on how to remove water already penetrated through it. That is, the "most interesting", those elements that carry exactly the protective function, in these species of the scene are out of sight. If the water penetrates through the top layer, it is better for her not to hinder - let yourself be seeded on health and the faster, the better. But then the water is already "waiting" the drainage tube, which also "with pleasure" takes and takes away from the foundation in the wells.
The waterproof layer on which the scene is located and the drainage tube is reliably cut off from other soils by any waterproofing material. Ruberoid or other materials, such as PVC films for swimming pools, can act as it.
The best for waterproofing the result gives the so-called PVP membranes (profiled waterproof polyethylene). They are made of high density and strength polyethylene (HPDE), absolutely inert to all substances that can meet in the soil. According to official documents - test reports declared by manufacturers, the service life of the PVP membrane is at least 60 years, and in reality there will be more if the installation is made correctly. This means that it is not necessary to make waterproofing again for all my long and happy life. In principle, the durability of the membrane is approximately equal to the average service life of the house.

PVP membranes have on their surface of irregularities in the form of truncated cones, 8 mm high. Thanks to these protractions, water is easily assembled on the surface and flows under the action of gravity forces. Therefore, the membrane in a soft deficiency is always laid under a slope in the direction drainage pipe. For laying in the ground it is better to use a composite geomembrane consisting of two bonded layers. The first layer is the actual PVP membrane itself, and the second is a geotextile canvas that freely transfers water and does not allow the surrounding soil to fill the entire space between the embossed protrusions.
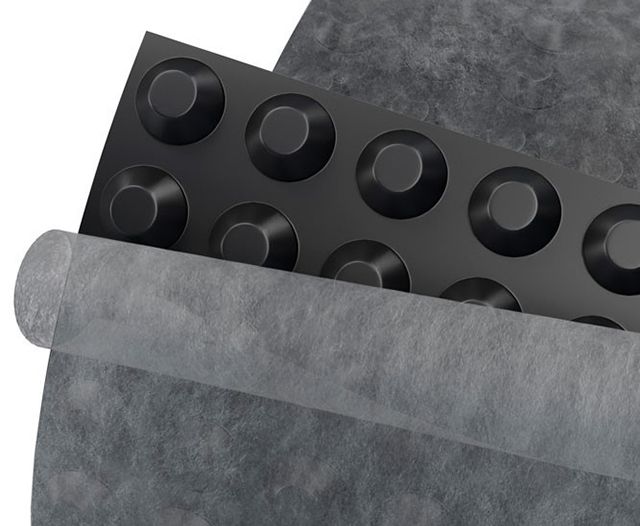 For waterproofing, the scene is best suited for profiled geomembrane bonded with geotextile
 In soft scenes there may be different finish layers, that is, those that can be seen outside.


Soft cessions are increasingly applied in the individual housing construction of Russia. And this is quite justified, after all, their advantages are obvious:
 Lawn, reinforced by geovel
 The disadvantages of soft softening include:

Some sources are mild from paving slabs or paving slabs, arguing such a choice in that there are no hard grounds in such structures. We do not intentionally do this for two reasons:
In order to avoid unnecessary disputes on the belonging of a particular type of construction to mild or solid, we consider in the article of a block of blocking or paving slabs in a separate category. So it will be much easier.
In the nearby past, some other than 20-30 years ago, during the construction of houses in our country there were no such issues at all. The foundation could warm up in the sinuses with a clay, and the gentle was not warmed separately at all. The foundation has always been laid below the level of soil freezing. And it was one of the few measures to protect the foundation from seasonal movement of soils on bunched soils. However, construction science and technology did not stand still, with them new materials appeared. As a result, in global construction, construction came to one conclusion to reduce the negative impact of frosty powered for the foundation, especially on bubbly soils - it must be insulated. This is still in addition to reduce the depth of the sole of the foundation in the ground, which significantly reduces the costs of it. And if the foundation itself is insulated, then the scene is mandatory too. Just never otherwise! We present the main reasons why the insulation of the foundation and the scene is needed.

The insulation of the scene does not need to be done only in two cases:
As a heater, completely different materials are offered, but in order to save readers from the flour of selection, we offer only the best price and quality ratio. This is extruded (estrusional) expanded polystyrene - EPPS. Why is it recommended to apply this material?
 The most popular insulation material in the world - extruded polystyrene foam
 The thickness of the insulation of the scene is calculated, but in no case should it be less than 5 cm.
As an example, we consider in detail the processes of creating three types of scene: reinforced concrete, from a paving and soft.
Consider the process of creating a concrete warmed ceiling around the house. At the end of this section, a calculator is proposed, which on the perimeter of the house, its configuration and sizes of the scene will help calculate the amount of concrete required for laying concrete.
Immediately, let's say that the number of options for implementing concrete breaks with various materials and technologies is infinite. Everything is not described in the framework of the same article, but even in a multi-volume edition it is simply impossible. We describe one of many, but the one that is implemented on a large number of objects and is successfully exploited by a sufficient long time in order to say that such a design justifies itself. Imagine for the convenience of perception the main stages of the process of creating a concrete breakfast in the form of a table.
| Picture | Process description |
|---|---|
 | Works should be made only in the warm season. First, the markup of the scene is made. It should be no less than 20-30 cm than 40-30 cm than the sink of the roof cornice. The smallest height is 7 cm, the slope is 3-10 °. Initially, it is denoted by the cord stretched in the level between the outer edge of the scene into the ground. If the curb stone and drainage trays of the surface drainage system are installed, then their width is also taken into account, since the soil must be developed for them. The horizontal of the cord is checked by a waterpaste or laser level. |
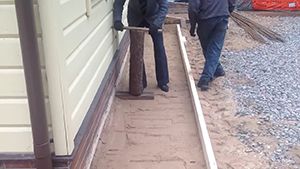
 | On the wall of the base, the top level of the adjuncing of the scene is noted. To do this, there are marks in one place at a convenient height (1-1.5 m), and then they are transferred to other places with a laser level or waterpaste. Next, the plumbing and tape measure is transferred down. The adjunct line can be accumulated by a pencil or marker, but it is more convenient to "repel" with a painting cord. |
 | On the marked base, the ground is removed to a depth of at least 30 cm. The main thing is to remove the entire fertile layer and "get" to a solid reliable base on which the scene will lie. If there is a need, then the soil is removed on a greater depth. Be sure to get rid of the roots of all plants and to prevent their growth in the future can be treated with the soil with herbicides. The profile of the trench bottom is given a bias towards the outer edge of the scene. |
 | At the bottom of the trench, the underlying layer of the core "fatty" clay, which is then trambed. This layer also attaches a slope. If on the plot of clay or drum soil, then only the trenches of the trench bottom are bypass. |
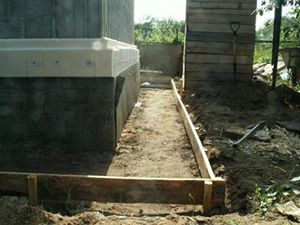 | A formwork from edged boards is installed on the outer edge of the future breakfast, which is fixed with wooden pegs or stretches of fittings driven into the ground. The top edge of the formwork is exhibited on a previously stretched cord and check the level. |
 | On the bottom of the trench, the non-woven geotextile thermoplated canvas density is lined with a density of at least 150 g / m², which should be completely covered and have access to the wall of the base and the edge of the trench by at least 30 cm. Geotextile is needed for separating heterogeneous soils. |
 | The layer of geotextiles is embanked by the layers of large construction sand with a thickness of at least 20 cm. The sand is spilled by robbles, shed water and trambed the first time. It is preferable to use a mechanized method of tamping using vibratinglitis. |
 | IN hard to reach placeswhere the vibroplite will not be able to pass, use manual tamping. After the first rambling, the sand and trambed again in the right places. The process of watering water and tamping continues until there is an even and dense base from sand, which practically does not remain traces when walking. |
 | If elements of the surface drainage system are installed - rain-seekers and sewage discharge pipes from them, then in the already rammed sand for them, pits and trenches. At the same time, it is necessary to take into account the level of the future breakfast - the rain-seeker must be installed at its level, taking into account the slope. The installation of it should be made on a concrete solution with a layer of at least 5 cm. Sewage pipes should also be laid with a slope - at least 2 cm for 1 lineage meter pipe. |
 | Trenches with pipes and mounting pits of rainhearts are sprinkled with sand, which is then trambed. In places of passage of sewer pipes and near rain-seekers, this can be done only carefully and manually. |
 | In the layer of the rammed sand, the heater from Epps is stacked with a thickness of 5 cm. If the upper part of the base was not insulated, then it can be done simultaneously with the breakfast. The insulation plates are stacked on the rammed sandy base. If necessary, they are easily cut by a building knife. Plates must lie tightly on the ground. If necessary, when they are laying in the right places, sand is sweeping. |
 | After laying the seams between the plates are filled with mounting foam. |
 | A compensatory seam is formed in the place of adjusting the scene to the basement. This can be done coherent twice and glued to the wall with a rubberoid foamed by polyethylene, a special self-adhesive ribbon for seams of a warm floor. Sooh must perform for the top edge of the future cessation by 5-10 cm. If the scene will be adjusted to the polystyrene foam, insulates the base, then the need for additional materials not. |
 | A metallic reinforcement grid of wire with a diameter of 4 mm with a cell size of 100 * 100 mm is stacked on the insulation layer. In the right places, the grid is cut. The edge of the grid must be defended from the end of the scene to 5 cm. If you need to put more than one grid, it is a nestrest on one cell, and then the grids are fastened with knitting wire .. |
 | The reinforcing grid must be in the concrete layer in its lower part at a distance of 3-4 cm from the insulation. To install the grid at the desired height, it is best to use special fixtures of reinforcement, which have different heights and are intended for different surfaces. To install the reinforcement grid, it is better to use the locks for bulk surfaces. Before laying concrete, all parts of the surface drainage system are covered with a polyethylene film. |
 | From cutting boards with a thickness of 20 mm, lighthouses are made or thin laminated plywood, which will simultaneously serve deformation (compensatory) seams in the breakfast. Segments are cut from them desired sizewhich one end is attached to the basement at the previously designated level, and the other to the formwork. The upper edge of the beacon must coincide with the surface of the future breakfast, and the bottom tight pressed against the insulation plates. Lighthouses are exhibited at the corners, as well as 1.5-2.5 m throughout the breakfast. The optimal is the distance of 2 m. |
 | For the pouring of the scene, the M250-M300 brand is used, but not lower. Learn more about the recipe and preparation of concrete of the desired brand in the desired quantity can be found in on our portal. The volume required for breakfast can be calculated in the calculator at the end of this chapter. |
 | To improve the properties of concrete when it is prepared, it is recommended to use plasticizers, as well as add polypropylene or basalt fiber. |
 | Mixed concrete is better with a concrete mixer or mixer - such mixtures have best qualitythan mixed manually. |
 | Concrete laying is gradually, sites between the beacons. Concrete is first fitted on the surface, then distributed to a cylma or shovel, and then align the aluminum rule for beacons. After laying on one site between the beacons, go to another. |
 | 1-2 hours after laying it is necessary to make an iron deficiency. For this, a thin layer of dry cement is poured through the sieve to the upper surface of the concrete - about 2 mm. Then a manual grater of polyurethane, dry cement is rubbed into the surface of the scene. Booting in the breakfast is possible only after 48 hours. |
 | For high-quality ripening of concrete, it is necessary to moisturize its surface to the surface daily, and then cover the polyethylene film or wet dense cloth. This operation should be done within 10-14 days. |
 | After the complete pouring of the concrete - after 28 days, the formwork is dismantled. Gotovka is ready. |
In the future, the breakfast can be equipped with a curb stone, to make storm sewer at the edges - install drainage trays and sands. About how to do this, described in detail in the article on this topic on our portal.
We provide the readers of our portal with the ability to independently calculate the volume of concrete required for the breakfast. The initial data for the calculation are the geometric dimensions of the breakfast: its height of the wall, height at the end, width. And also for calculations you need to know the perimeter of the house: the sum of the lengths of all of its sides. This calculator calculates the volume only for homes having a rectangular configuration if there are some foundation roundings, this calculator cannot be applied or can be calculated only on direct areas.
The calculations also takes into account the configuration of the house, namely how much external or inner corners. If you need to calculate the volume of concrete for a direct area, then you must specify that the number of external and internal angles is zero.
Even the most durable foundation over time is influenced by moisture, which gradually reduces the load on the drainage system of the house, as well as to vertical waterproofing. That this does not happen, a concrete breakdown is performed with their own hands, the step-by-step instructions of which will be considered in the article.
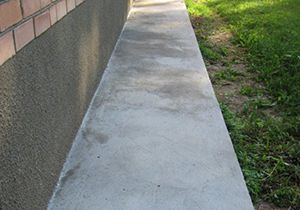
Concrete scene is the required coating to protect the foundation
In addition to its main function (protection against interaction with moisture), this coating also allows you to arrange a pedestrian zone around the perimeter of the house and give the architectural look of the construction completed.
However, before pouring a break, you need to pay attention to her constructive features and requirements for construction objects of this type.
Concrete breakfast has a fairly simple design, to prepare which the following materials will be required:

The grade of the solution must be carefully chosen, since the strength and durability of the entire structure will depend on its quality and characteristics. For such a coating, a mixture of M 200 is usually used, the strength class is not less than in 15 (you can also purchase a higher brand). It is also worth paying attention to the frost resistance of the composition, which should not be less than F 50. To ensure the best resistance to the differences temperature modesIt is recommended to give preference to the composition with the indicator F 100.
To obtain quality coating, most advantageous to make a concrete mix on their own.
To organize a concrete break around the house, it is not necessary to buy a ready mix and order an expensive delivery of the concrete mixer. Knowing the proportions of components, you can make concrete M 200 on your own, for this you need:

Accordingly, to get 1 cubic meter of concrete you need to mix:
Also using PC 400, other brands can be obtained.

Useful! First of all, cement and water is mixed, and only after the composition turned out to be homogeneous, sand and gravel add to it.
In order for the design of the scene to be durable, and concreting was durable, specific rules and requirements are provided.
To fill the bedside of the house, concrete must be familiar with the regulations and recommendations of SNiP:

There are also several schemes, which can be erected from rubble, in the form of monolithic concrete coating As for the usual type of soil, and for the "problem".

Knowing the requirements of SNiP and features country plot, you can make a break with your own hands using step-by-step instructionsThe following.
The device of the device of the unit includes several stages that even newcomers can cope with the construction work.
In order to proceed to creating a protective coating around the house, prepare:
The arrangement of the scene around the house begins with the preparation of the zone for construction. At this stage, it is necessary to place the perimeter of the future "tape", or rather trenches for it, with the help of a peg. There are several recommendations on this:

The easiest way to apply marking, if you act in the following sequence:
Useful! At this stage, you can use the sealant to separate the protective coating from the foundation.
After that, the slope of the system is formed, there is a trench for this, in which the depth of one of its sides will be larger. To make the resulting ditch just use the tree. First, the log need to put it vertically, lift and sharply lower it down with the effort. Thanks to this, the bottom of the trench constructs.

For formwork, you will need boards on which it is better to immediately note the height of the future pillow. At the corners, improvised "box", secure metal corners (bolts from the outside).
Important! If you do not want to remove the formwork, after the device of the scene from concrete is completed, then be sure to treat the tree by the antiseptic composition, and wrap the boards in the rubberoid.

In order for the cabin from concrete to be made on all "canons" of construction, it is necessary to prepare a sandy or clay base for it. The thickness of the sand layer can reach up to 20 cm. It is best to lay a pillow in several layers, moisturizing and thoroughly trambling each subsequent layer. At the final stage, the surface must be aligned.
The waterproofing device implies laying several layers of rubberoid or other geotextiles on the pillow.

Above the level of 3 cm from the layer with rubble must be laid metal grid In increments of 0.75 m. After that, it is necessary to mix concrete and pour it with equal portions to the obtained formwork sections. At the same time, the compiled composition should reach the top edge of the wooden "box".

Useful! After the fill, pour the surface with the iron rod in several places so that the excess air is released.
You can distribute the composition with a smooth or rule. To increase the resistance of the concrete, 2 hours after the fill, "ironing" is performed. For this, the surface is covered with a layer of dry PC 400 with a thickness of 3-7 mm.
Useful! So that the composition does not crack, it must be watched with water 1-2 times a day.

In addition to how to foul out the gentle, you need to take care that it does not crack in the drying process. To do this, it is necessary to protect the coating from atmospheric precipitation and the sun using a polyethylene film. It is believed that the scene completely dries after 10-14 days. However, according to the rules for drying, it is worth noting at least 28 days.
POST Views: 6


