The hollow roof is very practical and looks elegant. But effort and costs are decent. Its exaltation is possible, but the main thing here is to have certain construction engineering skills and clearly follow calculations and schemes.
It is one of the types four-tight roof. The top view of the house with her resembles a closed envelope. Two slopes of a slight area having a triangle format specialists were called "Walm". The form of another pair of skates - a trapezium. Their size is greater.
Valm roof form such nodes (scheme):

Cracker serves a peak of the roof. This is a line formed by rapid tandems on the site of their bonding. Specificity of the skate - it loses in the length of the overlapping structure.
Walves.These are skates triangular shape. They are positioned above the end walls and are used instead of the front. They are diagonal and intermediate rafters (DS and PS).
Skats.Their form trapesis. Their start is obtained from the skate, and the completion - in the scene.
Ribra. These are the angles resulting in the climbing zones and rods. The number of Valm is equal to the number of DS. Their final number is 4.
Drainage network.Its components: funnels, pipes and gutters. It allows you to remove the unnecessary liquid from the surface of such a roof into the sewer.
Important! The hip roof does not provide for the creation of residential attic in it. Cause: Its two slopes significantly reduce the ceiling height in the underlined zone.
Differences in mounting complex walm roof From the duplex consist in the presence of a larger number of components. They are such (scheme): 
Ski run.This is a special bar. It is mounted with rafting duets.
Diagonal rafters (DS).They constitute Röbra Valm. From the completion of the skate, they follow the corner nodes of Mauerlat, connecting with him. In length, they exceed standard rafters. Material for their creation should have a large cross section. And such is usually dual boards. By drawing up the drawings, it is important to take into account that the angle of the position of such rafters is more flat, than in standard (intermediate) rafters.
Standard or intermediate rafters (PS).The place of consolidation of their top is the ski run, and the zone of their ending - Mauerlat.
Central standard rafters. They are usually 6 pieces. They are joined with the completion of the skate and DS. It takes a lot of strength on this dock. Here you need absolute concentration and compliance with accurate marking.
Net pedigar or short length legs.In the upper side, their contact with the skate is not allowed. The place of their compounds is diagonal rafters the lower the position of the narchor, the one is shorter.
Tightening. This is a jumper from a bar. It is positioned between the standard rafting duet.
Rigel.This is a tightening, arranged in the upper zone of the roof, right under the skate .
Overlapping beams.These are tightening, mounted below, at the bottom of the rafted.
Rack.This is a vertical timing. It serves as a support of the skate, distributes the mass of the roof on the bearing elements. If you need to make a naked zone, the racks can be focused in the middle of the rafter.
Troop. These are supports fixed in perpendicular position to rafters. They save them from sagging. The pump is extremely necessary if the roof rates reach a length of 4.5 - 5 m.
Shprengel.This is a device for supporting diagonal rafters. Shprengel form two beams. One mounts two parts of Mauerlat. The second with the focus comes in the first and same in one DS. 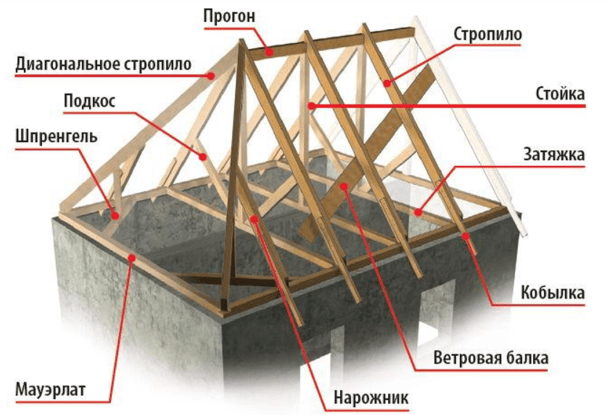
Before creating a holm roof, it is necessary to scrupulously calculate the components of its design. How to do it right? Before calculations, a block of overlapping building with all parameters is created. Then, applying uncomplicated formulas on the basis of the Pythagora theorem, can be calculated:
Scheme with parameters:

DS length:

Walm roof with parameters:

These schemes help calculate the length of the specified rafters only with the presence of data on the parameters of standard rafters.
The desired step between the rapid tandems is also often found in reference books, based on the breed and thickness of the working material (wood) and the length of the skate. The results of the calculations are reflected in the drawing. On it Next, make the markup of the roof.
It is still very convenient to produce the above calculations on the calculator.

Mauerlat is called the foundation for installing the roof. It is needed to distribute the mass of the roof over all carrier elements. It is usually created from wooden barAnd the solid rock tree is used. The greater the roof mass and more complicated its configuration, the more the cross section of Mauerlat is obtained. As a rule, the masters use a pine timber with minimal parameters of 15 x 15 cm.
Installing Mauerlat passes before building a house. How to do:
Here it is imperative to follow the instructions and technology. The stages of work are:
Scheme stephago: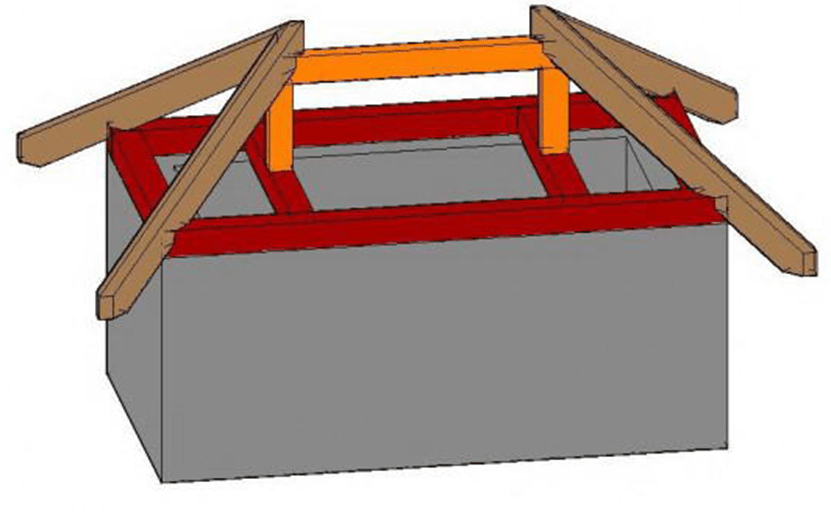


To create a hip roof usually involved soft roof. It is easier to cover the rods with a complex configuration. For such a roof, a solid doomba from the layers of moisture-resistant plywood is preparing.
Walm roof - perfect option For private houses. Its competent creation is impossible without special skills, calculations, hard work and patience.
Walp roofs can be created on smaller buildings, for example - gazebos. But for such a roof, only the arbors of the following types come:


Walm roof Build from the following materials:
All wooden elements must be treated with antiseptics, antipirens.

Scheme: 
The creation of a hip roof for the arbor is also impossible without the stage of drawings and calculations. Calculate:
Based on the calculated data, the drawing is made. It reflects the parameters and the relative position of the components of the rafting network. She has a lot of analogies with a rafter network for coating at home. As can be seen from the scheme, there is almost the same composition. There are only some nuances:
Slingers of a holmic roof and erker from Anton Weber:
The gazebo with a holm roof is erected by the following rules:


The following is an example of a competently arranged hip roof on a gazebo: 
On the creation of a hip-roof project for a bath in the Sketchup program, the author of the blog "Frame sauna in the village of own hands!"
Four-page roof with her own hands: drawings and photos below.

How the four-tie roof is mounted

Plan drawing rafter system
The arrangement of different layers of a four-page roof requires a careful attitude towards each stage of work.
Each layer stacked its function, all layers in aggregate form a unified systemwhich ensures the protection of the facility.
Doom - wooden designconsisting of bars located across the rafter feet. The optimal cross section of the bars of the crate - 50x50 mm.
Before mounting, the crate board requires antiseptic processing.
The crate is mounted either with a solid layer or a step of 100-150 mm (depending on the external coating).
Bashed the crate of nails.

Installation of crates
Vapor insulation film is set in order to prevent moisture from entering the heat insulation layer. Parosolation film is attached to the brackets of the brackets of the bracket. The places of adhesion are stuck with scotch.
At the same time, it is necessary to ensure that the film fits tightly to the boards. In places of pipe equipment or windows, rubber or polyurethane adhesive tapes can be used.
CAUTION!
A vapor barrier material should not ride the clashes boards to prevent the formation of places for water accumulation.
Water pairs have a high penetrating ability, so installation of vaporizolation - a very responsible stage of work.

Installation of vaporizolation
After mounting the insulation laid waterproofing. Waterproofing does not miss the moisture accumulated in the underfloor space inside the roofing pie. As well as thermal insulation film, waterproofing laid mustache and joints are sick.
It is especially important to properly lay the film in the skunk part.. The skating region is most susceptible to cluster of condensate vapors.
The importance of each stage on the installation of the roof of a holm roof cannot be underestimated and even more so to refuse to install any element.

Installation of waterproofing
Walp roofs are considered the most durable and durable. They were installed more than a hundred years ago, and such structures have proven themselves as reliable and hardy.
Despite the complexity of the design, installation of it can be done independentlyThe main thing is to perform a step by step in a clear sequence every stage of work and choose high-quality, reliable material, because the roof should protect the house not one dozen years.
In this video you will learn how to build a Walm roof with your own hands:
In contact with
Walp roofs give the building an elegant and completed appearance, its skates are well withstanding the gusts of wind and snow load. Under the roof of this type, you can place a nuclear indoor room. We will tell about the peculiarities of the rafter group of holmic roofs, about the methods of calculation and installation of rafters, as well as on roofing pie, ventilation and insulation of the structure. Let us dwell on the description of the properties of roofing materials and tell me how to make a hollow roof for a gazebo with your own hands.
Walp roofs give the structure a certain chic, but the peculiarity of their design is that they are perfectly withstanding multidirectional wind exposure. This is due to the rigid rafting system and the presence of triangular and trapezoid rods. The increase in the height of the skate and slope of the skates makes it possible to place the living room under the holm roof.
The hollow roof consists of two triangular and two trapezoid rods, which are based on the ski run
The features of the design of the hip roofs can be considered the following distinctive features:

The unique rafter system determines the strength characteristics of the roofs of the hip type and their resistance to atmospheric influences.
When preparing a hip roof project, it is necessary to determine the height of the skate, since this parameter will depend on the angle of inclination and the length of the skate. For the intic indoor room, the ceiling height must be at least 2.3 meters in accordance with fire standards.
The angle of slope is associated with the choice of skate height, since this parameter determines the volume of the zone of a comfortable stay.
To prepare the project after choosing the height of the skate, it is necessary to make measurements that will help calculate the length of the rafter, the area of \u200b\u200bthe skate and the volume of the inhabable room. For the design of the roof you will need the following parameters:

The developer determines that the attic room will be cold or inhabited, because the method of fastening the skate run, the presence or absence of pitches, the design and the number of rafter elements depends on it. After preparing the project, you can proceed to the calculation of the holmic roof and the elements of the rafting system.
According to the author of this article, for the design of a hip roof, especially complicated by erkers, tongs and tent fragments, it is better to use the services of the designer engineer. During construction dersighted roof country house The author helped a set of drawings with a calculated length of rafting beams, the way they are connected, the corners of the marbles and the number of fasteners. The list of insulation and roofing materials indicating the area and order of installation allowed them to order them in advance. Purchase of components on the project minimizes material waste and saves time. The calculated dimensions of the rafter system and a clearly defined sequence of assembly were removed from marriage, unnecessary calculations and additional fit. Mounting work Performed a team of four people with a small construction experience, which coped even in the complex area of \u200b\u200bthe skate dock from the roof of Erker, however, through the consultation by the author of the project.
For independent design It is necessary to start with the calculation of the main parameters of the roof and the size of the rafter, creating its own drawings and layouts of the layout.
When calculating the parameters of the holm roof, the house owner sets the height of the skate from practical considerations. For a cold attic, it can be less than two meters, and during the construction of the attic roof, it is necessary to remember that the height of the ceilings of the residential premises must be at least 2.3 m.
With preliminary calculations, the height of the skate is first determined, and then the length of the central run, the size of the main and diagonal rafters
The length of the central run with equal angles of the slopes is chosen such that the shooters of the run are located at the same distance from the side and end walls. In the course of further calculations, the size of rafters, narigines and auxiliary elements determine. It is necessary to select the type of the rafting system, since if the sleeve rafters are more characteristic with a uninhabited attic for holloral lines, then the hissing and hanging types of rafter compounds can be used for roofs with the attic.
The stability of the roof to wind exposures and the ability to withstand snow load depends on the angle of slope. The slope slopes is the most important parameter To calculate the length of the main and diagonal rafters, as well as nasha. As the basis of the calculations, take the following parameters:
Calculations are carried out in several stages.

| a, hail. | tG A. | sIN A. |
| 20 | 0,36 | 0,34 |
| 25 | 0,47 | 0,42 |
| 30 | 0,58 | 0,5 |
| 35 | 0,7 | 0,57 |
| 40 | 0,84 | 0,64 |
| 45 | 1 | 0,71 |
| 50 | 1,19 | 0,77 |
| 55 | 1,43 | 0,82 |
| 60 | 1,73 | 0,87 |
Squata area you need to know to calculate the number building materials and drafting scheme. The holm roof has two triangular and two trapezoid skate, we will use standard formulas from the school year of the geometry to calculate their area.

For the counting of the area, it is necessary to increase the height of each slope on the size of the eaves and keep in mind that their lengths will also increase.
Calculation of the volume of the inhabited underground space will be needed when calculating the heat supply and air conditioning systems. Since under the holm roof there is a multifaceted living room with a changing height and a form, then it must be divided into simpler figures to calculate the volume. Usually consider the cross-section of the attic, sampled by any rafter, split it to rectangles, triangles and trapezes, calculate their area according to the above formulas and multiply on the nurse. Thus, the volumes of each part are folded and obtained the total scope of the attic.
To calculate the volume of the attic room, it is divided into elementary figures, the volume of which is calculated separately and folded with each other.
If, when splitting the attic, more complex elements are distinguished, then they are calculated by the formula V \u003d S · H, where S is the cross-sectional area, H is the length of the element.
The layout is a reduced copy of the roof, you can determine optimum height The skate and the angle of the slope in relation to the size of the building. The scheme of the solid roof of the hip-roof system, made in the form of a drawing with an indication of the size and arrangement of the elements of the rafting group, is called layout layout. This scheme indicates the location, length and height of the skate run, as well as the size and number of main, diagonal and nariginal rafters.
The diagram of the rafter system indicates the dimensions of the elements, the place of their installation, the installation method and the angles of the rafting legs
The drawing indicates the method of fastening parts, the angles and the sizes of the sizing, the step of the rafter and the scheme of the arrangement of the cornese swell. According to the diagram, it is possible to calculate the amount of materials, cutting and magnificent layout of parts at the installation site.
It is necessary to consider that the calculated data needs to be practical, so before making templates for cutting parts, you need to test the main and diagonal rafters.
The hollow roof form four skates, and its rafter system contains elements of a duplex and tent roof. Mainly use spots, which rely on the ski run, fixed on the racks. The hollow roof consists of the following elements:
The hollow roof consists of standard elements and specific rafting nodes that ensure the necessary strength of the structure
In addition, the rafter legs are enhanced by bolts and additional racks. Often these elements form walls and an attic ceiling.
Mauerlat is a link between the building frame and rafters and is a solid timber attached to the wall with threaded heels. To eliminate the sawing effect, rafted on the walls of the bars Maurolalat must be attached to a solid reinforced belt. Studs with increments from 80 to 100 cm are immutted into a monolithic belt.
Maurylalat passes through the upper perimeter of the building and is attached to the concrete reinforced belt with studs
Mauerlat evenly distributes the load from the roof on the walls of the building, its length is equal to the perimeter of the house. For its manufacture, a pine sawn timber with a cross-section of 150x150, 150x200 or 200kh200 mm is used. At the corners of the house, the timber is connected with a threaded stud.
The ski run serves as a support for the main and diagonal rafters and is installed on vertical racks that are based on the beams of overlapping or laying. To give the rigidity of the rectangular design, it is recommended to install diagonal grooves between racks and a run. For the installation of the central run, the timber is used 100x100 mm or 50x150 mm.
Installation of the central run is made using vertical racks based on a litter or on the ceiling beams
Most often, the sleeve rafters are used, but the suspension type of the rafter can be designed for inhabitable attic rooms to free the living space from the journey of the auxiliary structures.
An option with hanging rafters maximizes living space from bulky structures.
In this case, the main and diagonal rafters are fastened to the central run, which are enhanced by the battlements and racks forming the walls and the attic ceiling.
Before mounting the truck system of the holm roof, workplaces must be equipped with ladders, forests and stairs, since the convenience of work significantly speeds up the installation. Then proceed to the assembly of the roof elements in the following sequence described below.
Maurolat beams are stacked on a layer of waterproofing from rubberoid and pinned with studs through pre-drilled holes
Roof arrangement begins with the installation of the central run and the main rafters
To install diagonal rafters, it is necessary to make careful marking, cutting and drunk under the dock with a skate and Mauerlat
Based personal experience, The author of this article would like to recommend to equip the place for marking, cutting and template the elements of the rafter system on the construction site. Conveniently when accurate tall tools are in one place adapted for marking and sawing. Equipped workplace Saves time with the workpiece of parts, which are then rising and mounted without additional fit. Below is easier to prepare and the assembly set of fasteners for each stage of work.
The roofing pie of the holm roof consists of the following elements:
The roofing pie of a holmic roof serves to create a specific sequence of protective layers, on which the finish coating is stacked on top
For a cold attic, roofing pie consists of rafting legs, waterproofing membranes, controls, doomles and roofing material. The heat insulating layer and the vapor barrier film here do not apply.
Ventilation of the undercase of the insulated hip roof occurs through a ventilated gap between the insulation and the waterproofing membrane. The ventilation is formed when the membrane is mounted on the rafter with a provision of 1.5-2 cm, so the air through the perforated furnace of the cornice penetrates into the insulation and comes through the holes of the skate aerators.
Roof ventilation is performed through the sofa of the eaves and aerators of the skate
From evaporation from residential premises, the insulation preserves a steam-insulating film, and the insulation of the layer protects the waterproof membrane from moisture condensate. The condensate, accumulating on the waterproofing, is removed through the ventilation gap of 5 cm height, which provides the circulation of air and saves the liner system. At the same time, the layer of heat insulating material does not lose its properties from excess moisture.
The cold attic is ventilated through perforated openings of the trim of the cornese swell and hearing windows, as well as skate aerators. The temperature difference between the external environment and the attic comes to a minimum, so the roof icing does not occur.
The advantage of a cold attic is the absence of the difference in the temperatures of roofing and attic room, because of what the roof icing does not occur
With this scheme of ventilation, the hip roof must be remembered for careful insulation of the ceiling and the top of the walls between the residential room and the cold attic.
The insulation of the roof is made after mounting the roof from the inside of the attic or outside when laying the roofing cake. Such a sequence of work protects the insulation from unexpected precipitation. Heat insulation material It is placed between rapid beams with a layer of 20-25 cm.
Insulation from the inside occurs by packing insulation between rafters and fixing it with a cord or fishing line
For insulation of a holm roof, you can use the following materials:
The elasticity of mats and plates allows you to fill them between rafters into several layers with a shear of a joint to get rid of cold bridges, and foamed insulation are applied by spraying using special equipment.
For different types of roofing, certain types of quantities are produced. The hollow roof uses skate planks with aerators, plugs for holm joints and tees for diagonal rafters. They close the skate and scanty joints, as well as the cornese skes.
At the final stage of the installation of the holmic roofing, numerous challenges are used
Of the remaining challenges on the hollow roofs, ladders, stairs, snowstores, seals and drippers can be used.
Sking Dobors have a different configuration and dimensions, for example, a straight line of 150x150x2000 mm or a semicircular R110X2000 mm. Sking planks may have aerators of different types. Consider the features of the installation and docking of the skate voltages.
Installation of straight skates on a holm roof is made with a falsestone at least 5 cm and begins on the part opposite to the prevailing winds. The planks are mounted in increasing from 15 to 30 cm, and the plugs are mounted on extreme straps. In the design of some skate slats Polymer aerators are provided that provide ventilation of the undercase.
Dostech of horizontal skates occurs with false school at least 5 cm
The range planks are attached, starting with the plug, from the bottom up, and in the place of the connection of the hip ridges and the skates are joined with tee y-racks. If necessary, the location of the docking is additionally sealed.
The design of the round skate is provided by ribbon ribs that serve as locks to dock individual planks. Such ribs prevent water penetration into a stepon space. Round routine is attached to the top bar of the root through the aeroelement, which provides air circulation through the ventilation gap.
Installation of a round horse is made through a seal using special plugs
When installing any type of skate slats, it is important to ensure that you do not block the ventilated products and maintain the air circulation between the eaves and the skate.
On the cornese swelling of the holm roof, drippers are installed for condensate removal, and wind or cornice strips are mounted on the cutting space from the wind and rain.
The dripper on the cornice skeleton (pos. 7) is used to remove condensate, and the wind strap (pos. 5) protects the underfloor space from wind and rain
This type of goodness is installed with a falsestone at least 5 cm, the standard length of the planks is 2 m.
For holm roofs are used different types Roofing materials that offer producers in large quantities. When choosing, you need to evaluate color gamut, ease of installation, weight and durability of roofing. Considerable importance is the cost and effective area of \u200b\u200bthe material. Consider the most popular types of roofing:
According to the author of the article, you should pay attention to the noise absorbing properties of the roofing material. From this point of view, metal plays loses onduline and soft tile with their beautiful noise insulation. In addition, condensate is formed on the surface of the metal when the temperature drop is formed, so you need to take measures to remove it. The soft tile is distinguished by the simplicity of installation, but for it it is necessary to establish a solid cut from plywood with a thickness of 12 mm and put the lining material, and this is somewhat leaving its use. For these reasons, as well as for small weight and simplicity of laying by the author of the article for the coating of residential country house Ondulin was chosen. In the process of operation, the roof has become clear that during a strong rain in the attic, a small noise is heard, and after the insulation of the attic, foreign sounds are practically disappeared.
Installation of roofing is made on the shap. Before conducting roofing work need to mount drippers, wind boards and brackets drainage system. Fastening sheet materials is made with screws with a washer and rubber gasket in a checker order. The laying of a hip roof sheet begins from the center of the skate to the edges.
Installation of roofing sheet coating begins with the first one-piece element, then they are symmetrically attached to the left and right
Installation is made on the cord stretched along the cornice. The soft tile is stacked up up with the recommended producer of the launch.
It includes roofing professional flooring and metal tire. The total width of the metal tile sheet is 1180 mm, the effective width is 1080 mm, the length can vary from 765 to 8000 mm, the shadow step is 350 mm. The roofing professional flooring has a mounting width of 1000 mm and a length of up to 6 m. The service life of these coatings reaches 50 years, while the material has a small weight and simply fit.
Profile is easily mounted and serves to 50 years
Slate is distinguished by high weight and fragility, so in modern construction It is used light (weight sheet 6 kg) analog - Ondulin.
Slate is distinguished by high weight and fragility, but still popular
The length of the Ondulina sheet is 2 m, width - 0.95 m, effective area - 1.6 m 2. Ondulin is mounted on a penetration with a pitch of 45 cm, with a longitudinal lap 20 cm, the side flap is one wave. Additional advantages: service life up to 50 years, good noise absorption, simplicity of installation.
The service life of Ondulina reaches 50 years, while the roof is characterized by noise absorption and simplicity in the installation
The length of the soft tiles is 1 m, the width is average equal to 333 mm, the fallout depends on the type and shape, and the thickness is 6 mm. This is a light noise absorbing material that is simply mounted, serves to 35 years, it is inexpensive, but needs a solid doom and lining layer.
Soft tile gives the roof modern view and just mounted on a solid doom
The gazebo with a holm roof creates a single architectural space on the construction site. For the structure, it is necessary to bring the carcass by type of Mauerlat and then perform the following steps.

All wooden details of the arbor must be treated with antiseptic and anti-view compositions and give them an appropriate color shade.
We talked about the design and calculations of the hip roofs, about the rafter system and step by step of installation of its elements. Tapped ventilation, insulation and roofing cake structure. Self installation Walm roof will allow you to save money and be completely convinced of the work performed. We hope that the materials of this article will help you in the construction of the roof for a cozy home.
Availability own roof Above the head is the vital necessity of every person, regardless of age, gender and the kind of classes. It is equally important that the roof is solid and reliable, for which it is recommended to appeal to highly specialized professionals, well, or at least make a clear phased plan of construction and thoughtfully produce the necessary calculations. A reliable and aesthetic option can be a hip-type roofing system.
The hollow roof consists of four slopes, its top view resembles a sealed envelope.
Calm roofing device. View from above
Side skates have the shape of a trapezoid, the skates on the ends of the building are smaller in size, have a triangular shape and are called hips. The vertex line formed in the connection places of the rafter, forms a horse. Its length is less than the length of the blocking building. The location of the side of the side skates and the valves form a rumble, the number of which is equal to the number of diagonal rafters. For removal of fluid in storm sewer In the design of the roofing is formed by drainage.
Note: Additional skates significantly reduce the height of the ceiling in the room under the roof, which is why this type of roof does not allow the presence of a residential attic.
Depending on which geometric shape is taken as the basis of the design, the following options for creating a hip roof are distinguished:
Semi-Walled type of roof
Four-sheet standard roof
Tent hip roof with the same slopes
Valvoy roofing with multiple frontones
The advantages of this type of roofing systems include:
However, along with the advantages, the hip design also has its drawbacks, in which the following are as follows:
At the preparatory stage of the construction of a holm roof is to take into account the type of material, the wind strength and the level of atmospheric precipitation in this area.
Note: Four-tight hip roofs are especially popular in the area, where protection is needed from strong wind gusts.
When choosing an angle of inclination of the roof, it is worth considering that in the area with dry and hot climates or strong winds the angle must be minimal (2-5 °), in climatic areas with abundant precipitation, the tilt must be made more.
Before producing all required measurements, It can be independently made from plywood a measurement rack, which will reduce the likelihood of errors in measurements. All the necessary dimensions are recommended to immediately apply to the rail. This will avoid numerous measurements, thereby saving time, and prevent errors that are often performed during repeated numerous measurements using a roulette.
The roof marking is recommended to start with the axial line. It is located at the top level of the strapping of the end wall. Then it is necessary to measure the thickness of the skiing board (the value of this indicator is divided by half) and outline where the first element of the rafter system will be located. One end of the rack for marking is applied to the line scheduled for the location of the first part of the rafter system, the line of the inner side wall is planned at its other end, where the intermediate component of the solo system will be located. Moving the rail to the line of the external contour of the same wall and setting the opposite end on the resulting skeleton, you can find out the exact length of the sink of the roof. The exact location of the second component of the rafter is installed by transferring the rail to the edge of the side wall and applying the label between the side wall and the upper end of the strapping.
The calculation of the elements of the rolling roof design is made on the basis of the Pythagores theorem. The main parameters of the holmic roof include:

An important effect on the strength and durability of the hip construction has right choice The material used in the manufacture of rafters. Whether the roof will be a reliable shelter from bad weather or a flipping facility, subject to rapid wear, depends on the responsibility of the developer. During the construction of a holmic roofing system, deciduous and pine breeds are most popular. In order to avoid damage to wood pests, the material must necessarily be well dried and impregnated with antiseptic means. As a material for the surface of the roof, professionals are recommended to use soft tiles. It makes it possible to embody many style solutions and saves both monetary and labor costs. For the strength of the rafting system, roofing masters advise to select the material of the same composition and section, as well as apply a single fastener.
The list of necessary tools and materials should be made:
After all the necessary measurements and calculations are manufactured, and the necessary props are prepared, it is possible to start the installation of a roofing structure.
Initially, it is necessary to mount the base of the roof - Mauerlat. With its help, the weight of the roof is evenly distributed throughout the perimeter, so it is necessary for the creation of Maurolalate a large-sized bar from solid wood species. To begin with, the desired length of the bar is measured, dumps, they apply a label to cut the compound grooves. A wooden formwork is mounted on the masonry, a concrete layer is applied to it, which screws the metal spiers. They will be attached to the roof base. When the concrete hardens, the rubberoid is halted on it or the layer is applied bituminous masticperforming waterproofing function.
Walm Roof Markup Scheme
In a bar, a thoroughly treated with an antiseptic and water-repellent varnish, holes are drilled by spires, after which the timber is satisfied with the spiers and is fixed with anchor bolts. It is not recommended to cut holes in the MueRelt of the hole for rafters and use a lot of spills for fastening, as it can adversely affect its strength.
After Mauerlat is installed, it is necessary to mount the burdens for the support of the skate, and on its line it is fixed and the support racks themselves.
A ski beam is installed on the support racks. It is worth considering that the horse carries the main load of the central roofing part, so it should have an impressive thickness. After that, you can start the installation of the rafter system. In accordance with the calculated parameters, sawing is performed. First set diagonal rafters. All rafters are attached to Mauerlat with special nails, wire, brackets and corners.
The rafters are attached to Mauerlat with special nails, wire brackets and corners
Then the central rafters are mounted. The average distance between them is 60 cm, however, the step can be adjusted depending on the corner of the skate and the type of roofing material. Corner rafters are attached to the latter diagonal.
After installation stropile design It is nailed to do bread, after that, with the help of a construction stapler, a vapor insulation film is attached to the rafter, and on the seams of tape for sealing. Then the insulation and waterproofing are tightly stacked on the rafter, after which the wooden planks are attached to the rafter, the final layer of the insulation and the outer coating is fixed.
Do not forget about the ventilation of the roof, because air circulation is important not less than waterproofing or thermal protection. From the bottom, in the wind binder, the air inlet is performed, the exit is better to make it higher, closer to the ski beam. If the roof has a wooden windbreaker, the boards are placed a few millimeters from each other. Plastic liner must have perforated components, or sofa. If there is a ready-made switcher, and its elements are tightly assembled, it will be worthwhile to build in her small ventilation gratesBy placing them along the length of the binder at a distance of about 80 cm from each other.
A detailed study of the installation of a holmic roofing system makes it clear that the process is not simple, but the effort is worth it. In this matter, the main thing is accuracy in measurements and calculations and attentiveness during construction work. With a clear follow-up to the advice of narrow specialists, the result may be above all praise. The hollow roof took a confident position in modern construction due to its practicality and interesting design. In order for the roof to become a reliable protection against a squall wind and turned the house in a miracle of architectural art, it is necessary to clearly follow the planned plan and check the quality of work at each stage. This will make it possible to adjust the shortcomings in the shortest possible time and will avoid the cost of time to correct the errors.
One of the most unusual Russian latitudes and today is a hip roof - a design with four inclined skates. At the same time any a private house With such a stylish top looks European good-quality.
Stopped exactly on this option? Then, if you never delve into the particular device of such a roof, we will try to reveal all the secrets in the most detail all the secrets and features of its device, hidden pros and cons, which few people are guessing.
And this is important, because about however, how well the roof of the house is arranged, it depends on how much it will effectively cope with its task to maintain the comfort and safety of households!
The hollow roof is a four-tight rafter system, where two end skates must be a triangular shape and are called Valmami, and longer can be both triangular and trapezoidal.
The fleece roof is different from the fact that she has no frontal, and therefore there are no straight windows - only inclined. Such auditory windows are needed to highlight and ventilate the attic.
The classic hip roof has a high angle of inclination. Although this statement also has its own retreat: some modern materials allow you to build hip roofs with a minimum angle of inclination, which from the side of the street even seem flat.
Here is an interesting high-quality video on this topic:
With the skillful selection of roofing material, the hollow roof looks especially stylish and expressed in the architectural plan. Such are very popular in European countries, and it is on such tops of houses that the Scandinavian or Swedish Town flavor.
The hollow roof is perfect for European-style houses, especially with blue, gray-blue or chocolate roofing. And, by the way, among professional designers and architects it is believed that it is not very successful to mount the bright Valm roof on the house - this is a sign of lack of taste.
As for aesthetics, the hip roof is quite ridiculous looks for a large multi-storey houseBut such a high superstructure (if the roof can be so called) makes the structure even more cumbersome. As an exception only let's call French Chateau or the projects similar to them.
Let's analyze the main types of holm roof:
Also one of the popular types of holm roof - M-shaped. For the first time, such a roof appeared in Italy, back in the XIX century. And with time in the US, when the houses began to build in the ranch style.She has four slightly inclined skate, which forms their shape of the outline of the letter "G" due to the perpendicular compound among themselves.
It is just the perfect option for the house that needs to be protected from a strong wind. In addition, in hot weather from sunlight, he perfectly closes the protruding visor. And finally, due to the continuity of the cornice of the M-shaped hip roof, it is quite easy to install drainage.
After all, this architecture has its own secrets: the veranda visor always repeats the outlines of the large wing of the M-shaped roof. In this case, such a roof looks just great!But there are also cons of such a design - a reduction in the area of \u200b\u200bthe attic space, and quite significantly.
As you can see, each form has its advantages, both in the style of style and in the matter of aesthetics. This is just the entire hip roof: how to make a right project, whether it is worth leaving small frontones from below or at the top, like Danish and dutch roof, No architect will not tell me. Focus only on your own feeling of comfort and what kind of filling and design you will have an attic.
Due to the complexity of the construction, the hip roof is considered one of the bold elections.Among the minuses, we note the higher cost of materials than that of a two-screw or single-piece roof, an increased complexity of laying roofing materials and the need for accurate knowledge.
It is also believed that it is in the holm roof that an internal subcoase space is more consistent and there is much more space in order to deliver furniture or technique there. And now - about the pros.
The modern device of a holm roof with a reliable fastening of roofing materials allows to achieve high resistance to air flow, as there are no vertical walls. Therefore, in the regions with strong winds, there is a roofing coating, and the solo system itself is exposed to the destruction of much less.
Also, the hollow roof is perfectly opposed to abundant precipitation, snow caps and therefore it is impossible to better suitable for the terrain with unfavorable weather conditions.The whole secret is that the angular ribs have increased rigidity, due to which the roof itself is not exposed to significant deformation, unlike a two-tie.
If the holm roof is equipped with large sinks around the perimeter, the facade of the building will always be reliably protected from wetting, while neither with a single-table, nor with a two-tie roof such an effect will not achieve.
Another important moment: due to the fact that the plane of the surface of the skates is almost the same and large enough, the attic space under the roof warms up evenly, due to which it creates a pleasant temperature mode. This is how the correct choice of the roof shape decides one of the most pressing problems with one of the most pressing problems!
Now a little about the construction process of such a roof. It begins with the mounting of the vertical supports, on them over the end of the ski run. After that, the resulting horizontal is measured and passed to the mounting of the cable diagonal rafters.
To do this, follow this instruction:
More details you will reveal this process such illustration:

As a final step - installation of shortened rafters, which are also called nurses. The step is the same, 600 m. One of its side, they must rely on the strapping bar, and the second to connect to the silent diagonal rafter.
In the middle of the Walm Skate will be a central narison, which according to the rules should lay down at once both legs of the corner rafters. The end of their upper part should be double mauelalat around the perimeter of the entire outer roof.
In such a system, the co-diagonal child has the largest length and serve as the main narons. For such rafters, there is not enough length of the standard bar, and therefore the angular ribs make the Brucks from Paired Vansel.
At the same time, ordinary rafters are attached to Mauerlat perpendicularly. Additionally, for strength, they are tightened by the beelels and the tie. To secure the rack from both sides, the soot is used.
There is also such an additional detail as Shprengel - a special detail that goes from the angle of Mauerlat and connects the walls of the angle:

Read more about the lines of the hip roof.
Each roofing material dictates its requirements for the base. So, under the modern tile, a frequent doom is suitable for long folding sheets - more rare, and solid and smooth rolled coatings are generally necessary for soft and roll coatings, as here:

At the same time, the other types of roofing are needed a durable lamp, which is calculated by special formulas. In the classic version it looks like this:

To ensure waterproofing the holm roof, we advise you to take a solid modern membrane, which is equipped with two self-adhesive ribbons. They are on the inside of the roll, and ensure reliable protection against leaks.
First, while significantly reduced the cost of laying the material, because here it will not be necessary to acquire a special roofing tape for sealing the adhesive.
Secondly, on the ridge it will be easy to transfer the membrane through the ridge to another slant, and there just press. This is an important point if you build a Walm roof with your own hands and the whole team of specialists does not help you.
Then it is really worth thinking about the convenience of work, especially at the height. Professional roofers in this case simply cut the membrane, turn the roll of 180 degrees and continues the installation right on the opposite ridge - that's all the secrets.

It also has piece waterproofing, which is already fixed in advance for convenience.


Full time on the hollow roof to work with flexible tilesBut most of all in Russia it loves to cover with modern metal tile:
By the way, it is often said that a large number of waste appears in the work with a holm roof. Here, in order to avoid this, each sheet for the ridge, cut or bend it in advance. So you fill in the formed gaps.
If you have chosen a ceramic or composite tile as roofing material, do not worry: with such installation you also cope with yourself!
Separately, we will focus on how to lay natural tile on the Walm roof. With such a roofing, the hip design looks just awesome, and in fact the installation process itself is not so complicated.
Let's follow the steps:
There are, of course, more complex projects, but if we divide such a house visually into separate parts, then it will not be difficult to deal with even a novice builder.
The main thing is to competently equip fundament and adjoining:

On the rafters, spread the vapor barrier and screw the bearing bars under roofing. To the bottom of the rafter, fasten the thick bar, which will support the layer of insulating plates.
Place the insulation. If you use rigid polystyrene foam, connect it in a solid layer using ridges and grooves. On the ridges where it will be necessary to fit the plates, select them on the desired form using a conventional hacksaw. All overcurrents and cover the plates with an extra film. Next, screw the counterclaim.
Of course, the device of the holm roof is not so simple, but the result will definitely please the eye!


