The construction of a roof for a bath is one of the last stages of construction, which is designed to protect the building from climatic influences. The roof of a bath can give a structure a personality, but more often than not, it is simple design, which can be done by hand.
The finished project of a bathhouse with a gable roof
For those who wondered how to build a bathhouse roof, it is necessary to carefully study all the nuances of construction, and then the bath will not only become a decoration personal plot, but will also allow you not to fear for comfort when taking water procedures.
The roof of the bathhouse consists of two main elements:
It is worth noting that some baths are built with an attic or attic. The presence of this element is optional, because there are options for the execution of baths with flat roofs without usable space under the roof. Whatever bathhouse is planned on the site, it is likely that it will have a single-slope or gable roof.
 Wooden sauna project with a pitched roof
 In addition, there are roof options with four slopes, as well as more complex versions with multiple kinks.
Surely those who are thinking about how to make a bathhouse roof with their own hands are tormented by a choice: which is better, a single-pitched roof for a bathhouse or a gable roof. Let's figure out in which cases this or that option will be preferable.

As a rule, the angle of inclination of the slopes is in the range of 2.5 - 60 degrees. The steeper slopes help to better remove sediment from the roof surface. However, it is worth considering carefully the choice of tall structures if the construction is carried out in an area for which strong gusts of wind are the norm.
 Construction diagram gable roof for bath
 For steppe areas, with a characteristic strong wind and little precipitation in winter, it is preferable to build a flat roof frame bath... In the northern regions, which are characterized by a large amount of snowfall, a high roof with a slope angle of 45 degrees is best for a bath. It should be noted that with an increase in the height of the roof, the cost of the structure being built increases, as well as the complexity of its installation.
The support for the gable roof structure is the top floor or Mauerlat, fixed at the top of the building. Mauerlat is usually mounted on brick walls and walls made of all kinds of blocks. When installing a roof for wooden baths from a profiled bar or a log house, recesses are provided in the upper crown of the structure for mounting floor beams.
 An example of a roof base for a timber bath
 It is worth noting that the floor beams can go beyond the boundaries of the log house, however, there is a rule: a beam extending more than half a meter should rest on a reinforcing structure or a pillar.
The construction of baths with a lean-to roof type assumes that the roof frame will hold on to walls with different heights.
In order to fix the trusses on such a structure, it is necessary to use girders and rafter bars.
The rafters are a link of the rafter structure, which rests on the Mauerlat or the upper crown, depending on which bath is being built: from bricks and aerated concrete blocks, or from profiled beams and a log house. Taking the load on the roof, the rafters work in compression and bending.
In order to assemble the structure with your own hands, you can purchase ready-made parts or make them yourself from the following material:

Installation of a truss truss will be simple if you use ready-made parts or material from a bar or board. Self-tapping screws or nails can be used to fasten the elements.
We will analyze what rafters can be, and what is best suited:

The truss consists of identical rafters installed at a certain distance. The resulting structure is necessary for the location of roofing material, insulation, as well as other types of insulating coatings (waterproofing, vapor barrier) on it. Usually the roof is made in the form of an isosceles triangle. Because of how complex the structure of the future roof will be and what the step of the rafters is provided for, the presence of overlays, struts, beams and other details necessary to strengthen the roof will depend.
It is possible to assemble a truss on the ground.
It should be noted that assembling the structure directly on the floor is not so convenient and carries a certain danger.
The disadvantage of assembling a truss on the ground is the need to transport it upstairs, which will entail unnecessary expenses in the form of renting special equipment.
 Various schemes truss structure for a bath roof
 Whether the choice will be made towards safety or towards saving money is up to everyone. However, if the construction of a frame bath, exactly like the construction of other types of baths (from blocks, bricks), is done by hand, it is best to choose a safer option.
For the convenience of building a roof, it is recommended to complete a template. In this case, all elements of the farm will be completely identical. The template is made as follows: two rafters are fastened at the top point, and their lower points are placed on a support and fixed with a crossbar.
After installing two trusses at opposite ends of the bath, a level is stretched between them. At this level, the rest of the elements are installed with a certain step. It is very important to observe the verticality of the installation of the rafters; for this it is best to use plumb lines.
 Installation of roofing material on the rafter system
 In cases where the distance between the supports shed roof less than four and a half meters, additional support legs are not used. Rafters are recommended to be laid at a distance of half a meter from each other. For reliable fastening of rafter trusses, a groove is cut out in the Mauerlat, on the one hand, and in the timber on the other, with the expectation that the rafters fit tightly there. The rafters can extend beyond the perimeter of the building by 500 mm, thereby creating cornices.
Roof lathing can be done with beams or planks. Depending on what type of roofing material will be used, the cross-section of the material for the lathing and the step of its installation are selected. Soft roof involves the installation of a lathing with gaps of one centimeter.
 Truss truss schemes one pitched roofs for bath
 If sheet material is used, then you can save on the crate, because the gap between its individual parts can be up to half a meter. The installation of the battens should be started from the ridge of the roof, followed by movement to the cornices using self-tapping screws or screws.
To deal with the question of how to make a roof for a bathhouse, let's immediately divide the answer to it into two parts - theoretical and practical. Because everyone has their own specifics, it is better to show the principle than to give a bunch of examples. However, there will be examples too.
And further. The article does not replace training in construction, and the roof is, after all, a complex structure that requires knowledge, therefore, for those who, without experience, intend to build a roof for the bath with their own hands, we advise at least books to cover the construction of the roof, after reading it will be clear whether the task is within their power or not.
Let's start the theoretical part.
When it comes to bath roof height, then you need to understand what is meant by her tilt angle... And it is not an arbitrary value, but depends on what winds blow in your area and how much precipitation falls.
ADVICE! Assume that increasing the angle of inclination simultaneously increases the wind load and prevents precipitation from retaining on the roof surface.
Minimum angle of inclination, at which the roof is considered to be pitched, starts with 2.5 degrees... Less - flat roofs, and up to 10 degrees - pitched, but they will also have problems with the removal of precipitation, manual cleaning will be required. But the accumulated snow is hundreds of kilograms pressing on the roof!
Maximum tilt angle will be considered equal 60 degrees... It is believed that maximum snow will press on the roof with a slope of 30 degrees, and with a slope of 45 degrees, the snow will slide down by itself.
Another factor related to the choice of the angle of inclination is specifications roofing material. You can select the material for the angle of inclination that is optimal for your area, or you can rely on the material and look for a compromise with the climatic optimum.
BY THE WAY! An increase in the angle of inclination will entail an increase in cost.
Cards and explanations to them, and simplified calculation formulas you will find in this. We strongly recommend that you familiarize yourself with them and study the formulas that will determine the load and affect the calculation of the mass of the roof.
However, you can use the simple life hack: you are not the first to build, take a closer look at the buildings of your neighbors, talk to them about problems with the roof, if there were any - the optimal degree of inclination will be determined without unnecessary trouble. And the material will also be clearer.
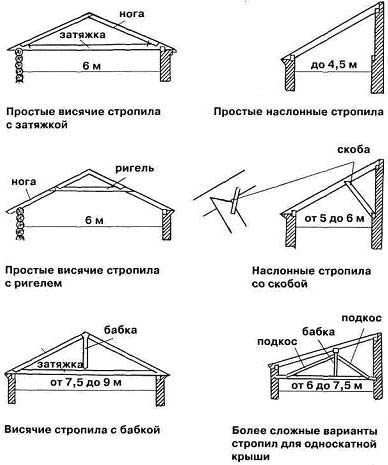
Let's show you first types of pitched roofs... Rafter systems are like ribs that can be easily visualized under the outer layer of these structures. Accordingly, you can imagine the complexity of each specific system. Rafter systems are named just by the type of roof.

Rafters by material can be made from wood or metal. In our case, consideration of metal structures is unnecessary, so only wood.
The principle of connection and transfer of the load is different for layered and hanging rafters. The first ones are attached at one end to the ridge, the other to the wall trim. In this case, the load is transferred to the ridge, and from it to the gables / tongs, the inner wall or supports, and the other end transfers the load to the outer wall. With this transmission, the rafter works only for deflection in the middle part.
Hanging the rafters abut with the upper edge against each other, creating a spacer. In this case, the skate is absent. To compensate for this spacing, the bottom of the rafter legs is tightened.
All of this can be seen in the figure below. It also clearly shows rafterless system, which was used in traditional log construction - instead of rafters, lay down, overhangs pediments (males). The orientation of the slats is perpendicular to the rafters.

taken from the book by A. A. Saveliev - “Roof structures. Roof systems "(2009)
Making the rafters for the bath with your own hands is a feasible task, however, it must be preceded by many calculations of the loads to which the roof will be subjected. Complete calculation is done by professionals, in the literature you can find both complete and simplified calculations.
In addition to wind and snow load the weight roofing - an important factor affecting the calculation rafter system, which must withstand all - static and dynamic - loads during the operation of the structure. Therefore, it is worth deciding on the type of coverage in advance, even before the development of the project.
Roofing material specifications also include minimum or maximum the angle of inclination of the roof at which it can be used. Consider this when choosing the height of the bath roof.
Light weight metal tiles- its main advantage, because it reduces the load on the rafters and the structure as a whole.
Made from iron, copper and aluminum. Iron - in the form of steel, which is subject to corrosion and therefore needs protection - for example, zinc plating. It is clear that copper and aluminum varieties much more resistant in terms of corrosion, and would last for several decades, but they are also less durable.
BY THE WAY! The service life of a conventional galvanized steel tile is 10-15 years.
Regardless of the metal used, the metal tile is coated on both sides polymer. This is done to give her the desired color as well as for added protection.
The thickness of the metal layer is different, the weight of a square meter of the coating depends on it, but recommended thickness is 0.5 mm... The weight is approximately 5 kg per square meter.

Bathhouse with a gable roof made of metal tiles. Photo
Minimum roof slope for metal tiles is 12 degrees. (More is possible.)
With its help, you can make a gable roof on a bathhouse, gable and broken (with an attic).
Slate can be different - from natural (slate plates) to ceramic plastics. However, most often you can find asbestos-cement variety is flat or corrugated sheets of material in which cement is mixed with asbestos.
IMPORTANT! The presence of asbestos makes it unhealthy.
A familiar roofing material weighing about 11 kg per square meter with a thickness of 4.8 mm.

Laying the roof of the bath from slate. StroyDom Photos
Fragile, brittle, but non-combustible and quite durable - it will hold out calmly for 30 years. Especially if you handle it protective compounds, and moss will not grow on it, its waterproofing properties will become much better, and it itself will be more durable. In addition, he has good performance isolation from noise.
Installation of slate is cost-effective when roof slope more than 12 degrees. It is quite possible to make a roof for a bath out of it.
Similar in appearance to slate (the same corrugated sheets), but completely different material. It is made from cardboard, which, to obtain the desired properties, is corrugated and impregnated with bitumen, as well as heat-resistant resin and dyes that give it bright shades.
Due to impregnations, the material becomes waterproof. In addition, it is quite flexible, not fragile. The weight of 1 square meter of ondulin is slightly more than 3 kg. It is produced in sheets of 2m by 0.95m. The pluses include a variety of colors.

A fragment of the roof of a bathhouse made of ondulin. Photo
Mounted on ramps with slope not less than 6 degrees... In this case, it is not necessary to remove the old roof, if any. Not a bad option than to cover the roof of the bath.
INTERESTING! The sound absorption of ondulin is such that the noise from the rain beating on the roof will practically not be heard, unlike all materials made of metal.
The shelf life from the manufacturer is 15 years, in practice it can be longer.
It is unlikely that many of the bath owners will cover them ceramic or shale shingles are expensive materials that cannot be found on outbuildings. Their main advantage is, of course, their service life, which reaches (for oil shale) two centuries! But this is not only expensive, but also heavy material that requires a reinforced rafter system. In general, it is unprofitable.
In addition to ceramic and slate, there is also cement-sand and silicate shingles, they are a little cheaper, they also have a long service life, but we will not recommend them either.
But there is another class of tiles, so called very conditionally, from which it is quite possible to make a roof for a bath with your own hands.
It is a flexible roofing material made from fiberglass(dense web of glass fibers) coated on both sides bitumen and sprinkled stone chips(basalt or shale).
ADVICE! It is better to prefer basalt crumb over shale - it crumbles less.
Flexible shingles are easy to install and completely undemanding to surfaces. Of course, you won't see the dome on the bathhouse, but she would have coped with it. Minimum slope roofs for its installation on the roof of the bath is 12 degrees.

Sauna made of double timber with a gable roof made of bituminous (soft) tiles. Photo
Shingles weight varies quite significantly depending on the amount of bitumen and the manufacturer. There are single-layer, which weigh 5-8 kg per square, there are laminated multi-layer, with a weight of 13 kg per square.
IMPORTANT! Since bitumen shingles only fit on a solid (!) Crate made of moisture-resistant plywood or OSB, the weight of plywood (or OSB) and their cost should be included in the project in advance.
Another type of metal roofing material that is noisy when it rains. However, he cheap and is in demand.
The metal that goes to the corrugated board can be different - this is steel, in need of galvanizing, and aluminum, and copper, and chromium-nickel steel. The types of corrugated board differ in the presence or absence of a polymer coating, the height and shape of the corrugation (profile).
ON A NOTE! The height of the corrugation of the corrugated board intended for roofing works, is 44-57 mm. What is less - wall sheeting, what is more - for fixed formwork reinforced concrete floors.
The weight of the corrugated board ranges from 4-9 kg per square. Overlapping sheets are installed on the roof with a slope of at least 8 degrees.

Bath with a roof made of corrugated board. StroyDom Photos
The roof of a bath made of corrugated board is a completely acceptable, budget solution.
Those who decide to make a gable roof on the bath with their own hands need to know what role the material from which the bath walls are built will play in their choice.
We have already said that wood construction traditionally dispenses with a modern rafter system, replacing it with logs (slugs) laid perpendicularly on males (pediments). Such a solution requires professional skills, as does the construction of a log house.
Let's start with the fact that the blockhouse must stand for 2-3 years, so that later the roof does not "go off".
The usual tilt angle is 45-60 degrees. Easiest to customize pediments on the ground - remove the upper crowns, put them on the ground and achieve the correct geometry of the pediment - the logs form steps, gradually decreasing in length. Lie down are placed in two or three rows, for this the cutting method is used, for example, "in the paw".
At the very top of the gables will lie ridge sled, and the male ledges are cut down to a regular triangle. On the slope, a log with a diameter of 18-20 cm is used. The feet should protrude 50 cm beyond the roof.

Bath roof bars, on which the roofing material will be laid. StroyDom Photos
Lay on top of the bed laths, on which the roofing material will already be attached. A traditional roof on slopes is made without nails at all.
In principle, the usual rafter system is applicable to log cabins and structures made of timber, therefore, what was said below can be applied to them. Walls can be made of bricks, block aerated concrete, frame. Brick and concrete will require installation on top of the walls of a wooden mauerlat, and in frame structures, its function is performed top bar wall binding... If we are talking about a log house, then the Mauerlat will be upper crown.
A gable roof assumes the support of the lower end of the rafter leg on mauerlat, and the top - on the ridge, or with an emphasis - on the top of the other rafter leg. In the latter case, the bottoms of the rafter legs are pulled together tightening.
The gables are made of the main material of the walls and serve as a support for the ridge bar. If the roof is heavy, the ridge will need intermediate supports. Usually, in such cases, under the ridge just passes inner wall that fits sill and rely ridge supports. But in our case, the roof should not be too heavy - and the dimensions of the bath do not contribute to this, and the roofing materials are quite light.
The end of the rafter leg can rest entirely on the Mauerlat, or it can continue further in the form of an overhang, while the support on the Mauerlat is due to notches on a rafter (or build-up).
Due to the fact that the structure is subjected to various loads, it is better to make the rafters of the gable roof for the bath with movable mount, which will relieve unnecessary stress at the joints.

What was said above about a gable bath applies, in part, to a gable one. Only here it is not provided for a log house classic solution for this type of roof, but the frame one is quite capable of claiming to be special, because the single-pitched version is very suitable for her.
ATTENTION! There is a site entirely dedicated to how to build a pitched roof. There you will find calculations and step by step instructions on the construction of the roof of the bath with your own hands.
Tips for those who want to do it themselves frame bath, will be found in this one.
For the construction shed roof you will need to raise one of the walls (it will become a ridge and set the angle of inclination of the roof). The video below shows that the height of the ridge wall is laid initially, and it is not necessary to increase it. The video demonstrates the stages of erection of a frame structure of an attic type, that is, the ceiling is the roof.
However, it is worth noting that pitched roofs may well be attic type. We recommend reading a book Miller M.R., Miller R. "Guidelines for the construction of a frame house and roofing works".
Those who are in quality wall material frame structure chose SIP panels, can use them to cover the roof. It is cost-effective if the length of the roof plane does not exceed 5-6 meters. But if you make a frame bath with a pitched roof, then this is quite real. It remains only to choose a lightweight roofing material and cover the outside with it.
In all other options, you will also have either a wall extended above from the main material, or a superstructure, possibly made of wood, with which you form the desired height of the ridge wall.
The videos below are not entirely relevant to our topic, but you can learn from them useful information, which will help you make the right roof for the bath.
Here is an interesting way of attaching the rafters to the Mauerlat using beams. The base is aerated concrete walls. You can adapt this idea to make a gable roof for a bath with your own hands as follows:
Make one wall higher than the other, put on both mauerlat, as shown in the video.
Then fix on a high wall board, which will keep the beams parallel to the ground.
It will not work to fix the rafters to the beams on a high wall, so they will have to undercut and put it as described in the one already mentioned by us.
A series of roof battens and counter battens:
Here are the answers to how to fix the battens:
However, do not forget that the rain will drum loudly on such a roof, and it will last for 10 years, no more. He chose the height not roofing, but wall (20 mm profile), however. And soon I ran into trouble: the corrugated board covered with a film collected condensate and has already started rust. And if condensation was easy to deal with, then the quality of the sheet cannot be corrected:
So be careful when choosing a material when building a bathhouse roof!
Of course, we have already mixed theory and practice, but still there will be more practical.
Attic roofs automatically include an overlap, which will become the ceiling of your building from the bottom and the floor of the attic from above. Such overlaps are of two types: flat and hemmed.
In the first case, you do not even have to install floor beams - it is enough to fix the flooring boards on opposite walls. However, do not rush to rejoice - if we are talking about a log house, then there you need to choose ceiling crown, which will not be the last (there are 1 or 2 more crowns above it), remove it on opposite walls, and make notch for laying boards.
In other cases, can be wall-mounted timber, which will be the "support" for the ceiling boards.
IMPORTANT! Boards should go on the wall / timber to a depth of at least 5 cm.
5 cm is the optimal value, which allows you not to worry that the ends will deteriorate and the board will not hold.

False ceiling during installation. StroyDom Photos
Can be used tongue-and-groove board or fasten it from the outer (top) side of the board with bars so that they do not fall apart. It is also possible to fasten the boards into a shield while still on the ground, and install it in its proper place.
BY STANDARDS, the flooring should not be used in areas over 2.5 meters, because the boards sag. Or you need to use partitions as intermediate supports.
So, the boards are laid, fastened, from below you can attach foil or film for vapor barrier, on top - put kraft paper and pour expanded clay or vermiculite a layer of 20-30 cm. In our opinion, this is an excellent insulation. Only the boards must be strong enough, for example 50 mm thick.
Hemming the ceiling starts with beams. For them, a recess is made in the walls, on 2/3 of the wall - it is cut down in the log house, and an empty space is left during construction from block ones. Do not make a through hole. The spacing of the beams is 0.6-1 m.
ATTENTION! Instead of a cut, you can use a metal mount "bar holder".

Metal mount "bar holder"
Is nailed to the installed beams cranial bar, which will be the "support" for the rough ceiling. Planks are laid on the protrusions of the cranial bar rough flooring.
Vapor barrier can be done from below, from the side of the ceiling. Then insulation is laid in the gaps between the beams, on top of it the beams are attached waterproofing, a rough flooring is placed on it or lags, next layer - clean floor... From below, from the side of the ceiling, on top of the vapor barrier is done clean ceiling, for example, from the lining.
Well, let's move on to building the roof of the bath with our own hands.
Any construction involves a preliminary calculation phase. In the case of a roof, you will need to consider the weight of all the components of the roof itself(rafters, roofing material, insulation, etc.), as well as snow load (which you can find out from the map of regions) and wind load (another map in the already mentioned article).
Next you will need formulas for calculating cross-sections wooden structures ... They are quite complex and even in books they are often presented in a simplified form. We advise you not to be guided by the "average indicators" on the Internet, but to calculate your own case from books.

Construction of a bathhouse with a garage under one roof. StroyDom Photos
Perhaps there are programs not only for calculating the cross-section of beams, they could facilitate your task. We found online calculators that calculate the rafter system, material weight and much more for you: Stroy-calc - Professional construction calculators.
When all calculations are completed, the lumber is purchased, the processing phase begins. Do not forget that antiseptics and fire retardants on the roof - your friends (in the steam room they were enemies). The joints of the tree with everything else are accepted waterproof something: mastic, roofing material, etc.
In addition to lumber, you also purchase fastening. The mounts themselves are also described in books - somewhere it can be rigid, somewhere - have degrees of freedom in certain planes. Freedom is needed so that the roof is not blown off by the wind, so that the elements do not collapse when the ground moves, the frame dries out, etc.
We go into the appropriate calculator and enter our data. Nizhny Novgorod is in zone 4, we will deal with the rest along the way - for an angle of 30 degrees, the rise will be about 175 cm (trigonometry, a leg and an opposite angle are given). The length of the overhangs suits, the step of the rafters and the parameters of the lathing too. We take 1st grade wood on the rafters.
At the exit we have: roof area - 47.68 sq. m. The weight of the metal tile is 286 kg. Rafters 22 pieces, with a minimum section of 40x150 mm, length of each 297 cm, total weight 241 kg. The same data for the crate.
As you can see, the calculator has saved you from unnecessary engineering pains, with such data you can already start working.
And now let's try to answer the questions that often arise among bath owners.
Above, we have already described the properties of corrugated board and metal tiles. Now let's think about the better to cover the roof of the bath, if the choice is between these two.
Tentatively, price metal tiles are two times higher than corrugated board (approximately). Consequently, its advantages should also be "twice" more noticeable.
That and the other material, as said, is subject to rusting if it is not made of copper or aluminum, but the use of non-ferrous metals dramatically increases the cost of the material.
Metal shingles usually have a well protected upper layer in contact with the atmosphere, but the lower one needs protection, so you need to do a good vapor barrier and ventilation so that there is no condensation.

Installation of metal roofing. Cromwell Photos
The corrugated board also has coating, but, as you saw in the video, it is sold as "made in Italy", and begins to rust after the first condensation.
In essence, here both materials are equal and too dependent on the manufacturer, his honesty.
In both cases, by the way, vulnerabilities become attachment points because they are penetrating. Therefore, it would be nice to varnish them and cover them with wide fastener caps.
Both materials noisy, this was also discussed. Both low thermal insulation... Both weigh a little.
Actually, the whole difference comes down to one single subjective factor - beauty. Metal tile looks prettier and "richer" than the corrugated board, which is traditionally used to cover garages, sheds and other outbuildings. If appearance it doesn't matter, the corrugated board will cost cheaper. Otherwise, rely on metal tiles.
Here we venture to state our own vision of how to cover the roof of a bathhouse inexpensively and efficiently.
Based on real budget savings, then the optimal material can be called ondulin or bitumen (flexible) tiles of the economy class. Both materials are based on bitumen.
Ondulin stands approximately as corrugated board, flexible tiles - as metal tiles. Of course, bituminous shingles can be very different in price, but they are cheaper than the tiled variety of ondulin - onduvilla.
It is also convenient that in the case when it is necessary to repair, replace the ondulin sheet or shingles much easier than corrugated board (they try to take them so that there are no horizontal joints, which increases the area of the sheet).
The question "how to make a pipe in a bath through the roof" we consider in detail in this one.
How to build a house with a bath under one roof is described in this one, which you will also find on our website.
But this question cannot be answered with one article. Below is a list of articles that may be useful to someone who has decided to build a bathhouse from foundation to roof with his own hands:
***
Well, what could be said on the scale of the article has been said. Books that can clarify many points related to the design and construction of a roof can be easily found on the Internet. Although it would be worth starting to make the roof yourself, after all, from the barn.
In contact with
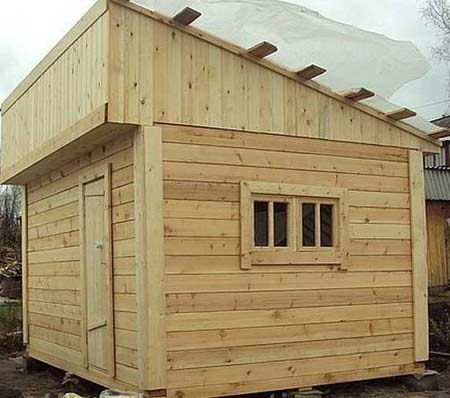
The bathhouse is a sanitary and hygienic building that is very popular among the population of Russia. It has become an indispensable part of leisure and health improvement, a way of life for the Russian people, so no country or even garden house can do without it. If there is enough space on the site for construction, then a freestanding bathhouse with a gable roof the best option... It will be easy to maintain optimal temperature, the building will become a reflection of ancient traditions in architecture. This article will tell you how to build a gable roof that retains heat with your own hands.
The gable roof of the bath is formed by joining two planes that are located at an angle to each other, called slopes. This is one of the easiest roofing structures to design and install with your own hands. In frontal projection, it has the shape of an isosceles triangle, which is considered traditional for this type of building. A gable roof consists of the following parts:
Note! The microclimate that is established in the bath is an aggressive environment for building materials... The difference between the internal and external air temperatures, heat and humidity have a detrimental effect on the wood, so any instructions for building a roof for a bath with your own hands involves processing with antiseptic and moisture-protective compounds. The high risk of fires explains the need to use fire retardants to protect the rafters from fire.


Gable roof - the most rational and popular type roofing structure used for the construction of baths with their own hands. She wants a building similar to a traditional tower, making it not only functional, but also aesthetic. Experienced craftsmen talk about the possibility of arranging two types of gable roofs:

Important! If the bath is performed as an extension to a residential building, then the most rational overlapping option is a pitched roof. It looks less presentable and has less energy efficiency, however, it costs much less and is built faster.
The collection of wooden elements that support the shape of the roof is called a rafter system. It consists of rafter trusses, each of which has the shape of an equilateral triangle, its base is equal to the width of the bath, and the legs are rafters. The triangle is the most stable geometric figure, so the roof frame can withstand significant loads. For construction gable roof two types of frameworks are used:

Note! When determining the composition rafter frame take into account its own weight, mass attic floors and seasonal snow load... The thickness of the rafters is determined in accordance with the length of the ramp, the width of the step between the legs and the type of roofing material. In order for the roof to last longer, a small margin of strength should be left to prevent breakage in extreme weather conditions.
The construction of a roof is a technically complex process, therefore, when building with your own hands, it is important to thoroughly follow the recommended technology. Installation work performed in dry weather to keep the elements of the rafter frame dry. From the tools you will need a grinder, a jigsaw, a screwdriver, a drill, a construction stapler. The assembly is performed in the following order:

Important! Since the bathhouse presupposes the presence heater, then the final stage of roof construction is the removal of the chimney. It should be located at a distance of 30-50 cm from the ridge and rise 50-100 cm above it.
Foreword
Every land owner dreams of a bath. In such a structure, the main role is played by insulation. Particular attention should be paid to the roof of the bath, through which all the heat can escape.
Depending on the type of structure, the roof may differ in its design and shape. The main feature of the bath roof is its low weight. Therefore, such a roof has a simple structure.
Before making the roof of the bath, you need to think about the type of the building itself. Such a structure can be located on a land plot separately or be attached to the house. You also need to think about the type of roof, which can be either single-pitched or gable.
The choice of roof slope is also important. The slope of the slope depends on the weather conditions. The roof must be able to withstand wind and snow. Therefore, the smaller the angle of inclination, the less abundant atmospheric precipitation the roof can withstand.
This type of bath roof is the easiest to build, less laborious and cheaper in terms of costs. A similar design consists in the fact that the beams are laid horizontally on the opposite walls of the bath. The angle of inclination of the slope is provided due to the different heights of the walls of the structure.
A roof with one slope can be made with an attic or an attic room can be built there. From the point of view of thermophysical indicators, such baths have the best thermal insulation properties. Such rooms can be used for storing bath equipment, stacking firewood there for the fireplace and stove. It is possible to make a rest room there.
To save money, attics are not made. In this case, the sauna roof can be combined with the ceiling. With this option, building materials will require significantly less than for the construction of an attic or attic.
Along the upper perimeter of the walls, it is necessary to lay boards that will support the entire rafter system. During this process, it is imperative to monitor the evenness of the arrangement of the beams. This control can be done with the normal level. At this stage, support pillars will be required if the boards protrude over 50 cm outside the wall.
At this stage, it is necessary to install the rafters on the rafters in increments of 1–1.5 m. They can be fixed with metal staples.
The lathing is necessary so that the roofing materials have something to attach to. Depending on the roof covering, the lathing can be either continuous or with gaps. The first option is used for ondulin or roofing material. In this case, boards 20 mm thick will be required. It is imperative to take into account that the joints of each row must be in different places. To achieve this, it is best to use different lengths of boards. In the case of using metal tiles or slate, a continuous sheathing cover is not required. To do this, you can fix boards with a gap of 20-30 cm.
In order to avoid excess moisture and leakage during rain or melting snow, it is imperative to hydro-vapor barrier the roof. For this, the vapor barrier film is attached with a stapler to the crate. A waterproofing material is laid on top of this film. The decking is usually done along the roof, starting from the eaves. The waterproofing must be overlapped 5 cm on top of each other. You can also fix this material with a construction stapler.
Metal roofing starts from the bottom corner of the bathhouse roof. Sheets must be laid on top of each other with an overlap of 10–20 cm. Fastening is carried out using self-tapping screws with rubber gaskets in the area of the head. This will prevent leakage when it rains. When the last sheets of the upper row are fixed, you can proceed with the installation of the ridge. As a rule, galvanized metal is used for this procedure.
For covering the roof, you can use lining or ordinary boards, which must be fastened without gaps. Siding can also be used as end cladding. Such material is easy to use, inexpensive and pleasant to look at.
The structural elements of the ceiling should not contribute to the wetting of the insulation. Otherwise, the heat-insulating material may lose its heat-saving properties. As a result, the bath will quickly cool down, which is unacceptable for such buildings.
The height of the ceiling of the bath plays a significant role. The ceiling should not be too high or too low. To calculate the optimal ceiling height, take into account the maximum height of people who will take bath procedures. The next criterion for calculating the height is the size and number of shelves.
Be sure to take into account the possibility of a comfortable swing with a broom. If a log bath is being built, then 10–20 cm must be added to the height of the ceilings for future shrinkage. As a rule, for people with a height of up to 190 cm, a ceiling with a height of 2.5 m is sufficient. and
There are several common types of ceiling coverings. The first type is a hemmed ceiling. Its structure consists of boards (trimmed or grooved) that are attached to the ceiling beams. It is also required to lay a vapor barrier on top of the beams, spread waterproofing. On top of these layers, a heat-insulating material is laid, which also needs to be covered with a layer of steam and waterproofing. Foam is used as insulation, mineral wool or use bulk material (expanded clay).
TO positive properties This type of ceiling includes simplicity in the device. High level thermal insulation, no doubt, is also a positive criterion for choosing which design. Due to the large number of different layers, such a ceiling is very reliable and can serve for a long time. As for the negative factors, this includes the cost of erecting such a structure. The price is influenced by the use of thick beams for the ceiling beam.
The next type of ceiling is flat. It is distinguished by its simplicity of design, it is constructed using a continuous flooring of cut boards. Thermal insulation with a vapor barrier film is laid on top of them.
For insulation, they are most often used basalt wool... Bulk materials can also be used as heat and vapor insulation. They fill all the cracks and depressions well, this results in a continuous layer of insulation. For bulk materials, it is necessary to make bumpers around the perimeter of the attic. When using this type of insulation, use attic impossible, since bulk materials cannot withstand high loads.
Among the main disadvantages of this design is the impossibility of creating a ceiling with a height of more than 2.5 m.
This is due to the fact that a ceiling beam is not used. The negative factors of this type also include the susceptibility of the insulation to moisture. The insulation material will get wet quite often and will need to be replaced frequently.
The third type is the panel ceiling. This design consists of panels that are assembled separately. The main element is the supporting beams. The box itself is assembled from boards. A pie made of hydro, steam and thermal insulation is placed inside such a trough. On top of these materials, boards must be laid. For this purpose, you can use trimmed beams of any length.
The final and most difficult stage in the construction of a bath is the construction of the roof. Here it is important to choose the right angle of inclination, the length of the overhang, think over the configuration of the rafter system. Much depends on the type of roof: the gable structure is more functional, but the pitched one is easier to mount. Of course, you can hire specialists for this, but a roof for a bath with your own hands will cost several times cheaper.


A pitched roof is mounted mainly on small saunas. One of the walls is made 2-3 rows higher, which allows you to lay the floor beams at the desired angle. To reduce the load on the floors, the angle of inclination must be at least 20 degrees. In regions where there is a lot of snow, the slope is made even steeper - up to 45 degrees.

For the construction of a pitched roof you will need:

Mauerlat is a load-bearing beam laid on top of the walls along the perimeter of the bath. It is designed to bind walls and rafter systems. V wooden baths the role of the mauerlat is played by the upper row of the log house, and for buildings made of bricks or blocks, it must be installed separately. You can fix the beams to the wall using steel wire, anchor bolts or construction rods. The third option is considered the most convenient for pitched roofs.


Construction studs are embedded in the upper rows of masonry at a distance of 60-70 cm.This must be done carefully so as not to stain the threads with mortar. The threaded part should rise above the Mauerlat by about 3 cm, and the bottom sinks into the wall by 45 cm. The roofing material is cut into strips along the width of the wall and laid on top, pinning it onto the pins. Then the beam is also laid on the points and beaten with a hammer so that the marks remain. Holes are drilled along the marks, the beam is put on the studs and the nuts are screwed onto the thread.


In the Mauerlat, grooves are cut out for the floor beams every 60-70 cm.After laying the beams, their ends should protrude beyond external walls baths at least 30 cm. Overlaps, which are also rafters, are attached to the Mauerlat with nails or with wire. During installation, care should be taken to ensure that the beams lie in the same plane. Upon completion of the work, the wooden elements are primed with an antiseptic composition.

From the bottom, the floor beams are lined with boards, and then the roofing is continued. A vapor barrier film is attached to the rafters, overlapping the material and connecting the joints with tape. The next layer is thermal insulation. Plate insulation is more convenient to use, but you can also take a roll one. Insulating material is tightly laid between the rafters, all gaps and holes are foamed, and a hydro-barrier is fixed on top. It is also laid with an overlap, the seams are sealed with tape along the entire length.


Bars and boards for lathing are treated with an antiseptic and dried. Next, the bars are stuffed onto the rafters directly through the waterproofing film, and then the resulting frame is sheathed with boards. Depending on the type of roofing, the gaps between the boards can be of different widths - from 1 to 15 cm.When the lathing is ready, you can proceed with the installation topcoat- slate, profiled sheet, tile or other. The sheet roof is fixed with self-tapping screws with special gaskets that prevent moisture from penetrating through the holes.

A gable roof is more suitable for a spacious bath. Bath brooms can be stored and dried in the attic, which is also very convenient. The gable roof rafter system is assembled in several stages, and the main elements are made on the ground.
In the process of erecting a roof, you will need:

In the Mauerlat or the upper crown of the log house, grooves are cut out for the ceiling beams. The distance between the grooves is 1 m, the depth of the cutouts is about 7-9 cm. The antiseptic treated and dried beams are inserted into the grooves on the edge and fixed with nails. It is possible to make ceilings with a protrusion behind the walls, but then additional sealing will be required at the points of contact with the Mauerlat.

A gable roof is formed by several identical triangular structures, which are called trusses. Each truss consists of two beams of the same length - rafter legs, base and lintel - crossbar. The truss elements are fastened to each other with special screws. For the base and rafter legs, an edged board 50x100 mm is used; the length of the rafters is 280 cm, and the length of the base is 50-60 cm longer.
The edges of the boards are cut at an angle of 40-45 degrees, holes are drilled for screws at the joints and the boards are firmly fastened together. Having retreated from the junction of the rafters about half a meter, a groove for the crossbar is cut out in the bar. At the ends of the crossbar, rectangular cuts are also made, with the help of which the jumper is tightly inserted into the rafter legs. In the places where the crossbar adheres to the timber, the screws are tightened. The rest of the farms are harvested in the same way.
Two trusses, which will be located above the side walls, should be sheathed immediately, and it will be more convenient to do this on the ground. A 50x50 mm beam is nailed to the farm in the form of horizontal bridges every 30-40 cm, the ends are cut at an angle. Additionally, the structure is strengthened with two diagonal bars. Now the sheathing is sheathed with boards vertically, leaving an allowance at the bottom edge of 2.5 cm.It can be done vice versa: the frame beams are nailed vertically, and the sheathing boards are fixed horizontally. A door must be made in the cladding of the second truss.

The finished trusses are lifted up and installed above the ceiling beams. First, they are fastened with temporary spacers from a bar, leveling vertically. The extreme farms are installed first: several through holes are drilled at the base and the rafters are screwed to the Mauerlat. In order to more conveniently control the vertical position of the truss, a plumb line must be tied to the girder. After the installation of the structure, it is additionally reinforced with jibs - strong beams, one end of which rests against the supporting beam on the wall, and the other against the rafters at the level of the crossbar.
After installation and strengthening of the extreme rafters, proceed to the rest of the trusses. They are leveled and fixed with temporary struts; the distance between adjacent rafters is 1 m. When all parts of the rafter system are installed, they are connected with a visor. To do this, use 2 long boards, which are nailed to the beams at the very top on both sides of the roof.

For the lathing, it is advisable to take boards of such length that they completely overlap the roof and protrude 20 cm beyond the edges of the truss. If you use short boards and join them on the rafters, the strength of the roof will be reduced. The width of the gaps between the boards depends on the type of roofing and can be from 1 to 50 cm. The boards are nailed to the rafters. At the location of the chimney, a hole of the corresponding parameters is made and a continuous crate is made around it. Next, a waterproofing membrane is laid: the film is attached with a stapler to the boards, laying strips of material with an overlap of 5-10 cm. Around the chimney hole, the edges of the film should hang slightly inward.

On top of the film, beams of 50x50 mm are nailed for counter-lattice. They are pre-impregnated with an antiseptic and dried well. The covering is laid on the counter-lattice, starting from the eaves. For a bath, you can use any type of roof - from soft tiles to corrugated board. The roofing material is fixed according to the instructions, making allowances for the overhangs. For the chimney, cut holes in the cover, and after installation outer pipe seal joints bituminous mastic or with special glue and covered with an apron.


After installing the roofing, the roof should be carefully insulated from the inside. Since the rafters have already been primed with an antiseptic, it is not necessary to process them again. Between the beams, thermal insulation plates are laid as tightly as possible, trying not to squeeze or bend the edges of the material too much. When deformed, the properties of the insulation are noticeably reduced. It is recommended to blow out the gaps and seams between the plates and at the corners of the rafters with foam.


Special attention should be paid to the warming of the gables. First, they are upholstered from the inside with a waterproofing film, then the sheathing beams are attached. You can also use aluminum profiles for these purposes. The next layer is insulation, and then the vapor barrier is attached. At the joints of the slopes and gables, the vapor barrier film is laid with an overlap and glued with tape. If necessary, the inner surface of the roof can be sheathed with clapboard, ordinary boards or plywood.


