Arrangement gable roof is considered a very practical and correct solution for the construction of a residential or commercial building. This option combines relative simplicity and reliability, ease of maintenance and long service life. V this material we will tell you how to perform the installation rafter system a gable roof with your own hands, what are its varieties, and how to calculate the sizes of its individual elements. Our step-by-step instruction will allow you to deal with any complications that may arise during the work.
A roof with two slopes has a whole list of advantages:
Consider the main types of roofs with two slopes, the rafter system in which will be slightly different in design.
This is the simplest gable roof, however, the most reliable and demanded. Symmetrical slopes allow you to distribute the load on the Mauerlat and load-bearing walls evenly. In this case, the type and thickness of the insulation layer does not affect the choice of roofing material. Thick rafter beams have a sufficient margin of safety, so they will not bend. In addition, the spacers can be installed as you like.

Among the disadvantages of this option, one can only note the too sharp angle of the slopes, which complicates the use of the attic floor and creates "blind" zones that have no use.
If the angle of inclination of the slopes is made more than 45º, you can use some unused areas of the space. It will even be possible to equip a living space in the attic. However, some additional calculations will be required as the load on the walls will become uneven.
This configuration makes it possible to place a spacious attic or attic under the roof. At the same time, in this case, more complex engineering calculations will be required.
The design of the gable roof rafter system assumes the presence of the following components:

The installation diagram of the gable roof rafter system will greatly facilitate everything construction works... How such a roof scheme will look depends on the type of roof.
Please note that the material for the rafter system must be of the highest quality, treated with fire retardant and antiseptic agents. There should be no knots or cracks on the beams for rafters, Mauerlat and uprights. On the crate, only a small number of knots are allowed, firmly sitting in the wood.
This element is attached to the load-bearing wall along its entire length. When it comes to log house, then the upper crown can serve as a mauerlat. For buildings made of aerated concrete or brick, a Mauerlat equal to the length of the wall will be required. Sometimes this part can be laid between the rafters.
If there is not enough length of material for the Mauerlat, several pieces can be spliced. In this case, the edges are sawn down at 90º and are joined with bolts - wire, pins or nails are not suitable.

There are two ways to lay the Mauerlat on top of the load-bearing wall:
Installation of Mauerlat is carried out on a pre-laid waterproofing layer of roofing material. This will protect the wood from rotting.
It is worth taking a responsible attitude to the process of attaching the Mauerlat, since in a strong wind it must withstand a particularly heavy load.
The following consumables can be used as mounts for the Mauerlat:
Assembling trusses can be done by one of the following methods:
Please note that it is worth starting the assembly of rafter pairs only after applying the markings. And if you make a template in advance, for which you take two boards equal to the length of the rafters and connect them together, then all the pairs will turn out to be absolutely the same.
After assembly and lifting to a height, the rafters of the gable roof are installed wooden house... To fix them on the Mauerlat, cuts are made at the bottom of the rafters. The first to install two trusses from opposite ends of the roof.
After that, a rope is pulled between the starting pairs, along which all other rafter trusses will be aligned and the skate will be installed.

Now you can mount the remaining pairs, observing the calculated step between them. In cases where the pairs are assembled directly on the roof, a ridge girder is attached between the two end trusses. Subsequently, the rafters are installed on it.
The order of installing the halves of the rafters, according to the opinions of professionals, may differ. Some people prefer to lay the beams in a checkerboard pattern so as not to overload the foundation and walls in the process. Others tend to install rafter pairs consistently. Be that as it may, rafter legs may need supports and uprights - it all depends on the size of the roof and the shape of the trusses.
The ridge is an element that is formed by attaching the rafters at the top point. As soon as all the details of the rafter system for gable roof will be installed, capital fastening of all structural elements should be performed.
The presence of a crate is a must for the construction of any roof. It not only supports the roofing material and allows it to be securely fastened, but also makes it possible to move along the roof during operation.

The distance between the individual boards is chosen based on the type of roofing material:
Outcomes
Thus, in order to assemble a rafter system for a roof with two slopes, many nuances should be taken into account and any possible complications... We hope that our tips will help you cope with this difficult task and create a high-quality and durable roof for your home.
Of all types of roofs, the gable is the most popular among developers. This is a very successful design for universal use. Such roofs can be installed both on large multi-storey buildings, including with attics, and on various outbuildings.
In addition, the rafter systems are in the middle category in terms of complexity, only flat ones are simpler. Due to the existence of a huge number of options for various stops, ties, linings, etc., for each version of the gable roof, you can select individual options.

But you should always remember that a gable roof of a house with their own hands can be built only by those who have experience in performing roofing works... Get trained on this architectural element strongly discouraged - too costly and ultimately costly mistakes. It is better to break the work into several stages, each of them should be performed in a strict sequence.
The more systematically the work is carried out, the lower the risk of errors. It is much more profitable to think over an action plan than to make rash decisions in a hurry in the course of work. This not only increases the construction time, but also significantly reduces its quality.
| Stage name | Content |
|---|---|
| It is necessary to decide on the elements of the gable roof, calculate the parameters of the rafters, their location, additional elements, etc. During the development of the project, the climatic zone of residence, wind and snow loads and terrain. Initial data are taken from SNiP tables and adapted to existing conditions. It is very difficult to make such calculations on your own, you need to have a special technical education... And there is no need to deal with calculations, this will take a very long time, and the result will be approximate. The fact is that the data on the height of the snow cover and the strength of the wind in SNiP have not changed for about fifty years. During this time, climatic conditions have undergone significant changes, the actual indicators differ significantly from those in the tables. It is much easier to view the constructed roofs on neighboring houses and copy the parameters of the structural elements. It is faster, cheaper and more reliable - the strength of such structures has been proven over time. | |
| In all cases, it is necessary to purchase materials with a stock. The amount of stock depends on the experience of the builders, the complexity of the roof and the quality of the materials. There is no need to save on the truss system; for its manufacture, lumber of at least first class should be used. Why? The developer may not always be able to see some prophets of the boards by eye, and the first class gives a guarantee of quality in any case. | |
| You can start only after choosing a design and complete procurement of all materials. A rafter system is a structure that does not have secondary elements. Each stop, brace or other unit performs its function, incorrect connections or violations of manufacturing technology will certainly cause very unpleasant situations during the operation of the building. There are currently big choice fasteners and building technologies, allowing to facilitate the physical work of roofers, to assemble the rafter systems relatively quickly and reliably. The most experienced builders prepare all the elements on the ground according to templates; on the roof, they are only assembled into a single structure. | |
| Used only when attics it is planned to be made residential. The parameters of the roofing cake, the nomenclature and cost of materials largely depend on the type of insulation. When choosing a heater, they must be taken into account temperature conditions in the area. If the thickness is not calculated correctly, then the insulation will be more harm than good. Mineral wool will quickly damp, the wooden elements of the rafter system will be used in conditions high humidity... As a result, the roof will prematurely lose its initial stability indicators, a current or overhaul... In some situations, the cost of capital repairs may exceed the cost of new construction. | |
| The drainage system is mounted on all residential buildings, it not only directs rainwater to the selected area, but also prevents waterlogging of the soil under the foundations. Waterlogging is very dangerous - the foundations sag unevenly, cracks appear on the facade walls. As for snow holders, this issue should be approached carefully. The fact is that snow does not accumulate on slopes with a large angle of inclination; snow guards are not needed on them. These elements are not required on roofs with a slight slope (within 20 °), the snow from such roofs does not fall, but gradually melts. |
Consider the step-by-step instructions for building a gable roof of a house with your own hands.
Work should be started only after all organizational issues have been resolved: a specific design has been selected, the linear dimensions of the elements and loaded nodes have been selected, and the methods of fixation have been selected. Taking into account the initial data, materials should be purchased.
Important. If there are unedged boards among the lumber, then they must be sanded. This should be done as quickly as possible; in warm and humid weather, pests may appear under the bark within a few weeks.

The rafter system consists of several important elements.
Mauerlat is an element of the rafter system on which the rafter legs rest. He not only perceives the efforts from the rafter system, but also distributes them evenly along the perimeter of the facade walls. It is made of boards 50 × 200mm, timber 50 × 150 mm or 50 × 200 mm. There are options for making a Mauerlat from thin paired boards. The decision is made by the foreman on the spot, depending on the amount and size of the available sawn timber, the maximum loads on the roof and the physical parameters of the walls. The Mauerlat is fixed to silicate or concrete blocks with pins after about one meter.

Important. During fastening, care should be taken to ensure that the studs do not fall into the masonry seam.
Between wooden beams and the wall must use waterproofing. For these purposes, it is best to use ordinary roofing material, but you can insulate with plastic wrap in several layers, waterproof mastics or modern non-woven roll materials on modified bitumen. It makes no sense to buy them specially for the Mauerlat, you can use the pieces left over after other work.

If the house is tall, then it is recommended to collect the scaffolding before starting the manufacture of the rafter system. They will facilitate construction work on the rafter system and roof. Professionals know that the time spent on the manufacture or installation of finished factory scaffolding always pays off in the future. With them, it is much easier to perform all high-altitude work. Another undoubted plus of forests is that labor safety increases, and this is very important.

Step 1. Assemble the temporary ridge girder. With its help, rafter legs will be installed much easier and faster. The ridge assists in setting the dimensions, adjusts the spatial position of the elements. The temporary run is assembled on corners and self-tapping screws, which will facilitate the dismantling process after the completion of the assembly of the rafter system structure. The element is made from various segments, the method of temporary fixation does not matter. You should pay attention to only one factor - the position of the horizontal bar. It should be such that the rafter legs are located exactly in the middle of the building, and the tops of the ridge knot of the rafter legs are on the same line.


Step 2. Make one pair of rafters. Be very careful with this problem. Check the position of the legs along the entire length of the structure, take the exact measurements. In the future, this pair will serve as a template for the manufacture of all the others.
Prepare on the ground workplace for the manufacture of rafter legs for the whole house. The distance of the table from the ground is about 1 m, it is convenient to work at this height. The length and width should be such that the blanks for the rafter legs can be easily placed.
Step 3. Make the required number of elements and feed them to the roof. Place them immediately in approximately their places, it will be easier to work this way. In all cases, one universal rule must be observed: there must be order on the roof, nothing should interfere with work or walking. These are safety precautions, and the build quality of the rafter system, and the total operating time.

Step 4. Nail the rafter legs. This is done in two stages. On the first, the lower parts of the rafters are fixed to the Mauerlat, you can nail it with ordinary nails (simple, cheap and reliable) or metal corners on self-tapping screws. Nails are knocked out one from each side of the rafter leg. The roof is subject to significant vertical loads, while lateral loads are minimal. The horizontal forces are held by the crossbar, corner stops, hardware. Due to these elements, sufficient stability is provided, do not be afraid that the rafter system will fall on attic floor.

At the second stage, a gash is made in the upper part of the rafter legs and their connection with wooden plates or metal plates. To speed up the work, filing is done with a gasoline saw, but you need to work skillfully. The cuts will have to be done at a height in an uncomfortable position; without practical experience, it will not be possible to make even cuts.

The master first makes the markings for sawing the rafters, according to the markings he cuts with a chainsaw
During assembly, first, a nail is driven into the end of the joint, then an overlay is applied and fixed.


Practical advice. On the outer rafters, mount a fastener from a board of 50 × 150 mm, be sure to lay a waterproofing protection between the pediment and the board. The tightening is needed to increase the stability of the system.
After all the rafter legs are installed, remove the temporary girder.


Step 5. Install the ledgers. To do this, nail the elements on the two extreme legs according to the level, pull the rope between them and fix all the remaining ones along it. It is possible to use thin boards with a thickness of about 25-30mm for crossbars, but then it is advisable to make two elements for each rafter. One transom on each side.


Step 6. Proceed with the installation of the puffs and vertical stops (headstock). The process is much faster if the ropes are pulled at the top and bottom. Using them, you can immediately control the correctness of the position of the elements, there is no need to waste time checking each of them separately. Puffs are fixed to the rafter legs on both sides, a vertical stop is placed between them. The upper end is inserted between double ledgers, the elements are nailed.


Extension of boards along the length


There is another method for fixing vertical supports. A piece of board is inserted between the puffs and crossbars, and a support (headstock) is attached to it. You can choose any, but the first one takes less time for installation.
Step 7. Make a cornice overhang. If the length of the rafter legs is insufficient, then the filly will have to be fixed to them. They are made in size from boards, nailed. Use a blue-laced rope to measure the cut lines and align the filly lengths. All this work is done from the scaffolding - simple, easy and safe. Nail a board 50 × 200 mm to the ends.


Step 8. If you need to make a large gable overhang, you will have to install rafter legs behind the gable. They are fixed to the rest of the rafters using boards and metal corners.

Then fix the rafter legs close to the pediment (do not forget about waterproofing), put inserts of the required length between them and attach them to the rafters.
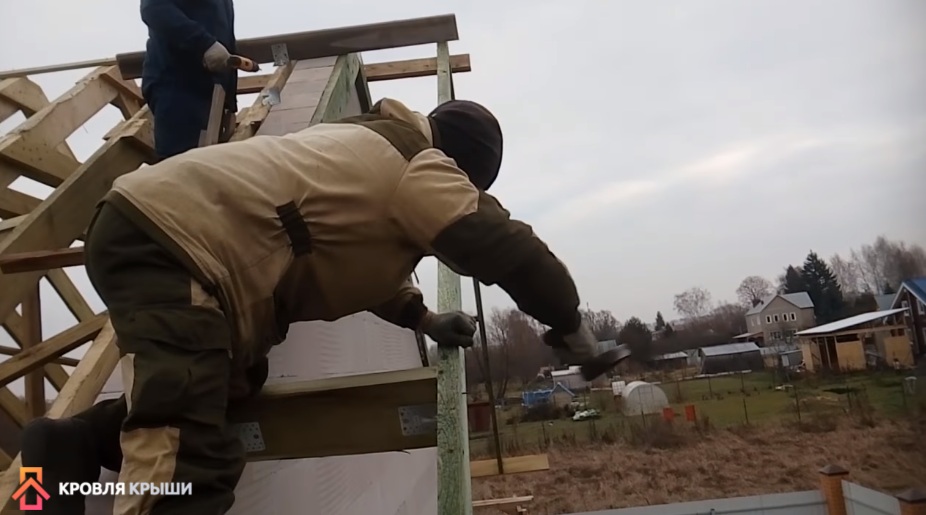

Photo: wind boards nailed to the additional rafters
This completes the main work on the manufacture of the rafter system, you can start roofing work.
Roof windproof membrane
Step 1. Install waterproofing. It is fixed with a stapler on the rafter legs. You can apply the so-called Finnish method - do not bring it to the end of the eaves overhang by about 30 cm.

What is special about the Finnish method of fixing waterproofing? The fact that the material does not reach the end of the cornice and does not interfere natural ventilation under-roof space. The membrane is not attached to the drip tube, but hangs down into the cornice. The Finns have calculated that the amount of moisture condensation dripping from the waterproofing is small. It will evaporate without any problems, icicles from the cornice do not sag in winter, the boards do not get wet.
Why is it so with them, but not with us? It's simple, the Finns insulate the roof and the attic floor so well that there is almost no loss of warm air. Hence, there is a very small amount of condensation on the roof.
What are the advantages of their method?
It is worth considering the feasibility and economic benefits of strict adherence to the recommended building codes and rules.
Step 2. Nail the slats of the counter-lattice, the height of the slats must be at least 50 mm, otherwise the ventilation is insufficient to remove moisture and condensation.

Step 3. Secure the first and second battens. Pay particular attention to her position and stride. The fact is that an error on the first board will cause big problems during the installation of metal tiles - the relief of the coating will not coincide with the location of the crate boards, the screws are not screwed in their places.

The second board is installed correctly if there is exactly 35 cm from the bottom of the first to the top of the second. This size does not depend on their width and is universal for all types of metal tiles.

Step 4. Mount the crate. For quick installation, prepare a template to check the dimensions of the lathing step. The length of the fixture is approximately 40 cm, and the working part is 35 cm long. The templates can have different design, the main thing is that this universal size is controlled.


Important. If the hooks drainage system are long, the first board must have a width of at least 30 cm. There is no such wide - nail several slats next to it.
On the ridge, a gap of at least five centimeters should be left between the slats, it serves as a natural ventilation air.

Step 5. Step back from the extreme rafters 5-10 cm, beat off straight lines on the battens of the crate and cut off the excess ends with a saw.

Practical advice. Experienced roofers accurately calculate the amount of indentation taking into account the size of the roofing sheets. The fact is that metal tiles and profiled sheets have standard overlap sizes, depending on the parameters of the wave. It is necessary to find out the width of the sheets to be mounted and, taking into account these data, adjust the dimensions of the slope. Otherwise, situations may arise when, due to a few centimeters, you will have to buy additional sheets and cut most of them into waste.
To increase the stability of the rafter system from the inside, install wind ties. These are ordinary slats or boards nailed diagonally to the ramp and several rafter legs. It is better to arrive immediately after the installation of the rafter legs in place before the installation of the waterproofing and the lathing begins.

Step 6. Nail the end boards and corner boards. To make them less deformed, it is better not to use one wide one, but two narrow ones of about 20 cm each and arrive them in the form of a step. The top board should protrude about 4 cm above the sheathing plane.This parameter depends on the wave height of the metal tile or other roofing.


This completes the construction of the lathing, check all the dimensions and proceed with the installation of the roof.
Metal tile
Nail in the wind and eaves with an overlap of about 10 cm. You can also nail in the wind bars after the first sheet has been installed, it does not matter.

Installation of wind boards

Step 1. Install the bottom sheet of the first row, secure it for now with only two self-tapping screws. Lay the second sheet of the first row and bait.

Step 2. Lay the first sheet of the second row and line everything up. eaves... Work better with a tight rope... The lower row of metal tiles along the eaves must be fixed through the wave. Further in a checkerboard pattern at a distance of about 40-50 cm (through the wave). The horizontal overlap must be screwed on in each wave.

Self-tapping screws must be screwed into the deflection of the wave, where the sheet is adjacent to the crate


Step 3. It is better to start mounting the ridge immediately when installing the second row, the distance between the sheets in this place is also about five centimeters. The skate itself can be fixed through the wave. If any self-tapping screw does not hold firmly, then it cannot be unscrewed. An additional one should be fixed next to it, and the first one should close the hole made in the metal tile. The ridge is fastened with long self-tapping screws on the crest of the wave.


The roof installation is complete, install a drainage system.


Content:
The gable roof system assumes the presence of two rectangular slopes that are connected at the top at a certain angle. With this design, the pediments are obtained triangular.
In order for such a gable roof to serve for a long time, while maintaining its technical qualities, the rafter system must be performed correctly.
As a roofing material, subsequently, you can use metal tiles, corrugated board, soft roof other modern options... Taking into account the types of roofing material, the roof lathing will be equipped.
All work on the installation of a gable roof can be done independently, the main thing is to observe the technology and sequence of work.
Before proceeding with the installation of the rafter system, it is necessary to assess the front of the work and choose the most suitable type. Today, two types of rafter system can be distinguished:
Gable roof rafter system
For the rafter system, it is characteristic that the rafters are installed directly on the side walls. Use this option it is possible if the distance between the walls does not exceed 10 m. The disadvantage of such a system is that it exerts a bursting load on the outer walls and over time they can be damaged. This may necessitate the installation of tightenings. At the same time, there is also positive points... For example, there is no need to mount the Mauerlat.
If the distance between outside walls more than 10 meters, a layered type of roof system must be used. A device of this design involves the installation of a vertical beam. It descends from the ridge onto the load-bearing wall, which is located strictly in the center of the room. With this design, the load on the roof is distributed evenly and does not create a bursting effect. Therefore, the design of the house must be entrusted to specialists who will take into account the features of the entire structure and the gable roof as well. Also, when developing a project, Construction Materials, which are used for the construction of walls and roofing roofs.

The structure of the rafter system
Roof construction is made up of several important components that are worth knowing. In the rafter system of a gable roof, one can distinguish:
It is not recommended to design the roof yourself, if not necessary knowledge... Since it is necessary to perform calculations, while taking into account not only the size of the house, but also the possible loads on the roof. Failure to comply with the rules and regulations can lead to destruction and emergencies.
The choice of the angle of inclination directly depends on the climatic conditions. If a house with a gable roof is being built in an area with an increased level of snowfall, the rafter system should be made with a large angle of inclination. At the same time, it makes no difference which roofing material in this case is used corrugated board or natural tile.

Most optimal angle slope of the gable roof 45 - 60 degrees
Most often, the device of a gable roof is made with an angle of inclination from 45 to 60 degrees. On such a surface, the snow cover does not linger. In addition to the snow load, wind loads should also be taken into account. The most practical option is a rafter structure that resembles an isosceles triangle.
If corrugated board or other metal material the step between the rafters can be made up to 120 cm. If the weight of the roofing material is much larger, it is recommended to reduce the step to 60 cm. After all calculations, it is necessary to double-check all the indicators to make sure that the results obtained are accurate.
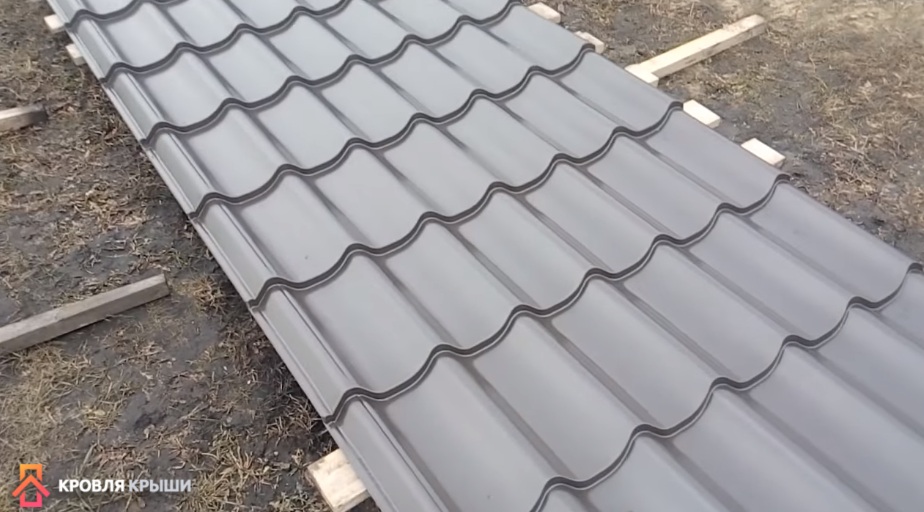
Despite the inconsistency different types roofing materials, corrugated board is especially popular. It is presented in a wide colors and with different wave sizes. In each individual case, you can choose the most suitable option.
Before starting the installation of the rafter system, you must prepare all the inventory. This will allow you to carry out work without interruption to find the missing tool and carry out the work as soon as possible.
Required inventory:
Despite the fact that there are different types of rafters, to achieve the highest quality result, it is worth combining them with each other. Only high quality materials should be used for roofing. The wood must be well dried and free from any defects. Before starting their installation, it is recommended to treat them with an antiseptic. Standard size The rafters that are used today are 50 x 50 x 6000 mm. The device of the elements should be carried out in pairs, on both sides at the same time. Layout of elements and fit right size must be carried out on the ground.

The scheme of fastening the rafters of a gable roof
In order for the supports to be as stable as possible, it is necessary to make inserts in them, which are made according to the size of the Mauerlat. If the installation is carried out with an overlap, you need to control the joints, there should be no protrusions.
In order to make all the frames the same and at the same time spend much less time on work, it is worth completing the template. For its device, you need to use a sheet of plywood or thick cardboard. The inserts must be strictly perpendicular, since they are acted upon by the load from above. Incorrect cuts can compromise the strength of the structure.
After the device of the side rafters is carried out, it is necessary to pull the cord between them. It will be used to adjust the height of the rafter legs. If there is a slight error in the height, it can be removed with a wooden backing. Elimination, thus, of large deficiencies should not be carried out, this may entail a violation of the strength of the entire system.
You can increase the strength of wooden trusses using struts. They are located from the bottom of the rafter to the middle of the opposite. The brace bar should be no more than 50 mm in size. It is such a device that strengthens the entire structure and increases its strength during strong winds or heavy snow loads.
If the installation of large spans has been carried out, they must also be strengthened using struts. With their help, the load will be evenly transmitted to the load-bearing walls. It is important that the braces are at a 45 degree angle. To connect the bed, the support post and the struts, it is necessary to carry out using special connecting elements - pins.
You can also additionally carry out the device of diagonal ties. They are located between the rafters. Thanks to them, the roof will be much stronger and will withstand any roofing material - metal tiles, corrugated board and so on. Such ties connect two rafters to each other, one end of the beam is attached to the bottom of the rafters, and the other to the middle of the adjacent one.
Particular attention should be paid to the ridge knot. It is important to secure it additionally using special bolts and self-tapping screws; metal plates can also be used.
The sheathing device will depend on what types of roofing materials will be used. You can use metal or corrugated board. It is they who are very popular today among developers. Profiled sheeting favorably stands out among other options available, valuable and excellent technical indicators.
To cover a gable roof, it is necessary to install the battens. Decking is a sheet material, it is not too thick, so the crate should be of high quality. For roof lathing, you can use a board of both edged and non-edged type. It is recommended to pre-treat the board with a special antiseptic to extend the life of the wood.
Installation of the board to the roof truss system is carried out using self-tapping screws of a suitable length. The lathing device for corrugated boarding can be made, single-layer or two-layer method. Before laying the corrugated board, it is also necessary to perform high-quality hydro and vapor barrier. Such insulation is carried out if it is necessary to install metal tiles.
The roof of the house is a reliable and durable protection from rain, wind, scorching sun or cold snow. It keeps the rooms warm and decorates the look of the building. A do-it-yourself gable roof is the final stage in the construction of the box, which requires preparation and skill from the builder.
Installation includes the assembly of the rafter system and lathing, hydro and thermal insulation works, laying of roofing material, filing of overhangs. The roof has been built for many decades, so it must be safe, functional and durable.
A gable roof is the most common construction in private construction. It consists of two planes, inclined in opposite directions at an angle to the horizon of 20-42 °, connected at the top - the ridge. Thanks to this shape, snow, rain and melt water flow down from the roof surface without lingering. With an increase in the angle of inclination, the windage of the structure increases, which in case of strong gusts of wind can lead to separation.

The supporting frame of the roof consists of a rafter system, which includes the elements:

On the crate, layers of hydro, noise and vapor insulation, insulation, if the attic is residential, and roofing materials are mounted.
The gable roof truss system in private construction is usually made of wood. The material is available, easy to process, allows you to erect light spatial structures that do not overload walls and foundations.

Diagrams of the rafter system of a gable roof.
Sometimes for the construction of the frame, metal rolling is used - channels, pipes, I-beams, corners. This method is used much less often in individual construction. Steel structures are more expensive, assembly requires professional qualifications and equipment.

Sections of standard load-bearing elements are:
With large spans of houses and high loads, the dimensions of the cross-sections of the bearing elements are determined by strength calculations. With appropriate preparation with antiseptics, the wood is resistant to decay. Special compounds - fire retardants - protect the material from fire.
In addition to the supporting frame and covering, the roof contains the elements:


From the sides, the roof is limited by pediments - parts of the walls of a triangular shape. The attic can serve as an attic and be used as living quarters for permanent or temporary residence.
A gable roof is the easiest option for building a private house. The rafter system can have a layered, hanging or combined structure.

Raised and hanging rafter system.
In the first case, the rafters are "leaned" - they are laid on the external and internal supports. In the second, they are “suspended” with support only on the walls.
The overhead system is used in the construction of houses with internal solid walls, which relieve the external enclosing structures from expansion. The main load here is vertical.

The absence of horizontal spreading forces simplifies and reduces the cost of the structure of the supporting roof frame. It consists of rafter legs, struts, crossbars, purlins and racks. The Mauerlat or the bed is mounted above the floor level by 100-150 mm for free access to the bottom of the rafters. If the walls are fragile, it is placed around the perimeter of the building. Otherwise, you can get by with short ones 60-70 cm long, laid under the rafter legs.
V wooden buildings the function of the Mauerlat is performed by the upper crown or strapping. The rafters are cut into the supporting beam with their lower end, additionally secured with brackets and twists of wire. To prevent bursting stresses in the ridge and the rafters not to move along the slope, the mating is performed with an overlap or end-to-end, secured with overlays, bolts, pins.

The system is reinforced with girders, struts and struts. It also helps to reduce rafter cross-sections and deflections. The elements are connected with metal fasteners - nails, staples, bolts, linings, rings, toothed discs.
Hanging rafters are mounted when the house spans 6-14 m. Relying only on the outer walls, the bearing beams perceive significant bursting forces. To distribute them, additional horizontal and vertical elements are introduced into the structure - crossbars, puffs, headstock (racks resting on the puff).

The wider the span of the structure, the greater the stress arising in the structures, the more complex the structure of the frame. Up to 6 m, there are enough puffs that combine the functions of floor beams. Above, additional crossbars are introduced. In houses without an internal load-bearing wall, exceeding a width of 9 m, the roof system is reinforced with headstocks and struts. A fragment of two rafters, ties and ties is called a truss.
In some cases, the Mauerlat is not installed. The finished trusses are mounted on a board laid along the top of the wall on a waterproofing layer. The rafters are cut into a puff or laid, beveling the edge. Fasten with pins, overlays, clamps.
The ridge knot is more difficult to solve than in layered roofs. Rafters cut into a horizontal beam, reinforce the joint with wooden or metal lining. The device of a hanging rafter system is more complicated and more expensive than a non-thrust one. Therefore, farms are often installed in steps of 3-4 m, connected by girders, along which layered rafters are laid. This method is called combined.
The advantage of hanging structures is the ability to use the attic space under the attic.
How to make a gable roof of a house, you need to determine at the design stage before installing the box. If there is an internal capital wall, it is advisable to use a layered system, in other cases - a hanging or combined one.
The angle of inclination of the rafters depends on the wind loads in the region - the greater they are, the lower the roof should be. The choice of roofing material also affects the slope. For different types coatings manufacturers recommend optimum angles.
Important. When choosing a roof structure, the width of the span, the load from snow, wind, and its own weight are of decisive importance. The higher the indicators, the more powerful the sections of the elements should be, the more reliable the execution of the nodes.
For self-made a rather difficult task - a gable roof of a house, step-by-step instructions will help you build it correctly and without errors.
For the manufacture of a support beam, a bar or log is used, which is cut off from one side for laying on the wall. The base must be level and horizontal. Waterproofing is laid under the Mauerlat roll materials or using coating compositions. This will protect the wood from rotting.

Important. For it is recommended the device of an armored belt along the top of the wall. It gives rigidity to the structure and at the same time serves as a solid base for fastening the rafter system.
Mounting methods that are used when installing the Mauerlat:
The bar for the Mauerlat is spliced along the length with an oblique or straight lock. In the corners they connect "in half a tree", "in a paw". If the wood is not dry enough, anchoring with a nut is recommended. The position of the beam is adjusted every year until the moment when intense shrinkage stops. This usually takes five years.
Important. Hardware in masonry or concrete should be as motionless as possible. Fasteners are not secure if the anchors are mounted at an angle or are not long enough.
A do-it-yourself gable roof with hanging rafters with a span of up to 6 m is mounted in the following sequence:
Important. If there are more than 6 m between the supports, the truss is reinforced with a headstock and struts. During installation roof structure connected with temporary fasteners from diagonal boards.
In the spacer system, the junction of the rafters and the Mauerlat is performed using two technologies:
Rigid fastening is carried out with or without a saw cut. In the first case, a saddle is cut out in the rafters for landing on a support bar. For this, a template is used.For additional area of support and blocking of the system's movements, the saw is made on a Mauerlat (fastening with a tooth) or on a thrust bar. Sampling of wood weakens the section, therefore it is not recommended to cut more than 1/3 of the height of the board or timber.

In the node without washing down, the efforts from the rafters to the Mauerlat are transmitted only through the fasteners - metal plates, corners and pins. Additionally, a persistent bar up to 1 m long is installed, which unloads the interface.
With the movable method, the elements are not rigidly connected. Wooden structures can move with fluctuations in humidity, change dimensions when shrinking. Special sliding supports are used, allowing the rafters to move along the axis. Such fasteners are often used in wooden structures, where deformations are significant.

In the case when the rafters are rigidly connected with tightening into one structure, the beam itself is attached to the Mauerlat by means of corners.
The sequence of installation of a non-expansion system differs from a hanging one:
Galvanized corners, pads, self-tapping screws, clamps, T-shaped plates, studded fasteners are used.
The lathing is the basis for laying the roof covering. At the same time, it strengthens the rafter system, gives it stability and rigidity. It is made of boards, bars, moisture resistant, plywood, OSB. Boards or bars are mounted along the ridge. If the distance between them is up to 1 cm or the crate is made of shields or sheets, then it is called flooring. If the step is larger, then this is a sparse construction.
For laying large-sized rigid materials - corrugated slate, corrugated board, metal tiles, folded sheets, a sparse crate is used. It is stuffed in a pattern.

If the material is small-sized, heavy or flexible - ceramic or bituminous tiles, ondulin, roll types - use flooring.

The lathing can be single or double. In the latter case, a row of bars is first laid with a pitch of 0.6-1 m, then boards or shields are stuffed over them.
If the roof is supposed to be insulated and a full-fledged roofing cake, then an additional counter-lattice is mounted. Its function is to create a ventilation gap between the waterproofing layer and the coating.
Algorithm for mounting a lathing with a counter-lattice:
Completing the work with the installation of roofing. Insulation and vapor barrier are installed from the inside. thermal insulation mats are placed between the rafters, the film or membrane is fixed on top.
You will be able to build a reliable house if you build for it high-quality roof... To do this, choose good project, calculate how many materials will be needed for the construction of this or that part of the house. Fastening the rafters of your gable roof do it conscientiously.
Do not forget that you will need to make high-quality waterproofing throughout the house and on the roof, to insulate your home. Roofing material choose the best one you can afford. For each type of roof, the rafters are made in their own way.
There is no need to build as you see fit. There are certain, proven technologies for building houses. Study the instructions, buy the necessary materials and start on your own or with assistants to the construction of your home.
For example, according to the norms, the rafter system is considered reliable when it can withstand a pressure of 200 kg per m2. First, decide what kind of roof you will make over the house, and then study the features of installing rafters for it.
In this article
Perfect when you've built country cottage with his own hand. You can choose the project of the house and the layout of the rooms as you like. You will personally choose and order high-quality material and take part in all stages of construction, and then the arrangement of your home. In such a house, where every corner is familiar, it will be pleasant to live.
A large load falls on the rafters - the severity of the roof. They must be of high quality, reliable and well attached.
The layered rafters include the following materials:
The rafter legs are of medium thickness bars. They are installed along the slopes. It is the rafters that keep the roof from deflection in one place or another. The weight of the roofing is distributed to other parts of the roof as well.

Structures are made layered when there are too large girders between the posts located vertically. When you are provided with a project, the step between the rafters will already be calculated there. The fastening of rafters on a gable roof must be such that the roof remains strong after installation and serves for a long time. There are struts that support the roof in the same way.
The rafters are included in the roof frame and can be on their own. characteristics oblique and hanging. Let's take a closer look at each type:

When you purchase beams for rafters, do not be too lazy to drive up to the warehouse. The tree should be mature, not wet, even and chipped, with no signs of mold or a bug. Buy only high-quality material, discard the bad. Then treat the bars with an antiseptic composition so that they do not become moldy or spoiled by insects.
The beds serve as a support for the bars and so the girder is supported. The rafter's legs will rest against the Mauerlat with one of the ends, and with the second against the girders. They are attached to the latter.
The braces are made so that the rafter legs become even more stable.
Make sure that the connections between the parts are strong and secure. Attach parts to each other:
When you just start roofing, you need to attach the Mauerlat around the perimeter of your walls. What it is? Large bar, it is attached to load-bearing walls at home using anchor bolts. Mauerlat is the basis for roof rafters.
Before assembling the truss, you must carefully trim all planks with joists and bars. They are cut obliquely.
At the top, where the base of the Mauerlat is, the rafters need to be fastened end-to-end using screws. Want to avoid cracks? Drill a hole slightly smaller than the screw itself.

The most popular wood slings. They are preferred by the overwhelming majority of those under construction. The material is lightweight but durable. Both an experienced builder and a beginner who decided to build a house on their own can work with him.
Many people make such a design when the rafter legs hang down. The system is good for both home and sauna. Some work can be done on the ground, and then the bonded material can be lifted to the installation site. There is relatively little lumber for such a structure, which will allow you to save money.
1 triangle of rafters is required, which is made according to precise dimensions and adhering to the rules. The made rafters, which will have well-measured and fastened crossbars with ties, are pulled to the roof. Here they need to be placed in certain places vertically and very evenly. Attach them to the ridge with a Mauerlat.
If the slopes at the roof are longer than 4.5 m, then in order for the system to be stable and more reliable, you need to install the racks in a vertical position. One end of them will support the rafter leg, 2 will rest directly on the beam located on the ceiling.

Do this and it doesn't matter what kind of rafters you installed: layered or hanging. When slopes are added to the structure, it becomes stiffer. Do not forget that the rafters are most often attached to a ridge beam with a Mauerlat. A reliable gable house will come out.
Entrust a professional to create a project at home. He will tell you what diameter in the section the beams are needed, the length of the slats and other details. After all, the specialist knows that the roof is supported by the rafter system. It carries the greatest load and needs correct calculations, high-quality building materials.
It is better not to ask advice from such housebuilders as yourself. Yes, they built their house, but how sturdy is it? Not known.
It is best to contact a familiar foreman and ask him for practical advice. After all, he owns the documentation. There are clear norms permissible load per 1 m2, which must be adhered to when building a house. The documentation states what kind of load is given and what material can handle it.

Take a notebook with a pen to the meeting with the foreman and immediately write down his advice. So, you will definitely not forget anything, you will not mix it up. Build as he expertly recommends.
For gable roofs, most owners make rafters from wood. Choose the one that has matured. Now handle it carefully so that mold does not start, the bug cannot undermine it.
When assembling the structure, make sure that the angle between the strut with the struts is no more than 45 degrees. Timber beams must be cut obliquely so that the construction truss tilts at an angle of 40 degrees.
The rafters can be attached to each other not only with brackets, but also with corners. Purchase suitable size metal corners to attach the rafters to the Mauerlat. The latter in any part must be strong and reliable. Parts of the system can be connected together with nails with cutouts, corners with screws, and other devices.
When you build a roof, do not fuss. Everything needs to be done soundly and thoroughly. Even wooden frame houses cost at least 50 years, and log cabins for 100.
Your task is to adhere to technologies, not to make mistakes anywhere, so that the roof does not warp after a year or 5. Consult with craftsmen and experienced comrades who have already made roofs for themselves or to order and are gradually building a roof.


