My relationship with radio and microelectronics can be described by a beautiful anecdote about Lion Tolstoy, who loved to play on the balalaica, but did not know. Sometimes he writes the next chapter of the war and the world, and he himself thinks "Trendy Brandy Trendi Brandy ...". After the courses of electrical equipment and microelectronics in the beloved MAI, plus endless explanations of the brother, which I forget almost immediately, in principle, it is possible to collect simple schemes and even invent your own, good now, if reluctant to bother with analog signals, strengthening, tips, etc. You can find a finished micro assembly and stay in a more or less understandable world of digital microelectronics.
To business. Today it will be about soldering. I know that many newbies wishing to play with microcontrollers, it scares. But, firstly, you can take advantage
So, we are almost already at the goal. I write everything in detail, because, honestly, for me it was a breakthrough. As I accidentally discovered, everything you need for soldering the simple components is a soldering iron, the most common with a sting in the form of sewing:
And solder c flux inside:

It's all about the process. It is necessary to do this:

A clear thing is that the waiting time on each phase requires at least minimal practice, but no more. I am sure that any newcomer on such a technique sees Maximite for an hour.
Let me remind you the main signs of good soldering:
Planar elements (of course, not the smallest) even easier for soldering in some way, although for homemade devices You will have to ride a fee, since there will be no special convenience from the use of planar items.
So, a small, almost theoretical bonus about the soldering of planar elements. These can be chips, transistors, resistors, containers, etc. I repeat, at home there are objective limitations on the size of the elements that can be poured by a conventional soldering iron. Below I will give a list of what I personally soldered by a regular solder on a 220V.
For soldering of the planar element, it will not be possible to use solder on the go, as it can "go away" too much, "bay" at once a few legs. Therefore, it is necessary to post a patch in a certain way, where it is planned to put a component. Here, alas, no longer do without a liquid flux (I didn't succeed at extremely me).
We drip some liquid flux on the pyatchek (or patch), take a very little solder on a soldering iron (it is possible without flux). For planar elements of the solder, it is necessary very small at all. Then gently concerns the end of the soldering iron of each patch. A little solder must come to him. More than necessary, every penchant "will not take".
Take an element of tweezers. First, it is more convenient, secondly tweezers will distinguish heat, which is very important for planar elements. Believe the element in the place of the soldering, holding it with tweezers. If this is a chip, then you need to keep the leg that solder. For chips, the heat sink is especially important, so you can use two tweezers. One hold the item, and the second attach to the soldered leg (there are such tweezers with a clamp that do not need to keep hands). The second hand again apply a drop of liquid flux to the place of the soldering (it will probably get a little on the chip), you take the soldering on the same hand and you touch the soldering place for a second. Since the solder and flux there are already there, the soldered leg will "plunge" in the solder, applied at the meadow stage. Next, the procedure is repeated for all legs. If necessary, you can pour liquid flux.

When you buy a liquid flux, buy and washing the boards. Alas, with liquid flux it is better to wash the board after soldering.
I'll tell you immediately, I have never been a professional, and not even an advanced fan in the soldering. All this I did a regular soldering iron. The pros has their own methods and equipment.
Of course, the planar element solder requires much greater skill. But still quite real at home. And if you do not solder chips, but only the simplest elements, it is still simplified. Microcircuits can be purchased already sold in the pads or in the form of ready-made assemblies.
Here are pictures of what I personally successfully soldered after a small workout.
This is the easiest type of housing. Such can be put in the pads, which are the same for the complexity of the soldering. These elementary are soldered on the first instruction.


The following two is already harder. Here you already need to solder on the second instruction with a neat heat sink and liquid flux.


Elementary planar components, type of resistors below, quite simply roll:

But there is, of course, the limit. This is good already outside of my abilities.


Under the curtain, a couple of cheap, but very useful things that should be purchased in addition to the soldering iron, a soldering, tweezers and tubes: 
Successes in soldering! The smell of rosifoli is cool!
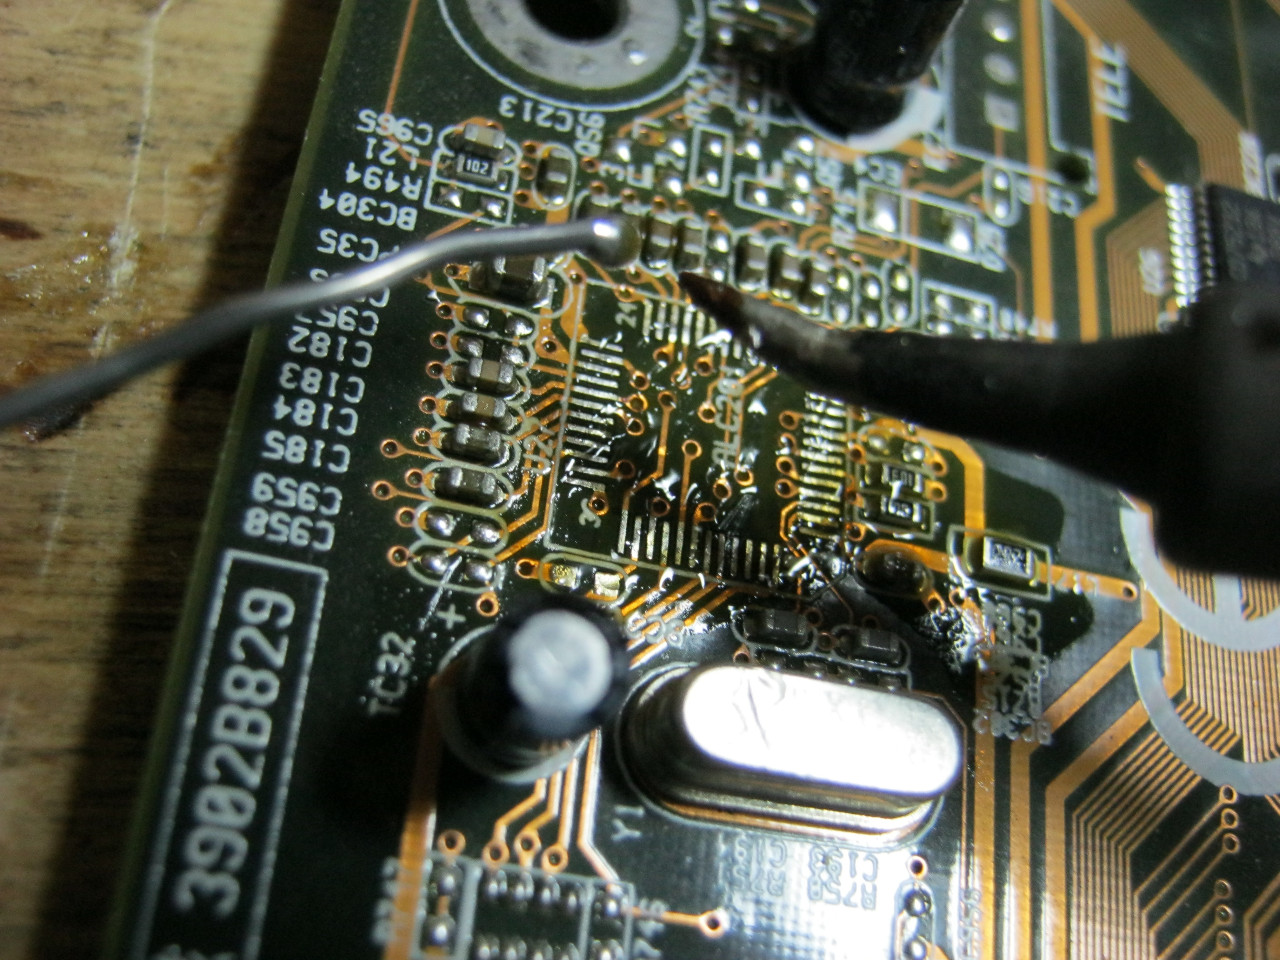
Every novice electronics crushed by the question: "And how to solder chips, because the distance between their conclusions is very small?" About different types of chip cases can be found in this article. Well, in this article I will show how you solder the chips, the conclusions of which are located around the perimeter of the microcircuit.Each electron has its own secretion of such chip such. In this article, I will show my way.
Each chip has a so-called "key". I highlighted it in a red circle.
This label from which the numbering of the conclusions begins. In chips, conclusions are considered counterclockwise. Sometimes on the printed circuit board, it is indicated how the microcircuit should be soldered, and the find numbers are shown. In the photo we see that the edge of a white square on the most printed circuit board is cut, it means that the chip should stand in this direction the key. But more often do not show. Therefore, before you disappear chip, be sure to remember how it stood or take a picture of it, the benefit of the mobile phone is always at hand.
For starters, all the tracks are abundantly lubricating the FLUX Plus gel flux.

Ready!

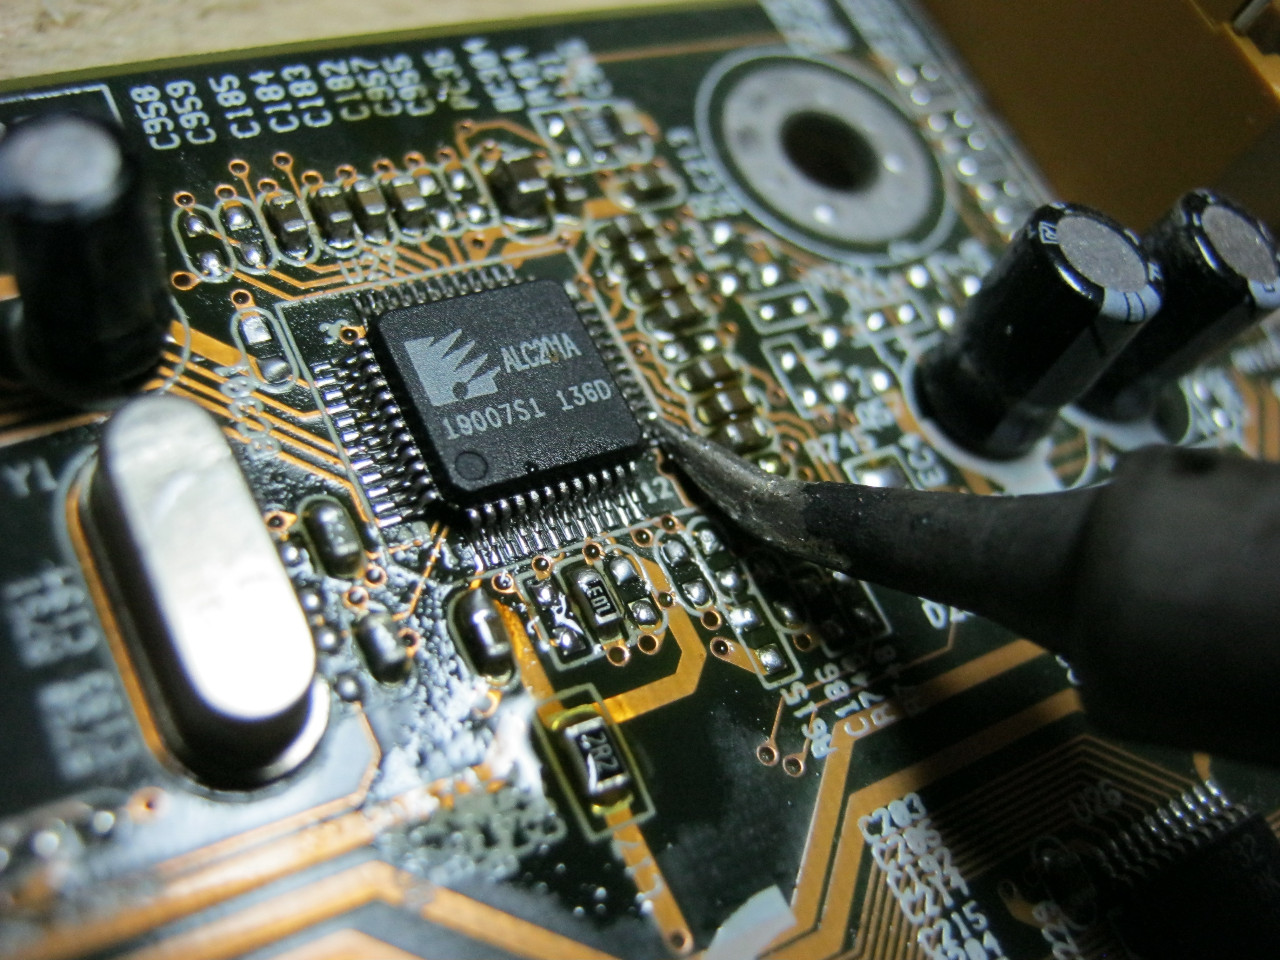
Expose the temperature of the hair dryer by 330-350 degrees and begin to "fry" our chip calm circular motions around the perimeter.

I want to boast one thing. She was bundled with a soldering station in a set. I call her extractor chip.

Currently, the Chinese have improved this tool, and now it looks like this:

That's how nozzles look for him

Buy can be used of this link .
As soon as we see that the solder begins to melt, we take over the edge of the chip and begin to raise it.

The amplification of the microcircuit extractor have a very large spring effect. If we raise a chip of some piece of iron, for example, tweezers, then we have every chance to snatch together with the microcircuit and contact tracks (figures). Thanks to the springing mustache, the chip is dropped from the board only at the moment when the solder is completely melted.
That came this moment.

With the help of a soldering iron and copper braid, clean the patch from the excessive solder. In my opinion the best copper braid is Goot Wick..

That's what we did:

Should turn out like this

Here the main thing is not to regret flux and solder. It turned out a kind of holly, for which we will put our new chip.
Now we need to clear all this matter from all sorts of nagar and garbage. To do this, use a cotton wand moistened in Flux-OFF, or in alcohol. Read more about chemistry. We must have clean and beautiful contact paths cooked under the chip.

Finally, all this a little lubricate the flux

We put a new chip in the key and begin to please it, while holding a hairdryer as much as possible, and the circular movements drive it around the perimeter.

Finally, a bit even lubricate the flux to the perimeter "smooth" the contacts of the chips to the pyataks using the soldering iron.
I think this is the easiest way to seal SMD chip. If the microcircuit is new, then it will be necessary to post its contacts with flux LTI-120 and the solder. Flux LTI-120 is considered a neutral flux, therefore, it will not harm the chip.

I think now you know how to solder microcircuits correctly.
Whatever innovations offered modern market tools for repairing radio engineering, soldering iron It remains one of the most reliable and secure devices.
The process of wiring and microcircuits is considered effective, since due to it you can achieve the maximum strong connection between wires and minor items.
Achieve such a result helps adding special material to the contact area - solder having more low temperature melting than those connected parts.
Thus, the soldering iron is the effect of a certain temperature for different metal surfaces for their lasting and high-quality connection. However, before proceeding with the soldering iron, first should be understood in the rules of soldering and other intricacies of this process.
In order for something to solder, first it is necessary to prepare all the tools for this process.

Having all the necessary tools at hand, you can get to work with a soldering iron.
 Kanifol has such unique qualities
As the ease of dissolution in various organic compounds, such as acetone or alcohol. In the process of heating, this substance can split complex chemical compounds like copper, tin or lead. therefore proper use Rosifoli contributes to the reduction of the probability of spreading matter, the destruction of the oxide coating, as well as the high-quality suspension of the supplied elements.
Kanifol has such unique qualities
As the ease of dissolution in various organic compounds, such as acetone or alcohol. In the process of heating, this substance can split complex chemical compounds like copper, tin or lead. therefore proper use Rosifoli contributes to the reduction of the probability of spreading matter, the destruction of the oxide coating, as well as the high-quality suspension of the supplied elements.
It is also necessary to take into account that the thinner will be the tip of the soldering iron, the easier it will work with it, especially if it comes to the switching of very thin wiring and parts. Therefore, if it is not yet fulfilled, it should be done before going to work.

Special difficulties when working with the tool should not occur. So that everything goes smoothly, it is best to preliminarily exercise in working with rosin on details that will not mind later to throw out. After all, experience always comes with practice.
In order to properly solder copper wires using rosin, it is necessary to comply with a certain sequence of actions.

As can be seen, special difficulties with the seating of wires with rosin, does not occur. The main thing is not to forget to get the wire and check the quality of the spike. If necessary, the logging must be repeated several times until the wires are firmly connected by the solder.
Having understood how to use the soldering iron, you should consider several recommendations for working with this tool.

If you take note of these little tricks, the process of seating the details will pass quickly, and most importantly, high quality.
 Soldering iron is a universal toolWith which you can quickly connect broken wires or contacts, as well as quickly repair the chip or connect the lung metal surfaces.
Easy to operate the instrument allows any man to learn them to use in the shortest possible time.
And what is important: to work with the soldering iron, no professional skills are required.
If in soviet time There was a game for schoolchildren, the essence of which was to solder "on the knee" the radio electronic chipself itself, that they have successfully done, now many are the question of how to use the soldering iron, puts in a predicable position. Although learn to solder the soldering iron is not so difficult and, having mastered the foundations for "kettles", it will be possible to carry out simple works, without referring to the specialists.
In order to start a soldering, you must prepare workplace and required tool. Regardless of the type of alleged work, the following requirements are presented to the workplace:
The next phase of preparation will be the choice of the instrument, and before the newcomer always arises the question of what is needed for soldering the soldering iron.
The basis of high-quality soldering is to warm the metal parts to the dawn temperature, respectively, for each type of work it is recommended to use solders of different capacities:
 After selecting the power of the soldering iron, you should prepare it to work, more precisely, prepare a tip. There are soldering iron with replaceable stages that are suitable for different species work. Models with copper sting are also available, which can be sharpened or with a hammer to give any desired shape. A serious disadvantage of such tips is the need to constantly strift them, so that the oxide film preventing the piano does not appear on the surface. Also manufacturers produce a more expensive option with nickel-plated coating, but it is afraid of overheating and requires careful circulation.
In addition to the soldering iron for soldering, the following is necessary:
 Solder is binder material Between the soldiers, and it will not work without it. Now in stores sell specially prepared solders in the form of wires twisted into the spiral of various diameters, from which it is convenient to "pinch up" the necessary stubborn piece, but you can use as a staring as a solder slice of tinbut it will not work so comfortable.
Rosin is used to prepare the surface to apply solder. Solder with rosin is distributed evenly, in the absence of the latter, it is rolled into drops, and some surfaces do not stick at all.
Soldering acid, or flux is necessary to prepare contacts to spawn. The newcomer should be known that the flux for each soldered material is different, and it is impossible to use acid to solder aluminum on copper wire, otherwise the solder just does not fall.
The basis of any soldering is high-quality warming up of soldered parts With the subsequent fixing them with solder. Technologically possible is allocated two types of soldering: Using flux or with rosin.
 Learning to solder a soldering iron with a rosiner harder, but, mastering this skill, it will be possible to perform 90 percent of the work.
Consider on the example of soldering the wires to the board. First, it is necessary to warm up the wire, for this staring the heated soldering iron we apply a plane (better if it is a sting in the form of a screwdriver), pressing as much as possible. After a few seconds, the wire with pressed to it falls into the rosin, which, boiling, evenly distributes along all the wires of the wire. So the wire is prepared for the application of solder. Putting the soldering iron take a small part of the solder and a thin layer we apply it to the wire. At the same time, there should be no drops or unaffected areas, ideally the same wire is obtained, but in Tin.
We purify the sting of the soldering iron using a metal sponge or cloth and, touching the stall of the rosin, spend the surface at the board, while the finest layer of rosin on the surface remains. Surfaces are prepared. Providing maximum contact of the wires and boards, press the wire sting with a thin layer of solder and several times "stroke" the place of the spike soldering iron for better warm-up. After that let me cool and check the contact for strength.
If the soldering is carried out correctly, the surface is glitter, and the compound has a maximum strength. If the surface will look like matte and loose, it means that the soldering rules of the soldering iron have been violated and the connection is not so durable. But in some cases such a result suits.
For soldering with flux you just need to take a flux, plunge into it with a brush and apply on the soldered surface. After that, you can apply solder or solder immediately. Despite the seeming simplicity, working with acid has many nuances:
In addition to knowledge, work with a soldering iron requires accuracy and accuracy, and, learning to solder simple details, it will not be easy to switch to the soldering of thinner circuit boards, or, on the contrary, thick wires, various elements, rhinestone, and subsequently even solder the plates among themselves.
One of the most reliable ways to connect wires and parts - soldering. How to solder a soldering iron how to prepare a soldering iron to work, how to get reliable connection - About all this further.
In everyday life used "ordinary" electric solderingry. There are from 220 V, there are from 380 V, there is - from 12 V. The latter differ in low power. Used, mainly in facilities in rooms with increased danger. It is possible to apply them in domestic purposes, but the heating occurs slowly, and the power is not enough ...
You need to choose one that is comfortable "lies" in hand
The power of the soldering iron is selected depending on the nature of the work:

IN household It is enough to have two soldering iron - one low-power - 40-60 W, and one "middle" is about 100 W. With their help, it will be possible to cover about 85-95% of the needs. And the solder of thick-walled items still better entrust the professional - there is a specific experience.
When the soldering iron turns on the network for the first time, it often begins to smoke. It burns out lubricantswhich were used in the production process. When smoke ceases to stand out, the soldering iron is turned off, waiting for it until it cools. Next must be sharpened.

Next must be prepared for the work of the sting. This is a cylindrical rod made of copper alloy. Fixed using a clamping screw that is at the very end of the thermocamera. In more expensive models, the sting can be slightly sharpened, but, mostly, there is no sharpening.

We will change the most tip of the sting. You can use a hammer (flatten copper as you need), a file or emery (just tooltenten unnecessary). The shape shape is chosen depending on the intended type of work. It can be:
More universal is considered sharpening "shovel". If it is formed using a hammer, copper is compacted, it will be necessary to adjust the tip less frequently. The width of "blades" can be done more or less, working around it on the sides with a file or emery. With this type of sharpening, it is possible to work with thin and medium soldered parts (turning the sting to the desired position).
If the sorry of the soldering iron does not have a protective coating, it must be sent - to cover with a thin layer of tin. It will protect it from corrosion and rapid wear. This is done at the first turning on the tool when the smoke stopped stand out.
The first way of tinning the sore tip:
The second way. Mix the rag with a zinc chloride solution, heated sting to lose a rag. Melt the solder and a piece of cooking salt to rub it all over the surface of the sting. In any case, copper should be covered with a thin layer of tin.
Almost everyone is now used by electric soldering. Those who have a job with soldering, prefer to have a soldering station, "lovers" prefer to manage to do with ordinary soldering iron without regulators. Have several solutions of different power enough for work of different types.
To figure out how to solder a soldering iron, you need to imagine a process in general, then deepen into the nuances. Therefore, let's start S. brief description Sequences of actions.
Soot implies a sequence of repetitive actions. We will talk about the soldering of wires or radio engineering details. It is with them who has to be found in the economy more often. Actions are:

On this soldering is finished. It is necessary to cool the solder and check the quality of the connection. If everything is done correctly, the soldering place has a bright shine. If the solder looks dim and porous - this is a sign of insufficient temperature during the soldering. Soldering itself is called "cold" and does not give the desired electrical contact. It is easily destroyed - it is enough to pull the wires in different directions or even hide something. Even the place of soldering can be charred - this is a sign of a return error - too high temperatures. In the case of wires, it is often accompanied by the laying of isolation. However, the electrical parameters are normal. But if the conductors are soldered when the wiring device is better to redo.
First, let's talk about how to solder the soldering iron wire. First you need to remove isolation. The length of the gentle area can be different - if the wiring is going - the power wires are taken off 10-15 cm. If you need to solder the minor conductors (the same headphones, for example), the length of the gentle area is small - 7-10 mm.

After removing the insulation, it is necessary to inspect the wires. If there is a varnish or oxide film on them, it must be deleted. There are usually no freshly accepted wires of the oxide film, and the varnish is sometimes present (copper has no red color, but brownish). Oxide film and varnish can be removed in several ways:
In the case of lacquered (enameled) wires, you can do without stripping - you need to use a special flux, which is called "flux for soldering enameled wires". He himself destroys the protective coating during the soldering. Only so that he never began to destroy the conductors, after the end of the soldering it is necessary to remove it (with a damp cloth, sponge).

If you need to solder the wire to some metal surface (for example, grounding wire to the contour), the preparation process is not much changed. The platform to which the wire will be soldered, must be cleared to pure metal. First, all the contaminants are mechanically removed (including paint, rust, etc.), after which the surface is degreased using alcohol or solvent. Next you can solder.
When soldering, the main thing is to ensure good contact of soldered parts. To do this, before starting soldering, connected parts must be fed or processing the flux. These are both interchangeable processes. Their main purpose is to improve the quality of the connection, facilitate the process itself.

To process wires, a well-heated soldering iron will be required, a piece of rosin, a small amount of solder.
We take the stripped wire, put it on the rosin, heating the soldering iron. Werewind, turn the conductor. When the wire turns out to be all in the molten rosin, on the sting of the soldering iron, we gain a little solder (just touch the sting). Then we remove the wire from the rosin and the tip of the sting is carried out along the bare conductor.

Conducting wires - mandatory stage when soldering
At the same time, the solder of the finest film covers the metal. If it is copper, out of yellow, it becomes silver. The wire should also turn a little, and sting to move up / down. If the conductor is well prepared, it completely becomes silver, without skipping and yellow tracks.
Everything is easier here, and more difficult. It is easier in the sense that only the composition and brush are needed. Tassel dip in the flux, we apply a thin layer composition in place soldering. Everything. This is simplicity.
Complexity in the choice of flux. There are many varieties of this composition and under each type of work should be selected. As we are talking about how to solve a soldering iron wire or electronic components (fees), we will give a few examples of good fluxes for this type of work:

For soldering electronic components ( printed circuit board) Do not use active (acid) fluxes. Better - on aquatic or alcohol basis. Acid and have good electrical conductivity, which can disrupt the operation of the device. They are also very chemically active and can cause destruction of insulation, corrosion of metals. Due to its activity, they are very well prepared to solder metals, therefore they are used if they need to solder the wire to the metal (processed the site itself). The most common representative is "Soldering Acid".
If you want to know how to solder a soldering iron, you need to learn how to determine whether the soldering place is heated. If you use a conventional soldering iron, you can navigate the behavior of rosin or flux. With a sufficient level of heating, they are actively boiled, pair allocate, but do not burn. If you raise the sting, the drops of boiling rosin remain on the tip of the sting.
Using soldering station They proceed from such rules:

That is, at the station set 60-120 ° C higher than the melting point of the solder. Clearance of temperatures, as you can see big. How to choose? Depends on the thermal conductivity of soldered metals. The better it takes the heat, the higher the temperature should be.
When the soldering place is trimmed enough, you can add solder. It is introduced in two ways - melted, in the form of a drop on the steering of the soldering iron or in solid form (solder wire) directly into the soldering area. The first method is used if the soldering area is small, the second - with significant areas.
In the event that you need to make a small amount of solder, it relates to the steering of the soldering iron. Solder is enough if the sting became white, and not yellow. If a drop hung is a bust, it must be removed. You can knock on a couple of times along the edge of the stand. Then they immediately return to the soldering zone, by staring along the place of the soldering.

In the second case, we enter the solder wire directly into the soldering area. Warring, he begins to melt, spreading and filling the emptiness between the wires, occupying the place of evaporating flux or rosin. In this case, it is necessary to remove the solder on time - its oversupportment is also not well affected by the quality of the soldering. In the case of soldering wires, this is not as critical, but when solding electronic elements on the boards is very important.
So that the soldering is high quality, you need to do everything carefully: to clean the wires, warm the place of soldering. But overheating is also unwanted, like too much solder. Here you need a measure and experience, and you can recover all the actions for a number of times.

Device for more comfortable soldering - Third hand
To begin with, take some pieces of single-core wire of a small diameter (you can - mounting wires, those used in connection, etc.) - work easier with them. Cut them into small pieces and train them. First, try to solder two wires. By the way, after the meadow or processing the flux, it is better to twist among themselves. So increasing the area of \u200b\u200bcontact and it will be easier to hold the wires in place.
When soldering several times it turns out reliable, you can increase the number of wiring. They will also need to be twisted, but under the use of passes (two wires can be twisted with their hands).
Normal soldering means:

After the soldering of several wires is mastered (three ... five), you can try stranded wires. The complexity consists in stripping and tinning. Clean it turns out only chemical method, and brow, pre-twisting the wires. Then the listed conductors can be tried to twist, but it is quite difficult. We will have to hold them with the help of tweezers.
When it is mastered, you can train on the wires of larger sections - 1.5 mm or 2.5 mm. These are those wires that apply when laying wiring in an apartment or home. Here on them and you can train. All too, but it is more difficult to work with them.
If the wires are treated with acid fluxes, after cooling the solder, its residues should be washed away. To do this, use a wet rag or sponge. They are wetted in solution detergent Or soap, after - remove moisture, dried.
About how to solder a soldering iron you know, now it is necessary to acquire practical skills.


