Choosing a finish that will give the interior uniqueness, many often prefer stone-like tiles. This technique allows you to issue accent walls dwellings are stylish and fashionable. Such surfaces are distinguished by an original texture, due to which the main idea of the design looks special. The secret of the unique tiles "under decorative rock"Lies in the texture and appearance.
It is worth understanding the intricacies of this cladding, studying the features of luxurious finishes, differences from the classic material, methods of application.


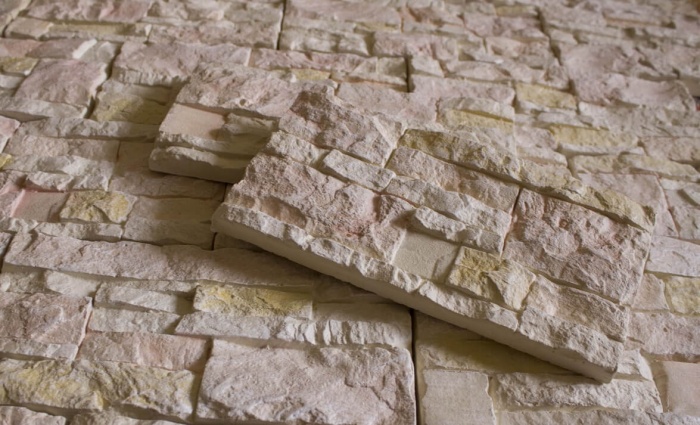
Tile "under the stone" is a luxurious type of building material, which outwardly quite realistically imitates the texture of the stone. This is an imitation of this texture, intended primarily for wall decoration. Depending on the composition and manufacturing method, the raw materials are different. It gives the surface a special relief, while reducing the width of the walls due to the thickness of each fragment, the size of which is noticeably smaller when compared with classic tiles.
Outwardly, such tiles are small rectangular fragments. reminiscent of a stone with uneven edges, while for believability front side do multi-shade. Against the general background of the cladding, the transitions of tones create the effect of versatility, which gives the space depth, deprives it of simplicity with the obvious roughness of the material.
Each piece can have a lot of irregularities. It is better if, when joining, it turns out that the thickness of two adjacent fragments is different. This will give the surface a distinctive character.


A feature of the decorative material is the way of laying, which is not correct in the classical sense. Stone-look tiles do not need to be adjusted, they are not just imperfect. It is specially made in different sizes. It is produced in two forms. In one case, it consists of one rectangular fragment, characterized by a noticeable curvature of the relief.
Another type is a fragment consisting of several stones. This tile does not overlap, as usual, with the formation of crosshairs. She has her own styling features. Usually, the picture is made up of blanks by gluing fragments of different sizes, connecting the facing elements as closely as possible to each other.


Among the facings of each variety, you can find options with smooth edges, as well as those with wavy edges. If the edges are even, then with some types of material this is noticeable. In this case, it is worth choosing fragments for finishing, the relief of which at the edges is higher in height. This will hide the seams.
Laying such material does not obey geometry. The set often contains tiles of different sizes, making the work look like laying out a mosaic.
It is not at all necessary to measure out the middle of one fragment in order to glue another. This is convenient, although it forces you to select every detail to make the look as attractive as possible. In the finished canvas, such a multidimensionality looks impressive.

A separate category of stone-like tiles is the type with a pattern. It does not convey the required texture in the proper volume. Here the emphasis is rather on shade and color. This is especially true for marble types of coatings. Nothing but the appearance of the marble surface and its coldness can be expected from such a tile. The same can be said for non-embossed floor tiles. The drawing, of course, can resemble masonry, the surface of natural stone, but it does not convey an imitation of the relief.


The task of tiles "imitation stone" with a relief is to replace the stone, not a picture demonstration, so compare the two different material pretty hard. They are distinguished by appearance, styling method. Thus, fragments with imitation of stone surfaces are close to classical ceramic tiles and porcelain stoneware. If we consider them from this point of view, then, apart from the external texture, there is little similarity. One tile resembles masonry, the other a surface. The assignment of materials to one type is based on the fact that in both cases a stone is taken as the basis.


The patterned variety is distinguished by a smooth surface type and strict geometric shapes. She has different sizes and colors. Distinctive feature is the variation in shades. So, pastel shades are often used. In fact, this is the usual ceramic tile, the design of which looks like a stone (for example, malachite, marble, wild stone).
These tiles are easy to care for and easier to clean. It is also possible to carry out the installation faster, and, if necessary, to dismantle it.


Finishing tiles imitating decorative stone have a lot of advantages. The range of textures is quite extensive. So, she is able to reproduce the texture of natural granite, basalt, wild stone and many others. Compared to natural analogue, factory products are significantly cheaper (3-5 times). This allows for a luxurious surface finish within the planned renovation budget.
This material is highly durable. Unlike wallpaper and ceiling tiles, it cannot be mechanically damaged unless you do it on purpose. With high-quality preparation of the base, such a surface will decorate the walls of the dwelling for a long time without the need for adjustment.
This is especially true if there are pets in the house. They will not be able to damage the surface of the cladding.


This finish is durable. The material will stick to the surface of the prepared walls no less than ordinary tiles. The coating will get bored faster than it will move away from the surface. Subject to the rules of installation, it will last at least 20 years, while the shape and color of the fragments will not suffer even from dry cleaning. Besides, this material not exposed to sunlight.
This installation is noticeably easier than working with natural stone. The consumption of decorative tiles "like a stone" is 25-30 kg per 1 sq. m. When laying natural material each square meter of the wall will become visually "heavier" several times. With external attractiveness, such an imitation will not allow the walls to settle or warp. This material has a variety of shades color palette and used textures. This significantly increases the design possibilities, allows you to choose an accent place for such a cladding, so as not to overload the room with an abundance of small fragments.
Due to the wide choice, it is possible to fit this finish into modern and ethnic stylistic trends.


A distinctive feature of stone-like wall tiles is the possibility of partial laying, which is not available in other analogues. It can be laid out in the form of separate islands, peculiar patterns on the smoothly plastered surface of the base, not being limited to the method of laying in the form of a solid canvas. Through it, you can finish the adjacent planes, which gives the space a touch of antiquity.
When simulating destroyed walls, the effect of antiquity is created, which is actively used by designers.


Due to the unusual texture, this finishing material has several drawbacks, so the purchase cannot be based solely on the attractiveness of appearance. In order for the finish to be really what you need, it is worth considering its features. The different-sized relief of the fragments can become a problem. In the process of laying, it is impossible to avoid cutting the material, which in this case is rather difficult.
A diamond glass cutter will not cope with the task; you will have to use powerful equipment (for example, a grinder). After trimming, you will have to grind the cut for a long time so that it does not damage the finished surface.


Despite the fact that this material strengthens the surface to be machined, it will not help maintain heat, since, regardless of the type of components, it is a cold material. It is unpleasant to lean on such a surface or just touch it. By tactile sensations, it loses to the same wallpaper and ceiling tiles... This cladding does not provide for placing any objects on the walls or fixing furniture. The point is not in the relief and complexity of installation, but in unaesthetic gaps that will be visible to the eye.
A picture or a mirror on such a surface will be difficult to look at. The same goes for furniture: its placement creates the feeling of being in a cave, which, in turn, will lead to a "heavier" space.


For the same reason, cladding of two or more walls is impossible. Even if you really want to, the volume of the treated area cannot be more than one wall. This outwardly looks ugly, overloads the interior composition, casts doubt on the appropriateness of using many pieces of furniture. Restrictions also apply to textures. It is undesirable to use more than one - this will turn the relief into ordinary ripples.
It is also difficult to care for such material. It all depends on the composition of the tile. Not every type of cladding can withstand moisture when cleaning. The relief is also a problem. Unlike smooth tiles, which can be wiped off with a damp cloth, the situation is different here. Dust settling on the surface will fill the grooves and joints. Care is possible with a vacuum cleaner, however, it will also be problematic. It will take a lot of time. Hand cleaning the surface can be injurious.


Today decorative tiles"Under the stone" in the construction market is presented in two varieties: gypsum and ceramic. It can be decorative and facade (for finishing the walls of the facades). Each material has its own characteristics. The main aspects should be considered.
Plaster stone tiles are a high quality imitation of natural materials. It is made from gypsum polymer mass, which is characterized by low frost resistance, therefore, this material can be used exclusively for internal works... It is lightweight, hygroscopic - it will absorb excess moisture and release it if the air is dry.


Such tiles are refractory and environmentally friendly, odorless, and will not fade under the influence of sunlight during operation. It is not difficult to work with it, but it requires accuracy. The disadvantage of such cladding is fragility, therefore, chips should not be allowed to appear before laying. At the end finishing works the surface must be treated with a moisture-repellent coating, otherwise the tile may deform.


This finish is notable for the presence of several varieties. These include:


The clinker is produced with and without glaze. It is suitable for cladding any type of room, therefore, if desired, it can even be used in the bathroom. Porcelain stoneware is characterized by zero moisture absorption and the absence of microcracks. Cotto is made from red clay. This variety has a beautiful natural shade. It is not covered with glaze, it is used in the corridor and in the hall. Majolica has high quality characteristics.
Recently, tiles "like a stone" with a 3D effect are gaining popularity. Outwardly, it looks three-dimensional due to the use of a special film that guarantees the three-dimensionality of the material. This material can be embossed or it can be completely smooth. It looks especially realistic from afar if it has a matte texture.


You can use this material in different rooms dwellings, if the design requires it. However, there are spaces where it is misplaced. This technique is unacceptable in the toilet, when decorating a balcony, loggia and children's room.
With regards to the toilet and balcony ledges, the inadmissibility of use is due to the fact that these spaces are already small in area. The cladding "under the stone" will not look beautiful on their walls.
The same can be said about the children's room. This finish obliges you to a certain style, and this style has nothing to do with children. She is good in the directions of loft, grunge, modern, brutalism.
Even with an open-plan apartment, this technique is inappropriate if a child lives in it:


There are two options suitable place for such a space: an adult's bedroom and a living room. In the first case, this technique is ideal for facing the headboard area, in the second, there are a lot of techniques, among which they look especially harmonious:


The use of stone tiles allows for luxury in the design, while the layout of the tiles can be varied. It can occupy part of the wall in the form of a monolithic canvas, be laid out in the form of a small ladder, simulate a ragged edge on a small part of a ledge or two adjacent walls located perpendicular to each other.
To make this finish look harmonious, it is not repeated everywhere, otherwise the technique loses its expressiveness.


The color palette of embossed tiles imitating natural and artificial stone is diverse. In general, they mainly stick to natural colors. One tone is undesirable. The priority is multifaceted color compositions. Sometimes you can see white and black colors in them, but more often you can find such combinations:


In addition to warm colors, the combination can be cold, however, using an exclusively gray contrast with a black tone does not give desired effect unless a colored companion has been added to them. The same beige makes the texture boring. White color, diluting gloomy tones, makes them more pleasing to the eye. It allows you to give the tiles the effect of versatility. Often, the shade of a tile is complicated by the heterogeneity of contrasts. This gives it a great resemblance to stone.


The parameters and appearance of the relief tiles glued to the walls are different. In addition to the basic rectangular shape, they can be conventionally square. At the same time, the edges of these fragments are replete with curly lines resembling refractive waves. For the convenience of cladding, a distinction is made between ordinary and corner tiles. The dimensions of the first are more often 24x7 cm, 24x14 cm, the angular variety can be 24 cm in length, 12 or 14 cm in width.At the same time, a fragment of 15 cm goes around the corner.
Dimensions are relative. Each trademark adheres to its own standards, directly related to the characteristics of the general canvas. Fragments can be traditional or very narrow. Often on sale you can find products 20x20 cm, 30x30 cm, 33x33 cm, 20x12 cm.


As for the varieties with a pattern, everything is simpler here: their shape is rectangular or square, the dimensions depend on the type of material and the country of the manufacturer.

Today there are many companies engaged in the production of decorative stone tiles. It is worth noting the products of Italian and Spanish companies. This tile will make any home special.
The most interesting samples include tiles of the following brands:
Finishing work inside helps to create an atmosphere of coziness and comfort in the room. Along with a large number of materials, it is very popular facing tiles under a stone for interior decoration.
There are various photos with a stone finish; for this, tiles are used from:
Note. In terms of their technical properties and characteristics, in some respects, materials of these types have similarities, and in some cases also have distinctive features.
Stone tiles for interior decoration made of natural agglomerate are distinguished by their original design.
She:
The surface of the tile can be:
Note. This indicator depends on the type of natural stone tiles.

Currently used as a tile finishing material:
Features and characteristics:
Advice. Such actions should be carried out in the event that the tile is mounted on the wall. To use natural tiles on the floor surface, reinforcement is not required, since the material will be in a horizontal position under its own weight.

In order to qualitatively carry out the installation of such a material for finishing, it is worth thoroughly performing surface preparation for such work. The whole process will not be difficult, and you can do it yourself.
Preparatory work - leveling the surface:
Advice. Drywall is used to level the surface if the weight of the material is not too large.
To apply plaster you will need:
Plaster leveling works are quite simple.

All work is very easy, they are performed without specialized assistance, just watch the video.
For them you will need:
Stages:
Advice. In the cement slurry, it is worth using cement (400), which has excellent strength after hardening.
Advice. The laying of such tiles must be carried out in stages in order to ensure sufficient strength for each element.
To mask the seams, it is worth using decorative putties. And best of all in cement mortar add coloring pigments of the required shade.

Tile under a natural stone for interior decoration can be made of artificial conglomerate. It looks similar to natural stone tiles and has almost the same properties and characteristics.
Decorative stone tiles:
Advice. Such a finishing material is used to decorate rooms that have high humidity air and sudden temperature changes (kitchen and dining areas, and so on).
Very often, a slab of decorative stone is used to decorate fireplaces and wall surfaces. You should not use this material on the floor, as it is quite fragile and can begin to deform under the influence of heavy weight.

Decorative tiles have the following types of surfaces:
Note.
The glossy surface is protected by a layer of a special protective agent. All other surfaces are also treated with a substance that does not have a gloss after drying.
Tiles of decorative stone are made from:
Installation:
To install the frame you will need:
Installation of artificial stone tiles, from the tools you need:
Advice. After the glue solution is ready, it needs to be allowed to brew for several minutes.
For mounting large tiles cement mortar is used for decorative stone.
Glue is applied to the wall and to the inner surface of the tile. After completion of the work, the seams are treated with decorative putty.

Ceramic tiles for interior stone decoration have excellent properties and characteristics. It is strong and reliable, durable and practical.
Ceramic tiles have three types of surface:
Note. You can clean the surface of ceramic tiles using any cleaning agent.
Note. The material is mounted quite simply, the whole process of work is similar to the installation of decorative stone tiles.
You can attach the material to any surface:
In case of visible defects on the surface, it is worthwhile to level it and prime it before installing decorative ceramic tiles. After installation, a decorative putty of a certain shade is used to mask the seams.
Gypsum stone tiles for interior decoration are used for decorating apartments, private houses, as well as restaurants, shops, offices, hotels and other premises. What is this material, what types is it and how to apply it?
Decorative gypsum tiles for interior decoration contain gypsum, water, sand, modifier and surfactants. Modifiers improve the quality of the finishing material, making it stronger and more durable.
The tile is available in the form of imitation brick, wild stone or cobblestone, as well as smooth.
Gypsum tiles, especially those imitating brick or stone, are widely used. Its advantages are:
It is also important that such an artificial stone can be restored and made independently.
Of course, it also has disadvantages:
The hygroscopicity of the tile can also be a positive quality - it allows you to regulate the humidity in the room.

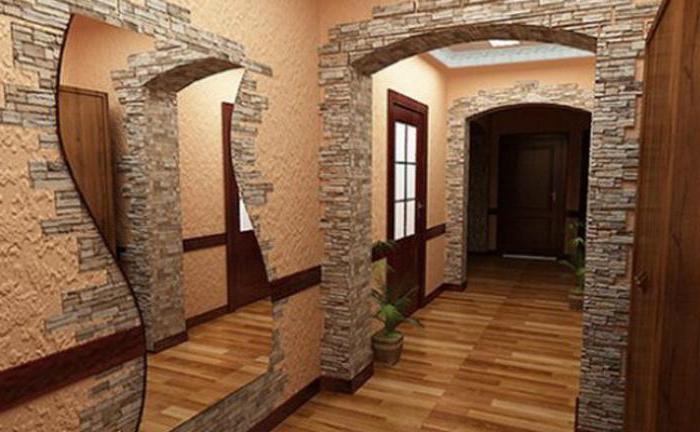
Artificial stone or gypsum brick can be used to decorate both the entire room and one wall or a small section of it. Often, with the help of this material, accents are created in the interior: niches, fireplaces, columns are trimmed with it.

Brick-like tiles are popular for decorating loft-style interiors, as in the photo, because it is not always possible to build a real brick wall... Its rough texture is well suited for this trend. Stone look tiles are used in a variety of architectural styles.
Advice! Before laying the tiles, fold the sample out of it and see how it will look.
For stone tiles, the direction from which the light falls is very important. Side lighting will emphasize the relief favorably, while front lighting is best avoided.

As in the case of other finishing materials, a light cladding visually expands the room, while a dark one makes it smaller. In small rooms, such as small rooms, balconies, loggias, it is better to tile not the entire wall, but separate fragments. Large areas it is better to tile in large rooms: living rooms, halls. Most often, individual elements are decorated with stone tiles: niches, fireplaces, stoves (in this case, its refractory properties are very handy), ventilation ducts, stairs. You can see an example of finishing in the photo.

Gypsum tiles are best glued to concrete, plaster, brick, plasterboard and plasterboard substrates. The cladding is carried out at a temperature above +10 degrees.

If gypsum tiles are glued to some non-standard surface, for example, to old tiles, it makes sense to make an interlayer of material that adheres well to both the cladding and the base. For a tile base, it can be a high-quality strong tile adhesive.
To decorate a wall with plaster stone, you will need from tools:
Also useful materials such as:
As a glue, you can use silicone sealant, cement glue, gypsum plaster, PVA glue, mastic.
To stick the tiles, you first need to mark the wall. This will make the cladding even. To do this, you need to mark the horizontal and vertical lines, relative to which the stone will be laid. Usually they start to mount it from the corner, so the markings are tied to it.

Stone-like gypsum tiles can be different shapes, so when marking up, select elements so that they do not repeat. In this regard, gypsum tiles for a brick are simpler, they are the same in shape. laser level... The latter is easier to use, including alone, but it is more expensive.

Next, proceed to gluing. Before this, the base is primed. The glue is mixed with a drill with a mixer nozzle according to the instructions; in consistency it should be close to thick sour cream. Apply glue to the base with a smooth trowel with a layer of about 5 mm, remove excess with a notched trowel. At a time, smear a site for 3-5 elements. The stone is pressed tightly to the base, correcting its position.

If the gypsum tile is made to look like a brick, then jointing must be done. To do this, use special "crosses" or any suitable material at hand. For multi-format artificial stone, seams are not required.

Advice! Gypsum tiles under the brick are laid with an offset so that the vertical seams are not located one above the other.
Gypsum is easily sawn with both a regular hacksaw and a grinder. The latter is easier to give the elements the necessary shape, but this tool is a lot of noise and dust. It is best to cut along the relief line, but if you use a grinder, you can cut the tiles along any desired contour.

It is important to carefully arrange the junctions of switches, sockets, floor, adjacent walls. To make the outer corners, the plaster tile is trimmed with a grinder at a 45 degree angle.
The seams are rubbed with plaster glue or a special mixture. For this, a spatula or a construction gun is used, you can also make a kind of a confectionery syringe from a plastic bag (as thick as milk), and squeeze out the glue with a strip 4-5 mm thick. Half the grout is poured into a gun or bag.

Advice! Do not squeeze out a large amount of grout at once, otherwise it will set before you have time to distribute it. Make sure that the composition does not get on the tiles - porous gypsum is difficult to wash from traces of putty.
Some design solutions imply a contrast between gypsum tiles and seams. If the color of the tile differs from the color of the grout, and this is not included in your project, then the seams are painted over with dyes after the fugue has set. You can also use dyes to mask chipped tiles. After the glue has dried, the stone tiles are coated with a water-based varnish.
You can make gypsum tiles for a stone look yourself. For this you will need:
Watch the video how to do it yourself gypsum stone for interior decoration.
You can cast it as ready-made Silicone forms, and self-made. For example, you can make the shapes in the form of a stone, as in the photo. Molds can be cast from liquid polyurethane. For this, a matrix is first made, and then a layer of liquid polyurethane is poured into it.

The gypsum solution is prepared at one time and immediately poured into the mold. Gypsum is poured into the water and mixed with a construction mixer, then lime is added. The solution does not interfere for long so that the gypsum does not begin to set. The solution is poured into a mold, leveled with a spatula and left to harden. The forms are placed on a strictly horizontal surface. To get air bubbles out, use a vibrating table.

Gypsum picks up in 15-20 minutes, but it takes about a day to completely solidify. Stone tiles should be kept at room temperature in a draft-free room. Then the gypsum tiles are removed from the mold and left to dry. A drying chamber can be used, but should not be exposed to the sun.

The gypsum stone can be painted. To do this, either add the color directly to the gypsum solution, or paint with a brush separate parts of the mold before pouring. You can also spray paint on the finished tiles, and this can be done both before and after installation. When the paint dries, the facing material is covered with acrylic varnish in two layers.

Plaster tile for brick or stone is a finishing material that can be used in a wide variety of rooms. It can be painted, applied over other decorative coatings, you can make your own tiles of the desired size, shape and color. This gives ample opportunities for its use, but it is important to remember about it. weak points- fragility, instability to shock and moisture
Decorating the hallway with decorative stone is a simple technology and it is quite possible to give originality to the interior with your own hands. Creating a design in the hallway requires special attention no less than in other rooms, because this is the first room that guests see. Decorative stone will give the hallway a stylish look, whether it is used as the main material or as an additional accent.
Before starting work, you need to choose the right finishing material. made on the basis of concrete and plaster with the addition of dyes. Both types have their own advantages and disadvantages, so it's better to study their characteristics first.

The advantages of concrete products include:

Walls finished with such a stone can be easily cleaned of any dirt, and the abraded surface can be quickly restored with paint. If you accidentally touch the finish with something hard, there will be no marks or cracks on it.
Disadvantages:
In order to cut individual fragments when laying, you will need a grinder and a diamond wheel, as well as some effort.

Advantages of gypsum coating:

Such a stone is chosen for finishing plasterboard walls, which cannot be subjected to heavy loads. If you cannot find the desired color, there are unpainted products on sale that you can paint at your own discretion.
Disadvantages:

If dirty, such a finish should not be wetted and rubbed strongly, so as not to damage the surface. Treatment of the stone with special impregnation or acrylic-based varnish will help to avoid such damage. Also on sale there is a gypsum stone with a polymer coating - it is a little more expensive than usual, but it is not at all afraid of moisture.

First you need to calculate the amount of material. If the stone will cover the entire area of the walls in the hallway, subtract the area of the openings and add 10%. If the decor will be located around openings, niches, in separate fragments on open walls, draw a rough sketch of the finish and take measurements of each section. Then add up the area and add 10-15% for pruning. When buying material, it should be remembered that the amount of an angular stone is calculated in linear meters, and correct shape- in square.

Additionally you will need:

You can attach an artificial stone to liquid nails, cement or gypsum-based glue. The consumption of glue is necessarily indicated on the packaging, so when buying, you should know the exact area of the finish and take it with a small margin.


If gypsum stone is used, a special miter box with high sides is required for cutting.

When everything you need is purchased, you should start preparing the surface.

If the stone will cover the walls of the hallway solid, the old covering is removed completely to the base. If separate areas are intended for decoration, you need to dismantle the coating very carefully. On the wallpaper, the borders of the finish are marked with a pencil and carefully trimmed with a clerical knife, leaving a reserve for stones 1-2 cm wide. The glue from the wallpaper is soaked with water and removed with a spatula, the walls are thoroughly washed. Also remove the paint, if it is peeling or cracked, peel off the loose plaster.

Laying the stone should be carried out on a flat, smooth surface - this will facilitate the work process and increase the strength of the decorative coating. Therefore, all small cracks, gaps, grooves are rubbed, and if there are differences of more than 5 mm, the entire area is better. Particular attention should be paid doorways: Deep cracks may form around the perimeter of the box, for which it is recommended to use a cement mortar for sealing.
Mixes for leveling walls and ceilings

Dry walls should be lightly sanded to smooth out irregularities in the putty areas, and then wiped with a cloth to remove dust. After that, the surface is treated with an acrylic primer 1-2 times. If there are wallpapers around the perimeter of the treated areas, the primer should be applied so as to capture the edge 1 cm wide - what will be hidden under the cladding.
The decorative stone has jagged edges and comes in different sizes. Laying must be done so that tiles of the same size must be interspersed with larger or smaller fragments, and the seams do not coincide either horizontally or vertically. This will make the coating look the most natural and attractive. To understand how best to join the stone, you need to lay out the tiles on the floor, picking up the fragments in a specific order.
Pour dry glue into a container with water and stir well. The ratio of water and glue is indicated on the package, so there is no need to mix "by eye". Failure to comply with the proportions reduces the strength of the connection or increases the consumption of glue. It is best to mix with a construction mixer, then there are no lumps left in the mixture. The finished glue should be homogeneous and resemble a thick paste in consistency.

You need to lay out the tiles from the corner of the wall, and this can be done both from above and from below. When laid from top to bottom, the stone is less dirty with glue, and the coating is more accurate. If only the area around the opening is revetted, start from the corner of the doors. For convenience, the wall can be marked by level with horizontal lines every 10-15 cm.


Now you can start styling:


Seams from 5 to 8 mm can be left between the fragments, especially if the stone is large.


After cladding, the joints are filled with putty and embroidered, which makes the masonry more attractive. Small tiles can be fastened close, as long as the joints do not coincide.

For cladding interior and outer corners you can purchase special corner tiles that are more expensive than usual, but greatly simplify the workflow. If the budget is limited, you will have to adjust the stone yourself using a grinder or a hacksaw. There are 2 options here - to overlap the stone or grind the edges at an angle of 45 degrees. When using the first option for the outer corners, the open ends must be filed and tinted, otherwise they will stand out too much. In inner corners both ends are closed, so no machining is needed. The second option is more suitable for plaster products, which are convenient to cut with a miter box.

So, first, the required number of fragments is determined, they are cut from a certain side, the sections are processed with a file. Next, the stones are smeared with glue and alternately attached to the walls on both sides of the corner, carefully combining the joints. When the vertical of the corner is laid out, you can expand the masonry to the walls.

The edges of the masonry will look more attractive if the tiles are cut nicely. The surface of the decorative stone has a clear texture, which makes it easier to trim the edge fragments. Saw with a hacksaw straight along the contour lines so that the cuts are the most natural. All cuts must be sanded with sandpaper.

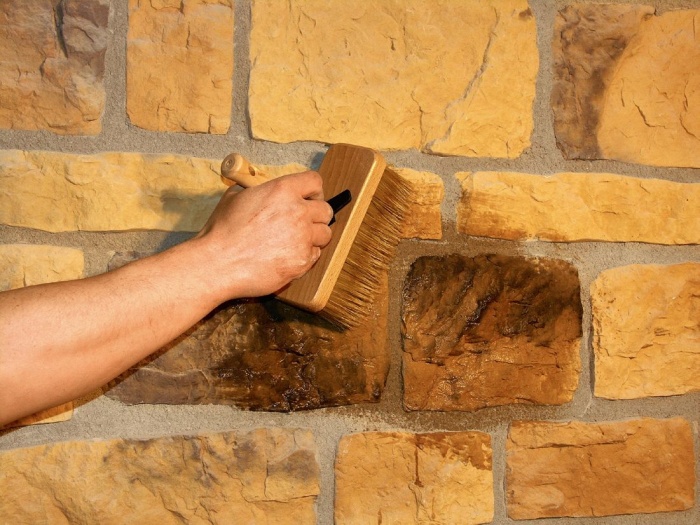
Plaster putty is diluted and carefully applied to the joints, in the corners, along the perimeter of openings and switches. For convenience, you can use a tight bag, for example, from under milk. One edge of the bag is cut completely, and a small incision is made on the other side. The package is filled with a putty mixture and squeezed into the seams with an even thin strip. If the solution is applied with a spatula, you should immediately wipe off the excess from the surface of the stone to avoid drying out. After filling the joints, the putty is rubbed with a damp foam sponge and left to dry.
The dried putty is white, and therefore the treated areas will stand out against the background of the stone. Paint will help get rid of light spots: in a small container, the pigment is diluted to match the color of the main coating and the putty areas are painted with a small brush. When the paint dries, the stone is covered with acrylic varnish. In places where the walls are constantly bumped, it is better to apply the varnish in 2-3 layers.

To make the coating more voluminous, you can highlight the edges of the masonry with golden or bronze dye. There is another option: a spraying of the same color, but more saturated in tone, is applied to the artificial stone at an oblique angle. In addition, you can use lighting: light directed from above or from the side makes the masonry much more textured and clearer.
| Calculation of decorative stone | Formula | Explanations |
|---|---|---|
| Calculate the surface area to be clad with artificial stone | S (wall) = AхB | A - wall length, B - wall height |
| Calculate the surface area that the corner pieces of the decorative stone will occupy | S (angles) = Lx0.2 | L - angle length (running meters), 0.2 - coefficient |
| Find the total area that all corner pieces occupy | S (angles total) = S (angle 1) + S (angle 2) | - |
| Calculate the area of window and door openings | S = AхB | A - window / door width, B - window / door height |
| Calculate the surface area for facing decorative stone, taking into account the area that is occupied by corner elements, window and door openings | S (stone) = S (walls) - S (corners) - S (windows / doors) | Increase the resulting area by 10% |
| How to calculate the required number of corner stone elements. | Measure and add up the height of the corners to be clad with decorative stone. L (total angles) = L (angle 1) + L (angle 2), etc. Increase the resulting length by 10% | L - length of corners (running meters) |
The most the best material for stone decoration in the interior will serve as an artificial stone made of gypsum. This material not only has affordable price, but also a huge number of mastered forms, light weight and easy installation. Gypsum decorative stone can be painted, as well as laid on drywall walls. It goes well with wallpaper.


