It is no secret that the furniture is used in the country, which served his term in the apartment. The table is no exception. However B. country conditions, That furniture that has served perfectly at home, can not always fulfill its purpose. We are talking about modern tables made mainly from LDSP. Such tables are not suitable for the gazebo, the veranda, the garden, and in the house when high humidity In the offseason, their service life is limited. In such conditions, the table is required wooden, but the wooden table is not cheap pleasure. Solving the problem to make the table with your own hands. It's easy enough to do it. In addition, it will significantly save, including on delivery.
SAMI simple design The table is shown in the photo below. At the same time, such a design is the least costly both in relation to materials and forces to manufacture.

Fig.1.
Optimal dimensions Table.
One of the advantages of the manufacture of the table for giving with your own hands is that the table can be done any size. Thus, the table is easy to adjust to the dimensions of the arbor, veranda or kitchens.
To make it easier to navigate in size, I will bring the dimension mesh, which is most often used in the production of tables. Size chart Based on the size of the table top.
Naturally, making the table with your own hands the size can be made arbitrary, however, so that at the table it is comfortable to adhere to the recommendations given above.
The drawing of the table is shown in the figure below.

Fig.2.
Foots for the table are made of wooden bar Section of 40x40 mm 70 cm long. If there is a desire to decorate the table, you can use balasins as a leg. They are carved, and make the design of the table more interesting.
Support for countertops can be made from the board with a cross section of 25x150 mm sawing it along two halves. For support, 2 boards are 650 mm long and 2 boards with a length of 1050 mm.
With the worktop, everything is much more interesting. Tabletop can be made different ways. The easiest option is to purchase it. furniture Shield Necessary sizes. It can be purchased in network hypermarkets building materials.

Fig.3.
Going along this path it should be remembered that the furniture shield is manufactured by gluing small segments of the boards, and with constant exposure to it atmospheric precipitation, it will quickly come into disrepair. Therefore, the table with a tabletop made of furniture shield must be treated with varnish or paint to protect against moisture.
Another option is a tabletop of boards. Boards can use any size. For example, a cross section of 25x100 mm. This is a simple and cheap option of the table top. This option is devoid of flaws that are inherent in the furniture shield.

Fig.4.
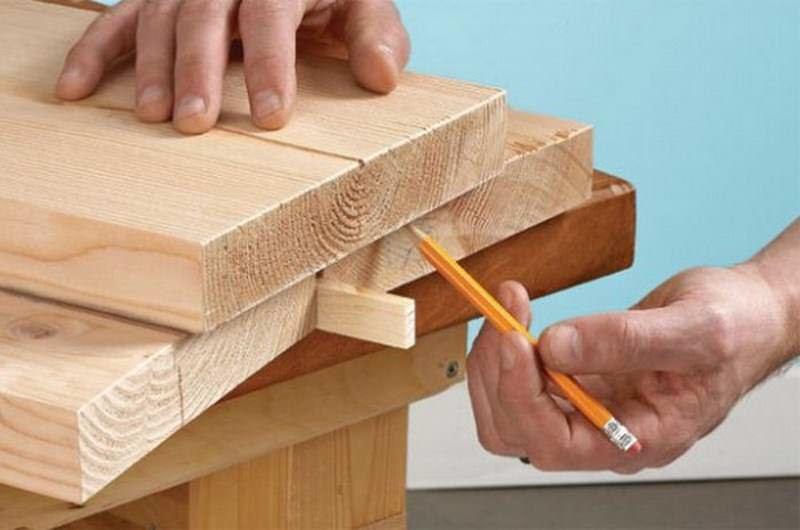
However, without special equipment, the boards are unlikely to fit tightly. Therefore, the tabletop will have gaps between the boards. It looks good for the Garden Table. But not very practical.
You can get rid of the gap that can be applied not an ordinary, tipped board. It will be somewhat more expensive, but it turns out a smooth smooth countertop.

Fig.5.
You can use boards for euro floor as a t-shit board. They are easier to find in the store. It is just important not to forget to ride them from the wrong side.
Once all the elements of the desk are ready to start assembling the table. The table assembly is performed in a specific order.
First, they collect support for the table top and fix the legs to it. This is the most difficult moment in the table assembly. As previously described, the support for the tabletop consists of 4 boards. They must be combined with each other. You can do this in several ways.
The photo below shows how to assemble a support for the table top and fix the leg with the help of a special screed.

Fig.6.
This method is the ideal solution, except for the fact. What to purchase a special screed may not be easy.
Another way is to pull the entire design with a wooden bar.

Fig.7.
Using this method, you need to pay attention to the fact that the bar must be sprinkled at an angle of strictly 45 degrees. Otherwise, the table will not be rectangular.
In my opinion the easiest and affordable option Assembling legs and supports for the countertop is the use of a metallic general construction corner of 50x50 mm. You can buy it in any store, and it has a proper geometric shape.
The last stage in the table assembly is the installation of the table top. Depending on the type of tabletop, it can be fixed in various ways. The furniture shield can be mounted or with glue. Separate boards with self-tapping screws and glue.

Fig.8.
As you have already been able to understand, make a table for giving or house with your own hands is quite simple. It is important to approach the question creatively. Such a table can be decorated with any paint coatings. Wooden table made with your own hands will delight you every day and will serve for many years.

Fig.9.

Fig.10.

Fig.11.

Fig.12.
A large table is often very necessary for a private house or giving. It is comfortable to sit comfortably in the evening with family or close friends. If you want to put it on the veranda, it is best to make such a table yourself, and not to buy. The fact is that the product from the store will quickly come to unsuitability from bad weather.
How to make a kitchen table with your own hands? What options tables can be made from the boards? This will be told about this and many other things in this article.

In order to make such a table you will need:
Initially, you will need to select the type of table, prepare drawings and only after that the material itself. By the way, it may be different:
Consider detail the manufacture of a table from a bar and boards.
After all the measurements were made and the necessary saws are made, each element of the future table is needed to lie with a grinding machine. Wet sponge is going to the dust that appeared during the process. After that, it is necessary to cover the tree with a solution - an antiseptic from possible moisture. When wood dries, it will be possible to continue all the work.
It will be necessary to form a supporting structure from bars and bars. The bars themselves are spinning, and the vehicles of the desired diameter are done on top. This is necessary for further connection. We will have to make certain efforts to dock them correctly. It will be better if you get inside the glue.

Now the table top is the time. It will be necessary to cut out longitudinally in half the board itself. Between two sections, the rest are built alternately. If everything is done correctly, then you should get a loose countertop.
For the front and rear boards, make the center of the opening of other bars from the opposite side. After that, full-fledged holes are drilled on that depth, which allows you to complete the screw completely.
You will need to use such screws that are not affected by rust. In this case, galvanized screws are perfect. All joints need to fasten the rail. Fixation should occur in a checker order.
At the end, you need to combine the tabletop and legs in one design. Metal corners will be needed for this. To make joints, glue will need. After this operation, the design is pressed by heavy load for six hours. On the screws of the screws, it is best to put the plugs of suitable color.
The table is assembled. Now it should be covered with a mourn and varnish. After it was done, the table is left for 36 hours for graze.
To get the holes of a large diameter, you need to apply for a drill crown and boral nozzles. With their help, you can form and external and internal contours.
Using the surface under the window, you can easily make the table. Lighting perfectly falls on the windowsill, and with the help of a view to the street you can relax the tired eyes.
In order to make the desk from the windowsill, the following materials will be required:

First of all, you need to make drawings in such a way that the desk from the window sill was convenient for work and did not interfere with the passage. After the measurements were made, you need to take up the furniture shield and its markup. For the future table should be cozy to sit. If there is a battery, then legs should not be resting.
From the panel you will need to cut the drawn blank and try on the windowsill. Draw with a pencil future holes through which the circulation of hot air from the battery will be held. If the table turned out short, you will need one leg in the center.
After that, you need to make short holes across the entire width of the table with a thick drill. In order not to arise the burrs, it will take to treat the surface with emery paper. Next, the legs brought to the tabletop.
Liquid nails, the countertop is strengthened on the windowsill. The surface is aligned, and the legs are adjusted in height. After that, we can assume that the table is ready.
It is also necessary to consider this option as the folding table from the board and the windowsill.

First, the windowsill is attached a piano loop of the desired dimensions. The table lid is cut. It makes several rows of holes that will spend warm air from the battery. From the bar are made cross and pair of legs. The product is treated with sandpaper and lacquered. All heavenly elements are connected by screws.
The tabletop attach legs with a kingoy with a piano loop. To the windowsill attach the lid. The table perfectly decorates the room and closes the battery, especially in folded.
From the board itself can be done and round table. Previously, it was considered the necessary attribute in any apartment. He was going to the whole family or with friends. Moreover, no one was sitting in the corner, since the round table is simply no corners. Today, these tables are gaining their popularity. Make it own hands not difficult.
Details to the assembly need to be thoroughly prepared. The tabletop will be a disc, and the circle will connect the legs and the tabletop itself.
Phaneur grind and in several layers are covered with varnish. The same procedure is repeated with what is future legs.
The legs are attached to the tabletop with a plywood ring.

On the plywood ring make markup for the holes in which there will be legs. In those places that were marked, drill the holes of the desired diameter.
The legs will be a bar, shed to four parts. Before assembly, they will need to be processed. The screwdriver is attached to the ring.
The table must be obtained both beautiful and stable. Between the feet of the table under the countertop, the cross will need to install two plywood strips.
All supporting design is fully attached to the tabletop. The plywood ring is connected to the worktop. After that, the round table is ready.
Your own hands can be made different kinds Tables. As you saw from the article, the manufacturing process is not sophisticated. Even novice homemade master can cope with this.
Wooden street table for giving is quite possible to make it yourself. This uses ready or independently developed drawings. To make a beautiful tree table yourself for use on the street, you need to purchase high-quality material, and comply with the rules of manufacture.
Beautiful and comfortable country table - an indispensable attribute of summer holiday. When choosing a finished product, you need to determine the sizes as well next parameters:
Countertop and Earlined Furniture Case Could be made of different species Material:

If it is planned to use the table in summer conditions yearly, the optimal option will be a metal structure, which is very resistant to any unfavorable external factors. The legs of the metal design can even be concreted, which will betray additional stability to the object of furniture.

Tables are wooden boards Very often manufactured independently. Of course, this option will require sufficient care throughout the entire period of operation, but will allow to give outdoor territory In the country, bright style and identity. Among other things, build the most simple models With your own hands, you can with insignificant time and money costs, even in the absence of professional skills and special tools.
Scheme self-assembly maybe already ready, but to get the original table with the most suitable sizes And the form of the table top, you need to perform the drawing yourself. When drawing up the drawing, it is recommended to focus on the standard dimensions of such an item 178x95x77.5 cm.

To make a beautiful and practical tree table for cottages, need to prepare:
Work is necessarily carried out in standard protective glasses and mittens. In the manufacture need to use construction MaterialsPresented:
It is also necessary to prepare antiseptic compositions in advance for wood processing, wood varnish or special paint and brushes.
All elements in the form of wooden boards must be smooth, natural humidity, from high-quality wood solid rocks. If necessary, the boards must be aligned before carrying out the assembly, and if necessary, their grinding. To get a durable design, you should make careful processing of wood with antiseptics.
It is not recommended to soak wood with oil compositionswhich has proven themselves in operation in conditions of high humidity, but increase the level of flammability and give the designs an unpleasant and sufficiently stable smell that remains for a long time. After applying water-soluble impregnations, it is recommended to apply a layer of a special lesing antiseptic that allows you to give high decorative properties of a product and promoting additional defense.

At the first stage of independent manufacture of wooden street country table. The framework of the frame base of the furniture subject is carried out. It is to the framework that the boards will be fixed to create countertops and, as well as the stands of the table. The frame base traditionally consists of four sharply and even longitudinal boards having a size of 168x10x2.5 cm and a pair of endboards with dimensions of 85x10x2.5 cm.
The assembly must be carried out on the maximum smooth surface, fixing the end elements to the longitudinal boards with galvanized screws and adhesive composition. Very important Do not allow the base of the base in the process of assembly and fastening. After checking on the diagonal, additional boards 153x10x2.5 cm are necessarily recorded, which will allow to give the resulting design to the additional rigidity, and also hide the sections of the feet of the legs.
The countertop is assembled from the board with dimensions of 95x10x2.5 cm. Fixation of boards can be produced both galvanized nails and self-draws. Be sure to leave a gap between the table top elements at 0.5 cm. The legs are mounted using self-tapping screws or bolted compound. The second option is more preferable and allows you to get a removable model, convenient for transportation and storage.

If there is a need to get the most massive and sturdy constructionThe amplifiers are used. To install such details, it is necessary to flip the product up with legs. Transverse amplifiers in the middle of the countertops are nailed, and the angles of amplifiers are spilled in order to save space. A pair of figure cut amplifiers, which repeats the shape of the worktop, is nailed to the sidewalls.

Unfavorable weatherrepresented by the sun, rain and temperature drops, are an aggressive medium for wooden designoperated in street conditions. To protect wooden crafts and extend their service life, special film coatings and a variety of impregnating compositions are applied. Polyurethane protective films are most often used. The disadvantage of such a film coverage is the loss of appearance, reduced efficiency and wear after the expiration of a certain time. Impregnations for wood protection are represented by a mixture based on oils and solutions of repetuents. And the other option of protection against external adverse factors has proven itself well, but requires periodic updates.
As a material for creating a wooden cottage table, a variety of remedies are very often used. Incredibly stylish and very reliable tables from the slab - an option that can be made independently in the presence of some skills of working with wood. In this case, you need to be prepared for the fact that the technique of manufacturing tabletop based on sleeps is characterized by characteristic specificity and quite laborious, but the resulting finished product will be unique and unique.
Very original B. garden design Designs design:

Enough wide use Received tables created from pallets. Fashion for such products came from Asia, where similar furniture furniture is very often manufactured for the absence of free funds. When creating this option, you can show all your fantasy, but it is very desirable to replace nails from pallets to the self-tapping screw, And all the fastenings of the frame and boards must be reinforced with special furniture corners. If you wish, you can add the design by conventional furniture wheels, allowing you to make the table mobile and convenient to operate.
One of the interesting and durable options for garden furniture. For self-making, you will need:

The tool can be represented by a welding machine, a grinder, saw for metal, hammer, screwdriver, self-drawing and bolts. The metal is pre-cleaned from rust and contaminants using a steel brush, after which the frame is created according to the stencil.
Welding should be taken carefully to prevent the formation of welding growths. The metal brush is cleaned with the whole design, after which the primer processing and staining is performed. After full, the paint is complete, the tabletop is recorded, which also needs to be treated with special antiseptics, after which it is covered with varnish or paint.
Independent manufacture Dunchaeted wood furniture is a very interesting and creative process, affordable even beginners. Such natural material is perfectly combined with metal, glass, and plastic, which allows you to create original, unusual and very decorative solutions.
The table - the furniture without which it is impossible to do in either the city or in the country. The table can be put on the veranda, in a gazebo or just in shady space. You can have lunch, arrange a feast or playing board games in the fresh air. Inexpensive can only be purchased by a plastic not a big table, a large wooden table for the cottage cheaper to make with your own hands. The article will feature three options for tables and drawings for their manufacture.
The optimal size of the tabletop table top for the cottage 80x120 cm. The smaller table will be significantly instructed by functionality, the larger table will be too cumbersome and it will be hard to clean it. The size of the table 80x120 cm will allow the solemn feast with the number of participants 8 - 10 people.
The table for giving is easiest to make out of the boards. In addition, this is the most affordable and inexpensive material. The advantage of the manufacture of wood table is that the boards can be selected to the desired size on any construction base, and without any problems bring to the cottage, thereby saving on transportation. It should be noted that with the size of the table 75x80x120 cm with the longest board, there will be a tabletop board with a length of 120 cm. The board of this length will use almost any machine.
A varieties of table designs are quite a lot, but by and large, the difference is only in the form of legs, which will be based on the tabletop. The poet legs at the table is the most difficult element of the whole design.
The table top at the table is made from the boards. The thickness of the boards can be from 30 to 50 mm. However, the optimal option is a 40 mm thickness.
An important point is cutting boards. With a tabletop length 120 cm, it is necessary to 5.3 boards with a width of 150 mm, 6.6 boards width 120 mm and 8 boards 100 mm wide. Considering that the boards sell a little more than 6 m long, then it is advisable to choose a 100 mm width board for the countertop.
By selecting a 100 mm wide board, you do not have to customize or change the sizes of the table top, which will significantly simplify the work on the table of the table. In addition, there will be 2 more boards with a length of 120 mm, which can be used for other details.
If you can buy the right board, it is not possible to make a tabletop not solid, but with intervals. Such a countertop will look no less interesting. At the same time, water that can accumulate on the table with a solid table top will flock through the gaps between the boards.
Table with straight legs is the simple table design for giving. This is a stable comfortable table that will be well served both indoors and outdoors.

Fig.1.
Wood legs consist of 4 elements 2 vertical racks and 2 horizontal. The upper horizontal stand is attached to the tabletop, the lower is support.

Fig.2.
The design of the legs may be different. For example, instead of support on the bottom board, it can be done so that the support is on the vertical racks, and the lower board can be made as an additional for strength.
Note in this design, the board connection is performed without additional grooves. It greatly simplifies the assembly of the table. In order for all the elements to be well fixed, all connections should be skled with joinery glue. In this case, the boards can be connected by self-draws.

Fig.3.
The table with x-shaped legs is essentially much different from the table with straight legs, it simply has a different shape of the legs. However, it is impossible to make additional grooves without creating additional grooves. This somewhat complicates the work.

Fig.4.
The feet of the table consist of 3 elements. Two cross-hard supports and vertical top plank. The top plank, as in the previous case is necessary for fastening the table top.

Fig.5.
To connect the legs in inclined supports, it is necessary to make a slot into the floor board.

Fig.6.
Table assembly procedure Next:
The table with benches is quite often installed on the veranda or in the open sky. Unlike the designs described above, it does not require additional shops or chairs, the shops are included in the table design.

Fig.7.
The disadvantage of this version of the table to the cottage is that the design is quite cumbersome, and it becomes very problematic to clean it for the winter.

Fig.8.
A feature of the design of the table is that the benches are fixed directly on the legs of the table. Scrolls, which are attached to benches at the same time are a tie legs, and benches play the role of a longitudinal screed.

Fig.9.
The order of assembling table with benches Next:

Fig.10.

Fig.11.

Fig.12.

Fig.13.

Fig.14.

Fig.15.

Fig.16.

Fig.17.
To do garden tableiK with your own hands can be from the girlfriend, which many will show absolutely useless. We offer you unusual ideas For giving, which relate to creating various garden furniture and tables, including. Look at the photo of garden tables and choose for yourself optimal option. When incarnation of any idea for giving, you can manifest the fantasy and make the changes you need.
Wooden garden table - this is aesthetics of the natural landscape of cottages and simplicity of manufacture. Make a garden table with your own hands will help photos and detailed instructions. Before you start making a garden, do it yourself, prepare everything necessary materials and tools. Be sure to look at the photo how to make a garden table with your own hands: they show the production process.
This is a very stylish and original table that can be used both in the garden and in the summer interior. Costs, minimal, because in its basis - pallet from under bricks.
You will need:
The procedure for making furniture and detailed instructions of how to make a garden table with their own hands.


Spindle the pallet: first with the help of coarse sandpaper, then fine-grained. You can also use the "Bulgarian" with grinding circle.
Attach rotary wheels from the bottom side of the pallet. To do this, use conventional screws to which the washers removed from the screws for the metal tile (since on the bases of the wheels big holes). You can directly fix the wheels with screws for metal tile, but then you will need a special nozzle for a screwdriver.
Cover the table with an antiseptic-verse for wood, best-containing wax. At the same time, the table can be toned under nut, rosewood, oak, pine, larch, or use a transparent antiseptic to only highlight the structure of the tree without changing its color.
Please note: not all pallets are the same! They are of different sizes and with different intervals between the rails. Choose such a pallet that is optimally suitable for you.
If you have an old round garden table, do not hurry to throw it away! Of course, it does not have a kind and broken, but for your garden this is a real find. In a new appearance, it will decorate not only a corner of recreation in the garden, but also a country house.

Garden tables made of wood will be combined with many styles, as their decor is universal.
Look at the photo Garden Tables with similar design solutions:


You will need:


Calculate cracks and potholes and treat the table with fine-grained emery paper, then boot all except the table top. Color white paint table (except for table top).
Customize tile tile In a piece of drape or other tight soft fabric and break it with a hammer. Top on the tabletop apply a smooth layer of tiled glue and put the surface of the table top with a tel. Cover the edges to the trowel. When your mosaic gets dry a little, wipe the surface with a sponge dipped in water to clean the surface from the traces of glue.
After the final drying of the adhesive, process the seams between the pieces of tiles with white grout.
Curse the side parts of the table top of white paint, and then decorate them, as well as the legs of the table, ornament with the help of a gold and copper circuit on the glass.
 Usually, garden furniture is made of plastic, wood, rattan represented in non-road natural colors.
However, if a bright multicolor "character" appears in the garden, especially from stained glass, then all attention is immediately attracted to it.
And he is made from the old broken flower Stand, covers from a metal barrel and ordinary round glasses.
However, all these elements can be replaced by colored plastic trimming.
So, consider in more detail how to make a plastic table table with your own hands.
You will need:


On a sheet of paper Draw a circular ornament in moroccan style. Then increase the pattern to desired size With a xerox. Put the pattern under the glass and circle it with copper contour. As you follow, dry the contour for the time recommended by the manufacturer (usually from 8 to 24 hours).
The inner parts of the ornament are cut by bright stained inks. It is important that the paints that you use are evenly distributed inside the section circled by the contour, so before coloring the tabletop, take strain on a small piece of glass, defining the desired amount of paint for fragments. Ready painting well dry.
If desired, add additional decorative elements with copper contour to the finished painting.
Circle with white paint barrel on rust. Now we will deal with the main part of the table top.
Stop the station detail and paint it copper acrylic paint, Then in some places apply a means to get a patina.
When "squirrel" the table dries, stick from the parts that will touch the table top, small pieces of the window seal. This will allow her to keep well.
Assemble the table: Put the painted glass on the cover from the barrel, and this "countertop" put on a pan.

Next, on this page, you can see ideas for giving from the priest materials and the photo of the process of their implementation in practice. We are necessarily accompanying all the ideas for the garden and giving our own hands photo in different angles so that you can clearly see the whole process of creativity.
 Try to make a folding garden table for your hozble universal destination. It looks beautiful and allows you to save space. And most importantly - it is very convenient and will help you contain a small hozblock in perfect order: everything is in sight, and nothing will be lost.
You will need:


Collect the board and paint it into light yellow color.
End boards decorate with a simple ornament with red paint.
Cover cans in red paint.
Cover from jars to attach to the board at equal gaps using small screws.
Hang the finished shelf on the wall of the Hozclock or workshop using finished fasteners (while the lids should be on the bottom of the shelf).
Fill jars with screws, nails, fine fasteners, brackets, nuts and other things that are necessary in the farm and screw the cans to the lids.
You can decorate jars with simple painting, applique and any other ways.
 And now offer interesting ideas For the cottage and garden with their own hands with respect to other interior items necessary.
It will be a comfortable seat on which you can relax after garden worries. All our interesting ideas for the house of summer house and garden are accompanied by photos and can be implemented using various girlfriend materials.
Make a garden baffic from old car tires. Costs, practically no, and the effect will exceed all expectations. This ottoman is not simple, but a chest empty. In it you can keep garden trivia. This will definitely won't have anyone!
You will need:


Cover both white aerosol paint tires, dry. Then color both tires of salad paint, thicker layer, dry.
Put the tires one to another, covering them with "liquid" nails or silicone sealant. To do this, apply "dotted" small portions of any of the means in a circle on the surface of the bottom tire.
Drink a circle from plywood, a slightly smaller diameter than the tire diameter. Cover it with cloth and secure the fabric to the stapler.
Put the circle covered with a cloth based on tires. That's ready! The seat is removable, so the inner part of the PUPPI can be used as a place to store the smallest things.
Color Painting Tires and Seat Coloring can be any, depending on the style of your garden and the color of other garden furniture. In any option, the Puffy will look spectacular
 Garden tables and benches are indispensable attributes of cozy and comfortable dacha life, in which it is possible to realize solitude in the shady corner of the garden.
How to do garden furniture Tables, you could fully learn their examples published above. And now we suggest making your own hands the exclusive design of the garden benches.
Garden bench is not just necessary, but very necessary.
So convenient to care for landings and pour, not standing on the knees, and sitting on the bench, the more so beautiful, like this. Even if she is just like that, she is already garden decoration, no worse than any figurine.
Green paint add pictures: Dorisinate branches and leaves.
Gold paint Estab the accents: make picturesque strokes in the drawings, emphasizing the lines and details.

When the bench dryness, cover it all, together with the pasted pictures, transparent or slightly tinted antiseptic for the tree.
If desired, the bench can be slightly tinted with gray-blue acrylic paint, creating an effect of an old tree.


