Modern windows for the most part are double-glazed windows, consisting of prefabricated panels. These windows are notable for their ease of use, but they also have some disadvantages. So, for example, if one of the glasses is accidentally broken, it will not be easy to replace it, especially if it has a non-standard size. In addition, companies that produce double-glazed windows often close, and many models, when it comes time to replace glass, are discontinued.
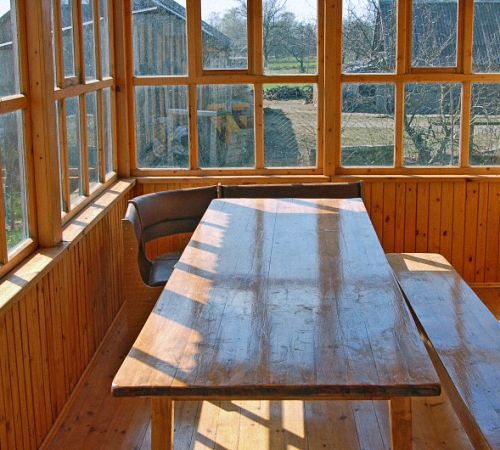
For those who are interested in how to make wooden windows yourself, photos and detailed instructions posted on this page will be very useful. The photo shown below shows a real home-made double-glazed unit, for the manufacture of which neither special skills nor significant financial investments are required. If glass breaks in such a glass unit, a replacement can be easily found in any hardware store, and if condensation collects between the glasses, then it will be enough to change the sealant and replenish the desiccant.
Double-glazed windows that have an air gap not filled with any noble gas, due to the circulation of air flows between the glasses, suffer significant convective losses. Noble gases have a large mass, which significantly slows down diffusion. But on the other hand, as the glass unit ages, it tends to be lost, and in a bag filled with air, you can add a desiccant and change the sealant without special devices.
The most common material from which wooden window frames are made is pine, which is considered the most practical, inexpensive and available wood today. A reasonable substitute for pine wood is oak, but for the first time in their lives, craftsmen who make wooden windows are better off choosing less expensive types of wood. Wooden beams for wooden windows must be dried in accordance with all the rules, and in addition, they must not have any twigs, cracks or other damage. It is important to remember that the boxes, when they are fixed in the window opening, take on the main mechanical load. If glued laminated timber is used for the manufacture of all elements, then its strength will be sufficient to withstand deforming loads.
Tools for the job that will be needed
If, for example, a 150x50 mm board will be used to make a box, then in the blanks for it you will need to make a groove 15 mm deep in the form of the letter G. For the block, you will need to make four blanks, and then connect them with glue (best of all, carpentry) , and additionally drill holes in the right places and insert a three-centimeter rod made of wood, which will provide the connection at right angles with immobility and the necessary rigidity.
The finished box is rigidly fixed in the prepared window opening... To do this, drill holes in the wall, drive in dowels and fix the finished structure with self-tapping screws. If there are gaps between the finished block and the walls, they must be sealed with construction foam. It should be remembered that the installation of the box does not take into account the mobility that it can acquire with temperature drops.
The main feature of the project presented here is the window sash, which expands the glass and provides free place for gaskets and wooden glazing beads.
For those who are going to make do-it-yourself windows from wood, the drawings on this page show how to make a frame for ten-millimeter glazing beads that will securely hold four-millimeter glass. The gap between the glasses is about 1 cm, while no metal parts expanding them are used. It should be borne in mind that a seal for wooden windows, the width of which is equal to the width of the glass, will not be the most the best option for such a construction: it is better if cross section the seal will be equal to the groove section.

Making a box for a window
The best sealant will be a material that does not suffer from exposure to sunlight. Often a silicone seal is used for this, but it should be noted that it is not suitable for such purposes in the best way, since it is difficult to remove from the glass surface. You can make the frame from pine wood, or you can use white oak wood or other blanks. Before cutting the material for the window frame, carefully measure the perimeter of the window opening and increase the result by another 10%.
To assemble the binding shown here, you will need to saw the material at an angle. Groove and tenon joints hold the structure tighter, but continuous grooves are better suited for the seal. It is best to use flat head screws with coarse threads to connect parts of the frame to each other. Flat head screws are best sunk into the holes.

DIY window frame assembly
The glass cutting process is inherently not difficult, but it is important to take into account some of its nuances. First of all, you should take care of observing safety measures: reliably protect your eyes and hands from possible surprises. The glass must be strong and completely intact. Before cutting, the glass is thoroughly cleaned and then greased with a small amount of grease.
Experienced craftsmen it is advised to always cut glass in one cut. When you press the glass, a sound is heard, after which the glass is moved to the very edge of the working surface and pressed on it. To make such a double-glazed window, as discussed here, you need to make measurements with millimeter accuracy.
After cutting, the edges of the glass are processed for polishing with sandpaper.
First, the glass for fitting is inserted into the frame, and then the sealant is removed and put in its place. The glass is placed back in the frame and wooden glazing beads are installed for the windows, and then the window is painted and equipped with handles.
When attaching glazing beads, tighten the screws slowly, starting from the middle. This is to ensure that too much pressure is not applied to the fragile corners of the frame.
Proceeding from the fact that the window should, if necessary, be easily repaired, the caps of the screws used should not be painted over, but many prefer not to be visible. The perfect way to hide the screws has not yet been found, so everyone chooses what suits him best.

We install a window frame in a house from a bar
A desiccant must be placed between the glasses. To do this, a hole is added at the top of the window sash, which is later caulked with a wooden pin. If you have a compressor on hand, you can fill the gap between the glasses with dry air. The pins are painted with paint before installing the window and repeat this procedure after it.
The window mentioned here does not fog up even after a year, and if you need to replace the glass, it will not cause too much difficulty. Such windows can be installed even in rooms with high humidity (that is, in the bathroom or in the kitchen).
The screw holes can be closed with decorative handles. Using standard screws can also scrape paint out of their grooves.
For reliable sealing, experienced craftsmen insert glass, having previously applied a sealant to the places of its joints with the structure. To make the window more resistant to weather conditions, you can apply a window putty on top of the sealant after the sealant has dried. It is important to know that some modern putties can be difficult to remove from glass, making it much easier to work with traditional window putties.
It is best to paint the windows a few days after the putty has been applied.

Wooden window options
For the manufacture of laminated window blocks, specialized technologies are used. A special film is applied to the plastic profile, which is attached to the surface with glue. The film consists of several layers embossed on its surface, and in order to apply it to the plastic surface, it is necessary to use laminating equipment.
Lamination is necessary not only to make the windows look more aesthetically pleasing: in this way they become more resistant to all kinds of weather conditions and are durable and remain extremely easy to maintain. There is a film, the surface of which resembles natural wood. Dust and dirt are practically invisible on such a decorative film, therefore, plastic windows laminated under a tree, the photos of which can be seen below, are incredibly practical.
In addition, the windows covered with foil are resistant to temperature fluctuations and weather conditions. The structure covered with PVC film is not sensitive to atmospheric precipitation, and the film itself retains its color even under prolonged exposure to sunlight.
Another indisputable advantage of lamination with PVC film is a wide range of its colors and textures, among which there is a suitable option for any occasion.
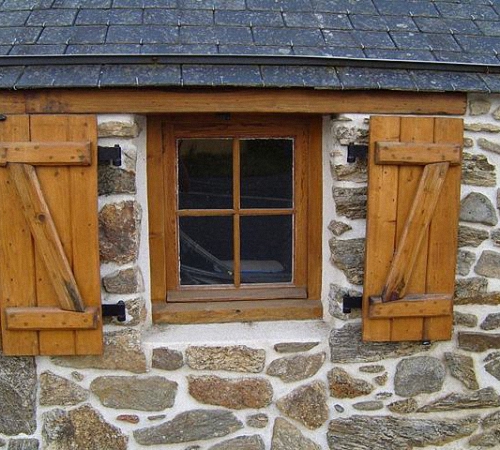
After installing the shutters, the room becomes additionally protected from cold weather and atmospheric phenomena. Wooden shutters on the windows, photos of which can be viewed at the end of the page, are made external or internal, and in structure - one or two doors, panel or paneled. Anyone can make such shutters on their own.

Window shutter design option
To make wooden window shutters, you need boards 100-200 mm wide and more than 20 mm thick. Hardwood veneered planks are considered the most suitable, but a smooth fugue is also fine.
In addition, you will need to take care of the availability of tools for processing wood: a hacksaw, a drill, a screwdriver, a plane, a chisel, etc. You will also need measuring tools: a level, tape measure and a carpenter's corner. For the final stage of work, you need to purchase drying oil, brushes and paint, as well as an antiseptic.

Assembly of shutters for windows

How to make ordinary shutters out of boards
Options for wooden windows We install a window frame in a house from a bar
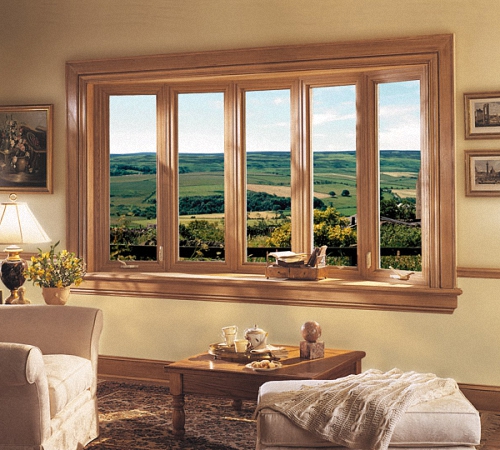
Plastic windows were able to win the hearts of millions of buyers around the world. However, they can only be attributed to budget solutions with a stretch. More affordable option there will be wooden frames for windows. Special machines will cope with the production of frames faster, but when it comes to the desire to create something with my own hands, then this material will definitely come in handy. In addition, windows made of wood with double-glazed windows will become the best option for a country house or summer cottage, where the requirements for external gloss are much lower. So how to make a window with your own hands?
Even a professional will hardly be able to make a window that is not inferior in quality to the products on sale. The reason is simple: the construction of a wooden window must be made as accurately as possible, including the frame and binding - a deviation of a few millimeters threatens with considerable problems with thermal insulation. Despite this, create more simple design many are quite capable.
Homemade window unit made of wood
Wooden windows that are produced today in factories are almost identical to plastic ones, with the only exception - the material used. They are distinguished by a rather complex design due to the possibility of opening the flaps in two planes. If you start making the frame yourself, then it is better to simplify the design by replacing all engineering delights with an ordinary rectangle of bars.
The frame manufacturing process is carried out in several stages:
First of all, you should find out whether it is planned to use ordinary sheet glass or double-glazed windows in future wooden frames. Each option has its advantages: in the first case, it is low cost and the possibility of self-cutting, in the second, it has lower thermal conductivity.
 The thermal conductivity of a classic window is greater than that of a double-glazed window
 One of the features of insulating glass units is a special inert gas that the manufacturer pumps between the individual sheets. Over time, its concentration may decrease. Do not be afraid in advance - the heat loss through the window, if it increases, is minimal, it will hardly be noticeable.
There is also a special hybrid version - the so-called Finnish Euro-window (or Scandinavian). It includes sheet glass and 2 or 3-chamber double-glazed windows. This approach will allow you to achieve high thermal insulation.
 Finnish window has the highest thermal insulation properties
 The simplest and at the same time reliable and popular solution among the people today is the option with a pair of glasses, between which there is an air gap with a width of 2 cm or more. Another option is to make do-it-yourself wooden windows with single glazing and double frames.
Most often for making wooden frame use pine... It is a practical, easy to process and inexpensive material. Alternatively, you can use oak, but for the first experiments it will be too expensive.
 As a rule, pine is used for the manufacture of a window block.
 Whatever material is chosen, the timber must be thoroughly dried, there should be no flaws on its surface: knots, cracks or other damage - it is impossible to make windows from low-quality material.
The main nuance of the manufacture of wooden frames is the preservation of shape and geometry during assembly - prepared in advance will help with this. The beam for work is selected based on the planned thickness of the glass. The minimum section size is 60x40 mm. An electric planer or router is used to create the grooves. Experts recommend that beginners practice on small pieces before starting work - to make a vertical or horizontal cut.
 Typical drawing for the manufacture of a window frame with dimensions
 Before starting work, all measurements should be carefully made. If there is such an opportunity, it is better to entrust this work to professionals - a deviation of a millimeter can lead to undesirable consequences, in this case it will not work to make a wooden window. The ends are sawn at an angle of 45 degrees.
Do-it-yourself assembly of the elements of a wooden double-glazed window is done with wood glue. To give additional strength at the corners, holes are made into which wood rods are inserted, also coated with glue. For additional reinforcement on the connecting elements, a groove is knocked out with a cutter into which the key is installed. As a result, the structure must become stationary so that the homemade binding is practically monolithic.
 Types of corner connections
 As alternative option you can use a tongue-and-groove connection. However, working with it can turn out to be much more laborious, since it requires very high precision. Therefore, most often in the manufacture of wood windows, the above option is used. After that, the production of the window proceeds to the final stage.
Do-it-yourself installation of a wooden frame is done in a pre-prepared hole in the wall. The opening should first be prepared: level it, remove all dirt and debris. Holes for dowels are prepared in the walls in increments of up to 80 cm. The box is fastened with self-tapping screws, then the slots are sealed with foam or other heat-insulating materials.
 Installation of the box in the window opening
 In the process, it is very important to observe the geometry of wooden windows: angles of 90 degrees, a deviation in evenness of no more than 1 mm per 1 m, a diagonal difference of up to 10 mm.
This is followed by the placement of double-glazed windows in wooden frames. The main nuance- precise choice of sizes, because the device of a wooden window does not allow deviations. A deviation in a millimeter will create the so-called cold bridges, which lead to extremely negative consequences... Also, safety precautions should not be neglected - gloves and goggles must be worn to protect hands and eyes.
 During glazing, it is necessary to ensure the tightness of the connection between the glass and the frame.
 Traditionally, a diamond glass cutter is used for cutting, polishing is carried out with fine-grain emery paper. The technique itself is simple - we measure right size, apply a ruler along a straight line and draw a glass cutter along it. After cutting, you should check whether the glass is suitable and, if so, then all that remains is to install it in the frame, not forgetting about the sealant... The glass is fixed in the frame with glazing beads - when making wooden windows with a double-glazed window, you should take care of it in advance.
One of the stages of installing wooden windows with double-glazed windows is working with a window sill. Material for him can be anything.
 Installation of a window sill
 Installation of the window sill is carried out in the following sequence:
It is not difficult to paint wooden windows with your own hands. However, you must remember the following nuances:
 The frame is painted with a brush in 2-3 layers
 On this, the manufacture of a wooden frame for windows can be considered complete.
As you can see, it is quite possible to make a wooden window with your own hands. Of course, in terms of quality, it will be inferior to factory models, but the difference in price is also very significant. In order to cope with everything on your own, you will need not only to thoroughly study the technology, but also to stock up suitable material and tool. If everything is done correctly, the result will surely delight you and your loved ones with both beauty and warmth, which wooden double-glazed windows and binding will help to keep in the house.
In order to make window frames with your own hands, you don't need much: just a list of tools, materials and a couple of hands. So let's get started!
Quality joint
Among the tools you need for will be:
Additionally, if possible, it is advisable to have for installation:
To make a window frame with your own hands, you, of course, need wood, and best of all, if it is pine. So, from a pine bar you need to prepare the following blanks:
So now let's get started!
Finished frame
To begin with, to make a window frame with our own hands, we collect the outer contour. We cut off the length of the elements from the workpiece.
Important! Do not forget that in width you need to give extra centimeters for the "thorn"!
The length of the "spike" will be exactly the same as the width of the bar (60 mm).
Let's start manufacturing, perhaps, with a groove. Mark the length you need and work with a jigsaw. When the "groove" is ready, you can tackle the "thorn", noting for yourself how it will stand (for this, focus on exactly where you have already made the "groove").
Important! The width of the “spike” should be slightly, a couple of millimeters larger than the “groove”, then the “male-female” connection will work optimally.
Assemble the main frame. Additionally, you can coat the tongue-and-groove connection with wood glue, only do this after you have completely adjusted all the parts and after the internal partitions have been snapped into place.
In the assembled state, mark the places for the lintels on the main frame. The jumpers themselves will go with a "thorn", but in the places where they are connected to the main frame, you will need to carefully drill the grooves.
Now, first you fix the jumpers, then you finally assemble the frame.
Important! Don't forget to glue the joints!
Additionally, in the corners, you can fasten it with pins or ordinary self-tapping screws after the carpentry glue has dried. Just so that the frames do not crack, it is advisable to make holes for self-tapping screws in advance, and then they will only delight you.
This is how do-it-yourself window frames are made. Additionally, the frame can be varnished or painted, and you can also go here if you want to know. We hope this information will be useful to you!
Wooden windows are quite common in most residential buildings. This is primarily due to the availability of materials used in the manufacturing process. If the window opening has a non-standard shape, then the easiest way is to build the window yourself, while the master himself will choose its shape, the number of sashes and fittings. Let's talk about the peculiarities of making wooden windows further.
In order to understand the features of wooden windows, we propose to consider their main advantages:
1. Aesthetic appeal appearance.

On a wooden window, the structure of the wood from which it is made is clearly traced. In addition, wooden windows fit perfectly into any kind of both exterior and interior. Most often, wood furniture is installed in the room and wooden doors, which are in good harmony with the windows made of wood. At the same time, wooden windows have high functionality and sophistication.
Windows made of plastic have an unpresentable appearance, compared to wooden structures... The tree brings warmth and comfort to the room.
2. Ability to breathe.
Only wood has this function. It is the tree that is responsible for regulating a healthy indoor climate. Since wooden surfaces are able to absorb moisture, with excess, and give it back in case of a shortage. The house, with installed wooden windows, has a comfortable and healthy atmosphere.
Windows, made of plastic or other materials, tend to form condensation on the windowsill or other nearby surfaces.
Due to the fact that the tree breathes, there is a gradual circulation of air in the room. Even if you do not open the windows for ventilation for a long time, the air will be renewed through the micropores in the tree. After a long absence from home, the air in the room will be fresh and refreshed.
3. High durability.
Despite the fact that wood is a rather vulnerable material, especially in front of moisture or fire, thanks to the presence of modern compositions and impregnations, they improve quality characteristics wood used in the process of making windows. Modern dyes and impregnations on a moisture-resistant basis ensure long-term operation of wooden window structures... In addition, in the process of using wooden windows, their pristine appearance is preserved. For example, plastic windows will require replacement after ten years of operation, wooden windows do not lose their presentable appearance even after twenty years of use.
4. High level of strength.
Wood and its quality are assessed immediately, in the process of purchasing materials. The strength of plastic windows cannot be estimated, since there is a metal profile installed inside the structure. In addition, option self-made a wooden window allows you to choose a tree of such quality that is suitable for the owner of the window both in material and in an operational sense. It is better to give preference to three-layer glued beams with a minimum thickness of 70 mm. It is the use of a glue bar that will ensure the stability of the window against external stimuli and prevent its deformation.
5. Low level of thermal conductivity.
This property is due to the use of glue bar in the manufacture of windows. In addition, thermal conductivity depends on following the technological moments of window installation.
6. Environmental friendliness and safety for human health.
This condition is the most important when choosing wooden windows. After all, it is wood that is a natural material that does not emit any substances harmful to humans.
7. Ease of repairing wooden windows.
This advantage allows you to reduce the cost of repair or restoration of a wooden window. These types of windows are easy to maintain and repair.
Wooden windows photo:
Installing a high-quality wooden window opens up opportunities for its owner such as:
In relation to design features wooden windows are:

The first option is characterized by the presence of one separate wooden part. It consists of one box and two doors, each of them glazed. For the manufacture of the wooden part, a pine massif is used, and not wooden beam... The minimum leaf thickness is 4 cm. The main disadvantage of such windows is their susceptibility to deformation. In addition, it is not possible to achieve complete adhesion of the sash to the window. Moisture that is outside the room gets to the surface of the window sill. Double wooden windows are equipped with non-adjustable hinges and handles, so there is no ventilation mode in them.
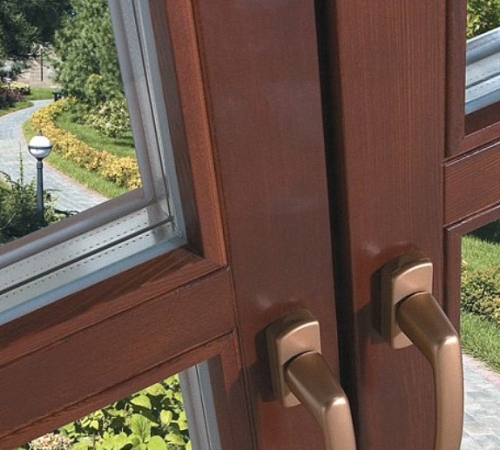
German windows are also called European windows. Since the fittings that are installed on them are of European origin. Such a window allows you to adjust the height and angle of the sash, it is possible to ventilate the window, there are locking mechanisms.
Euro-window includes a window frame and a sash. The sash has a double-glazed unit, which perfectly prevents heat loss. A little effort is enough to open the window. In addition, the care for such windows is quite easy, and glued beams are used for their production, the thickness of which allows you to make a multi-circuit seal, which completely protects the room from drafts.

Such windows are warm, reliable and durable. The service life of the euro windows exceeds sixty years. This is due to the presence of a glued three-layer timber, which is not prone to drying out or deformation.
There is an option of upholstering a wooden window with aluminum. This window has a longer service life and does not require permanent painting.
Aluminum-wooden windows involve the manufacture of the supporting part of the windows from aluminum. Wood, on the other hand, covers the outside of the aluminum. Thus, the strength of the structure is improved due to the presence of aluminum, and the wooden surface creates an attractive appearance and warmth of the window. This type of windows is practically not common due to the high cost of aluminum and the complexity of the work.
Finnish windows are distinguished by the presence of a wide frame and two sashes, which have a sequential type of opening. One simple glass is installed on the outer sash, and a single-chamber double-glazed window on the inner sash. For the manufacture of the outer sash, both wood and aluminum are used. The two leaves are connected using a sequential opening mechanism. For the manufacture of window frames and sashes, a solid wood is used, not glued beams. The window has an attractive appearance, although compared to German windows, it loses to it in quality characteristics.
In addition, wooden windows are:
In addition, Swedish wooden windows stand out. They represent a combination of German eurowindows with a Russian version of the window. Such a window has an outer frame with a single glass and an inner frame with a single glass unit. Thus, a high level of sound and heat insulation is ensured.
Carved wooden windows are characterized by the presence of different rose patterns that make them more attractive.
Before you make a wooden window yourself, you should take care of preparing all the tools necessary for this in the form of:

We propose to study step-by-step instructions self-production of wooden windows:
1. Construction of the box.
Depending on the size of wooden windows, they are:
Before starting work, you should select the material for the window. The most optimal and inexpensive option is pine. Since this type of wood contains a large amount of resin, it is the most resistant to moisture and other external influences.
A more expensive but high quality option is oak. Although for beginners it is better to choose pine, so as not to accidentally spoil the expensive material. Boards must be properly dried, there must be no knots, cracks or deformations on them. Please note that the box is the main supporting structure, on which the entire load is assigned.
A variant of using a glue bar is possible, which is distinguished by higher strength characteristics and a long service life.
To build a frame, there are enough boards, 15x5 cm in size.A groove hole should be made in the workpiece, which will have the letter G, and a depth of 1.5 cm.All parts are connected using wood glue, and then a wooden rod, with a minimum length of 30 mm ... It is the rod that is the element that acts as a retainer for all components of the box.
Next, the box is installed in a previously prepared window opening. This procedure includes drilling holes in the wall, installing dowels in them, fixing the box with self-tapping screws. To seal the joint and seal the cracks, it is used polyurethane foam.
2. Construction of a frame for a window.
How to make a wooden window with your own hands drawings:

To create a frame, you need a beam, 70x50 mm in size. Although it is possible to adjust the thickness of the timber, depending on the size and strength of the window. The profile shape is determined by the thickness and amount of glass that will be installed in the window.
If you plan to install a single-glass profile, then it is enough to build two rectangular groove holes, otherwise, more holes will be required.
To make a profile of a certain shape, you will need an electric planer or milling cutter. If the thickness of the glass is 5 mm, then a glazing bead is required, 1 cm thick.
When all the parts are prepared, the frame is assembled. To do this, you need to cut the board at an angle of 45 degrees. With the help of the prepared profile, a tenon and groove connection is provided, for more high level fixation screws are additionally used. Please note that all caps must be sunk into the wood to improve the attractive appearance of the window and to avoid corrosion.
3. Installation of glasses.
In order to prevent condensation from collecting in the window and there are no cold bridges, the length and height of the glass that must be installed in it should be correctly measured. The minimum error when taking measurements is 1 mm.
It is better to use a diamond self-tapping screw for cutting glass, and fine-grained sandpaper for polishing the edges.
In addition, all safety measures should be observed, namely, wear gloves from thick fabric so as not to injure your hands by shrapnel and wear a mask that protects your eyes from dust or small debris.
A ruler with a small margin fits on the glass. A line is drawn along it with the help of a glass cutter. Then the glass is placed on the edge of the table and broken off. The prepared workpiece is installed in the window, if it does not need correction, then the edges of the glass are lubricated with sealants and laid again. Next, the glasses are fixed with glazing beads, on the surface of which small nails are hammered. If the width of the glazing beads is large, then it is better to use self-tapping screws to fix them.
4. Studying the question of how to make a wooden window with your own hands, mention should be made of the final assembly of the entire structure. If the window has big size and is divided into two parts, then first the assembly and installation of the vertical bar is carried out, then the sash is fixed with hinged hinges. Handles and other fittings are installed.
Completes assembly work installation of the finished window into the window frame, fixing it with self-tapping screws, which first pass through the surface of the box, and then through the wall. To seal all the cracks, polyurethane foam is used, and after it dries, the walls are plastered. The installation of an ebb and a window sill completes the work.
How to make a wooden video window:
Four years ago, I published the article "Drawings of the profile of a window block (wooden glass unit)", where I attached photos and drawings of the profiles of a wooden window. Over the years, I have received several emails asking me to show the blueprints. corner joints or send more detailed drawings. A week ago I received another such letter and today I will try to clarify the situation with this review article.
Letter from the reader of ModelMen.ru
Writes: Daniel
Hello Dmitry. I am from Sevastopol (Crimea, Ukraine). I was very interested in the drawings of a wooden window with a double-glazed window. (). Now I am doing repairs in the house and did not want to install plastic windows, and the wooden ones were very expensive, I came to make them myself, I began to look for drawings on the internet and many search engines indicate yours. You write that you developed the drawings yourself, so I wanted to ask you a question as a developer. How much the window should be smaller than the frame, that is, if the frame is assembled, then how the frame should be calculated (height width), so that they exactly fit each other and do not create cracks when closing (or do not cling to each other). Is it possible to make such a window without a milling machine? How to join corners (butt or 45 degrees)? What fittings was the window designed for? I promise that if I manage to make such a window, I will post photos phased creation such a window. Thanks in advance. With admiration, Daniel.
= = = = = = = = = = = = = = = = = = = = = = = = = = = = = = = = = = = = = = = = = = =
So let's go!
Is it possible to make such a window without a milling machine?
Yes, it is possible! Moreover, such a window can be made with only a circular saw at hand. In my arsenal there is a modern saw blade for aluminum, although at the time of sale it was written that it also saws wood, of course. My disk looks like this one:
Specifications:
Disc diameter 255 mm.
Number of teeth 80 pcs.
Bore diameter 30 mm.
My true bore hole is 32 mm and a larger diameter, but the point is not in this, but in the number of teeth! Thanks to the large number of teeth on the disc, it cuts wood exceptionally clean. I often asked my friends to compare planed wood and sawn with this blade, sawn always won in quality. Home planers often do not provide a high-quality planed surface, it turns out to be wavy, especially at the ends of the workpiece, and not everyone can afford industrial equipment.
Why am I all this, you can make a wooden window by having a circular machine and a good saw blade with a lot of teeth (soldering) at hand.
How to connect corners?
The most interesting question :) because most people make a simple spike connection into one spike.

These single-stud frames have already proven themselves to be extremely short-lived. If you want the window to serve for a long time and withstand a large number of opening and closing cycles of the sashes, then make a tenon connection in two spikes. Of course, it can be made in three spikes, if the thickness of the frame allows. 
The more spikes, the larger the gluing area of the parts and, accordingly, such a spike connection is several times stronger.
How to make a spike connection?
This is not as difficult as it seems at first glance, first you need to saw off four blanks to size, two vertical and two horizontal. It can be just rectangular bars or bars with a selected profile. The length of the blanks depends on the size of the box of the window block, of course it is better to calculate this on the drawing.
You can even cut the blanks by eye to length, attaching them to the finished box, but taking into account that the frame should overlap the box. Of course, in this case, a profile must already be selected in the blanks for the frame.
Thorns and eyelets are usually cut on milling machine, but we have circumstances, there is no machine tool, so the same can be done on a circular saw with the help of simple devices or without them at all.
It should be noted right away that the vertical parts of a wooden window or door are always eyelets, and the horizontal parts should be spikes.
For example, I will show you a video of how the guy makes spike joints on a circular with the help of his device.
Here's a trickier device:
In both videos, box spikes are made, they are small, there are a lot of them and it is difficult to make them without tools. If you make one or two windows, then you can do with a simple device as in the first video, but without a pin, then all the work will need to be done by marking with a pencil on the workpiece.
What fittings was the window designed for?
Honestly, I took fittings and a profile as a basis. plastic window... I don't know if there are any differences between the fittings for a wooden and for a plastic window, but I think that having any of them you can adapt.
At the beginning of this winter, I installed a factory-made wooden window in my kitchen on my own. Below you can see a photo of the window, which elements can be taken from there when developing a drawing.


Today, I would depict my profile a little differently than four years ago: 
As you can see, I increased the size of the bars to 80 mm., After all, we have severe winters, and I would like the warmth to remain in the house, besides, a more massive frame will be stronger and look better.
In this article, I again do not give you ready-made drawings and window sizes, because in order to develop them, you need to have window accessories in your hands and understand how it is attached and works. Unfortunately, I have no experience with such fittings, so develop finished drawing I can't yet. Below I tried to visually depict how the gusset spike should look like.


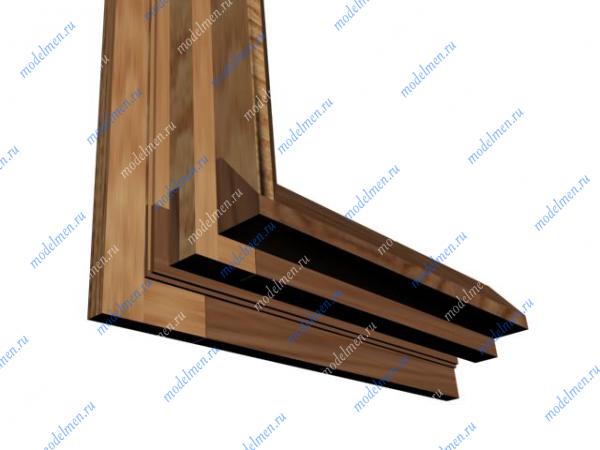

I found a few more photos on the Internet showing the elements of the spike joints of a wooden window. I hope the information I have given will help you to independently develop a drawing of a wooden double-glazed window and bring it to life. Good luck!


