Everything that surrounds a person in his house should radiate warmth and peace. All the things that fill a room most often carry certain information. We must strive to ensure that this information is only positive. Indoor plants not only have a great effect on a person, but are also beneficial for his health. And an original hand-made stand for a plant will help to give the house additional comfort and harmony.
Many people use indoor flowers in their room décor. Plants, like nothing else, are able to revive even the most gray interior... But, speaking of indoor flowers, one cannot but mention their beneficial effect on the human body. After all, it has long been believed that some plants have healing properties and have a beneficial effect on human health and psychological state. Most indoor flowers are safely used in folk medicine... And there is also an opinion that they are able to cleanse the house of troubles and troubles. In addition, potted plants, even in small quantities, have been proven to perfectly purify indoor oxygen. In nature, there are many types of indoor flowers. Each plant has its own unique qualities. But most people, as is customary, choose flowers according to appearance... When using colors in the decor of a room, it is important not to forget that these living things require special attention. The most important thing is lighting and watering. And in order for harmony to reign in the interior, you should use original jardinieres (from the French. Jardiniere - stand, basket, whatnot) for flowers. It is not necessary to purchase this decor item. A stand made to surpass all expectations.
In order to choose the material for the stand, you need to carefully study the style of the interior in the room. In principle, a do-it-yourself flower stand can be made of anything, the main thing is that it should look good indoors. It is important to correctly calculate the area that it will occupy, as well as the number of flowers that will be located on it. If there will be a lot of plants, it is better to choose a multilevel option. And if there is only one flower, then in this case it is necessary to choose a stand with a rather graceful shape. The stands have a wide variety of different types... Most often, plastic, iron, wire, vines, wood, threads and unusual objects are used for their manufacture. Jardinieres can be floor-standing, suspended, located on window sills and built into the wall. They are often decorated with decoupage, mosaics or paints. They also combine several manufacturing options at once, for example, combine wood and metal. It is not necessary to have special talents to make an original stand yourself. It is important to approach this matter with a soul.
Floor stands are of many different types. They are in the form of ladders, multi-level shelves, in the form of an apartment flower bed, high and low, wide and narrow. Such jardinieres are the most common option for any room. They are quite practical, most often such racks are made of strong materials such as wood, metal, plastic. They look great in any interior and perfectly complement any design. In order to get original design can be made from an unexpected object. In the design of outdoor jardinieres, the most different directions... Of course, in any flower shop, as well as specialty chains, you can find many options. The advantages of such designs are that they are very practical and convenient. And in order for the flower stand to look advantageous, the floor structure should be decorated in the general style of the room. The simplest design floor stand- low round detail on the leg. It is very easy to do it on your own. To do this, you need any material that is malleable for work (chipboard, wood, plastic). It is important that the stand is stable, for this the diameter of the base should be approximately 20cm. The leg length can be any, depending on the desired height of the jardiniere. With the help of tools, it is necessary to cut out the grooves to connect the parts. When attaching them, it is imperative to use special glue.

If the interior is dominated by wood elements, then the best option would be a wood flower stand. Although such models of jardinieres bring naturalness and naturalness to any design. They go well with herbal compositions. Wooden stands for flowers can be floor or hanging, they can be placed on the windowsill, and also partially embedded in the walls. Specialty stores often offer coasters made from untreated natural wood... Thanks to this natural appearance, it seems that the present is growing in the house. The most common ones are made from boards or special parts. They have a wide variety of shapes: shelves, stairs, multifunctional bedside tables. The only place where this type of decor is undesirable is balcony window sills. Excess moisture has a negative effect on the structure of the tree, which can lead to a short service life. One of the simplest options for making such a jardiniere is a ladder. To create it, you need a little glue or nails. All parts must be properly fastened. The entire work takes a maximum of an hour. When the main structure is ready, it must be varnished or painted in desired color... Multi-colored stairs look very interesting.

Very often, indoor flowers are located on the windowsill. For the sake of cleanliness at home, this is not very practical. Therefore, there are several types of window sill stands. Most often, flat structures are used, made of plastic or varnished wood. But forged products look much more original. They look as unusual as possible. They are made for each flower separately, as well as for several pots at once. Stands for flowers on the windowsill are made of metal and have the shape of a long, rectangular box. The advantages of such a jardiniere are that it fits even the narrowest window sill. First of all, it is space saving. And a large number of flower pots guarantees the appearance of a paradise flower garden. In general, it is not necessary to use special decorative coasters on the windowsill. Fashion trend- a wide window sill with flowers, decorated with various little things: books, records, toys. Absolutely any items that are associated with home and comfort will do. Perhaps, coming up with a stand on the windowsill on your own will not be difficult. For small pots, a jardiniere woven from a vine is perfect. The main structure consists of a rod or dense wire. The rod will be the base of the product, it must be well attached to the heavy bottom (you can use a round wooden block). Further, it is necessary to attach separate "branches" to it in a chaotic manner and decorate everything with a vine. Each pot must be braided, starting from the bottom. The very first turn must be secured with wire. It remains only to assemble the structure.

Indoor flower stand can be made with wrought iron. This option is perhaps one of the most beautiful and unusual. I would like to say right away that such coasters are the most durable and undemanding to care for. Such models easily combine strength and delicate lightness. In addition, the execution forms are very different: consoles, racks, slides, towers, spirals and others. Among all the products, I especially want to highlight forged balconies. This chic part of the interior can turn any loggia or balcony into a real paradise flower garden. Forged products can also be used to decorate windows, be placed on walls, and look original in the form of pots. Often these jardinieres are combined with other materials. Most often, forged stands are made to order. Product options can be very different: from simple abstraction to figured images and inscriptions. The only drawback of such stands is their high cost. This is not to say that such jardinieres are easy to make with your own hands. Indeed, to create such a structure, a special metal-twisting device is needed. First you need a sketch. For consideration, we take a simple structure consisting of three legs, fastened together in the middle. All three parts must be exactly the same, so all measurements must be taken very carefully. For manufacturing, it is best to use metal with a small thickness. The elegance of the whole product depends on the diameter of the rods.

If there are a lot of pots with flowers in the room, then the option of a multi-level stand is best suited. A tall flower stand can not only save a huge amount of space, but also place as many pots as possible at the same time. High jardinieres are most often floor-standing. For such a product, stability and an advantageous location are important. Usually these stands are located in the corner of the room. The most varied width is used. Forged high jardinieres look very original. They complement any interior with elegance and tenderness. Wooden multi-level high racks look very unusual. Most often they are located on balconies and loggias. Their advantage is a large number of bowls for indoor plants... If the flowers in the house are of the same type, for example, multi-colored violets, then the high jardiniere option is the most suitable. To make such a stand with your own hands, the most successful option is a hanging jardiniere. To make it you will need: rope, metal rings, ceramic pots and some tools. The shelf must be cut into several square pieces. On each part, apply the diameter of the bottom of the pot (plus a few mm is required) and, using a jigsaw, cut it out. In each corner of the square, you need to make a hole for the rope. The next stage is the assembly of the structure. Initially, it is necessary to determine the length of the entire jardiniere, as well as the distance between the pots. The lace on which the entire structure will be attached can be decorated to match the interior. With the help of knots, it is necessary to fasten all the details on the rope, and the jardiniere is ready.

If the room is filled with furniture to the maximum, then there is simply no better option than glass stands for flowers. The transparent design is able to withstand large pots, while absolutely not burdening the interior with massiveness. Glasses for such jardinieres come in many colors. Transparent glasses make the stand weightless, and, for example, black glass emphasizes the geometry of the product itself. Such racks are always made in combination with other materials: plastic, wood, forging. Structures placed in the window opening look good. It is best to use shallow pots with flowering plants... Well, for making such a jardiniere with your own hands, the simplest design is the shelves. For work, you will need several sheets of building glass (preferably 6 mm), guides and supports. In the slopes, it is necessary to make several holes and fix the structure. The whole work takes just over an hour, and the effect is simply amazing!

Increasingly, indoor plants are used to decorate summer cafes or just streets. This is done for several reasons: the impossibility of planting a plant in the ground, the method of interior decoration and aesthetic value. Unfortunately, not all stores offer such an accessory. But it can be easily made to order. Most practical material for making - iron. It is the most durable in such conditions as the street. But other materials are also used for manufacturing. Stone jardinieres look very original. Street flower girls fall into two categories: stationary and portable. Such landscape decorations will not leave anyone indifferent.
Jardinieres for flowers are an interior detail with which you can safely experiment. Give the room unusual view a do-it-yourself stand will help. To make such a structure, it is not necessary to be a master, the most important thing is to approach work with imagination. What the rack will be made of depends only on its owner. The more unexpected the base of the product, the more likely it is that a self-made flower stand will turn out to be original and unique. The jardiniere should bear the character not only of the premises, but also of its owner. Then the result will be simply amazing. DIY flower stand is easy!
Sometimes, there is not enough space on the windowsills to place your favorite flowers and seedlings. Of course, if you have extra funds, you can buy a bookcase, a shelf for plants. To save money, make these devices to your liking, make such a system with your own hands.
There are many options for such products, choose the one for which you have materials. You can make a high shelf or not.
Notice how beautiful this looks like. Here you put several flower pots, each plant will be illuminated by the sun. To craft such a miracle, you will need:
Saw through the pattern with a jigsaw. Mark the distance from one edge of the shelf to the other, based on this number, saw the boards of this length.
Paint them and the plywood sides white. Once the finish is dry, use a stencil to paint on the plywood with a different paint. When it dries up, then attach the boards to the cut straight parts of the plywood using self-tapping screws, while on one and the second side of each shelf, you need to screw in two self-tapping screws. The work has been completed.
If you do not have a jigsaw, do not know how to work with it, or you are looking for an easier option, then another shelf will do.

Saw off the first plank so that it is as long as or slightly shorter than a window sill. The second tier will be above it. You can make this element the same length as the first, or cut it by a third or half. Also determine the size of the top shelf yourself, depending on how many flower pots you need to place.
Pick up the beams so long that they are higher than the pots along with the plant planted in it, add a few more centimeters so that the flower does not rest on the shelf above it and is well lit.

WITH right side the middle shelf rests on two vertical bars, and the top one on one. Secure all elements well, then leave the flower shelf the same or paint. After it dries up, you can install plants and enjoy the vacated space.
If you don't have wide boards, this is not a reason to give up. Use subtle by studying the following master class. As you can see, the height of this shelf for flowers is 1 m 20 cm, its length is the same, and its width is 28 cm. The distance between the shelves, depending on the height of the plants, is 35–40 cm.


Pass the pipes through the holes, fix the structure with slate fasteners. If the shelf is near a wall, then attach to it to secure the shelf. In this case, the plants will need lighting, using small self-tapping screws, attach fluorescent or phytolamps under each shelf.
A great option is a shelf with glass beams. They will transmit light, which is so necessary for plants.

In order to make a glass flower shelf with your own hands, it is better to take tempered glass with a thickness of at least 5 mm. This is more durable.


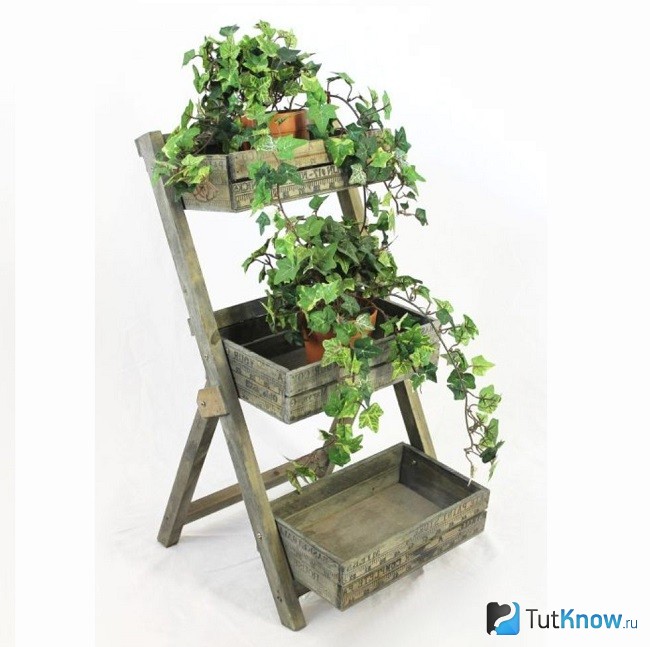
If you have wooden boxes, then a bookcase rack can look like this. The base is made like a ladder, then the boxes are fixed on it.


The time for its cultivation begins. Seasoned gardeners know how often there is not enough space to sow seeds. different cultures... Therefore, vertical shelves will be an excellent solution to the problem.
You can buy a plastic rack to place all the containers and cups on it.


In this case, 4 boxes were used, for them you will need 12 pieces of hose 15 centimeters long. Cut it with pruning shears or scissors.

Now install one piece of hose on each rod, put the box on top, then the hose sections go again, then the plastic container. Thus, collect the entire structure, put it on the windowsill. Such a seedling rack will help save space and will be made according to your individual measurements.


To solve the problem of watering and the boards are not soaked with water, put the cups in transparent plastic containers that sell marshmallows or cookies.


Using the same elements, you can make corner shelves.


When buying pipes, you need to purchase such that their total length is 5 m 10 cm. When sawing, it is better to use a saw to make the cut more even.


The first plot is for those who have the skills and tools to work with metal. You will get a beautiful openwork flower stand.
Here's another interesting and quick idea.
In the third video, you will learn how to make a seedling stand.

If you want to decorate your home with indoor plants, but free space is limited, then you will definitely need stand for flowers, do it yourself you can make it out of wooden planks. Some creative ideas can be used to form original racks from only clay or plastic pots, without additional structures. We have already made with you from beads, satin ribbons and paper, but artificial flowers cannot fill the air in your room with the freshness and scent of a flowering plant.
A green corner of the house is the dream of every housewife, because this is one of the main ways to create a warm and cozy home atmosphere, for this very purpose we also create. The only opportunity for many housewives is to arrange flower pots on the windowsill, but then they will be hidden behind a curtain most time, which is why it can be used DIY wood flower stand... Various stands can be found in shops that sell flower pots, but sometimes they do not meet your requirements at all, and then you decide to make them yourself. You may need to master new tools to realize your creative idea, some of which are considered masculine. For example, you may need a jigsaw, saw, grinder. Do not worry, you will not have any difficulties when working with these tools, but the result will exceed all your expectations.

DIY flower stands for home can be suspended and floor-standing, even multi-level. In this case, we will make a suspended multi-level shelf that will decorate your home interior... The wooden shelf will perfectly complement the interior, where natural textures prevail.
Before you start making an accessory for your home, you need to go to a specialty store and purchase wooden planks, but you can also take old shelves, which will receive a second life and will decorate your home.

To form a suspended multi-level shelf, we need a thick rope-rope, whose natural color will perfectly fit into the interior, and a metal ring must be prepared to attach the suspended structure. Of the tools, we will use a drill with a large diameter drill, jigsaw or jigsaw. For processing wood, you must definitely need a brush and paint (or varnish). Of course, when it comes to indoor plants, we need four ceramic pots, but you can use 2-5 pots for your design.
If you are still hesitant to tackle such complex tools, then you can create that will also decorate your home.

We need not only to make a beautiful hanging shelf, but also to resolve the issue with the strength of our structure. Therefore, when you consider the master class, how to make a flower stand with your own hands, please note that there must be at least two centimeters from the side of the pot to the edge of the wooden stand, otherwise the wooden plank may break.
We need to cut out squares or rectangles from the boards, the width of which will be 4-6 cm larger than the pot in its widest part. When the squares are ready, you need to draw a circle in the middle - circle the pot in its widest part, but not in the widest part, otherwise, when we insert a flowerpot into the hole, it will simply fail. The hole should be slightly smaller than the base of the flowerpot, so the pot will be securely fixed in the wooden shelf. You can measure the squares after the circle is drawn in the center. Recall once again that the circle in diameter should be a couple of centimeters less than the diameter of the pot at its widest point.

Next stage, how to make a stand for a flower with your own hands, it is assumed the use of sophisticated tools for sawing the inner hole. First we will fix the square, and first of all we will drill a hole in the very center. We will need this drilled hole in order to "penetrate" into the center of the circle with a jigsaw for its subsequent sawing. You must work very carefully with a jigsaw so as not to go beyond the outlined boundaries, while it is desirable that you get an even, neat circle. Thus, it is necessary to prepare all four blanks. Only when the holes in the center are cut, it is necessary to drill holes along the edges (in the four corners), into which the ropes will be threaded, which will hold our multi-level structure. It should be noted that only those plants that hang down like vines, as in other suspended structures, should be placed on such shelves. It is important to first make marks on all the squares in the corners, because on each board they should be located without displacement.

Further decoration do-it-yourself flower stands, photo which you see in the master class depends on your imagination. If the tree has a beautiful natural texture, then there is no need to hide it, but it is only worth emphasizing by covering the tree with varnish. However, you can paint the wood any color you like so that the shelves blend in with your home decor. For painting wood, you can use acrylic paint, for example, dark blue.

In order to give the paint the effect of antiquity, two shades of paint are usually used: the lower one is darker (brown or burgundy), the upper one is light (aqua, turquoise, mint, blue). First, the surface is covered with dark paint, waiting for it to dry and covered with transparent varnish on top. After the varnish has dried, cover the surface with light paint. When the top layer is dry, use a soft sandpaper to make “scuffs” in the corners. This will artificially create the look of aged furniture, which will give the interior a vintage shine. Crocheted tablecloths and carved photo frames will perfectly fit into such decoration.
Even if you take plants with branches hanging down, you need to measure the height of the bush that rises to us with a pot in order to know what should be the distance between the shelves. It is advisable to make the same distance between all four shelves, then the whole structure will look neat and stylish.

The next stage will be formed DIY flower stand: You need to cut four pieces of rope of the same size and fasten the pieces to a metal ring. Then the ropes must be threaded through the holes made in the first square. On the ropes, you need to tie knots under the base, before that you align them so that they are on the same level. Further, in stages, it is necessary to fasten all the other square planks, completing nodes under each, which will be the main fastening. The knots are easy to adjust so that the planks are parallel to each other. The excess rope from the bottom can be cut off.
Note that one such hanging structure can accommodate four plants without taking up space as it can be hung near a window or anywhere on the wall. Such a solution will be ideal for a small apartment, but if you are the happy owner of a summer house, then in the summer months the structure can be hung on the veranda.

DIY floor stand for flowers formed from pots of different diameters. At the base there will be the largest pot, four more medium-sized flowerpots will follow them up, and a small pot will complete the structure. At the base there will be iron reinforcement, on which the rest of the pots will be attached one by one, forming a pyramid. The length of the iron bar will determine the height of your future floor stand. The rod should be thick enough in diameter if you plan to attach large flower pots to it, but you can also make a decorative stand from miniature pots. You can use such a stand for decoration, then sisal should be laid out in each pot, forming a nest, and a decorated decorative egg in it.

The pots can be pre-coated with spray paint to give a stand decorative view: They can be made in one color or create an original color transition. Before painting the flowerpots, they should be covered with several coats of primer. The paint is also applied in several layers after the previous ones have dried.
In four medium-sized pots, holes should be made at an angle: such a hole should go through the bottom and the wall, when you thread the reinforcement into this hole, the pot will be inclined. The largest pot will be our base, in it we need to fix the fittings vertically, and then string three inclined containers and the last, the smallest. The flowerpots must be filled with earth and planted with home flowers. DIY floor stand can be located anywhere in your home, and this idea can be used to form a flower bed on a personal plot.

In the store you can find the most original racks for flowers made of metal, do it yourself it is quite difficult to complete them, because, when working with metal, it is impossible to do without special hacksaws, welding machines and other tools, which require special skills to work with.
Beautiful forged racks, despite their popularity, can make the interior "heavier", as the designers say. Therefore, if you decide to buy such a rack for indoor plants, evaluate the space of your room, it is advisable to place them in spacious halls, and it is strictly forbidden to use them in cramped small apartments.

You can breathe life into old, seemingly unnecessary things for a long time, for example, iron legs from the old sewing machine or metal chairs that have long lost their decorative look.
Growing flowers, for most housewives, is a very exciting experience. A small hobby gradually develops into a big hobby, filling all the free space. It is good if the living area allows you to allocate the necessary territory to create a green oasis. But what about this sprout, which has no place on the windowsill, you can't put it on the closet either, the table is busy, and it will simply get lost on the floor among the large flowerpots.
A solution such global problem, there are floor and wall shelf options. Modern market offers a wide range of ready-made designs. Variety of shapes, structures and color schemes strikes the imagination and has no boundaries. However, do-it-yourself flower shelves become unique. design solution and bring an extraordinary atmosphere into the interior.
Before getting down to work, it is necessary to create an approximate plan for the arrangement of flowers, on the basis of which the sizes and features of future shelves will be determined. Depending on the type of plant, two main options are used:
The number of flowerpots located on the selected structures also divides them into several types:
All proposed options can be designed in the form of corner shelves, so you get space savings and additional features for design innovation. For lovers of vine plants, ceiling shelves are offered for consideration.
A wide variety of materials can be selected and combined for the self-made invention of flower shelving. Very often, many people opt for a tree. Despite environmental friendliness and versatility in use, do not forget that you can always find others at hand. interesting options having their own advantages. We will consider some of them in more detail.

Plywood is perhaps the simplest and cheap stuff from which flower shelves are obtained in a wide variety of shapes and sizes. If there is no plywood sheet in the house, a small amount of money will be spent on its purchase. The process of creating a plywood shelf is not difficult. In the presence of necessary tools the task in a short time will turn into a work of art.
At the beginning, you need to make a sketch. Here you can show unlimited imagination. The main thing is that the resulting structure is consistent with its initial purpose, is strong and can withstand the intended number of pots.
When the blade is ready, the edges of the saw cut are cleaned with sandpaper and holes are made for future fastening. The entire surface is covered with a special solution, thereby increasing moisture resistance and preventing mold. After drying, the shelf is opened with varnish.
Creative people can demonstrate their talents by decorating a product with drawings, glue them with pebbles or shells, and show creativity.
To secure wall options plywood shelves use metal corners or staples, due to which they are attached directly to the wall.


The most common place for placing flowers in a room is a windowsill. Floral racks are created using such a plastic sheet. You can buy it in almost any hardware store or order at the manufacturer's factory.
For the construction, you will need several nickel-plated pipes, fasteners, flanges for fastening to the floor and a pair of brackets, do not forget about the tools necessary for work.
After the measurements are made, the window sill is cut to the desired length. The next step is to drill holes for pipes, two at the edges, it is important that they are parallel to each other, and one in the center. The length of the pipes must be the same, otherwise the structure will be unreliable and wobbly. The assembled rack is secured with ceiling brackets and floor flanges.
The advantages of plastic shelving are durability, they are not afraid of moisture, they are easy to care for.

All materials listed here can be used to create a corner shelf. For small items, leftover materials will be sufficient.
The technology for creating corner shelves with your own hands is very simple. A surface of the required size is cut from a chipboard sheet. A galvanized pipe is threaded into the prepared holes and the whole invention is connected with flanges. With the help of brackets, it is fixed to the selected surface.
The next stage is varnish or paint treatment.
To create a green corner, interesting solution there will be a kind of corner shelving. As the shelves grow, they decrease, representing a pyramid. On this design, you can arrange flowers of different sizes using climbing plants on the sides.

Wood is one of the most reliable materials used in construction. Properly assembled and secured wooden racks or shelves can accommodate any number of plants, regardless of size. In the choice of wall-mounted wooden shelves, you can limit yourself to the simplest option. For this, a timber of the required length is taken, covered with varnish or paint and fixed with metal corners to the wall. If you replace the fasteners with leather straps, you get a creative design approach that brings individuality.
For plants in large flowerpots, wooden floor racks are made. They support a lot of weight, allowing you to combine different types of colors.
A corner shelf is easily assembled from scraps, even if of unequal length. Blooming bushes diversify the boring life of the corners with their bright colors.
For lovers unusual options wooden shelves are offered for consideration, combining several different materials.
The assembly method for wooden shelves or racks is the same as for the plywood version.

When combining materials for flower shelves, we recommend choosing a combination of metal and wood. Welded metal carcass with wood flooring it is used for wall types of shelves and fits very harmoniously into a modern interior.
For manufacturing, you will need a drawing with measurements, several rods, which in the future will form the basis of the shelf, and a wooden board for the partition. After welding the main part, it must be treated with an anti-corrosion solution and painted in the selected color. Next, a prepared wooden board is installed, the finished product is attached to the wall with self-tapping screws.
Considering this combination of materials in floor options flower racks, the main work is done according to the same plan. Preference is given to options in several tiers, and lovers of sophistication will love the forged flower stands.

Main location glass shelves usually occurs in window space. On such shelves, all plants will receive the necessary portion of light. When preparing for work, it is necessary to choose the right glass thickness. The best option 0.5 cm. Having strengthened the lower part with a tree, such a structure can easily support up to ten small flower pots.
If handling a glass cutter causes some difficulties, it is better to seek help from knowledgeable craftsmen. By providing required sizes, they will easily complete your task.
In addition to glass, you will need iron corners with which the slats are attached. Shelves are placed on top of the slats.
Great importance is attached to the correct arrangement of flower racks and shelves. By following a number of simple tips, harmony is achieved between green space and the atmosphere of a home:
The use of flower shelves is not limited to the interior of the premises. Houses, apartments with balconies or loggias contain entire greenhouses. Owners of home gardens create incredible compositions on the territory. Refurbished stairs, bicycles and wheelbarrows are used as shelving. Teapots, watering cans and other old utensils can serve as a hanging shelf. These green spaces become one with the owners, and self-designed racks and shelves for plants are an integral part of a small flower paradise.


Sooner or later, many lovers of indoor plants ask themselves the question: how to place all the flora in the house?
You can solve this problem quite effectively by using various stands for flowers in your interior.

Buy whether ready-made stand and how to choose, or can order by individual design or make it yourself - it depends on your desires and capabilities. Even more recommendations are presented on the website http://clubsamodelok.ru

Florists know perfectly well what plants need certain conditions so that they delight with their luscious greenery or beautiful flowers. Some plants require more light, others less.
A correctly selected flower stand solves several problems at the same time:

Stands are floor and hanging (wall). Both are distinguished by a variety of designs and materials.

Floor stands for flowers can be for one plant, or for several. On single ones - as a rule, they have large flowers - palm trees, ficuses, hibiscus, etc.

The cache-pot of such plants is quite voluminous and heavy, therefore, the stand under it should be quite strong - wooden or metal.

On racks for a group of plants, light-loving flowers are placed at the top, and those preferring partial shade are placed under them. These stands are the most popular because they have the following advantages:

High stands for flowers are especially effective in solving the issue of compactness. There are vertical structures that are fixed to the floor and ceiling for greater stability.

Straight high supports also look original for one plant, which in this case receives the maximum amount of light, since it is located at the level of the window.

You can decorate an empty part of the wall with plants. To do this, you need a stand or shelf that is attached to the wall. There is a huge variety of such designs, for every taste and budget.

By the way, you can make a hanging flower stand with your own hands. You will need wooden planks and a thick rope. Drill in each board large holes under the pots and small - in each corner for the rope. Install the shelves by threading the rope through the holes and securing them to the knots.

Such a design using natural materials will perfectly fit into the interior of a country or country summer house. And if you paint the shelves in bright colours, it can be used in the nursery.

Advice! In wall or hanging flower stands, it is better to place ampelous plants hanging down.

The variety of materials from which flower stands are made is striking in its quantity. The simplest and a budget option Is plastic, sometimes using metal hollow tubes.

It is convenient to place such flower stands on the balcony or loggia, in the kitchen. Made in white, they look light and airy without overloading the interior.

Their plus is that the plastic does not deteriorate in the open air, there is no need to tint.

Wooden flower stands are also popular. As a rule, they are shelves, racks or whatnots. Both floor and wall stands are made of wood.

One of their advantages is that you can always repaint in the desired color when updating the interior. Wooden structures will be in perfect harmony with the furniture in the living room or bedroom.

They are also suitable for plants on the loggia. Often they place wooden or plastic flower stands on the windowsill when the hostess has a lot, for example, violets or cyclamens, which require the same amount of light.

Perhaps the most chic and sophisticated option is forged coasters. Here there is no limit to imagination, and blacksmiths, at times, offer simply masterpieces: butterflies on the wall, cats on the floor, as well as scorpions, bicycles, etc.

Forged flower stand can be made in classic style, and in Provencal, and in some exotic - oriental, Japanese, etc.

The most important positive features forged products Is strength, stability and durability.

Glass and metal shelves look beautiful. The metal base can be forged. But there are options for glass coasters on chrome tubes. Such flower stands are applicable in modern interiors.

Into the premises ethnic style, eco or country colorful wicker coasters will perfectly fit.

Looking at the numerous photos of stands for flowers, various in shape, color, design and material, you understand how interesting this interior detail can be.

In addition to fulfilling their main function, flower stands attract attention with their originality and beauty.


