Most of the owners of their own housing are chosen to install plastic windows not only because of excellent performance, but also due to the ease of installation. This process is simple due to the fact that the design provides very easy in the device fasteners and enough details that are included in the window package. Many are interested in how the installation of windows-professionals are made. With the most minimal skills of the tools, any housing owner is able to install such windows.
Of course, as when installing anyone constructive elementWhen installing PVC windows, you will need to comply with a number of features defined. It is advisable to perform this kind of work with the assistant, even if you have no construction skills, some difficulties may arise when aligning the window, if you perform this work alone. The correct execution of all nuances of the installation will help you carefully perform work and save on the work of employees.

Before purchasing windows, measurements should be performed - on the basis of these data you will make an order to the workshop. When performing measurements, you need to consider, with a quarter or not. For buildings from foam concrete, the openings are characterized with a quarter, which is much reduced by heat loss. For opening a quarter, when ordering fiberglass windows, the length will be 5 cm less than the same parameter at the opening. From the value defined as the width of the opening, 3 cm are subtracted. By contour, the gaps of 1.5 cm should be provided - they are necessary in order to marry. At the bottom should be left additive 3.5 cm for the mounting of the windowsill. According to GOST, it is necessary to leave 2 cm around the perimeter.
To make the right measurements for the opening of the quarter, the measurements must be carried out by the narrowest place. When ordering windows to a diedy width, it is necessary to add 3 cm, the length of the value does not change.

More often, the window structures from PVC are not satisfied with the middle of the opening, but to deploy from an external plane approximately 1/3. But if you are going to install the design yourself, the window can be slightly shifted at your discretion. To order sobs and window sills, you should certainly take these parameters. To the width indicators that are calculated for the intended location of the windows, add 5 cm.
When determining the width of the future window sill, it is necessary to take into account the battery - it must be closed by a window sill approximately halfway. Add 2 more cm - the windowsill will need to be started under the base of the window frame. In length, it is necessary to leave the reserve - the smaller 8 cm. But it will be much better if adding 15 cm - it allows you to cut the windowsill.
Complete to the lowers and window sills, plastic side plugs are usually attached. It is not worth refusing to refuse, although some masters come in this way.
Back to the category

The technology of installation of windows from polyvinyl chloride does not depend on how many internal chambers in the profile of metalplastic, or on the number of cameras in the glass packages. Consider when developing an installation plan will need the following points: Material from which housing walls are made, and the size of the window plastic design. Depending on this, the method of fastening and devices that will be used are determined.
Plastic window frames can be recorded in the opening using the following items:
More reliable of them consider the 1st option. It is often used in cases where it is necessary to install window systems with considerable sizes and weight. Window frames through mount It is quite well resisting a variety of shock loads that may occur, for example, during the operation of PVC systems with sash discovering in different positions. Anchors, passing through plastic frames through, make it possible to more precisely adjust the design when mounting and vertically, and horizontally.

Those who want to find out the method of proper installation of PVC windows that have small sizes, with deaf double-glazed windows may be interested in fixing the design using anchor plates. The fasteners will not spoil the appearance of the window - the slopes are closed.
To install anchor plates in the openings of walls of brick or concrete, it will be necessary to make a deepening. If you do not do, you will need to apply an excess leveling layer before installing internal slopes.
Sometimes installers try to combine these 2 methods. In the wall, the anchors are performed through the bottom profile, that is, the base of the window design and the side sides of the frame, and the upper part is fixed with the help of plates. If the installation of PVC windows is made in the bath built of wood, the anchor plates should not be installed - during operation they are loosened. In some cases, instead of anchors use galvanized screws.
Back to the category

The installation process will have a significant impact type of material from which housing is lined up. For example, for walls from hollow or full-scale bricks, foam concrete differences will be imprisoned in the depth to which anchor is installed. But to the openings in the walls of logs or BRUSIV, a special approach will be required. Here it will be necessary to take into account the installation method and choose the right time for this.
Plastic windows can be installed in the walls of wooden building materials only a year after the construction of the house. It is even better to wait 2 years - during this time the shrinkage process will enter the stage in which subsequent operation will be longer and reliable. In the buildings from the glued bar, the shrinkage period lasts faster.
Installation of the window should not be carried out immediately in the opening, as they do sometimes in the villages.
The plastic window should be inserted exclusively in a wooden box that will protect the window design from the skew. Self window block There must be deprived of any damage, unacceptable the presence of defects, rot. Before starting work, it should be processed by antiseptic composition.

After the PVC windows are installed on the seats, the shrinkage of the cut does not end. True, it will continue not so intense. In order for it to make a crushing lesion by plastic structures, it is recommended to leave the frame between the upper face and the window box of 3-7 cm. After the window is put in place, the gap is filled with a jute insulation and closed on both sides by platbands.
In the norms of construction, there are no accurate recommendations for which the materials should be placed and window sills in the houses from the tree should be installed. As a rule, set standard fits that are ordered in one set with the window design. The window sills are wooden and polymers. The bottom profile can be opened on the windowsill of a tree, that is, it can be installed before mounting the window.
Those who are going to install windows personally, but there has no special experience in this business, it can be useful as follows. Since wood misses moisture pairs, technical qualities mounting foamused when installing the window, are seriously reduced. In order for the foam, which is conceived along the perimeter of the structure, was not exposed to moisture and did not go well, along the line on which it is applied to the window unit should be applied to the tape from foil polyethylene. This nuance in standards is not negotiated, but experienced installers are very recommended when installing the window not to neglect such a snap.
Back to the category

Installation technology window structures The plastic includes such a moment as the use of mounting foam. In addition to providing insulation, it will give additional rigidity to the compound of the opening with the frame. Thus, a layer of mounting foam obtained as a result of its polymerization simultaneously protects the opening and fixes the design. In order to under the influence of adverse external influences, the foam layer would not have lost its technical properties, it is better to surround additional insulation.
Regarding when it is to insert the PVC windows, the decision takes the owners of housing. You can meet this opinion that the installation is better to make it not in summer, and in the winter - in this case, all flaws of installation will be immediately and can be corrected very quickly. When choosing a mounting foam for work, pay attention to information about the composition - there must be specified at what temperature you can work with this product. Calculation of foam will occur only at that temperature, which is indicated in its performance, therefore it should not be used to work in the summer time of the foam intended for use in conditions of strong cold, and vice versa.
On how to make a marking, you can read in the instructions that the manufacturer applies to specific products. Usually, the foam begin to bottom, gradually moving up. Movements must be swivel-circular. In order for expensive material to be spent smaller, foam is better to poison in several techniques, calculating the segments of about 25-30 cm.
To shift the dew point, perform the fudgement better with different density. In practice, it looks like this: the outer layer of foam is trying to seal less than the layer facing inside. The foam must be poured around the perimeter of the window frame as younger, without skipping and emptiness.
Back to the category

To install the PVC windows, you will need to prepare work before work. From the window opening before installing, any contamination should be completely removed: dust, construction trash, particles old paint.. With independent execution of work, masters should be aware that when installing a new plastic structure in a wooden window box, which was used in use, the top layer is better to completely comprise. It is not reliable enough, it is better to remove it completely in order not to disturb the clutch of the foam with the surface.
If the gap between the opening and window Rama does not exceed 4 cm, their filling is made only by foam. With a greater width of the lumen, it is better to fill them with partially by other materials, cheaper. It can be pieces of timber, plasterboard, foam, brick fragments and other construction waste.
Today, the PVC windows have become very common, and with them are wide popularity and those firms that install them are widely popular.
However, the installation of PVC windows does not represent any special difficulties, so it should not be afraid of such a job.

The whole process consists in several actions that require a sequence of execution:
It must be said that many of these stages are preparatory, so the whole process can be divided into the following types of work:
Back to the category

Before buying a product, you should carefully measure its necessary parameters. In this case, one should consider one characteristic of the opening:
A quarter is a special piece of block, concrete or other structure that serves to reduce heat loss.
If there is no quarter, then the window is made by 5 cm in short along the length and 3 cm shorter in width. This explains that in this case it is necessary to leave the gaps - 1.5 cm on each side, and below 3.5 cm for the windowsill.
It is necessary to say that in various documentation (standards) are 2 cm, and not 1.5 cm.
As for the opening, which has a quarter, then the PVC windows are ordered, which in the width of the width of the outlook itself by 3 cm. But the length in this case should remain the same.

In order for all the measurements to be faithful and the window later approached, they need to be carried out by the narrowest place.
There are subtleties and when choosing the size of the low tide and the windowsill. In most cases, the windows are installed by removing them by a third of the opening of the opening, that is, not in the center. However, the installation of windows allows you to make a choice in this regard. Accordingly, the windowsill is chosen on the basis of the resulting result.
It is only necessary to say that both sides, and the windowsill should have 5 cm more than it turned out as a result of measurements.
As for the width of the window sill, it must open the window on each side by 2 cm. When calculating the minimum reserve can be considered 8 cm, but it is better to make 15 cm that then these cuts can be removed in case of an unsuccessful first attempt.
Back to the category

So, when all the calculations are completed and the dimensions of all components are known, you can proceed to the preparation of the place where the product is installed.
At first you need to proceed to remove the old window. Make it can be done different ways. If you deal with the old wooden window, then it is better to do this:
Why do you need to remove glass? The fact is that the old windows are very often simply nailed to the windowsill through the frame. In the process of dismantling the fixed windows, the glass could simply crack and fall out from their places, which is unsafe. After the old window frame is dismantled, the whole niche needs to be cleaned of dirt, dust and paint residues.
It should be noted: the foam is best covered with fresh wood, so the old layer must be removed, which can be made with a planer, sandpaper or grinding with grinding circle.
Of course, it is necessary to do only in a tree niches.
Back to the category

Immediately I must say that some professional workers who have already established no one-tent of the PVC windows do their own hands, do this without disassembling them. Concerning independent work, Better adhere to the following recommendations.
It is necessary to free the frame from the sash. To do this, the pin is extracted, which is located in the upper loop. It can be removed by pliers and a screwdriver, carefully picing and pushing. After removing the pins, the sash is easily removed from the bottom loop. If the window does not have flaps, then it is necessary to remove the glass that can be done, deleting all the strokes. To do this, you can use a knife or spatula. It is inserted into the gap between it and the frame and the smooth movement are shifted to the side.
It must be said that such procedures must be performed only in the case of large products. If it is possible not to disturb the integrity of the new window, then it is better not to do.
From the outside of the frame, it is necessary to remove the protective film so that then there is no difficulty with this.
Then you need to put markup, that is, designate the place of attachment of the product to niche, regardless of which method is selected (they will be discussed a little further). It is recommended to hold a step in 0.4 m. The minimum distance from the place of attachment to the angle should be at least 15 cm.
Back to the category

Immediately I must say that the choice of the method should not be based on such parameters of the product as the number of sash and cameras in the double-glazing. The installation method must be selected based on the size of the product and depend only on the material from which the walls are made.
So, installation PVC Windows can be carried out by one of two ways:
Anchors and dowels fasten the frame to the wall. At the same time, in the case of the anchor bolts, the holes of the corresponding sizes are drilled with dowels.
Installation using these fasteners is good when it comes to concrete, block or brick Walls.

As for fixing reinforcement, it is usually used in the case of wooden walls. But it should be noted that this is an optional rule.
The essence lies in the fact that the plates are pressed into the profile and are installed in space to the wall. These plates themselves are attached with the help of ordinary self-tales.
If there is a desire to install plates on brick or concrete walls, then it is best to pre-cut the corresponding dimensions in them. This will help avoid unnecessary work related to the subsequent alignment of slopes.
Very often, builders in the process of installing windows use both methods at once, which is also permissible.
Back to the category

Installation of the window begins with the fact that the prepared frame is inserted into the niche or the entire window is inserted. Before that, it is necessary to put bar or plastic corners around the perimeter. They will help provide the necessary minimum clearance.
The frame is aligned vertically and horizontally, as well as relative to the center of the niche. Make it easily by moving these steamards.
Placement wedges or corners are best spaced under the fastening points.
This will give her extra rigidity and keeps out of the deformation at the time of attachment.
Since the installation of PVC windows may differ from the fasteners used, the installation technology will be their own. And the differences begin with precisely from the next step:

After prior installation, it is necessary to check the verticality and horizontal frame of the installed frame. This can be done with the help of an ordinary building hydraulic level or a plumb.
After checking the frame is fully fixed. In this case, the anchors are not very tightened. The final tightening time is determined by the moment when the anchor hat is leveled with the frame plane. Some builders recommend even leaving 1 mm.
Then join all dismantled on preparatory Stage Details of the window, i.e. glass or sash. After installation, they should be adjusted.
All gaps between the window and the opening are filled with foam. It often arises such a situation that the window is less than the opening so much that the gap remains greater than necessary. If this clearance does not exceed 4 cm, it is allowed to completely fill in with the mounting foam. If the gap is from 4 to 7 cm, it is recommended to fill it with a foam, consolidating the mounting foam.
When the gap is more than 7 cm (except for the case below), it is required to fill it with boards, bricks or other similar materials. Cement mortar is suitable.
The tump is installed on the foam. Additionally fastened with self-draws to this profile, if it was used, or to wooden bars.
Single is installed with a slope from the window.
After the foam dries, you can start the installation of the window sill. He will start under the "Donnik" for 2 cm. I must say that the window sills do not install strictly horizontally. This is done with the goal so that the moisture that the moisture does not accumulate on their surface. In order to create a slope of the window sill, it is also carried out on the installation foam.
After all installation actions are completed, the window should not be touched by another 16-20 hours. It is necessary, in order not to disturb the integrity of all the gaps, that is, do not shift the product relative to its initial position.
Previously, only wooden windows were installed in the houses, but in our time they produce not only wooden, but also.
And in the modern world, people often become in their homes or apartments to install plastic windows. So you, at some point they decided that the wooden windows are no longer so well kept warm, they are frozen and look, say, so, not very attractive and for this reason you decided to change the windows of the tree on plastic.
Installation plastic windows It is not easy, so this work is best to entrust specialists. But, if you are sure that you can install the windows on your own or you have some experience on the installation of such windows, then the installation can be installed on your own.
That's just how to correctly install the plastic window we will also tell me further.
The positive quality of the installation of plastic windows on its own, is that you will produce more carefully than many specialized workers. Still, if you do not have the skills of installing such windows and have never seen how it do, it is best to use the services of specialized workers.
Installation of plastic windows can be carried out in winter timeBut if there is no less than a minus of five degrees on the street. Otherwise, you need to install a special thermal screen.
Before purchasing a new plastic window, you need to make a window outline measurement and on received data Buy a ready window or make an order for the manufacture of the window. When you order the window according to your size, it will be perfectly fitted in the opening of your window.
The window should not be close in the opening, there should be a small gap between the window and the opening, as it needs to be expanding or narrowing, it will depend on temperature changes.
The minimum sizes should be such:
When you replace the window, you must consider that the window must enter the opening for the window, only for a certain number of centimeters. It is necessary that the glass package is not in the wall and to make the slope.
All measurements are made, all the nuances are taken into account and the desired window profile size is obtained. Now you can go to the company and order a window or take a ready-made suitable one.
After you have already bought a window and weather allows its installation, you can make it installation. It must be borne in mind that all the work will be rather dusty, so all things are better removed or covered with a film.
After you have done all the preparatory work, start disassembling the old window, and to remove the old window, use the chisel, mate and the hammer.

Before installing the plastic window, it is necessary to remove the window to remove the window from the dirt and slightly moisten it.
Then you can proceed to the preparation of the window to the installation.
Before installing the window profile, the sash with the windows remove and remove the windows from the deaf parts of the window. Then you need to unscrew the protective tapes outside the profile and set the protective caps in the drain hole. On the self-tapping screw fastening for the grid from mosquitoes.
If you decide to make an anchor as fasteners, then the profile is drilled through and therefore the chambers are unloaded. Still fastening windows on an anchor requires more labor costs and skill and for this reason such fastening is not suitable for beginners. If you do not correctly fasten the profile, it may be a story, and if he behaves, the window will be spoiled.
But the anchor attachment has positive qualities, such as the design, will be durable. But the negative quality of the mounting plates is that they do not provide good strength of the structure. But the mounting plates are the easiest view of the fastening of plastic windows. Very often, experts use both types of fasteners.
The next step of work is the installation of low tide.
We make it measurements and with the help of scissors for metal cut the desired size, then in the bottom of the frame, glued a special tape, it is needed to protect the seam between the wall and the bottom of the window.
After the tape is glued, the layer is applied to it. Also the layer of the mounting foam is applied to the edge of the slab it is necessary in order to ensure the sealing of the low tide. The tump should enter the profile grooves and is attached by self-drawing.
Then the mounting foam closes the seam between the wall and the window (first from one side then from the other and above). After the foam dried, one more insulating tape is glued on top of it. From the inside of the window, you must remove the protective tape and use special lining when installing the glass.
With the help of the planks hold the glass, hammer the planks in the grooves and install the sash, fix it in the canopies, then fasten the handle and adjust the sash horizontally and vertical. After all works install a mosquito net.
After all the works begin the installation of the window sill.
In this article we told how to make the installation of the plastic window and we hope that this information was useful to you. Good luck and patience!
In this article, I will tell you in detail how the installation of plastic windows is performed with your own hands. I will give a similarity instructions for installing windows, which includes dismantling the old window and all the details of how to properly install plastic windows into an old or new window opening.
I will say right away that nothing is difficult in how to install a plastic window itself, no. This is not required to have special skills or expensive professional equipment. The technology of installing plastic windows is quite simple and consists of dismantling the old window and installing a new one. By the time, the dismantling of the old window takes from 30 to 90 minutes, and the installation on its place of the new plastic window is another average of 2 hours (the middle window, up to 2x2 m). Total, you will have 2.5-3.5 hours to replace one window. Agree, this is not a lot. So, if desired, approximately, for some weekend, you can independently replace the windows with your own hands, changing 2-3 windows per day. Savings will be about 40-60 $ on one window. It is so much today's services for replacing windows. Sometimes the price of installation is set as the percentage of the cost of new windows and is in various regions and firms from 10 to 40% of the cost of new metal-plastic windows. Dismantling of the old window and delivery of the new, as well as the decoration of slopes, if you order the installation of new windows, most often are made free.
If you still decide to entrust the installation of windows to builders, then below I will list those warranties that you have the right to demand:
When the installation of windows is running with your own hands, then you have the right to demand the guarantee for the organization where you buy windows. And the responsibility for the seams and their filling remains at you.
One will say exactly if you have some free weekend, hard work and the desire to save, then following the recommendations that I will describe, below, you can replace the windows in your house no worse than any mounting brigade. Moreover, the word "brigade" applies to the installation of windows, very conditional. Since, in fact, the installation performs 1 person, and one more - just gives the tools and sticks the window at the right moment.
To order plastic windows from the seller, you need to make preliminary measurements.
To do this, you must first determine what you have a window opening - with a quarter or without. For clarity, in the figure below, I cite a schematic view of the opening with a quarter (a) and without (b).
Window opening circuit with quarter and a quarter
Measure windows without a quarter
Installing a quarter window is as follows. If your home has a new one, then the windows are mounted in an empty window opening. And in order to order the window you need from the size of the vertical opening, take 5 cm - it will be the height of your window. And from the size of the opening horizontal, take 3 cm - it will be the width of your window. Subsequently as independent installation The windows of these 3 cm will be filled with mounting foam (1.5 cm each with each side of the window). A 5 cm is 1.5 cm from the top of the window to fill the mounting foam and 3.5 cm on the window sill under the window.
It is also necessary to make measurements of the length and width of the windowsill and outdoor slope and add to these dimensions at least 5 cm so that the windowsill slightly "crashed" to the right and left to the wall. For an inexperienced installer - it is possible and 20-30 cm to take into a margin, is unnecessary cut when installing. In general, the windowsills and the lowers go a unified width (10, 20, 30, 40, 50, 60 cm) and length (up to 6 m), but you, in any case, should provide minimal dimensions so that you brought the most suitable windowsill and sings from available.
We measure the size of the window opening horizontally between the quarters in the narrowest place. Add 3 cm to this size (1.5 cm with each side of the window). It will be the width of our window. And vertically simply measure the distance from the bottom of the opening to the upper quarter, we do not add anything to it and do not take away. It will be the size of our windows vertically. The windowsill and the tump measure the same way as in the Option version without a quarter.
Thus, we get 6 sizes:

Dimensions of the plastic window
If your home is not new, and an old window is still installed in the window opening, then measurements are made in the same way. Just behind the window opening, you take the external dimensions of the window frame, as it will need to be dismantled.
By ordering the window, be sure to check if the kit includes:
If not, they should be ordered separately.
Also, when ordering the windows, in addition to its size, such important characteristics as:
To date, there are two ways to install metal-plastic windows: installation of windows with unpacking and mounting without unpacking the window.
.png)
Plastic window diagram
So the installation method of the window with unpacking involves pre-disassembling the window: the strokes are removed, the double-glazed windows are removed from the frame and set aside during the installation of the window frame, then the frame is attached to the wall through the dowels, after which the windows and strokes are installed back.

Installing a window with "Splitting"
Installation without unpacking does not require removal of double-glazed windows and staps, as the frame is attached to the wall not throughout, but with the help of the fastening elements in advance on its outer surface.

Installing the window without "unpacking"
At the same time, the installation method with unpacking has several drawbacks.
For example, mounting with unpacking sometimes leads to fogging in the process of operation. Removing and re-installing the strokes, especially without any experience, is often reflected in their appearance (visible scratches, chips). Double-glazed windows at the time of installation of windows must be put in safe place for their integrity, otherwise they can be inadvertently broken, especially if you leave near the installation site. The installation method itself is more time-consuming and takes longer than the installation without unpacking (on average, the installation of each window will take 30 minutes longer, and if you install plastic windows for the first time, then by about 60 minutes).
The installation of plastic windows without unpacking is deprived of the above disadvantages, since the glass packages are not required to remove from the frame.
Now, as for the strength of the attachment. The method with unpacking is considered more durable, especially if we fix the frame through the wall to the large long anchor. Therefore, it should be stopped if:
In private houses, where windows are usually installed standard medium sizes, and the floors rarely exceed 4 floors, of course, it is better to choose the method of installing metal-plastic windows without unpacking. Fastening strength without unpacking will be more than enough.
And considering that our site is devoted to private construction, then we will analyze in detail more suitable for low-rise construction method for fastening the plastic window - without unpacking.
In order to understand how to install the window, - toratko will list the main stages of installation, after which we will focus in detail at the main stages:

Performing propyl when dismantling the old window wooden frame
Then, in parts, we take it off with a score, a perforator with a "blade" with other handicraft tools.

Dismantling of an old wooden frame with a perforator and scrap
Sometimes the wooden frame is left, if it is in good condition. But it is better to dismantle it and attach to the wall material. Then the size of the light window will be greater, and the mount is more reliable than to the tree, and the wooden frame will not rot with time.
If a window with opening (not deaf), then during installation, the window must be in the closed position. This is very important, since if the window is open, for example, to ventilate, then the foam, which we will later fill the space between the frame and the window opening, will abnoun a semicircle frame. In the closed position, the window must be at least 12 hours after the fading. Then you can open. In order for the window to be accurately closed, the handle is desirable just not to install until the end of the window mounting. Otherwise, someone from your household will be able to discover the window when you go to a couple of minutes. If there is no handle, it will be just nothing to worry about.
Do not remove the protective tape from the surface to the end of the window installation process, and if you separate the slopes, then before finishing the finishing works.

Scheme and photo of the appearance of the undergrade profile
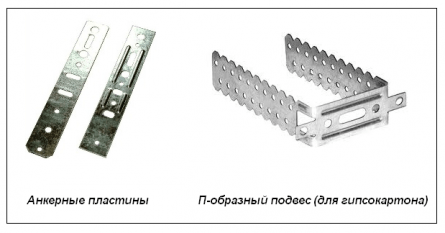
Fasteners for mounting windows in window opening
That's just the value of them about the same - from $ 0.05 (with a wholesale purchase) to $ 0.15, and the thickness of the metal, while, often different: anchor plate usually goes with a thickness of 1.1-1.5 mm, and P-shaped Suspension from 0.5 to 1 mm. The thicker metal, of course better.

Fasteners for plastic windows made from P-shaped suspensions

Embossed in the window opening of recesses under fastening elements
Important: If you have a window without a mounting plank, then inserting it into the opening, it needs to be lifted to the height of the window sill, so that later the windowsill could be started under the frame, and not attach it to the junction with the window frame. To do this, put under the frame of the tree lump, pieces of foam or brick. If the window with the mounting bar, then do not need to do this. The mounting bar just lifts the window frame to the height of the window sill. It is not necessary to mount the mounting bar on the frame, it is usually supplied in the already fixed form.

Installing the window in the level

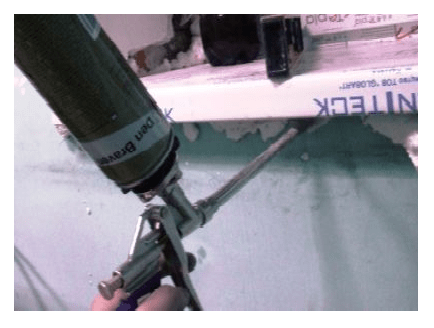
Filling the construction foam space between the frame and window opening
It is very important that the filling was 100%, without emptiness and interrupts. At the same time, if the gap between the window and the opening is greater than 2 cm, then it is desirable to bother for some time with a break of 1-2 hours. Then the expansion of foam is not a "destructive" factor. And saves foam that would have to cut. If the installation of windows is performed at a temperature below than +5 degrees, the mounting foam must be used winter or all-season. If the temperature is above + 5 degrees, the usual summer mounting foam is suitable.
After foam hardens, it must be closed from ultraviolet. Since this can already be called part of the work on the discovery finishing, then this work can be postponed until the dissection finishes. But if you do not plan to separate them at all or, you plan, but later than in a month, it is better to close the foam at once, since under the open rays of the sun and foam will come into disrepair. We close it either with a strong cement-sandy solution (cement: sand - 1: 2) or tile glue (for example, Ceresit cm 11.) or special tape Pits (vapor-permeable self-insulating sealing tape). The only ribbon is so pretty expensive (about $ 3 per mp), so the first two options are used more often.

Trimming windowsill to the desired level

Installing the window sill in terms of level
The plugs are better to establish with the calculation so that they go into the wall. And it is desirable to glue them to super-glue, as acrylic and silicone are not glued.
As a result, the windowsill should be set up in two horizontal directions and do not live anywhere (check, pressing hand). Sometimes the windowsill are installed with a slight bias "from the window". It is done to condensate that can be formed on the window does not glare under the window. And if such a slope is to do, then very small, only about 3 degrees.

Load plastic window sill Heavy subject
If the windowsill do not cheer, then the foam will bring it up.
Joining construction foam cavity under a plastic window sill

Z-shaped galvanized steel plates for setting the tight fit of the window to the frame
Now you can fasten the handle to the window and remove the protective tape from its surface. If there is still a finish of slopes, it is better to remove the protective tape after their finishes.
They are a bit, but they all eventually affect the service life of the window, as well as the convenience of its operation:

Open mounting foam
I hope that this article will help you to save on the installation of plastic windows in the house, as well as make this simple work properly and without errors so that your windows serve you for a long time. If you decide to contact the services of an assembly organization, then you will be easier to understand what the builders do at each stage of installation, which will allow you to control the process with the knowledge of the case.
ATTENTION: All prices are shown for 2011.
The PVC windows that are more often called double-glazed windows, today are extremely popular. What is not surprising. Such structures have a lot of advantages over the old standard wooden windows, which today for the most part not only have a sufficiently unsightly appearance, but are not capable of performing functions assigned to them. So they seek the owners of the apartments to replace outdated designs to make their home inside the warm and quiet, and outside are beautiful and modern.
To date, the cost of services of professionals in the field of construction and repair is extremely high. Perhaps this is exactly what is explained by the fact that now many are trying to carry out similar works on their own, not paying for help from specialists. Of course, not everything can be done with your own hands, especially in the absence of appropriate skills. However, there are works that are quite on the shoulder to the home master, despite the seeming complexity. Among those - and installing PVC windows. Almost every home-grown sample can independently carry out such a procedure. The main thing is to competently follow the technology of the process, thoroughly observing all its requirements. What, in fact, it is simple enough if there is an instruction for installing PVC windows before your eyes. Competent and detailed. And if there is no such, we suggest you familiarize yourself with our article in which we want to tell in detail about what is the procedure as the installation of the PVC window with your own hands.
Installation of PVC windows - work, to carry out many homemade masters are afraid due to the emergency complexity of the process. It is worth noting, completely in vain. This is not difficult, as it seems to be somehow. Moreover, when installing double-glazed windows, no special toolkit is required. So, almost the usual set homemade Masterswhich is available in every home (in more detail on it we will stop just below). The procedure itself includes several stages, including the preparatory. If we generalize, it looks like this: first you need to spend correctly all measurements in order to purchase the "right" double-glazed windows; Then you need to prepare for the installation of the opening, to install the windows and accessories attached to it; After that, to improve the slopes. All these procedures (excluding the latter) take away from professionals for only two or three hours. The home master, of course, will have to work longer, but during the day it can well cope with the task. But so PVC is still half of the case, because after the installation still have to mess with slopes, then it is better to count on a few days. Say, devote weekend to this case.
So, begin. With measurements.
To install the PVC windows with your own hands, it is necessary to correctly calculate the design dimensions. The fact is that the double-glazed windows will have to be ordered, as it is easy to go to the store and buy them is unlikely to succeed. You can, of course, call the company's specialists who are engaged in the production and installation of windows, however, first, it will have to pay for it, and secondly, such firms, as a rule, have comprehensive services - ranging from measurement and ending with production and installation Each PVC windows ordered from them. Prices are almost all today, due to tough competition, the same, and for the installation usually take about 30% of the cost. As a rule, on average it is about $ 50. And if you decide to save, you have to do everything yourself. Including calculate the size of the future glass package. And to do it right, you need to first study the old structure and directly the way it is, because it happens two species - with the so-called quarter and without it. This is a special design that is present on the sides of the opening. To find out, it is necessary to first remove the cash from the old wooden window. And then measure the width of the old frame at first from the side of the room, and after - from the side of the street. If the result is the same - a quarter is not. If the difference is available - it means there is a similar design. From here and dancing.
In the presence of a quarter, the height of the future window will be the same as the outlook itself. But the existing width should add three centimeters. With its absence, the glass should be shorter than five centimeters and already three. This difference is the so-called gap. When installing PVC windows, it is necessary, since the installation of such structures is carried out using foam, and it takes place between the opening and directly the frame itself.

Well, in the event that it is a new building, then at the moment the technology of construction of houses does not provide for the presence of such a structure as a quarter. That is, you will have a clean window opening in stock. Boldly measure it sizes vertically and horizontally and go to the company of the PVC windows. There, experts themselves will hold all the necessary calculations.
Since the correct installation of PVC windows is impossible without additional elements, then when ordering structures should certainly pay attention to it. Plus, you need to additionally provide additionally to the glass package, special seal, installation profile and a windowsill with a tump. As for the last two additions, here you need to know some nuances.
These elements are available in several standard options (width). Therefore, it is enough to measure the existing old design, and then choose the right one. As for the length, it is better to take elements with a reserve at least twenty centimeters. All the unnecessary you can trim when the installation of the PVC window itself will be directly. Well, both low tissue, respectively.
After the design of the ordered and agreed, the time can be processed. Of course, the window opening from the old frame you can only be released immediately before installing the new glass package. No need to explain that it is impossible to sit in an apartment without windows. The installation time of the PVC window, as we have already mentioned, is about three hours from specialists. Let you and prote, without experience, all day, but the old frame must be removed, of course, only before starting the installation of a new one. But to prepare everything you need for the process should be in advance.

So, what do you need?
When the PVC window is installed with their own hands, then the master should be available in the presence of a certain and, most importantly, a mandatory set of tools and materials, without which the installation process cannot be implemented. Therefore, the acquisition should be taken:
This is the basic set that is required when it is carried out. simple installation PVC windows. If it is planned to mount the design using, it is necessary, naturally, to take care of their acquisition. It should pay attention to their strength. It is advisable to buy fasteners made of thick metal, as the installation of PVC windows, which have quite high weight, and not some light suspended structures.

So, new windows delivered to you, it means that you can proceed to preparatory work. First of all, you need to free the room from furniture. Installing the PVC window with your own hands - a procedure that requires a large number of free space, so we remove everything that is possible from the room. After that, you can proceed to the dismantling of the old design. Naturally, it is possible that PVC will be held in the newly built house with new window openings. In this case, this stage, naturally, omit. However, most often homemade craftsmen are interested in how to install the PVC window instead of the wooden framework. And for them, the information presented below will be extremely valuable. Although there is an approval that it is much easier to break than to build, however everything needs to be done with the mind, in order not to damage the window opening. By the way, he will suffer enough without this, so try to make the procedure for dismantling as gentle as possible.
If a wooden design So old that the glass is literally hardly falling out, they need to be pre-removed. For this, it is fairly first to remove the stap glass glass. If it is still quite durable, then you can try to remove the existing flaps with the hinges together with the glass. However, be careful. It is better to get rid of the glass, in order not to damage the chance of their skillful hands. As a result, the window should remain a frame without sash and windowsill. Arm yourself with a hacksaw or, which is even better, with a grinder equipped with a circle of concrete, and suck the old frame in several places. Then remove it in parts. In the end, the windowsill will remain. Enter the same way with him. First drink, and after - Broken. The sill may deliver the windowsill, not made of wood, and from concrete. In this case, it will be necessary, of course, tinker. And best will help to cope with the problem of a jackhammer. In the absence of the latter, the brandy and perforator wrench.
After the old window is removed, carefully inspect the opening. Remove all sticking pieces of fittings, plaster wreckage. In general, make sure that, despite a somewhat unsightly look, it will be a reliable basis for a new design. Well, naturally, remove all dust and dirt.

Professionals install PVC windows almost always without disassembled them. Which is understandable, because they already have a considerable experience. The home master is better to be renewed and remove the opening flaps with the loops, and the glass windows themselves are directly removed. Many are afraid of this procedure, nevertheless there is nothing complicated in it. To remove the sash, just remove the pin, which is located in the upper loop. To extract it, it is enough to have only pliers (picked up and pulled out). And then remove the leaf from the bottom loop. As for the glass, there are no difficulties here too. This only at first glance the PVC window seems to be a monolithic design. In fact, it has exactly the same as in a wooden, strokes. This is a plastic frame located on top of the glass. They are enough just to pick up a knife and push out the grooves. After that get the glass.
Of course, it is not always necessary to install large structures. In private houses, sometimes replacing a single-handed small window. In this case, you can not pumped out and proceed to the installation, without disassembling it.
After the window is prepared, you need to remove the protective film from the outdoor side. Everything. You can proceed directly to the installation.
There are two of them. The easiest is the fastening of the frame directly to the way with the use of dowels. The second is the installation using anchor elements, which first mounted to the inside of the frame, and then attach to the impact. Professional masters in some cases combine both presented methods, which does not contradict the requirements of technology. We will try to tell in detail about the other option.

At first, on the bottom surface of the opening, that is, in the place where the windowsill will be located, building wedges unfold. The prepared frame is inserted into the opening, align with building level And spend marking. That is, they note on the wall location or holes under the dowel, or fasteners. Then the frame is removed. Next, the algorithm of actions depends on the selected method of installation. If it is planned to be mounted on a dowel, then in place marks are drilled by the corresponding hole with the corresponding diameter. In the same cases, when the installation is provided with the use of anchor plates, professionals recommends first to express deepening under them, and then drill holes for the tapping screw. Why do you need it? Yes, so that these same plates do not perform very much over the surface of the slopes. If this happens, this will noticeably make it difficult to finish.
When everything is prepared, again insert the frame. Just before you need to sneak it on the sides of the hydraulic tape. Then they fix the frame on the sides of the construction wedges, diligently align. After that, finally fastened (or dowels directly, or self-reserves anchor fasteners). Moreover, specialists are not recommended to strongly delay these elements. It is better even if an anchor hat or dowel will perform at a millimeter above the surface. As soon as it becomes clear that the design is durable and exhibited exactly in terms of the level, the removed glasses and sash are returned to the place. After that, with the help of mounting foam, the gaps on the sides and on top, not forgetting to remove the clins.
As for the foam itself. Fill should be carefully so that no emptiness remains. Nevertheless, it is not recommended and doing this with an excess. Therefore, it is best, especially with the fact that this is a debut of a home master, conduct this procedure with small breaks. Filled half meters - they walked a little, at least twenty minutes. Foam has a property to expand over time. And if you are mistaken for the first time, then the subsequent will be much easier to regulate its feed.
From the outside, after the end of the installation, the window is installed. On the same foam. And for greater confidence, they are also screwed up with self-drawing to the construction wedges, which, as you remember, remained with us to stand below the design. As for the windowsill, it is first measured in length, and it is unnecessary. After that, insert under the bottom edge of the frame. It is enough to have a window sill below the window for only two or three centimeters. From the bottom the windowsill is married.
Important! If there is a very big gap between the windowsill and the lower edge of the window opening, then it is not recommended to fill it with foam. It is best to pave wooden lumps. Or even bricks. And then to secure the construction of foam, without forgetting, naturally, to set it up in terms of the level.
On this installation process can be considered completed. Now, for a day about a double-glazing, it is better to forget to forget and not touch it, so that, clapping without the cause of the flaps of the new window, do not disturb the integrity of the design. After that, you can proceed to removing excess foam and finishing the slopes.
There are some nuances that are due to the fact that wooden buildingsDue to the characteristics of the material from which they were erected, they are able to give shrinkage. Logs are capable practically moving when the temperature drops, contributing to the deformations of the window and door openings, walls, etc. What can cause the appearance of all sorts of flaws in double-glazed windows. It is for this reason that in the first year after the construction of the construction is not at all their installation. PVC B. wooden house, In addition, it is not mounted in directly the window the opening itself, but in a special design. It is called casing. Simply put: first is manufactured special wooden frame From well-dried material. Then it is inserted into the window opening, aligns and fixed. After that, the PVC window is already mounted. This will reliably protect the glass unit from the deformations and the appearance of flaws. What, you see, it is very important, especially if you consider the cost that PVC windows have. Prices even on the most simple designs, even if you are not translated, but still impressive - on average, a small window costs about two hundred dollars. And under such protection, no shrinkage is not scared. The only thing to take into account is that the clearance between the window and the casing. Experts recommended to leave more - at least 5 centimeters on each side. In the same rest, the process of installing the glass package is the same as described above.

The glazing of the balcony also has some specifics. If a holistic design is inserted into the window opening, then the Balcony Rama-PVC consists of several parts that need to be bonded with each other. This is done using anchor rails, and some experts additionally recommend losing the place of joints with liquid nails. Since the lower part of the windows is installed directly on the railing, then it is necessary to carefully check their integrity and strength thoroughly. And if necessary to carry out the necessary repair work. After that, build a frame from wooden bar, firmly fixing it all over the perimeter of the balcony. Then the visor is fixed on top from the outside. Next, the PVC windows are mounted, which are attached directly to the bruus. At first install the front group, after which they go to the installation of lateral. As for the fastening method, it is used by any of the two, described above, to their own discretion. The only thing to take into account is that it is better to make at least four fastening points on the sides, and from above - at least three on one window. The gaps are also ridiculous, after which the opening is installed outside, and from the inside - the windowsill. As you can see, everything is quite simple.
We tried to tell the most detail about how to install the PVC window into a concrete opening, in a wooden house and on the balcony. As you were able to make sure there is nothing complicated in the procedure. In the presence of skillful hands, it's easy to cope with it. We hope that now, after reading you detailed instructionsThe installation process will be easily and fast.


