If you decide to build a fence with your own hands, then surely the ones of independent construction is the task of saving money or at least not to overpay for the construction of the fence. Today you can easily find a lot of tips on the network on how to independently build a fence, among them there are many useful, but there are also quite a lot of strange and harmful councils (about them at the very end of the article). Actually independent construction The fence is not a technical task, it is rather difficult physically. As the saying goes: "Do not burn the gods in the pots!" Regardless of which you gathered to build a fence, the basis of this construction will lie down the installation of columns. The choice of pillars for the fence will determine its strength and cost, and the correct installation of the posts will determine the durability and neat appearance fence.
In this article, we want to talk about several main points underlying how to build a fence with their own hands and how to avoid the most common mistakes.
If you choose a fence poles by price-quality ratio, then the optimal choice There will be precisely metal poles for the fence. They are inexpensive, lungs, durable and durable (provided if they were initially covered with primer and painted). In addition, it is precisely metal poles for the fence that are the most versatile, which can serve as the basis of almost any fear. For example, later, as a cloth of the fence, you can use a metal-pile sheet or boards. As for the fence columns themselves, they can be set as a brick (provided that the base of the pillar is concuped).
Now a few tips on what is worth paying attention before buying iron pillars for the fence.
Remember that the higher the fence is more dense, the higher its sailboy (the property of the object to perceive the kinetic energy of the wind). In the fence, which uses a metal-wide sheet - the highest sailboat. During the strong wind, the pillars will experience heavy loads and that such a fence does not pushing the wind, you need to be burned to be buried at least by 30% of your length. The second point that affects the choice of pillars to fence one or another length, the height of the fence is planned. If it is planned to use a metal-mill height of 2 meters, then the length of the post must be at least 3 meters, while it is burned to the ground not 1 meter, but by 1.2-1.3 meters (the top edge of the pillar does not have to be on one The level with the top edge of the fence).
Do you need to concrete pillars for fence or can you just bury? You can and so - at your discretion. Concreting Pillar bases is preferably in cases where you build a fence with high sailboat and / or you do not have the opportunity to drill the lower edge of the pillars to sufficient depth.
If you decide to build a low fence with your own hands, then you do not necessarily concote the base of the pillars. It is enough to dig a holes that have dimensions exceeding the cross section of the pillar and having a depth above the depth of the injected part of the pillar. On the bottom of the pit flooded sand, then gravel, it's thoroughly tram. Using gravel, you can adjust the installation of the post in height. Next, the pillar is exposed exactly along the fence line, observing the strict verticality of the pillar. The line and the height of the fence is usually set by installing extreme pillars and pulling the cord between them. The verticality of the pillar installation is checked by applying a level to it alternately in two, mutually perpendicular planes. If you do it yourself, for the first time and without helpers, it may be more convenient for you to use 2 levels at the same time, having taken them to the installed post with a painting tape.
The pit around the post falls asleep with sand and rubble having a fraction no more than 20-40. All this will be trambed.
In general, the rules for concreting fence pillars are no different from the rules of concreting of the rural foundations.
Remember that in cases of frosty powder, the water contained in the ground, freezing - expands. The soil begins to expand. Theoretically, such an extension should occur evenly in all directions, but in fact it goes up. This extension goes so to speak along the path of the smallest resistance, as the lowest pressure (only atmospheric) acts on top of the soil. Expanding up, the soil is trying to captivate everything, with which it comes into contact. From here make conclusions. In order for the spring the election poles to be partially squeezed out of the ground, you can do the following:
In this case, buy a pipe with such a length that will be multiple the length of the final columns. This will allow you to cut it without waste that will save you money.
Remember that the tubes for intamine pillars have not only parameters as the length and cross section, but also important parameter As the wall thickness. The wall thickness will largely determine the durability of your fence. After all, metal, in any case, is subject to corrosion and the thicker it will be, the longer will last. However, it is necessary to remember that it is highly dependent on the wall thickness.
Be sure to close the upper end of the finished pillars for the fence in order to prevent the rainwater post from entering the post. If the posts are filled with rain water - they will rust from the inside, and in case of freezing of water inside the post, the pillar can break. It is possible to close the upper end, or weld from above the steel plate, or shutting a pillar with a special plastic plug.
Poles must be painted, but before painting it is desirable to cover a primer pillar. If there is such an opportunity, you can cover the primer and the inner part of the pillar (at least its lower part). It is possible to do this by partially immersion of the pillar into the tank with the primer. To do this, it is possible to make a narrow capacity in the form of a sleeve made from a tube a little longer cross section than the cross section of your intake pillars. This sleeve must be drowning down and you will get a narrow container in which you can pour primer and dip the bottom of the poles.
If you suffer from giantomania, you can additionally cover the lower part of the pillar of the bitumen-polymer primer.
The thing described above relates only to metal pillars for the fence.
Some "opuses" do not look anecdotic. Below are two screenshots from the whole set of similar "jokes". Increase them and read the selected text.


We remind you that you can buy pillars for fences by best prices In St. Petersburg from our partners. Their prices for metal poles for fences (both square and round-section) are published on our website in the "" section \u003d\u003e ""
Installation of columns is one of the most important stages of construction. Supports do not give the fence to fall, they depends on how much he will just try whether it will not break away from the wind, whether it will protect it.
In the "professional fences" we pay a lot of attention to the installation of pillars. There is no universal recipe here - the type of installation and materials depend on the peculiarities of the site. In the wooded terrain, the runs can be done less, and the supports are not buried too deep. But the bumping soil requires the removal of groundwater, steppe windy areas - concreting or gaskets of the foundation. Therefore, we recommend consult with a specialist before starting the installation of pillars to fence with your own hands.
For a constant fence, we advise you to take metal poles: they are durable, stand for 40 years, do not break, do not rot, and install themselves much easier than to do brick masonry. Another option is a tree, but wood is suitable for temporary solutions. Long it will not last.
The distance between the columns (run or "step") is 2-2.5 meters, for a chain grid - up to three. What he is less, the more stable the fence to the strong gusts of the wind, so see in circumstances. The grid has low sailboats, the air passes through the cells, without creating a strong load on the support, but the solid professional leaf has a high sailboat. The wind presses on the poles. Over time, the hedge can glance.
It is important to take into account how much the soil hesitates in the fall and in the spring. In the summer, the soil looks dense and dry, but if it is taking place for autumn, and the supports are installed without fortifications, then the fence will simply fall.
Work begins with the markup of the plot around the perimeter. The remaining pillars are the first to put into the other.
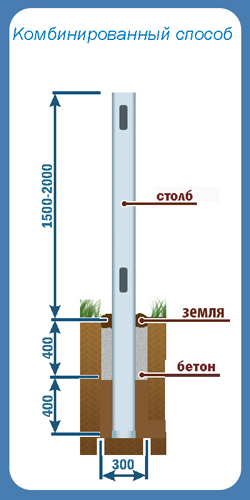
The most universal way to install pillars for the fence with your own hands is a bouting, which is still known as dry cementing. This is a falling asleep with rubble or brick fragments with a subsequent layer in the rambling.

Bouting is good because it struggles with seasonal swelling, with the freezing of soil and subsequent thawing. You can visualize this: fill the bottle with water to the edge and put in the freezer. The volume of ice is higher than liquids, so when you start unscrew the plug, the lifting water immediately rushes out. The same happens with the soil: in winter, the water in the ground freezes and pushes a pillar of support as a plug.
With this, it is possible to fight the supports below the level of freezing, and you can not risk (because the winter may be chosen colder than usual) and immediately make competent bouts. Moreover, it is one of those methods of installing pillars to fence with their own hands, with whom you can handle alone.
The optimal depth is 150 cm, of which 20 cm leave on the lower layer of rubble. The pillar is put on a peculiar chubne-sand "pillow", which does not allow the support to immerse itself below the permissible level. It also needs to be tamped.
To dig the holes are used by Motobur or manual drill. It is possible to work and the shovel, but the hole will turn out the imperfect form, it can be a curve, inconvenient in work. In diameter, it must be centimeters on the 20 wider post.
After the pits are ready, the post is put inside.
Fucking material - rubble fraction of 0.5-20 mm, but lumpy bricks, which makes the construction of the fence is very cheaper. It is important that the pebbles are about the same size.
The rambling is carried out in layers: 20 cm rubble, mixed with sand, - careful rambling - another 20 cm of a falling material. So that the layers were denser, they are watered with water. It can be traaming manually, and you can use vibrons, which will achieve an optimal density level.
So that the support does not squint, temporary struts are attached to it, which look like pieces of wood on both sides: they hold the pillar in the same position. After the end of the work, you need to make a hillside - she will stop falling.
By the way! Crushed stone leaving transmitting. If the fence glanced, just repaired it, rebuilding yams.
The second way to install pillars under the fence with your own hands is scoring. It is suitable for clay abnormal soil, not prone to swelling, the main thing is to drive the support for at least 1.5 meters.
A hole is drunk or digging - its diameter should be less than supports: so the ground will fit it tight. It is necessarily a mark on which the immersion depth is measured.
Can be carried out in three ways:
The driving, unlike the bouting, requires at least two pairs of hands. Someone must hold the pillar in the same position, control so that it does not twist. And be careful, work with a proven sledgehammer, which definitely does not scatter and does not injure.
Now more about the "grandmother" and Koper.

"Grandma" - metal pipeequipped with lid, weights and handles. She puts on with a support from above, after which the worker raises her and lowers with pressure. "Grandma" beat on the pillar and drives him to the ground. The design may be a bit different, but the principle is always the same: metal trimming, washers, weights, giri, ideally, should be 10-15 kg), it should be 10-15 kg). It is easier and safer than a sledgehammer job.
Copher - a machine that a series of blows drives the pillar to the ground. The worker remains only to observe and transfers the puffy from place to place. It is capable of piercing asphalt and concrete to a depth of 3-4 m, it often use road workers to install signs and traffic lights. Neither stones nor dry tight soil will prevent him. It is worthwhewing Copher Nedo, but it can be rented.
The third way to install metal columns to fence with your own hands, about which we will talk about, concreting. The solution is prepared from the ratio of 1: 3: 5 - cement, sand and rubble, respectively.
The principle of operation is the same as when driving:
Sustainability is obtained above than with ordinary clogging, but it will only suit for relatively light hedges. If the soil is badly absorbing moisture, heavy and clay, then with time, the supports can glance. Therefore, for heavy fences it is better to use complete concreting, and even better - a combination of concrete and a falling material.

Here the principle is similar to that:
As an option, the fossa can be partially concerned, and on top of pour cement. It is important to prevent the appearance of air pockets in cement. For this, the solution is rambling: skews the metal rod.
An interesting way of formworking concrete is used abroad: these are cardboard tubes-dies, which are flooded with cement and put in a hole dug in advance, after which the pillar is immersed in concrete. Over time, cardboard dissolves, but the shoe remains the perfect round shape.
Whatever it says, concreting is not a panacea. In practice, we came across the need to redo the slaining fences that melt soil waters simply pushed out.
Finally, the last method of installing posts for the fence with their own hands is the creation of a full-fledged belt foundation. This is the most difficult, long and expensive way, it will suit the installation of heavy fences, for example, from brick and forged metal. The more the fence, the wider there should be a foundation tape (30-80 cm), the deeper it must be laid (60-80 cm). Supports are laid deeper than the main foundation: they need "wells" at least 90 cm. The company "Prof-fences" offers the construction of a ribbon foundation, subject to the order of the fence from us.

We recommend using concrete M-300 or M-200 class B15. In addition to him, you will need sand and gravel to create a pillow and reinforcement bar 8-10 mm diameter to make a frame of reinforcement, as well as plywood and formwork boards.
The process is:
Supports for the construction of fences can be metallic, concrete, wooden, brick ,. Do it yourself such pillars can anyone. Their installation does not represent a special complexity and quite forces even to lovers. Proper installation Pillars for fence implies a sequence in stages of work and compliance with the required technologies.
Installation process concrete pillars fence
The fence is erected in the calculation for many years of operation. The more correct it will be made, the longer will last. For this reason, the installation should be taken with no less responsibility than, for example, to the construction of the house. Most fences are structures consisting of supports, foundation, sectional filling.

Scheme of a brick fence device
We think about how to install pillars to fence with your own hands, it should be understood that it is this part of the construction that bears on itself the main burden. The stability of the support provides the entire fence the necessary rigidity, durability and preservation of the initial type. Competent exercise mounting work Determine the quality of the design and will allow you to do without repairing the fence for many decades.
When installing the columns, you need to understand with your own hands that the depth of the holes under the poles and the method of fixing piles have a huge effect on the level of resistance to the loads. It is these parameters that are responsible for the safety of the vertical of the fence.
Putting can be performed from both the sections used in the design and from any other material. In this matter, the main role is played designer ideas And the preferences of the owners.
Most often, the following errors are allowed during the construction of fences:

Wooden Pillar Installation Drawing for Fences
Errors made on and pillars lead to the cooler of the supports and the fence collapse after five years of operation. Those who solve their own hands to build a fence on the site, it is necessary to give the device of these elements (supports) special attention.
Since the types of fence are much, then the pillars are selected different. They also differ by the installation method. Choose the type of foundation and supports follows from the type of fence and used in its construction materials.
Poles of support are made of various building materials. This allows you to build such a fence with your own hands, which will be perfectly harmonized with the architecture of the surviving buildings and landscape design territory.

The process of installing metal intake pillars
The selection of this or that option depends on the individual taste of the owners of the site, as well as on their financial capabilities. Today, you can buy inexpensive finished pillars for the fence made by high-quality and modern technologies.
The most popular types of pillars for the fence: 
Installation of support poles with your own hands should be made with regard to the type of soil. So, for example, if the soil is non-empty, sandy, then it is best to use. To do this, the pillar is inserted into the well, which is leveling in terms of level and is fixed with concrete. For bunching soils, this method is not recommended, since with time the soil is able to push the pillar from the wells, which will cause the deformation of the fence.
The soil is bugged suggest the installation of support in the pit, dug below the soil freezing level.

Pillar installation scheme in bunched soils
They additionally get an extension. In this case, in this case, almost half will fall into the ground, while a lot of concrete mortar, building materials and labor costs are consumed. This option refers to the most efficient, but not economical.
Installation of pillars by concreting does not apply for sand soils. In this case, the wells are manufactured by the diameter of the pipes themselves by drilling holes. But the drilling of vertical wells requires experience. The universal installation method can be called the installation of pillars in the wells large in diameter than the supports themselves. The space remaining empty is falling asleep with small rubble and bricks. This option will ensure the design good drainage.
The most economical are considered to be made by their own hands.

The fill process of a curb concrete
The main characteristics of such products:
The manufacture of concrete pillars at home requires special forms, concrete mix And space for drying. Can be made of polyurethane, metal or fiberglass. The cooked fresh solution is simply poured into such a template and it is withstanding it to frozen.
Before pouring a freshly prepared mixture into the form, it is treated with special lubrication. Over the entire area of \u200b\u200bthe template, the associated fittings are uniformly. Special inserts, which will be used as fastening sections, are installed in the lower and upper part of the pillar at the same distance from the edge of the distance. In the prepared form, the solution is poured into one reception.  It needs to be thoroughly dissolved and tamped. Seven days later, the pillar will be ready.
Also are an economical option. Most often, such supports are made for. They can serve several years, but require constant care. The advantages of such poles include:
Those who thought about how to install poles for fence from wood should be started with the choice of the right wood variety. Preference should be given to bars from oak, pine and larch. They should be without a bark well dried. The optimal humidity of such a lumber is not higher than 15%. Good bar There is no bitch, bundles and mold traces. If the bars are deployed or scrolled, it means that they were incorrectly dried.

Detailed installation scheme of fence pillars from wood
If there are plots with a bark on the material, then there was most likely the insects have already found themselves. All material should be treated with antiseptic impregnations and means making them resistant to ignition.
Installation steps:
It is important to remember that the insufficient depth of the hole can cause the fence collapse.
The lower part of the support should be treated with a primer with an anti-corrosion effect. At first, the pillars are installed in the place of rotation of the fence (at the corners).

An example of processing and installation of pillars from a metal profile
Then it is necessary to mount additional supports, for example, in the places of height drops (on the steps). Drops up to 25 cm can be safely ignored. After installing the angular and additional supports, the intermediate supports are fixed. On average, the intermediate pole step is about 250 cm, but not more than 300 cm.
Before installing support in the pit, 15 cm of fine rubble are poured. So that the supports stood smoothly, they must be checked by level and maintain the backups. It is also necessary to constantly check with a plumb testimony, which will help determine the vertical of the supports. Row of columns check for verticality with stretched rope. After fixing the metal columns into the pit, concrete is poured.
Click to enlarge
The fence from the professional flooring is the most common type of fence for country areas. The design of the fence consists of the profession itself, supports and lag.
The installation of the fence from the corrugated floor is not a great difficulty and does not require the use of special equipment and expensive equipment.
Many are interested: How to put a fence from the professionalist alone, without the involvement of specialized brigades. Even a person without experience, it is easy to do this, for this you will need only one girlfriend from home or friends.
To carry out the installation of the fence from the professional flooring will be required:
For the implementation of calculations by the number of material will help.
If you install the design yourself, then the fence from the corrugated floor without installation will cost you only at the cost of materials.
First stage of work - Preparation of the territory. You must mark the markup for the columns. The optimal distance between the columns is 2 meters. If the fence is low - one and a half meters, you can increase the distance to 2.5 meters.

Perfect pegs on the places where extreme supports and supports of the portal group will be. Then the place of rotation of the fence is noted: there is also a pegs. After that, pegs are installed marking places to install the remaining supports.
After performing markup, it is necessary to align the territory on which the line of the fence and stretch the twine between the pegs.
 Poles can be installed in several methods. The correct installation of a high fence involves a device of a belt-pole foundation.
A combined fence from the professional leaf with brick columns is installed on such a foundation with the basement.
there is different variants Installations of the fence from the professional flooring of the simplest type:
If you want to make a fence from corrugated with your own hands with a standard up to two meters high in the middle lane on non-empty soils, the most convenient installation technology is a bout. This method will protect the support from the impact of frosty powder.
To set a pillar, you need to dig a hole to the depth of one third of the above-ground part of the support. On average, it is 0.7-0.8 m for the middle strip plus 5 cm for a crushed pillow.
For higher fences and bunched soils, the depth of the well can reach one and a half meters. The diameter of the wells must be 10 cm more pipe diameter.
After installing all columns, it is necessary to align them in height with the level and additionally, if necessary, score a sledgehammer. If the fence is put for a long time, the pipes can be concreted from the inside to reduce corrosion processes.
When concreting, it is necessary to stumble the concrete to stack a piece of fittings to drive all air bubbles.
Pillars of the portal group are installed on ribbon foundation. Correct installation The fence of their professional flooring serves as a key to the long fencing service.
Lags can be mounted in two ways: welding or bolts. The welding seam is rather unstable to corrosion processes and requires the ability to handle the welding machine.
Bolted connection is more reliable and more durable. Lags are attached at a distance of 20 cm from the top of the support and from the soil. After installation, they must be carefully painted.
Professional official needs to be attached together with the assistant, ranging from the gate. Each sheet is installed vertically and attached to lags by self-drawing with the help of an electro-screwdriver.


Two self-pressing sheets on the edges, and one in the middle on the lag. The subsequent sheet is placed on one wave of the mustache.
After installing the professional sheet, it is necessary to close the supports on top of plastic plugs. This will prevent water from entering the pipe.
If the professionalist is raised above the ground, even 5-10 cm, the territory of your site can penetrate small rodents, dogs and rabbits that will disturb your peace. And from you, on the contrary, the chickens and other homework can escape.
But if the sheet rests on the ground, he will start rust. Therefore, after the end of the installation of the fence makes sense to make a bilateral concrete break with a bias on his line. She will protect corrugated from rusting and the rainwater will go further from the fence. On this, the installation of the fence from the proflist can be considered complete.
If you are interested in installation, you can see photos and video of the installation process presented on our website.


