Who among us, seeing in front of us beautiful, old, chopped houses, decorated with intricate carvings of openwork platbands, with rich kokoshniks on the roofs carved like a royal crown, did not admire the fabulous beauty that has come down to us from time immemorial. But to see such beauty and admire her is one thing. And making a fabulous palace out of your home is not an easy task.
And the point is not even that someone lacks the skills of an artist or lacks imagination in the construction of twisted patterns, a snag in the fragility of external wooden elements and structures. Unfortunately, wooden platbands and carving elements retain their original appearance for many years, only in internal, dry rooms. In an external humid environment, wood quickly warps, cracks and chips, especially in places of fine carvings. The external environment, the sun and rains quickly destroy paintwork, forcing it to spend more money on paint and repaint everything every two or three years.
Despite some difficulties that may seem at first glance, you should not give up the desire to turn your gray house into a teremok. The abundance of materials in hardware stores allows you to replace wood with a more durable material. In this master class, you will learn how to make carved window frames with your own hands replacing wood with flat iron.
Flat iron, or flat sheet, as it is correctly called according to the factory classification, it is a thin sheet (thickness 0.40-0.70 mm), which comes from the factory in rolls of 20, 30 and 50 meters. The standard factory width of a sheet in rolls is 1 meter 25 centimeters. Flat iron is dyed in different colors, from white to dark chocolate. All iron sheets are covered with a protective film that protects them from scratches during transportation.
For the manufacture of carved window frames, we need:
Starting to manufacture window frames, it is necessary to make and install slopes on the windows in advance. One option is white iron slopes.
After we make and install the slopes, we remove the exact size from the window, taking into account the edges of the slopes protruding onto the walls. When the size is removed, we calculate the width and length of the platbands. Standard width 30-35 centimeters, the length of the window plus the width of the casing.
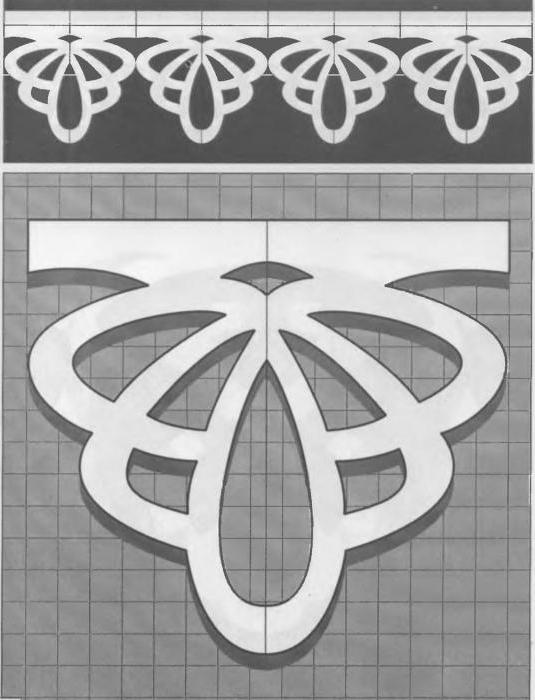
Having removed all sizes, we make templates for the platbands from any smooth roll of wallpaper. Having chosen a sample of the drawing, we prepare two templates. One long side and one short for the bottom and top of the window. Fold the cut out strip of paper in half and draw a sketch so that the center of the pattern is formed at the fold. When the drawing is cut, its second half will automatically be ready, so the correct even template will turn out.
We prepare workplace, for this we put two tables, of the same height, next to each other in length, leave a gap of 7-8 cm between the tables, this is a place for working with an electric jigsaw. Platbands are made of two metal colors (the simplest option). The upper invoice color will be white, and patterns are cut out on it. The second color is any to choose from, this is the background lining under the upper carved sheet.

We take a sheet of flat iron, cut the strips for the platbands of the required width.
We turn the blanks of the upper overhead part of the casing face down, and on reverse side fixing the template with paper clips, we translate the openwork pattern of the platband.
When the drawing is ready, we take an electric drill, insert an 8 mm drill bit and drill through holes at the edges of the drawing for a jigsaw file and start cutting out the platband.


We cut out the platbands for the iron windows.
We put the strip of iron on the table so that the cut out part is in the center of the table, and we begin to cut the pattern along the contour.
Having cut out the upper part, we proceed to the manufacture of the lower, background part of the casing. To do this, we also cut the iron sheet into strips of the size we need, taking into account the edging. The width of this sheet should be 4-5 centimeters wider.


Turn the sheet over face up. We put the finished upper blank of the casing face down on it. We circle the outer edging along the edge of the picture 4-5 cm wide and start cutting.


Having prepared both blanks, remove the protective film from them and put them on top of each other.
We fix them with paper clips and make 1-2 holes with a 3-4 mm drill. We make a control coupling with a riveting manual machine so that the parts do not disperse. After that, we drill and rivet the entire structure. The window frame is ready.
After the platbands are made, we begin their installation on the wall, here you will need a ladder or stepladder.
When installing platbands on wooden wall you will need:
When installing platbands on stone walls, we need:

Platbands are fitted close to the edges of the protruding window slopes and are attached to the wall.
Then all cracks and uneven places are coated with mounting silicone. And the heads of nails or screws with a thin brush are painted over with paint according to the color of the casing. The work is ready, carved platbands are installed on the windows.
On multi-storey buildings wooden platbands are rarely seen, but in private construction this is the most common element. Modern private house can be made original and stylish by installing homemade carved frames on the windows. In the old days, unique patterned platbands were installed on each house, which were not only decorations, but also served as amulets. Today in Russia there is a tendency to revive traditions, and many owners prefer to put a beautiful wooden cashing instead of "boring" metal-plastic frames. In this article, we will tell you in detail how to make a carved platband with your own hands.
Modern platbands are made not only from wood, but also from metal, plywood, PVC and laminated MDF. Plywood and MDF products are not intended for outdoor use, since they are not able to withstand temperature extremes, humidity and exposure to ultraviolet radiation.
Useful: the correct name for the external elements of the window trim is cashing, and the casing is called the inner framing.
What are the functions of cashing:
The platbands have no drawbacks as such, but there are a number of features that you need to know in order to install them correctly and extend their service life. So, wooden carved platbands will sooner or later deteriorate from the influence of the external environment - after all, the tree does not last forever and eventually collapses from moisture, frost and sunlight. But at the same time, treatment with anti-corrosion compounds will extend the "life" of beautiful homemade structures.
It is very important to choose the right type of wood for the manufacture of platbands, as well as to process all areas with high quality. It is necessary to regularly monitor their condition, timely replace damaged parts, tint the surface, etc.
If you plan to install wooden casing on plastic windows, you need to carefully choose the pattern and color, otherwise such a design will look ridiculous. But often wood and plastic are simply incompatible. It is better to install wooden double-glazed windows, wood-like lamination or paint the platband itself white.
To make carved window frames, you need to decide on the installation method and the type of the structure itself. So, there are telescopic and overhead platbands. Telescopic ones are often installed not on windows, but on doorways. Special L-shaped projections are made on them, which slide into the grooves of the box. This is a rather complex connection, but the result is a very nice and harmonious framing of the passage.

Overhead platbands are attached to window frames using weather-resistant wood glue or nailed. Very often, the cashing is complemented by carved shutters, which make the facade of the house even more picturesque and authentic.
Since the encashment is placed outside the house, it must be made of the strongest and most durable wood to withstand the impact the environment... For the manufacture of carved platbands, the material must also be malleable so that intricate patterns can be easily cut out.

What to make a platband:
To choose a template for a carved window frame, you need to determine what you want to achieve or demonstrate with this pattern. If you just need to "revitalize" the facade, you can choose a not too complicated pattern, especially if you need to make cashing for windows in all buildings on the site. This will save you time and effort.
If you want to emphasize with the help of carved platbands belonging to an ancient family or any nationality, to reflect the cultural heritage of your homeland, we recommend that you study traditional motives and symbols. Moreover, each region, moreover, each village or city may have its own distinctive features.
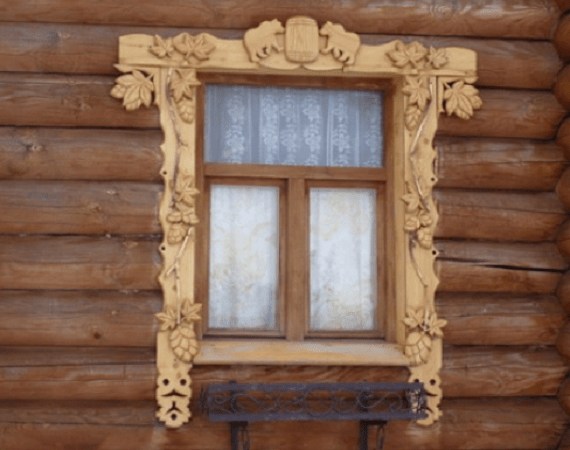
If possible, arrange all windows with the same platbands. The threads may differ slightly, but the same motifs must be present. For example, on kitchen window there is a platband with a deer framed with flowers, a bear surrounded by the same flowers can flaunt on the window in the living room, etc.
Below we will show several examples of patterns of carved platbands, but in order not to repeat someone's work, you can copy only part of the drawing, supplementing it with your own patterns. This way you can be sure that your windows have a unique frame.


Useful: if you are dealing with wood carving for the first time, practice first on a separate piece of wood of the same species from which the platbands will be made. Hone your hand positioning skills, basic movements and cuts. Video tutorials and tutorials for beginner woodcarvers will help you do it quickly and correctly.

The easiest way to make patterns with round holes, because they are fairly easy to drill even for a beginner. If you want the platband to last as long as possible, give preference to templates with large elements, moreover, they are easier to cut. Small parts will require much more time and skills, and will become unusable earlier, since moisture and small debris will accumulate in them faster.
Important: in the upper part of each platband, it is imperative to make a slope so that snow and water do not accumulate on the surface of the tree. Just a few degrees of incline, and moisture will quickly drain down, and the surface will dry out faster.
The laudable desire to do everything with your own hands requires not only knowledge and skills, but also special tools. In the case of woodworking, you will need a large set of chisels, a hacksaw, sandpaper of various grain sizes, a router bit, a drill, and a jigsaw. In addition, stock up on impregnation to protect the wood from insects, weather-resistant varnish or paint, stain, if you will tint the wood.
To make the same pattern on the trims for all windows, prepare a stencil. It is better to cut it on thick paper, cardboard or plastic.
Important: place the stencil pattern along the grain of the wood so that the thread does not crack, and place the places where you need to make through holes with colored dots.
There are two ways of carving:

Step-by-step instructions for making a carved wooden platband:
The durability of the cashing depends not only on the correct processing of the carved elements, but also on competent installation her on the windows. For this, two types of fastening are used: a deaf or through thorn. With the method, a deaf thorn in the casing is fastened with thorns, and voids of the corresponding shape are drilled in the window profile. Weatherproof glue is applied to the spike and inserted into the hole. This is a rather complex mount, but very durable and neat.
To do through fastening, install the spike in the most inconspicuous place of the casing and fix it. This method is less reliable and durable, but it is much easier to implement it.

However, it should be borne in mind that these fastening methods can only be used for wooden windows... For fixing carved platbands on plastic or metal-plastic windows use special high-strength glue or liquid nails so as not to violate the integrity of the profile.
At the very beginning of the article, we mentioned that earlier, carved wooden platbands were used not only as protection and decoration of the house, but also as protective amulets for residents. The application of certain symbols and ornaments protected the family and created a barrier to evil intentions and black witchcraft.

In the old days, our ancestors believed that evil power penetrates into the house precisely through doorways and windows, so they tried to protect these places by all possible methods. The most widespread and "reliable" way to protect homes was to apply magical patterns.
Even today, most of the templates for platbands posted on the Internet can be found with these protective symbols, but now they play more of a decorative role. If you want to make not only an aesthetic, but also a useful element on the windows, you can combine various security symbols with decorative elements. It should be borne in mind that each country (region, village) has its own traditions. So, for example, it was customary for the Scandinavians to apply runes, and for the Slavs, a subject image (animals, plants, birds) is characteristic.

Images on platbands helped not only protect houses from evil spirits, but also strengthen or develop certain qualities in a person. So, floral ornaments have always meant unity with nature and love before Mother Earth. Wings meant strength of mind, and the bird fully personified the unity of times. The snake symbolizes wisdom, and the cross said that the owners of the house strive to maintain harmony between the spiritual and material world.


The old tradition of making and installing carved frames on windows in a wooden house was remembered relatively recently, when the first boom in the construction of log cabins from rounded logs and beams took place. Having lived for several years in a new wooden house, the owners almost always begin to treat it as a living being, so it is not surprising that on the windows and entrance doors amazingly beautiful carved patterns began to appear from wood, serving as decoration and protection at the same time.
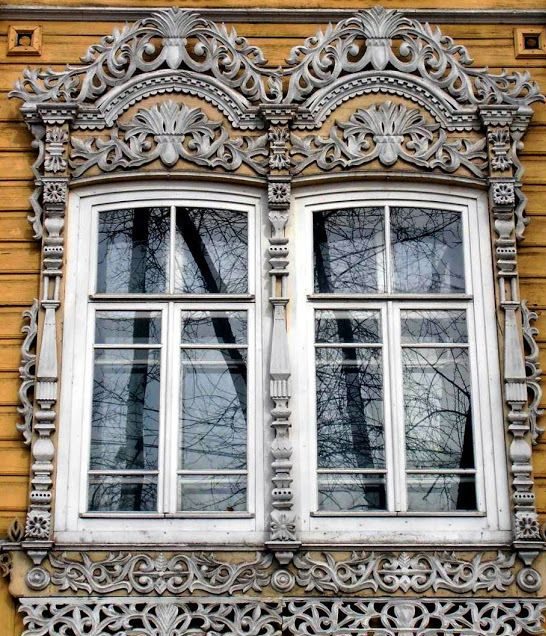
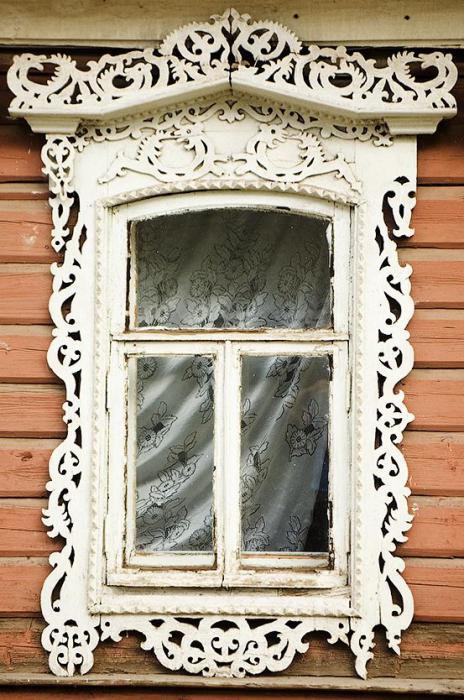
Most experts dealing with the culture and history of wooden architectural monuments note that carved window frames, photos, are almost a status item. A house without carved patterns looks like a wooden hut, even if it is very large and beautifully decorated, with platbands - it turns into a tower.
Traditionally, carved window frames are installed for two purposes:
For a wooden house, builders traditionally offer window frames made of wood or metal-plastic window profiles complete with a double-glazed window. Ordinary plastic PVC trims can also be ordered in a carved version. Just choose a pattern or pattern, most likely, will not work, carved plastic window frames are made according to traditional patterns by stamping and only give the look of handmade.

Advice! Today, many restoration workshops and firms have at their disposal three-dimensional milling machines, capable of automatically cutting a pattern of any complexity from polycarbonate, foam and epoxy plastics.
Such work will not be cheap, but the quality of the carved platbands for plastic windows will be even higher than manual cutting. It remains to choose a drawing and a pattern.

About the third task of the casing on the windows, rarely any of the owners of the house can tell more or less clearly and reliably. We are talking about protective functions that protect a wooden house from the "evil eye", diseases and uninvited guests. You can treat beliefs and traditions in different ways, but taking into account the specifics of choosing a pattern for platbands in your home will obviously not be superfluous.
It is clear that any self-respecting owner will not hang the first platbands on the windows of a wooden house, the process of selecting a theme and pattern can be delayed, so you should not abuse the use of symbols whose meaning is incomprehensible or unknown. If the mystical and culturological part of the carved platbands creates psychological discomfort, you can treat the carving as a way to decorate the window openings of a wooden house.
It was no coincidence that they were invented to decorate the carved platbands, and they were carefully kept and passed on practically unchanged. Most master woodcarvers cut just like copiers, so you will have to plan and decode the drawing on your own.
Advice! In any case, before using carved wooden platbands on windows with patterns and pictures of incomprehensible content, it makes sense to try to understand the meanings of carving elements, patterns and figures.
For example, figurines and images of animals have always symbolized positive wishes for the house of prosperity and well-being:
It was not customary to depict pets and figures of people, especially in the same canvas with climbing plants and flowers.
More modern designs on carved wooden platbands usually have a traditional, regular pattern.

It can be intertwining flowers, leaves vine laid in a regular pattern. In the carved compositions of the 18th-19th centuries, more modern images of columns, porticoes and drops, used in the wooden architecture of that era, have already appeared.

Most of the carved platbands are ordered from master carvers. If you wish, it is not difficult to make carved window frames with your own hands according to templates or ready-made schemes... The simplest lines and drawings can be transferred to a workpiece and cut out with an engraving attachment; you will have to tinker with more complex schemes and remember drawing lessons at school.
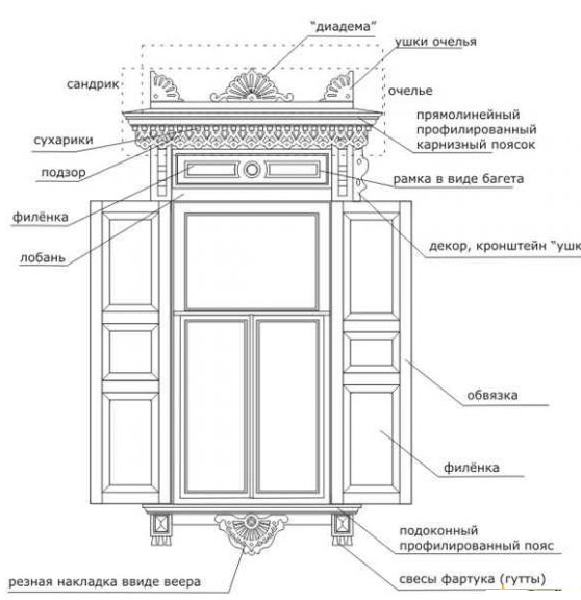
The upper part of the platbands was called an ochelya, this is the most complex and beautiful part of the decor, on the one hand, the ochelya set the general tone of the carved composition, on the other hand, it served as a visor over the window opening. At the top of the composition there was a diadem symbolizing the rising sun, and in the center there was always a medallion or crown made of plants. The lower part of the window was covered with a carved apron, usually in the form of an open fan.
If the mystical and culturological part of the carved platbands creates psychological discomfort, you can treat the carving simply as a way to decorate the window openings of a wooden house.
The usual intertwined pattern of vines or flowers will be far from any mystical content, while the beauty of the platbands and carvings of the frame of the window of a wooden house will only intensify. Carved platbands with a regular pattern have a serious advantage over a complex multi-tiered composition:
Therefore, before making carved window frames, choose a simple pattern for yourself, with a minimum of individual details. Even the most uncomplicated pattern on the facing strips can transform the appearance of a wooden house window beyond recognition.

Wood carving has always been and remains a rather expensive undertaking, therefore, instead of buying ready-made platbands, cut or stamped on furniture equipment, you can try to make decorative strips with simple patterns with your own hands. At home or in a carpentry workshop, you can use one of three methods:
Before you try your hand at making carved platbands, you need to choose suitable material... For carving and engraving, you will need hard types of wood, beech or oak is well suited, pine or spruce is slightly worse, poplar and aspen are not suitable. You can use a regular floorboard to cut the overlay pattern, but the material should be free of knots, defects or intricate weaves.
To make the simplest patterns, you can use the simplest patterns of intertwining plants, flowers, grapes. In fact, it is a flat tracing paper from more complex carved reliefs. This pattern can be used to decorate the vertical side trims of the casing.

To decorate a window, you need to look not for regular, but single patterns, for example, a composition of symmetrically located figures or interweaving of plant stems.

The same pattern can be translated into a contour line and turned into a flat ornament that can be easily cut out of plywood, boards or even MDF board.

The most complex relief or volumetric patterns are made by typesetting method. Initially, ordinary wooden platbands are made from planks, individual elements of the cladding are carefully adjusted to the size of the window and assembled into a finished frame.

All other decorative elements are sequentially cut out of wood, cast from a casting polymer or cut out from MDF board, after which they are sanded, primed and glued to the prepared frame.

Most often, patterns for window decoration are cut from waterproof OSB slabs in the form of overhead decorative elements. Initially, on tracing paper, a piece of graph paper and with the help of the program, the necessary template for the drawing is developed.


Next, you need to make a working template, with which you can transfer the pattern to a wooden substrate an unlimited number of times, photo. To do this, a drawing printed on a printer is glued to a fiberboard sheet and cut out with a slotted nozzle for a drill or with ordinary metal scissors.
After marking the wooden blank, you can start cutting the casing. The easiest way is to make cuts with a jigsaw on a joiner's workbench.

Along the line of the cuts made, you need to carefully remove the chamfer with emery paper so that during further processing the front surface of the carved pattern does not chip off. If a fairly thin strip was chosen as a blank, then the cut out carved part of the decor can be glued to the fabric base.
In the same way, small overhead elements in the form of rhombuses, squares, rings, braids are cut out. After sanding, the cut out elements are grinded on an electric grinder with a stone for grinding wood. With the help of a circle, you can quite simply give a rhombus or any other geometric figure the required shape, form faces or transitional curved planes.
After gluing the decor, the carved platbands are primed with hydrophobic impregnations and aged. This is done in order to remove the whiteness of freshly polished wood. For this, solutions of salts of iron, copper, chromium are used. As a result, it is possible to choose the color and shade of the carved platband to match the wooden window frame. It remains to open the tree with varnish or oil impregnation and install the carved decor on the window.

Very often the owners wooden houses instead of making new decorative elements, they prefer to buy old carved platbands preserved in villages, abandoned houses and buildings. Often, the cost of a set of carved platbands for three windows of a building facade is cheaper than hand carving of one platband by a modern craftsman. In some cases, among the old décor, one encounters real works of art made by hand by the masters of the last century. Such carved platbands are usually deeply restored and installed not on the outer parts of the windows, but inside the room.
Fabulous beauty that has come down to us from time immemorial. It is visible to everyone in old, beautiful, log houses, decorated with interesting carvings of platbands with openwork patterns and rich kokoshniks located on the roof, and it delights many modern people. You can admire such beauty for a long time, but creating it yourself is a very difficult task. However, with a strong and irresistible desire, you can make carved window frames (templates) with your own hands.
The question is not that you need the skills of a real artist or imagination to create geometrically correct, interesting, ornate patterns. The problem is more that products made from natural materials, for example, from wood, are rather short-lived due to the influence of external factors. The disadvantage of wooden platbands and carving elements is that they can retain their original appearance for many decades if they are stored in dry rooms inside the house. And the humidity outside will quickly provoke the tree to warp, crack and, possibly, even cause chips to appear in places where the carving is thin. Any paintwork is inferior to ultraviolet rays, and rains only aggravate the overall picture.
This leads to the need to paint the product every year, constantly spending money on the coating and spending a lot of time on labor. Not to mention the fact that you will have to repair or even replace such carved templates with your own hands for these products can be made from various materials.
This moment can cause difficulties, but do not get upset ahead of time. There is always a way out, how best to create a cozy and pleasant atmosphere and improve the appearance of the building. Modern technologies made it possible to create a variety of materials that are more resistant to environmental influences.

Moreover, in all hardware stores, they can be found in abundance. You can, for example, use flat iron instead of wood. With its help, you can make durable and no less beautiful carved window frames in this case, you need it in the same way as in the manufacture of this decorative element from wood.
Flat iron or sheet, as it is customary to call it, given the factory classifications, is a thin sheet, the thickness of which is approximately 0.4-0.7 millimeters. In the store you can find rolls of this material from 20 to 50 meters. The standard width of such a roll is 1025 centimeters. It is customary to cover this material with various colors, and you can find both light and dark tin. In addition, each sheet of iron is covered with a protective film, which allows it to retain its original characteristics during transportation and does not allow scratches and dents.
To independently make carved from flat iron (patterns can be seen in this article), you will need the following materials and tools:

Before you start creating carved window frames, you should make and install high-quality window slopes. This is necessary for removing the correct dimensions and in order to make carved window frames with your own hands. Drawings can tell you how to do this correctly. This is done taking into account the protruding edges of the slopes overlooking the walls. After all dimensions have been removed, it is worth calculating the characteristics of future platbands. The standard width of this product is approximately 30 centimeters.
Next, you need to choose any smooth roll of wallpaper in order to make carved window frames from it with your own hands (templates, of course). When the pattern is selected, you will need to prepare three "patterns". One of them will be longer, it is needed for the side symmetrical parts, the second and third, respectively, are shorter, for the upper and lower parts of the window.
The cut stripes must be folded in half, and so that when the sketch is drawn, the center of the pattern corresponds to the fold. This manipulation will save time and reduce the likelihood of errors when creating a template.
The fact is that during the cutting of the pattern, both halves of the template will be created at once, in other words, this will allow you to create perfectly even and correct carved frames on the windows with your own hands. In this case, pattern drawings will not be used as often as when each part of the workpiece is drawn separately.
To create the perfect workplace for further work, you need to slide together two tables, which will be the same height. You need to leave a gap between the tables, which will be about 8 centimeters. This distance is necessary for the operation of an electric jigsaw. For the manufacture of platbands, metal of two colors is required. This combination is the most simple option... You can change this parameter if desired.

The overlay top color, for example, will be white. It is on it that patterns will be cut. As the second layer, you can choose a material of any color, since it will not be visible anyway, since it is used exclusively as a lining for the outer layer of the product, which is called carved window frames. We make templates with our own hands, we will remind you again.
You need to take a sheet of flat iron and cut it into strips to create the trims of the desired width. It is necessary to turn the blanks of the upper overhead part face down, and also turn to the reverse side after fixing the template with paper clips. After that, the openwork pattern is transferred to the material.

After the picture is displayed, you will need an electric drill with a drill with a diameter of 8 millimeters. You need to drill through holes and start cutting out the platband with a file and a jigsaw. Next, you need to put the iron strip on the table, and it is important that it is located clearly in the center of the table. This will allow you to cut out the drawing clearly and evenly without compromising the overall picture.
After the top part has been cut out, you can move on to the next action, which is responsible for creating the bottom part, which will serve as the background. To do this, you also need to cut the material into strips with the required width and length characteristics. At the same time, do not forget that the part will have an edging, that is, the width of this pattern should exceed the indicators of external blanks. Ideal option in this case, there will be an increase in width by about five centimeters. Reversely, turn the sheet over - so that the front side is on top. Next, you need to put on this part the upper blank of the casing, which is located face down and circle the outer edging along the edge of the picture, taking into account the indent, and after that you can start cutting out the part.
After both blanks have been prepared, you need to remove the protective film from them and put them on top of each other. After that, the parts should be fixed with paper clips. Next, you should make one or more holes with a drill with a diameter of four millimeters. Using a manual riveting machine, you need to make a control coupling of the parts, thereby preventing them from diverging. Having carried out this action, you can begin to drill and rivet the entire structure.
Everything - the product is completely ready to use. You can proceed to the next stage - do-it-yourself carved window frames. We made templates for them earlier.
In order to carry out the installation of platbands, first you need to find a ladder or stepladder, along which you can get to the windows. To carry out the installation of products on a wooden wall, you will need:
To carry out the installation of platbands on a wall, which consists of stone, you will need:
It is necessary to fit the platbands close to the edges of the window slopes that protrude, and fix them to the wall. Then you need to eliminate all cracks and irregularities using silicone. After bringing the product into an aesthetic form, the work can be safely considered completed.
Based on the information given above, it is immediately clear that it is quite possible to create carved window frames with your own hands. Templates - simple or complex - can be found or also made by yourself. Therefore, using even minimal skills and imagination, it is quite possible to improve the appearance of the building without spending a lot of money and time.
Do-it-yourself window frames are a wonderful decoration for the facade of a house (ready-made stencils and templates will be given in the article below). They make the house look like no other, visually change its proportions.
Today, with certain skills, you can independently create graceful trims for windows in wooden structure... Moreover, they can be made not only from wood, but also from other materials.
 When the owner decides to install platbands, he seeks to arrange traditional decor in his possessions.
Platbands have the following advantages:
The platbands have some drawbacks:
 Today there are many platbands. Their types are determined by the way they are mounted to the window. According to this criterion, there are two types:
For your information: finished samples are created in full size. They are printed with the required parameters.
The installation of carved products is considered an exquisite solution. Self-realization of such ideas is possible only with the availability of special equipment.

 As already noted, wood is the most popular material for platbands. AND performance characteristics wooden platbands depend on the type of wood used.
Here, they usually pay attention to such options.
With the help of high quality wood, a beautiful original design window opening.
The basis of the work comes down to the creation of stencils and designs.
Self-printing of stencils is quite feasible for everyone. It is important to achieve a combination of the selected ornament with the entire style. Mixing geometric and floral patterns is not allowed.

The following subtleties are taken into account when working on platbands:
When it is possible to achieve color combination platbands and the plane of the walls, a holistic and harmonious facade is obtained.
Before creating window decor carved platbands are selected from the photographs. You need to make a template in advance. It should turn out to be the same for the decoration work of all openings.

Typically, the following methods of creating patterns are used:

Installation of overhead components should be done on the base in accordance with the template.

For all methods of work, the presence of stencils is mandatory. This is how they look:
Advice: it is not necessary to make a large-scale stencil for simple patterns. Enough and a notebook sheet.
 Also, the work requires the presence of such tools:
Platbands must be created from prepared materials. The working stages are as follows:
 All workpieces are pre-treated with a protective compound. They are cut using templates. And the cutting of ornaments is done using a jigsaw. It is better to use this tool different types files.
To work with an electric jigsaw, you need certain skills and special care. The holes created must be wiped. An excellent tool for this is sandpaper. After powerful grinding, the part is treated with a special impregnation.
Next, all the prepared parts are installed to the base. Here you need to use glue or special nails. In such work, it is better to refuse the use of self-tapping screws. They will cause cracking of the products.
 The created platband can be attached to the desired position by the following methods:
These techniques are justified when working with a wooden window. For attachment to metal-plastic, a special powerful liquid glue is used.
 The installed platbands need constant attention and care. For processing, special preparations are used - powerful impregnations. They create high-quality protection against:
Carved options must be covered with a primer, then varnish or paint. The intensity of such treatments is once every 3-5 years. Thus, the operational life of the products will be seriously developed, and at the same time their attractive appearance will be preserved.
When installing plastic or metal products, no careful maintenance is needed. For products, it is necessary to arrange high-quality corrosion protection. Periodic paint renewal is also required.
Thus, it is very possible to independently make platbands of extraordinary beauty with graceful patterns. Certain skills of a carpenter, carpenter and working with tools are required. So you will decorate with a very original method window openings and add an elegant twist to the chosen architectural style.
How carved platbands are made using the slotted carving technique, see the following video: