The time of the monotonous design of walls in the form of pasting wallpaper was caught in the fly. A period came on a shift when the surface finishes turned into a creative process that allows you to create a unique design of the room or the facade of the building from the same material. Platform for the manifestation of aesthetic taste and artistic talents is decorative plaster. Various techniques Its applying contributes to the formation of an individual interior. What includes preparatory stage, and what ways to design walls and ceilings with decorative plaster exist, consider in detail. The proposed video will help deepen the knowledge of the topic under study.
Before describing the technologies for applying finishing material, a brief excursion should be made by the diversity of its species. There are several parameters for which the classification of decorative plaster is carried out. Depending on the binder, the plaster happens:
The composition of decorative plaster affects its final appearance. On this basis, the decorative plaster can be divided into the following types:
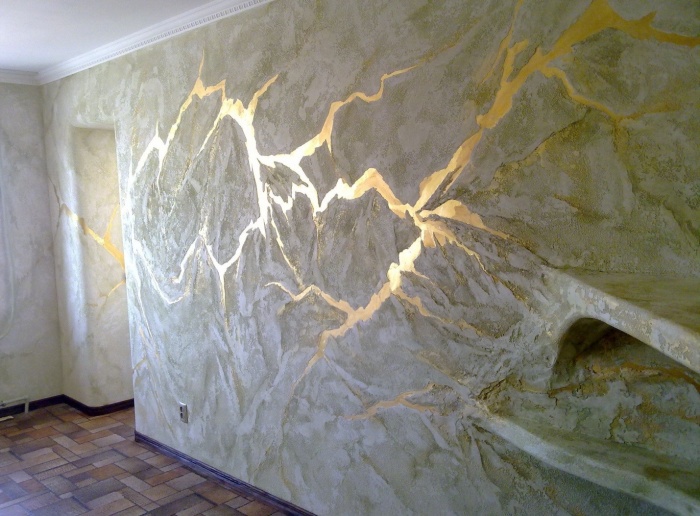
Depending on which the technique of applying decorative plaster is selected, the material is able to imitate various surfaces, ranging from stone or tree, ending with wallpaper. The presence of artistic skills allows you to create an exclusive panel on the wall.


Preparation of walls before applying decorative finishes is a prerequisite for obtaining high-quality coating, regardless of the selected technology. The process contains steps the same for all types of plaster and nuances that depend on the composition of the material. The entire preparatory procedure precedes the application of the decorative layer includes the following steps:
Tip! In conditions of high humidity, it is better to use an antiseptic tool warning the appearance of mold.
Decorative surface design technology finishing material Includes the preliminary application of the thin layer of plaster. It is not necessary to strive for the perfect surface, in the future, all meager shortcomings will be disguised. After drying, following the rules of application techniques, it is recommended to re-treat the wall with a brutal composition of deep penetration. These measures significantly increase the adhesion of contacting layers. Surface preparation nuances and simple techniques Application of finishing material are described in the following video:
The choice for applying the decorative finish of structural plaster opens a wide expanse of the manifestation of creative abilities even with minimal skills. There are many techniques for applying this material, which can be divided into several groups:
After familiarization with several application technologies, choose the most suitable way will be easier.

A decorative plaster should be directly from the material at hand, the wax on an acrylic basis and a kel can be used as an finishing coating. Basic tools for work - spatula and roller (flat or with a pile).
The technology of applying decorative plaster with the use of a roller having a pile is quite simple:
It is important! Ribbled seams are formed between the application sections. This technology will make them practically imperceptible.
The use of textured roller changes slightly applying the finishing material technique:
According to the proposed technique, an option is allowed when the roller is simultaneously applied with a layer of decorative plaster, and a pattern is formed. During the day, the layer of plaster dries, after which they are moving towards applying a protective coating. In this role, wax serves, its application is carried out with a roller with an average pile. In conclusion, the wool cloth is carried out polishing the surface.

It is interesting to look like the final result when using decorative material spray technique. This method is applicable as for external finishing workand when designing an internal interior. Application technique is not capable of complexity and includes the following actions:
The outlined technique is clearly shown in the figure below:

If you wish to improve the process, the first layer can be made a little darker, and for the final distribution, take the decorative material of the lighter shade. A little different texture is obtained if you treat the surface with the second layer without waiting for the starting finish.
The original spray technique is clearly described in the following video:
Options for designing surfaces with decorative plaster with the use of submitted means a set, most of them can be mastered even to a novice master.

The technique of hatching remotely resembles the formation of "rain" from the decorative plaster Coroed:

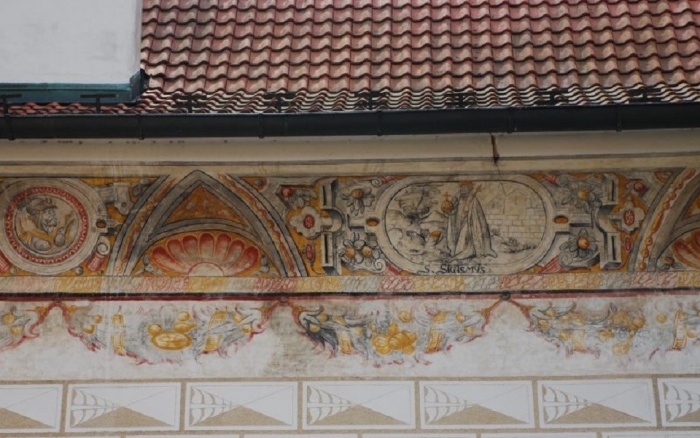
Much more difficult in the work of the "Sgrafito" technique. For applying, the plaster of various colors will be required, the main thing is that they are combined with each other. First, the surface in several layers is treated with multi-colored decorative material. After drying, with the help of an acute spatula or cutter in some sections, the layers are partially deleted. With this technique on the wall, unique patterns that are similar to the application are identified. In conclusion, decorative finish is subject to neat grinding.

The desire to issue the wall of Venetian plaster involves the presence of skills to apply decorative finish. It will be difficult to master the techniques to master the technique. From materials you need to have:
Kelma and sandpaper shallow grit paper are basic appliances for applying and processing. The essence of the entire process is to alternately applying the layers on each other, with alternating these actions by grinding the surface.

Note! Mandatory condition for the qualitative application of Venetian plaster are perfectly smooth walls.
The main stages of the work are:

With insufficient experience, any of the proposed techniques for applying a decorative finish can be tested on a sheet of plasterboard. Detailed work on working with Venetian plaster can be studied in the proposed video:
For a long time passed the times of total deficit generated by the Soviet era. After all, then the decoration of the walls in the room was a thing of understandable and simple. Today there are many of the most diverse finishing materials:
But decorative plaster is a real breakthrough in construction and repair technologies. This is absolutely not the plaster, which is placed under the wallpaper, but a completely new independent material.
Excellent decorative plaster qualities do not need additional recommendations. Two rooms, even decorated with the same person, with the help of the same materials and techniques, will never be the same. Each exclusive, because the drawing of plaster on the wall is impossible to repeat. With it, you can create interesting effects, you only need to master the necessary technique. Such a coating is very strong to different kinds of harmful effects. It is difficult to stain, but if it somehow happened, it is easy to launder.
Plaster eco-friendly, does not highlight harmful chemical compounds.
In addition, it improves the soundproof of the walls. In stores such material is sold in a dry form, it is manufactured on the basis of binding materials. As fillers, crumb, sand, stones or fibers with supplements of antiseptics, dyes, thickeners can be used. In this article, we will tell you how to make decorative plaster walls with your own hands, what methods and materials for this exist, as well as demonstrate photos and video instructions.
Conditionally, the plaster is divided into:
Facade plaster is much more resistant to aggressive environmental impact and is used for external work. Interior in turn is divided into:
There is also a classification according to the type of surface, which is obtained as a result. For example, under the "roller", "fur coat", "Rust", etc.

In general, each type of plaster has its own features in applying. For example, the expensive "Venetian" plaster is applied in several layers, a special way requiring solid professional skills, it can be covered on top of wax. This is not a newcomer, so it is better to turn to a professional.
If you still want to make repair with your own hands, it is better to choose a "Coroed" type plaster. To apply it, only an ordinary spatula will be required.
Working with an ordinary decorative plaster will be submitted even a newcomer, because to spoil such a coating archative. And too thoroughly prepare the walls there is no need - it will smooth all the defects. Such decorative plaster walls will also give flight your designer thought.

It is necessary to carefully clean the wall from the remains of the past coverage (paint, wallpaper, etc.). Displaced areas are removed, and the gaps are closed. This will be sufficiently under the plaster type "Coroed", but the "Venetian" and some other varieties require a perfectly smooth surface.
After priming and drying the surface, it is necessary to decide whether the wall area will be plastered, or part of it will go under the other coating.
Zones of different facing can be divided by painting tape or window seal.
Minimum tool kit:

The solution should be prepared on the basis of the recommendations on the package, then you will receive the necessary consistency. And you need to prepare such a portion to choose it at a time, because otherwise the solution "grab" directly in the container. This is a job that does not tolerate long smokers.
Apply the plaster need a spatula. When it thickens a little, you can walk on it with a grater without excessive pressure, creating the desired pattern. It is better to practice pre-on a small area.
To create a unique relief enough spatula, graters and your own hands. You can use any remedy.
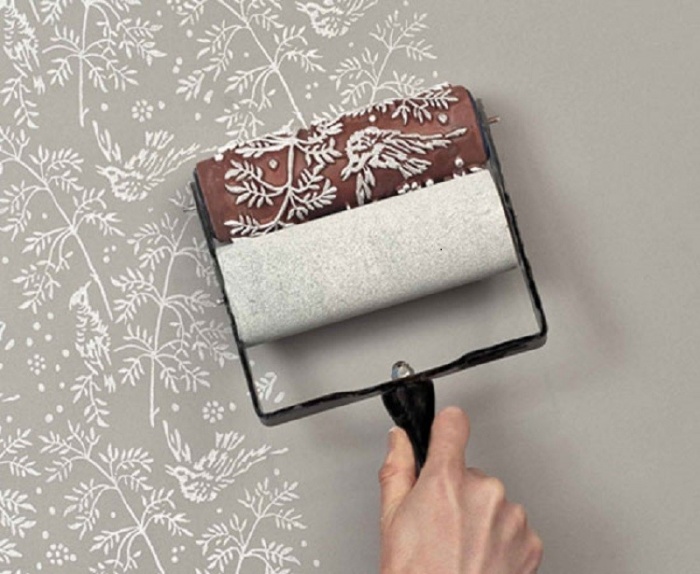
Most often beginners create on the walls of rains different areas, circles, waves, crossed lines. The most simple is the horizontal relief. You can also use a special curly roller, then apply the pattern is much easier.
All this needs to be done at the maximum pace, because the layer of plaster dries very quickly. It is necessary to pay special attention to the joints of the plots to avoid the influx.
If your wall was prepared under different types Coatings, then tape in the areas of separation of zones, it is necessary to remove to the complete drying of the plaster, later it will be more difficult, and small defects may remain.
After complete drying (usually about 24 hours), the plaster must be treated with shallow skin, which will remove all excess.

On this, the wall decoration with decorative plaster can be considered complete. But there are people who do not suit it, and they want to paint the wall. In this case, only high-quality paint resistant to moisture, solar rays and mechanical effects should be used.
When carrying out work, you must first paint the texture sections of the surfaces, and only then smooth.
After drying the first layer, we should apply a second layer of paint.

For the finish of the facade, the decorative plaster of the coroede is increasingly used. Even the apprentice will be able to apply it, the main thing is to get acquainted with the technology and adhere to it as accurately as possible.
As a rule, the coroede is used for facade works, but due to the attractive texture, this type of decorative plaster has recently applied in the interior design, for example, in Eco-style.
Coroede is applied to finishing vertical surfaces, but if you have experience in this matter, you can apply it even to the ceiling.

Before applying the cores, it is necessary to send the surface of the walls, if we are talking about plastered walls. It is very practical to inflicted a corefield right on the foam, pre-pasted on the facade of the house. Alignment will be reduced to the seams.
In order to avoid the formation of cracks at the joints of the foam, the reinforcing grid should be used when applied to putty.
To achieve proper clutch of plaster with a wall, you should use the primer, which contains quartz sand, providing an excellent clutch of plaster with the base of the wall.
The most in demand in the market of manufacturer's manufacturer Ceresit. If you decide to purchase such a primer, then the decorative plaster should use the brand Article 16.
The walls are covered with a primer shortly before the application of the Coroed. At a temperature of + 20 ° C, the primed surface will dry for 30 minutes. The consumption of composition is 150 g / m 2.

The primer is slightly shouted from under the plaster, so its color should be as close as possible to the color of the cored. To do this, it should be simply composed in the corresponding color of the corefish shade.
If the coroede will be applied to cement-sand plaster, then there is no need for surface priming. Just moisten the wall for an hour before the application of the border. To achieve maximum clutch, moisten the base with plenty of water.

In the market, you can purchase a ready-made mixture, it can be Ceresit CT 63 or a dry mix that will need to prepare yourself. If we talk about the price, then from an economic position it is better to get a dry mixture, as it is cheaper.
To prepare decorative plaster from a dry mix, you need a drill with a mixing nozzle, water and a container for the kneading.
The cored will dry quickly and cannot be mixed with water. Therefore, make a small snack, especially if you have no experience in working with decorative plaster.
Given the magnitude of the marble crumb, the number of cores is calculated. For a small fraction XS, consumption is 700 g / m 2, for XL - 1700 g / m 2, and for XXL - 2000 g / m 2. So that the jokes were inconspicuous to perform the applying of the kororad on the wall at a time.
So, for the preparation of the mixture, pour the amount of water into the container indicated on the package. In this case, the water temperature should not exceed 15-20ºС. Enter the dry mixture in water gradually, while stirring the composition of the drill with the nozzle mixer. Leave the ready-made plaster for 10 minutes, and then mix again.
You can only scroll on the basis of acrylic, all other species are better painted on top.

The main thing is when applying a koroeda - distribute the composition on the surface evenly. It is possible to do this with a metallic semiral, having a length of 30 cm. Excess the Cororad you can remove a 10 cm long spatula from it.
The cores layer must correspond to the magnitude of the marble crumb, that is, within 2-3 mm. This is an important condition, because if the layer is too thin, the primer will be too thin, as a result of which the protective properties of the finish will be deteriorated. Well, if the layer of plaster will be unnecessarily thick, then the texture of the cores will not be visible and the appearance of the facade / will suffer interior decoration.
Since, as already mentioned above, the core will dry quickly, then work will also have to work quickly. In order for the surface of the walls as uniform as possible, it is better to apply plaster at a time. But if it is unrealistic due to the large area of \u200b\u200bthe wall, then separate the strip by painting scotch and apply the composition slightly on the tape. Then separate the tape, without waiting for the drying of the plaster. Continue the application of plaster in the same way until it is covered with it all the wall.

The most responsible stage of the work is the rubbing of the Coroed. It depends on what will ultimately be a picture on the wall. This work should be started immediately after the plaster starts to be filled (after about 20 minutes). If the palm does not stick to the wall, you can begin rubbing, which is performed using plastic cells.

When rubbing marble crumbs, chaotic recesses are formed.
Thus, you can get the desired effect:
If you fail to apply plaster for one reception, then do not rub it to the very edge. Better separate the following part of the wall, and after carefully set the joints. So you can make an imperceptible transition.

Color the walls are possible the day after the application of the koroeed. Painting has some advantages over the tinting plaster. After drying, the cores without a flaper can be finally aligned with a layer of sandpaper. Stucco with a kel is alumming this way, because the lighted pieces will be noticeable.
Painting provides more opportunities for designer work. This aspect is especially relevant when using a corehouse in the design of the interior of the premises.
Very spectacular look underhanded dark tint groove. To achieve it, first you need to paint the wall with dark color. After the paint layer is driving, apply the second lightest layer of paint. In this case, the second layer must be applied with a semi-dry roller. In this case, the paint will not penetrate the grooves, and they will remain dark. The flow rate of the paint composition is 300 g / m 2.
For increase performance characteristics walls (especially it is appropriate with the interior of the walls), you can cover them with a varnish - glossy or with sparkles.

Preparation for the application of homemade decorative plaster made from putty, begins with the definition of the room in which it will be applied to the walls. From this depends on the choice of invoice, collecting the instrument and even the method of kneading the composition.

So, for successful decoration of walls, we will need a putty:

Make measurement of walls, which will allow you to roughly calculate the amount of source material for finishing. It will help you in this specified on the package approximate consumption of putty. To save money, you can purchase putty in the form of a powder. For the manufacture of the solution in this case you will need:
Instruct putty with water in some suitable capacity. You can do this with a mixer. You must have a homogeneous mass. Then add PVA to the mixture and bring it again to uniformity.
For decoration of walls in low humidity rooms, you can use gypsum or cement plaster. And for premises with high levels Humidity is better to use cement.

If the walls are damaged, then all the racking parts need to be cleaned. All recesses should be shred out by cement. So, you can align the walls. If the surface is unreliable, then it should be plastering the plaster grid, which you subsequently covered.
After the layer of putty dries, set it up so that the surface is smooth. Then the walls should be refined. Use the composition of deep penetration for these purposes.

Apply decorative plaster made by putty from putty, in several ways:
After your homemade decorative plaster dries out, color it or open with colored wax.
In general, science is not even in force even inexperienced "plaster." If you did everything right, the interior of your home will delight you with originality and identity for long years.


We bring to your attention a series of video about various decorative plaster and methods of applying:
If you want to order decoration of walls with decorative plaster, we recommend contacting professionals, since the price of this product is very large. You can find out the cost of decorative plaster on the sites of manufacturing companies decorative coatings. Also pay attention to the Venetian plaster, it is superbly suitable for wall covering.
Find out how to properly apply decorative plaster on the walls, beginners will be useful, first of all, from a financial point of view. Having mastered the finishing method, you can significantly reduce the cost of designing all rooms. So the repairs price will turn out much lower than when attracting third-party specialists.
In our article we will tell me that they are decorative plasters, as well as characterize the main techniques of their application.
Decorative plaster is a mass that is used for registration different surfaces. It is called it because of the appearance: after applying on the wall, a rather attractive coating with a high aesthetic potential is formed.

All materials that are used to shock the walls can be divided into two groups:
Note! Typically, the coloring substances are introduced into the base of the material, but after texturing and polymerization of the surface, the wall can be additionally painted or toned. The processing of textured plaster metallic or pearl pigments is especially popular.

In principle, there are other types of materials on the market - fibrous products, translucent plaster mixes, etc. However, they are used quite rarely, therefore it will be more expedient to give the focus of more common finishing techniques.
Now we need to figure out how to apply decorative plaster. In fact, you can cope with one spatula, but in this case the work will take quite a lot of time, and the skill of the finishing will be needed very impressive.

As a rule, such a set of tools is used to perform decorative plastered walls:

Naturally, other tools will also be needed to perform the pretreatment of the wall, but we will talk about it in the next section.
Now we need to prepare the foundation so that the decorative composition holds on it quite tight. The question of which surface decorative plaster is applied, professionals have been resolved for a long time: if you properly prepare, then almost any.

Of course, most often we will work with concrete, brick and plasterboard. Here, the list of preliminary work will be as follows:
Note! To decide whether it is possible to apply decorative plaster on the plaster, it is necessary in each case individually. The optimal option will face the entire surface with a sufficiently heavy hammer: if the material does not appear and voids are not detected under it (there is a characteristic deaf sound about their presence), then it can be left.


Important! When processing the hypina, basic plastering can be replaced by putting off putty. Naturally, after drying, the material does not need to grind, as it will reduce the adhesion.
As for the walls of other materials, before applying decorative plaster on the walls, you need to keep in mind the following:

So, what to bring decorative plaster, we studied how to prepare the surface to work - too, now let's go to the technologies of the finish. Structural coatings are applied easier, therefore, let's start the description from them.

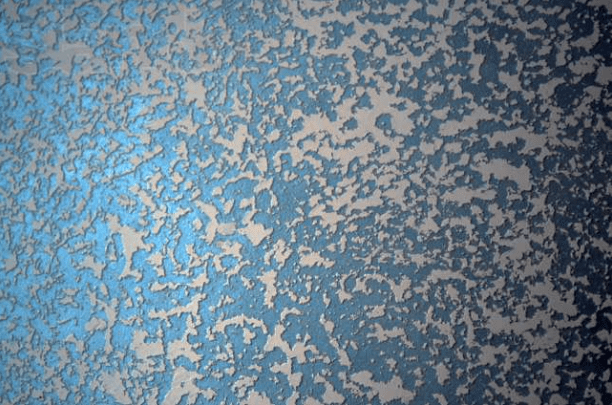
"Shuba" is one of the most popular coatings based on cement-sandy solution.
The material is mixed in a ratio of 1: 3 (1 mass part of cement on 3 parts of sand), and then applied to the wall by spraying:

Mineral granules are also applied quite easily. The most popular of them is "Coroed" - plaster, the surface of which mimics wood damaged by insects.

Instructions for applying the composition does not differ in difficulty:
Tip! The optimal thickness of the applied layer must correspond to the size of the largest grain.

In this section, we will tell how the decorative plaster texture type is applied. The main difference from the previous version will be the fact that the result here depends not so much from the processing technique, but from our skill.
In many ways, the formation of the relief is akin to painting and sculpture, so even an experienced plaster before starting work should be practiced to understand how new material will behave.
Work is starting with the application of the main layers:
Note! Since the material will be applied on top of the base, it should be initially painted into the shade you need. This is done by administering the pigment into the plaster mortar followed by stirring.


Tip from practice! It is necessary to remove polyethylene carefully, trying not to damage the coating. It is also important not to reap the film, because otherwise it will suck, and will be off with the parts of the plaster.

If the technologists described seem too complicated you, and you are not sure that your skills will be enough to create a beautiful relief, you can purchase a special roller. The protrusions and depressions on its surface form a drawing, which, imprinting the raw plaster, gives it a beautiful appearance.

Tip! For work, you can use a simple langer roller, partially plucking his pile. Also good results gives winding the working part of the tool with cords, polyethylene or tarpace with folds.
These devices are used extremely simple:

No matter how much decorative plaster was applied, after drying it should be treated to improve the appearance and protection against various influences. There are several processing methods:

| Technology | Description |
| Painting | For painting most often used acrylic pigments for internal or outdoor work. The material is applied using a brush. Roller or pulverizer trying to crose all elements of the relief. Sometimes the paint is applied in several layers: the bottom is made with a dark, and the top is lighter. This method of processing allows us to give relief plaster a greater visual depth. |
| Decoration | Painted plastering can additionally reorganize metallic or pearl pigments. These materials are applied to the embossed surface or with a sponge, or a dry brush, and then fixed by one of the two techniques described below. |
| Fracture | Wax processing is a standard version of the protection of Venetian plasters, however, it will be applicable for other compositions. Limiting factors here are the price of raw materials for fracturing, as well as the strength of the plaster itself - some materials simply cannot withstand polishing. |
| Lakovka | Instead of wax coating, acrylic varnish can be used to protect and decorate. It is applied in the same way as on any other surface - in two or three layers with a mandatory drying. |

Understand how to apply decorative plaster walls, quite easily. It is much more difficult to master the methodology in practice, but this will help you and the given advice, and the video in this article, and the recommendations of the professional plasters that you can get by contacting the comments below.
The finishing of the walls is a very troublesome and responsible event. Especially if the corners and walls turned out uneven. Casting of such surfaces with wallpaper or decorative tiles is a complex task and rarely manage to solve it.
In such situations, decorative plaster comes to revenue.
Currently, the dominance of dry mixtures is the same bulk composition, as well as the usual mass for the interior decoration of the walls. The properties of the decor give her various additives specifically entered into the formulation. These can be small pebbles, and even wood fibers that give the lined surface completely original drawing and texture.
Even experienced plasterer, starting the walls of the walls, will not be able to present at the beginning of work what happens in the end. Therefore, the masters prefer before starting work to produce a test application on a small flat surface, for example - on a debris of plasterboard. The test allows you to immediately determine the methods and coating techniques to identify the most winning characteristics of the decorative coating.
The presented material has many varieties. Depending on the composition of the material of the material in the form of a dry mixture ranges from 200 to 600 rubles per square meter. The rate of consumption of the finished composition is presented by the manufacturer and is indicated on the package. And the price of work per m 2 invited specialists is from 250 rubles.
It should be borne in mind that the use of such a method of finishing the walls eliminates the need to carry out a number of preparatory operations on their surfaces, which reduces the total cost of the coating. In addition, possessing minimal finishing work skills, you can perform them with your own hands, eliminating a significant part of the cost.
Several types of classification of such material for wall decoration are used:

On the first question, you can get advice from the building of the building materials store. The choice depends, first of all, from the texture of the coated surface and the operating conditions of the coating after applying.
Depending on the filler, the classification may be as follows:
Plasters of this type, in turn, are divided into several varieties:

In addition to the types of decorative plaster mentioned here, others are available. All of them differ in the character of fillers that imitate one or another surface inaccessible at cost. Such characteristics may be imitation under wood or silk fabric.
These materials include color plaster produced in a wide range of tones.
With the exception of individual cases (the application of the Venetian coating), plaster works are performed quite simply and any developer, if there is time and desire, seeks to fulfill these works on their own. The desire is quite reasonable and understandable, but it is necessary to take into account a number of circumstances that are set out below:

Plaster, as a rule, is a waterproof coating. Therefore, it can be washed without fears. At the same time, it is necessary to refrain from the use of aggressive detergents. The soft detergent is used with elastic sponges, rigid brushes and means containing abrasives to care for such a coating are not applicable - the surface quickly loses the appearance, becomes matte due to a large number of scratches. As additional protection The surface is covered with a thin layer of wax, which protects it from moisture, but not from mechanical damage.

If you wish to change the interior, the walls can be repainted, and if it is planned to use wallpaper, the walls can be fascinated.
The tools and devices for professionals are quite diverse. It must ensure not only the performance of the work, but also their quality.
The assortment of the tool used largely depends on the choice of the nature of the coating. In very simple version You can do the minimum set of various sizes. It also takes Kelma, and for more complex variants, it is desirable to use textured rollers. If surface color is provided, you need to plunge the greasy tool.
How to make decorative stucco with your own hands? For self-execution, man without experience can be recommended to cover the type of cored. It is not demanding of careful preparatory activities. By virtue of its invoice, it is not necessary to diligently align it in the process of applying. To work with such a material there are enough enough spatulas of various widths and a small skill of plastering. Coroede spoil almost unreal. The technology implies the manufacture in various versions, which directly depends on the size of the grains. Larger will require a thicker coating layer.

The device "Venetian" without solid ownership of skills is impossible. When it is performed, you need to apply a few perfectly smooth layers of plaster, each with its properties.
Silicone materials require special skills. This is a painstaking fine work, requiring incredible patience and artistic inclinations. But the result corresponds to the invested work.
The decor on the wall can be performed in the following order:


To give decorative properties, the coating of putty can be used in the following methods:
As an finishing operation, the surface is most often performed. It is made by painting roller for two passages, for the first time - with a long pile, the second - short. Such a coating highlights the texture of finishing.
Elements of textures are applied on the front layer of the same putty. Its thickness should not exceed 3 mm. Otherwise, it is possible to crack during operation.
The drying of the spacing layer is required when the doors and windows are closed. Drafts are not allowed. Acceleration of the process by turning the heaters can lead to cracking and collapse of the decoration layer. The essence of the process consists in crystallization of the mass of the finishing material, in which the air moisture takes place. Therefore, its premature removal will lead to a violation of the process.
As can be seen from the given data, the process of decorative decorative plaster can be very simple, even easier than the creation of a smooth base surface. But individual materials and methods require special attention and skills, as well as artistic taste. Really appreciate your strength and opportunities. I wish you success!
Decorating with woven materials came from distant centuries. Walls of vintage rich houses were decorated in this way. Today, much has changed due to the introduction of modern technologies. The present wall coverings are thoroughly different from their predecessors.
Decorative plaster with their own hands and its application in different variations Allows you to create unique masterpieces and adds sophistication to any interior. Do not be afraid to experiment! It's not hard!
Types of decorative plaster are distinguished by the nature of the solution to the surface:

Application different species Decorative plaster accordingly requires careful surface preparation. Previously, it will be necessary to align existing defects. As a rule, gypsum, cement-sand and lime solutions are suitable for these purposes.
Next is the coating of the ground in 1-2 layers. The tool is applied solely after complete surface drying. Subsequent activities will already depend on the work makeup, and there are quite a lot of methods for applying "decorative".
Imitation woven materials looks exquisite. Such coatings, by virtue of the application of minimum layers, require high-quality surface preparation. It is recommended to work with a brush. The desired effect can be achieved using vertical, horizontal or circular movements.
As part of the funds predominate glass, quartz sand and metallized powder.

The fur coat is both economical finishing materials, and easy to work. It gives rough texture. It is painted with a pigment added to the solution, or the roller is tied at the final stage.
The technology of applying this type of decorative plaster provides for the preparation of a sour cream solution and throwing it onto the wall. To lift the layer, use special spatulas and honeyrine from steel.
To make textures take a brush or flap of non-human fur. Manipulation is important to carry out fresh surface. In order to protect the wall is treated with acrylic varnish or wax.
With the help of Venetian plaster, it is easy to imitate both polished and unprocessed stone breed. Beautifully modeled:
This technology is often used to recreate granite and marble stones. The task does not require special skills, the main thing is to try to repeat the natural pattern with splashes and streaks.
If you wish to bring high costs and nobility to the house, follow further recommendations how to apply decorative plaster:

Important! Wall covered with wax, are not afraid of wet cleaning!
For finishing embossed venetian coating, several other techniques and methods are required. The solution must contain solid granules up to 2 mm in size, they create the desired texture. To set the texture, the finishing wax layer is applied, it is associated with the previous one and gloss.
The effect of muffling adds the roughness of the final layer. The form of the material is similar to the old marble. Such technology involves the use of several layers, where the latter is treated with wax and corganize.
Rough stone relief looks expressively and easy to work.
Decorating the core imitates wood damaged by insects. Such applying decorative plaster is often used for facade and interior finishes, it is easily performed with their own hands.
Coroede is produced in special mixtures containing marble filler. It is also prepared at home, by introducing into a working solution of polished marble granules.
The technology is reduced to the embroider of "decorative". In the process of leveling of the surface, the stone grains are striving for a grater than creating distinct furillary traces.
Coroede does not need additional reclamation!
The interior solution and structural pattern will depend only on the direction of movements by the tool!

Cameshop covers are most popular for facade and internal works.
The tools will need a special mesh, a flat roller and a brush.
How to apply decorative stucco with your own hands:
Make sure that the wall treated with a mixture during operation did not subside, otherwise there will be cracks!The recommended thickness of the layers should not exceed the size of the pebble filler!
For this plaster method, they take special mixtures with the addition of marble, where the size of the fractions should not exceed 1-1.5 grains. Due to this, level the surface is very easy.
It is important to remember that this "decorative" is intended exclusively for finishing! Up to its use, the wall should be prepared and bring to the perfect state.
Each method of applying decorative plaster is unique, the masters fantasy also plays a major role here. As a rule, special tools are used for work, but you can do without them. Using the screwdriver, you will also achieve a wonderful result.
With the help of a bath or kitchen sponge, for example, we rinse the freshly mounted mixture and get a very beautiful texture pattern. A variety of notches and grooves are convenient to perform with some sharp tool, such as cutlery or pencil handles. Possing the surface of some kind of oldity can help conventional tongues that are clogged into the drying solution. But first things first…

For this method, a small-grained mixture is best suitable. After setting the starting layer, which is necessarily applied to the prepared surface, take a rigid brush, wetted in water and recreate the following patterns:
Painting rollers have various nozzles, each of which you can get a certain effect:
Decorative plaster, applied in this way, require further staining.
Stencils are original decision For the decor of any dwelling. Can be used with various mixtures.
A starting plaster is applied to the prepared surface. It doesn't matter what style of "decorative" you have chosen, it should be painted, and the shade should differ from the previous one for several tones. When the first layer will completely dry, the stencil is applied. Next comes the finish plaster with the subsequent recreation.
Stamps for walls are not applied as simple, the technology requires some skills. Therefore, to begin with, it is necessary to practice a little!
The base layer is pre-tied and applied with a thickness not exceeding 3 mm. Also staining can be made at the final stage. The next layer of plaster should be about 1 mm. To this end, it is convenient to use a liquid solution of brighter shades. At the end of the surface using a special rubber device, the desired elements are asked. When the layers are mixed, it turns out a very original texture.
Choosing certain methods for applying decorative plaster and the corresponding mixture, it should be considered whether it is allowed to apply to old wallAnd what is the order of work.
To achieve the desired result, strictly follow the instructions and manufacturer's recommendations!
The method of applying any decorative plaster to master is not at all difficult. Modern technologies They will come to the aid, they greatly simplify any process. Master's business is afraid! Try! Let and in the interior of your home will add a unique highlight.
Would you like to know more on a similar topic? Watch out for the release of new articles.
Send
Castle
Link
Stamp

![]()
House - a place to embody design solutions, embodying which, do not forget about such a finish, like a wet decor. This is one of the varieties of decorative plaster, which has nuances in the preparation of the surface, technology, as well as further care.

Before choosing a web, you need to properly evaluate the possibility of using indoor finishes, compatibility with its condition and consider the benefits and disadvantages.
To the first:
The shortcomings of this does not have, with the exception:
Before preparing the premises, tools and the purchase of the mixture should be determined with the type of finishing:
The type of finish depends on the composition, durability of the material and the complexity of the work. The range regardless of the species remains almost the same.
The durability of the work done directly depends on the quality of the prepared premises. Upholstered and overloaded walls are the basis for decorative elements.

It is important to make sure that before the wedge of the walls were:
How to apply the liquid wallpaper on the old finish, no one will tell me - it is not worth doing this, with time the material can be detached. And nails, self-tapping screws and screws are twisted before starting work. This material It is considered masking flaws, but it is not worth neglecting his masking properties. The area under work should be well prepared.
After preliminary work, they go to the preparation that consists of:
Putty and primer is the basis of reliability. Walls should be durable and ready for finishing decoration.
Technology of applying wet wallpapers in the following types of walls:

The manufacturer took care of the ease of creation of the knead, giving the consumer already in the packaged package. Externally, this is a bag with a dry composition resembling sawdust and containing necessary components. It is enough to dissolve with water warm temperature (40 degrees), constantly stirring until the consistency of medium-sized gloves. For 1 bag - 6 liters of water.
The mixture consists of such components:
They are already sold in a mixed form, less often - you need to mix yourself. At one time you can mix one bag of each component, without doubles not the amount or volume of water. We can separate on the parts of the component, reducing the finished result is also undesirable, you can be knocked down with the proportion of the mixture and the amount of water.
When mixing, it is necessary to observe the proportion and alternateness of mixing. The water is first poured into the container, and then the powder is gradually added. This will facilitate the process of kneading.

The solution itself is mixed solely manually, otherwise, resorting to the auxiliary tools (mixers or drills), you can not deliberately change the structure and ornament. The composition does not contain harmful substances that would damage the skin of the hands. It insists a solution from 6 to 12 hours. Before use, it is checked. Sometimes he freezes so much that it becomes overly thick, then it is added to it a little 1 liter of warm water and gradually mix.
To save time and accelerate the process, the preparation of walls and solutions is combined. This can be done if the wall condition is approximated to a satisfactory state.
The technology of applying liquid wallpapers is not possible without the use of the following tools:
The tool must be convenient to use and give the desired result.

The work begins when the walls, tools, solution, the temperature and humidity of the room are adjusted. So, the indicator of the first not lower than the mark of 15 degrees. Application of liquid wallpapers and dried period does not allow the appearance of drafts.
Punching of liquid wallpapers is made with a spatula or a hollow gun, the further distribution over the surface is made with a roller or grater. Applying to keep the tool at an angle of 15 degrees. It is not worth pressing through the lastness, since it is not possible to pressed the elements and the factory layer will distort. Insufficient pressing can adversely affect - the solution will not be entrenched correct and will not last durable.
Use heat devices to accelerate drying is undesirable, with the exception of the lamp to enhance light and give visibility to smoothing problem areas.
Covering the surface is evenly, from angle or edge (preferably from light to dark), not exceeding 2 mm in the finish layer. It is important that the area covered is the result of one kneading, not different. The impurities and the domain are the worst option compared to the excess consistency, which can be dried and updated.
The success of sticking with liquid wallpaper depends on the production period of the component packages, which should not exceed 2 years. The manufacturer assures that even after the storage time, the contents remain suitable, however, as practice shows, it is better to be restrained.
Only following the instructions on the design technique and using special means, you can see all the desired decorative characteristics. They manifest after complete drying, which occurs from 12 hours to 3 days. Time depends on the composition, thickness, technology of applying liquid wallpaper, humidity and room temperature.
The finishing is subject to local fixing of the site, which was incorrectly decorated or deformed with time. Sometimes locally eliminated the problem fails and the installation of liquid wallpaper is necessary.

The process of replacing and restoring the site begins with the complete removal of the previous layer and consists of the following steps:
The wet decor is the same inhabitant, like a wooden finish. Therefore, the first and second is covered with protective equipment. In the case of first, this is an acrylic varnish.
Thanks to the acrylic binder and organic solvents, the coating remains harmless and environmentally friendly. Subsequently, the decor can withstand the mechanical load, cleaning and washing with chemical gels.
Methods for using acrylic varnish:
As a final protective coating, the acrylic is applied with the following flow rate: 20 square meters of the surface are covered with 1 liter of acrylic varnish. If the first layer lacks and remains the risk of damage and deformation of the wet finish, the manufacturer recommends covering the second time with protective varnish. The proportion of the flow will remain the same, and the area will increase to 24 square meters.
Whatever properties have acrylic, in places of moisture sources (bathroom, kitchen) coating strength will not give 100% quality guarantee and durable result. In this case optimal option Moisture-resistant coating or tile will become.

Wet decor became alternative option classic type. His difference in the invoice is displayed and in the fact that you can draw wallpaper with your own hands. After preparing the area, tools and kneading, thoroughly examining the instructions of which, one can boldly begin the incarnation of interesting design solutions and the transformation of the premises.
Send
Castle
Link
Stamp

![]()
Painting walls can be attributed to one of the most popular finish methods. This option does not require large cash costs, and all work can be done with your own hands. In order for the result to please, and the coating retained its properties for a long time, it is important to properly prepare the base before applying paint.

In order to paint the wall in the apartment with your own hands, you will need:
You can also quickly cover smooth walls using a collapse, but in this case you need to have the skills of handling the tool.

To paint does not fall into hand, use gloves. Eyes protect with construction glasses.
For painting walls in the rooms and in non-residential premises use different compositions.
In residential rooms, the walls must be covered with non-toxic paints. In such premises, moderate humidity and temperature are usually supported, therefore, the requirements for the composition are not too tough.
There are several types of water-based paints with which you can paint the walls in the bedroom, living room or children: water-level, water-dispersive acrylic or silicone. In addition, the use of decorative texture paints is allowed in the residential premises.
PVA-based solutions use more often than others. They are inexpensive, it is convenient to work with them, they easily and smoothly fall, have an average consumption, and after drying it is formed a dense, but breathable coating.
By adding a colorate in water-emulsion paint You can get almost any shade.
Among the disadvantages: low resistance to mechanical stress, the need to highly align the surface before applying the painting composition (paint does not hide even the slightest defects), the inability to wash the painted wall.
Acrylic water-dispersion paint exceeds the water-emulsion in its properties. It is not only easily applied, but also masks small surface defects, forms a dense and smooth coating, painted walls can be washed. Resistant to ultraviolet rays (does not lose brightness), it is easily kernel.
Such paint will cost more than everything, however, the high price is explained in excellent operational properties Silicone Water-Dispersion Makeup: It makes invisible large enough (up to 2 mm) cracks, so before the coloring wall is not required thoroughly align.
Smooth coating obtained after drying silicone paint does not accumulate dust, but passes air. Thanks to the latest property, the composition can be used to finish the walls in the kitchen or bathroom.
Another composition that can be used in residential premises.

Staining the walls of texture paint gives the effect similar to that brings the use of decorative plaster. In this case, the process of application is much easier and does not require great experience.
It differs from conventional paint structure - this is a thick solution that, after drying, forms a relief coating.
You can paint the walls in the apartment of texture paint using different tools: roller, brushes or spatula, the choice depends on the thickness of the composition.
In premises with high humidity, you can use silicone or acrylic paintsSince they are well tolerated with water contact. Other compositions are also used in the kitchen, corridor and bathroom:
Before starting to work, suitable conditions should be organized in the room. Coloring can be carried out only if the air temperature is +5 to +20° S.. Humidity should also be moderate (up to 70%).
The next step is to prepare the wall to paint with your own hands. They should be cleaned from old coating, dirt and dust.

After that, to align, using a sand-cement mixture for sealing a large cracks, and small shut-out putty. If there are traces of mold, rust or other contaminants on the surfaces, from them should be rided before painting the walls in the room. To do this, use mechanical (stripping by sandpaper) or chemical (the use of special alkaline or acidic drugs).
After the wall is ground in 1-2 layers. It is necessary that the paint falls in exactly and not peeled out afterwards. The staining of the projected surfaces requires less paint.
Malanted scotch is covered by wall joints with floor and ceiling, plinths and other elements for which the coloring agent can fall.
The paint is transfused into the container, a colorant is added to it. If the instructions for the selected composition says that it must be diluted with water, add the desired amount of fluid. Stir through a drill with a special nozzle. Pour into cuvette.

Further actions depend on which tool was selected for paint.
With roller, you can quickly paint the walls in the apartment. If large areas are required, it is rational to use it. Since the roller creates a very thin coating, it may not be necessary 2, but a larger number of layers.
When the tool is immersed in the coloring composition, it is important to ensure that the fluid does not cry in its axis, otherwise the splashes can get when working on the surface.
The correct painting of the walls is carried out according to the following scheme: on a plot of approximately 1 m² spend a roller several times, pressing the tool with force and squeezing to the surface of the paint. After moving to the decisrer of the composition throughout the workspace. Start from above, move down.

When all surfaces are painted, carefully remove the painting tape and carefully blame the remaining areas with a narrow brush.
For the processing of open areas of the wall, it is convenient to use wide brushes (about 10-12 cm wide), and use narrow at the joints.
Mobile walls in the apartment with a brush, ranging from the ceiling. On the pile should not be too much paint.
Short strokes cover the processed area so that they overlap each other. The first layer is performed by horizontal smears, the second - vertical. Between the application of the layers, withstand a break so that the paint manage to dry completely. The exact time is determined, focusing on the instructions for a specific composition.

Crossing the wall from one color to another possible. The procedure depends on the initial and selected colors:
Staining can be not only monophonic. Various techniques will help to make the interior:

In order for the coating to be smooth, without flutters, and individual sites did not differ from others by tone, the advice of experienced masters should be adhered to:
![]()
Add a comment


