When building private houses, the roof is most often made gable. There are reasons for this. The first is that it is reliable. Copes well with wind and snow loads... Second, it is compatible with any roof covering. The third is relatively inexpensive. The fourth is an uncomplicated design that is difficult to spoil. Fifth - it looks attractive. All this, and also the fact that a gable roof is built with your own hands without special knowledge, determines its popularity.
The assembled gable roof with your own hands is ready for installation roofing
As you saw above, there are a lot of rafter systems. Accordingly, each assembly has its own characteristics, but in general the order is the same. It is necessary to say about the general step: preliminary drying and processing of wood. This step is required if you bought fresh lumber, not dried.
The use of raw wood of natural moisture in the construction of a roof will lead to problems: the beams will bend, they will dry out, and the geometry will change. All this will lead to the appearance of stress points and at the slightest sign of overload (a lot of snow, strong wind or rain), negative processes will begin. Eliminating them is a complex and costly undertaking. Therefore, either buy dry wood (no more than 20%, ideally chamber drying 8-12%), or buy the material in a couple of months, put it in ventilated piles. After that, treat with the necessary impregnations (against fungal attack and to reduce flammability) and only after that use it in the installation of the rafter system.

Dry lumber in ventilated stacks. To do this, they are laid with short pieces of boards. They are placed a meter from the edges and then every meter. Under the bottom, be sure to install spacers
We will tell you about the main stages of assembly, about how to make a gable roof with your own hands in this section.
The assembly of the gable roof truss system begins with the installation of the Mauerlat. It should be placed strictly horizontally, therefore, before starting the installation, the horizontalness of the wall to which it is attached is carefully checked, if necessary, it is leveled cement mortar... You can continue to work after the solution has gained 50% strength.
Depending on the system, this is a bar with a section of 150 * 150 mm or a board with dimensions of 50 * 150 mm. It is attached to the top row of the wall masonry. If the house is wooden, its role is played by the upper crown. If the walls are made of lightweight building blocks - foam concrete or aerated concrete and others - their rigidity is not enough to redistribute the load. In this case, a reinforced concrete belt is made on top of the last row of masonry, into which embedded fasteners - wire or studs - are embedded. A bar or board is then placed on them.

There are several ways to connect the walls and the Mauerlat:
The distance between the pins (wire) should not be more than 120 cm. Cut-off waterproofing must be installed on the wall (belt) under the Mauerlat. It can be rolled roofing material or waterproofing material in two layers, it can be smeared with bituminous mastic.
There are more than a dozen types of gable roof truss systems. First of all, you need to choose how yours will look like. Further, in order to make it easier to work, a template is made from thin boards for all cuts, cuts and other similar details. To do this, you may need to assemble the first mold on the roof, and then make templates for the ready-made one.

The assembly procedure depends on the type of rafter system. If the rafters are layered, they are installed gradually, collecting from the elements directly on the roof. In this case, it is convenient if the ceiling beams are laid and, if possible, the rough flooring of the attic or attic.
In systems with hanging rafters, a truss is assembled on the ground - a ready-made triangle from a puff and rafter legs with all the required struts and struts. The required number of farms is collected at once. Then they are lifted to the roof, there they are exposed vertically and attached to the Mauerlat.
On the one hand, it is convenient - it is easier to work on the ground, with a high assembly speed, the accuracy is high: one farm is not much different from the other, which simplifies the procedure. But lifting finished trusses can be tricky, especially for large buildings. To make this easier, two inclined boards are installed, which with one end abut against the ground, and the other sticks out slightly above the wall. The trusses are brought closer to this "hoist", one by one are set at the bottom, the ropes are tied and pulled along the boards to the roof. In the absence of a winch or crane, this is the most acceptable method.
Assembling rafters requires certain knowledge: how and in what order to mount them, how to mark and make cuts. See the video for the assembly of one of the diagrams with a headstock.

Everything, gable roof assembled with their own hands and ready for installation of roofing material.
The process of installing the rafters itself raises enough questions, but there are many ways and it is impossible to tell about all of them. See one of them in the video. The system is large and was raised to the roof in parts, and there it was already assembled into a single structure. This is convenient for large houses.
The difference wooden houses consists in the fact that the frame shrinks, and this leads to a change in the geometry of the rafter system. If the elements are rigidly fastened, the roof may fall apart. Therefore, the mounts are made floating. There are special sliding fasteners, which in this case attach the rafters to the upper rim and to the girders, if any (see photo).

In order for the rafter to move freely during shrinkage, its long part is fixed strictly parallel to its edge, and the support is placed strictly perpendicularly. If necessary, a site is cut out for it. Mark the attachment so that the hook is in the lowest position or near it. Fastened to special self-tapping screws that come with the kit (the usual ones do not fit). If the installation is carried out on a log, so that the rafter leg does not slip along it, a semicircular hole is cut out in the lower part, on which it will rest.
Such fasteners are sold in any construction market, it is called "slippery". See the video for how to attach the slide to the timber.
It is not easy to build a gable roof with your own hands: there are a lot of subtleties and nuances, there are different ways fastening, building. To describe in words their work is thankless. This is the best time to see. Below we offer you a selection of videos that may be useful to you.
The story of the owner of the house about the stages of construction. There are some interesting technical points that can be helpful.
A video about the two most problematic types of connections.
This film takes just under an hour, but the whole process is shown from start to finish with many details. The roof is put on, but when installed on buildings of a different type (except for wooden houses) there is no difference.
If the roof of the house is not reliable, the structure will not last long. Today we figure out how to make a roof with our own hands together with experts: how to choose good materials and tools for work, what is important to know before starting work and what problems may arise in the process?
Before building, you need to decide on the type of roof for the house. This is important not only for the appearance of the building, but also for the correct calculation of materials.

A practical option. It allows you to effectively use the entire available area of the house, although it does not require inventive design solutions, noticeable alterations and serious roof insulation.
 Photo 1 - House with mansard roof by Peter Stoner Architects
  Photo 2 - Cozy country house for big family by Van's Lumber & Custom Builders, Inc
 Building mansard roof not very different from the construction of any other.
Mansard roofs are:
 Photo 3 - A room on the attic floor can also be spacious, like in a house from Charles R Schwartzapfel RA PC
  Photo 4 - Big house with finishing natural wood by Charles R Schwartzapfel RA PC
  Photo 5 - Cozy corner among tall perennial trees by Asse Architects
 The gable is used for a single-level attic. According to the construction principle, it does not differ from the usual gable. In implementation, such an idea is quite simple due to the uncomplicated roof structure... A noticeable drawback - small size premises.
 Scheme 2 - Scheme of a gable roof attic
 The broken gable, unlike the previous one, has not two, but four pitched planes, which are located at different angles of inclination. In design and construction, this view is a little more complicated, but inside it is larger.
 Scheme 3 - Broken gable roof attic
 It is used not only in the construction of houses, but also in garages, baths, gazebos. The design is lightweight and simple. Even a novice builder can build it.
 Photo 6 - Private residential building from the Atrium Architectural Workshop
  Photo 7 - The modern house of the Roman Leonidov Architectural Bureau
  Photo 8 - Shed roof and attic are not compatible concepts, as in the house from the Architectural Bureau "Alekminsky and Partners"
 Advantages:
Minus: it will not work to equip an attic or an attic under such a roof.

 Photo 9 - Strict laconic lines and nothing more from Carlton Edwards
  Photo 10 - Guest House by Tricia Shay Photography
 It is important to foresee the weather conditions of the region. Whereas in America the thickness of the snow cap is usually small, in Russia the weight of snow can reach 240 kg per m2. Roofing materials must be strong to withstand such loads, and even their own weight. Reinforced concrete floors successfully cope with this task.

During installation, a construction crane and additional technologies are used. It will be difficult to cope on your own. Then roofing material, rubemast or euroruberoid comes to the rescue. They can serve without repair for about fifteen years, if they are properly laid. The term will be reduced if you equip a recreation area or a green corner on the roof.
 Photo 11 - Cottage for a small family by Snug Architects
  Photo 12 - Stylish modern house by AR Design Studio Ltd
  Photo 13 - Benelux from Nina Frolova
 IMPORTANT! From a flat structure, you can make a large terrace with an exit directly from the house.
 Photo 14 - Grill-house with flat roof by Archduet
  Photo 15 - House in the style of modernism from mo + architekten
 Used for attic spaces.

 Photo 16 - Stone house on the lake from Porter Construction
  Photo 17 - Big house from David Heide Design Studio
 There are several types:

 Photo 18 - Vacation home from Zubkov`s brothers Architectural workshop
  Photo 19 - Preston Hollow_Traditional by LRO Residential
 Photo 20 - One-story house for a friendly family from Sticks and Stones Design Group inc
Mauerlat is made from a bar with a section of 100x100 mm or 150x150 mm. The timber is attached to the tree with nails, bolts or staples.


We install the ridge beam on the gables. If capital gables are not planned in the structure, the rafters must be connected to each other on the ground and mounted on the roof already in the form of ready-made rafter corners.

The upper part of the rafters is fastened with a ridge. He is knocked out from below.

Pull the vapor barrier membrane along the inside of the rafters.

A drain is mounted on the eaves of the roof:

We lay the roof, seal all gaps and crevices.
 Photo 21 - House in Mediterranean style from
 Do-it-yourself roof construction requires serious preparation. It is necessary to develop a project for the roof structure and roofing cake, perform the appropriate calculations, familiarize yourself with the work technology in detail.
Construction begins with calculations of the rafter system and materials for the roof. The rafter system consists of beams and planks. The configuration of the structure depends on the selected type of roof; it can be single-slope, two- or four-slope, with straight or broken slopes.
When calculating the power of the rafter system and the step of installing the rafter legs, it is important to take into account the load on the roof, which is summed up from the individual loads:
Snow and wind loads depend on the climatic characteristics of the region (which requires the introduction of correction factors in calculations), as well as on the angle of inclination of the roof slopes.

When calculating the material for the roof, it is important to take into account the working dimensions of the sheet roofing materials as they overlap. In order to minimize insulation waste and simplify its installation, it is recommended to choose the rafter pitch taking into account the suitable width of the thermal insulation material.
The width of the rigid sheet material should correspond to the pitch of the rafters, and the width of the wadded material (basalt or glass wool) should exceed this parameter by about 10 mm. This makes it possible to mount soft slabs or roll material in the spans at the spur, without gaps.
The calculation of the construction of the roof can be carried out independently, using the appropriate tables from the reference literature, or by resorting to a specialized calculator, which are abundant on the Internet. It is recommended to entrust the calculation of complex roofs to a professional architect.
When calculating the cost of building a roof, the amount of each of the basic materials is multiplied by its cost and 10% is added to the resulting value. We must not forget about consumables- fasteners, sealants, etc. The total cost also includes the transportation of materials.
The construction of the roof of the house is carried out on the basis of a detailed project, which indicates the length and cross-section of all structural elements, as well as the principles for the implementation of attachment points.
For the installation of the frame, it is important to use well-dried (moisture up to 15%) high quality lumber - without chips, cracks and other defects. This guarantees the necessary reliability of the rafter system, and also excludes deformation of its elements during operation. The roof frame is predominantly erected from coniferous wood, since this material is distinguished by its strength, resistance to decay, and durability.

To increase the fire resistance and protect the wooden frame elements from damage by microorganisms, they are treated with special refractory and antifungal agents before installation. The fire retardant composition is applied in two layers, while the second layer can be applied only after the first one is completely absorbed and dries. The installation of the wooden parts of the frame is started after they are completely dry.
It is especially important to carefully treat the elements of the cornice with protective agents.
Elements made of rolled metal - corners, channel bars can also be involved in the rafter system. But metal structures for self-erecting a roof are rarely used, since their installation requires the use of welding equipment.
Do-it-yourself roof construction usually involves the implementation of relatively simple projects: one pitched roofs, two-slope simple and broken lines. The difficulty of erecting a four-pitched hip roof or half-hip roofs (Danish, Dutch), first of all, lies in the need to make complex calculations and the most accurate markings. In addition, the installation of the diagonal rafters of the hip roof must be performed flawlessly, since otherwise the roof structure will not be able to withstand the operational loads. Calculation and installation of multi-gable roofs, roofs with complex architectural forms requires an exceptionally professional approach.

To build a roof, you need to understand the basic principles of building its frame. In general, the work is divided into the following stages:
To erect the roof of a house on your own, 2-3 people are required with the skills to work with construction tools.
A video with step-by-step instructions will help you to visually familiarize yourself with the basic principles of installing a rafter system.
Before building the roof of the house, it is necessary to complete the erection of the walls of the structure to its full height and lay waterproofing on their horizontal surface - a layer of roofing tar paper or roofing material. If the construction of a gable or shed roof, waterproofing under the Mauerlat is performed on two walls on which the rafter legs will rest. Erection of four pitched roof implies the installation of a Mauerlat around the entire perimeter of the building.

Mauerlat is a square or rectangular timber that forms the basis of the entire roof structure. It serves to evenly transfer loads to the walls and foundations of the house, and is also the place where the roof is attached to the building. To fix the Mauerlat on the walls, a monolithic concrete beam with metal pins is made, or forged annealed wire is embedded in the masonry.

The size of the cross-section of the timber is selected depending on the complexity and total weight of the roof frame. If the Mauerlat is mounted around the entire perimeter, its elements are connected to each other by cutting one into another by 500 mm across the entire width, and for additional reliability, nails or a bolted connection are used.

To prevent the roof from moving under wind or other loads, the Mauerlat should be fastened as securely as possible.
The assembly of the rafter system begins with the installation of the rafter structures on both gables. If a partition or load-bearing wall passes in the middle of the house, this allows you to lay a beam on it and install supports for the ridge run. In this case, the rafter legs are attached with the upper part to the ridge girder, and the lower part to the Mauerlat.

If the structure has a small width, A-shaped truss structures without a ridge girder are installed. The horizontal lintel (crossbar) provides rigidity to the structure and reduces the load on the spacer, which is transmitted to the walls. The fastening of the rafter legs in the upper part is reinforced with a wooden or metal plate-overlay.

The lower part of the rafters can abut against the Mauerlat with the cut end - in this case, the rafter system is performed without an overhang. If the project provides for the construction of a roof with an overhang of rafter legs, a recess is cut in the lower part of the rafter so that the rafter with the horizontal part of the cut rests against the Mauerlat.

The construction of the roof of the house can be carried out without laying the Mauerlat on long walls. In this case, beams are mounted across long walls, with the beams being longer than the width of the building. The pitch of the beams must match the pitch of the rafters. It is important to securely fasten the beams - with embedded wire or put on reinforcement embedded in concrete. The lower ends of the rafter legs are attached to the beams without overhang or with overhang.

When erected with a residential attic floor, rafter systems with layered rafters are usually used... This means that the rafter legs have an additional fulcrum. For this purpose, special support posts are installed, connected by girders. In addition, struts and other elements are used to ensure the rigidity of the structure.
The creation of a roofing cake is started after the installation of the rafter system. First of all, it is recommended to install waterproofing - a special membrane or roofing material. It is attached to the rafters. It is important not to overlap the waterproofing ridge - this will worsen the ventilation of the roof. On top of the waterproofing, bars with a cross section of 50 mm are stuffed onto the rafters - counter-lattice. This allows the necessary air gap between the waterproofing and the roofing to be created.

The battens are attached to the counter battens. It can be made from planks, bars or wood-based panel materials (solid lathing). The type of lathing directly depends on the installation features of the selected roofing material.
At the next stage, the finishing roofing is laid. For pitched roofs, the following are commonly used:
Pitched roof insulation is performed from the inside... Materials made of plant fibers (mats made of straw, seaweed, hemp), cellulose (ecowool) can be used as heat insulators. But most often it is used mineral wool- environmentally friendly fire-resistant fibrous material obtained from melted basalt or glass. Sheet and sprayed polymer heat insulators are somewhat less commonly used - they are more expensive, in addition, sheet polystyrene foam and polyurethane foam have certain drawbacks in installation, and special equipment is required to spray foam insulation.

Roof construction technology involves the installation of a vapor barrier from a special membrane. It allows you to save insulation and wooden rafters from the destructive effects of moisture.
It is not recommended to replace the membrane with plastic wrap or other materials.
The video shows the main stages of installing the roof of a private house with your own hands.


The dream of many city dwellers is to have suburban area, which can be immediately equipped on the construction site. When drawing up a building project, the construction of the roof of a private house is of great importance. Comfort in the future house depends on the choice of its shape, correct calculations in the design and adherence to the technology of work.

The quality of the roof and roofing materials directly affects the comfort of living and the life of the house. Source rapidroofs.com
The installed roofing system can be of several varieties. The roof structure of a private house is:

Common forms of roofs of private houses Source socratstroy.ru
As a material for sheltering a house, metal or natural tiles, profile flooring, ondulin, slate or double-glazed windows can be used.
The device of the roof of a house made of glass can be of any of the listed varieties. Installation of a double-glazed window is possible along the entire perimeter of the roof or on its individual elements.
The choice of the type of roof and its coverage largely depends on the climatic conditions of the area in which the house is located, the wishes and financial capabilities of the owner of the house.

Each detail has its own purpose and technological requirements Source ms-aig.ru
On our website you can find contacts construction companies who offer the service of designing and repairing the roof. You can communicate directly with representatives by visiting the Low-Rise Country exhibition of houses.
The roof device of a private house consists of the following elements:
skate- the upper connection point of the rafters, the place where air exits from the ventilated space;
support legs and struts- structural parts designed to strengthen the rafters and increase the rigidity of the structure;

General scheme of the roof structure Source slide-share.ru
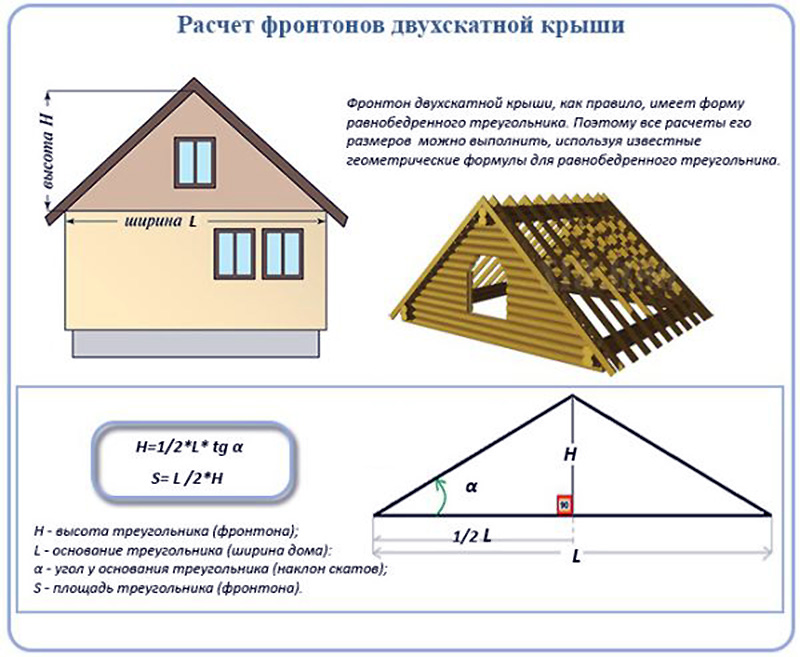
To facilitate calculations, it is recommended to make a front sectional drawing of the roof. For example, if you cut a broken structure, you get several geometric shapes. A rectangle will be located in the center of the cut, an equilateral triangle will be located above it, right-angled triangles will be located on the left and right. This will make it possible to calculate the volume of the roof space.

Complex forms can always be divided into simple ones and all calculated separately Source tirez.ru
For an example of calculation, see the video:

In case of hip roof the areas of triangles and trapeziums are calculated Source tl.decorexpro.com
To find out the approximate cost of the roof different types, use the following calculator:

Frontal projection of the roof drawing, plus the option of a broken shape Source legkovmeste.ru
For the manufacture of a rafter system, it is recommended to choose a base that has high strength, low own weight, resistance to moisture and temperature extremes. Best suited for this conifers trees with a moisture content of up to 20%, which do not have cracks, large knots and other imperfections. Prepared wooden parts must be treated with a refractory mortar. To prevent fungal diseases, rotting or damage by rodents, the wood must be treated with an antiseptic agent.
Construction principle roof structure consists in the phased erection of its elements. To understand how to properly build the roof of a private house, it is necessary to divide the construction process into several main stages:

Armopoyas for the roof Source lineyka.net
The presence of heat and waterproofing layers is mandatory for any roof. Their installation can take 2-3 days.

Heat and waterproofing on the roof scheme Source stk-prof.ru
If you disregard reinforced belt, then the construction of the covering of the house can take from 7 to 14 days.
You can clearly see the whole process of roof installation in the video:
In general, the construction of a roofing system is not a very difficult task, but it must be borne in mind that the future heat loss of your house will depend on the quality of the selection and installation of all elements. Therefore, it is strongly recommended to entrust the construction site to the builders, and use the acquired knowledge of the roof structure and installation stages to control the progress of work.
The last stage of building a house is the arrangement of the roof. Traditionally, a gable roof is erected for any residential building, a gable roof for outbuildings. Technological processes works on installation, fastening and arrangement of a roof with a rafter structure in a gable version of the roof have been honed for centuries, and these operations do not change from the type of roofing materials (clay tile, corrugated board, metal tile, asbestos slate, metal or plastic).
The people say: "the roof is a house", that is, they mean not only the form, but also the reliability of the structure, which has a long list of advantages:
The three most common gable roof options are:
The shape of the roof and its structure can be selected based on - the size of the building, the material of the load-bearing walls, the geographical location of the site play a role. It depends on these and other parameters specified in the project what loads the gable roof can withstand during operation.

The angle of inclination of the slopes has a certain optimal range in which weather conditions least of all affect the formation of maximum loads on the roof. If the slope angle is ≤ 400, then this limits the possibilities of equipping the attic or a full-fledged room in the attic, and the slope angle ≤ 100 increases the load on the roof from rain, wind or snow. If you definitely want to have an attic or a room in the attic space, it is better to use the option of a broken asymmetric roof, and if the walls of the house are more than 6 meters long, then the rafter system must be strengthened with additional girders. 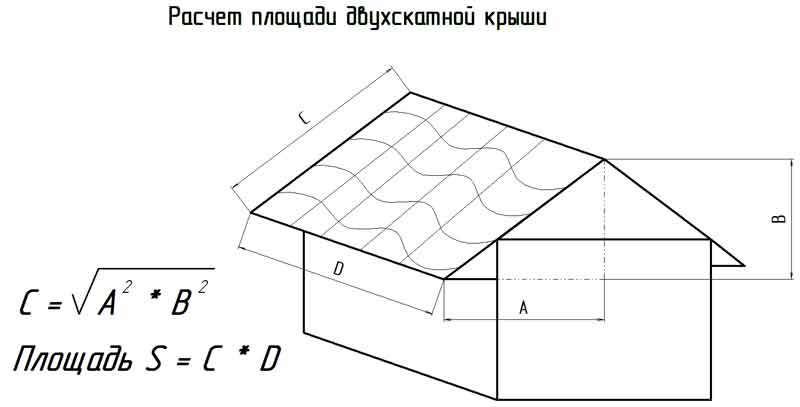
When calculating building materials for gable roof it is necessary to proceed from the axiom that the weight of roofing materials should be as small as possible so as not to load the walls and base of the house. Wooden elements will be stronger not only with an increase in their cross-section, but also with the use of suitable types of wood. The main parameter in calculating materials is the total roof area, and a symmetrical structure in this regard is calculated easier than others - it is enough to know the perimeter of one slope, double its area, and get an accurate result.
The main load from the weight of the roof is taken by the long walls of the house, therefore the rafter system is built according to the principle of load distribution along the system. For a small house (≤ 6 m) it is more practical to use the system hanging rafters(without props), when building a house of larger sizes, a system of layered rafters with a more complex configuration is used. 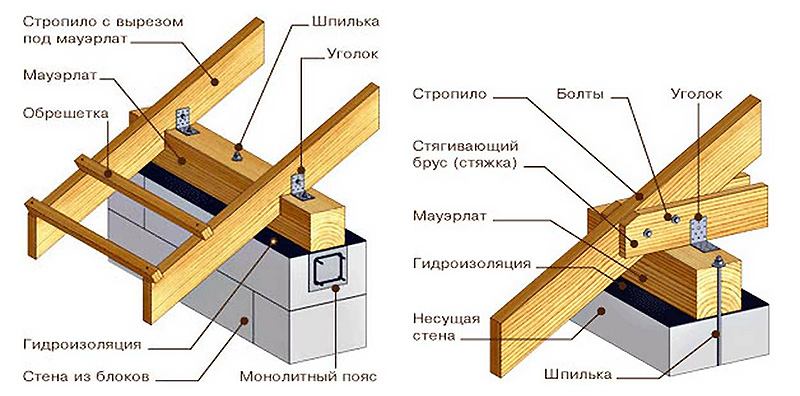
A finished gable roof for a private house consists of the following elements and nodes:
Mauerlat on the walls of the house holds the weight of the roof, evenly distributing it on the walls and base of the house. The width of the bar for the Mauerlat should be equal to the width of the wall. The timber is impregnated with an antiseptic and substances that increase the fire resistance of the tree. The outer border of the Mauerlat should not protrude beyond the outer edges of the walls. 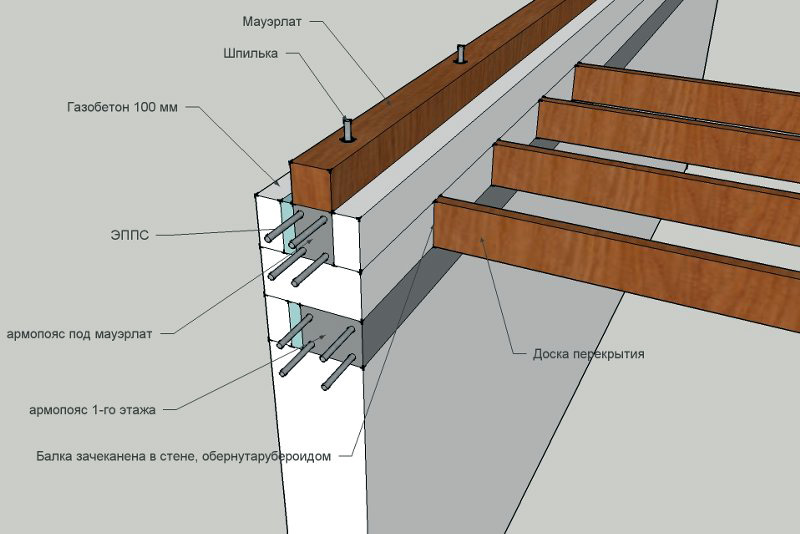
The Mauerlat is attached in different ways. Steel wire Ø 8-12 mm is laid in the brick wall, holes for the wire are drilled in the tree, and through them the bar is tied to the wall. Also, the beam can be secured with brackets, threaded rods in one or two teeth, metal plates, wooden pins or anchors through the same holes in the Mauerlat. The gables and the lower edges of the sheathing are attached either directly to the Mauerlat, or to a smaller bar, which is nailed (screwed) to the upper harness.
When arranging beams for the roof of a private house, it is necessary to use a wooden beam with a section of 200 x 100 mm. The larger the area of the house, the larger the cross-section of the supporting beam should be. Beam installation begins with fastening the extreme elements along the long wall of the house. Then the points are marked at which the remaining floor beams will be attached. 
The lathing is mounted on longitudinal beams, which are located at a distance of 50-60 cm, and are attached to the Mauerlat with nails 200 mm long or in any of the above ways. Beams are moved beyond the edges of the walls to a distance that determines the width of the cornice - from 30 to 50 cm. The cornice will be nailed (screwed) from below to these beams. Since the pediment will be arranged at the ends of the roof, a cut-in is made into the groove on the transverse beam of the Mauerlat to fasten the cornice and pediment. When erecting sloping roof for the attic at the pediment will be enough big square, therefore, it is necessary to ensure the design of the ebb and the gable overhang. 
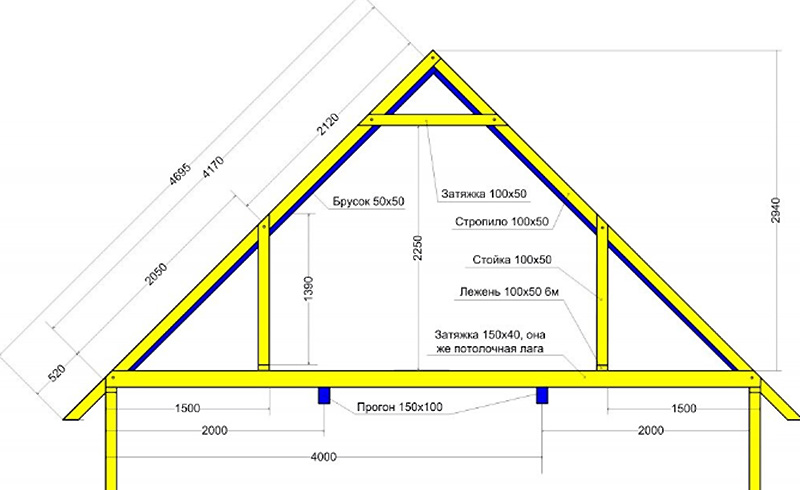
The rafters of a gable roof are several of the same wooden beams one length and section. After the installation of the floor beams, a ridge beam is attached, for which beams with a section of 100 x 50 mm are fastened along the central longitudinal axis of the house with spacers. Height of racks in typical scheme a gable roof is equal to the distance from the floor to the upper surface of the Mauerlat. Instead of a skate bar, boards with a thickness of 50 mm can be used.
Before installing the rafter system, it is recommended to make a large-scale template. To do this, the board from the rafter structure must be attached with one end to the timber, the other to the ridge, and mark its length. This will be the template length of the rafters. 
The rafter system is also mounted according to a template, observing the sequence of processes. After installing and securing from the lower end of one rafter beam, you must immediately attach the opposite rafter, and connect the beams with the upper ends to each other through the ridge. The rafters are nailed to the ridge beam, and to the floor beam - with steel brackets or a corner, self-tapping screws or anchors. For a roof of any shape with two symmetrical or asymmetrical slopes, boards are attached along and across the rafters to give rigidity to the system.
The pediment is sewn up after the completion of the construction of the truss structure. Modern materials are increasingly replacing traditional wood when sheathing gables, and now they use clapboard, siding, corrugated board, and other durable decorative Decoration Materials... Any cladding material is attached to the frame, which is mounted in advance. Regardless of whether or not there will be a room or an attic in the attic, a window opening must be left in the pediment - for ventilation and minimal natural lighting of the space. 
The cornice must be equipped around the entire perimeter of the house - it is necessary for moisture and wind protection of the truss structure, the walls of the house and the foundation. Since every self-respecting owner necessarily makes drainages around the perimeter of the house, they are also attached to the cornice, and drain pipes to the walls. The plastic drainage system is mounted on plastic clamps. From the bottom of the cornice board or the cornice frame is painted, sheathed with siding, clapboard or corrugated board - in unison with the decoration of the pediment. 
The roof is mounted on a lathing, and, based on the type of roofing materials, sheathing is first done with vapor barrier, hydro and heat insulating materials. For the roof, you can use ondulin, metal tiles, ceramic materials, soft shingles, etc.


