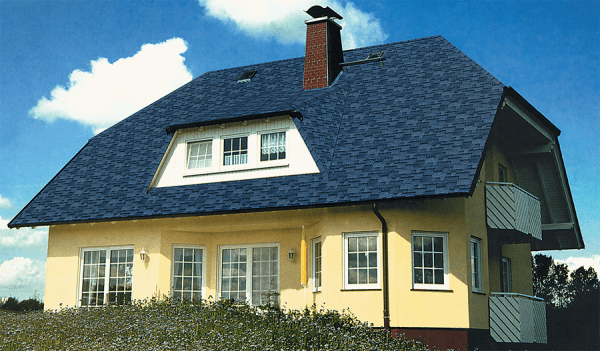
For areas where windy weather is not uncommon, a half-hip roof is ideal, because the rafter system of such a design is characterized by great reliability and resistance to weathering. A semi-hip roof is similar to a pitched one, but has small overhangs at the ends. This design makes it more resistant to wind and precipitation. The roof usually has a very attractive appearance due to the use of additional elements.
Floor construction hip roof, in contrast to the hip, has a much more intricate design. The trapezoids have turned into polygons, and the hips have changed.
Complex roof structure
This design is a symbiosis of gable and hip-type roofs. The hip roof slopes are quadrangles, trapezoids and two triangles, and the half-hip roof slopes form a broken line. A structure with such a roof is not only decorative, but also very justified. It has a number of undeniable advantages. Thanks to the height of this design, you can arrange an additional room in the attic floor.... For increase useful area rooms, the upper plane of the slope is made sloping and long, and the lower one is almost vertical.
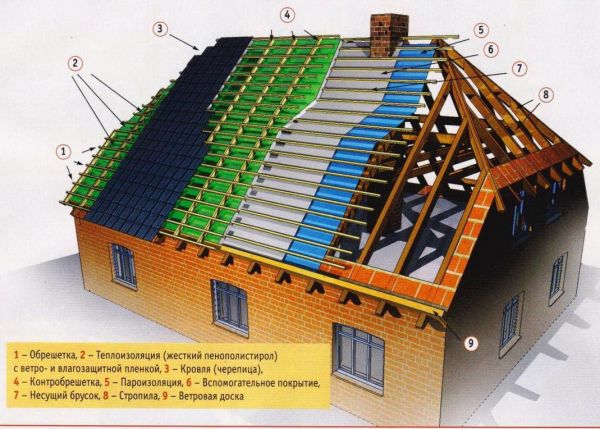
Structural elements of a half-hipped roof:
 The device of the rafter system
 In addition to the main elements, the roof structure includes a lot of additional ones: crossbars, posts, stops. All this requires a significant consumption of wood, it is difficult to install the frame of the truss system. But it is precisely because of this peculiar structure that the roof has strength and durability..
Rafter system The half-hip roof has a rather complicated structure: a significant number of ribs, intermediate rafters, stops, valleys, struts, spreaders, shrengels. Such a device requires a significant waste of materials. Therefore, before installation, you should make a calculation, make drawings, pay attention to control over the quality of the purchased material. It is important that the wood is free from cracks and knots and is dry..
 There are two options for semi-hip roofs: two- and four-pitched.
By type of hips, roofs are divided into:
The names appeared due to the popularity of the first type of roofing in Holland, and the second in Denmark.
The gable half-gable roof of the Dutch variety is arranged as follows: under the ceiling of the attic there is an attic space, in which small windows are made for lighting and ventilation, located on the pediments. The scheme of this option is more convenient, since the attic ceiling has bevels only on two sides, and in the Danish version of the roof - from four.
 Trapezoidal hip slope
 The scheme of a four-pitched half-hip roof is a combination of elements of a gable and a hip roof. As with a gable roof, a large attic space can be used to furnish a living room.
This type of roof is even more laborious and complex than the first option.... However, if everything is done strictly according to the calculations and choose suitable materials, then such a roof will be much more beautiful than a Dutch one. The structure will serve for a very long time, providing reliable protection for the building.
 Triangular cropped hip
 To determine the required amount of material for roofing, you should know its surface area.
The semi-hip roof has a difficult decorative form, but, despite this, the calculation of its area will not be difficult.
This can be done by dividing the roof plan into separate geometric shapes. It is necessary to calculate the area of each figure separately, using the formulas known to everyone from the school geometry course, and then add the results.
 House with a half-hipped roof
 The roof is erected in several stages.:
During the production process, wood is treated with antiseptics and fire retardants according to the original method with its preliminary heating. Similar manipulations for wood processing can be performed in a domestic environment.
A fireproof and antifungal covering of the truss system is an invariable rule of roofing.
With a brush or sponge, the surface of the beams is carefully treated with an antiseptic. The agent is capable of forming a protective layer, the action of which lasts up to 2-8 years.
The assembly of the roofing system begins with the installation of the Mauerlat. In some cases, along the perimeter of the bearing walls, make concrete screed, into which the reinforcing pins are immersed, a Mauerlat bar will subsequently be attached to them with further fixing their ends with nuts and washers.
 The timber is fixed along the perimeter of the walls
 In order not to complicate the subsequent joining of the rafters with the Mauerlat, the studs should be placed in the correct order. Before laying the beams, the concrete screed should be covered with two layers of roofing material.
After the Mauerlat is installed, the ridge and the racks under it are strengthened. The posts must be strictly vertical, so a plumb line must be used.
 Installation of the ridge frame
 The ends of the ridge are connected to the corners of the house through diagonal rafters. Diagonal rafters are longer than privates and must have large area cross section .
 Installation of diagonal rafters
 Then, with a step of 60-120 cm, ordinary rafters are installed. The installation of the rafters is done with an emphasis on the rafters... It is necessary that the load is evenly distributed along the diagonal rafters. Therefore, when calculating the load on the structure, it should be taken into account that the points of support on the surface of the rafters should be different.
 Installation of ordinary rafters
 Then reinforcement is made with additional struts supported by floors, beams or support posts. Roof rafters should be reinforced with a truss truss.
To increase the reliability of the roof, the rafters should be additionally screwed to the crutches hammered into the wall..
 The supporting structure of the roof is ready
 Do not use in the gap under the ridge. polyurethane foam to ensure free air circulation... This is important for the preservation of wooden structures.
 Roofing cake
 Finally installation works do:
Often, corrugated board or metal tile is used to cover a half-hip roof. These materials facilitate installation and repair of the coating, are lightweight and affordable price... Meanwhile, they are quite strong and durable, and also have quite decorative view... For a Dutch roof, a metal profile will cost less than for a Danish one. The material has fewer cuts and less waste. And the use of shingles in both cases will entail the same costs.
Any kind of semi-hip roof has both its pros and cons. You can only decide based on personal preferences. In order to make the installation of the structure without problems, you should make accurate calculations, know the installation rules, the features of the materials used. The combination of all these factors determines how long and efficiently the roof will serve.
To better understand what a semi-hip roof represents, you can imagine a structure that looks like something intermediate between a hip version and a simple gable.
Distinguishes the half-hip design from the rest of the trapezoidal pediment.
There are a lot of characteristics of such a design that are worth paying attention to and understanding them before proceeding with the installation.
Basically, they construct a half-hip structure for attics. The roof can be gable and hipped, in which there is a corresponding number of cut triangular edges. The location of such cuts is above the end walls.
This is what distinguishes a half hip from a similar hip design. Roof ramps are symmetrically positioned in relation to the axial beams and have equal angles of inclination.
If we consider such a design from the positive side, then the following points can be distinguished:
Regarding the shortcomings, we can say the following:
It is not easy to independently design such a variety, everything depends on the construction of the rafter system. This system characterized by a lot of differences compared to conventional gable and pitched roofs.
Semi-hip roof: photo below.

House with a half-hipped roof
Frame house with a semi-hipped roof
The rafter system is much more complicated than the hip type of the roof, it is represented by trapezoids and various polygons, in addition to this, the hips themselves are also of a different shape.
From the species diversity, half-hips are presented:
There are two types of rafter system for such a roof, it depends on which rafters are used for the construction of the structure:
The listed elements create a rafter system:
ATTENTION!
To increase the strength of the rafter system, special ties are mounted in it, connecting the elements located on opposite sides. Installation of additional screeds is carried out flush with the ceilings or at the level of the middle of the rafter beams.

Truss system diagram
 K any roof, regardless of its type there is not one layer of material, but several.
This solution allows the roof to be provided with all the necessary characteristics and properties for a comfortable life.
The composition and structure of a roof owl may vary depending on its purpose and variety.
With regards to a half-hip, such roofing cake represented by the following layers:
Each material in the "pie" of the roof is designed to perform certain functions, much depends on the correct installation of such a system.
All materials must be correctly selected in accordance with individual characteristics and structural parameters.
The roofing cake is laid in the same way in all types of roofs, the lathing is installed first, on which materials are subsequently attached alternately.
Roofing cake
It is better to break the entire construction process into several separate stages, understanding the essence of which construction will take place easily and without errors.
Process steps:

Rafters

Installing Mauerlat
Diagonal rafters installation diagram:
Manufacturing and installation of hip legs... The distance that the rafter leg should rise relative to its lower part be sure to measure and the result is set aside from the top of the skate and also make a note. From this point, a lace is pulled, along which they are guided in the further process of installing the rafters in the central part of the structure.
To mount a leg of a half-hip structure, you must:
Completion of construction... When the roof rafter system is ready, the last step is to suture the eaves and construct the sheathing for laying the materials for the roof pie. After completing the laying of all the necessary layers, relative to the individual roof structure, the roofing is installed.

Despite the complexity of the construction of a half-hip, having understood the essence of the process, you can easily cope with the task of erecting such a roof. The most difficult thing in the installation process is to equip the end parts of the roof system, therefore, it is worth starting to understand the process from these stages.
In contact with
When choosing a project for the construction of a private house with their own hands, they take into account not only the practical side of the issue, but also the aesthetic one, because it will become the "face" of the site. More often than not, future homeowners choose, as they say, with their hearts, making decisions based on what they find attractive and what not. Perhaps that is why the original, unusual half-hip roof has become so popular.
In response to clients' requests, architects and designers are creating more and more projects with a half-hipped roof, which is also called Dutch. Having extensive experience in private housing construction, they explain their choice not only by its aesthetics, but also by its high functionality, which will be appreciated by residents of regions with a harsh, windy climate. Under what conditions to opt for such a structure and how the process of its construction with your own hands goes, read in a specially prepared material.


The construction of a half-hip roof cannot be called simple either in design or in installation with your own hands, since it is a cocktail of the positive qualities of a simple gable and hip,. If we talk about the appearance, then in the shape of the gables it resembles a trapezoid, which is formed due to the hip elements, cutting off the apex of the triangle. Due to its structure, the half-hip two pitched roof has a number of advantages:

The interest in building a half-hipped roof with your own hands is very commendable, but you must understand that only professional roofers can do it. You can take part in it personally, with your own hands, if you work under the guidance of an experienced master who will draw up a drawing. During preparation and installation, you may encounter the following difficulties:

Nevertheless, we assure that the information received about the half-hip gable roof will be helpful. After reading this article, you can easily "read" the drawings, learn how the installation process should take place and be able to flaunt the knowledge of the terms in front of the masters.
As already mentioned, the roof truss system with hips is difficult to assemble with your own hands, it includes both the elements available in gable roof and new ones. It is characterized by the following scheme:

Depending on the layout of the future building, the rafter system may differ significantly. There are two types:


Roofing masters advise using a layered type of rafter system for DIY assembly, if possible. So the roof structure comes out more resistant to external loads, there is more space for arranging the attic.
The construction of a semi-hip roof is a complex, painstaking process that can only be entrusted to professionals. They install the roof in the following sequence:

After the completion of the external work, they move on to the internal ones. For. In order to use the attic room as a residential one, the half-hip roof must be insulated, its frame is sheathed with decorative material. When the work is completed, you will only need to regularly inspect the roof, monitor its condition, and carry out preventive repairs with your own hands.
The covering of the upper part of the house should not be judged purely utilitarian. In fact, this element has an important decorative value, because the impression received by people, including the owners themselves, depends on it. Original decision often becomes a half-hip roof.

The semi-hip roof is sometimes also called Dutch, which directly indicates its origin. That is why the main property of the protective structure is the combination of an elegant appearance with the ability to withstand significant wind loads. It should be remembered that a half-hip roof is quite complex in structure. Designing it, and then assembling it, will not be easy.
To a large extent, this "pays off" by combining the positive characteristics of gable, hip and hip structures.


The configuration of the gables is close to the trapezoid formed by the hip elements, which allows you to achieve several positive aspects at once:


But we must not forget that a half-hip roof is not so easy to make - you can make it yourself only with the assistance of professional craftsmen and under their direct supervision. The amount of materials spent increases significantly compared to other options. The reason lies in the complexity of the geometry and the weighting of the structures - you will have to carefully calculate all the loads and ensure the ability for each part to resist them.


The gable rafter system includes, first of all, the Mauerlat - a square-shaped bar that helps to distribute the weight load along the wall and transmit it to the foundation. Legs, ridge girders, diagonal legs, ordinary rafters, filly and a number of other elements are also used. When choosing a hanging contour, the frame of the house does not have a single load-bearing partition. The support of the rafters is made only over the ridge girder and over the Mauerlat. For the rest of the length, there is no support.
Long, heavy legs are pushed towards the wall of the house, so they must be compensated for by crossbars, puffs, attendants and struts. There is another device - layered, which is used when at least one load-bearing wall is located within the perimeter of the building. Then it will become a good base for holding the rafters. Since the energy directed to the sides is reduced, no additional burden is required, therefore reducing the number of support parts will not affect the stability of the system.


Specialists in working with the roof indicate that, whenever possible, a layered type of structure is preferable and more reliable.
There is the so-called Danish variety, which is equipped with a triangular block in the upper lobe of the end. The bottom line of the triangle is in close contact with the vertical pediments, lined up in the form of trapezoids. The tangent line forms a convex corner.
The difference from a simple hip design is that the end slopes are shorter.


It is important to know that any half-hip roof, no matter how formally called it, will in fact be hipped, since the division is only conditional. If it is called that, then, unlike the gable version, the end slopes are not led from the skates, but from the central points of the side slopes. They certainly reach the eaves.
Half-hip gable roofs v one-story house differ in that they make it easy to create an attic. If you use a four-slope design of a full-fledged sample, then the attic should be equipped with a very high window. In addition, it will not work to put a balcony at the end.


Pairing boards is an excellent practice, which allows you to get a large block even from small elements and make, for example, a part 9 meters wide or more. When calculating the permissible and justified length, width or thickness of the board, a balance must be observed between strength and the load generated, because a strong structure inevitably turns out to be heavier. The smallest section, which is considered acceptable by technical requirements, this is 5x15 cm. It is it that should be used to save money in the construction of secondary buildings.
When constructing long spans, it is worth choosing boards measuring 15x15 or even 25x10 cm for rafters.An even larger section is justified only for very large-scale roofs (for example, on apartment building, above a solid shopping pavilion and similar buildings). Regulatory parameters can be useful, but they do not reflect the climatic specificity of certain areas.
Therefore, professional builders unambiguously agree that calculations should be carried out every time a new structure is created.


The optimal thickness of the boards for the formation of rafters ranges from 40 to 60 mm. When building a roof over utility structures of secondary importance, it is allowed to save money by using wood with a thickness of 35 mm. But above residential buildings, it is recommended to put solid rafters from boards with a thickness of at least 50 mm. When the board lengthens, its required width also increases.
The most accurate calculations are made using special software.


It is not enough just to pick up boards for the rafters - to build a half-hip roof on a log or other house competently and in a short time will not work if you do not use suitable materials. The choice of thermal insulation, a vapor barrier and means of protection against precipitation and wind is largely individual - it must be consistent with both a warm or cold arrangement scheme, and with the type of face material, with the order of its use. Therefore, it is on him that you should focus.
Metal tiles should have a lower slope of 150 mm, and if it does not exceed 200 mm, then you will have to carefully seal the joints.


A roof of this type is attached using self-tapping screws equipped with rubber gaskets. Attaching metal tiles to the base is quite simple, and its mass is relatively small. The requirements for transportation, loading and unloading are quite sparing, the cost of the material is low. However, one has to reckon with a significant amount of waste during work and with the need to mount reinforced noise protection from below.
When choosing a profile deck, a roof slope of at least 100 mm is required.


You need to fix this material with 6-8 self-tapping screws per 1 sq. m. It is allowed to install the profile deck on the previous roll material... The advantages of the coating are long service life, bending strength and low price. But you have to reckon with the fact that the roof can become very noisy if you do not take care of sound insulation.
Ondulin is good where it is required:


But it is important to remember about its disadvantages: ignition when heated above 110 degrees, the likelihood of paint fading, the danger of overgrowing with moss in insufficiently lit areas. Cheap and long-lasting slate is suitable for roof slopes from 12 to 600 mm, a prerequisite is an overlap of 1 or 2 waves.
A crate is mounted below, for which square-section bars are used. When a reinforced slate is taken, the supporting structures must also become thicker.
You will definitely need a lining layer (roofing felt, glassine) and additional soft material for all nails.


It should be remembered that the asbestos present in the slate can negatively affect human health. In addition, even the best varieties of slate are very fragile, they can absorb moisture and become covered with moss and lichens. Steel seam roofs are durable, outwardly beautiful and can work for a long time. But they easily let the cold through, which raises the bar for requirements for the quality of thermal insulation. Fastening of "pictures" to the lathing is carried out using thin steel clamps.
Regardless of which of these materials and types of construction is chosen, it is advisable to work in the same way as professional builders. And this means, among other things, the obligatory purchase of only such materials, components and fasteners that meet the requirements of the state standard.

When working on the installation of roofing materials with your own hands, you will need:


Project options. Differences between specific versions of the hip roof are due to the fact that the angle of the short hip in relation to the walls of the gables is. It can be both convex and concave, there is an upper or lower placement of a half hip. In the drawings of the Dutch half-hip roofs, it is clearly visible that the half-hip is located below. The upper side of the trapezoid stretches parallel to the vertical triangle, which can be either monolithic or with an addition in the form of a dormer.
The Danish type of roofing implies that the half-hip is made in the form of a triangle. A vertical pediment in the form of a trapezoid acts as a support for it. The whole structure together forms a convex corner.
The difference from a simple hip roof is that the end slopes are shortened.


It is not necessary to be limited to just the classic options - there are hipped structures, each side of which belongs to the Danish or Dutch group. There are also buildings in which a hip of a shorter length is placed from one end or from one side.
Regardless of the approach chosen, there will be some part of the rafter legs, which are installed in a hanging or layered pattern. Execute suspended structure it is needed where the box does not have load-bearing walls inside.
It is also appropriate in a situation where it is impossible to put supports for ridge runs.


In both cases, the heels rest on:


The development of the Dutch format in one way or another is quite common. An example is a design that resembles a postal envelope, but differs from it in the projection of the hip contours. The Danish "broken" system turns out to be more complicated and more expensive than the classic half-hip roof. During the preparation of projects, it is by no means necessary to scrupulously calculate each element - experienced builders and architects recommend limiting the calculation of the longest part, and all the others do the same or slightly smaller size.


Construction guide. Any step-by-step instruction on the construction of a half-hip roof with your own hands implies that by the beginning of the work, all the necessary calculations have already been carried out and drawings have been drawn up, because both are necessary for the selection of materials and an assessment of their quantity. Mauerlat is made unlike the classic wood frame.
The timber is laid in the form of separate strips:


Then comes the turn of the floor beams laid out at right angles to the Mauerlat beam of the key walls. If it is required to join two bars together, then the weakest position in their connection is brought up from the inner support wall. When installing supports that hold the ridge run at the same inner wall, it is very important to estimate the distance from one peripheral pillar to another, since the length of the key piece of the roof depends on it. Ordinary racks are bred at equal distances from each other - the uniform distribution of the generated load depends on this.
It is important to know that before fixing, you need to control the lines of the supports using a plumb line or a laser meter.


Exposing auxiliary jibs helps to eliminate distortion of the positions of the racks after measurement. They are removed as soon as the final fixation is made. After it comes the turn of the installation of the rafters of the main slopes (their ordinary legs), for which they choose a suspended or layered technique. It is worth remembering that in many pictures that can be found on the Internet or in special manuals, floor beams are not displayed in order to simplify the presentation of information. In fact, of course, you can't do without overlap.
The diagonal rafters are designed to connect the edges of the skates with the corner points of the gables. First, a piece of the board is placed flush to the outer side of the Mauerlat, the dimensions of which are 5x15 cm. This part is lightly pressed to the base with nails so that it does not change its position and does not fall during further manipulations. This approach allows you to quickly determine exactly where the cutting points should be. Then they take a board (the size is not important), which is placed on top of 3 or 4 ordinary rafters, if only the parallel with respect to the girder is maintained.


The landmark must be checked: whether it is horizontal to the required degree. Then the board is pulled up to the nailed area. When crossing, they find a point from which a line is drawn for a cut. The diagonal block itself is tried on by applying it to the top point of the peripheral truss and to the corners of the scraps.
Then the upper cut is measured, and the required distance is set aside, counting from the mauerlat pediment in 4 places. In this case, the imaginary contours of the board are duplicated. Cuts by marks are made only on a solid basis. If there are no serious problems, then you can immediately proceed to the next stage of work. The heel of the rafter leg, going diagonally, rises above the Mauerlat to a carefully measured distance (it is counted from the top of the skates).


The construction cord acts as a reference point. The middle leg of the half-hip is placed only after measuring the angle separating the lace from the support post with a goniometer, as well as the angle of the joint of the diagonal parts. The workpiece is tried on again, the result is transferred down to determine how deep to make the bottom cut and how to cut it there. Narodniks filling the hip slopes are prepared according to the usual method, but adjusted for the dimensions and installation conditions.
When all the rafter legs (long and shortened) are ready, you will need:


Another option is as follows:


When the outer work is over, they begin to work on the inside. The semi-hipped roof must be insulated and sheathed with decorative materials. After finishing the finishing, you only need to control the actual condition and timely repair problem areas. Any, even the most weak spots leaks and passages of cold air must be eliminated immediately. Compliance with these principles allows you to operate the roof for a long time, but only if it was done correctly.
It is worth mentioning separately about the safety measures during the construction of a half-hip roof. It will be necessary to strictly follow the instructions of the manufacturers of materials and tools when storing, moving and lifting up. All work is carried out exclusively in calm or light wind, in clear dry weather. Before starting work, all tools are inspected each time.
It is forbidden to work in poor visibility, as well as without protective gloves.


Calculations. In addition to choosing a semi-hip roof scheme, it must be carefully calculated. Not a single developer will pass this stage.
To simplify calculations, the surface to be treated is conventionally divided into figures. The Dutch formation is characterized by division into rectangles and trapeziums. First, the area of the slopes is calculated, and then the area of the triangular parts.
If a Danish roof is performed, then division into a rectangle and a series of triangles is performed. Then the hip slopes are calculated and the indicator is doubled. The results are summarized. It is important to consider that the slightest mistake can lead to very unpleasant consequences.
Therefore, it is stupid and irrational to save on the services of professionals even at the design stage.


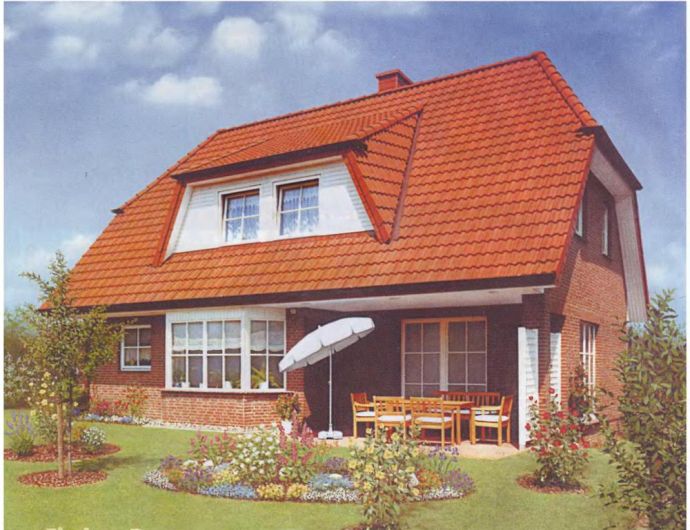
The semi-hip type of roof looks really beautiful and unusual and can be very diverse in appearance... The photo below shows just such an example. Shiny, even sparkling in the sun, metal tiles, laid out in a bizarre geometric pattern, are in perfect harmony with the light brick of the walls, which does not create such a dazzling look. There is another option, with an attic - here they are already going to interesting color experiments: this roof is purposefully framed under rusty metal.


Sometimes architects go even further. Here is an example of a radical approach: a black, as if shabby and worn half-hip roof with white inclusions in various places. From the side, it looks as if it was not installed firmly on the rafters, but simply put on top, like a hat. Pinkish brick walls complete the ensemble and create an interesting contrast. In the roof itself, there are two relatively small windows used to illuminate the attic space.

For information on how to quickly and efficiently cut the rafters on the hip roof, see the video below.
When building houses, they use completely different types roofs.
They differ, first of all, in their design.
It is customary to divide roofs into combined and pitched.
Pitched roofs are arranged where they plan to create an attic space.
Such a space can be residential (attic) or cold (attic).
One of the most successful and used pitched roofs is a half-hip roof.
Such a roof is also called Dutch.
This is an ordinary pitched roof, which has small overhangs at the ends.
A semi-hinged roof is both a very beautiful and very practical solution.
Since after its installation, a reliable durable roof is formed at the same time, and a rather spacious attic is obtained.
This design is highly resistant to high-intensity wind loads and the effects of various atmospheric precipitation.
Structurally, the half-hip roof is divided into two-slope and four-slope.
Gable roof has small overhangs at the ends.
It is thanks to these overhangs that the roof is able to withstand strong wind currents, and qualitatively protect the gables of the house from precipitation.
This type of semi-hip roof has many advantages.
Such a roof allows you to get a fairly large space in the attic.
And constructively it can be done whatever you want, depending on the climate and the type of roofing material.
If in the area where the house is being built, winters are harsh and with a lot of snow, then the roof slopes will be steep, and the overhangs will be small.
If the climate is milder, and there is little snow, then the overhangs are made more, and the slopes are flatter.
Is an attic structure with a broken slope.
Such a roof is suitable when the area of the room cannot be entered into a triangular shape.
As a result, there is a lot of space under the roof that can be used as the owner of the building wants.
Whether as a living room or as an attic for trash.
The main advantage of a half-hip roof is the ability to equip living space in the attic.
In this case, the upper part of the slope is desired to be flat, and its lower part is steep.
Almost sheer.
Using this type of roofing allows you to protect the gables from wind, snow and rain.
But, besides the advantages, such a roof also has disadvantages.
There are several of them:
This type of roofing can look quite varied.
But all the options are very beautiful.


A semi-hip roof includes a fairly large number of elements.
Each element plays its own specific role in the overall picture and cannot be excluded.
The role of the supporting skeleton is played by the Mauerlat and the rafter system.
The rafter system consists of:
If you have a certain training and level of skills, then it is not difficult to develop a project of a house with a half-hip roof on your own.
But it is preferable for a professional to do it.
Then you can guarantee that the roof structure will match the drawing and will turn out to be strong and reliable.
A hip roof, like any other, consists of a rafter system and a frame.
A "roofing pie" is laid on top.
It is very important that the load is distributed evenly over the entire structure, the walls of the structure and its foundation.
When erecting a hip roof, different types of rafter systems can be used.
The use of a particular system depends on whether there are supports or internal load-bearing walls in the structure of the house.
The rafter systems are layered and hanging.
The hanging structure has 2 supports, no intermediate support.
The structure is supported by the load-bearing walls of the building.
When using a suspended structure, a large expanding force is transmitted to the walls of the building.
To reduce it, use metal or wood puffs that connect the rafter legs.
A system with layered rafters is used where there are intermediate walls inside the house.
The ends of the rafters rest on the Mauerlat, which is laid and secured along the perimeter of the bearing walls.
The support for the middle part of the rafter is a structure that is installed on the middle load-bearing wall.
Such a structure weighs less than when used and less lumber is required for its construction.
This design is distinguished from others by its high strength and rigidity.
The installation process begins with laying the Mauerlat on the load-bearing walls of the building.
A concrete belt with metal pins installed vertically is poured over the walls.
The step between the studs is 120 cm.
So that in the future there are no difficulties between the docking of the Mauerlat and the rafters, the studs should be placed between the rafters.
Then several layers of roofing material are placed on the concrete belt and the Mauerlat is installed, in which holes for the studs are preliminarily arranged.
For Mauerlat, as a rule, a bar with a cross section of 150 x 150 mm is used.
Structurally, the half-hip roof device is a ridge device, to which diagonal or oblique rafters are attached.
lazy "allowfullscreen =" "frameborder =" 0 "height =" 360 "src =" about: blank "width =" 100% "data-rocket-lazyload =" fitvidscompatible "data-lazy-src =" http: // www .youtube.com / embed / qZegDI_2dZc ">

Sergey Novozhilov - expert in roofing materials with 9 years of practical experience in the field engineering solutions in construction.