Wooden windows are quite common in most residential buildings. This is primarily due to the availability of materials used in the manufacturing process. If the window opening has a non-standard shape, then the easiest way is to build the window yourself, while the master himself will choose its shape, the number of sashes and fittings. Let's talk about the peculiarities of making wooden windows further.
In order to understand the features of wooden windows, we propose to consider their main advantages:
1. Aesthetic appeal of appearance.

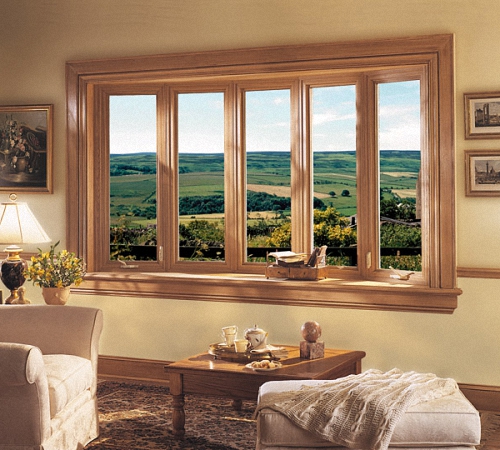
On a wooden window, the structure of the wood from which it is made is clearly traced. In addition, wooden windows fit perfectly into any kind of both exterior and interior. Most often, wood furniture is installed in the room and wooden doors, which are in good harmony with the windows made of wood. At the same time, wooden windows have high functionality and sophistication.
Windows made of plastic have an unpresentable appearance, compared with wooden structures... The tree brings warmth and comfort to the room.
2. Ability to breathe.
Only wood has this function. It is the tree that is responsible for regulating a healthy indoor climate. Since wooden surfaces are able to absorb moisture, with excess, and give it back in case of a shortage. The house, with installed wooden windows, has a comfortable and healthy atmosphere.
Windows, made of plastic or other materials, tend to form condensation on the windowsill or other nearby surfaces.
Due to the fact that the tree breathes, there is a gradual circulation of air in the room. Even if you do not open the windows for ventilation for a long time, the air will be renewed through the micropores in the tree. After a long absence from home, the air in the room will be fresh and refreshed.
3. High durability.
Despite the fact that wood is a rather vulnerable material, especially in front of moisture or fire, thanks to the presence of modern compositions and impregnations, they improve quality characteristics wood used in the process of making windows. Modern dyes and impregnations on a moisture-resistant basis ensure long-term operation of wooden window structures... In addition, in the process of using wooden windows, their pristine appearance is preserved. For example, plastic windows will require replacement after ten years of operation, wooden windows do not lose their presentable appearance even after twenty years of use.
4. High level of strength.
Wood and its quality are assessed immediately, in the process of purchasing materials. The strength plastic windows cannot be assessed, since the metal profile is installed inside the structure. In addition, option self-made a wooden window allows you to choose a tree of such quality that is suitable for the owner of the window both in material and in an operational sense. It is better to give preference to three-layer glued beams with a minimum thickness of 70 mm. It is the use of a glue bar that will ensure the stability of the window against external stimuli and prevent its deformation.
5. Low level of thermal conductivity.
This property is due to the use of glue bar in the manufacture of windows. In addition, thermal conductivity depends on following the technological moments of window installation.
6. Environmental friendliness and safety for human health.
This condition is the most important when choosing wooden windows. After all, it is wood that is a natural material that does not emit any substances harmful to humans.
7. Ease of repairing wooden windows.
This advantage allows you to reduce the cost of repair or restoration of a wooden window. These types of windows are easy to maintain and repair.
Wooden windows photo:
Installing a high-quality wooden window opens up opportunities for its owner such as:
In relation to design features wooden windows are:

The first option is characterized by the presence of one separate wooden part. It consists of one box and two doors, each of them glazed. For the manufacture of the wooden part, a pine massif is used, and not wooden bar... The minimum leaf thickness is 4 cm. The main disadvantage of such windows is their susceptibility to deformation. In addition, it is not possible to achieve complete adhesion of the sash to the window. Moisture that is outside the room gets to the surface of the window sill. Double wooden windows are completed with non-adjustable hinges and handles, so there is no ventilation mode in them.
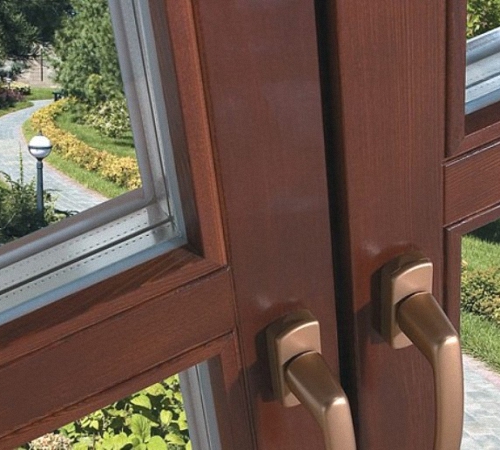
German windows are also called European windows. Since the fittings that are installed on them are of European origin. Such a window allows you to adjust the height and angle of the sash, it is possible to ventilate the window, there are locking mechanisms.
Euro-window includes a window frame and a sash. The sash has a double-glazed unit, which perfectly prevents heat loss. A little effort is enough to open the window. In addition, care for such windows is quite easy, and glued beams are used for their production, the thickness of which makes it possible to make a multi-circuit seal, which completely protects the room from drafts.

Such windows are warm, reliable and durable. The service life of the euro windows exceeds sixty years. This is due to the presence of a glued three-layer timber, which is not prone to drying out or deformation.
There is an option of upholstering a wooden window with aluminum. This window has a longer service life and does not require permanent painting.
Aluminum-wooden windows assume the manufacture of the supporting part of the windows from aluminum. Wood, on the other hand, covers the outside of the aluminum. Thus, the strength of the structure is improved due to the presence of aluminum, and the wooden surface creates an attractive appearance and warmth of the window. This type of windows is practically not common due to the high cost of aluminum and the complexity of the work.
Finnish windows are distinguished by the presence of a wide frame and two sashes, which have a sequential type of opening. One simple glass is installed on the outer sash, and a single-chamber double-glazed window on the inner sash. For the manufacture of the outer sash, both wood and aluminum are used. The two leaves are connected using a sequential opening mechanism. For the manufacture of window frames and sashes, a solid wood is used, not glued beams. The window has an attractive appearance, although compared to German windows, it loses to it in quality characteristics.
In addition, wooden windows are:

In addition, Swedish wooden windows stand out. They represent a combination of German eurowindows with a Russian version of the window. Such a window has an outer frame with a single glass and an inner frame with a single glass unit. Thus, a high level of sound and heat insulation is ensured.
Carved wooden windows are characterized by the presence of different rose patterns that make them more attractive.
Before you make a wooden window yourself, you should take care of preparing all the tools necessary for this in the form of:

We propose to study step-by-step instructions self-production of wooden windows:
1. Construction of the box.
Depending on the size of wooden windows, they are:
Before starting work, you should select the material for the window. The most optimal and inexpensive option is pine. Since this type of wood contains a large amount of resin, it is the most resistant to moisture and other external influences.
A more expensive but high quality option is oak. Although for beginners it is better to choose pine, so as not to accidentally spoil the expensive material. Boards must be properly dried, knots, cracks, deformations must not be present on them. Please note that the box is the main supporting structure, on which the entire load is assigned.
A variant of using a glue bar is possible, which is distinguished by higher strength characteristics and a long service life.
To build a frame, there are enough boards, 15x5 cm in size.A groove hole should be made in the workpiece, which will have the letter G, and a depth of 1.5 cm.All parts are connected using wood glue, and then a wooden rod, with a minimum length of 30 mm ... It is the rod that is the element that acts as a retainer for all components of the box.
Next, the box is installed in a previously prepared window opening. This procedure includes drilling holes in the wall, installing dowels in them, fixing the box with self-tapping screws. To seal the joint and seal the cracks, it is used polyurethane foam.
2. Construction of a frame for a window.
How to make a wooden window with your own hands drawings:
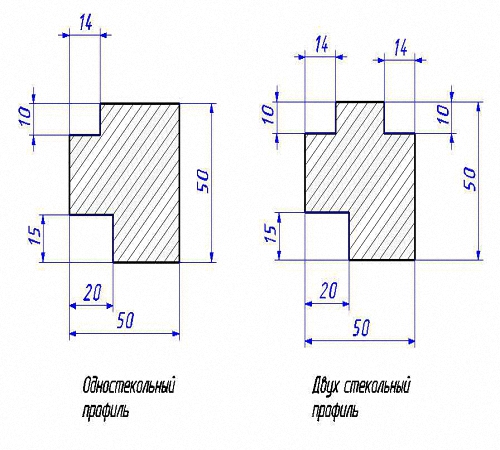
To create a frame, you need a beam, 70x50 mm in size. Although it is possible to adjust the thickness of the timber, depending on the size and strength of the window. The profile shape is determined by the thickness and amount of glass that will be installed in the window.
If you plan to install a single-glass profile, then it is enough to build two rectangular groove holes, otherwise, more holes will be required.
To make a profile of a certain shape, you will need an electric planer or milling cutter. If the thickness of the glass is 5 mm, then a glazing bead is required, 1 cm thick.
When all the parts are prepared, the frame is assembled. To do this, you need to cut the board at an angle of 45 degrees. With the help of the prepared profile, a tenon and groove connection is provided, for more high level fixation screws are additionally used. Please note that all caps must be sunk into the wood to improve the attractive appearance of the window and to avoid corrosion.
3. Installation of glasses.
In order to prevent condensation from collecting in the window and there are no cold bridges, the length and height of the glass that must be installed in it should be correctly measured. The minimum error when taking measurements is 1 mm.
It is better to use a diamond self-tapping screw for cutting glass, and fine-grained sandpaper for polishing the edges.
In addition, all safety measures should be observed, namely, wear gloves from thick fabric so as not to injure your hands by shrapnel and wear a mask that protects your eyes from dust or small debris.
A ruler with a small margin fits on the glass. A line is drawn along it with the help of a glass cutter. Then the glass is placed on the edge of the table and broken off. The prepared workpiece is installed in the window, if it does not need correction, then the edges of the glass are lubricated with sealants and laid again. Next, the glasses are fixed with glazing beads, on the surface of which small nails are hammered. If the width of the glazing beads is large, then it is better to use self-tapping screws to fix them.
4. Studying the question of how to make a wooden window with your own hands, mention should be made of the final assembly of the entire structure. If the window has big size and is divided into two parts, then first the assembly and installation of the vertical bar is carried out, then the sash is fixed with hinged hinges. Handles and other fittings are installed.
Completes assembly work installation of the finished window into the window frame, fixing it with self-tapping screws, which first pass through the surface of the box, and then through the wall. To seal all the cracks, polyurethane foam is used, and after it dries, the walls are plastered. The installation of an ebb and a window sill completes the work.
How to make a wooden video window:
Select the type of wood from which you are going to make the window. For this type of work, you will need well-dried planed boards. The section of such boards should be 50x150 mm. With the help of an electric planer, it is necessary to make a groove on the board so that the profile board has the shape of the letter G. This installation will contribute to the tightness of the structure.
Based on the size of the window opening, the board must be divided into four parts. The resulting parts must be connected together. The connection is best done with a straight tenon or straight groove. In the course of work on one of the boards (which will perform the horizontal connection), it is necessary to cut out a spike. On the other board (which will make the vertical connection), you need to cut a groove. The joints must be coated with wood glue and the joining of the boards. The joining of the boards of the box should be done at an angle of 90 degrees. To strengthen the structure, a hole is drilled at the end of the box and a wooden pin greased with glue is inserted. Also, in order to strengthen the structure of the box, it is necessary to install metal corners in the corners and attach them to the box with screws. The box will be ready for further use after the glue has dried.

The frame is made and connected in the same way as the window frame. In the process of manufacturing the frame, a bar is used, the section of which should be 50x50 mm. In order for the frame to open and close easily, it is necessary to leave a gap of 1-2 mm between the frame and the box.

The profile must be divided into blanks and a finger joint made on them using a saw, hammer or chisel.
It is necessary to install glass and hinges in the required places. After completing these steps, the work on creating the window can be considered complete. The window must be treated with anti-corrosion materials and painted to protect it from moisture.

Thus, the article describes and describes the process of making a window frame with your own hands.
Wooden windows are made from:
Larch
Each option is good in its own way. Larch is considered the best on the list. It releases substances that kill fungi and diseases that can destroy the window over time. If the room is very humid, then this is an ideal material for making a window.
Oak is also good, it is very durable. It is difficult to handle, but the appearance is beautiful in the end result.
For the manufacture of windows, you will need special tools for processing wood and installing an already finished product. List of tools and materials:
Screwdriver
Glass cutter
Chisel
Electric planer
Carpentry glue
Diamond self-tapping screw
Work gloves
Fine grit sandpaper
At the first stage, you need to make the correct measurements, and from them already a drawing. Thanks to the drawing, you can calculate the exact amount of material. The final result of the work performed will depend on them.
When choosing a material, you need to know that the wood must be well dried. There should be no knots and cracks on it, they cause deformation of the finished product in the future.
To make a wooden box, it is enough to take a board 150 * 50 mm in size. You need to make grooves on the parts of the box. They will look like the letter G. Their depth should be 15mm.

The four parts of the box must be connected together with wood glue. Now you need to drill holes in the sides of the block. Insert a rod 30 mm long into the holes. This will secure the box at a 90 degree angle.
Then we drill a hole in the wall, drive in dowels, fasten the boxes with self-tapping screws. The gaps that form between the wall and the box can be filled with polyurethane foam.
For its manufacture, you will need a bar measuring 60 * 40 mm. The shape of the frame profile depends on the number of glasses and their thickness, the size of the glazing beads. A profile with one glass has 2 grooves, with two glasses - 3 grooves. One or two grooves are needed for glass and one for installation in boxes.

The glass thickness should be 4 mm, and the glazing bead should be 10 mm. Boards must be cut strictly to size and obliquely, at an angle of 45 degrees. Using self-tapping screws, we connect the frame. They need to be screwed in so that they eventually drown in the wood.

Be sure to take care of safety. Work gloves and glasses must be worn. The dimensions of the glass must be determined to the nearest millimeter.
Self-tapping is carried out along a ruler, which should be longer than the glass. Then the glass is placed on the edge of the table and pressed by hand, an unnecessary piece of glass with a characteristic sound should fall off.
Then the glass is put into the frame, thus checking the correctness of the dimensions. After that, they are pulled out, a sealant is applied to the grooves of the frame and glass is applied, securing it with glazing bead. Glazing beads are fastened either with thin nails, or if the glazing bead is thick. using thin self-tapping screws.
In order to make window frames with your own hands, you don't need much: just a list of tools, materials and a couple of hands. So let's get started!
Quality joint
Among the tools you need for will be:
Additionally, if possible, it is advisable to have for installation:
To make a window frame with your own hands, you, of course, need wood, and best of all, if it is pine. So, from a pine bar you need to prepare the following blanks:
So now let's get started!
Finished frame
To begin with, to make a window frame with our own hands, we collect the outer contour. We cut off the length of the elements from the workpiece.
Important! Do not forget that in width you need to give extra centimeters for the "thorn"!
The length of the "spike" will be exactly the same as the width of the bar (60 mm).
Let's start manufacturing, perhaps, with a groove. Mark the length you need and work with a jigsaw. When the "groove" is ready, you can tackle the "thorn", noting for yourself how it will stand (for this, focus on exactly where you have already made the "groove").
Important! The width of the “spike” should be slightly, a couple of millimeters larger than the “groove”, then the “male-female” connection will work optimally.
Assemble the main frame. Additionally, you can coat the tongue-and-groove connection with wood glue, only do this after you have completely adjusted all the parts, and after the internal partitions are in place.
In the assembled state, mark the places for the lintels on the main frame. The jumpers themselves will go with a "thorn", but in the places where they are connected to the main frame, you will need to carefully drill the grooves.
Now, first you fix the jumpers, then you finally assemble the frame.
Important! Don't forget to glue the joints!
Additionally, in the corners, you can fasten it with pins or ordinary self-tapping screws after the carpentry glue has dried. Just so that the frames do not crack, it is advisable to make holes for self-tapping screws in advance, and then they will only delight you.
This is how do-it-yourself window frames are made. Additionally, the frame can be varnished or painted, and you can also go here if you want to know. We hope this information will be useful to you!
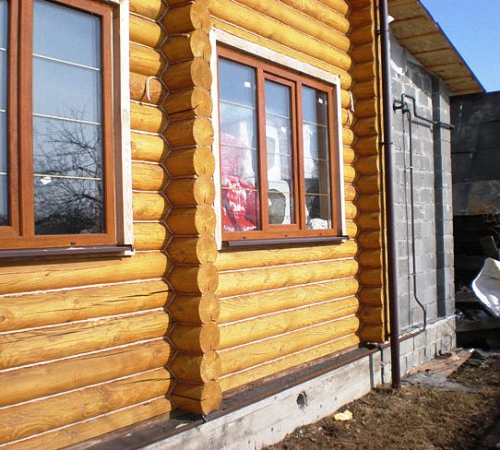
I decided to change the windows on the veranda, in the village house. I wanted the windows to be wooden and warm - I don't want to "clog" the dacha with plastic. A wooden double-glazed window is not cheap, if not expensive. I have the tools, my hands seem to be in place too, I measured and ordered the double-glazed windows themselves, single-chamber, without frames, 30 mm thick. For the entire veranda, these are 7 windows, 1.3 m in size - width x 1.4 m - height, it turned out 13,000 rubles. And he started making wooden frames.Board 45 mm x 30 mm while "resting".
We take 2 three-meter boards 100 mm x 20 mm and mark every 100 mm ...
We draw with a square on the marks.
Sawing into squares 100 mm x 100 mm - I did it by trimming.
On the segments, mark four marks by 20 mm from each edge.
We drill through with a 4 mm drill.
And then, we glue the segments, ATTENTION !!! fibers across !!! to one and a half meter four boards.
And we pull with 32 self-tapping screws for wood.
Then we drill through with a 4mm drill in this way. From the edge 20 mm.
We put on glue (on the opposite side of the segments) a board of 30 mm x 45 mm (which was resting)
Turn over and pull with 65 wood screws.
We got four such blanks.
We cover the blanks with impregnation - I used biotex, 2 layers.
Mark the desired length and file the edges at 45 degrees.
I used trimming.
Assembling the frame
We connect our blanks and drill holes at an angle through and through with an 18 mm drill.
The joints of our blanks and 18 mm pins are carefully coated with professional PVA glue (household glue is not suitable). And we drive the dowel through and through.
Saw off the extra dowels. And we connect three more corners ...
We got such a frame.
We insert a pre-prepared double-glazed window into it.
We adjust the glazing bead to the size and pull the glass unit with it. By the way, I also covered the glazing bead in advance, 2 times covered with biotex.
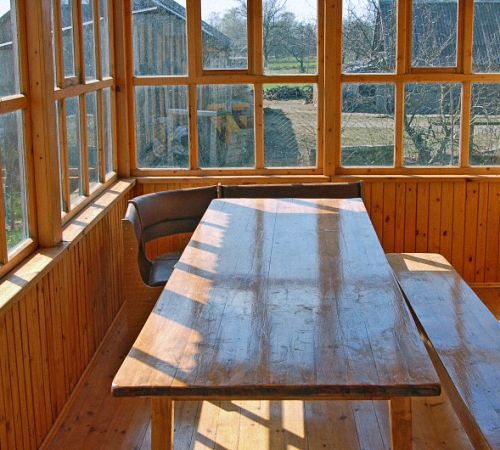
Well, here installed windows... We have already survived the winter - the flight is excellent.
And these are the windows that stood before the double-glazed windows.
And this frame opens. Now I'll tell you how I made it.


