Leaf length from 550 to 8000 mm
Mass - 4.75 kg / m 2
As grubes for metal tileage Profiles from galvanized steel production "INSI" (PSh-28-0.7, PSh-28-1.0, PSh-61-1,5), or tree (25x100, 32x100 boards or 50x50 boards), which are attached to The rafters from the bottom up (from the cornice to the skate) in step corresponding to the metal tile step. The vapor barrier film is installed on the side of a warm room. Waterproofing is mounted in terms of solo structures.

Superdiffusion membranes are laid on the insulation without a gap, paying attention to the location of the parties, which should be adjusted to the insulation. Anti-condensate films must be installed with a gap between the film and insulation. It is necessary to strictly follow the recommendations of the film manufacturer for its use and the installation method. When the cold attic device is possible not to install waterproofing, when guarantees proper ventilation of the underpants.

The underpants films are stacked along the rafters, from the bottom up across the skate, parallel to the eternity. The joint of the film is done in the width of the row, with a falsestone at least 100 mm. By the length of the film, the film is joined on rafters with a 100 mm twist. Permissible film films between rafters 2 cm. The maximum distance during installation of the films between the rapid structures is 1.2 m. When installing using a wooden doomber, the anti-condensate film is installed under the control, to improve ventilation between the tiles sheet and the film.

Eaves mounted before installation sheets metal tires Along the bottom edge of the skate. If an organized drainage device is provided, the chute holders are installed before mounting the eaves. In this case, the eaves must be mounted so that the end of it comes to the first third of the chute from the wall.

The cornice is aligned with the lower edge of the skate using a lace. Fastened to the makeup using a flat head self-drilling screws. The bog of the cornizes is carried out with a total of 50-100 mm.
Paddle farmery Sve. Roof is performed different ways. For the binder use: Professional Sheet, Metal: facade panel. There are two options for the location of the materials: along or perpendicular to the wall.
Stacking sheets metal tires produce right left. Installation begins with the installation of the first two sheets. First sheet of metal tilefucked by self-sharp in the lower right corner so that the lower edge of the sheet comes from the edge of the root. Second sheet of metal tile It is superimposed on top, closing the capillary groove. The edges of the sheets are aligned on the eaves and the plane of the fondon of the skate. After performing alignment, the sheets are fixed. Next, begin to install the following sheets metal tires.
With the length of the skate, more than 6 m are recommended to perform it composite, due to the inconvenience of transportation and installation of sheets. When the composite slide device, metal tile sheets are mounted from the bottom up, right to left, according to the scheme. It is important with such a mounting to combine the capillary grooves of the lower and top sheets. Otherwise the clearance is formed between sheets of metal tile. The sheets of all are stacked with a false length in length 200 mm. For the right organization of the flask, the length of the lower sheet, the metal tiles must satisfy the formula:
LL. \u003d 0.2 + B * NS
b - the magnitude of the tile step; NSh - number of tile steps on the skate
For example, this formula is subordinate to the sheets of 3.0; 3.4; 3.8; 4.2; 4.6; 5.0 m.
For mounting metal tile Roofing screws are used 4.8x35 or 4.8x20 mm. The fastening of sheets of metal tiles produces to the bottom deflection of the profile (Fig. 12), the self-tapping screws are located on sheets in a checker order, near the edge of the skate (Eaves, Konon, Fronton, Endova) In every wave. The longitudinal bog of the sheets is bonded by self-drawers or rivets. In cases where the bias of the roof is less than 14 ° it is necessary to seal the longitudinal and transverse joints of the sheets.
Fastening the metal tile in the upper deflection of the wave is strictly prohibited!
Mounting metal tiles with nails or self-pressing without sealing gaskets is categorically prohibited!
Bringing roofing screws with a hammer is strictly prohibited!
By metal tile.it is necessary to walk carefully, in the shoes with a soft sole and attack only the lower deflection of the waves in the obsess.


The self-control screw with the sealing gasket is established in the deflection waves of metal tile Under the transverse wave (at the bottom of the wave), perpendicular to sheets. The screw is spinning until the gasket is rectified into the horizontal line. Excessive twisting leads to the bending stripping and leaving it from the sheet plane.
Dooming at the place of the jacks of the skates is performed solid at a distance of 400 ... 500 mm from the middle. Lower Endow Mashed to the makeup with the help of curls. Sheets of metal tiresthey are stacked in such a way that at least 100 mm remains from the edge of the sheet to the Niza.
Upper Endowit is installed after laying sheets of metal tiles and is fastened with roofing screws after 200 ... 300 mm at the top of the metal tile waves. Self-tapping screws should not disturb the integrity of the Lower End.
Gable It is fastened in such a way as to cover the upper deflection of the wave of metal tiles. In fig. 13 shows the entry of the roofing protruding from the frontone sten profile S-13Located across the roof skate. C-13, in this case, is ordered in advance or cut in place in accordance with the amount of removal.

Skate elements with flush 100 mm are joined. The horse is attached to the roofing screws of 4.8 x 80 mm to the doom, to the top of each second wave. Cracker is flat mounted with roofing screws of 4.8 x 80 to the shell or 4.8 x 35 to sheets of metal tile, to the top of each second wave.
Between the skate and metal tile, the foam-polyurethane sealant is stacked. The ends of the shaped skate are closed with a decorative plug.
For ventilation of the underpants, the skate fan is used, which is fastened with roofing screws to the skate. The junction is processed by a sealant.

In places, the roof is adjacent to the wall, pipes and auditory windows are installed a wall profile. The profile is superimposed on the sheets of metal tile and is attached to the wall.

Speakers from the roof brick rectangular pipes Frames in the following way:
step 1 - Installation of the Lower Pipe Apron
First you need to prepare the locations of the lower apron to the side surfaces of the pipe. To do this, using the apron elements as a template, on the pipe outlines the lines of the cut. Then with the help of an angular machine (bulgaria), shit in brick walls Pipes. Cleaning the stroke and the surface of the root of brick dust, begin to mount the elements of the lower apron, after pre-encompassing each element and begging on the slope of the roof. When installing the apron, the rented upper edge starts in the stroke, the vertical wall is tightly pressed against the surface of the pipe, and in this position the element is fixed with roofing screws with a sealing gasket to the trough. The first element is mounted to the lower edge of the pipe, then two side and at the end - the element to the top face. Fasting of the checker elements on the lower must be at least 150 mm. After fixing all the elements to the lamp inserted in the stroke, the edge of the apron is labeled with silicone sealant. Attention! For better clutch, the stroke must be washed with water.
step 2 - Installation of the lower sheet from the pipe to the cornice

At this stage, a flat (galvanized or painted) sheet is installed. The length of the sheet must correspond to the distance from the lower edge of the pipe to the cornice or the nearest end, the width is not less than the width of the lower element of the apron (taking into account side bending). One edge of the sheet is started under the lower element of the apron, and the other is displayed from above, on the cornice or endand. After fixing flat sheet Felexing from its side sides is made using a hand tool.
step 3 - Laying sheet metal tiles at the bottom and from the pipes of the pipe

step 4 - Installing a used profile
After mounting the sheets, the metal tiles around the pipe starts the trim of the pipe to be a used profile. The order of installation is similar to the elements of the lower apron. First, a wall profile is installed to the lower edge of the pipe, with the preliminary trimming of its width, according to the figure. The fastening to the pipe is performed using a dowel-nail, and the profile is attached to the metal tile of roofing self-drawing into the upper part of the wave.

step 5 - Installation of a wall profile with pipes
It is necessary to process two wall profiles on the side size of the pipe and install them on the side face.

step 6 - Installation of a used profile on the top of the pipe
Install a wall profile on the top of the pipe, while the pipes protruding for the contour vertical parts to cut down and bend on the side faces of the pipe, consolidating a dowel nail.

step 7 - Installing the top sheet metal tile
Install the top sheet of metal tiles on top of the wall profiles and sheets of metal tiles, laid earlier, while leaving the clearance of at least 100 mm between the lower edge of the metal tile sheet and the pipe. Under the metal tile, lay a polyurethane foam seal. In a small gap, obtained at the place of the joint of a used profile, upper and lateral sheets of metal tiles to lay sealant.

A wall profile is used for internal roof fractures. On the outer fracture of the roof is used element cornice.

If you plan to sew a pipe with a straightened, then after framing the pipe mounted a frame from a hatched profile, a straightener is mounted on it, the angles are decorated with an outdoor 50x50 corner.
The smoke is attached to the pipe dowel-nail before the installation of the proflist.

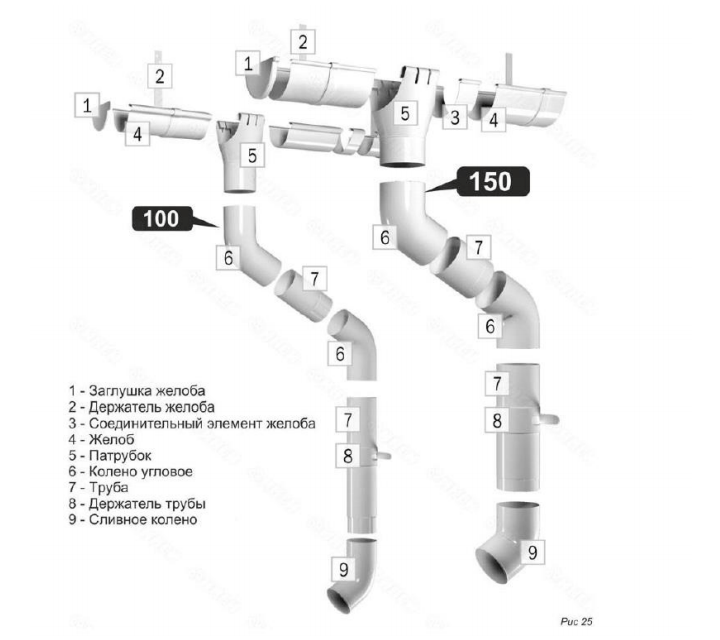
The drainage system is applied on industrial, residential and public buildings for organized water removal with roofs.
The drain system with a pipe diameter of 150mm will allow you to remove rainwater from 117 square meters of the skate. Significantly decreases the number of pipes on the facades of buildings. Holders of the grooves are mounted at a distance of 10.7 m, the pipe holders are no further than 2 m from each other.
The drainage system with a pipe diameter of 100mm will allow to remove rainwater from 52 square meters of the skate. Holders of the grooves are mounted at a distance of 10.9 m from each other (the estimated distance is 0.75 m), the pipe holders are not more than 3 m from each other (for example, it is necessary to 3 holders on a pipe with a length of 5 m. m enough two.
In the event of a threat to the drainage of the drainage system, it is recommended to use heating systems of gutters and pipes.
With the area of \u200b\u200bthe catchment less than 30 square meters per one drain pipe The gutter can be mounted with a zero slope, when large Square Waterboards The slope slope can be up to 2%.
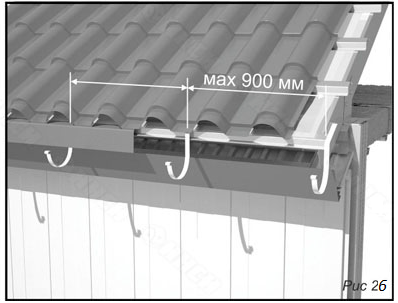
step 1 - calculation of the number of chute holders.
The total length of the chute is divided into the selected step of holders (no more than 900 mm, the recommended pitch of the chute holders is 750 mm) (see Fig.26). The resulting number of segments is +1 is the number of chute holders.
step 2 -Marking under the holders of the gutter.
On the bottom of the crate, mark the place of installation of a gutter holders with a step selected in the previous stage.
step 3 -Choosing a gutter.
Select the magnitude of the exchanging gutter (h) Based on the aesthetic perception of the gutter line. The line of the gutter should smoothly go down, without causing the visual sensation of the strong curvature of the edge of the skate or flictening of the cornese swell. Recommended slope (i) The gutter is 1%, that is, from 1 cm per 1 m. The difference in the heights of the top and bottom dot (h) You can calculate as:
h \u003d l x i
where L is the length of the gutter;
I - gutter bias
step 4 - Determination of places of bend holders of a gutter.
Numbrive holders from the beginning of the gutter to drainage funnel. Mark the place of bend on the first holder, thus determining the initial (upper) position of the gutter. It is necessary to take into account when markup, so that the edge of the gutter is 2 -2.5 cm below relative to the roof line line (see Fig. 27).

Fold holders in order of increasing numbers and mark the place of bend, as shown in Fig. 28.

step 5 - Fastening the holders of the gutter.
Aligning the place of bend with the edge of the crates, attach the holders of the gutter to the crate by self-drilling galvanized screws 4,8x22 with a flat head of 3 pcs. On one holder. When using 50x50 bars as a crate for a reliable mounting of the holders, you need to install a dual timber.
Step 6 - creation of a slope
To create a slope, bend the first and last holder, pull the cord between them. The remaining holders to adjust so that they touch the cord (Fig.29).
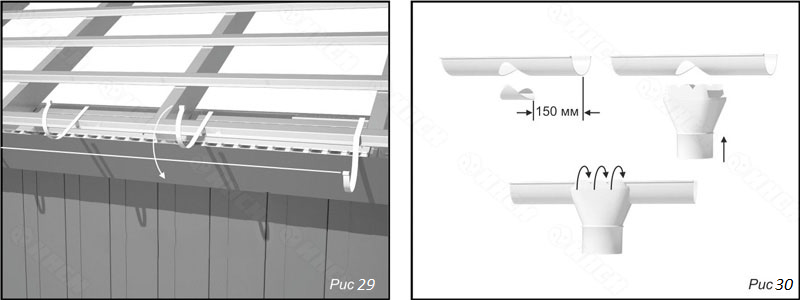
step 7 - Mounting nozzle
In the groove at a distance of 150 mm from the bottom edge, cut a hole with a diameter of 100 mm for the nozzle. Insert the nozzle at the opening site (Fig. 30). Take the front edge of the nozzle under the external bend of the gutter. Break the flange of the nozzle to the rear edge of the gutter and fasten the 4.2x16 screws with two screws.
step 8 - Chute Installation
On the ends to install chute plugs (Fig. 31).

Step 9 - Installation of the gutter.
Insert a chute into the holders, starting the back edge of the gutter into the protrusion of the holder.
step 10 -Job connection.
At the site of the job joint, set the border connecting element (Fig. 32).
Step 11 - Installation of the corner knee.
With the help of an angular knee, create a transition to the wall of the building. Length connecting pipe Determined at the place (Fig. 33).

Step 12 - Installation of the pipe.
Fastening the pipe to the wall is performed using pipe holders. The pipe is measured, if necessary, increases at the installation site of the pipe holder, is fixed by the lock (Fig. 34).

Step 13 - Installation of drain knee.
Drain knee completes the drainage pipe, serves to remove water from the foundation of the building. The bottom of the drain knee should be located at a height of 300 mm from the building of the building (Fig. 35).
For safe movement on the roof at the level of the cornice, starting from the second line of the root, the roof fences are established.
The fence is made depending on the downhone roof and the type of tile. The mount is made to the drying profile through a sheet of metal tiles and a sealing rubber gasket at the place of the wavelength of the wave by self-drilling galvanized bolts 5.5x25 mm for a metal doomb and 5.5x60 mm for a wooden roaring. Fix the roofing fence to one sheet of metal tiles is prohibited. Between the fencing sections are attached to bolted connections.

Snow-retarders are installed to prevent low-pass masses of snow. The design of the snowmobile supporter consists of brackets and pipes. Brackets are installed in the wave deflection and fasten through metal tile and rubber sealing gasket to the roof crate. In places of installation for mounting the bracket, an additional cage profile is mounted in advance at a distance of 120mm (along the axes of the crate profiles). Snowstanders are installed above the roofing fence. In the absence of roofing fencing, snow-holders set no lower than the third row of the root. With a skate length of more than 10 meters, it is recommended to install two rows of snow-sowers. In areas with a large number of snow rainfall, it is planned to install a traction bracket. The snowstore traction is mounted in one end to the bracket, and the other crate profile through the sealing gasket and the metalochief sheet (see Fig. 38).
Fastening a symborant bracket to one sheet of metal tiles is prohibited!

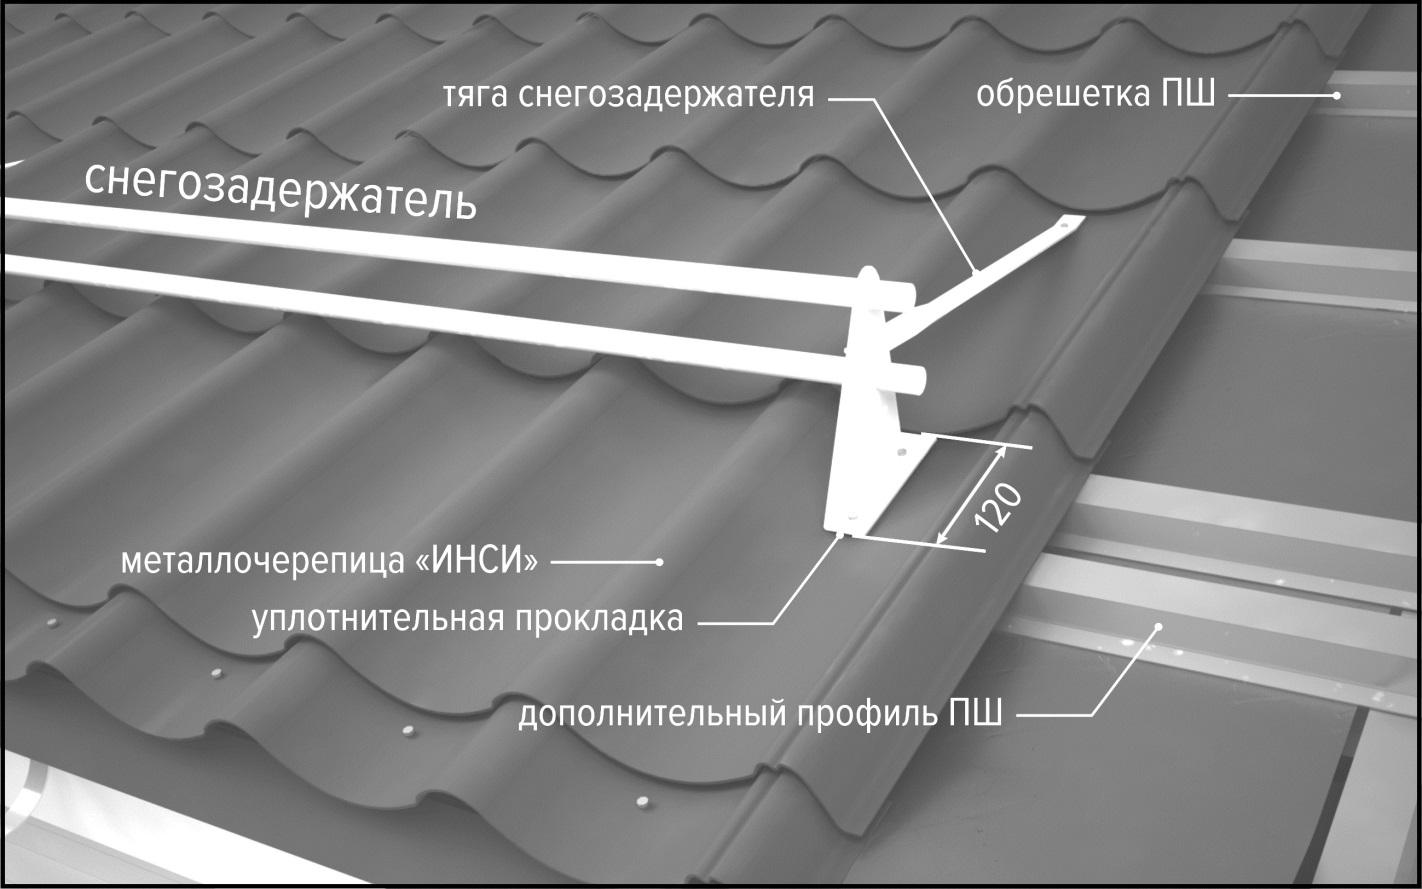
The step of installing snowstand brackets depends on the snow area of \u200b\u200bconstruction, roof design, fastener element. Developed recommendations for calculating the steps of the installation of Kronech. The calculation is made on the basis of the use of screws with a diameter of 4.8 mm. The immersion depth of the screws is shown in Fig. 39.

Snowplows are available in formatHTML This instruction.

Fluggers, decorative spiers, smokers are installed as accessories on the roof. Installing all accessories is made in accordance with SNiP standards.
For the device outputs from the roof of the antennas, mast and ventilation pipes of the circular section with a diameter of up to 330 mm (with the temperature of the outer surface to 130 °), the Master Flash roofing seals are used.
Wooden structures used in the roof device need antiseptic and flame (fire processing) processing. Processing can be carried out both to the soup of the designs (processing of individual boards and bars) and after the processing of rafters and dohes). Processing is carried out various methods (Immersion in a container with a solution, brushing, applying a sprayer.

The use of mounting foams as short-circuit or olemnal seals is categorically prohibited!
All products produced by the factory facade and the roof "INSI" are designed for use on scanty roofs according to this Instruction on installation. The plant "INSI" is not responsible for losses or losses that may occur when using INSI products to perform unusual functions.
Metal tile is an engineering and technical "alloy" of steel strength and aesthetics of traditional roofing ceramics. Light profiled sheets practically do not affect the weight of the structure and delight the installers with convenient dimensions.
Confident plus in the piggy bank of the priorities of the material - the ability to independently spend the whole cycle roofing work Without paid participation of builders. It is only necessary to figure out how the roofing of the metal tile is built with their own hands, and learn about the rules and intricacies of the process of its device.
Wavy metal sheets of popular coating are equipped with double protection against atmospheric attacks. Steel profiled billets are first plunged into a container with a hot zinc, so that the anticorrosive film is formed on the surface. Then the outer side of the material is coated with a color polymer shell that performs aesthetic and protective functions.
However, both degrees of protection will not be able to confront precipitation and household evaporation attacks, if roofing pie is arranged with violations and errors. In the space under the coated, the condensate will accumulate, which is slow, but will surely get to the metal. Moisturizes the insulation and will lose its insulation qualities. Wet wooden elements, resulting in rotation.
To fully rely on light weight and the impressive area of \u200b\u200bthe sheets of the material is also not worth it: and the rafter system should be sufficiently strong, and the doom is needed so that each element is fixed in the required number of points. Therefore K. independent installation Metal tiles should be competently prepared, i.e. familiarize yourself with the nuances of the facilities stropile design, crates and roofing pie.

Metal tile is used in the arrangement of cold and insulated roofs. The rafter system for the cold type can be erected from steel or aluminum elements. But in priority still wood, because it is easier to fix the sheets of coverage. Insulated designs require more powerful rafting farms, because thermal insulation will be placed between their feet. The use of metal in such situations is inappropriate, so warm roofs are arranged by wooden rafylas with clamp.
Note that the roofing device from metal tile is possible on scanty roofsah with minimal steep rods 14º. The optimal is the steepness of the roofs from 15º to 20º.

In the construction rafter system for warm roof With metal tile has its own rules, it is:
In order to ensure the ventilation of wooden elements, it is desirable to drill holes Ø 2-2.5 cm in the rafter legs. The formation of holes - the procedure is optional, but persistently recommended by metal tile manufacturers. If there are concerns about the weakening of the design, they are allowed to have them closer to the skate in two or three rows in 30 cm.

Before building a crate operating as the basis for fastening sheets, check the geometric parameters of the rafter system. Measure and verify the length of the diagonals of rectangular rods. On the mansard roofs The lengths of the diagonals of each part of the skate separately. You need to check the horizontal of the sinks and the skate, as well as the location of the outer surface of the rafter feet in the same plane. Timely detection of deviations in geometry will exclude further errors.
Making advantage of the geometric flawlessness of the rafter farms, it is possible to start the construction of the crate, in the device of which the clear rules are valid:
Among other things, all the wooden components should be treated with antiseptic and fire prevention.

The lamp plays not only the role of the base for fastening sheets, but at the same time performs one more very important work. It forms ventilation channels by which air flows are circulated from the sink to the skate, and provides ventilation gap between the waterproofing layer and coating.
Ventilation channels must remain free so that the air can flow under metal sheets without interference and also went out. From the sides and from the side of the skate, they are simply covered with a perforated ribbon that prevents dust and garbage from entering the roofing pie.

Farmers are used to strengthen the skate and give it cruelty if the roof is planned to be equipped with organized drain or sunmate vinyl siding. In situations, when the lifting is performed by a banal board, there is no need to apply a board strengthening.
Foreign boards are stacked along the sinks in the grooves, pre-selected in the rafters. The size of the grooves must correspond to the size of the board so that the plane of the sink remains unchanged and the height of the rafter system did not increase. If the installation of long hooks used for fixing the drainage gutter is planned, the grooves are cut into the fastener to fasten them. Hooks with a short leg screwed only to the frontal board. They are used when the device of the drainage system was not planned in advance and when repairing old roofs. The installation step of all types of hooks is equal to the step of the rafter.

The windshield is used if the roof does not have an organized drainage. She attached to the ends of rafted galvanized nails. It serves as an element for fastening various roofing parts and accessories, including for stitching of the soles. The end board serves as the basis for the end bar, the latter closes the waterproofing planted over the board. In addition to the decorative function of the plank, navigable to the end board, prevents the roof rattling.

The coating manufacturers persistently advise to sveset the valves specially produced for these purposes, such as KTV or Vilpe. Siding, professionalist or vinyl sophytes are recommended for binder. Dobors are sold with a full attachment of connecting parts and with instructions. Economically, you can use a board attached with a gap for roofing ventilation.

The composition and structure of the roofing cake under metal tile depends on whether the design will be insulated or not. In the simplest radiated scheme, only a waterproofing film is used. The vapor barrier is applied if attic room It is supposed to be used.
Insulated roofing cake includes three standard layers, it is:
The waterproofing layer is so that its web climb the wall lines around the perimeter at least 20cm. In the zones of dusting of the skates, the styling is made with overlaps in 20-30 cm. Under the line of the skate, waterproofing is obliged to have a gap so as not to interfere with air circulation.

Important condition: Bituminous water repellent materials cannot be used as waterproofing the roofing pie when installing the roof of the metal tier. Waterproofing is obliged to skip steam and condensate accumulated in the insulation.
The method of the device of the water-repellent layer depends on the material used:
All types of insulating materials, in addition to polymer waterproofing, are stacked with sagging. It is necessary that the film does not break the film. Only the membrane does not need to be styling with a savory - it has a stretch property.
Around through passages through the roof, waterproofing starts on the walls of communication pipes by 5-7cm. Ideally, around pipes and other weakened roof sections, it is recommended to arrange an additional waterproofing layer.

Before laying, metal tile is mandatory:
The lightning conduction system includes three main parts. The first is a lightning game, which is a steel or aluminum rod Ø 12mm from 20cm to 1.5m. The second component of the current - it is welded to zipper a single-core steel or aluminum wire Ø 6mm. Put the current sequel on the crate and walls, remove to grounding. Grounding, Third Detail of the System, It is buried at a depth of 1.5 m Iron beam with a length of 1.5 m or steel sheet with an area of \u200b\u200b1m × 1m, for example.


Before laying profiled sheets, you need to arrange lags for the transportation of the material on the roof. In order not to raise the coating on one sheet at the top it is desirable to build racks for temporary storage. A still homemade master will need soft shoes, diligence and accuracy in the process of moving on the roof. The performer of work is allowed to come exclusively in the defiled waves.
When laying a metal tile, you can move at least to the left, even right from the first fixed sheet. The main thing is to cover the capillary groove to be laid on top. Landmark the direction of laying - convenience. However, it is better to act so that the element laid under the top immediately led under the extreme wave of the previous one and snapped the capillary groove. So it will fix on the spot and does not slide.

Intended installation rules Metal tile:
Before mounting, it is necessary to carefully monitor the horizontal location of the sheet. After making sure the installation impeccability, it is temporarily fixed with one self-tapping screw at the top edge in the center. Then the second sheet is placed, align it and temporarily fixed in the same way. Aligned sheets fasten each other. Similarly, they come with the third and fourth.
Screening to the crate is carried out when the block of 3-4 sheets is fixed and is temporarily fixed. Fix block in all put points. It is not screwed to the crate only an extreme leaf to remain the ability to connect it to the subsequent element.

The process of laying metal tires in several rows is distinguished only by the fact that the rows of material will have to be attached to each other. Sheets in height increase vertically.
Profiled sheets are suitable for pitched roofs of any configuration. However, for the competent device of the hip or tent roof from the metal tile, there will be on another scheme.
Installation of sheets on triangular shapes:
After attaching the wavy sheets, the surplus is trimmed.

The convenience of trimming with the markup of the material for the improvement of funds, triangular, trapezoid and obliquely skate, will provide homemade "blacks". It is built of four boards 10 cm wide. The boards are located parallel pairs and are connected by a hinge principle. A simple device will help accurately delay the cropped segments.
After laying a wavy coating with a light chassity, you can start the final strokes:
On the laid coating is mounted drain system, snowstores, stairs for maintenance and fence, if planned.


Excellent consolidation of information about the device on the roof of the durable roof from the metal tile with its master's hands will be detailed video instructions:
Nuances in the roof device with a metal tiled a lot. However, there is no excess in technology. Get acquainted with the subtleties of the device and it is necessary to comply with them so that I have not had to change the roof again to the next option.
Installation of metal tile is a responsible case and if you don't have experience in such work, you should first carefully read the installation instructions before you start buying the most metal tile, fasteners and all the challenges used during installation.
Only with proper preparation and laying, your roof will last long and will not bring trouble.
To begin with, make sure that the slope of the roof skate on which the metal tile will be installed is at least 14 degrees, otherwise snow load May just sell it.
Before starting work with the roof, you should decide what it will be in your home warm or cold. The main difference it will be with you a warm second floor or just cold attic. In the case of a warm roof, thermal insulation is placed inside the rafter under the metal tile, in the case of the cold it is placed on the upper overlap of the house - in the second floor semi.
The most difficult of course is the construction warm system - And we will consider it.
To mount the rafter system, it is recommended to use a timing of 50 to 150-200 mm in size, the so-called "sex" board. The distance between the mounting rafters must lie within 800-1000 mm. If you do warm roof, then you pick up your width heat insulating material. Most often, this value equals 600 mm.

After mounting the rafting system, be sure to drain the diagonals of the skates at the future roof. The difference in diagonals should not be more than 2 centimeters. All rafters must be in the same plane. If you find discrepancies in size or in a plane, then defects should be eliminated by stinging additional items or cutting up too much.

Now, in the ralling system, the so-called "roofing pie" should be installed, which includes vaporizolation, insulation and waterproofing. It should be understood that from how you laid this "pie" will continue to serve you roofing.
This is how it looks like - in the diagram below. Order from top to bottom:

First of all, it should be laid from the bottom of the rapid vapor insulation material. The vapor insulation material prevents the penetration of vapors into the thickness of the insulation. Fasten it more convenient with the mounting staple bracket. Rolled rolls of vapor barrier material, horizontally from the eaves up to the skate of the brass 15-20 cm. The joints of the material for tightness is recommended to sneak with a special adhesive tape.
Top on the vaporizolation between the rafter laid mattes of insulation. The insulation should not go to the height of the rafter, as the waterproofing material will lie on top, and it should not touch the insulation.
The following is stacked by waterproofing material, which serves to remove condensate to the drainage chute. It is also attached to the brackets of a construction stapler to the top of rafters or immediately with a vertical crate with dimensions 25, 30 or 50 by 50 mm. You should remember two rules:

It rolls it as well as vaporizolation - from the bottom parallel to the eternity, each subsequent canvas goes with an adhesive 150-200 mm. The very first, it is the same lower canvas of waterproofing should be put so that its lower edge can then be started on the earthen bar so that the condensate forms freely glasses in the gutter of the drain. The last cloth through the horse does not reckon, but begin on the other side below.
Over the entire length of the skate width of about 200 mm should be a gap between waterproofing from the other side of the roof for air outlook.
The next stage is the manufacture of vertical and horizontal crate to which metal tile sheets will be installed. Vertical rails (counter-rails) are stuffed over waterproofing along the entire length of the rafted bottom up. It is recommended for counter-rails before assembling to stick a special sealing tape, this tape will prevent the wetting of counter-deques from moisture formed on the waterproofing. Next, they are already stuffed horizontally with a certain gap of the board of the crate itself. The magnitude of the gap is determined by the brand and type of metal tile - usually this width of the wave is 350 mm. To control the correct size of the gap between the boards, a special tool is used - a template for the crate.

Recommended sizes of boards for crate for mounting metal tiles - 25 or 35 per 100 mm. Start the horizontal crate follows from the cornice. The first board must be 15 mm more in height than the rest. For example, if 25 mM boards are used for the main crate, the first "cornice" board should be a thickness of 40 mm. The difference in 15 mm is just the height of the step metal tile. This step should be parallel to the eternity, and the ledge beyond the eaves should be such that water flowing from the roof falls into the middle of the gutter of the drain.

The second crate board is installed at a distance of 300 mm, the countdown comes from the center of the first cornice board to the center of the second. The following already go to the skate in a step of 350 mm between the centers of the boards.
On the skate, along each roof slide, it is embarrassed by an additional chalkboard.

The lamp is finished can be started to install metal tiles and accessories.
Before starting the installation of sheets, metal tiles should first install brackets for the gutter of the drain and the cornice bar.
Installation starts with fastening of extreme drain brackets. This is done in order to set the right angle of inclination to drain the water in the desired side.
Krepim is the first bracket holder with self-draws to the cornice board and bend down.

Using the water level, we set the label for the bracket of the lower end of the gutter. The bias should be from 2 to 5 mm for each tempor - meter. After that, by the label of the bottom holder. Now between the extreme holders stretch the rope.
Focusing on the rope, we set the rest of the drain holders. The distance between them should be 500-800 mm. The rod of the drain from the last bracket should be at least 50 mm.
Next, the adjacent groove is inserted into the holders and is fixed with special petals on holders.

The installation field of the drain should be installed an earthen bar. It serves to protect the frontal boards from the harmful effects of ultraviolet. We establish the bar so that its lower edge overlap the edge of the gutter of the drain. If one plank was not enough, we set the following flap 40-50 mm and secure the bar with self-draws to the frontal and cornice board with an interval of 300-400 mm.
After installing the cornice bar from above, it is glue with a connecting adhesive tape (double-sided adhesion) and glue the lower edge of the waterproofing material on it.


Metal tile sheets are more convenient to mount if they have a length equal to the skate length. In this case, you do not need to dock the lower and upper sheets. But it is permissible if the skate length does not exceed 8 meters.
Start mounting sheet metal tiles follows from the end edge of the roof slide. If you do right left, then each subsequent sheet lay one wave from above the previous one. If left to right, the edge (one wave) of each subsequent sheet is put under the previous one. The first sheet should be immediately aligned from the bottom on the eternity and side of the roof, for this it is fixed with one self-tapping screw in the skate and leveled. The bottom edge of the sheet must be 50 mm from the cornice.


For fastening, metal tiles are used special self-tapping screws with rubber gasket. Self-tapping screws should be screwed into the drain groove under the wave. In the photo, on the left, the place of screwing the self-pressing is clearly visible. The procedure for installing self-tapping screws: through one wave and in a checker order.
For a square meter, metal tiles require 6-8 self-tapping screws. Skate and eaves sheet should be fixed more often - through the wave. Outlines of sheets are attached to the ridge of the waves under each transverse groove.
Sking planks can be both flat top and rounded. Rounding the bar is equipped with plugs - flat or conical. Before fastening the rounded riveting bar, plugs from two sides are installed on the rivet. The figure of the skate is stacked with a figured seal, and the bar is screwed by skate screws to a metal tile with a step through one wave.

The end bar should be attached to the endboard of the roof. When installing the end board, it should be remembered that its height should be the above crate on the thickness of the metal tile. Fix the end bar from above and side with roofing screws.

The filament between the end slats during installation is 7-10 cm.
Metal tile is a material that is used to finish the roof along with such popular materials such as slate, bitumen tile and galvanized tin. Excellent specifications Make it with excellent options for any home. And although usually to carry out this kind prefer to invite professionals, consider how to install metal tiles independently: step-by-step instructions and some recommendations of specialists.
Roof of tile, especially if it is made of metal - one of better options For registration at home. Experts and users themselves note many positive aspects of using this material, including:

Differs on a democratic price, long service life and expressive appearance
It is practically no need to talk about the lack of metal tiles, except, except, an increased level of noise in the days when it rains. But even with this, it is quite possible to cope if the glass gamble layer is pre-laying.

Before you begin consideration of the process of installing this roofing material, it is necessary to determine how the material should be used.
View photo of roofs, metal tile on which it looks attractive, far from best Method In this case, since in the process of choosing, you need to pay attention to the list of challenges, as well as the labeling presented by the manufacturer. Consider what you need to know the buyer.
First of all, you need to pay attention to the presence of such good elements in the price list as:

Important! The presence of all listed elements among the proposals of the seller is the company's level indicator that produces metal tile, which may indicate the quality of the products themselves.
In addition, it is worth paying attention to the study of marking, which must be present at each certified material. Typically, the production indicates all the characteristics of the material itself, as well as the level of quality of the anti-corrosion coating, which is applied over the sheet.
So, here's what information you can learn by reading the information provided for back side Sheet metal tile:

In the process of visual inspection, it is necessary to pay attention to the integrity of the protective layer, both with facial and from the wrong side of the sheet, as well as the availability of all mandatory labels.
Important! If we are talking about the material acquired from a major producer, then the marking will be present and the brand used steel.
Given the fact that the installation price of metal tile has never been low, many prefer to try to do everything you need yourself. Although initially it is worth familiar with how much professional installation of metal tiles. The price of work per M2 begins from 250 rubles and may increase depending on the complexity.
The process of installing the roof of metal tile, the technology of which will be considered further consists of several stages, each of which has its value and must be carried out properly.

The first thing that will be needed to be done in the event that a decision was made on the independent procedure for laying the metal tile on the roof surface - conducting preliminary calculations. This is necessary in order to determine which amount of what materials it is necessary and, accordingly, to avoid unnecessary costs.
Let's start with the fact that we clarify some of the basic concepts so that in the future the question of how the roof is arranged from the metal tile not arose. If you look at the roof that has already been covered with this material, you can see that it consists of rows that pass across the skate and waves. The distance from one row to another is called a step.
There is such a concept as "model". Under this title, the sheets of metal tiles are meant, the step of which is 35 cm, and the number of waves at the same time 6. On sale you can find the sheets of modules 1, 3, 6 and 10.

Helpful advice! In addition to the purchase of sheets standard sizes, It is possible to consider the option of individual manufacture of metal tile under the order. Of course, it will cost it more expensive, but it is possible that this material can be obtained that it is suitable for you. The main thing is to remember that the length of one sheet should not be less than 45 cm or more than 7 m.
In the process of choice suitable size The sheet is necessary to navigate to ensure that after mounting the joints and waves converged in such a way as to form a single coating along the entire length of the skate. The amount of material at the same time is quite simple to calculate, taking into account the length of the roof and sheets.
Acquiring metal tile, it is important to pay attention to some additional items that are included and allow you to spend proper installation. This includes steel strips with a length of 2 m, as well as the sheets of steel 200x125 cm, which must have the same coloring as the tile.
In the process of acquiring metal tile, you need to make sure that these auxiliary elements are available in sufficient quantities and meet all requirements. For example, the standard level of inclination of the plank is 30 degrees. Although other options are possible at the request of buyers - from 11 to 70 degrees.

Important! 11 degrees are a minimal slope at which the installation of metal tiles will be allowed.
In order to carry out the installation of metal tiles with their own hands, you need to take care of the presence of some tools and materials that will allow you to spend all the work as simple as possible and effectively:
It is also worth taking care of the presence of a ladder and means intended for individual protection of the face and hands (glasses, gloves).

As for consumables, which will be required to prepare the base and fastening of metal tiles, then this list includes: waterproofing material, roofing plates, tiles, and a terrorist, planks for the skate and ends, guide board and 2,5x10 cm. ourselves, the fasteners are required - self-tapping screws and special sealing washers for them.
Helpful advice! To give an attractive appearance of the coating, it is worth using decorative lining.
The weight of the metal tile allows the minimum amount of preparatory work, before moving to the laying. And nevertheless, it will still have to prepare suitable reasons. Since there is no need for an enhanced base, it is quite suitable for the usual wooden, made from the rails.

The procedure is extremely simple - based on the step of the selected metal tile, the slats are located on the surface. It is important to observe a single distance so that in the process of fastening the roofing material did not have to screw the screws into the emptiness. Another important factor that should be taken into account during the installation of the crate - the location of the windows. It is extremely undesirable to position rafters directly above the windows.
Article on the topic:
When it comes to a roof device from metal tile, the thermal insulation material is designed to solve two tasks at once - reduce heat loss, as well as reduce the noise level, which produce rain drops, fall on the surface. To do this, the steam insulation material is first put on rafters, and then the layer of thermal insulation. It is important that the thickness of the layer does not exceed 25 cm. From above, the antioxidant film is fixed, fixing it with wooden bars straight to the rafters.
Important! In order to ensure precipitation in the drain, the material needs to be recorded with a small allowance (approximately 2 cm). Due to such a small sagging there will be no problems with water flow.
Such "Pie" - Maximum effective system The heat insulation of the roof, which is allowed by the technology of mounting metal tiles. As for the choice of heat-insulating material, there are several options that depend on the cost, quality and manufacturer.

Before starting to work related directly to the metal tile laying, it is necessary to familiarize yourself with some rules and concepts that will not allow widespread errors and make everything you need as high quality:

Certain rules exist for the installation of other mandatory elements, without which no roof could do. Here are some recommendations regarding the installation scheme of metal tile and other elements:

Helpful advice! If it is necessary to work with the roof, the angle of inclination is more than 45 degrees, then it is necessary to carry out calculations that will allow to determine whether the installation of a particular model of the skating plank is possible in this case. It is necessary to do this, as otherwise, even the complete replacement of the entire roofing coating may be needed.
It is worth paying attention to the fact that, if necessary, the skating plane is amenable to some adjustment. That is, you can not bend it or disperse to ensure the most accurate repetition of the roof tilt angle. More information about such sublicties can be known from the video instruction in the installation of metal tiles.

Another extremely important element, whose installation rules cannot be neglected - Endow. For each such element, an additional board is defined. Fastening In this case, you need to start the bottom, gradually moving up and not forgetting about the need for an adhesion (in this case 25-30 cm). Below the level of the cornice is necessarily cut off the lower bar. Then follows the flap, which, like under the lumber, is paved seal.
Between the sheets and the axis there is a gap, the size of about 8-10 cm. Then, at a distance of approximately 1.5 cm from the stamping line into the trimmed sheets, screw screws. At the same time, the mount must be located 25 cm from the axis of the endand. If you follow this technology, then in the end, the sheet, in the location of the fastener, will come down with a board on which it is located Endow.
As for the installation of the endhouse at the bottom, it must be started before laying roofing material. It is important that in the future to ensure the flow of water directly into the diverse element.

Important! All errors in the process of conducting calculations and measurements can lead to the appearance of gaps on the surface, and when abundant atmospheric precipitates begin, most likely the roof will flow.
In order to cover the places where cropped sheets are visible, special decorative linings use. Installing them, you also need to remember a few simple rules:
It is often necessary to deal with situations when the beginning and end of the end are located directly on the roof scap. As an example, you can consider the case when installing hearing window. In such a situation, it is necessary to put a separate board, and for the window itself in the sheet, the metal tile is done hole. The carnome cutout is overlapped with a bar. And along the walls, the sealing material must be laid.

If there is a need to cover a triangular or trapezoid roof with a metal tile, then the installation of two additional bars must be required. They are installed along the lines of the roof bend on both sides of the "Range". After that, they mount the cornice board and start assembling the crates. The step of the crate for metal tile in this case is calculated in the same way as under the standard scheme. Then the installation of the cornisic system is carried out. Metal coaster start to lay only after all these procedures, orienting and even the first sheet along the cornice bar.
Important! The distance between the angular sheets, which was subjected to trimming and were installed near the "Range" should not exceed 10 cm.
In order to install the skate nodes, you need to pore the skate slats relative to the corner of the "Range". In the case of using a direct skate, it needs to be trimmed according to the existing corners, and special plugs are provided for semicircular. Moreover, it is best to use plastic models.

The skating bar must be located strictly along the "Range" axis. This is not a very difficult task if the corners of the slope are the same. If they have different magnitude, the task is significantly complicated. As an auxiliary material uses bright mounting foamwhich allows you to determine the quality of the adjoining to the skates.
A separate type of metal tile, undoubtedly worthy of attention - Monterrey. This option is very popular due to some exceptional characteristics:

The disadvantages of this material only two are a large number of residues after laying, as well as the need for high-quality sound insulation.
As for the peculiarities of which you need to know before, before putting Montray metal tile, such aspects play a role here:

It is categorically impossible to cut the sheet in the transverse direction, as this may lead to the fact that the profile doubts. Also, in no case cannot be used for this purpose the Bulgarian or other tools with abrasive circles.
Interesting! The metal tile of the cascade looks perfectly, the installation instruction for which is not too different from all others. But but the appearance of such a roof is considered more aesthetic and original.
Having studied step-by-step instructions for mounting metal, you can spend its high-quality laying. But in order for the material to serve for many years, you need to know how to care for him.

The top layer of metal tile is a polymer material that is designed to protect against corrosion processes. But as a result of the constant impact of external factors: atmospheric precipitation, ultraviolet rays, as well as dust and dirt, this layer can begin to collapse, which will lead to the need to replace the coating. In order to avoid such a phenomenon and extend the operational period of the roof, it is necessary to regularly carry out the following procedures:
Subject to these simple, but extremely important rules, the coating of metal tile is able to regularly serve as roofing material for about 50 years.

Inexperienced masters often allow mistakes that can lead to the fact that work will have partially, and sometimes completely, redo. Such negligence can lead to additional spending on the purchase of material and consumables, so it is better to familiarize yourself with the common mistakes in order to prevent them:
Taking into account these not difficult rules, as well as acting in accordance with the metal tile laying technology, you can independently make a beautiful and reliable roof.

The high level of security is one of the basic requirements that are presented to the roof from any material, including from metal tile. For this purpose, special designs are used, which are called snowstanders. And the main goal is to ensure a safe snow from the roof and prevent possible dangerous situations. In addition, they contribute to the preservation of the initial form of the design, and do not allow it to be deformed under the weight of iced snow. And considering that his mass in some cases can exceed the weight of the roof itself, this problem is quite relevant.
Important! The issue of the load distribution, which the snow has on the surface of the roof, should be thought out at the stage of laying the foundation. This factor must be counted in the calculations.
It is almost impossible to predict that the snow will be distributed on the roof surface. It depends on many factors, including the angle of inclination of the roof, wind directions, etc. Therefore, to produce calculations, a special formula is used:
Q \u003d g × s
In this case, q is the load that the snow has a snow on a flat surface of the roof, to find out from a special table, and S is a correction coefficient, which depends on the angle of inclination of the roof:\u003e 25 ° - 1, if 25- 60 ° - 0.7. If the degree of inclination is more than 60, then this is not accepted into the calculation, since in this case the precipitation on the surface is definitely not delayed.

In order to determine the G indicator, it is necessary to refer to a special table that provides information regarding snow cover for each region of the country.
As a rule, a pipe that is paired along the roof is used as the basis for snow-colaspls. In the case of using metal tile as roofing material, fixation is made in places where the roof and carrier wall connects.
It is strictly forbidden to fix these elements on the cornice bar for metal tile, as this may entail the destruction of all systems. Moreover, if you have to deal with a skate, the length of which is large enough, then the installation of snowstanders on metal tile should be made immediately into several rows to ensure more reliable fixation.

The pipes themselves are attached to the roof or jack, or in a checker order. Special attention is worth installing such a system if there is an attic in the house. In this case, the installation must necessarily be made in such a way that a snow designer is located on each window opening. As for the distance from the edge of the roof to the elements, it is quite enough 40-50 cm.
The most effective are the lattice snowstores, so those users who are interested in the quality of the systems installed, choose this option predominantly. There are two types of such structures - ordinary and "royal", although it is worth recognizing that there is no special difference between them, with the exception of the supports and complexity of the lattices.
The high level of efficiency and safety of this type of snowmates is due to their considerable height, at the expense of which they may not be useful not only in winter when it comes to holding snow, but also in the summer. After all, it is in the warm season that all sorts of repair work is most often produced.

Corner snowstores are thin steel sheets that are covered with a polymer coating that protects them from corrosion. This is one of the most budget optionsWhich makes it possible to effectively prevent snow rolling from the roof. Pick up the model that will approach the existing metal tile is very simple, as the range of color solutions is extremely large.
To fix corner snowstores on the roof of the roof of the metal tile, the screws and conventional metal corners are used. Fastening is made on the top wave of the sheet.
This is not all design options that can be used to prevent snow roll off from the roof. The metal tile is perfectly combined with many models and varieties of these elements, so there will definitely not arise problems with the choice and fixation.

It is believed that the installation of attic windows is not a task for beginners, and with this question is best to contact the specialists who have due experience in this area. But this does not mean at all that it is impossible to do independently, especially if you use step-by-step instructions for dummies. Installation of metal tile and installing the window itself in this case may well pass without any problems.
First of all, it is worth paying attention to the fact that the maximum possible width of this window should be 80-120 mm less than the existing opening between the rapids. In cases where the rafter step is very small, the installation of two small windows in adjacent niches.
The installation of the window is carried out after the roofing "pie" is fully made, then you need to install a mounting bar for which I use the same boards as for the solo system. Then they produce the installation of the frame and mounted sash. It is very important to take care of high-quality waterproofing so that later the window does not become a source of sediment penetration into the house.

Of course, you have to make some changes to the process of mounting the crates for metal tile, and pay special attention to the issue of mounting the skate of the metal tile, if planned mansard window. But all these difficulties are more than justified by an excellent result, which is waiting for owners as a result.
For those who have never been engaged in such works, it will be extremely helpful to watch the video on how to fix metal tile on the roof. A visual demonstration, as well as the recommendations of specialists will allow you to prevent errors, and independently make a beautiful and reliable roof, which will correct for many years.
Metal tile is a material that is used to finish the roof along with such popular materials such as slate, bitumen tile and galvanized tin. Excellent specifications make it excellent options for any home. And although usually to carry out this kind prefer to invite professionals, consider how to install metal tiles independently: step-by-step instructions and some recommendations of specialists.
The roof of the tile, especially if it is made of metal - one of the best options for housekeeping. Experts and users themselves note many positive aspects of using this material, including:
Differs on a democratic price, long service life and expressive appearance
It is practically no need to talk about the lack of metal tiles, except, except, an increased level of noise in the days when it rains. But even with this, it is quite possible to cope if the glass gamble layer is pre-laying.
Before you begin consideration of the process of installing this roofing material, it is necessary to determine how the material should be used.
Viewing photo of roofs, metal tile on which it looks attractive, far from the best method in this case, since in the process you need to pay attention to the list of challenges, as well as the labeling provided by the manufacturer. Consider what you need to know the buyer.
First of all, you need to pay attention to the presence of such good elements in the price list as:
Important! The presence of all listed elements among the proposals of the seller is the company's level indicator that produces metal tile, which may indicate the quality of the products themselves.
In addition, it is worth paying attention to the study of marking, which must be present at each certified material. Typically, the production indicates all the characteristics of the material itself, as well as the level of quality of the anti-corrosion coating, which is applied over the sheet.
So, here's what information can be learned by reading the information provided on the back of the sheet metal tile:
In the process of visual inspection, it is necessary to pay attention to the integrity of the protective layer, both with facial and from the wrong side of the sheet, as well as the availability of all mandatory labels.
Important! If we are talking about the material acquired from a major producer, then the marking will be present and the brand used steel.
Given the fact that the installation price of metal tile has never been low, many prefer to try to do everything you need yourself. Although initially it is worth familiar with how much professional installation of metal tiles. The price of work per M2 begins from 250 rubles and may increase depending on the complexity.
The process of installing the roof of metal tile, the technology of which will be considered further consists of several stages, each of which has its value and must be carried out properly.
The first thing that will be needed to be done in the event that a decision was made on the independent procedure for laying the metal tile on the roof surface - conducting preliminary calculations. This is necessary in order to determine which amount of what materials it is necessary and, accordingly, to avoid unnecessary costs.
Let's start with the fact that we clarify some of the basic concepts so that in the future the question of how the roof is arranged from the metal tile not arose. If you look at the roof that has already been covered with this material, you can see that it consists of rows that pass across the skate and waves. The distance from one row to another is called a step.
There is such a concept as "model". Under this title, the sheets of metal tiles are meant, the step of which is 35 cm, and the number of waves at the same time 6. On sale you can find the sheets of modules 1, 3, 6 and 10.
Helpful advice! In addition to the purchase of sheets of standard sizes, one can consider the option of the individual manufacture of metal tile under the order. Of course, it will cost it more expensive, but it is possible that this material can be obtained that it is suitable for you. The main thing is to remember that the length of one sheet should not be less than 45 cm or more than 7 m.
In the process of choosing the right size of the sheet, it is necessary to navigate that after installing the joints and the waves converged in such a way as to form a single coating along the entire length of the skate. The amount of material at the same time is quite simple to calculate, taking into account the length of the roof and sheets.
By purchasing metal tile, it is important to pay attention to some additional items that are included and allowed to carry out the correct installation. This includes steel strips with a length of 2 m, as well as the sheets of steel 200x125 cm, which must have the same coloring as the tile.
In the process of acquiring metal tile, you need to make sure that these auxiliary elements are available in sufficient quantities and meet all requirements. For example, the standard level of inclination of the plank is 30 degrees. Although other options are possible at the request of buyers - from 11 to 70 degrees.
Important! 11 degrees are a minimal slope at which the installation of metal tiles will be allowed.
In order to carry out the installation of metal tiles with their own hands, you need to take care of the presence of some tools and materials that will allow you to spend all the work as simple as possible and effectively:
It is also worth taking care of the presence of a ladder and means intended for individual protection of the face and hands (glasses, gloves).
As for consumables, which will be required to prepare the base and fastening of metal tiles, then this list includes: waterproofing material, roofing plates, tiles, and a terrorist, planks for the skate and ends, guide board and 2,5x10 cm. ourselves, the fasteners are required - self-tapping screws and special sealing washers for them.
Helpful advice! To give an attractive appearance of the coating, it is worth using decorative lining.
The weight of the metal tile allows the minimum amount of preparatory work, before moving to the laying. And nevertheless, it will still have to prepare suitable reasons. Since there is no need for an enhanced base, it is quite suitable for the usual wooden, made from the rails.
The procedure is extremely simple - based on the step of the selected metal tile, the slats are located on the surface. It is important to observe a single distance so that in the process of fastening the roofing material did not have to screw the screws into the emptiness. Another important factor that should be taken into account during the installation of the crate - the location of the windows. It is extremely undesirable to position rafters directly above the windows.
Article on the topic:
When it comes to a roof device from metal tile, the thermal insulation material is designed to solve two tasks at once - reduce heat loss, as well as reduce the noise level, which produce rain drops, fall on the surface. To do this, the steam insulation material is first put on rafters, and then the layer of thermal insulation. It is important that the thickness of the layer does not exceed 25 cm. From above, the antioxidant film is fixed, fixing it with wooden bars straight to the rafters.
Important! In order to ensure precipitation in the drain, the material needs to be recorded with a small allowance (approximately 2 cm). Due to such a small sagging there will be no problems with water flow.
Such a "pie" is the most efficient system of thermal insulation of the roof, which is allowed by the metal tile installation technology. As for the choice of heat-insulating material, there are several options that depend on the cost, quality and manufacturer.
Before starting to work related directly to the metal tile laying, it is necessary to familiarize yourself with some rules and concepts that will not allow widespread errors and make everything you need as high quality:
Certain rules exist for the installation of other mandatory elements, without which no roof could do. Here are some recommendations regarding the installation scheme of metal tile and other elements:
Helpful advice! If it is necessary to work with the roof, the angle of inclination is more than 45 degrees, then it is necessary to carry out calculations that will allow to determine whether the installation of a particular model of the skating plank is possible in this case. It is necessary to do this, as otherwise, even the complete replacement of the entire roofing coating may be needed.
It is worth paying attention to the fact that, if necessary, the skating plane is amenable to some adjustment. That is, you can not bend it or disperse to ensure the most accurate repetition of the roof tilt angle. More information about such sublicties can be known from the video instruction in the installation of metal tiles.
Another extremely important element, whose installation rules cannot be neglected - Endow. For each such element, an additional board is defined. Fastening In this case, you need to start the bottom, gradually moving up and not forgetting about the need for an adhesion (in this case 25-30 cm). Below the level of the cornice is necessarily cut off the lower bar. Then follows the flap, which, like under the lumber, is paved seal.
Between the sheets and the axis there is a gap, the size of about 8-10 cm. Then, at a distance of approximately 1.5 cm from the stamping line into the trimmed sheets, screw screws. At the same time, the mount must be located 25 cm from the axis of the endand. If you follow this technology, then in the end, the sheet, in the location of the fastener, will come down with a board on which it is located Endow.
As for the installation of the endhouse at the bottom, it must be started before laying roofing material. It is important that in the future to ensure the flow of water directly into the diverse element.
Important! All errors in the process of conducting calculations and measurements can lead to the appearance of gaps on the surface, and when abundant atmospheric precipitates begin, most likely the roof will flow.
In order to cover the places where cropped sheets are visible, special decorative linings use. Installing them, you also need to remember a few simple rules:
It is often necessary to deal with situations when the beginning and end of the end are located directly on the roof scap. As an example, you can consider the case when the auditory window is set. In such a situation, it is necessary to put a separate board, and for the window itself in the sheet, the metal tile is done hole. The carnome cutout is overlapped with a bar. And along the walls, the sealing material must be laid.
If there is a need to cover a triangular or trapezoid roof with a metal tile, then the installation of two additional bars must be required. They are installed along the lines of the roof bend on both sides of the "Range". After that, they mount the cornice board and start assembling the crates. The step of the crate for metal tile in this case is calculated in the same way as under the standard scheme. Then the installation of the cornisic system is carried out. Metal coaster start to lay only after all these procedures, orienting and even the first sheet along the cornice bar.
Important! The distance between the angular sheets, which was subjected to trimming and were installed near the "Range" should not exceed 10 cm.
In order to install the skate nodes, you need to pore the skate slats relative to the corner of the "Range". In the case of using a direct skate, it needs to be trimmed according to the existing corners, and special plugs are provided for semicircular. Moreover, it is best to use plastic models.
The skating bar must be located strictly along the "Range" axis. This is not a very difficult task if the corners of the slope are the same. If they have different magnitude, the task is significantly complicated. As an auxiliary material, a bright mounting foam is used, which allows you to determine the quality of the adjoining to the skates.
A separate type of metal tile, undoubtedly worthy of attention - Monterrey. This option is very popular due to some exceptional characteristics:
The disadvantages of this material only two are a large number of residues after laying, as well as the need for high-quality sound insulation.
As for the peculiarities of which you need to know before, before putting Montray metal tile, such aspects play a role here:
It is categorically impossible to cut the sheet in the transverse direction, as this may lead to the fact that the profile doubts. Also, in no case cannot be used for this purpose the Bulgarian or other tools with abrasive circles.
Interesting! The metal tile of the cascade looks perfectly, the installation instruction for which is not too different from all others. But but the appearance of such a roof is considered more aesthetic and original.
Having studied step-by-step instructions for mounting metal, you can spend its high-quality laying. But in order for the material to serve for many years, you need to know how to care for him.
The top layer of metal tile is a polymer material that is designed to protect against corrosion processes. But as a result of the constant impact of external factors: atmospheric precipitation, ultraviolet rays, as well as dust and dirt, this layer can begin to collapse, which will lead to the need to replace the coating. In order to avoid such a phenomenon and extend the operational period of the roof, it is necessary to regularly carry out the following procedures:
Subject to these simple, but extremely important rules, the coating of metal tile is able to regularly serve as roofing material for about 50 years.
Inexperienced masters often allow mistakes that can lead to the fact that work will have partially, and sometimes completely, redo. Such negligence can lead to additional spending on the purchase of material and consumables, so it is better to familiarize yourself with the common mistakes in order to prevent them:
Taking into account these not difficult rules, as well as acting in accordance with the metal tile laying technology, you can independently make a beautiful and reliable roof.
The high level of security is one of the basic requirements that are presented to the roof from any material, including from metal tile. For this purpose, special designs are used, which are called snowstanders. And the main goal is to ensure a safe snow from the roof and prevent possible dangerous situations. In addition, they contribute to the preservation of the initial form of the design, and do not allow it to be deformed under the weight of iced snow. And considering that his mass in some cases can exceed the weight of the roof itself, this problem is quite relevant.
Important! The issue of the load distribution, which the snow has on the surface of the roof, should be thought out at the stage of laying the foundation. This factor must be counted in the calculations.
It is almost impossible to predict that the snow will be distributed on the roof surface. It depends on many factors, including the angle of inclination of the roof, wind directions, etc. Therefore, to produce calculations, a special formula is used:
Q \u003d g × s
In this case, q is the load that the snow has a snow on a flat surface of the roof, to find out from a special table, and S is a correction coefficient, which depends on the angle of inclination of the roof:\u003e 25 ° - 1, if 25- 60 ° - 0.7. If the degree of inclination is more than 60, then this is not accepted into the calculation, since in this case the precipitation on the surface is definitely not delayed.
In order to determine the G indicator, it is necessary to refer to a special table that provides information regarding snow cover for each region of the country.
As a rule, a pipe that is paired along the roof is used as the basis for snow-colaspls. In the case of using metal tile as roofing material, fixation is made in places where the roof and carrier wall connects.
It is strictly forbidden to fix these elements on the cornice bar for metal tile, as this may entail the destruction of all systems. Moreover, if you have to deal with a skate, the length of which is large enough, then the installation of snowstanders on metal tile should be made immediately into several rows to ensure more reliable fixation.
The pipes themselves are attached to the roof or jack, or in a checker order. Special attention is worth installing such a system if there is an attic in the house. In this case, the installation must necessarily be made in such a way that a snow designer is located on each window opening. As for the distance from the edge of the roof to the elements, it is quite enough 40-50 cm.
The most effective are the lattice snowstores, so those users who are interested in the quality of the systems installed, choose this option predominantly. There are two types of such structures - ordinary and "royal", although it is worth recognizing that there is no special difference between them, with the exception of the supports and complexity of the lattices.
The high level of efficiency and safety of this type of snowmates is due to their considerable height, at the expense of which they may not be useful not only in winter when it comes to holding snow, but also in the summer. After all, it is in the warm season that all sorts of repair work is most often produced.
Corner snowstores are thin steel sheets that are covered with a polymer coating that protects them from corrosion. This is one of the most budget options that makes it possible to effectively prevent snow rolling from the roof. Pick up the model that will approach the existing metal tile is very simple, as the range of color solutions is extremely large.
To fix corner snowstores on the roof of the roof of the metal tile, the screws and conventional metal corners are used. Fastening is made on the top wave of the sheet.
This is not all design options that can be used to prevent snow roll off from the roof. The metal tile is perfectly combined with many models and varieties of these elements, so there will definitely not arise problems with the choice and fixation.
It is believed that the installation of attic windows is not a task for beginners, and with this question is best to contact the specialists who have due experience in this area. But this does not mean at all that it is impossible to do independently, especially if you use step-by-step instructions for dummies. Installation of metal tile and installing the window itself in this case may well pass without any problems.
First of all, it is worth paying attention to the fact that the maximum possible width of this window should be 80-120 mm less than the existing opening between the rapids. In cases where the rafter step is very small, the installation of two small windows in adjacent niches.
The installation of the window is carried out after the roofing "pie" is fully made, then you need to install a mounting bar for which I use the same boards as for the solo system. Then they produce the installation of the frame and mounted sash. It is very important to take care of high-quality waterproofing so that later the window does not become a source of sediment penetration into the house.
Of course, you have to make some changes to the process of installing crates under metal tile, and pay special attention to the issue of mounting the skate metal tile, if a mansard window is planned. But all these difficulties are more than justified by an excellent result, which is waiting for owners as a result.
For those who have never been engaged in such works, it will be extremely helpful to watch the video on how to fix metal tile on the roof. A visual demonstration, as well as the recommendations of specialists will allow you to prevent errors, and independently make a beautiful and reliable roof, which will correct for many years.


