Before making a milling hand, it is recommended to prepare a drawing. The diagram indicates the main elements of the tool.

The fluster from the drill is made quickly, but is used limited.
The homemade milling mill on wood is used to remove the chamfer, edge decoration, creating decorative thread. A similar device for metal is equipped with special cutters and is designed to work with a soft metal. If necessary, you can make a milling mill for working with plastic, plexiglass and other materials.
The main elements of the tool are spindle, motor and cutter. Rotation from the motor is transmitted to the spindle with the working cutter. Some metal milling mills and wood are operating from the alternating voltage single-phase power supply. You can make hand mills with your own hands on a small DC motor.
For this apply various cutters. The selection of the element depends on the purpose of the future tool and the material being processed. Simple models Designed for wood processing. For such aggregates is characterized by low speed. It is harder to make your own hand milling mill, since this material has a high degree of rigidity and strength.
Back to the category
For the manufacture of spindle, a solid metal is used, which must comply with certain requirements for rigidity and hardness. The principle of operation of any freser is as follows: the rotor is associated with the spindle to which the cutter is fixed. When the tool is turned on, the spindle begins to rotate. The material is cut by sharp knives.
The accuracy of the work performed depends on the speed of rotation.

The rack for the milling is also peeling out of a piece of wood chipboard.
Since the number of revolutions depends on the density of the raw material, the homemade tool is recommended to equip the regulator.
The top mill is classified into the following types:
The narrow-profile tool is divided with the material and parts to which it applies:
Back to the category
The hand tool presented from the motor that rotates the cutter, you can make it yourself. This requires a cutter, an electric motor and a cartridge. Engine can be taken from any worker electric device. Cartridge can be taken from the perforator, as this item can withstand greater power.
The base for the motor is PVC or standard lists Chipboard. The base is cut and fixed to the motor. The cartridge is connected to the engine with a special adapter. This will require the help of a specialist. For the resulting material, appropriate milling mills are selected. The tool is ready to operate.

The resulting manual device can be turned into the machine. To do this, it will be necessary to equip the face of suitable sizes and make holes in the appropriate places. Such a versatile machine, made at home, will not be able to give sufficient speed for high-quality work. It can be used for "coarse" wood work.
At home, you can make the CNC machine. It is intended for the production of a product designed on a computer. The numeric control unit allows you to perform the following works:
The homemade machine should be multifunctional. For its manufacture, you will need the MDF plate size of 1.5x1.5 m and fittings. Details are cut out with an electric bison and a drill. So that in the process of work the chips is not fluttered, dust removal. The resulting tool is not used for metal processing. It can be used to work with aluminum, bronze, foam and plastic.
CNC Machine is made with your own hands using an aluminum profile with a cross section in 80x40x4 mm. Boxes cut out of it:
In 2 channels with a cross section in 50x30x4 mm, guides fit. The legs of the machine are made from similar sofa elements. The base frame is ready. At the heart of such a multifunctional tool are stepping motors.
The main elements of the manual milling is the motor and cutter. The remaining parts of the device are performed by the mediator functions, providing uninterrupted operation of the device. Therefore, in the manufacture of a manual frelet, it is recommended to consider the parameters of the motor and cutters.
Handmade homemade tool has the following advantages:
The disadvantages of self-made devices, specialists relate low material processing speed. If the device is equipped with a standard motor that are equipped with modern appliances, then for the processing of complex elements and surfaces does not have enough revolutions. To eliminate such a deficiency, high-speed engines are used. They can be removed from the modern perforator. The powerful unit will allow you to regulate the number of revolutions to perform carpentry work of any complexity.
The homemade milling tool has low rigidity and durability, as it is made of girlfriend. The above-mentioned advantages and disadvantages should be considered when making and working with a manual homemade device.
One of the main assistants of the Master's joinery is a milling mill for wood processing. This hand tool is indispensable when in a wooden billet need:
However, when performing some carpentry work, it is not always convenient to apply this tool due to the fact that it is necessary to simultaneously hold the processed part and wrame the mill. Therefore, many masters go to the tricks, manufacturing the milling table for a manual milling mill. With the help of a table, which is a reliable addition to the milling tool, as a result, it is possible to obtain wooden elements in quality and accuracy with no inferior to carpentry products made in professional furniture workshops on milling machines.
The homemade table for a manual milling is significantly improving the productivity of the instrument and facilitates the work on processing wooden products. Making such equipment is easy, besides, in contrast to the standard milling table, produced by various manufacturers, this table will have dimensions, design and options selected directly by its manufacturing master.
To perform any engineering works, and the manufacture of equipment is precisely such and it is necessary to make a sketch of the future machine. It needs to designate your project vision indicating real sizes. Based on the sketch, you can easily choose the materials for the manufacture of the future design, their number, to determine the construction budget and store the tool necessary to process the machine parts.
For the construction of the milling table, you need:

In any case, before starting to do any such table, the drawing must be performed with the designation of all sizes and the determination of the location of the working elements relative to each other.
Consider in detail every step on the manufacture and fastening of each element of the self-made milling table.

1st step. For the manufacture of the stationary base for the table, bars and trimming of the chipboard are required, from which the leg supports twist are additionally reinforcing the rigidity using horizontal connective panels from plywood. In the right side part, cut the hole under the start button, which will be connected to the manual pulverer.

2nd step. Tabletop tables perform from chipboard. We make it lifting together with the mill, for which we install the loops and make an additional basis of the support from 15-thymillimeter plywood.


3rd step. In order to smoothly move the processed workpiece along the table, for example, to cut into it the grooves, the moving carriage is applied. In the table top, cut out the groove under the guides of the movable stop and install a metal profile into it. As a carriage, you can use the guide from the old saw.

4th step. The longitudinal focus is also carried out from the chipboard and make it moving to regulate around the cutter cutters. To ensure mobility, cut into the upper part of the stop perpendicular grooves and fasteners stop to the tabletop by retainers. In the middle, cut out a small groove for sucking chips and other milling waste.

5th step. From thin plywood mastwork a box with a hole for connecting the hose of a vacuum cleaner, which will remove the dust and chips formed during the milling process. Krepim the box behind perpendicular stop.

6th step. We take a sixmillimeter steel plate and screw it up to the tabletop in a closure with a surface. In the process of fastening, follow the edges to do not oppose the table top, otherwise the workpieces will be cling to them. A manual milling mill will be mounted on the bottom.

7th step. We attach a milling mill for an aluminum sole to the bottom of the plate with bolts, but do not forget to pre-drill in the sole of the bolts. Fastening the manual tool to the removable plate, and not directly to the table, ensures savings of milling depth and makes it easy to replace the mill.

8th step. Construct the elevator of the mill. To do this, use a car jack, which allows you to change the height of the cutter with maximum accuracy.


9th step. We remove the handles from the milling mill and instead we are screwing aluminum guides that connect with the jack mechanism.

Before proceeding to the manufacture of the milling table, it is necessary to define it accurately constructive features. This article provides instructions according to which a simple milling table is manufactured. Other first assembly option Details Look at the video below.
Check the reliability of fixing all the elements - and the milling table is ready!
We offer to your taste for a few more models milling machines on the tree made by your own hands.
We offer the design of the table for a milling room with a detailed analysis of its nodes.
Materials and tools.
In order to make a table under a hand milling hand, materials will be required:
The following tools are also needed:


Under the milling machine you can adjust the existing workbench. But it is more expedient to eliminate the effect of strong vibration when working cutters, produce a separate design that ensures the stability of the table.
The main loads during the operation of the equipment are transmitted to the base. Therefore, the bed must be reliable and stable. Under the face, the fixed base is understood on which the mill is located. It perceives all loads and is a construct in the form of a table with a fixed lid. It is possible to make it from a metal pipe, a corner, chapellera, wood, chipboard.


It is necessary to take into account that the fastening of the mill itself is carried out to the tabletop below, it means that there is no empty space.

The milling mill is attached to the table through a high-strength and rigid plate for execution. mounting work. It is preferable to make metal, a textolite or a circular board.

On the sole of the milling room is provided for mounting the installation holes with thread. In the absence of threaded holes, cutting themselves. If the task is impossible, fasten the milling device using special presses.

Works start with the sample milling and the thickness of the mounting plate. To simplify on the mounting plate, straight angles need to round the file. The recess in the table lid provides the location of the plate at one level with the worktop.

The center of the plate make a hole for the output tool, drill the holes for fastening the plate on the table. The next step is to drill holes to attach the milling device, consider that the fasteners should be sweeping.


Making the base of the future milling table begins with a frame. For the convenience of performing the work, the table cover must perform in the front part 100-200 mm. Special attention in the design of the framework of the beds, select the height of the work surface installation. This size is defining for the convenience of work behind the machine. According to ergonomic requirements, it should be 850-900 mm depending on human growth. For convenient operation Future milling machine You can install altitude controllers at the bottom of the support. This will allow, if necessary, change the size of the table height, in the event of irregularities, the floor will help to put the tabletop in terms of the level.
The kitchen countertop of Soviet times will be useful for the workstation for the future machine. Most often it is made of 36 mm List chipboard covered with plastic. Wood-chip material will reduce vibrations arising in the process of milling, and the plastic coating will provide excellent movement over the surface of the workpiece. In the absence of an old countertop apply MDF or LDSP plates, with a thickness of at least 16 mm.

Choose a place for the future milling machine in your workshop, dimensions depend on the size and type of future design. This may be an aggregate machine located on the side of the circular saw, the desktop version, and may be a separate stationary machine.
In the event that the use of the milling machine is not regular, coming down to one-time work from time to time, it is enough to make a small compact table.
Making milling machine for yourself. It is a design that fits on a standard table. You need a chipboard of chipboard, two boards. On a sheet of chipboard in parallel, fasten two boards. Attach one of them to the tabletop bolts, it will serve for the direction and as an emphasis. Secondly use as a restrictive stop. In the table lid, cut the opening for the placement of the mill. Mill Attach the table cover using clamps. Milling machine in compact design is ready.
If in your workshop a lot free space, Make a full-fledged stationary milling machine. It will be more convenient to work on it than on the desktop version.
Sketch ready. Materials purchased. The tool laid down in its place in the workshop is waiting for the moment to serve its owner. The Master is also serious and is not going to grab everything at once. He will decompose everything on the shelves and will do everything in stages.
Step number 1.


Start from making a frame of a future machine. You can apply the following method of making bed. Profile pipe 25 × 25 With the help of "Bulgarian", cut in size, then weld the blanks intended for the frame on which the work surface will be located. We breed on one side the pipe at which the parallel focus will later move. To the frame welded 4 supports.
To fix the table cover, the perimeter frame is moving the corner, then it will sit in the recess.
Take advantage of the second way of making framework. It implies additional supports for the work surface. In the middle of the table weld limiters for milling equipment. The size between them should correspond to a convenient fastening of the milling mill.
For the stability of the design, connect the lower supports with jumpers at a height of 200 mm from the floor.
Step number 2.
Color the resulting design. Why prepare the surface: Clean metal pipes And degrease the solvent, after which it is proper. If there is a need for putty surfaces, perform a special putty mixture and impose soil. After complete drying, color PF-115 enamel.
Step number 3.
Work surface cut down internal size Frames, install it tightly into corners. After that, drill in the upper frame of the opening under the mounting of the table covers. Make the tabletop itself, drill and securely connect with the bed with furniture bolts. Dimensions of the table 850 × 600 × 900.
Step number 4.


Return from the edge of 200-250 mm and cut the T-shaped guide along the length of the working surface.
Step number 5.

Cut half milling axes. This will give the opportunity almost twice to increase the distance from the sole to the guide axis, which in turn will expand the range of the tool capabilities.
Stage 6.
Remove the sole from the milling equipment, in the middle of the working surface of the table, mark the holes for its fastening and drill them. In the middle of the table covers, drill a hole under the device. On both sides of it, drill holes for fastening the presses of the milling axes.
Stage 7.
On the bottom of the countertop, make a sample under the sole of the milling device.

On both sides of the drilled throat in the sample, make grooves to install the milling axes. The size of the groove and the axis should coincide.


At the edges of the grooves, the floter drill (picture above) drill holes for adjusting bolts under the hexagon.


Step number 8.
Cut two pieces of pipes in size of a large groove width and drill in them in the center of the opening for non-removable bolts. They will serve as pressed axes of the milling device. Screw the nuts on the bolts.

Step number9.
On both sides of the axes, install bolts and nuts from the hexagon, to adjust the plane of milling equipment.

Step number 10.
Now make a parallel focus. Take a small piece of plywood and shift in it the groove so that he can move along the pipe welded for this. With the help of an electric bike cut three bands identical in size, where its length is equal to the amount of the table length and the width of the guide tube and the four plates for them as ribs.
On the page number 1, make a semicircular hole to remove woodworking waste. It should coincide with the slot in the working surface of the table. In the page number 2, we roll a square hole in the same place.
Lane No. 3 from plywood sawd on equal parts. One attach to the back side of the strip with a square bolt or using guides. Plywood halves should move in opposite sides. At the top edge of this band, install aluminum guide.

Stage №11.
While the plates number 1 and No. 2 among themselves as parties with semi-sides. Two stiffeners fix the edge of the resulting hole and two around the sides at a distance of 70-100 mm from the edge.
Cut the square from plywood in size to the distance between the ribs, cut the hole in it to the diameter of the vacuum cleaner hose. Attach the square to the rigidity ribs.

Step number 12.
Fix the parallel stop by clamps. This is done for the mobility of rearrangement of the stop. If it is intended only for the milling machine, then fix it with brackets with grooves for movement.
Stage №13.
We weld to a metal strip with a thickness of 6 mm bolt. Fit clay from wood with two grooves under the bolts in the number of two pieces.


Stage №14.
Install the milling equipment: Cut off axis in the side openings of the device, put on them nuts and secure the device with clamps from pipes.

Step number 15.


Turn over the table and with the help of a hexagon, raise the mill.
For the convenience of raising the milling mill, it is advisable to establish an elevator based on the jack.

The milling machine on the basis of writing table is considered an economical and convenient solution. In the list of photos of the drawings, a table is presented, with the specification of parts in size and recommended material.

Dimensions of children and materials


The question of how to make an independent milling table, many homemade masters are set. This is explained: the equipment on which the milling is fixed motionless, and the workpiece moves on a specially equipped desktop for this, in many cases much more convenient to use. Often when working with a manual milling, the workpiece is fixed on by the usual tableAnd all manipulations are carried out by the instrument itself, which does not allow to observe the processing accuracy.
The milling table significantly increases productivity and efficiency with manual milling. Acquire the serial model of this table for its home is often unprofitable. Much more economical to make a milling table with your own hands. It does not take much time and will require very minor financial costs. Certray with such a task maybe any domestic master.
Using a homemade table for a manual milling processing of wood products, you can achieve results that allow you to obtain professional milling machines. With the help of such an uncomplicated device, a whole list of technological operations is performed qualitatively: cutting figured holes and spend the various slots and grooves in the workpiece, the manufacture of connecting elements, processing and profiling edges.
The device of the factory milling table can be found in the video below. We will try to do no worse, but something even better and, that is very important, cheaper.
A homemade milling table that you will equip your home machine will give you the opportunity to perform not only wooden blanks, but also products that are made of chipboard, MDF, plastic, etc. With such a self-made milling table, you can make grooves and slots, process Elements of tongue compounds and joints "Schip-grooves", to remove the chamfers and create decorative profiles.
The homemade table for the milling ager, the manufacture of which will not require large financial costs, will allow you to equip your home workshop with a real woodworking machine. It will only be necessary to secure the tool itself - a manual milling driver, for which you can use the rack of a drilling machine or workbench. It is not by chance that many manufacturing companies engaged in the manufacture of milling tables and accessories to them, but for such an adaptation will have to give a decent amount of money. Homemade table for equipping the milling machine, if it is done in accordance with the drawings, which we will analyze in this article, in our functionality is not inferior to models released in production conditions, and it will cost much cheaper.
Drawings of the milling table with a detailed analysis of the design of the main nodes and their size.

Drawings of homemade table for manual milling (click to enlarge)
Dimensions of parts Table in section Double-layer table cover cutout in the first layer of table
Cutout marking of the second layer of the table gluing both layers sawing the cutout on the markup of the second layer drawing of parallel stop
Facial Plate of Stop Dust Tube  Plexiglass Safety Safety Clamp Fil and Stop Block
If you wish, you can make a milling homemade table from the usual workbench, but it is better to make a special design. It is explained by the fact that the machine with a cutter creates a strong vibration when working, therefore the bed used to fix the milling mill should be highly resistant and reliable. It should also be taken into account that the milling device itself is attached to the bottom of the tabletop for the milling table, so it should be enough free space.
When mounting the device to the worktop of the homemade table for a manual milling plate, a mounting plate is used, which should have high strength and rigidity, or special fittings for milling machine. Such a plate can be made of metal sheet, textolite or durable plywood. On the soles of most models of milling mills already have threaded holes, they are needed to connect such a device with a worktop and the mounting plate. If there are no such holes, you can drill them yourself and cut into them the thread or use special fittings for the milling machine.

Prints for a milling machine or mounting plate should be placed on the same level with a tabletop, for this, the last sample is made in the latter. In the plate it is necessary to drill several holes, one of which is necessary for its compound with the table top with the help of self-samples, while others - so that such a plate can be fixed on the sole of the mill. Screws and self-tapping screws that you will use must be necessarily with a secret head.
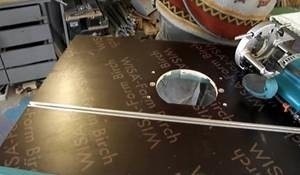
To make your inclusion more convenient, on the table top you can arrange a regular button, as well as a fungus button that will make your device even more secure in operation. To improve the convenience of its home machine, you can fix on the surface of the milling table, made for hand milling with your own hands, a long metal line.
Before starting to design the milling coordinate table with your own hands, you need to determine the location where it will be located, and also decide which type of milling equipment you want to make. So, you can make an aggregate milling mill (the table will be located with the side part of the sawing equipment, serve its expansion), compact desktop, separate stationary equipment.
To stop your choice on the compact desktop equipment for woodworking and other materials, in the event that you appeal to it irregularly or often use it outside your workshop. This installation that is distinguished by small sizes is quite a bit of space, and if desired, it can be hung on the wall.
If the sizes of your workshop allow you to be better to adjust the base of the stationary milling machine, to work on which is much more convenient than on desktop equipment. To make such a device more mobile, you can put it on the wheels with which you can easily change its location.
Simple homemade milling table. There are questions for general strength, but cheaply and angrily.
The simplest milling table or table for drilling machine can be done very quickly. For the manufacture of such a design, easily located on the usual desktop, you will need a sheet of chipboard, on which the guide elements are fixed. As such a guide that can be used as a parallel stop for the milling table, a regular small thickness board is suitable, which is attached to the tabletop using bolted connections. If necessary, in parallel, you can attach the second such board, which will serve as a restrictive emphasis.
At the table in the table in a sheet of chipboard it will be necessary to make a hole for its placement, and it will be fixed on the tabletop, it will be with the help of two clamps. After that, the manufacture of the milling table can be considered complete. To make the use of such a design more convenient, you can place the simplest fittings for the milling machine on the table top.
The box of the homemade milling unit should have high stability and reliability, since it is precisely the main loads. Structurally, it is a frame with supports on which the countertop is fixed. As a material for the manufacture of framework frames, you can use metal profiles, chipboard, MDF, wood. It is advisable to first prepare the drawings of such a device. They need to designate all design elements and their dimensions depending on the dimensions of the parts that are planned to be processed on such milling equipment.

The lower part of the bed on the side of its front part must be deepened by 100-200 mm, so that the feet of the milling machine operator prevented anything. If you are going to handle on your homemade door lining and facades for them, then the sizes of the beds may be as follows: 900x500x1500 (height, depth, width).
One of the significant features of the bed for a homemade milling machine is its height, on which the ease of operation depends on such equipment. According to the requirements of ergonomics, the most suitable height of the equipment, followed by standing - 850-900 mm. The lower parts of the bed supports are desirable to make adjustable. This will make it possible not only to compensate for the unevenness of the floor, but also if necessary, change the height of the milling table. For the manufacture of swivel table. It is sufficient to fix special wheels on his legs.

The assembly of approximately such a table is considered in version 2
Make a milling table, distinguished by a low price, high reliability, from the old kitchen table table top. Such countertops are usually made of a sheet of chipboard 26 or 36 mm thick, covered with wear-resistant plastic. Their surface provides good gliding of the workpiece, and the base from the chipboard is perfectly extinguished by vibration equipment occurring. If you do the work desk for the machine with your own hands, then for these purposes, slabs from MDF and chipboard (LDSP) thickness from 16 mm are suitable.
Detailed drawings of the milling table with additional extended drawers, which can be made from a bar and plywood (or MDF). The list of parts with dimensions and the recommended manufacturing material is presented in the table.

Table of table details and their sizes frame top corner carcass lower corner carcass
Sliding Guide Boxes Playing Table Top Layout Drawing
Large drawer Little Retractable Box Front Small Drawer Side Table Panels
Since the worktop of the homemade milling machine has a sufficiently large thick, the mounting plate for fastening the milling mill must have a minimal thickness. This will maximize the departure of the cutting tool. It is clear that such a plate with a minimum thickness should differ high strength and rigidity.
The plate can be made from metal or from a material that is not inferior to him by its strength - textolite. The thickness of the textolite sheet must be in the range of 4-8 mm. Taking advantage of pre-prepared drawings, a rectangular detail is cut out of such a sheet, in the center of which is done hole. The dimensions of the latter corresponds to the diameter of the hole in the sole of the mill.

The compound of the plate with the soles of the mill and the table itself, as mentioned above, is provided by holes made in it, and the response threaded holes in the sole of the mill. Holes for fixing the plates to the surface of the table, which are used as fitness for milling machine, are made in four corners.
The dimensions and location of the holes for connecting the plate with the mill must fully match the holes located on the tool sole. In order not to make a mistake in the manufacture of the plate, it is necessary to pre-prepare its drawing on which you need to specify dimensions This detail, diameters and location on it all holes. If desired, it can be fixed on the surface of the table using brackets.
The video with a detailed story about the construction of the milling table, the functionality and the convenience of which is very high, but also the complexity of the manufacture is also very serious. For most masters, such a table will be unnecessarily difficult, but maybe someone will turn useful ideas When creating your own equipment.
Universal milling table or begin to collect from attachment countertops to the finished bed. The mounting plate is applied to the place of the tabletop, where it should be placed according to the drawing, drive it with a pencil contour. It is necessary to choose the recess for the plate indicated for the plate, for which the manual milling is used with a tool with a diameter of 6-10 mm. The size of this recess should be such that the plate lay down in it on the same level with the surface of the table top.
Make a round milling recess with straight corners will not work, so on the plate itself, the corners also need to round up with a file. After fixing in the table top, it is necessary to make a hole in the mounting plate with dimensions corresponding to the diameter of the soles of the mill. It is done with a straight cutter, the thickness of which should be greater than that of the table top.
When the requirements with equipment are small and communicate with homemakes there is no desire, you can buy something similar to what is depicted in the photo below.

Proma cost about 6 thousand rubles - one of the cheapest factory milling tables
To perform such an operation, you will not need a drawing, as it does not require high accuracy. FROM back side The table tops also need to choose a certain amount of material, since the dust collector housing and other devices will be installed at the bottom of the table. To quickly perform all the above operations, you can focus on the drawings or photos posted in this article.
The final stage of the assembly of the self-made milling table is the connection of all it constructive elements. First, from the bottom of the tabletop, the milling mill will start, its sole is screwed to the mounting plate. Then the plate itself is fastened to the top surface of the table top with self-tapping screws, which must be completely recessed into the prepared holes. Only after performing these operations, the countertop itself is reliably fixed on the bed.
Compact desktop milling table and detailed analysis Its creation in the photo below.

Computer model Appearance Assembly Rear View Front View
Raised milling cutter, sash spread mills omitted, sash shifted hand milling hose from vacuum cleaner for dust and chips
Fastening of the milling and tap chips Adjusting the raising cutters Lifting the cutter is carried out by rotating the screw setting the lifting of the cutter
Setting up departure cutter pad from plexiglas to the installation of a milling glass exactly adjacent to the tabletop Millinger is screwed with a reference platform
Asking how to make a homemade machine, more securely in operation and ensure the convenience of processing the overall blanks on it, such equipment can be equipped with upper clamps. To create this device manufactured based on the roller, it is also necessary to prepare drawings.
Ball bearing can often use ball bearing suitable size. Mounted such a roller on the holding device that allows you to fix it at any distance from the table top. With this simple universal device, the processed billet of any thickness will be securely fixed when moving on the surface of the desktop.
On the video below, the person shows its homemade milling table, which was assembled right on the balcony of his own home.
In order for the homemade milling mill on the tree by you, it was highly productive and functionality, it is necessary to equip it with an electric power. If you plan to use your machine for processing parts made of wood with a shallow sampling, it will be quite enough electric motor with a power of 500 W. However, equipment with a low-power drive will often be disconnected, which will negate all savings from the purchase of a weak electric motor.
The optimal choice for such machines are electric motors, the power of which starts from 1100 W. Such an electric motor with a power varying within 1-2 kW will allow you to apply your homemade device as a real milling machine for the processing of wood products. In addition, you can use any type cutter on such a machine. To equip the machine drive, you can use electric motors that are installed on stationary equipment (for example, on drilling machines), as well as on hand tools (drills, grinders, hand mills).
From this article, you can find out how at home to make a milling machine on wood with your own hands to perform basic operations with blanks. The text is set out step-by-step technology Tool creation: Analysis of the structural features of the device and all components required for its installation, drawings with dimensions and detailed descriptionsthat will help create each of these items and collect them together.
Milling machines on wood can have various appointment. Some devices are designed to perform only one operation, others are multifunctional. Buying a professional tool - expensive pleasure, so many masters resort to the manufacture of a wood machine with their own hands. Most often, such a mill is used in small furniture workshops.

The milling mills are usually used to handle wood along a direct or curve contour. As a working element in the design, the knife head protrudes that performs rotational motions. In most cases, this item is located vertically. There are many varieties of milling mills, each of which has its own structural features.
Most popular types of devices:
Note! In all listed structures, in addition to the latter, the material is applied manually.
The design of the mon-shunting machine includes a horizontal table with a pair of tongue sockets designed to fix the guide lines. It is installed on the bed of cast iron. Under the table there are sleds that move on the guides. They have a spindle on the spying and a pair of bearings. At the top of this element there is another spindle - insertion. It is intended for mounting cutting parts.

Salazki with a spindle can be raised if necessary. For this use conical gear With flywheel or screw. The belt transmission allows the spindle to move. And for this can be used counter-use, motor or motor shaft.
To make such a mill on a tree with your own hands, you need to take into account some nuances. In some cases, do not do without additional spindle strengthening. Such a need arises if it is necessary to process high height blanks or serious loads affect the part. To do this, you need to install the machine on the table and secure the upper stop. This element is fixed on the bracket. To control the movement of the workpiece during the milling process, it is desirable to use the guide ring or ruler.
Machines in which the spindle or the table bends, allow you to perform a wider range of wood works with your own hands. In addition to standard operations, such structures allow you to obtain higher quality processing, getting a clean and uniform surface. This result can be achieved by treating wood at an angle, using mills with a very small diameter. The device with the tilting spindle is much safer and more convenient.
These devices are used to perform copiers. It does not require high power. Such structures allow milling and drilling work to create openwork products.

The copier is able to replace three tools at once:
Wood processing is performed using cutting cutters. The spindle develops a large number of revolutions, due to which the treated surface is very clean.
A homemade woodworking machine can be used for various purposes:
As a basis for such a design, a bed is used made of cast iron. Its upper part is bent in the form of a sickle. This zone is used for mounting an electric motor.

Note! The bed performs the function of the binder, which is installed all the elements of the homemade milling machine on the tree. The stronger and more reliable its design, the better.
The engine is installed on the guides. Due to the levers system, it can move along these elements down and up. This plot is driven by pressing the pedal, which is equipped with a special stopper. The rotary motor shaft is connected to the spindle, where the cartridge with the tool is fixed. This cartridge can be self-centritable or American.
The bottom area of \u200b\u200bthe bed is mounted on the table on the movable bracket. Such a design can move around the guides vertically using the handwheel. There are other options for the manufacture of a homemade milling machine on a tree with their own hands, the drawing of such a design involves the vertical movement of the table also during operation by pressing the pedal. In such models, the electric motor and spindle remain motionless.
The easiest way to personally make a tool at home is to construct lathe Or the mill of a drill or an electric motor removed from another tool. This process is not so complicated, so each master is able to cope with its execution. This will require an electric motor, the power of which does not exceed 500 watts, and infirm materials. Drill can be used as a drive. Of course, for the manufacture of a lathe, some skills will be required.

For the construction of the machine, the following items are necessary:
It will not hurt to acquire a drawing that will help navigate in size and properly make all the design elements for subsequent assembly.
First you need to prepare an electric motor shaft. To do this, it is installed onto a tablebuck, a steel center with carvings is also suitable. Installation of the second center is carried out in the backstand tube. For the manufacture of the bed, a pair of corners of 5x3 cm is required, their length is 15 cm. Motor is fastened to the bed with a bolted connection.

Note! The central part of the backstone must necessarily coincide with the middle of the electric motor shaft.
At the next stage of manufacture homemade machine With their own hands, a grandmother is assembling. This element is formed from a pair of horizontal and pairs of vertical corners. It is attached to the pipe designed for the spindle. It is necessary to insert a bolt, the diameter of which is 1.2 cm. Previously its head is sharpened at right angles. Thus, the central part of the spindle is indicated. After that, the grandmother is installed on the bed. On the top rack, which connects with horizontal corners, it is necessary to secure the welding method.
For the manufacture of a girlfriend you need to take a steel rod with a chamfer. Also, this element must have a hole that will be used to secure the support line. It is necessary to vertically welcome the tube with a locking screw to a long corner. Then inserts the brief of the girlfriend.
As a spindle of the front grandmother, the motor rotor will be used, on which the topplack is fixed. It needs to perform several holes. In the central part will be inserted fork. Holes along the edges are designed to fix the part with screws.

Instructions for use. Parts components. Recommendations for the selection of structures and an overview of the best models.
The design of the freesome consists of the following items:

Helpful advice! The recommended engine power for the machine is 2 kW and more. The tool with smaller indicators will not be able to process blanks from solid wood.
In order for the bed to withstand high dynamic loads, it is desirable to use metal as a material for its manufacture. The most suitable option is a pipe with a square or rectangular cross section. It is allowed to use a massive metal corner.
The choice of such materials allows you to create a design without applying a welding machine. All elements are connected by bolts. The design is collapsible, which facilitates its transfer and transportation. In addition, using the appropriate drawing of the milling table, you can create adjustable legs with your own hands. Movable supports will be allowed to adjust the machine horizontally.
For the manufacture of countertops, such materials will be suitable:

The countertop must have a smooth surface. Any irregularities will affect the quality of work. In addition, it is necessary to exclude all the factors that can cause scratches during the processing of blanks.
In the manufacture of a table for a milling mill smooth surface You can achieve in several ways:
For the manufacture of a milling mill, you can use an asynchronous or collector engine. The first option is quite unpretentious in operation and does not impose restrictions on the size of the cutter used. Among the disadvantages - a high level of noise. The collector engine is more accessible, but its brushes wear out faster.

Self-made wood cutters are able to effectively process wood, however, when contacting with solid materials, the cutting elements are quickly blinking. Therefore, the spectrum of the application of such parts is significantly limited.
To make a milling cutter with your own hands, you need to take a cylindrical blank and cut off half of its diameter on the site where the cutting zone will be located. After that, it is necessary to smooth out the resulting transition. From the cut part of the workpiece you need to remove another 1/4 diameter and perform a similar operation. Then you should give the treated cutter section of the rectangular shape. To do this, cut its lower part. The thickness of the obtained working area should be 2-5 mm.
Helpful advice! To cut a metal blank under the cutter, you can use a drill or a grinder, adapting this tool to perform this task. Cutting edge can be made using.

The simplest milling machine can be made by the same principle as the turning tool described earlier. There are several ways to issue a leading construction center.
In the first case, a steel tube with thin walls is located on the shaft. This method is considered the simplest, but it is not devoid of flaws. The operator will not be able to process the workpiece, the diameter of which is less than the inner cross section of the pipe. In addition, this design will not be able to quickly dismantle, if there is a need for this.

In the second case, the billet will be attached to the table cheeper. To do this, you can use screws for which you need to pre-make holes. This method also has drawbacks. The diameter of the processed blanks is limited to the size of the facebuck. To simplify this process, you can make a special cartridge, although in this case it will not be possible to avoid some restrictions.
Rear center, which will be used to fix long blanks, you need to install on the backstone. Installation of an electric motor is carried out on the frame. In general, the simplest designs of the turning and milling tools are largely similar. If you wish to get a more functional device, you can make a CNC milling machine with your own hands, but for this you will need additional technical knowledge.
There are several design options that can be used to install a CNC desktop mill. Tables can be stationary or portable. In addition, there is also an aggregate variety. This design allows you to expand the surface of the table to use the mill.
Most often, the masters prefer stationary structures having a metal frame. Dutch plywood is suitable as a material for the countertop.

Note! Making a table for a manual milling woman with your own hands, be sure to take into account the growth of a person who will work for it.
List required tools and materials include:

Having everything you need can easily make the design of the milling table with your own hands, video reviews of technologies that are quite a few in the network will help to visually familiarize themselves with this process.
CNC mill differs from the usual tool in the presence of a program that controls its operation. On many videos, homemade machines are made on the basis of a beam with a rectangular cross section, which is fixed on the guides. CNC milling mill is an exception. In the process of installing the supporting structure, it is desirable not to use welded connections, the fixation is better to perform with bolts.
The fact is that the welds are vulnerable before the vibrational impact, which is why the frame will be subject to gradual destruction. As a result of a geometric dimensional change, the equipment will lose its accuracy and quality of processing. It is desirable that the drawing of the table involves the possibility of moving the tool vertically. For these purposes, a screw transmission is suitable. The rotational movement will be transmitted using a toothed belt.
The vertical axis is an essential element of the design. For its manufacture, you can use the aluminum stove. It is very important that the size parameters of the axis correspond to the dimensions of the future machine.

Helpful advice! Using a muffle furnace, you can cast a vertical axis of aluminum, taking into account the dimensions specified in the drawing.
The machine assembly should be started from the installation of two stepping type electric motors. They are installed behind the vertical axis directly on the housing. One engine will control the movement of the milling head horizontally, the other - vertically. Then you need to go to the installation of the rest of the design nodes.
The rotational movement will be transmitted to the node elements of the tool using belt gears. Before connecting to the finished milling program control, it is necessary to check its performance and in the presence of flaws to eliminate them. Many masters use video reviews to build the machine, where this process is considered in detail.
To create a CNC milling machine at home, be sure to use stepper motors. They provide the possibility of moving the tool in 3 planes. Electrical engines present in the matrix printer are ideal for creating a homemade machine. It is necessary to trace the motors to have sufficient power. In addition to engines, steel rods will be required.

In the matrix printer there is only a pair of engines, and three will be required to create a mill. Therefore, several old printing devices will be required. It is desirable that the engines have 5 control wires. Due to this, the functionality of the tool increases.
Other engine settings are important:
To assemble the drive, the hairpin and nut will be required. The size of these parts is selected taking into account the drawing. To secure the motor shaft and the hairpin, you can use a thick winding of rubber from electric cable. The nylon sleeve is suitable as a retainer, the screw should be inserted into it. You can use a drill and file as auxiliary tool.
Management tool will be managed software. The required element of the machine is the LPT port, which provides the connection of the control system to the Filtray through electrical engines. From the quality of components used to assemble the machine, its service life and the quality of the technological operations performed are dependent. Therefore, the choice of parts should be made thoroughly. When all the electronic components of the machine will be installed and connected, it will only be downloaded to drivers and software.

If almost any master can cope with the manufacture of a manual milling and stationary table, then the assembly of the CNC machine for many will seem unlevued task. Moreover homemade structures Do not have such capabilities that the factory production tool can offer.
Helpful advice! If it is assumed to use a milling mill to perform complex woodwork, it is better to prefer precisely factory structures that are accurately calibrated and have many functions.
Rates for them vary depending on the functionality, the size of the table, power, manufacturer and other parameters.
Average rates for milling machines with CNC factory production:
| Name of the machine | Stamp length, mm | price, rub. |
| LTT-K0609 (LTT-K6090A) | 900 | 228970 |
| Woodtec MH-6090 | 246780 | |
| LTT-P6090. | 329120 | |
| RJ 1212. | 1300 | 317000 |
| Woodtec MH-1212 | 347350 | |
| Ruijie RJ 1200. | 399200 | |
| Woodtec MH 1325. | 2500 | 496350 |
| Woodtec MH-1625 | 540115 | |
| Woodtec VH-1625 | 669275 | |
| RJ 2040. | 3000 | 1056750 |
| Woodtec VH-2030 | 1020935 | |
| Woodtec VH-2040 | 1136000 |
Assembling the machine with software is a rather complex process that requires certain skills and knowledge. This work cannot be performed without a suitable drawing and necessary parts. Elements such as loops designed to transmit signals, stepper motors and microprocessor boards can be removed from outdated equipment or purchased on the network. Many online stores offer ready-made sets for assembling milling machines for homemade workshops.
In Russia, large-scale and professional use of wood and woodworking technologies began to be used in Peter the first. The first professional machine on the tree was brought to them from Holland. To date, such machines are sufficiently popular.
To independently make the milling table, you do not need to have any special knowledge. Such tables in some cases are significantly superior to the factory branded tables used for milling.
Such wood aggregates have a different appointment. They can be used both for a single operation and for several. Such machines are mostly manufactured at the factory, however, many make them with their own hands.
Most devices are multifunctionalThey contribute to saving space in the workshop. After small manipulations from the bed of the unit, it can easily be replicated to perform various operations.
A professional machine is expensive pleasure, so often many craftsmen begin to make it with their own hands. It is used then most often in small furniture workshops.
Whatever professional wood machines, but they are able to combine only a certain amount of processing techniques. This is explained by the fact that in some devices the blank is fixed, and in the others it performs rotational and translational movements.
The homemade milling machine is made using a drill. The electrical drill spindle is fixed on the steel profile, in which the workpiece clamps. From the opposite side, a reel or rotating clamp is installed. Treatment is carried out by special cutters that should be held with hand. This method ensures the manufacture of simple parts of the round shape.
Among the variety of milling machines, few are used for woodworking. Machining furniture, be sure to apply milling. The wood machine is provided for the following operations:
For example, to install furniture accessories required rejection of the exact shape and depth. Therefore, milling allows you to achieve the necessary parameters very easily and quickly, and this is very important in production facilities.
Most convenient and therefore quite common is considered flatShelipoval Milling Machine. It is easily manufactured with his own hands. Homemade device The tree allows you to significantly save finances when organizing a domestic workshop.
 Such a device on a tree processing the part with a milling of rotational movements. The workpiece or hard is fixed, or is fed to the mill with the required trajectory.
The mill is steel cutting tool cylindrical form , very similar to the drill. However, unlike him, the cutter cutting edges have the entire body. Due to this, you can remove the tree simultaneously in several planes. You can control the milling mill in automatic, manual and semi-automatic mode.
The milling machine consists of the following details:
 Materials that are required for the manufacture of an aggregate with their own hands can be found quite easily and they are quite inexpensive. That is why the homemade milling device costs small money. You can use such a material as: laminated plywood, chipboard sheet.
The size of the future table depends on how much free space will be in the workshop. The manufacture of the machine begins with the fact that it takes sheet of plywood and cuts on the details With a circular saw according to the drawing. The countertop and the bed are considered in detail, which is why they are made first.
The main cutting tool of the milling device applies with their own hands. manual frezer. For these purposes, devices are remarkably suitable, which for different reasons are broken, guides are broken.
The hand mill is fixed strictly perpendicular to the tabletop. The milling sheet is organized using a standard device. You can also make special devices that contribute to the minimization of time and effort to change the angle of inclination and the depth of the aggregate.
The final stage of the manufacture of a homemade machine is device parallel stop. This device contributes to the direction of the part to the cutting edge under a strictly specified angle.
The homemade milling machine is pretty simple, just enough to have minimal skills in order to cope with this work with ease. The material for this unit is publicly available and rather cheap. The resulting device is used mainly for small furniture workshops.


