Sections Articles:
Success B. independent installation Interior doors can be achieved if you properly approach the solution of this task. On the one hand, such work is easy to produce, but on the other there are a number of nuances that need to be taken into account during the installation process. Before installing the interior door, it is important to consider the actions algorithm. At the same time, if it does not prepare work, it may affect the final result. Of great importance is theoretical preparation in the question of how to put similar door structures. Even in the absence of experience, you can install interroom doors competently and reliably.
Before studying the theory of the installation of interroom doors and proceed to the installation of the structure, it is necessary to consider the issue preparatory work. In no case cannot ignore this stage, otherwise simple and fast installation Doors can turn into a real nightmare. First of all, you need to pay attention to two points.

To begin with, you should make sure that the door block should be done in full compliance. The optimal situation will be if after mounting the design from all of its sides, the gap of 2-3 centimeters will remain. It will make it possible to easily put the door frame in the same plane level with the opening.
To achieve this is easy. If the open is too narrow relative to the door block, it can be expanded with a perforator or a shock drill. In the case when the doorway is too wide, then it is possible using a wooden timber to reduce its dimensions. In general, the clearance of up to five centimeters is normal.

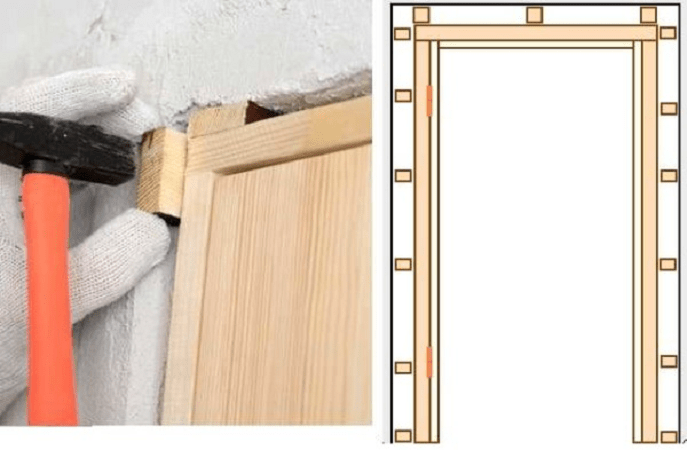
For the perfect installation of the door block, you can use one simple device. It is required to attach a cross box three smooth wooden rails. One bottom, second from above, the third is in the middle of the design. These rails will allow door block In one plane with opening.
To avoid surface damage door box You can fix the rails by plating under them wooden lining. They should be screwed to the end of the box. In addition, the length of the rail must be chosen in such a way that after installing the door frame in the opening, the rails rested in the walls. By the way, it will be that there are some more nuances that will help to install without unnecessary difficulties.

First of all, the rails are required to be fixed on the side of the door block into which the door will open. In addition, they must be fixed after installing the door frame in the opening and formation between the logging and the opening of the gaps of the desired size.

To fix the box, you can use the folded twice tight cardboard. It is very important at the preparatory work stage to perform two actions described above. Without the implementation of these procedures, it is not recommended to install the door block, because in this case, the risk of skewing the entire structure increases significantly. After the implementation of these manipulations, you can proceed directly to independent installation Interior doors.
After completion of the preparatory work and the workpiece of all necessary tools, you can begin the installation of interroom doors. From the tools you will need a hammer, a non-sleeping rack and a fombus. In addition, you must purchase a balloon with mounting foam low pressure With polymerization. As an example, it is possible to make a foam macroflex 65. It should also be prepared by a wedge of wood. To date, there is a spent technology, how to put interroom doors correctly. The installation process can be found in the video.
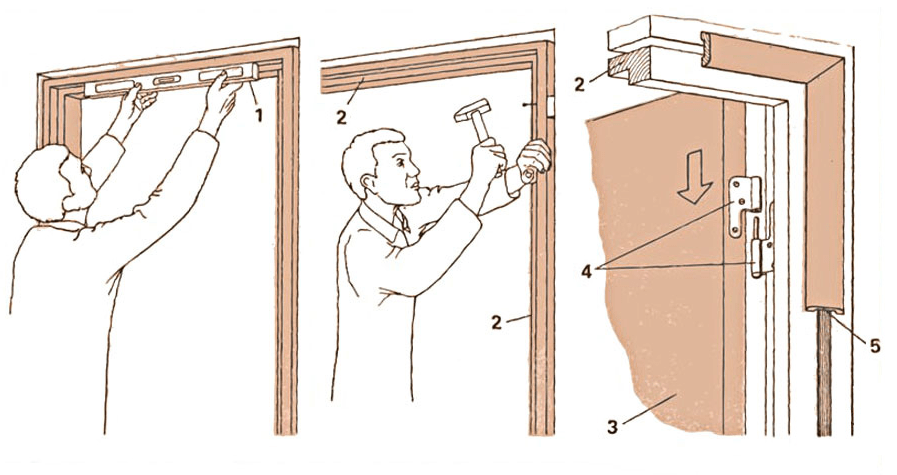
First of all, you must put the door block in the opening. During this process, it is important to pay special attention to the part of which the design is established. It is desirable when making installation is where the door will open. Now you should set the design in the center of the day. Moving the door unit to the right or left it is necessary to provide the same gaps between the design and walls on both sides.

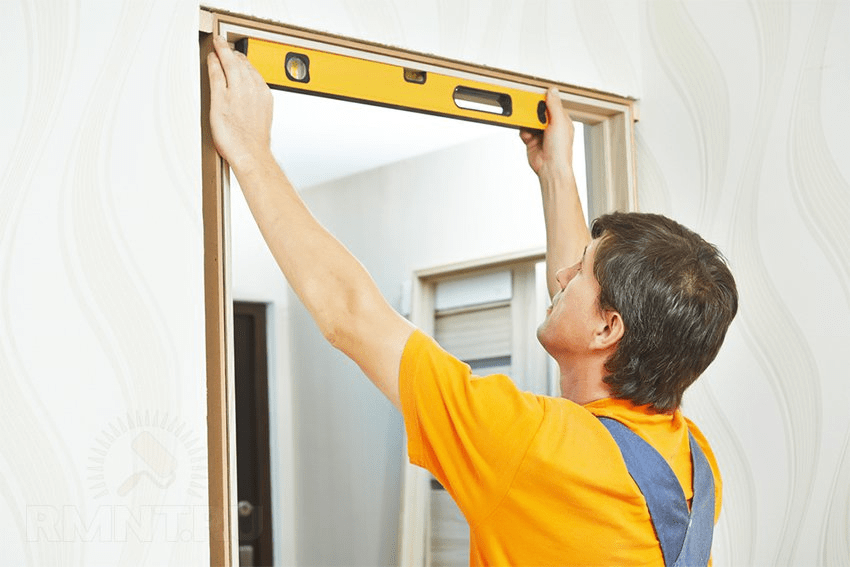
At the next stage, you will need to make sure that the vertical location of the door frame racks. To do this, you can use the Rack Level. It must be applied to the bottom of the top transverse jumper. If the level is not followed, it will be necessary to take advantage of the bag, lifting with it the desired rack and resting wooden wedges under it.
After that, the door block should be fixed to partitions. To do this, drill holes with a diameter of 6 mm in the protruding part of the wooden jumpers. Then the dowels are clogged into these holes. In the process of fixing the door block, it is necessary to check the position of the structure relative to the side walls from time to time.

After that, you should wet the water box and the disc. Such a procedure is carried out in order to increase the polymerization of the mounting foam and its adhesion with the walls of the goof. Then you need to make sure to preserve the correct position of the door frame. To do this, use a rack level. In addition, it is necessary to control the presence of pads made from cardboard, between the door cloth and the lodge. If some fell out in the process of performing work, they must be returned to the place.
At the next stage, it is necessary to fill the gaps between the door block and partitions using the mounting foam. After that, you need to give foam to grab and dry out. This will require several hours. As a rule, the mounting foam is completely freezing for 6-10 hours. It will be by the way to say that the mounting foam is a poisonous material. To avoid the unpleasant consequences of skin contact with it, you can use protective gloves. In addition, it is necessary to protect the surface of the products using a painting ribbon, placing the door block around the perimeter.

After that you need to remove all auxiliary means. Now they are no longer needed. So, with the help of dumping, dowels and self-tapping screws are dismantled with which jumpers are fixed in the door frame. Then you need to remove the rails themselves and open the door. Cardboard linings must fall on the floor after opening the door.
The question is how to properly put the door blocks is not limited only to the installation of the structure itself. After the interior doors are mounted, it is necessary to carry out work on finishing door Piece. The method of implementation of this procedure depends on the width of the doorway, as well as the type of the mounted door block. In the case of a subtle simpleness, such as, for example, at the entrance to the bathroom, you can make a finish using single platbands. This option is the easiest and easy-to-see. The acquired platband kit is fixed on both sides. door constructionClosing the foam filled gaps between the box and partitions.

If we are talking about wide door Opeters, their finish is carried out with the help of the same platbands or volunteers. They may differ from the color of the door leaf, the more recently contrasting solutions have become popular. The sentiment can be cut into the desired width, and it should be fixed using the construction glue.
In addition, it is worth emphasizing that one of the ways to finish the doorway is shuttering. This method is especially appropriate when installing wooden door blocks. The fact is that the cement-sand plastering solution adequates the door structures from natural wood. At the same time, this type of finishing is not recommended to use for door frames from Feds. This material is not compatible with high humidity Materials that are used in plastering.

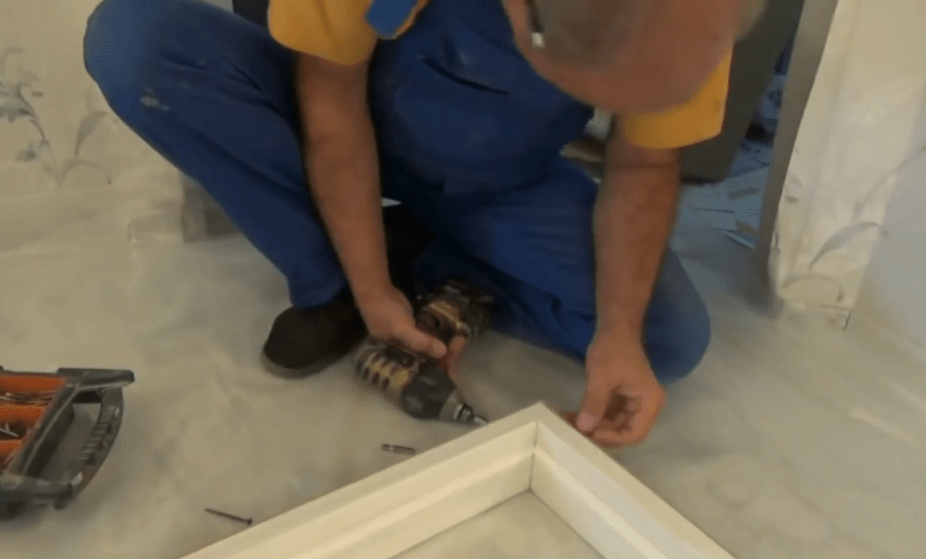
After installing the door block, the installation of platbands own hands Does not represent much difficulty. It is necessary to cut the edge of each platband at an angle of 45 degrees and consolidate them on the door frame. For these purposes, you can use glue, finish carnations or self-tapping screws. Covers are subsequently rubbed, and self-tapping screws are hidden using decorative plastic plugs.
As practice shows, the installation of interroom doors is quite simple procedure. But, only subject to the compliance with the installation technology and the sequence of work. A reasonable approach to the case will allow all manipulations without much effort and problems.
It is important to remember that technically competent and neat installation of interroom doors can easily be leveled by the lack of care for design and improper operation. Interior doors are recommended to use indoors at a temperature of +15 to +35 s °. In this case, the humidity of the air should not exceed 70%. It is important that there is no sudden temperature fluctuations and moisture differences in the apartment on the door block.

It will be emphasized by the way that special attention should be paid to the operation of interroom doors in rooms equipped with hermetic windows. If you do not air the rooms, there may be excessive humidity in them, which is likely to be the cause of damage constructive elements Door design. So, the door can wake, the material of the finish is cut off.
In addition, installation is strictly prohibited. MDF doors In those rooms in which there is a constantly elevated air temperature and humidity. Such objects include pools, saunas and baths. At the same time, it is not recommended to establish such structures in rooms without heating, with cement or earth floors. At the same time, it is allowed to exploit interroom doors with a short-term impact of moisture. In this case, the prerequisite is ventilating premises. As an example of such an object, you can bring the bathroom.

In the course of using interroom doors, the opening and closing of the web should be made exclusively in ways that are not entitled damage to the design and platbands. In addition, even if the door is equipped with a wear-resistant castor coating, a coarse mechanical impact on the design should be avoided. Otherwise, probably the appearance of chips, cracks, burr and pulp. Such defects will significantly worsen the aesthetic appearance of the door block.

Interior door, like furniture in the room or other interior items, needs careful attitude and attention. To preserve aesthetic appearance of the design, it is enough to periodically apply special means Care. Clean the door block from dirt and dust is necessary with a soft tissue or wet napkin. Contact design with various solvents, acid and alkaline compounds should be avoided. If you adhere to such simple rules, then interior doors will delight their owners aesthetics and long service life.
In conclusion, it is advisable to emphasize that the whole process called "We put interroom doors on your own", which is produced in compliance with the technology and recommendations of professionals, will take about three hours. True, this is not counting the time spent on the preparatory work before you start installing the design with your own hands.
Newcomers, deciding to make all the work on installing interroom doors on their own, often missed important nuanceswho are well known to experienced masters. An important point It will be thorough preparation for installation work, the use of reliable fasteners.
Right installed door It will be closed without too much effort, not breaking out if they even have periodically clap. The carrier base is the box. From how strong it will be, the reliability of the design depends.
The design must be properly set - for this you need to purchase building level. It is best to use laser, as it is very convenient to work.
Installation of interior doors is performed in several stages. Door canvas and box need to be equipped with accessories. In order to conveniently close the door, you need to install the handle. If required, it can have a castle with a spring mechanism. On the door and the box should make a loop. The canvas can only be mounted after pre-adjustment is performed. After that, you can go to the mounting of the platbands.

Installing doors with your own hands will require a newcomer labor. If the master completes the installation for 1 day, the novice builder can spend much more time. This moment must be taken into account if emergency installation is required.
It is important to perform all steps in a clear sequence, strictly observing construction norms. A number of door blocks already have mounts for mounting. But there are products, the box of which will have to be assembled on your own. They are sets in which bruks from wood and planks for platbands. In addition, the manufacturer includes a door leaf.

Deciding to collect the box on their own, you can take advantage of different methods. It is necessary to pay close attention to the quality of work, because when even the slightest error in the measurements will have to either make all the work again, or buy new parts of the design.

Install the door to the interroom partition can be with a threshold and without it. Most. simple option It will be the installation of the construction without a threshold, but 2 option will require the presence of a bar-strip. In this case, the finished design will have a form of a rectangle.
Step-by-step instructions will be helpful. Before you start work, it is necessary to remove the exact dimensions. First you need to learn the dimensions of the opening. Then the calculations should be made, determining the size of the side racks and pendants. Then you need to determine the optimal size of the door of the door, not forgetting about the technological gaps. Having made the markup, the elements are screaming with a hacksaw, and then the assembly of interior doors begins.
It is important to correctly calculate the thickness of the box, which should be no less than the thickness of the wall. In order for the measurements to be clear, you need to use roulette. Beginners builders should not rely on the fact that the same elements, for example, side racks will be "mirrored". To avoid errors when measuring, each item needs to be measured separately from right side, and then with the left. If deviations are detected during the process, they should be taken into account in further work.

How to install interroom door Alone? It is especially closely to put a preliminary bar, which should have a clearance under the mounting foam. It is enough to allocate 1 cm on it. It should be done similarly to the Podolok and Looping Bru.
The clearance from the inside should be much smaller, 0.3 cm is enough. If the interroom will be with a damage, then the gap should go through the entire perimeter of the structure. When installing the design without a neck between the floor and the blade you need to leave the gap. The average value is 1 cm. Such an assembly and installation of interroom doors will be considered correctly performed.
On vertical racks, markers are needed for dipping, which are determined on the inside of the bar. In case of insufficient sizes, it must be increased. If the hole is too large, then it is reduced by laying drywall cut in size.

In order to make a cut, it is better to use lathe. In this case, the installation of the door box will take a little time. If the machine is not, then the knife and stub are suitable as an alternative.
By installing the interroom door, you can use 2 in the following ways:
How to install the interroom door do it yourself? If we talk about 1 option, it is quite complex. From an inexperienced joiner, work will require increased attention. But as a result of a carefully completed docking, it turns out a product that looks very beautiful.
In order to connect several elements, you need to use screws. Under them need to make special holes. If the door is made of MDF, then work should be carried out in advance, which will avoid damage to the blanks. It is most convenient to work using the drill, the diameter of which is 3/4 diameters of fasteners. It is best to buy a self-tapping screw, which thread comes to the head.

If we talk about 2 ways, then he assumes that the angle will be recovered 90º. To perform work, you will need a hacksaw with small teeth. The upper beam is attached to vertical stands 2 self-drawers; They are screwed on every side. In order to make the threshold, the bar need to be soaked at right angles.
The easiest way to collect the design, laying out the elements on the floor or the big table. The master must establish accessories. Performing interior decoration, It is necessary to correctly fix the functional fittings.
Don't forget about fire safety. In order to be able to quickly evacuate from the room, you need to install the door opening out.

How to put interroom doors? Several options. The loops are hung on the right or on the left - there are universal products on sale. If earlier it was possible to buy a loop that demanded a neat knocking, now you can buy products that do not require veneer cuts.
From the upper edge of the canvas, you need to make an indent, sufficiently 20 cm. Then hinges are hung. From the bottom, you should retreat for the same distance. Possible variations: In these cases, both parties are retreating by 5 cm. Additionally, it is possible to strengthen the design by penetrating 3 loops. It is 50 cm from the top line.
In order to fix the box in the opening, you need to buy anchor. The door will be securely held on 3 long self-drawing. In addition, the design will support mounting foam.
Drill the door box made of wood, without conducting preparatory work. Installation procedure Next:

After completion of the installation work, you need to wait for a complete drying of the foam. Surplus can be trimmed, and then perform the installation of platbands.
Independent installation of interior doors will not require complicated action. To solve this issue, there will be enough basic knowledge and skills in the area of \u200b\u200brepair. The installation of the door leaf with its own hands allows you to save money, because it is not necessary to pay for the work of specialists.
Installing the interior door may be required during repair work. The procedure is not as afraid, as it may seem at first glance.
Installing a new door is performed in several stages. As a rule, it is necessary to remove the old cloth, and then proceed to installing a new one. At the end of the work, it is required to secure good things (if necessary) and platbands. In the process of replacing the web may require various tools - like manual, so electrical. Depending on the type of work performed and the fittings used, their list may differ.
The list of tools for replacing the door will depend on whether it is necessary to dismantle the box, as well as from the selected accessories
To replace the interior door, you should be aware of how to measure the measurement of the workflow for ordering or buying a product according to the specified parameters. The correct measurement implies the removal of the following indicators:

First of all measure the width of the door. The standard opening in most cases is designed for the door 80 cm. The easiest way to find out this size is to measure the distance between the vertical supports near the floor using the roulette.
To obtain more accurate indicators, the measurement should be carried out on top and centered.
After determining the width, you need to measure the height of the door loop. Approximately it is 210 cm. To find out the exact value, it is necessary to determine the distance from the floor to the top of the outlet. If the floor is assumed, the installation of the new door is recommended to perform after laying the material on the floor. In this case, it is not necessary to take into account the thickness of the finish or to customize the door components during the installation. Doorway Height is measured at several points, but the main indicator is the center. Measurements are carried out within a pass.
To determine the height of the doorway, it is necessary to measure the distance from the floor to the top of the golet
The width of the Owl is determined in a similar way, while take into account that the door design (Lutka) should be less than several centimeters to provide technological gaps. To make the door to have a free move, small gaps should also be between it and the box around the perimeter.
Width of the Owl is determined by the distance between the two parties
Between the door cloth and the louting leave from all sides the clearance of 5 mm, from the bottom - 12 mm.
An important parameter for the unimpeded installation of the door is the evenness of the doorway. Vertical is checked with a plumb or level. Measurements are made in the center, on the left and right. Next, with the help of the roulette, the diagonals are measured - the distances from the upper angle of each side to the opposite angle from the bottom. They should be the same or at least not to have significant deviations.
In addition, before starting the replacement of interior doors, it is recommended to draw up a drawing on which to put measurement results. This will speed up the execution of work.
When there is a need to choose a new door, make the right decision due to the variety of models sometimes not easy. In the appearance of the door look perfect, but serious disadvantages are possible inside. It's all about geometric indicators. If the door leaf will have deviations at least 1-2 mm from the values \u200b\u200bobtained as a result of measurements, it may complicate its installation. To avoid unnecessary time spending time, it is recommended to measure the cloth in the store. It is also important to trace to be immersed and delivered exactly the door with which measurements were shot. At the next stage it is necessary to choose the door box. Most often, he comes complete with the door, but sometimes it is selected separately. Installation of the door design can be simplified if you purchase all the items from one manufacturer. Then it will not be necessary to customize one part to another.
Sometimes there are situations when you need a replacement door without a box. To do this, you will need to remove the old door canvas, adjust the parameters new, secure the accessories and install the product in place.
The loops on which the doors are attached are different. Therefore, dismantling can be done in different ways. The carport design has two parts, one of which is fixed on the door, the second - on the Lutka. Some canopies have an axis attached inside one of the parts. If you want to dismantle the door with such loops, you install the mount or any lifting device and, applying some effort, lift it. Work is best done with an assistant who will support the door at the right moments.
If the loops can be disconnected along the axis, to remove the door slightly lifted the canvas
There are other loops options in which the axis enters both parts of the canopy and is inserted through the top. To remove the door with such elements, you will need to remove the rods. The upper part of the pin has a peculiar hat that the hole is pushed and try to extract the element from the loop. It is best to start a procedure from the lower canopy, which will exclude the drop in the door, as a result of which it is possible to break the part of the loop attached on the Lutka. Especially the damage should be avoided if the box has a normal state and further it is planned to operate. After removing the door from the side of the face with it, accessories dismantle.
To remove the door with the loops on a separate axis, it is necessary to remove the restrictive cap and remove the axis
Replacing the door without a box involves fitting a new product for old sizes. To do this, the new product is placed horizontally, and on top are placed old door. Both canvases are aligned along the top and long side, where the handle will be attached. If a new web has large sizes, you will need to remove too much. The pencil is applied by a line, according to which the unnecessary part is cut off from the new door with a circular saw.
The new door is customized by the size of the old, cutting the extra pieces of circular saw
After fitting a new product, you must perform marking of those places where the loops will be mounted. This is done in the following order:
On the door canvas We make marking places location looped pencil
Clear markup lines can be made a sharp construction knife
The deepening under the loop is cut with a chisel
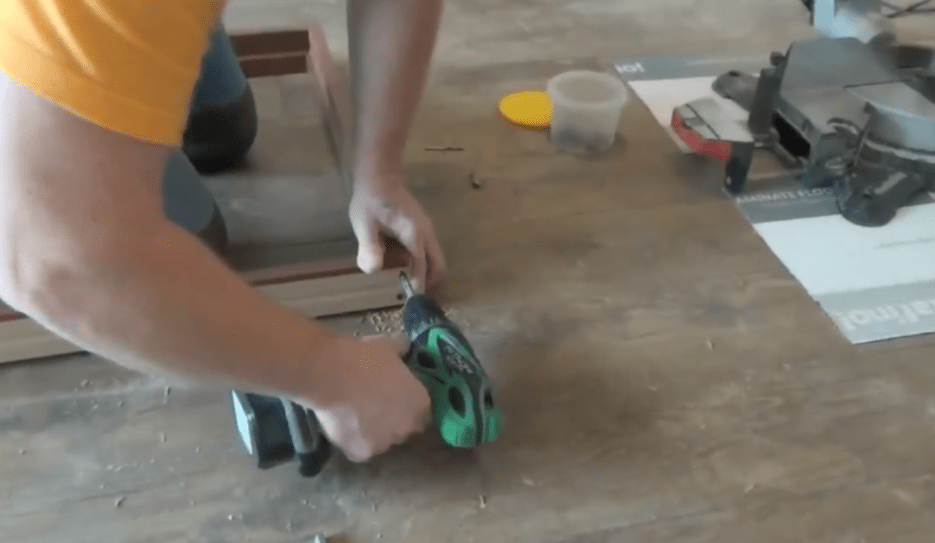
For the convenience of wrapping the screws, pre-drill holes with a small drill
Loops to the door are fixed with screws with a screwdriver or screwdriver
After installing the loops, you can proceed to the manufacture of landing places under the locking mechanism and handles:
On the new door marking under the castle, according to its location by the old canvase
From the end door hole under the lock drills with a feathers drill
On the main surface of the door, the hole under the castle is made by a ring saw
After drilling holes Install the lock and handles
The door is lifted on the floor to the required height and put a piece of the boards of the desired thickness. After that, the canopies combine and make pins in them first into the upper part, and then in the lower one. When using the loops of another design, the suspension canvase will occur in a different way. Work is best done with the assistant, since the axes in the loops installed on the LUTK, at the same time should get into the holes located in the opposite parts on the door.
If during the repair of an apartment or house it was revealed that not only the canvas needed in the replacement, but the box, it means that you need to dismiss the fully door kit.
To remove the old door frame, you will need the following list of tools:
To dismantle the door log, you will need ax, hammer, hacksaw and mount
Door frame removed in such a sequence:
To remove the platband, it is enough to score the ax between it and the box
Sweep the ax under a nail and move the bar from the box
Retreat 800 mm from the floor and saw the door frame
Move with mounting the vertical part of the support above the breakdown
The upper part of the box dismantle with the ax, moving the bar down
Door frame can be collected from a profiled timber or MDF. The assembly process does not depend on the material and consists of the following steps:
Fine elements are carried out with a circular saw
We put the door to the side and place the locations of the loop
To mark the position of the loop on the Lutch, it is necessary to attach an element and outdue it with a pencil
Door box boards are peeling at an angle of 45˚
Connection of elements of the box We produce Samores 40-50 mm long
After connecting the frame elements, it can be installed in the opening. To do this, perform the following actions:
For accurate location of the box in the door, you must use wedges
Wedges are installed in places location loops
So that the door frame is more stable, the space between the wall is filled with the mounting foam
Laying under the canvas the block of the desired thickness, fastened at first, and after the bottom loop to the box
To avoid the intake of elements, it is recommended to put spacers between vertical supports using any blowed materials.
Since the door letters sometimes put with a threshold, you should consider the assembly and such a design. Box elements can be connected not only at an angle of 45˚, but also at 90˚. In addition, the straight angle provides a more reliable connection.
All preliminary procedures until the assembly does not have almost no differences from the installation of the door frame without a threshold. Otherwise, the process is performed as follows:
Horizontal part Scheduling in length, which is equal to the width of the door leaf plus 6 mm on the gaps on both sides of the box
Speaking quarter on the door leaf by removing the electric bike
From the end side of the vertical supports with the help of the chisels we remove a quarter
Preparing seats on the door under the loop and other fittings
The threshold to vertical supports is attached to self-drawing
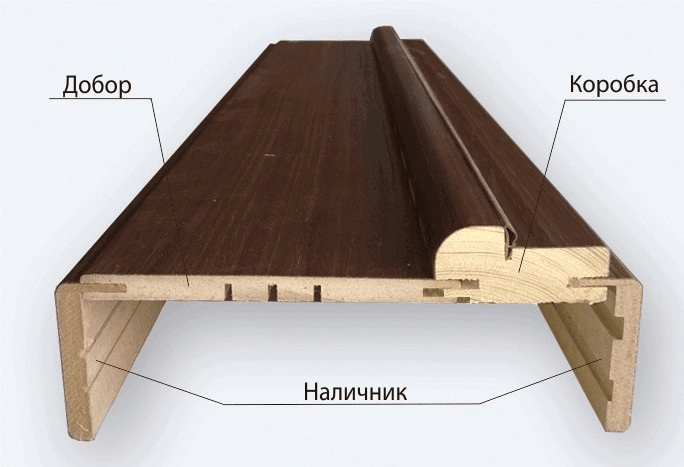
If the wall is thicker than the width of the magnitude, apply door dobrels that allow you to close the wall and visually zoom in the size of the door frame. To install these elements, you will need to prepare the following list:
Probory planks can be installed in the groove and without a groove, so it will be logical to consider both options.
If it is assumed to use good, then the frame for the door canvase is best acquired with a special slot.
The presence of a groove in the door box will facilitate the installation of good
Its presence will accelerate the installation process, and will also allow you to move the challenger, which will significantly increase the accuracy of the installation. The process consists of the following steps:
Measurements are convenient to produce a construction kit
Dobly planks are bought with a stock in width, and accurate fit produced in the installation process
Dobly planks insert into a special groove in Lutch
Upper Dobor lies on the side at right angles
To do not squeeze the foam, you need to install spacers
After frozen the foam, everything is too much removed with a knife
If there is no special groove in the elements of the box, their mount is performed in bulk. With this installation, accurate measurements are needed, as well as a thorough fit of the planks. Installation perform in the following order:
To determine the size of the good, it is necessary to measure the width of slopes
So that the land of the edge was sharp, we cut the caps
Horizontal good is installed on top to vertical elements
When the dobors are fixed, and the mounting foam froze, the installation of platbands.
Tubes are a decorative finish of the doorway, which is curly profiled overhead strips.
To mount the platbands, perform the following steps:
The side plank should be higher than the doorway border on the width of the platband in the top
The markup of the top element is better to produce at the place
Cooling ends are roasted in mirror mapping
It's preferably to bite the hats to make them low
When used as a fastener of the screws, it will be necessary to drill holes under the hat, and after screwing them, hide the heads with decorative plugs.
When installing platbands, leave the clearance under the plinth does not need
The lower part of the platbands rests on the floor, with no need to leave the clearance under the plinth.
You can replace the interroom door yourself, but it is better to do it with an assistant. Professionals for such works use a large set of tools. However, for a single installation, you can do with a simple list consisting of screwdriver, hammer and chisels with a level. Following step-by-step instructions, replace the door in both individually and together with the box will be noticeably easier.
The ability to handle the joinery and measurement tool is already a reason to try to solve such a difficult task as the installation of interroom doors with their own hands. The work is simple, but in its own way slapped. Scrupulsiness will be required, and even the bore in markup and adjustment, otherwise it is not possible to correctly install the interior door with the box.
At first glance, nothing complicated, but it is only a superficial impression. It is about not to simply install the box and the doorbell into the interroom opening, but to make it beautiful, without distortion, scratches and lackers. If this is the first experience, it is best before the start of work to make a detailed step-by-step instructions Installation of interroom doors do it yourself. This is not amuseable for beginners. Even experienced masters often make a mark with their own hands - what not to forget what to pay attention to the installation of the door box on a specific interior partition.
During the installation process, it will be necessary to solve the two most difficult tasks with your own hands:
W. experienced Masters The installation of the interior door takes 2-3 hours, a newcomer to fully install the box and hang the door canvas, you will need at least a day.
Tip! It is not necessary to stupidly follow the instructions on the installation of interroom doors, recommending sequentially embed accessories of locks, fix the loops, and only at the very end solve problems with hanging interior doors. The main thing is to establish a box and door leaf with a fresh head, and platbands, locks and pen with platbands can be postponed the next day.
Measure and sawing many. All cuts are performed with their own hands with hand-hacks, therefore, in addition to fresh strength, it will be necessary to stock high-quality tool.
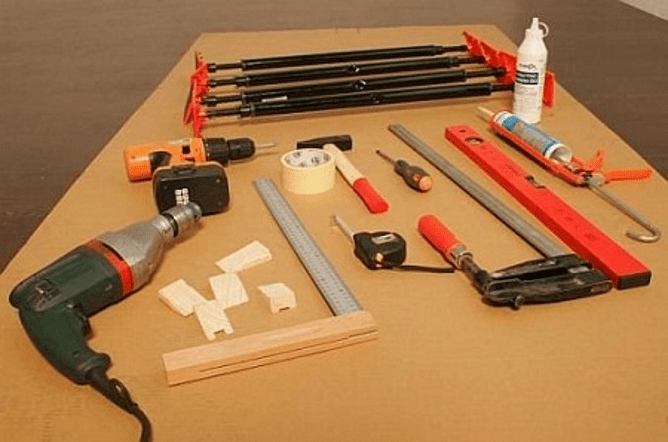
During the day or two before the start of work, you will need to collect a working arsenal for working with sawn timber. It can be collected from friends or rent. Why two days before installation? Because ahead before the start of work, you will need to check the health and performance of each tool:
In addition to the tool, a hammer, a clamp, a joinery, mounting foam in a cylinder, tape and gloves will be required. Dust and waste when installing interior doors, it turns out a bit, but it will still periodically take it with your own hands in order not to spread all over the apartment.
In addition, it will be correct to have a perforator with a blade blade in stock, because when installing a box of interior doors, problems with the doorway in the wall may occur. Ideally, the gap between the boxes and the ends of the opening should remain 10-20 mm, for normal alignment and gate of the gaps. In reality, the opening can be uneven, and you will need to be with your own hands, a perforator or a hammer with a chisel, knock down a piece of concrete or stone.
The best option will be the purchase of a ready-made door kit, which usually includes:

In this case, the entire installation process of the interroom frame box is reduced to transferring the second parts of the loops to the framework of the frame, the assembly of the lutcies with self-draws and the installation in the opening.
It will take less than two hours. One of the options for installing interroom doors do it yourself on video

The only shortcoming scheme is that not all manufacturers modern models Interior doors produce their products with sets designed for installation with their own hands. Most often, the customer buys the door leaf, and the platbands and the framework details are purchased in the calculation to establish an interroom door with the box independently.

First of all, you must lay out the door leaf on the flat. Next, the selected pair of browns is placed to the left and right end of the sash. Tape measure measure the width and the estimated height of the future carrier frame. Then, with the help of the construction level and roulette, the dimensions of the interior passage are checked.
Important! This is done in order to determine whether platbands are closed by the edge of the break in the wall, and which thickness of the challenges must be used.

If you "miss" with a height or width of the frame, you will have to remake the platbands with your own hands or, even worse, it will take to lift the intercommunal door in height.
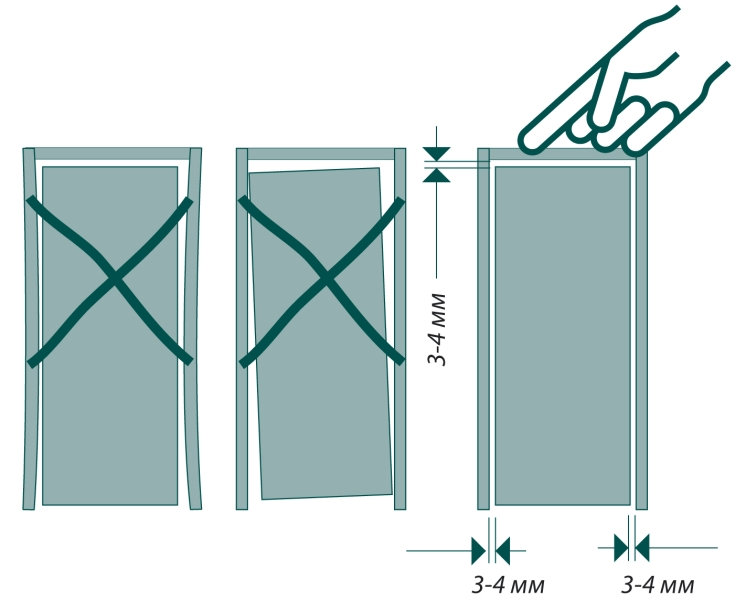
In order for the installation of the interior door to be without distortion, it is important to choose the right distance between the left and right racks so that the door canvas is part of the frame with a small gap, no more than 2 mm per side. In this case, the door will be freely open without subflinking in the log.

The easiest way to assemble the frame with your own hands with the help of clamps, saws and two blanks. Vertical racks, as in the case of preparation, attach to the ends, are aligned and fixed by clamps.
On the side of the top and bottom edge of the canvas on the workpieces leave the allowance equal to the thickness of the bar. At the same time, the line was applied to the left, with their own hands, the line was caught at an angle of 45 o for further docking with horizontal crossing of the frame. Without disassembled the design, put markings under the clipping grooves for canopies, lock and handles.
If the interior door is too wide or complex, then usually at this stage check the compliance of the frame configuration with the door of the interior opening form. To do this, on a wooden bar, a pair of nails are clogged at a distance of each other, equal to the external width of the frame. The bar must be consolidated over the opening, and on the nails suspend a pair of construction plumbers. If the gap between the frame and the wall is 10-15 mm, then the calculation is correct.
After all the checks are made, it is necessary to cut the mounting grooves in the canvas under sheds using a chisel or a joinery knife and a hammer. The easiest way to sprill a niche with manual millingBut, as practice shows, you can make work with your own hands and without expensive power tools.

If this operation causes complexity, you can use overhead loops or models for the control for interior doors. To install, it will be necessary only to drill holes for fasteners.
Tip! If the frame and the door leaf are small, then the frame can be fixed with the mounting perforated petals to the wall of the interroom partition.

Next, it is necessary to blew the mounting foam space between the frame and the wall while the installation on the PPU is performed, it is necessary to check again and, if necessary, finally align vertically using a long construction level. At the top mark, we apply a small building level and, in case of need, you have a charter on the desired height.

After the Lutka is firmly fixed by frozen foam, it is necessary to establish the response parts of the canopies. For this purpose, the original door canvas lifted by wedges so that 1-2 mm clearance is obtained between the boiler and the bottom edge.

It remains only to install the sash on the canopies, and you can go to decorative finish Interior doors.
Facing the frame with platbands does not represent a special complexity. First of all, the vertical plates of platbands are installed. The height of the plank is measured according to previously noted, after which the platband is applied to the frame and placed the line was driving down at an angle of 45 oh.
Tip! Make a cut is best with your own hands using a thin-hackerboard for metal. Pre-on the render line sticks tape. The bar nourishes wallpaper nails or plant on glue.
In the same way, the installation of a second vertical platband is carried out. After the installation of vertical parts is made, you can put the line marking on the horizontal bar, and in the same way to install it on the door box.
Dobly planks are used as an additional element to increase the width or thickness of the door box. Most often, the installation of sobers for interior doors is required in a situation where the wall is much thicker than the web, and the gap remains to be closed between them.
The width of the challenges varies from 10 mm to 200 mm, for interior structures The most running size is 10-20 mm, and often due to the non-standard profile, the hardness slot has to be ordered or cut down with their own hands from platbands.

If, after installing the box, the unpleasant fact is detected that the vertical plane of the frame is recessed into the space of interior opening relative to the wall of the wall, then the only way to improve the position will be the use of volunteers.

Previously, it is necessary to determine the size of the good, for this, the construction level is applied to the wall and the ruler measure the distance to the front edge of the box. Thin planks are nailed by wallpaper nails, wide dobors are glued to the frame.
Among the features of the installation of home doors, the following problem areas can be noted.
Before mounting platbands, you need to make sure that the frame or a good bar is located in the same plane with the surface. interior wall. Otherwise, even if it was made of the edges with their own hands perfectly, a gap will definitely be sure between the platbands.
The second problem with which you have to face, - sagging the doors with incorrect installation. To correct the position, you need to remove the canvas, put the washers, or cut the edge and install the door to the place.
The installation of interroom doors will require a small practice of mounting canopies and good things, but in general, the work is simple, and with due skill can be mounted in a few hours. The masters claim that with each installation the quality of work with their own hands is doubled.
Wanting to install the interroom do it yourself, many overestimate their strength. Without presence required tool And certain skills of working with the material you can hopelessly spoil the costly product. If the decision is made, it is necessary to first get acquainted with the installation rules and scrupulously follow the recommendations of professionals.
The process of personnel installation of doors between the rooms begins with the execution of certain actions. We describe step by step stages of the work performed:
These are the actions that need to be performed. Video "How to set the interroom with your own hands" will help finally understand all the details:

There are many all kinds of sliding doors. They differ in the material external species, other characteristics, although the principle of operation and design remain unchanged. Any such system has a canvas, rollers and guides.
Important: installation of sliding interroom doors is carried out in different ways, it all depends on the purpose for which it is mounted sliding door. It is usually installed to save place, since the space is released, which is necessary to open the swing door.
Schematically, the installation of the design is divided into the following steps:
Detailed installation of sliding interroom doors with their own hands is shown in the video:
If the thickness of the existing opening exceeds the width of the box, then to give aesthetics you have to use good, fixing them directly to the block. The advantage of such components is the monotony of all structural elements, quick installation. Before mounting, it is necessary to determine the dimensions of the sizes. To do this, measure the required width of the plank, inserting a box in the opening and measuring the unfastened width of the opening.
Important: Door Dobor in size can be cut off with a circular saw.
To secure a good, you need to screw the mounting planks from the back and connect them to the box.
It is enough to use three fasteners on each element. Then you should install in the opening box with a good and consolidate it. After that, it is necessary for professional foam to go through all the existing gaps.
Two ways to install goodness interroom doors do it on video:

Overhead loops, referred to "Butterflies" - Do not need to be inserted, simply install them. It is enough just to attach on the door end and to the box the product, fasten it with self-drawing so that the door is ready for operation.
Consider more this process:

To install the lock in the interior door with your own hands, procedures should be performed:
Complete mounting work By installing doors between the premises of the ticket fasteners. This process is simple.


