To determine the level of horizontal or vertical surface, the construction level is used. There are several varieties: water, laser, but most of all use a bubble level, or alcohol. How to use the level, let's tell me further.
Structurally, the bubble level is a rectangular rack of metal or plastic, equipped with special transparent inserts, so-called "eyes", or viziers. Usually there are two or three of them: everyone is necessary to check any particular plane. So, with the help of vizers, the evenness of the horizontal, vertical, and the surface located at an angle is determined. These inserts are made in the form of a flask with a stained alcohol liquid and an air bubble. On the walls of the "Eye" there are special labels that serve as a guideline for the correct position of the air bubble.
Building levels are used both during home repairs and over capital construction. Therefore, they are of different sizes and types. More reliable are racks with a metal case, which protects the tool during drops and from other mechanical damage at the construction site. In addition, metal rails are made of a special alloy that cannot corrosion. Plastic levels are less durable, accurate, but cheaper. To the tool show the most accurate measurements, it is recommended to purchase it in a specialized store.
In addition to standard, rectangular models, there are round levels. They are made as a sealed air bubble capsule inside, which is placed in a small housing. Usually such devices are used on industrial enterprises To comply with the technological conditions of the equipment.
In a bubble level, there is a working surface - the one, which is applied during the measurement to the wall, floor, foundation. It can be determined by the absence of paint, unlike the rest of the body. If you apply a construction level not a working, but opposite surface, when measuring the device can show a small error. The side of the tool is not used at all.
To check the horizontal plane, use the Vizier, which is located in the middle of the rail. To calibrate vertical surfaces there is a vizer located closer to the end of the instrument housing. The tool length should be chosen based on which work will be performed with it. It can vary from 20 cm to 4 meters. The level 20 cm long is used to determine the accuracy of small surfaces, such as the location of the sockets, switches. Rakes up to 1 meter long apply when conducting a larger work, for example, during styling tile tile. Long building levels Used as control rails.
To talk about the rules of operation of the bubble level, it is necessary to consider 2 options for its use:
Rake laid on the horizontal ( flooring, windowsill, timber, etc.) work surface book. At the same time, the air bubble inside the vizier should be exactly the center between the two risks. During the measurement, accuracy is important to a millimeter, i.e. if the bubble deviates even one millimeter, this is an indicator of irregularities. If it deviates from the center in leftThis indicates the need to lift the right side of the horizontal surface to the desired height, until the bubble falls into place. When it turns out to be in the middle, the horizontal is fixed in this position.
Often check the evenness of plastered walls. To do this, applied the rail to the work surface to the wall and are observed for the testimony of a Vizier located near the edge of the rail. If you notice the deviation of the air bubble in the direction of "from the wall", it means that at the bottom of the plaster layer is thicker than at the top. If it deflects "to the wall", it means that the rehabilitation surface is not enough at the bottom.
Despite the fact that the tool is usually made of metal, glass eyes are sensitive to mechanical damage. The device after falling or shocks often shows inaccurate measurements. Immediately after buying it, you need to configure it: applied to the perfectly smooth horizontal surface. To adjust the error, you need to turn it around your axis.
Without the help of this simple tool, do not do even during the usual cosmetic repair, not to mention the overhaul. Simple operation, lack of special care in aggregate with accuracy of indications are the main advantages of bubble building levels.
Modern technologies have already done more efficient hand tool - Chisel replaced the perforator, the electric drill came to replace the mechanics, electronically computing modules and regular construction tweep, coal and plumbers appeared in the theodolites and levels, and regular construction tweep, as well as laser instruments (hereinafter referred to as LP).
About laser devices for construction and finishing.
Laser plumb and level, laser level and rotary laser, laser marker and builder, laser roulette and rangefinder - all these names are related to modern and effective toolused when breaking down land plots, building buildings, finishing of premises, montage of communications. These devices allow you to construct a basic horizontal, vertical or inclined plane, directly on the wall, floor, ceiling and monitor them visually or with special receivers and leveling plates.
Tasks LP
A completely even laser beam successfully replaces the usual plumb, an alcohol level, a metal square, a construction string or cord and even roulette, especially at distances up to 200 meters. How simpler and more accurate to build the wall, column, install door box or a window when you can clearly control the deviation from the vertical using the red line of the laser beam passing along it, which is precisely attached to the vertical, and with the help of a laser roulette that allows you to measure distances to inaccessible areas. LP allow you to quickly and convenience to check the horizontal and overall level of the foundation, design a bias water pipe Or draining, plan the slope of the land plot, mount the fence and siding, control the masonry of the brick and tiles, make the marking of the lighthouses for mounting the ceilings and fill the floor, assemble the telescopic gate and roof, help everyone without exception to do their work efficient.

|

|
|
How LP work
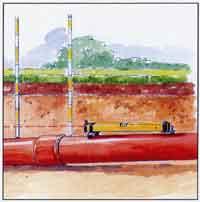
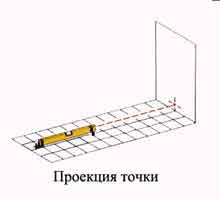
Many are already familiar with the laser pointer, playing with which children often direct the red laser point on items. This principle is used by laser devices for the projection of the horizontal, vertical, inclined plane or point directly to the working surface. Vividly it will show pictures:
|

|
|

|
Inside the device, a laser red laser LED is installed, with a capacity of about one MW and long wave 633 - 670 nm, referring to the second class of lasers involving the absence additional protection for eyes. The LED is in a sufficiently strong case and interacts with the control panel with the electronic circuit and is powered. In order for the radiation of the LED to focus to a point or obtain a line, optical elements of different forms (cylindrical, tapered, etc.) are used.
The laser emitter can be rigidly fixed inside the instrument or is in a free hanging state for self-leveling. In the self-leveling LP, the "Principle of Pendile" is used - the emitter is suspended inside the device and when installing on the surface itself aligns relative to the ground level and gives the exact horizontal, vertical or inclined beam projection. To reduce the time of balancing the pendulum with the emitter, magnetic pillows formed by magnets embedded in the bottom of the device are often used. In more complex LP, a system similar to a gyroscope, which, using electronics, controls the radiators built-in inside the device, allowing it to be balanced and even set the required slope.
The devices with a self-causing emitter are often equipped with the function of automatic notification of the critical inclination of the case (usually more than 5% of the horizontal), which avoids erroneous projections and measurements. Just put the device on relatively smooth surface And turn on - the device automatically balances the emitter relative to the horizon for a few seconds and ... proceed to work!
Laser level
Inside laser level (Next, the LU) The emitter is fixed relative to the alcohol bubble and can design a point at the remote distance at the same level and in the same vertical plane, performing the role of the level and stretched string between the level and the projection point. Stabila 70LJ level with one emitter can be bought at a price of 2250 rubles.
One of the most popular Lou Stabila 70LJ P + L models is manufactured by the German company Stabila and has two perpendicularly located emitter, which allows you to use it for a wider circle of work (Fig. 1). Another novelty is represented on russian market The German company GEO-FENNEL is a MultiDigitPro tilter with a built-in laser emitter and a digital sensor / level, which allows you to simultaneously design a level point, measure the angle and deviation of the measured surface from the horizontal (Fig. 2). Geo-Fennel also produces a pocket laser level / Long Linner cord for fixing at one level of fasteners of shelves, paintings, etc. It is enough to simply lean to the wall and it will design a flat line at it at it under the angle you need - just turn the device to the desired angle (Fig. 3).

|

|
|
Laser builders of horizontal and vertical plane (hereinafter referred to
The palm of the championship among the LP for finishing is occupied by the devices that allow us to construct different variants of intersecting horizontal and vertical rays at an angle of 90 °. The simplest intersection of the vertical and horizontal plane forms on the working surface of the Laser Cross with two red line projections. Each LPP model can build:
Laser Built Plane Builder APL-1
The main manufacturers of LPL in Europe are Geo-Fennel, Stabila (Germany), Agatec (France), Zircon, Trimble (USA). Most of the LLPs sold in Russia under the other brands are either a copy of these companies (in another case or other color) and are made under the order (as a rule, it is more expensive), or produced in China or Taiwan, often having lower build quality. But in China there are high-quality devices. We are talking about LLP, manufactured at the Beijing Opto-Mechanical Plant (BOIF) - APL-1, offered on the Russian market is a bit more expensive than 4100 rubles. It is made of high quality plastic and has a rubberized external case that protects the device when falling. LLP can design simultaneously three lines - one horizontal and two vertical lines designed on the wall at an angle of 90 ° relative to the center of the device emitter. This device is used for the simultaneous markup of two vertical wallslocated at an angle of 90 °. APL-1 is one of the most affordable at the price, and its emitter is closed with a black plastic lining with slots for rays in the form of a cross, which makes the glass less vulnerable at random blows and drops than in similar devices of the TRIAX LS series.

|
The discharge of the projection of the laser beam is limited to the fastening of the pendulum and the emitter lenses. This means that the laser plane projected into one direction is limited to the horizontally circle with an angle of 0-90 ° (depending on the model of the device) and can be increased by using additional emitters located perpendicular to each other. When turning the device around its axis, it can lead to a horizon displacement if the LLP is not equipped with a special swivel fastening with a lumbell and a fine-tuning handle, such as the FL-50 models Multi-Linner and FL-50 Plus of the German company Geo-Fennel. By the way, the latter gives a scan with an exemplary angle of 270 ° of the horizontal line and the vertical line, as well as 360 ° of the second vertical line, located perpendicular to the first, which makes it almost unsatisseable for competitors.
Laser Square (Direct Corner Builder)
The laser carbon refers to the discharge of planes with a fixed emitter and proacts two lines at an angle of 90 ° relative to each other on the floor or wall (working surface). He is good to a tool To control the working axes and is widely represented on the Russian market, two models - Square Linner of the German company Geo-Fennel and LT-80 of Triax. Unfortunately, this device Cannot replace plastic crosses that allow you to withstand the seams between the tiles in one dimension and is used only to control the working axes (it is set to check and then removes the time of the laying of the next tile many times during the operation). The LT-80 model is too heavy (weight 3.4 kg) to constantly put it, raise and remove to control, works with a stated 4 mm error of 10 m and more than three times more expensive Square Linner (stated error 3 mm on 10 m) that makes the device of the company GEO-FENNEL more practical .
Multipath laser instrument
From the name of this group of laser builders, it is clear that these devices design laser dots to the surface and are intended for marking holes perpendicular to each other at once on several surfaces. In the most advanced models of this type, a system of five points is used: two vertical up and down from the device, two horizontal on the right and left and one right in front of the device, which allows you to post any frame designlocated on the right, on the left, from above, below and in front of the device.
Laser Multi-Pointer Point Builder
So far, three similar instruments are presented on the Russian market - RT-7610-5 (Robotoolz), PLS-5 (Pacific Laser System) and Multi-Pointer from Geo-Fennel. According to the stated characteristics, the German Multi-Pointer is the most accurate (Fig. 4), and the multifunctional fastening included in its kit (allows you to mount the device to the wall, tripods with 5/8 "or 1/4" screw, wooden surfaces on nails or metal Magnet help), bring it forward. It should be noted that with the price of analogs in the area of \u200b\u200b12-13 thousand rubles, the price of Multi-Pointer looks more attractive.

|
Laser Level (Full Horizontal Plane Builder)
Laser builders of the horizontal or vertical plane with a radius of projection in 360 ° are called levels that almost completely outlined the builders of the planes from this segment of laser builders. After all, a laser builder with a compensator suspended inside can only give a horizontal projection, at the same time, almost any laser level can be used both in horizontal and vertical position, often working in different modes (point, line and laser segment) and use it with Receiver and / or remote control.
Laser Level Agatec M-10
One of the last builders in the Russian market is the PLS-360 (Pacific Laser System) with a cost of more than 14 thousand rubles today. Its direct competitor is the Laser Level M-10 French company Agatec. At a cost of less than 9 thousand rubles, this device can:

|
The nearest analogue of this level is the almost accurate replica from Triax with the LT-60 model at a price of almost 40% greater than the cost of French Agatec M-10.
How to choose an instrument
In the Russian market, German companies Geo-Fennel, Stabila, French company Agatec, Beijing Opto-Mechanical Plant, which speaks of sustainable demand and high popularity on LP data producers is most widely represented. When choosing a laser builder, the following aspects should be taken into account:
Provided LLC "GEO Total"
Imagine that you need to quickly choose a cupcake.
What do you think, what is the location of the range on the screen most attractive?
Or vertical:

Each of us is confronted daily with both. All around: from supermarkets to online stores - attack us different options Product Presentations:


But which one is better? And does this factor really be important and to influence something?
Can. And in this article you will learn about what kind of product is more efficient and when.
First, we see the world horizontally. We have binocular vision, and your eyes are horizontally, due to the fact that we have a wide horizontal view - about 190 degrees.

That is why computers and monitors are wider (and not higher).
Secondly, horizontal scanning is easier physically.
By virtue of the peculiarities of the muscular structure of the person, the movement by the eyes horizontally make it easier. Our head is naturally slightly tilted forward, which makes movement up-down eyes more time-consuming.
In 2016, a study was conducted, during which the subjects proposed two options for the location of the lollipops. To explore the nature of the movement of the participants' eye were used. It was possible to find out that the nature of the movement of the eye corresponded to the type of product representation. Eyes made movements in a horizontal plane with a horizontal representation of goods and vertical - with vertical.

But more importantly, since horizontal movements are easier to perform, in a second, people covered more objects with a horizontal representation (3.26 with horizontal and 2.77 with vertical).
Since a person can see more items, he makes the wrong conclusion that the choice of goods is wider.
In turn, a wide choice is a factor contributing to the transaction. Customers have a natural desire to seek diversity, so they prefer those assortments of products that correspond to this criterion.
In addition, there is more time to view a more diverse assortment. As a result, people browse more units of goods and form a wider pool of options available for choice (consider the purchase of a larger number of options). It is not surprising that the horizontal representation in the end leads to a larger number of purchases (and more purchases of several items at once).
The presentation of goods on smartphones should not be horizontal. It's just reasonable. There is no other explanation here.

Horizontal representation effectively due to the fact that the product range presented in this way seems wider.

But sometimes a wide choice may be counterproductive.
If customers know exactly what they need, they hardly want to look through too much product range.
Take, for example, Amazon.

It is right. When people "just look", a variety is useful.
However, if you pay attention to the search results - the area where people are looking for a specific product - they will notice that the goods are presented vertically.

If users are looking for a specific product, you should reduce the apparent variety and just help them find the right product. Therefore, the vertical representation is most preferable.
The horizontal view of the products is good because it increases the breadth of choice, creates the impression that the product range is more diverse. However, if your task is to reduce and speed up the choice, use a vertical representation.
You can follow the example of Amazon or even Walmart. On the latest site, if you look for a non-some specific model of a specific product, but give a request to all categories (for example, humidifiers) - the proposed results will be presented horizontally.

And it is also correct. Walmart understands that a person who performs a search by such a common term is in the early stages of the sales funnel, where a wide choice is an advantage, and the horizontal representation of products is just contributes to this. But if you look for some particular product, the search results will be presented vertically.

Vertical presentation focuses the buyer's attention on a particular product, which is of interest to him. In addition, these goods will occupy the most advantageous place on the page - the first thing will fall the buyer's view.
The level of Waterpas, referred to as bubble, is very often used in the construction site, as it allows you to quickly determine the deviation even on a small degree from the horizontal or vertical plane. Sometimes these errors can be critical for the result, so this tool is indispensable at the construction site.
As a rule, this level looks like a rectangular plank, which built in one or two (sometimes and more) flasks with liquid, you can also see a small bubble of air, which is the indicator. When this ball takes place between the two marks on the flask, it means that the surface under study is vertical or horizontal. If it comes for some risk, you can estimate the approximate degree of deviation.
Each flask (they are called another eye) filled with low viscosity fluid so that the bubble can easily move, also an important requirement is the non-freezing of such a filler in the cold. Therefore, the main material for the columns is alcohol, it is still tinted, it is more convenient to observe the measurement. The marks for which the testimony is removed is also applied to the flask, sometimes they are not two, and more, for high accuracy.
The economic bubble level rarely has more than two measuring flasks: one - for examination of the horizontal plane (180 degrees), and the second one perpendicular to it is for measuring vertical (90 degrees). You can meet the third flask that is adjusted under 45 degrees and fixed. Professionals can see a more fancy tool where the flask is much larger, they duplicate the main to reduce the error, or measure other angles (for example, 60 degrees). Moreover, the tool of any level is available for understanding to each wizard, difficulties with how to use Waterpas, never occurs.
There is an electronic Waterpas, which has a convenient display, where the measurement results are shown. It is determined not "on the eye", but with the help of acoustic effects, why the numbers are obtained more accurate, and the error is significantly reduced.
In addition to the main structural elements On the housing there may be useful additions, often corrupt builder during operation. For example, a ruler located on any level of the level, or the milling surface, so that when installing the tool it was more stable, and it would be easier to keep it (for example, with a vertical measurement). You can also find on the one side of the bending recess for lower surfaces, type of pipes, to measure it was convenient and their location in space.
Some bubble levels have the ability to adjust. These are two imperceptible screws on both sides of the flask. In the case under them, the springs are hidden, which exhibit flasks at the desired level, which you check your own. As practice shows, a rare tool is really configured correctly, and many of these "unsuccessful" options do not have the possibility of adjustment, and those who can check the quality often part with just a purchased tool. In addition, even correctly configured level is able to move, if it is dropped, from changing temperatures and humidity, or even trite from time.
To check the location of the flask in the case, place the level on any horizontal surface, if the bubble has taken the correct position, turn the tool to 180 degrees so that the ends simply be changed in places and put on the same surface again. Rate the location of the bubble again, and if it has not changed, it means that everything is configured correctly. And it is not scary if the bubble is not strictly in the center, the main thing is that it is not falling for the invasses, and the most important thing is that in the two these provisions it is in the same error. If, for example, it is not strictly in the center, but slightly shifted to some risk, then after turning it should also be shifted to the same side to the same extent.
In cases where such a check showed a different result, tweet the screw from the problem side and again draw such an exquisite. For a vertical measurement flask, the only difference is that tooling the tool you need a little differently, to attach to the surface first with one side, and then the one that looked at you when measured. That is, turn the level around its axis relative to the floor. And the results are analyzed in the same way.
Since the choice of levels is extremely great, going to the store, we begin to discard one single selection criterion.
The first to highlight the length that our tool should be, it should be enough to measure one step of the plane of your construction site. For example, when installing a window with a width of 1 m, the level should be just about this length. For minor work is suitable size with palm. In the case of ceilings and walls, quite long tools are needed, 2 or more meters. But in case of such a purchase, prepare to carefully protect it from falls, because it will be the first for such a "oglobli". There are giants at all (about 4 m), but they are telescopic, i.e. They are extended when working, and stored in a slightly reduced form, but we suspect the presence of large errors in its work, since the body is desirable to have a one-piece.
Follow the material, it should be tough, preferably from some alloy, because the plastic is extremely short-lived. Today there are many lungs by weight, but sufficiently strong alloys for the execution of the level hull, and the stiffness is achieved by a certain structure of the tool profile. Most often there are T and N profiles, more reliable than the second option.
We have already talked about their device, it remains to present practical requirements for them. First, find the measurement error in the manufacturer, secondly, check the adjustment right in the store and do not forget to do it at the beginning of each cycle construction work. Please note how sensitive to the flask is for this to rise to the level of something thin, the bubble must change its position, and so that this is noticeable to the eye. For professional models, you can even use a sheet of paper for this purpose, since their sensitivity should be quite high. This parameter depends on the curvature of the flask, and therefore from its material and form. It would also be nice if the risks were put on the flask from the inside, since they are quickly erased from the outside, and the device becomes useless.
In the end, you should blaake a future purchase in your hands, look how good the case is assembled, there is no distortion, the backlash. The location of the plugs along the edges and fixation of the flask is especially important. All this should be clearly fixed, and it is quite reliably that with a slight pressing it is impossible to observe even a hint of a shift. Fastening the flasks should be available for adjustment, and the plugs on the body are better to choose from rubber, so its damage is less likely when negligence.


