The New Year's time is coming - the time of miracles, when everyone can feel like a little helper of the kindest old man in the world. After all, think if, in addition to gifts for the children of the whole planet, the old grandfather also had to decorate our houses, how would he manage everything. That is why we, adults, help him in every possible way, because there is no way that children should stop believing in Santa Claus.
Home decoration is the most the main task in the process of creating a New Year's mood. Buying ready-made decorative elements in the store is not difficult, but making Christmas decorations with your own hands is completely different! In this article you will find more than 20 master classes and schemes for creating New Year's houses. At first glance, an unprepared person may think that creating a New Year's house out of paper, cardboard or any other materials is an overwhelming task. In fact, this is not the case, especially if you have a ready-made template. So, if you are serious, then get ready to become a real builder, because in this article you will find schemes of not only single houses, but also entire winter villages!
You can make a very beautiful New Year's house with your own hands from an ordinary cardboard box. The inside of the box is usually Brown, which, in fact, plays into our hands. The box will have to be gutted and turned inside out. Draw a house template and cut it out. Next, we glue the walls and floor. You can leave the top with a makeshift roof and use the house as a gift box, or you can glue a full roof and put it under the tree. On top of the cardboard, you can draw with a special white marker, white gouache or an ordinary proofreader. Outwardly, the house is very reminiscent of a gingerbread delicacy, which is common in the Western world. Well, you and I are familiar with the gingerbread house from the famous fairy tale by the brothers Grimm "Hansel and Gretel". If your kids haven't heard it yet, then it's time to read this story, and a homemade gingerbread house from a cardboard box will be an excellent attribute for a little stage play!
More gift boxes:

On the eve of New Year's holidays, shop windows are full of gift boxes, decorative bags, wrapping paper for every taste. Smiling sellers helpfully offer to provide services for wrapping New Year's gifts. And it seems that all this is great, because you must agree, it is much more pleasant to receive a New Year's trifle in a beautiful package. But on the other hand, the whole meaning of the gift is lost, the very gift that should [...]
If you are planning to make not just a house, but a whole Christmas village, then you will definitely need a church. Print out our finished diagram, cut it out of cardboard, glue it in the right places and the layout of the church is ready. Now it remains to decorate it with sparkles and artificial snow to make the church truly wintery. You can download the finished scheme below.

So, the church is ready, now it remains to build the houses of local residents. Download the ready-made scheme from the link below, cut it out of cardboard, glue the house and decorate it. Whom to put in the houses? Anyone! Little dolls, pine cone elves or any other inhabitants you have. If there is a little Santa Claus, then feel free to settle him too! The whole residence will turn out!

If there are any problems with the cardboard, then it is quite possible for yourself to make a New Year's house from salt dough. You can use it as a candlestick, it looks very cool. So get ready salty dough, roll it out about 1-1.5 cm thick. Cut out the walls, windows and door. This can be done with special molds, and if there are none, then use a stationery knife and a ruler. Glue all the walls and glue the roof. Cover the joints with the rest of the dough. When the house is dry, sand the irregularities with a small foot and enjoy your creation!

Lovely houses in the style of Danish architecture can be made using this diagram. Using the link below you will find diagrams of all three houses, which you just need to print and bend along the lines. Put an electric candle inside, turn off the lights and enjoy the city's winter landscape!

If you like cornflakes or, like the real Englishmen, eat oatmeal in the morning, then you probably have cardboard boxes of the appropriate size. Below is a step-by-step master class on making a New Year's house with your own hands from a cardboard box, clearly follow the instructions and you will succeed!

Great New Year's houses are made from magazine clippings. Find a picture of a suitable house or castle, cut it out and glue it around. Put an electric candle inside and enjoy.

Wonderful New Year's houses can be made from plain white paper by decorating some parts (roof and windows) with sparkles. You can download ready-made templates from the link below. See step-by-step instructions and make your own New Year's house!

If you have accumulated a lot of greeting cards, you can make wonderful houses from them that you can use to decorate your apartment by combining them into garlands. Or you can congratulate friends and acquaintances with such postcard houses. You will find step-by-step instructions for making houses from old open ones below.

You can make crafts houses not only from paper or cardboard. Felt is also an excellent material for manufacturing. The manufacturing process is madly simple, you will find step-by-step instructions below. It remains to get some felt and an electric candle. The Christmas craft house is ready!

With our ready-made scheme and step by step instructions You can make a whole city, especially if your team has little fidgets ready for needlework. You will need more electronic candles or you can use a New Year's garland. Add some mini Christmas trees and the New Year's city is ready! And most importantly, the whole family has a New Year mood!

Christmas houses can be made from scrap materials, it is especially great when these materials are no longer suitable for use, such as milk packaging. If you look at it, the house is almost ready, all that remains is to make the roof and adjust the size of the house itself. If the box does not look very presentable, you can glue it over with paper and draw windows and doors, but if everything suits you, then the craft house is ready!

From this step by step wizard class, you will learn how to make a simple New Year's house out of ordinary cardboard. The main difficulty lies in the template, and if you do not have a spatial vision and architectural education, it is not easy to draw something more or less complicated on paper. Therefore, using the link below you can download a ready-made scheme of the house and glue it yourself.

Download a ready-made house template, cut and glue. DIY Christmas craft house is ready!

Download this simple template, print and cut. In our instructions, the house is made from an old music book. You can make from plain white paper or "drafts". A bit of decor, an electric candle and Voila! A do-it-yourself paper house is ready!

If you don't have time to tinker with voluminous houses, but you want to decorate an apartment with a whole city, then this option is especially for you. You will need a sheet of Whatman (thick) A2 size paper, a printed template and a clerical knife. From the links below you can download two different variants of cities. Ready-made schemes printed on A4 sheets, printed, glued and transferred directly to whatman paper for cutting.

We are preparing for the new year with the children and making a house for Santa Claus out of paper. Download a ready-made template, print it and glue it. Young designers will be delighted!

As already noted, house crafts can be made from the most different materials, including from wooden sticks. Ice cream sticks are quite suitable for this work, but they had to be collected all year round. In any case, you can take notes on the idea and be sure to do it next year!
A very cute New Year's house can be made from paper tubes. To do this, you will need: thin paper, scissors, glue, pencil, decorative elements. Cut the paper into strips of the same size. Wrap a paper strip on a pencil and glue it with glue, remove the pencil. You will need about 50 straws to make a house like in a master class. When the base is ready, glue the roof, and then the windows and other decorative elements.

Incredible New Year's houses can be made from felt. Volumetric or flat, in the form gingerbread houses or hours. In addition, felt houses can be used to decorate pillows or socks for gifts. Ready patterns You will find it under the photo.


Have you ever noticed, driving through the outskirts of your city, how much unfinished and already as if abandoned brick boxes of houses, cottages with gaping window holes cost? Apparently, a lot of money has been invested in such a quantity of bricks, concrete, digging of foundation pits and other construction. In fact, most of this money is buried in the ground, thrown into the wind. After all, they then sell these unfinished houses and cottages at a price much lower than what was invested in their construction. And if you look at some houses or cottages built in the recent past, then you will hardly find among them not only an architectural masterpiece, but just a house with its architecture evoking at least respect, not regret. Probably Russia is still the richest country in the world, since we allow ourselves to spend money so unwisely.
Where does this extravagance come from? Why are we accustomed to investing in the construction of ruins or in some awkward buildings?
Firstly, from the fact that a private developer often cannot calculate his real capabilities and, as a rule, swings at the construction of a house or cottage more than he can master, bring to mind and subsequently serve.
It also happens that a person who has built a four-story house or cottage for himself, as a rule, lives on one floor, and goes on an excursion to the rest, but on these floors of the cottage you need to do cleaning, wash the windows, and finally heat them. The cost of building and operating such a house or cottage is very high. To prevent money from going down the drain, it is necessary to act according to the principle of reasonable sufficiency.
When starting the construction of a house, a cottage, private customers often console themselves with the thought that they will be able to find some wonderful, almost gratuitous builders, cheap but talented architects. As a rule, all these dreams in the process of building a cottage turn out to be nothing more than an illusion. And the economy begins. But they do not save on what would be needed. As a result, it turns out that fixing the work of these wonderful builders will cost even more than initially finding normal designers and listening to their recommendations on choosing a contractor for building a house.
I would like to warn potential customers against architects who vow to design the house of your dreams in a couple of weeks. Already during the construction of a house or a cottage, such an approach to business can go sideways, not to mention whether you can live in this dream. After all, if you want to start building a house in the summer, it is better to contact an architect in the fall.
The practice of building houses, cottages shows that the more attention is paid to the project, the lower financial costs await you at the construction stage. It is better to design a house once than to rebuild seven times, - experience suggests.
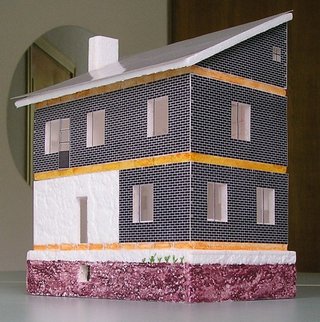
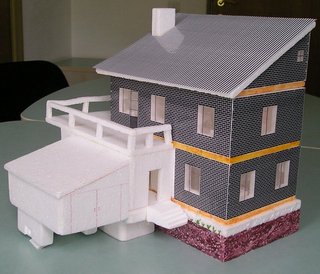
In order for your idea of the future house to be the most complete, you should order the architect a model of the house with the surrounding area. Many customers believe that a cottage layout is needed to get more money from it (the customer). This is fundamentally wrong. The layout of the cottage will help save your money and nerves, because you will represent your future home, and the result will no longer be unexpected for you. A model of a cottage made on a scale of 1: 100 gives a fairly complete idea of the object, but on a scale of 1:50 it will be possible to show all the architectural features of the house and various types of finishes so that it will literally allow you to literally live with your unfinished house. Photos of models of houses you can look at our page.
It is imperative to carry out geological surveys on the site and geodetic survey of the site's relief - they are necessary as initial data for designing the foundation of a cottage. The foundation is the foundation of the house and problems with the foundation can lead to the unusability of the entire structure. Most of the houses abandoned at the construction stage are therefore abandoned because they have problems with the foundation. Either because of the uneven settlement of the foundation, or because of the force of the frost heaving of the soil, which distorted the foundation. Cracks can go along the walls of the house, so it will be easier to order geological surveys than to grieve then over your warped and cracked house.

Also, in order to save money, it is better not to bury the basement in the ground - you will save on earthworks, foundation material and waterproofing. It's another matter if you want to get the maximum with a minimum building area. useful area- here you cannot do without a basement floor, usually pools, gyms, storage rooms are placed there - everything that does not fit on other floors.
To achieve tangible savings in construction, considerable attention must be paid to the selection of building materials. The most advanced wall material for country house is aerated concrete, laid on a special adhesive solution. Modern aerated concrete block released by German technology, with a thickness of 375 mm, it fully meets the standards for heat engineering. The wall turns out to be very even, because the seams between the blocks are no more than 2 mm, and does not shrink. Therefore, after a slight preparation of the surface of the wall, you can proceed to its final finishing. In general, the cost of material and installation aerated concrete wall two times cheaper than brick and at the same time three times warmer. One of the advantages of aerated concrete walls is also that it is vapor-permeable, this allows such walls to breathe, getting rid of excess water vapor inside the house.
But it should be remembered that the bearing capacity of aerated concrete is low, although it is quite enough to carry reinforced concrete floors of two or three floors. Also, aerated concrete absorbs moisture well, therefore, its surface should be protected from its effects.
The most economical material for facades is vinyl siding. It is attached to the crate, leaving an air gap, which allows you to ventilate the outer surface of aerated concrete, removing excess moisture from it.
The siding does not need to be painted, it is not subject to decay; to maintain its appearance, it is enough to wash it from time to time. Siding finishing can be combined with other, more expensive types of finishes, for example, decorative synthetic plasters with various fillers: quartz, marble, granite chips of various fractions, it is important that the plaster is moisture resistant and vapor permeable.
Brick cladding will undoubtedly add solidity to your house; to save money, you can use the products of domestic plants. The use of these materials in harmonious proportions will give the facades of your home a unique, individual look.
Inexpensive enough roof covering that can be used - bituminous shingles, but to give the house a more representative look, you can use domestic polymer-sand shingles. It has the same standard sizes as the Finnish ceramic or cement-sand tiles, but at the same time it has half the weight at a much lower price, does not prick when dropped. The lack of ceramic, cement-sand, polymer-sand tiles in relation to bituminous ones is a relatively large weight, which entails an increased consumption of material for roof structures... But bituminous shingles will deteriorate faster, while traditional shingles have been tested for centuries and are undoubtedly more durable.
Reinforced-plastic windows are the best option for a person who can count money. Have metal-plastic windows the same advantages as vinyl siding- they do not need to be repainted over time and they do not rot. In our climate, it is imperative to install double-glazed windows. It is better if the windows have a triple seal along the contour and high-quality shut-off valves that tightly press the window sashes to the frame. At the same time, one must remember that it is better to contact a company that gives a long-term guarantee for its windows, because some problems with windows may appear after a year of operation and after two years. Excessive savings on windows can subsequently lead to unjustified costs.

A well-thought-out planning and constructive solution plays an important role in saving money. By simplifying the construction of the house as much as possible, we will reduce the number of necessary operations during installation, the amount of material required - and accordingly, labor costs and expenses will decrease.
As you know, an airplane that flies well and looks beautiful too. Beauty is derived from its functionality. Likewise, a good house does not require anything superfluous. After all, a house can have a spectacular appearance not due to architectural excesses such as turrets and columns, but due to thoughtful proportions, combinations different types finishes, interesting color scheme and yet be constructively simple. Moreover, we already live in the twenty-first century and classical columns and molded details on the facades look at least strange on new buildings. Modern architecture does not dwell on details, but operates with color, plane, volume, texture….
An important role in saving money is also played by which heating system you choose. Or it will be a traditional radiator system that is initial stage will undoubtedly cost less, or the heating system through the floor. The advantage of the heating system through the floor is that the water here does not need to be heated to high temperatures, because the area of heat transfer in this case is larger, as a result, 15-20% of funds are saved in comparison with the radiator system. In addition, when heating through the floor, the air rises to a lower height and there will be much less dust in the house. Also, the rejection of radiators will make it possible to arrange furniture more freely, which is important if the area of the premises is small and every square centimeter counts.
What is the recipe for building a solid house? First, to measure your capabilities with your needs, to find a reasonable proportion in their ratio. Secondly, take a balanced approach to the choice of builders, be sure to look at the houses they have built, which have been in operation for several seasons. Thirdly, do not contact the designers who will depict everything on a computer in a week, it’s not a computer who thinks! When the architect offers you planning options, try to imagine them in reality, think about whether everything is convenient in the layout. (The same applies to the case when you order finished project according to the catalog). Fourth, if you have already decided on the designers, negotiate with them both for the production of a model of the house and for work on interior design, listen to the recommendations of the architect on the choice of construction. Fifthly, decide on the materials from which the house will be built, either it will be expensive, durable materials, or less expensive and less durable - the choice of materials depends on what perspective the house is being built for, how soon you want to settle in it. Simply put, if you want to build a beautiful, comfortable house for yourself and your family and not go down the drain, you need to approach this matter seriously and carefully.
Based on the foregoing, it is possible to formulate a collective image of a solid economical home, which, in our opinion, will be affordable for a fairly wide range of families wishing to live in their own home.
In terms of area, such a house corresponds to a decent city apartment - 150 m2. On the ground floor: living room - 28 m2, kitchen - 12 m2, entrance hall, bathroom, pantry, boiler room, attic floor: 3 bedrooms - 20, 16 and 11 m2, as well as two bathrooms. All this is like a residential module, to which it will then be possible to attach a garage, terrace, veranda, additional living quarters. The cost of such a residential building will be lower than the cost of a similar city apartment and at the same time be able to develop. In terms of the plan, the house is a square with sides of 9.4 m.This feature of the project makes it possible to save a little on wall material and on heating, since a square has a smaller perimeter than a rectangle of the same area.
The walls are made of aerated concrete. The absence of an average load-bearing wall saves on the foundation for this wall and on the wall itself, and also makes it easier to carry out redevelopment, if necessary. Wall decoration outside - siding and decorative plaster... Roof - bituminous shingles. This project may work for the second guest house on your site and for the typical development of the village.
I wanted to visualize how the future house will look like. For this reason, this general pattern was born.

The result was not at all impressed, and I really wanted to see the house from all sides. It was then that the search for ideas for creating a layout began. I remember in the old childhood days I made soldiers from cardboard and paper, but when I tried to build at least part of the foundation from these materials, it became clear that it was much easier to build real home than its layout. Without hesitation, I bought polystyrene, which is glued over the ceiling to give a divine appearance. (Unfortunately, it was not possible to find foam flat on both sides, so I took it, which is even more even - without any flowers, petals, but with a texture like "loose plaster".) This material came at an opportune moment. Firstly, it has a thickness of 0.5 cm, which is almost proportional to the thickness of a real wall, and secondly, the foam is very easy and quick to process - it can be cut into even pieces with an ordinary knife. I used PVA as glue.
To make a model of a house, you need to know exactly what you are doing. That is, you need to have a drawing of the house, a sketch or a plan with basic dimensions.
I had enough of a rough draft of the architect, who, by a happy coincidence, was at hand. Having estimated the dimensions, I decided to take the scale of 1 m = 2 cm as a proportion.This proportion is easy to calculate, and the dimensions of the layout are good - the layout of the house is not large and not small, the thickness of the walls is almost proportional. And then there is a lot of routine work - marking the foam, cutting out the foundation, walls, roof, gluing the pieces together.
The front door to the house is visible on a white background. Ask why there are no steps ?! How to get into the house ?! There will be steps! And there will be a corridor, just in the place where the wall is white. See below. I needed a model of the house to be collapsible, so that you could see the interior layout of the rooms, stairs and furniture. For this reason, I did not glue the second floor, but made it removable. This is how it looks interior arrangement Houses.
To be honest, I was too lazy to make the staircase completely proportional - one step of the layout is equal to two real ones. As they say, next time :-). But otherwise everything is correct - the slope, the size it takes, the width. Closes the staircase bearing wall made of brick, which is needed so that the floor slabs of the second floor rest on it.
The layout allows you to visually assess the spread of light during daylight hours. You just need to know in which direction to the north the house will stand.

The layout of the first floor shows a staircase leading to the second floor. The descent to the basement is visible. Heating radiators are marked with yellow stripes under the windows. Bath and toilet are visible to the “naked eye”. In green the heating boiler is indicated. The ventilation niche runs behind the toilet. And also the descent to the basement is visible. In principle, it would be more logical to place the descent into the basement under the stairs, but these are questions for the architects. The front door to the house is near the sofa. Entering the house, on one side there is a bathroom, toilet and closet. On the other side is the kitchen. The premise on the ground floor is quite spacious, so any redevelopment is possible - for example, the kitchen can be separated by a partition, or the entrances to the bathroom and toilet can be hidden from view. The sofa can be placed by the stairs, and the kitchen can be separated by a bar counter. The option without partitions or with sliding partitions is preferable if you are going to arrange parties and crowded gatherings - then you need a lot of space.
Floor slabs are marked in orange. Naturally, they will be hidden under the brickwork, but for clarity of the layout, I brought them outside.
On the second floor there is one large bedroom and two small children's rooms. As well as shower and toilet. Also visible are the stairs to the attic and the exit to the balcony in one of the children's rooms.
In this picture, two children's rooms are better visible, as well as the entrances to the rooms. Heating radiators are located under the windows. Unfortunately, the picture does not show the staircase from the first floor to the second - it is closed by the staircase to the attic. You need to see the layout of the house live!
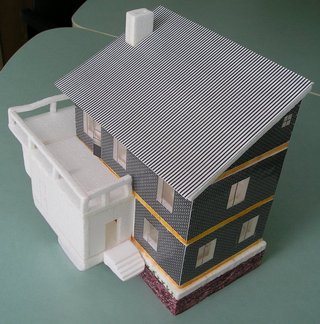
Now we make the roof of the house and place it above the second floor.
I made the roof of the house a pitched one, since the house will border on the neighbors with a blank wall, although the gable would have looked much more beautiful.
The layout of the house is almost ready! The only thing left is to add a corridor. The corridor can be built not immediately, but as finance for construction appears
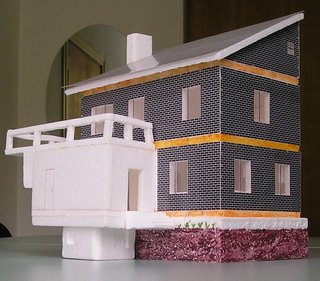
The corridor can be made of any size - it all depends on your taste. The roof of the corridor is also a balcony where you can hang clothes to dry or install a hammock. If desired, the balcony can be glazed or simply installed with a transparent plastic rain canopy.
Part of the balcony extends behind a blank wall. Tired parents can hide there and smoke so that the children do not see.
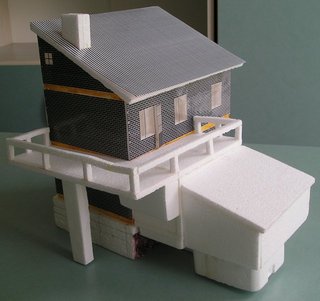
The final touch is the garage. Attached as finance arrives. From the garage, you can immediately enter the corridor through inner door... If someone thinks the balcony is too small, then it can be made over the roof of the garage. The garage and the corridor are built on a light foundation, since the weight of these buildings is insignificant.
Of the materials you need the following: foam plastic 0.5 cm thick, PVA glue, paper, scotch tape. Tools: blade or sharp knife to cut the styrofoam, scissors, pen to mark the styrofoam, pencils, ruler.
He made "exterior decoration" in the form of a brick on a printer, followed by "lamination" - he pasted adhesive tape. This is not a rewarding business, since as soon as something is, the scotch tape is crookedly glued and the workpiece needs to be thrown away. For the future, I want to try on a real laminate. Without lamination, you will not be able to stick the texture on the house, since the paper swells up from the glue. But if you still manage to stick it, then the paper will be frayed very quickly and the model of the house will lose its beautiful shiny appearance.
My brick is black - I didn't have a color printer at hand. Now this is not a problem and you can make a "finish" for any material. And special fans can wallpaper and make parquet. But I pass. This is a thankless job.
That's all, actually!
How to make an architectural layout out of paper with your own hands.
This lesson shows in sufficient detail how you can make an architectural model from simple materials at home. We decided to show you how to work with paper and how to transform it into three-dimensional forms using the example of an architectural layout of a business center with many complex elements and cuts.
Materials: thick toned paper, self-adhesive film, double-sided tape, PVA glue, children's colored paper, brush handle (for the spire).
Tools: Scissors, metal rulers of various sizes, a paper knife, a pair of compasses and a few tools that I forgot about :-).
Phased creation of a building layout.
Part 01. Consecutive execution of structural elements of the walls.
1. Ground floor.
To show the wall thickness up to window frame ribs must be installed.
The glass of the outer part of the window is imitated using autotinting. Tinting is glued onto a slightly larger double-sided tape.
2. First floor.
The first and subsequent floors of all walls of the building are made according to a similar scheme, like the basement.
All decorative elements are made by gluing parts end-to-end, which reduces the error in dimensions.
3. Floors from the second to the fourth.
4. Fifth floor.
Part 02. Connection of structural elements of walls in a block.
1. Wall number 1.
2. Wall number 2.
3. Wall number 3.
This wall is a little more complicated than the previous ones.
4. Wall number 4.
Part 0 3. Consecutive execution of frontal cuts of the layout.
1. Section No. 1.
Because the model of the building is carried out partially, it is necessary to make cuts. One of them will be detailed, while the other will indicate only the main structural elements at the cut.
2. Section No. 2.
In contrast to the drawing, the internal elements of the structure (windows, doors, hidden from the sectional area of the wall and partitions) are also visible in the section of the layout, which makes it more accessible for perception.
Actually, for simplicity, gray color indicates what falls into the sectional area in the drawing.
Part 04. Connecting the frontal sections to the walls of the building.
1. Section 2 with walls 1 and 2.
2. Section No. 1 with walls No. 3 and No. 4.
Part 05. Consecutive execution of collapsible elements of the layout.
1. Dynamic structural block number 1.
A dynamic building block is a moving part of a layout, which is essentially a complex cut.
2. Dynamic building block number 2.
Both dynamic elements are fixed in the breadboard by means of magnets.
Part 06. Installing the blocks of the layout on the stand.
The stand is made of plywood.
Part 07. Phased execution of the central entrance.
Part 08. Phased execution of the front part of the building (tower) model.
Part 09. Consecutive execution of a horizontal section (fifth floor).
Part 10. Sequential execution of a dynamic building block (roof).
Part 11. General form layout with the exterior.
Many people, seeing beautiful and neat layouts of buildings made by architects, dream of learning how to create the same small copies. beautiful houses... It is not easy to learn how to make real complex models, but it is in your power and ability to assemble a decorative model of a house at a scale of 1:50, having previously drawn on paper the outlines of the details and facades of the house, as well as the roof and frame.
Instructions
1To create a layout, you will need plywood with a thickness of 6-8 mm, as well as materials for facades, partitions and a roof. Make a frame of the house out of plywood and place it on a flat surface.
2 Separately prepare the facades, cut out according to the drawings, and cut door and window openings in them. Then sand the cuts and joints.
3 Make the foundation of the house from wide slats, gluing them to the finished box of the house, and also make a separate porch with stairs from solid wood bars.
4 From thin plywood, cut out the doors and window frames separately, sand them with sandpaper, glue them along the contour with thin strips and glue them tightly to the frame of the house in the openings. Instead of glass, insert plexiglass of millimeter thickness into windows with plastic or wood frames glued from the outside.
5 Take a separate sheet of plywood and cut gable roof for a house, and then roofs for individual buildings, if you want to complement the house with a yard. Solder from thin sheet metal downpipes and gutters, and then secure them to the roof slopes. Stove pipes craft from small pieces of wood.
6After the small parts are ready, start assembling the house. First, assemble the box of the house, then place the roof on it, and then attach the porches to the outer doors.
7Mach out individual beautiful posts or slats with which you will close the joints of the plywood sheets to make the house look more beautiful. Sand the surface of the building, cover it with wood stain and varnish, or paint it with paint.
8 Start building layouts with simple models- for example, small huts or barns. Then you can improve your skills and move on to building more complex layouts.
What could be more interesting and exciting than making some handicrafts to decorate your home with your own hands? After all, what you can think of and do yourself is impossible to buy in any store!
Such products serve not only as decorative elements in any apartment, creating a cozy atmosphere and mood, but also are the reason for a fascinating pastime during their creation. After all, children love to cut and glue toys out of multi-colored paper - houses, animals, rockets and ships! In this entertaining business, they are often helped by adults and * a paper house for children * will be a universal decor for a children's room or an item for games. At the same time, it is quite simple and very original craft- a house made of paper with your own hands, which you can easily make with your child, will serve as a bright decoration for the holiday and will bring many pleasant minutes when creating it.

It can be a snow-covered hut with a Christmas tree for the New Year or a mystical haunted castle and bats for a merry Halloween, a colorful house for dolls with bows and ruffles or an impregnable fortress for knights, or maybe a country house with a fence and flowers, nestled on the windowsill of your kitchen. After all, creating a * house out of paper with your own hands * you completely immerse yourself in a fantasy world and become the creator of the most unthinkable ideas! Well, and * how to make a house out of paper * so that it is unusual, bright and pleasing to the eye, we will tell you in our article.
The template you like can be printed on a printer or simply neatly, without pressing, transferred through the monitor screen onto thin paper, having previously enlarged the picture to the right size... The template obtained in this way is cut out, superimposed on cardboard for the future house and completely outlined with a pencil. After the diagram is drawn, it should be carefully cut and prepared for gluing. To do this, draw the blunt side of the scissors along the fold line of the walls so that the cardboard is easily bent and cut out the doors and windows. If you have never made a paper house before, then we advise you not to be smart with complex diagrams and small details, but to choose an easier-to-use option. Your house made of paper, a scheme for which is simple and understandable, has every chance to turn out beautiful and original the first time. Some types of schemes for paper houses are presented below. Click to enlarge:


Doors can be opening if the opening is not completely or completely arched. It is the same with windows: shutters in them can be opened or the window will be without shutters by design. A finished window made of colored cardboard can also be glued separately to the wall of the house without cutting out the opening. Everything here will depend on the scheme that you have chosen or made, at your own discretion, amendments to the design of the house. After all the necessary details have been cut out, you can glue the house, giving it a square shape.

The roof is glued separately. It is cut out of white or colored cardboard, folded in half and attached to the walls of the house. You can pre-decorate it: draw a tile or make it from separate strips of colored paper, cover with velvet paper. If a pipe is provided for in the scheme, then it is cut out, folded at the folds and glued to the roof. Smoke can be attached to the pipe. To do this, a wavy smoke is drawn on the cardboard, cut out and glued at the base to the inside of the pipe.

The finished house can be glued to any stand made of cardboard, wood or plastic, having cut it out in advance to the size of the house and decorated with a fence made of strips of colored cardboard, green paper grass, dried flowers, berries, leaves, moss. You can attach a twig to the stand using plasticine, and hang beads on it and glue the flowers. It will turn out to be a very elegant version of a summer house.


We bring the house, already finished and fixed on a stand, to the final. To do this, we decorate and decorate the walls, windows, roof and base of the house. If this is a New Year's version, then the roof with a pipe can be covered with snow - a crumb of foam plastic, after having smeared the sprinkling with glue, cover with cotton wool, paint with white paint, depict snowflakes, make snow-covered windows. Decorate the house itself with colored tinsel and beads, attach a paper silhouette of a snowman and a Christmas tree next to it. You can use ready-made pictures for decoration or cut out figures from gift paper.


The Halloween house is made of dark cardboard, with the addition of silhouettes of ghosts and bats. Windows can be made from bright yellow or orange paper to create a light effect in the house. Nearby, on a stand, you can glue trees and a cardboard fence, put a black cat on the fence. You can be sure that your child with great interest and enthusiasm will help you cut the creepy characters of a happy holiday out of paper!
For staining sawdust, ultramarine blue is taken, diluted in hot water, where wood powder is immersed, staining before the eyes to the degree of the desired color. Once removed from the paint, it is wrung out and placed in a thin layer on a baking sheet to dry.
Powder wood can be used to cover mock-ups instead of paint, but for this it is prepared in a wide variety of colors, dried and stacked in jars. Best paint for this - aniline, sold in bags for dyeing cotton fabrics. The powder is applied in a thin layer on hot wood glue and pressed down. Excess of it, upon drying, is poured into a jar and stored for the next work.
The snow surface is done as follows: the desired part is lubricated with glue and sprinkled with brown with an admixture of boric acid to give shine. You can also make the surface of cotton wool (absorbent), which is spread in an even and thin layer over white paper. Cotton wool is sprinkled with boric acid on top.
When the glued parts are dry, they are covered with a putty made from chalk (tooth powder) and glue. Depending on the color that the primer should have, a different paint is added to the chalk. The putty is applied in a thin layer, and in those places where it is required, it takes the forms of the necessary bulges, relief, protrusions, banks, etc.

Covering with putty has the goal of holding the layout together, smoothing out irregularities or creating them, making it dense and monolithic. Pebbles, roots imitating one or another object may be interspersed into the putty when it is applied.
The background of the layout can be painted with brown paint or sprinkled with wood powder on glue, or pasted over with dark paper. After finishing the entire layout, while it is raw, sprinkle with diamond mounds, from which it comes to life, especially in the evening light.
The inscriptions are made on drawing paper in ink and placed under glass like labels, and the layout is ready.
Let's turn to the manufacture of some details of the models.
The forest and bushes conventionally depict green deciduous mosses. They are going ahead. You need to choose the greenest, brightest and not very juicy, dry them in a draft, but not in the sun. Very dense bouquets are tied from mosses, which are inserted into the holes made in the model with an awl.

The grassy surface on the models can also be depicted with moss. The surface is covered with matte green paper or painted with green paint. The green background is smeared with glue and sprinkled with finely cut moss. You can replace the moss with small sawdust stained green. If you want to represent a part of the vegetation in its natural form, then you have to take real plants or parts of them, dried in the sand.
Surface irregularities, pits, small rises, etc. do this: moisten in liquid carpentry glue a wad of thin paper of the required size and stick it on the surface of the stand. Soak another piece of colored paper in glue. When it becomes soft, lay on the lump and press the edges around the lump to the surface of the stand. Coat the irregularities made with glue and sprinkle with clipped moss or earth.
Imitation of the surface of the earth. The easiest way to arrange flat surface soil. It is enough to grease a piece of cardboard and sprinkle with earth or sand. The cardboard must be painted in the same color as the prepared soil.

"Earth" is done like this. Take thin cardboard and black matte paper. Cut out a piece of cardboard of the desired size, paste over it with matte black paper, reverse side the cardboard must be pasted over with paper right now, otherwise it will warp. In the absence of paper, cardboard can be painted with soot on glue with complete success. Apply wood glue to the black side of the cardboard, cover it with earth in an even layer, let it dry for half an hour and only then shake off the excess soil.
Dry soil is not black, but gray, and therefore, in order for it to remain black, it must be painted. This is done prior to the sticker. Take black mineral paint, dissolve it on a silver platter and pour earth into it. Dry the soil soaked in paint in the sun or in an oven.
The sandy surface is done in exactly the same way, you just need to take yellow, best of all, ordinary wrapping paper instead of black paper. Occasionally it is necessary to paint the background with watercolor paint if the prepared "breed" has a shade of a different color.
Artificial sand is prepared for sandy landscapes. It is composed of 20% natural sand and 80% ocher. The mixture is thoroughly mixed.
From natural stones, it is best to use stones obtained from a stream, as well as small gravel. In order to attach pebbles, sticks or any objects to the cardboard, they are greased with very thick wood glue and lowered to their intended places. When boiling leu, a little granulated sugar is added for strength.
The trickle is decorated with paints, and its bed is covered with a specially applied blue putty powder of a blue embankment, which emits shine, and the shore - with earth and pebbles.
Animals to enliven the landscape can be cut from plywood, painted and attached in the appropriate places on the layout. Also the plants of the foreground. The stones must be prepared from paper pulp and then painted. You can also use the corresponding drawings for this purpose by cutting and pasting them on cardboard, and then attaching them to the layout.

High slopes and bluffs. A box of the required size is bent and glued from cardboard. It is glued upside down on a piece of cardboard. This will be the skeleton of the mountain. On all or some sides, you can glue a sheet of thick paper so that with one edge it is attached to the edge of the bottom of the box, and the other to the cardboard, you get a slope of the desired steepness. The paper is taken in the appropriate color, depending on whether it will be an earthen, sandy or grassy slope. When the model is finished, this slope is smeared with glue and sprinkled with sand, earth or clipped moss.

To break off, take a thin gray wrapping paper. Cut off the desired piece, soak it in liquid wood glue and apply the same way as the "slope", but of course, lower it much steeper. The glue will dry out soon, and you can easily collect the paper in any folds and wrinkles. When the glue dries and the paper hardens, coat it again with glue and, holding the "cliff" upwards, sprinkle with sand. Then the folds and folds will resemble potholes washed with water on the slope of a ravine. You can sprinkle the "cliff" not only with sand. After picking up multi-colored clays, sprinkle them on the glue in horizontal stripes and visually depict the layering of the earth's crust.
Such models of mountains, cliffs, shores and even ravines can be easily made from nature if you have drawings and maps of the area.
If you are assembling a rock collection from a cliff, then an accurate, proportional cliff model made (sprinkled with glue) from genuine locally sourced materials will tremendously increase the value of your collection.
Building models of dwellings or villages fosters resourcefulness and creativity in students. And made such models will serve as valuable aids for the geographical office. Pictures, drawings, etc., as well as descriptions in magazines and books can be used for guidance. For example, let's give a description of one layout.

A man sits by the fire in front of the cave entrance. All the inhabitants of the cave went hunting. The rest must guard the dwelling and maintain the "eternal flame".

A well-executed model of a primitive man's cave will help you imagine the life of our ancient ancestors. The size of the model holder is 40 X 40 cm. The height of the back wall is 40 cm. Sculpt a model of a mountain with a cave out of clay. Cover the model with layers of paper. Pre-tear the paper into pieces of 150 × 150 mm. You will have a papier-mâché cast of the mountain. Sew the mount to the baseboard and to the back of the breadboard.
Cover the area around the mountain with earth and green sawdust. Paint the mountain so that it looks like it is made of stone. Animal hides are made well from bits of old shaggy towel. Color in the "skins" and glue them inside the cave. There are stone tools in the cave. Sculpt the stone parts of the ax and spear from plasticine or other material. Make a bonfire out of tissue paper dyed red and yellow... For the primitive figure, make a frame of soft thin wire, then apply plasticine to it. Dress the person with a piece of animal hide.

You will need:
White cardboard
Sequins
Ruler
Latex primer (optional)
Glue stick
Scissors
Stationery knife
Decorations (tinsel, bells, balls).

1. First, download the template by THIS link or you can draw a house of similar sizes yourself.
2. Cut out all the pieces from paper and glue them to the white cardboard using glue stick or double-sided tape.
3. Cut the pieces out of the cardboard. Use a utility knife to cut out doors, windows, and other details.

4. Along the fold lines, fold all the elements and glue everything together.
5. If you wish, you can apply a primer to the paper house so that it does not deform.
6. Paint your house and after the paint has dried, start decorating it.
The house can be hung on the tree with a string attached to the roof so that it hangs straight, or you can simply put it on a flat surface to decorate the house.

You will need:
Thin paper (can be plain paper)
Scissors
Pencil
Decorations.

1. Roll each sheet (or identical pieces of sheets) into a tube. Better to use a pencil - it's easier to curl.
2. Draw windows and doors on paper or cardboard and cut out.
3. Glue the tubes together as shown in the image (to make a hut).
4. Glue the windows and the door to the hut.
5. Decorate the house to your liking.
Another option:


You will need:
Cardboard box or
Scissors
Sandpaper
Stationery knife
Brushes
Polyurethane foam and a gun (optional).
1. Prepare a cardboard box and make a house out of it. You will need to cut into pieces and glue them.
2. Use a utility knife to cut out the windows and the door. You can draw them in advance with a simple pencil.

3. Color the house or you can decorate it polyurethane foam... To do this, you need to apply foam in strips so that each strip is 1.5 cm wide. During drying, the foam will swell, so it is better to leave 3-4 mm between the strips.
4. After you have covered the house with foam, let it sit for 30 minutes to allow the foam to dry.


We make a stand for the house.
Cut a rectangle out of cardboard, which should be larger than the base of the house.
Glue the house to the stand and decorate the stand around the perimeter with foam.

* The use of foam is optional. To simulate snow, you can use cotton wool, which should be glued with PVA glue.
* You can also cut out snow slides, snowdrifts, a snowman or a Christmas tree from paper or white cardboard and glue them to the base by bending the bottom and applying glue to it.

If you used foam, then after it dries, trim off the excess parts with a clerical knife and sandpaper.

Color in all the details you want.


You will need:
Toilet paper cylinders
White paper
Colored paper
Black felt-tip pen
Glue stick
Hot glue or PVA glue
Sequins in different colors (including white).
1. Cut one toilet paper cylinder in half and the second and third so that you have two long and two short pieces. So you will have houses of different sizes.

2. Cut the white paper into strips 15 cm long and 2-3 cm wider than the height of the cylinder that you will wrap with this strip.

3. Cut out windows and doors from colored paper. Use a felt-tip pen to draw door handles and window details.
4.Use a glue stick to glue windows and doors to the white stripes.
5. Place the strips around the appropriate cylinders and secure them with adhesive. Fold the excess paper into the cylinder.

6. Make some cones out of colored paper different color, glue the ends of the cones, and glue the cones themselves with PVA glue to the cylinder-houses.
* You can add a little glue to each roof of the house and sprinkle glitter on it, which will simulate the fallen snow.


You will need:
Corrugated cardboard (cardboard from regular packaging)
Stationery knife
Scissors
Ruler
Pencil
White acrylic paint and a brush
LED garland.

1. Prepare cardboard and with a pencil draw on it several houses connected to each other. You can use a ruler. You will end up with a small village. Cut a village out of cardboard.


2. Bend the cut out part with an accordion along the lines that connect the houses. To make even folds, place a ruler over the fold line and fold the cardboard.


3. Draw and cut out a Christmas tree on cardboard. Trace the tree over another piece of cardboard and cut out a second tree. Make a half-cut on one tree at the top and half-cut on the other tree at the bottom, and cut the two pieces together to create a 3-D tree.


4. Apply white paint to roofs and trees to simulate snow.
5. Place the village and tree on a white cloth or felt and place an LED string next to it.

Paper or white cardboard that you can print on.
* You can draw a similar drawing yourself and cut it out.
Scissors
Stationery knife
Glue stick
Battery powered candles.
1. Print and cut out a drawing of the house. Cut out the windows and doors with a clerical knife.
2. To make the roof, cut a 15x9 cm rectangle. Fold in the middle.
3. Assemble and glue the house and glue the roof to it.
* You can make several houses to make a small village.
* You can also cut green cardboard Christmas trees.
4. Put a candle with batteries inside the house.
* You can decorate the house to your liking. Use felt-tip pens, glitter with glue, cotton wool (snow), etc.

You will need:
Box (from cereals, pasta, for example)
Ruler
Pencil
Scissors
PVA glue
Clothespin or masking tape (if necessary).

1. Open the box completely and place it on the table.

2. Along the unfolded box, draw a straight line 2.5 cm below the middle.

3. Make cuts from the original fold lines of the box to the line you drew (see image). The white dots indicate the places where the cuts need to be made.

4. Cut off those parts of the box where the X is written.

5. Turn the box over and apply glue to a small fold (see image).

6. Fold the box with the pattern on the inside and secure with glue.


7. Fold opposite narrow sides to form a roof. Each piece must be folded in half (see image).

8. Cut the wide sides so that they can be glued to the part of the roof that was formed in step 7. You need to cut with a margin in order to bend and glue this stock.


