Perhaps such an original globe of paper can be useful not only to schoolchildren for their teaching geography, but also to decorate the interior with unusual crafts from paper, it will be perfect. And the main thing is that you can make it with your own hands from paper, just downloading the scheme of the globe.
And such an interesting handicuit - the paper globe developed a designer from France Joachim Robert and laid out for general use. Now the scheme of this globe can download anyone who wants to print on paper, cut and assemble according to the scheme. And how to make such a paper globe we will show in today's post.
First and print it on the printer. By all, you can print it on colored paper for printers - make a craft of any color.

Then we take and cut everything along the lines. And in order to better be the details of the author, the author makes a bicking with an ordinary ballpoint handle on the line in the places of folds. That is, it simply presses the handle on the line in the places of bends - thereby forming a groove for which it will be easier to smoothly bend the paper.

The entire card on the globe is attached at the expense of the internal framework. The octagonal details with three horizontal lines need to be cut, cut into the bottom of the hole over the inner three lines and bend in half along the dotted line.

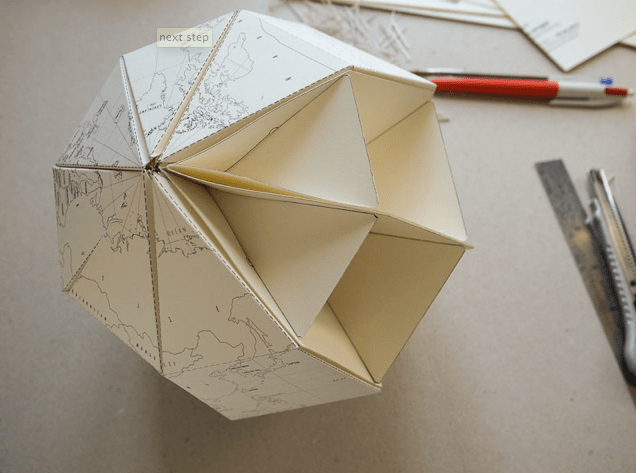
The remaining three octagons cut out, cut through all lines around the perimeter. And then we connect all the details into the cuts made as shown in the figure. All folded octagons connect with three placing the largest in the center and smaller sides filling the entire perimeter.

Then simply insert the parts with the card into the folded parts of the octagons as shown in the photo.

Collect carefully in accordance with the terrain, although there are all identification labels in the diagram - pay attention to them.
Love geography or dream of going to a world journey? We offer to make a globe with your own hands in the technique of Papier-Masha. The history of this technique is rooted in one of the most romantic countries - France. Used papier-mache first for the manufacture of dolls, and the scale of the technique received at the end of the 17th century. The range of products in the Papier-Masha technique has become stunning: frames, boxes, toys and even furniture. At the moment there are three techniques from Papier-Masha, one of which you can master from this article.
- Balloon from dense rubber;
- newspapers;
- Food film;
- PVA glue;
- scissors;
- simple pencil;
- Cardboard sheet.
1) inflation ball before desired size. Well tie to him not blown away.
2) wind the ball of the food film.

3) cut the newspaper or the pages of old books on the strip.
4) Stavim balloon On a bowl, to make it easier to glue the surface.
5) Then they freeze the harvested ball with glue and apply strips from newspapers. So we glue the entire surface. So that the globe is durable, stir up newspapers in several layers.
6) drying process. The paper can dry in half a day, but it is better to leave the ball for a longer time.

7) Make a cone from the cardboard sheet and glue its edges so that it does not unwind. This will be the stand for the globe.
8) When the workpiece dried, draw on it the contours of the continents with a pencil.
9) Now proceed to decorating. Try to decorate too in several layers so that the globe has become saturated shades. In order to transmit the naturalness of the globe, remember the depth of the oceans and the seas, the forests and the mountains are always darker. Do not forget to give each layer in paint drying. You can decorate and stand.

10) It remains to fix the ready-made globe on the cone. The tip can be cut or hide when gluing a bowl on the cone.
Crafts Globe do it yourself Ready! On the example of the crafts of the globe, you can make sure that the Papier Masha technique is simple and safe. Now you can clearly help the child to master geography and explore the structure of our unique planet. This will be a good and popular gift to the school to a favorite teacher or just will be decorated with a cabinet.
Visually study the continents and water spaces are more convenient with the globe layout. However, not everyone has the opportunity to purchase a ready-made globe. Then you can feel yourself with the Creator and make it myself the planet in the miniature. Moreover, it can be made in several ways. Consider how to make a globe with your own hands from paper.
Shipping with newspapers, unnecessary paper or a special oilcloth on which you are going to make. Prepare everything necessary materialsSo that in the process is not distracted by their search.

You will need:
For the globe need the basis. Therefore, you need to figure out how to make a ball of paper with your own hands. Ideally need a round air ball. Choose such a diameter, what you want to make a globe. Inflate the ball and tie firmly. Put it on a cup or any other convenient container that can serve as a stand. If you want to make the most real planet layout, then try to achieve a bit of the flap. If only a standard oval ball found, just inflated it rustling.
Before making a globe with your own hands from paper, you need to prepare a binding solution - Cleeter. Pour four glasses of water into the pan and put boil on fire. In the meantime, in another container, knead flour with the rest of the liquid. As soon as the water boils, gradually enter into it the resulting mixture, constantly stirring.

Fire reduce to a minimum and boil a couple more minutes. Do not stop stirring, otherwise it will nourish it. The finished holter can be put in a cool place so that it is faster than cooled.
The newspaper has no hands on small stripes or squares. Air ball lubricate with oil or vaseline. Put a saucepan with a binder in front of you. Lunch newspaper pieces into the hobster and apply to the ball. So make several layers. Do not forget to leave a small hole, through which you will then remove the ball. The remaining Clayster cover the dense cover or polyethylene package. Leave to dry the workpiece per day.
Heat the adhesive mixture and repeat the entire process. That is, wrap the ball with pieces of paper and let me dry. In principle, at this stage you can stay. But the more layers of paper, the stronger there will be a ball.

Already approaching how to make a globe with your own hands. From paper, we are not a completely closed workpiece, but with a small hole. Through it, pinched the balloon or unleash the tip and blow away. Tailor Do not let go, keep your fingers. Remove the balloon. It turned out a hollow blank from Paper-Masha in the shape of a ball.
Future globe Cover the primer and let dry. Now the ball is painted in a blue color. So symotize the oceans and the sea. From hand or using stencils, draw a pencil mainland. Slide their green, brown, yellow and white paints, leaning on a real layout. Optionally, sign the names of the mainland, reservoirs, islands, and so on. Now it remains to make a stand so that the Globe is desktop. But first consider how else you can make a map of the world.
Mobile globe in blue color. From paper, cut out ready-made continents and glit to the ball. Card can be left white to the child in the process of learning the child itself painted continents and water spaces in the desired colors. And you can fully globe with blue paper, and then apply the mainland.

The easiest way is to postpone the ready-made map of the world. Some craftsmen handle the image in a graphic editor: Increase, stretch, and then printed and glued. And you can come even easier - to take the basis of the paper globe already ready for the basis. For example, you can use the image presented above by changing it to the desired size.
Take the bushing from toilet paper, make cuts on one side and remove. Apply hot glue on them and attach to the middle of the plastic plate. Instead, you can take the lower part of the round box from under the cake. If necessary, expand the hole in the globe. Insert the other side of the sleeve, pre-lubricated with glue. Globe Desktop ready. If the workpiece from Papier-Masha turned out to be sufficiently weighty, then drip the stand with plaster or instead of a plate, use a sufficient weight tank.

As a basis, take a volleyball, football, gymnastic or other ball of suitable diameter. They can immediately draw or stick the continents. And you can use them as a form for papier-mache. Only paper billet will have to be cut to remove the ball. But to halves you can attach the loops and turn the layout of the planet into the box.
Now you know how to make a globe with your own paper hands. Try to make it with your children, they will definitely like this exciting process.
Master Class. Designing from paper "Globus" for children of the preparatory group with ONR.
Nomoconova Svetlana Anatolyevna Educator MBDOU " Kindergarten № 197 "BarnaulProgress:
I bought me a small globe as a gift,


At the beginning, God created a three-dimensional array in Matlast
RGB 19200 x 19200 x 3 blue color. And God said: Yes, there will be sushi in the middle of the water in the equally projection of the Mercator. And so.And God created on land, various states of the four main colors sufficient for the non-changing coloring of any card. And accidentally it turned out that the British Empire turned out to be painted green, China - Yellow, USA - Purple, and Russia is Pink. Only Greenland and Antarctica remained white. And God called sushi and various objects, mountains, ridges, plateaus, plains, and even one small-scale on it, and the waters have called the oceans and various objects, the sea, islands, chute, underwater ridges and rivers flowing into it. And I saw God that this is OK.
And God said: May the land of the city, the state and the capital will grow. And created algorithms for posting inscriptions so that they do not interfere with each other. And God transformed the projection of the Mercator into the globe scan and divided it into separate sheets of 10 degrees. And so.And God saw everything he created, and so well quite. And all this can be mixed with NASA snapshots, print, cut and stick to the globe.
Print more convenient fromPaint. There you can set the scale and slightly stretch or compress the image along each axis if necessary. In my case, for the length of the equator 1333 mm, the scale turned out to be 28%. At the same time, 10 degrees at the equator are 1333/36 \u003d 37.0 mm. In one centimeter, it turns out 44000/133 \u003d 330 km.


