09.06.2018
7 890
22.12.2014
Of course, the main highlight will not be the material of the house, but its stylistics. We will make some of the houses and of them will create the ghost gaming city.
We will need:
Our city will be given by the location of windows and door openingsI explain: on the wall of the house there are two windows and the door located in such a way that the face is reminiscent of their face (windows, eyes, house - mouth). The house seems to be followed by you. Moreover, the shapes of windows and doors can and should vary in shape, and the houses differ slightly with dimensions, color and shape of the roof.

In principle, templates can be found on the Internet and print. Can be made by yourself.
On a sheet of white paper, black is a rectangle, it is long, equal to the length of the perimeter of the poorer, and the height of the house is excluding the roof. If you do not want to calculate the dimensions simply, draw for a start in the middle of the album paper sheet a rectangle long 16 cm with a height of 5 centimeters. Slide it with vertical lines along the long side to four equal rectangles. Then the second left rectangle (this is the facade) draw a triangle from one free side, the side of the rectangle is the base of the triangle, and the top looks toward the opposite side (the triangle is the end side of the roof). 
And on the other free side, we draw another rectangle to the second left of the rectangle. Its height will be equal to the width of the first rectangle on the left, (this is the bottom of our house). By the third, the rectangle on the left, add a rectangle with a height equal to the length of the two side of the triangle (these are the side sides of the roof), and we reinstate it from the same side as a triangle. On the latter, if you count on the left, the rectangle is drawing a triangle (the size is the same as in the previous one, the display is mirror, if it is not equilateral).
It is possible to draw a truncated triangle instead of the triangles, then the height of the side of the roof is equal to the sum of the lengths of the triangled triangle, plus the length of a smaller base. Now it remains to trim the flaps from the outside, so that the house can be folded and glued. Cut the layout.
Bending the bulk house from paper will be inside about the drawn lines so that they are not visible on the facade. Pre-draw or take windows and Deri.
The principle is understandable, make different houses, and play.

This is an instruction, how to make a house from paper with your own hands for the kids! I hope even it will take them for a while. Note: parts for these toy houses will need to be cut out of thick paper, so it will be better if an adult cuts them, not a child.
Creating a paper home with your own hands
Ideas:
Color the parts of the houses before collecting them together. You can draw the door frame around and windows. You can glue the cellophane inside the window. You can draw roof tiles. Or add windows or even two, and maybe the doors.


You can add people and animals. Create your own home. Make a church, school, hospital. Or maybe even you will make a whole village.


You can make the basis of the green color to imitate herbs. Create your own streets.
New Year's option to decorate a paper house

If you make a small town with a huge number of such houses, could you post a photo with him to the site so that I could look at him?
NOTE: My templates are not very good, but everything is fine in them. You can download and print templates. If you can print them on tight paper, it will be very cool, and if not, you will have to move the drawing from printing on tight paper.
You can also download all the templates for buildings 1 - 5 in one zip file shown by just below the house number 5. You can also download all templates for buildings 6 - 8 in one zip file shown just below at home number 8.
General instructions
After you cut out all parts, transfer all lines with a ballpoint, including the places for the loops on the doors and leave the doors open. Then glue them together. It is better to take quick-drying glue. If you make a house made of thick paper with any pattern on it, make sure that the drawing will be from the inside of the house so that it is not visible.
To keep parts together until the glue is dry, you can take a few clips, old can also come up.

1. We will start with the simplest projects and move on to the most difficult houses. Let's start with a very simple garage:

For template
2. This garage A little more, designed for two cars:

You only need 2 parts for it, floor / wall and roof. Press here For template
3. Now proceed to our first house:

Press here To get a floor / wall drawing and click here For roof
4. Next house Very similar to the previous one, but it is a bit longer:

You only need 2 parts for it.
Press here For roof.
Please note that you need a sticky tape to bond some parts together. When gluing the roof to the house, keep the roof upside down in your hand and lower the house on it to make sure it is located in the center.
5. I. second house Not much more complicated, he has a chimney passing through a hole in the roof:

You only need 3 parts for him.
Press here To get a floor / wall template and click here For roof.
If you want to download buildings from 1 to 5 one zip file, click here . Please email me if you have any problems with the download file.
6. This house is a bit more complicated - a multi-level house:

You need 4 parts for him.
and for lower walls and two roofs click here
This house is quite complicated! See carefully where you cut parts.
7. The complexity of this house lies in the roof and "l" shaped floor.

You will need 6 pieces for him.
For floor / wall templates, click .
For roof patterns / roof for canopy / chimney click here
For canopy templates / extra roof For the back click here
This house is not for newcomers!
8. The last house with an unusual roof, a canopy and chimney (Very similar to the one above).

You will need 6 parts for him:
For floor / wall templates Click here
For roof patterns, pipes, pointed roof Click here
For canopy and its roof patterns: Click here
Be careful with a canopy; Mark every end of the house to which it will be attached. In addition, to install a pointed roof over the main roof is uncomfortable. I propose to cut off the two glued parts of the pointed roof and re-attach them with a scotch from the reverse side.
If you want to download buildings from number 6 for 8 zip file, click here .
There are also other houses, just now issue templates, but you can look at them in the finished form and download outline:
building 9:

Template 1 \u003e\u003e
Template 2 \u003e\u003e
Template 3 \u003e\u003e
house 10:

Template 1 \u003e\u003e
Template 2 \u003e\u003e
Surely many parents are familiar with the problem: the better Take a child how to tear it from a computer or television. A good option is a walk, but if the weather is not set, he immediately disappears. A fascinating occupation is represented by your attention, which will help your spell to pass a couple of cold winter evenings. The main thing is that for this you do not need to spend a large amount of money for toys. You only need to download one file and print it. As you can see, everything is quite simple.
We offer an entertaining game - a designer that will provide you a couple of hours of rest until the baby is busy with construction. It is better Join it, because you have to deal with glue. Such a wonderful time will only bring you closer to your child. Help him build a dream house! In general, the game is designed for children from three years under the supervision of adults. However, it will be suitable for the children of younger school age. In the latter case, you can afford a couple of hours of rest. But do not hurry to deny yourself in such an entertaining pleasure.
For a child, the game will be useful, because you need to glue everything according to the instructions. Here develops thinking, imagination and motor skills. You will need paper, scissors, cardboard, glue and, of course, paints. It is better to take and, for example, PVA, and glue - a pencil. The last option is much easier to use and give you a minimum of inconvenience. We simply print the downloaded layout of our future home, gently cut it out and proceed to construction.
If you enjoy the process itself, you can make a whole miniature town, gluing a few more houses. In fact, it is an excellent option for the New Year holiday. You can, for example, place your creations under the Christmas tree and put presents there. When you finish the construction, with the help of ordinary wool you can create the illusion that snow fell in the town. You can settle there a few inhabitants there or decorate the windowsill, for example with this composition. In a word, the construction of such a paper theater will be a great time-looking for your baby and, perhaps for you. Such a scope for fantasy and imagination will give you a wonderful mood!
Paper is the easiest and most suitable material for a variety of creativity. For months from three, the child makes attention to the rustling leaves and they are engaged in them for a long time and with passion. Becoming older, children do not lose interest in paper and love to make different items from it. They are insanely rejoice when adults are mastered with them.
And if you ask Chad, what he wants to do, most often it turns out that this is a house. Moreover, create your own hands, it is the houses that love both boys and girls. Apparently, children, let and unconsciously, already perceive the house as the main attribute of life. How fast and just make a paper house?
Tools and materials for creating a paper house
When you decide to brighten a family evening or a child in school will receive a task to make such a crawl, you will need a little fantasy, paper, glue and just a few tools. Paper can be any: thin from color sets, sheets of notebooks or albums, drawing (which, by the way, gluits perfectly) or pieces of wallpaper. We will need scissors, ruler and pencil, and sometimes brushes for glue.
If there is a stationery knife, it will help quickly and carefully do the slots of the winds and the door. The glue is suitable in the most different: in tubes, PVA glue, bulk, glue-pencil, braceter of own preparation or paper in bottles, tape. From your child's scope with a child of fantasy depends the selection of objects to decorate the future house. Paints, gouache, color pencils, beads, wool, lace and other items for appliqués.
You can make a magical action at a table, on a wide windowsill or sitting on the floor. If only the surface was smooth and resistant to glue and scratches (you can put a plank or plywood).
Preparing paper house sketch
Constructing a house, small or volumetric, simple or complex, first create a sketch. Work starts with drawing. If there are only small sheets for making a house, you can cut the drawing on the dotted and perform each part separately.

Cutting the drawing, remember that the right side will remain without bending for applying glue and need to be daughter. You can add the floor to the house sketch. But is it necessary? Without him, the child is more convenient to put toys: the dishes, furniture, "residents" of various sizes, and through the door not everything can crawl.

Connection of parts, decoration and paper house assembly
Then cut out parts of the house and begin "construction", missing and gluing special bends.
Some time will take drying the product.
A new building lacks stability - it is better to install and glue it to a cardboard frame.

The design of the house can be complicated by adding an extension, porch, attic, second floor, balcony and other elements. Stages of work remain the same: creating a sketch - cutting parts - decor - bonding - drying.
Other options for paper houses
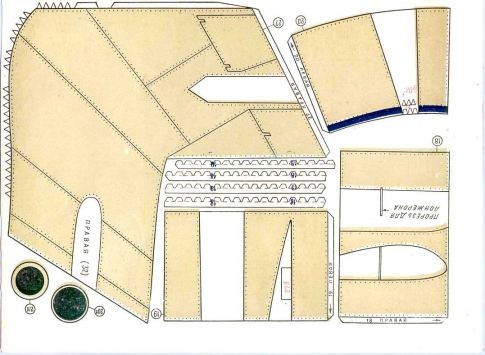
Very interesting, it turns out of paper round shape houses.
When creating a sketch, the housing of such a design looks like a solid long rectangle. Blooming a snaps of one column. And the roof is more often drawn separately in the form of a circle, then manifests and connects with the body with glue.

But it is possible to build a drawing in unity with the roof. Then there are many cuts for the roof, which then you can glue the flashes, creating a conical form.

With great enthusiasm, children make fabulous "log" hut.
Materials for work take the same, but the technology of building such a house is completely different. Here they first harvest construction material. Of the same long paper rectangles with a pencil make tubes - "logs".

Will it be a little domishko or bulk domain depends on the size and number of rolled tubes. Usually the guys compete with adults or among themselves who rolls or smoke more.
Then the walls are neatly folded from the finished material. There are options: the walls are glued with the lumen, where there are two logs in a row, or a solid laying of four tubes with displacement of them to the edges in the next row. The roof of the house can be a "log" or smooth.
Save yourself to your computer scheme and print.
You can make a paper house in the Origami technique
Creating origami figures, among them and houses, by ready schemes It serves as the development of the logical and spatial thinking of the child, the activation of its mental processes. Origami can be engaged in any place, for example, in line for the doctor.
Having created my own first simple houses from paper, you can come up with a lot of others extraordinarily and more often to make them together with your favorite child.
Print, cut, Skeleton 3Paper houses. Print, cut, spool.
Name: Paper house I.
Format: PDF.
The size: 83 mV
Focus on: Letitbit and depositfiles
Description: Print, cut down and spool.
The kit includes: Bakery, Bathroom, Living room, Living room with fireplace,
Children's, Cabinet, Cafes, Bedroom, Kitchen, Toy Shop, Meat Shop, Vegetable Shop, Flower Shop, Fish Store, Restara, Japanese Dining Room ...
All houses in one archive
http://letitbit.net/download/7729.7c4904a413acc3f41dd7a9fa56/____________.Rar.html.
Bakery
http://depositfiles.com/files/5bxf09x0g.
Bath
http://depositfiles.com/files/8lks6dpoj.
Living room with fireplace
http://depositfiles.com/files/evjdxs8sy
Living room
http://depositfiles.com/files/iox6kk45o.
Children's
http://depositfiles.com/files/u8p7LCqog.
Cabinet
http://depositfiles.com/files/s27qry56d.
Cafe
http://depositfiles.com/files/7gel2i34b.
Room
http://depositfiles.com/files/ikfmub4xe.
Kitchen
http://depositfiles.com/files/l774x5px4.
Toy store
http://depositfiles.com/files/ccfj7q49p
Butcher shop
http://depositfiles.com/files/g0szu7bpz.
Vegetable shop
http://depositfiles.com/files/txn6u7t4k.
Restarant
http://depositfiles.com/files/2bj2t2sj1
Christmas
http://depositfiles.com/files/ynqbp9uui.
Fish shop
http://depositfiles.com/files/g43srx4za.
Flower shop
http://depositfiles.com/files/4a8a04zca.
Japanese dining room
http://depositfiles.com/files/9npbqpmmr.
Paper figures for each letter of the English alphabet. Print, Cut, Skool
Name: Paper figures for each letter of the English alphabet
Format: PDF.
The size: 1.86 MB.
Focus on: Letitbit and depositfiles
The kit includes: Apple, Bus, Coffee Cup, Duck, Elephant, Fish, Glasses, House, Island, Juice, Kettle, Lion, Milk, Notebook, Ottoman, Post, Quoits, Rucksack, Star, Tote, Umbrella, Vase, Watch, Xylophone, Yacht , Zebra.
Description: Print, cut and splashes
Paper houses
Name: Paper houses
Format: PDF.
The size: 12 mV
Focus on:iFolder.ru.
Description: Print, cut down and spool.
Print, Cut and Square House Halloween
Name: House Halloween
Collective
The year of publishing: 2007-2008
Pages: 25
Language: Russian
Format: PDF.
The size: 5 MB
Focus on: IFolder, Rapidshare.
Description:Print, cut down and spool house-halloween.

Name: Paper models of cartoon characters
Format: PDF.
The size: 8 mV
Focus on: iFolder.ru.
Description: Everything is very simple - print, cut down and spool!
Gingerbread house. Paper model

Gingerbread house . Paper model
Developer: Canon
Format: PDF.
Language: English
Mock at home and his architectural model - what do they differ? The first can be made of available materials: paper, cardboard or wood. It does not have to repeat the form of a certain structure. The architecture of the construction can be any you like, if only the result of your creativity also liked you, and others.
The architectural model is an exact copy of any building with the repetition of all major and secondary signs. It is built from expensive materials, and its creation can take several months of hard work. Therefore, we offer to begin to build a layout of the houses from the girlfriend. Do not know how? In this article you will find recommendations and detailed instructions How to make cardboard and wood layout.
The layout of the paper house, the scheme of which is attached in this article, is a simple building, although work on its creation can become an interesting creative process requiring attention and doctrine. Paper will need dense, newspaper or packaging will not fit.
Better to take standard sheet 29x21 cm. In the event that the contours of your future house do not fit into the size of the sheet, you can glue two by the "joint in the joint" method with an overlay strip of a 2 centimeter width. After the harvest desired size Received, it is necessary to make marking. We offer to build a layout of a paper house, which will be rectangular in terms of, two-storey, with three doors, windows and

First of all, we recommend copying our scheme that you see in the photo in order to designate the dimensions of the future building. Then you need to decide which layout will be the length and width. Write these numbers in the diagram. Next, determine the height of the first and second floors, as well as the roofs. Now you can transfer the resulting drawing to the bottom sheet using a ruler and pencil, measuring all the parameters of the future at home. At the next stage, you need to draw windows and doors. Their location can be changed as you like, relying on your taste. The layout of the paper houses allows you to make constructive changes at any stage of the building.
At the next stage, you need to read all the "wings" that you see in the diagram. They will play the role of mounting brackets when assembling layout, maintain the roof and connect the walls. Then follows the most responsible part of the work requiring accuracy and attention. Follow all the drawing lines with a ballpoint handle over a ruler and with pressure. This is done so that you can bend paper in the right place.
Layout of paper houses require accurate fraud lines. After all the boundaries are fired, you can cut the windows and doors with scissors, as well as "wings". Next Respired Moment: It is necessary to properly bend the entire design and glue it in the right places. To do this, we recommend glue PVA. When the layout is driving, you can start coloring.

Such buildings are performed not only from paper. The layout of the house can also be made of cardboard, the material is strong enough for the structure to look "truly", with opening doors, windows, floors and ceiling, internal decoration and even inhabitants sitting inside on miniature sofas and chairs.
It all depends on how much the "builder" is interested in the final result. It can build any layout at home with his own hands. However, its execution is a complex creative process that requires accuracy and perfection. The tool will need the usual: scissors, stationery retractable knife, sewn, line (better metallic) and PVA glue.

Cardboard for making layout is better to take two types: smooth and corrugated three-layer. The second will go to the floor and the ceiling, and the first - on the manufacture of angle for connecting individual parts of the structure, small parts of the external and interior decoration. Layout of cardboard houses needed. It can be a plate glued from two layers of corrugations or carved from plywood. The basis or sole of the layout is drawn by the size of the future at home and can be made with decorative miniature flower beds, garden vases, benches.
Next, it is necessary to draw on the basis of the location of the walls, the porch and the attachments. After that, you can start making the main parts: walls with carved door and window openings, the ceiling and floor of the second floor (if it is necessary to harvest angle from thin smooth cardboard to assemble the design. The longer the corner, the stronger the connection is optimally the length of it must not be less than 70% of the length of the connection. The width of the cardboard corner is 1.5-2.0 cm.
Mock at home with your own hands from the tree can be made only with the participation of adults, as the work is associated with woodworking machines for home use. They are dangerous enough if there are no skills. Hand tool For wood processing also requires caution when working with it. The blades of knives, plans, files and pins are sharply sharpened cutting edges.

Layouts wooden houses Do with your own hands require accuracy in the process of work. Their creation is a fascinating creative occupation, in the course of which the master can show the intelligence and smelting. First you need to draw a drawing of the future at home. Then make the base for layout. After that, you can proceed to the creation of parts.
Walls and floors are better to do from thin militants with a width of 1.5-2.0 centimeters and a thickness of 5.0-7.0 mm. Billets are located on smooth surface It is close to each other and fasten with the same rails that are superimposed on top and pressed by any cargo. Previously, all parts are labeled PVA glue. After the manufactured block is dry, it can be customized according to the drawing and dock with other details.

The assembled layout must be sanded and stalled. This is done by hand the glassmaker brand 25-H on a tissue basis. Then the surface is grouped out perplex brand 8-H brand to full smoothness. After processing, the layout can be painted, install doors, insert windows and produce finishing work.
Mock at home, with your own hands created, as a rule, has a removable roof. It is necessary in order to have free access to indoor rooms, since in a miniature building will have to install toy furniture and other interior decoration items. The surface of the walls is covered with "wallpaper", i.e. the painted strips of paper. Paul must paint in brown color Or it is possible to apply it with linoleum - it can be made of loaf.
Paper simulation can be attributed to the category of classes that will never cease to wonder the person. Many children's creativity houses necessarily organize construct mugs, because the paper models are not only allowed to get a new interesting figure or a toy - with their help you can improve the knowledge of physics and mathematics.
To learn how to add basic paper models, you will need simple devices It seems like scissors, a stationery knife, PVA and tassels for applying it. Prefers to the construction glue of PVA - from all varieties of its most thick consistency, it does not spoil the paper, making it wet and viscous as the usual one.
Different models are folded from different species Paper - from cigarette to dense cardboard. Newcomers are advised to start with watercolor paper with a density of 200 grams per m 2 for large elements and drawing paper with a density of 140-160 grams per m 2 when developing small parts.
Separate parts, like mast, railings, small finishing elements, the masters are created from polymer clay, plaster, plasticine and self-hardening plastics. If you also complement your work with stucco parts, bow to various stacks, moldes - such as those used in ceramic floristry.
The working process of creating a paper model takes place in several simple stages. Before starting the process, the master is determined which figure it wants to descriptive. In fact, from paper, you can make it possible to make practically any product, but paper modeling more often assumes such options:
Figures of man, animals, plants design much less often. After determining the category of the product, the main part of the workflow begins.
From several large and small parts fold three-dimensional patterns of paper - the diagrams of elements must be pre-draw on paper sheets the desired color. Here, a person cannot cope without understanding certain knowledge of geometry and the possibility of presenting a three-dimensional image.
To ease beginners training, many specialized magazines began to produce for a paper model drawings of finished sweeps, gluing which, you can get a figure.
Cut the layout is also needed by the rules. For example, a solid line on the contour indicates the place of the outbreak, dotted - fold. But in each designation scheme is individual, so before cutting you need to get acquainted with the explanations for the figure.
After the drawings of the paper model are ready, the layout glue and produce finishing works if necessary.
To give the surface of the product of the masters, various coatings are used: glossy varnishes, matting sprays, crackering fluids, veneers, etc.
The newcomer in paper modeling will have to taste this master class, which contains information on how to construct the well-known model of the car VAZ 21011 type sedan in just half an hour.
Fueling with dense drawing paper or a sheet with a coated coating, if the figure is created as a gift to a friend.

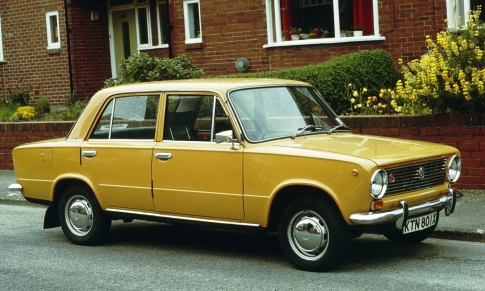
Please note that the strips of the testers need to be glued, forming the rings that will be attached to the wheels to get the most voluminous patterns of paper.
The design of military equipment from paper is somewhat more complicated than creating civil cars because the tools consist of a plurality of small parts forming the housing.
To make sure that try to form a difficult but very interesting model German tank "Panther".

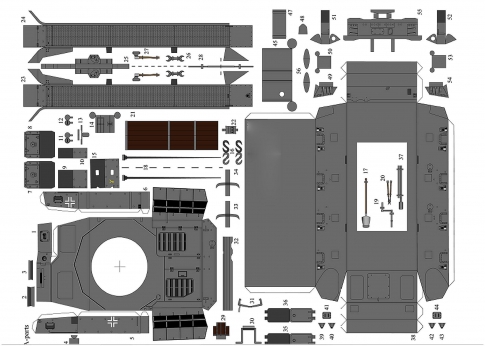

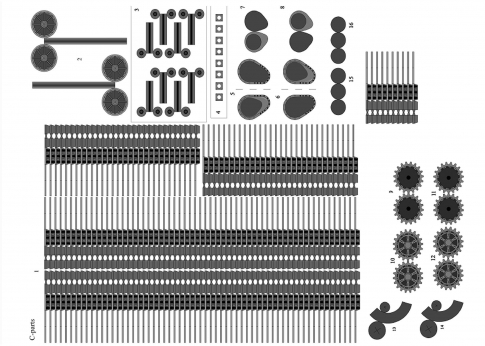
To glue parts of the tank in the correct order, follow the assembly of this video language.
Sometimes jokes are connected to small errors, which is why white paper stripes appear on the model. From them you can get rid of stomers or pencils similar to color armor.
If you already have certain skills in building paper figures, you will probably like the design of the paper and cardboard of the passenger aircraft Tu-104.

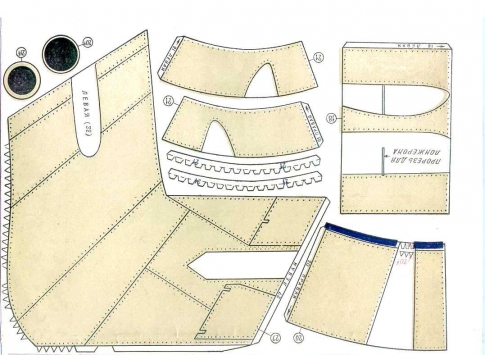


To avoid bends and chances on the housing and tail, bring the parts with your cotton in the assembly process. Decorate the plane as desired using sprays and paints for decoupage.
More simple model You can make an airplane from paper to do it yourself, focusing on this video.
Take yourself, tell me friends!
Read also on our website:
show more
What could be more interesting and more exciting than to make your own hands any crafts for home decoration? After all, the fact that you can come up with and do it yourself, it is impossible to buy in any store!
Such products are not only elements of the decor in any apartment, creating a cozy atmosphere and mood, but are the reason for the fascinating time in their creation. After all, children love to cut and glue from multicolored paper toys - houses, animals, rockets and ships! In this entertaining business, they often help adults and * houses from paper for children * will be a universal decor for the children's room or the subject for games. At the same time, quite simple and very original pallet "The paper house from paper with your own hands, which you can easily do with the child will serve as a bright decoration for the holiday and bring a lot of pleasant moments when creating it.

It can be a snow-covered hut with a Christmas tree to the new year or a mystical castle with ghosts and battle mice To the merry Halloween, multicolored with bows and ruffles, a house for dolls or an impregnable fortress for the knights, and a rural house with a fence and flowers, a cozy fit on the windowsill of your kitchen. After all, creating * a paper house with your own hands * You are completely immersed in the world of fantasies and become the Creator of the most unthinkable ideas! Well, * How to make a paper house * so that it is unusual, bright and pleased with the eye, we will tell you in our article.
A used pattern can be printed on the printer or just carefully, without pressure to translate through the monitor screen on thin paper, having previously increased the picture to the desired size. The pattern thus obtained is cut out, superimposed on the cardboard for the future house and completely outlined with a pencil. After the scheme is drawn, it should be carefully cut and prepare for gluing. To do this, on the line of folding the walls you need to spend a stupid side of the scissors so that the cardboard can be easily bent and cut the doors and windows. If you have never been making a paper house before, we advise you not to wise with complex schemes and small details, but choose the easiest version. Your paper house with a scheme to which is simple and understandable has every chance to get beautiful and original from the first time. Some types of schemes for paper houses are presented below. Click the mouse to enlarge:


Doors can be opened if cut off the opening is not fully or completely arched. Also with windows: shutters in them can be opened or the window will be on the plan without stable. The finished color cardboard window can be glued and separately on the wall of the house, without cutting out the disc. Here everything will depend on the scheme that you have chosen or made at your own discretion of the amendment in the design of the house. After all the necessary parts are cut, you can glue the house, giving it a square shape.

The roof is glued separately. Cut from white or colored cardboard, folded in half and attached to the walls of the house. Previously, it can be decorated: draw tile or make it from separate strips of colored paper, cover velvet paper. If a pipe is provided in the diagram, it is cut and it is cut, it is folded along the sections of the fold and glued to the roof. To the pipe can be attached smoke. For this, a wavy smoke is drawn on the cardboard, cuts out and glued at the base to the inside of the pipe.

The finished house can be glued to any stand from cardboard, wood or plastic, cutting it in advance for the size of the house and decorate the slaughter of colored cardboard strips, grass of green paper, dry flowers, berries, leaflets, moss. You can attach to the stand with a plasticine twig, and hang beads on it and glue the flowers. It turns out a very elegant version of the summer house.


Already ready and fastened on the stand, the house is brought to the final. To do this, decorate and decorate the walls, windows, roof and the foundation of the house. If this is a New Year's option, then the roof with the pipe can be swept in the snowball - crumbling of foam, pre-smeared by glue of the floor-saw, cover with cotton, paint white paint, portray snowflakes, make snow-covered windows. The house is decorating with colored tinsel and beads, attaching a piece of paper silhouette of a snowman and Christmas tree. You can use ready-made pictures for decorating or cutting figures from gift paper.


The house for Halloween is made from dark cardboard, with the addition of the silhouettes of ghosts and volatile mice. The windows can be made of bright yellow or orange paper, creating the effect of light in the house. Near the stand you can stick the trees and fence from cardboard, put on the fence of the black cat. You can be sure your child with great interest and enthusiasm will help you cut out of the pair of terrible characters of a cheerful holiday!
Today we are publishing paper Doming Schemes for beginners. This is a very simple and lightweight model of a paper house. To glue it will be even a novice modelist. You can implement the skills when gluing more complex models, for example, "".
For dessert, we offer to see the cheerful cartoon "Three heroes against Godzilla"
How did you not glue? Well, it's in vain ...


