So, you start the overhaul of your home. It is no longer possible to postpone on it - almost everything happened over time. So work you will have a grandiose. How to start, what stages in the work are coming and who will do all this - you yourself or a hired team of specialists?
With a real estimate of the position - the volume of work, your skills and repair skills, financial opportunities. Ideally, it is best to hire an experienced brigade led by a good foreman. He will offer the project of overhaul, will be responsible for the course and quality of repair. In Arsenal, the pros has everything required tools For any type of work.
But in practice, in order to save costs, the owners have to take a lot to themselves. Make a detailed plan, determining that you will change dramatically - roof, facade, communications, windows, doors. Surely something will require simply partial repair. Calculate the upcoming costs, to drafting the estimate should be done very carefully. Separately settle the calculation for all objects:
Overhaul of the house includes external work, replacement of engineering communications and internal work.
Replacing communications (water supply, sewers, electrical wiring, heating, ventilation, gas supply) not only time consuming, cost, but also requires special knowledge and skills. It is better to trust it by masters.

Since the repair of your home is capital, the replacement of doors and windows you will be spent. Concerning plastic windows, then independent installation of them - the occupation is risky. Improper measurement or non-compliance with the installation technology can lead to a violation of the design geometry, which, in turn, will disturb the heat and sound insulation. But the doors can be installed independently:
The foundation is the basis of the house. If cracks are found in it, it means that, over time, he gave a precipitate and will need to strengthen it:

Overhaul of a private house will clearly require roof repair. It may be dismantling the coating and its replacement, heat and sound insulation of the attic. The overhaul system may be required, if the damage to the rot will exceed 50% of the total area. Of roofing materials Experts recommend metal tile or Ondulin.
Then you can start updating the facade. Old walls, depending on the state, will have to pay special attention: if they were led, disassemble and put it again. And if the walls have not lost their strength, then the facade will be separated. To do this, you will have to remove the old coating, close the cracks. You may need to insulate the walls. After careful inspection, the method of thermal insulation (internal or external) is determined and the insulation technology is selected: "Wet method" or hinged ventilated facades.

After the end of the exterior work, you can start finishing indoors. Bathrooms and kitchens will take place first:
Room finishing - the final stage overhaul at home. Removal old wallpaper, flatten the walls, glue new. On the ceiling, if there is a desire and means, install suspended system. Covering on the floor choose to your taste - laminate, linoleum, parquet, carpet. Many for the insulation of the house use the "Warm floor" system.

Since overhaul must be prepared in advance, it would be nice to explore the topic in detail:
Even if you are involved in the work of the masters, you need to be in the subject, controlling the process. Drive the diary of the work, where you will record addresses and phone numbers of the desired stores, contacts of specialists, prices for materials, credit accounting. Make the mark, comments - everything is useful! After all, overhaul is not forever, after some time it will be necessary to reproduce something in the house.
Not many have the opportunity in a short time to make overhaul of the whole house in a short time, in this case divide this process at the stage.
Is it possible to do without attracting builders? It is unlikely that it will be definitely answered: yes or not. Of course, repair with your own hands will save a certain amount for payment for services. But if you allow mistakes, the alteration will fly into an extra penny. Independent overhaul at home is most likely stretched not for months, but for years. So we have all "for" and "against" - and good luck to you!
Installation of a warm floor under the tile:
Often, it is more profitable to repair the old wooden house Alone, how to demolish it and build a new one. If you have such a house and you would like to bring it into a fit, we will tell you how to do it. The main thing is to pay attention to the general condition of the construction, that is, to evaluate the prospects for work. If you are confident that the house can still serve - boldly start doing repair with your own hands.
First of all, it is necessary to estimate the degree of wear of the existing nodes of the house. Carefully inspect the foundation, walls, roofing and communications. Repair of an old wooden house with your own hands begins with the preparation of the material, and its volume directly depends on the state of the construction.
Fully free the house from all unnecessary things, garbage and knots, actual non-design. Carefully inspect the wooden parts for signs of rotting - from these need to immediately get rid. Most often in old wooden houses Floor comes to full disorder - it must be dismantled.
Pay attention to the foundation. As a rule, the solid concrete fill serves for a very long time, but in some places it can break. This requires small cosmetic repair - With the help of a prepared solution, simply put the visible shortcomings, aligning the entire foundation. If the foundation of the house came into disrepair (many large cracks around the perimeter, corrosion of reinforcement, considerable skew of the horizontal level of the foundation) - repair not to do. This will require complete reconstruction.

Communications should be taken in advance because you may want to strip the walls with plasterboard or other coating. So, completely dismantle the existing wiring and plumbing pipes. Laying new electric network, be sure to conclude wires into special tubes, with a cross section of 15-20 mm. For plumbing, it is better to use plastic pipes.

Repair of a wooden house with their own hands, the photo of the process of which we attach, start from the walls. Brother's crown - the most vulnerable place. Here are most often cracked and other damage. Floor beams can also suffer and directly the floor (as already noted, it is better to immediately dismantle).

Small damage to wood can be repaired without disassembling walls. To do this, it is necessary to clean the problem areas, treat them with an antiseptic, and then close with a suitable sealant. If we talk about the outside of the facade, then for cosmetics, you can see it with special panels to your choice. Most often, siding is used, and it is mounted as follows:

The inner side of the walls can be seen by plasterboard. The installation of plasterboard plates is carried out in the same way.

Pay attention to the beams above the window and door Pieces - They are very often suffering from moisture. We need to replace places to rot - it can be done simply drinking a piece of beams and inserting a new item.
If the house is quite old, most likely you need to completely dismantle roofing. Inspect the frame, especially pay attention to the condition of the rafter. Roof repair easily - any item can be replaced. To do this, use additional strength locks - for a while, connect the existing beams for a while (which you will not dismantle), having several boards between them. After that, you can shoot low-quality rafters without fear of destroying the frame.

Carefully inspect the main detail of the roof - Mauerlat. If signs of rotting are found, be sure to cut the damaged parts and insert new ones with reliable fixation with lamellar lining or tighted bolts. Ideally, Mauerlat can be completely replaced, carefully dismantling its parts around the perimeter and setting new ones.

After repairing the roof frame, put the coating. If desired, the roof can be additionally insulated using, for example, mineral wool.
Doors and windows in old houses are most likely to be completely replaced. But the main problem is not in this, but in quite frequent cases of skew. To get rid of the skew should dismantle the door frame and with the level of leveling walls.

Collect the door frame frame anew and install. All existing gaps need to blend tightly by mounting foam. As for the doors, they choose their model at wish, but the windows are recommended to replace with metal-plastic, since they are more durable and reliable than wooden, not to mention the thermal insulation properties.
Interior doors also need to be replaced in the same way along with frames. If you have all the doors of the same format and sizes, you can immediately prepare the required number of boards for frame panels. But do not hurry with their installation inside the house, as you will still do the repair of the floor and finish. Installing interior doors can be installed at the last stage of repair work.
For high-quality gender it is recommended to do concrete screed. If you have no such, proceed to work. First of all, dismantle the lags on the floor (you can not cut under the walls) and clean the platform from garbage and dust. The screed is styled in the following order: Flashing (sand, fine crushed stone), insulating film, concrete layer. Be sure to align the screed level. Concrete must dry about one month at a temperature of about 20 degrees.

Next, you can begin to lay the floor. This may be, for example, laminate. For laying, a special substrate is used first, after which the sheets of laminate are stacked, connecting with "locks". Near the walls should be leaving the expansion gap of about 1 cm, which is hidden by a plinth.
If you do not want to make a screed, you can make the floor from the board. In this case, the boards are simply nailed to lags and grind on top with a special typewriter. It is recommended to ensure moisture insulation for such a floor, pouring under the lags of the ceramzit layer (if the lags are located on the ground).

Last Stage Repairs wooden houses do it yourself, whose video you can see at the end of the article, it finishing work. If you used drywall for the walls, be sure to treat it with a putty and align with wallpaper or painting.

The wooden floor of the boards should be treated with a special varnish and let go well. Similar procedure should be held with others wooden materialswhich are in open areas.
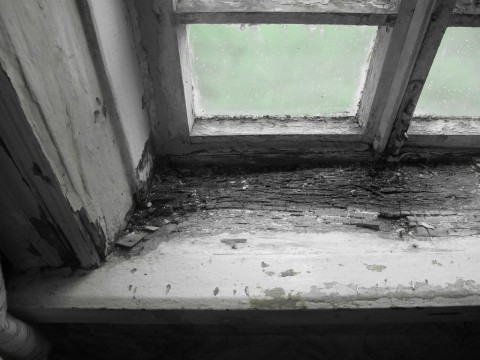
That's how it looked before the repair ... Wooden rotten frames, closed outside with double film, from cold and wind ... On the left old veranda with a shattered visor porch ...
For those who have to do repair in their home, it seems ...
These were the windows and window sills.
Started the house in order with the foundation.

Alternately reveal the corners of the house, we remove the crisps that rotten logs with chainsaws, put the formwork, put large stones and rubble, lay the reinforcement so that its ends remain open (for subsequent fastening it with the bay foundation), the crown of the crown to wind up and foul in concrete. Finished stand.

And so all four corners of the house and the middle of it, around the perimeter. Total - 8 Tumb. The process is time-consuming, heavy, but the result is worth it ... When it was finished with the couches, we made Zavaling around the perimeter. The continuation of outdoor work was postponed for the next summer. And we took up the internal repair of the house ...
This is a big room and start with it. She looked before repairing like this:

This is its right corner ... And this, in the photo below, the left corner. In the process of writing the topic, I will hold these two corners ...


At first, all the layers of old wallpaper were completely delimited. The windows were still old, but we have already waited for Masters on the installation of plast.
The old stove disassembled ... And the liver folded the new one.


And the result was not forced to wait a long time ... one window decided to close at all and make one big-there will be a dining room.


After installing windows, the men began to disassemble the old floor, align the lags and put the brick courses for them ...

Then the floors were mounted with old boards (they will serve for a very long time, as fat and dry), and in places where they were rotten, replaced with new boards.

Set the metrophrophilic frame for the walls and the ceiling ... My mistake was that you first need to do the ceiling, and then the walls, and not on the contrary. The equipment of these works I found on the expanses of the Internet, I will not stop on it in detail. If you do There will be any questions, I will answer with pleasure that I know ...

On the ceiling, mount the frame is much more complicated, the neck hurts ...

When metal carcars is completely ready, you can sew it to it, it is preferably in a checker, starting from the ceiling! Do not forget to scatter the wiring and hide it in a hafrolanal, for the profile, and the boxes are distributors in a convenient place for you.

When all the walls and ceiling are covered with GLK, we will put off the spatula and align all the joints between the sheets and the screws in the screws of the screws here ...

In the corners and seams reinforced grid For the strength of the compounds, and after everything is dry, sandwich, we appline the primer on the walls and the ceiling.
And now the most interesting moment-sticking wallpaper. I took vinyl white on the ceiling and with gentle roses on the walls ...

invited the brigade of the masters to finish their work in this room through the windows (slopes and window sills).

After that, I stuck the ceiling plinth, hanged the shelves on the wall, put the flowers on the windowsill, which we already installed the guys from the company ...


The carpenter helped put the door interroom, only then I learned that it stands up with my legs ... (what's the difference!) If only I function normally ...

Door loans Pucked with a white corner on a liquid nail.

On the draft floor put the substrate, then Fiberboard and linoleum. Then the floor plinth screwed up self-drawing and voila-beauty !!!

This is what this big room is ...
Some of you wanted to see more detail about concrete courses, so I added details ... So, the windows layer are inserted, the house is covered outside flat slate And the panels were made around the house, until the next summer ...
Now continue about outdoor work, after cold winter And spring ... for the next summer.
When all the cabinets are ready, gradually, revealing each of the sides of the house from Zavalinka, we remove the rotten birch of the lower crown, dry-wind the waterproofing,

we set the formwork, lay the reinforcement, connecting it with the ends of the armature of the corner tumb and fill with concrete ...


On the finished foundation we make brickwork ...

We work all !!!

And as it should be done, the scene is made ... Not quite ordinary ...


This is all with regard to external work, repair at home. Will what questions, ask, with pleasure I know, I will answer. And all those who are interested, waiting for the continuation of the inner repair dining room!
ABOUT country house Most urban residents dreams, however, considerable funds are required to buy good new real estate, and build a house "from scratch" and more expensive. That is why many prefer the "secondary market" and buy old houses. Rarely which old house does not require repair, and this article is dedicated to this topic. What to pay attention to first and how to make the most economically repairing the old house with your own hands?
The Germans say: "afford to buy an old house can only or very stupid, or very rich man." But the nature of the Russian mentality and the features of pricing in the real estate market are such that sometimes, indeed, it is more profitable to purchase used accommodation.
In addition to the financial savings, there is another advantage of old houses - usually they are built in places with a developed infrastructure, while progress has not yet reached the new buildings. If you buy a plot and build a house yourself, you will have to lay communication to it, which will take additional funds and time. And everything would be fine, but nobody has canceled natural wear, and very often old houses require major repairs. Where to get started, and what is worth paying attention to first?
The cons of second-hand houses are primarily associated with the specifics of construction in Russia, more precisely, in the Soviet Union, since old houses were built at the time. In the past, most private houses in the countryside were built from a tree, and it should be thought that 50 or more years such designs need to restore and strengthen. Inside the walls and the floor, the colonies of the treasures of the treasures are accommodated, which is noticeable rotten and fungus. If you are "lucky" to become the owner of such housing of the Soviet building, for the repair of an old wooden house you will need large cash costs, and sometimes it is even easier to demolish the box, strengthen the foundation and build everything again.
In the 90s, there was a sharp boom of private house-building, and a brick came to a shift. It would seem more durable material Must maintain its operational qualities much longer, however, the lack of qualified architects, the use of fragile building mixtures, and sometimes - frank slope in the construction led to the fact that today most of these homes require large capital investments.
Most often in such houses there is a non-compliance with the design of the foundation and the nature of the soil - brick buildings weigh quite a lot, therefore, there should be a powerful base and stable soil under them.
If you had to work with "incomplete" - a box of the house without interior decorationthen, most likely unprotected brick walls Already fused and began to crumble, so you will have to strengthen them or even replace strongly destroyed areas.
Before reinforcement and purchase of building materials, an action plan should be developed. To do this, it is necessary to carefully inspect the dwelling and evaluate its state. So, what should be paid attention to first when repairing an old house?
The most "weak" places in old houses:

Many of the above problems are eliminated by themselves during repair, for example, unusable wall covering will be dismantled if you are going to enhance thermal insulation. Replace sockets and switches will not be difficult, to change the old plumbing can be in a rather short time. But if we are talking about a faulty roof or a cracked foundation, it will be difficult to solve such questions and expensive.
Start overhaul of the old house is necessary with thorough planning. When you examined housing and recorded all serious defects, you can proceed to the implementation of the project, so far - on paper. If you do not have artistic abilities, design computer programs will help to cope with the visualization (3DMAX, Autodesk Homestyler, Ashampoo Home Designer, Sketchup Make, Sweet Home 3D).

Why do you need a plan:
If you planned demolition or transfer of walls (partitions), plumbing equipment, gas or heating devices, replacement of electric furnaces on gas, such actions require documentary permission. To do this, contact the relevant organizations in the area. To adjust the technical passport of the house, you need to provide a written application and package of documents, including detailed description upcoming work. To determine whether it is necessary to obtain permission to repair anything in the house, take a look at the serviceport - all the design available can be repaired. But for attaching additional square, for example, summer kitchen, you need permission. Otherwise, the extension can consider illegal and demolished.
Modern rhythm of life forces people to constantly work or spend time on the road, but even the most busy person spends a third of his life at home, which is talking about housewives, children or pensioners. Therefore, it is imperative to create a favorable atmosphere inside, and we are talking not only about a beautiful finish, but about warm, lighting ventilation and other important points. The physical and psychological health of residents depends on this.
Natural lighting should be present at mandatory, and the more - the better. On the standards of the window must occupy 10% of the area of \u200b\u200bthe house. Imagine how many discomfort will feel a person, being in a constantly shaded room - it will spoil your eyesight, it is impossible to grow in such a room houseplants, ventilated and fully seen. Moreover, the lack of or lack of windows will lead to excessive waste of electricity, and today even the most wealthy homeowners save on electricity.
Interesting: I used to have small windows and small doorways in wooden houses to cut the heat loss as much as possible. Then used ordinary glasses that were not very well protected from the cold. 
But just so cutting the beach window in the wall, unfortunately, no one will allow. For transfer, expansion or replace windows, appropriate standards are provided with which you can find in the document "Natural Lighting of Residential and Public Buildings". Please note that for each region of Russia there are its norms, since the coefficient of natural illumination is different everywhere.
The degree of illumination of housing depends not only on the size of the window, but also from what glass is inserted there. It is known that ordinary glass or glass does not miss UV radiation, so make a solarium or a luxurious greenhouse will not work. It uses quartz glasses for this, but they cost quite expensive, so they are bought for certain needs.
How to position the windows in the house:
Comfortable microclimate in the room depends on temperature and humidity. These factors, in turn, are provided with the right heat and vapor barrier, as well as venting space.

The temperature in the house is folded from two components - air and surface temperatures (floor, walls and ceiling). Optimal temperature The air is + 20 ° C, surfaces - about 17c. At the same time, the individual features of tenants should be taken into account. So, for the elderly, housing should be done warmer, so ideally it is recommended to install the heating regulator for each room so that each can configure the optimal temperature for itself.
In the homes of the old type, as a rule, insufficient thermal insulation of the walls, or it is missing at all, therefore the difference between the temperature outside and inside the building can occur. As a result, condensate is formed, humidity increases, and the tenants feel uncomfortable due to constant stuffiness. If it is impossible to disassemble the wall, it is recommended to make thermal insulation of the walls outside or from the inside.
The roof serves not only to protect against rain and cold, but also determines appearance building. Depending on the design, the exterior changes and the "mood" of the house. If there used to be bounce tile designs in fashion, today the "European" direct roofing occurs. They create a stylish and concise image, much easier to operate and can be used as an additional useful Square (we are talking about exploited flat roofing). All information about flat roofs is set forth in the article "".

From state and integrity roofing cake Depends on the microclimate and the preservation of heat indoors. The most common problems of the roofs of old houses include impaired density or damage to the coating, spoiled waterproofing, rotting slinge systemwho has been protested or not at all thermal insulation. If the roof is removed by slate, then, most likely, he discovered from time and humidity.
From practical considerations, the old roof cover should be completely changed to eliminate the possibility of leaks, especially if you bought the house in the summer and do not know what to wait with the onset of the rainy season. The article "" will help you navigate in the situation.
It is absolutely impossible to tell exactly how to repair the old house, since the volume and specificity of work depend on the nature of the damage. In this article, we mentioned the most frequent faults. If you are just going to acquire used real estate outside the city, pay attention to the above moments, especially on the state of the foundation, carriers And the roof, then, perhaps you will be able to avoid expensive overhaul and get rid of "low blood." But the fact that repairs in the old house should be done is an irrefutable fact.
We suggest familiarizing yourself with a small photodoting, which demonstrates how to transform an old house by making it beautiful and cozy.


That's how it looked before the repair ... Wooden rotten frames, closed outside with double film, from cold and wind ... On the left old veranda with a shattered visor porch ...

For those who have to do repair in their home, it seems ...
These were the windows and window sills.

Started the house in order with the foundation.

Alternately reveal the corners of the house, we remove the crisps that rotten logs with chainsaws, put the formwork, put large stones and rubble, lay the reinforcement so that its ends remain open (for subsequent fastening it with the bay foundation), the crown of the crown to wind up and foul in concrete. Finished stand.

And so all four corners of the house and the middle of it, around the perimeter. Total - 8 Tumb. The process is time-consuming, heavy, but the result is worth it ... When it was finished with the couches, we made Zavaling around the perimeter. The continuation of outdoor work was postponed for the next summer. And we took up the internal repair of the house ...
This is a big room and start with it. She looked before repairing like this:

This is its right corner ... And this, in the photo below, the left corner. In the process of writing the topic, I will hold these two corners ...


At first, all the layers of old wallpaper were completely delimited. The windows were still old, but we have already waited for Masters on the installation of plast.
The old stove disassembled ... And the liver folded the new one.


And the result was not forced to wait a long time ... one window decided to close at all and make one big-there will be a dining room.


After installing windows, the men began to disassemble the old floor, align the lags and put the brick courses for them ...

Then the floors were mounted with old boards (they will serve for a very long time, as fat and dry), and in places where they were rotten, replaced with new boards.

Set the metrophrophilic frame for the walls and the ceiling ... My mistake was that you first need to do the ceiling, and then the walls, and not on the contrary. The equipment of these works I found on the expanses of the Internet, I will not stop on it in detail. If you do There will be any questions, I will answer with pleasure that I know ...

On the ceiling, mount the frame is much more complicated, the neck hurts ...

When metal carcars is completely ready, you can sew it to it, it is preferably in a checker, starting from the ceiling! Do not forget to scatter the wiring and hide it in a hafrolanal, for the profile, and the boxes are distributors in a convenient place for you.

In this picture, you see wooden lumps, I screwed them for the subsequent fastening of the bookshelves. Equally the same, only a thorough, fasten under the ceiling above the windows (for fastening the eaves).
When all the walls and ceiling are covered with GLK, we will put off the spatula and align all the joints between the sheets and the screws in the screws of the screws here ...

In the corners and seams, we lay the reinforced mesh for the strength of the compounds, and after everything is dry, sandwiches, we applied to the walls and the ceiling.
And now the most interesting moment-sticking wallpaper. I took vinyl white on the ceiling and with gentle roses on the walls ...

When dried out the wallpaper, I am by mutual consent
invited the brigade of the masters to finish their work in this room through the windows (slopes and window sills).

After that, I stuck the ceiling plinth, hanged the shelves on the wall, put the flowers on the windowsill, which we already installed the guys from the company ...


The carpenter helped put the door interroom, only then I learned that it stands up with my legs ... (what's the difference!) If only I function normally ...

Door loops pasted with a white corner on a liquid nail. FROM right side The oven is new, heels all the rooms immediately.
The firebox itself is in the bathroom ...

On the draft floor put the substrate, then Fiberboard and linoleum. Then the floor plinth screwed up self-drawing and voila-beauty !!!

This is what this big room is ...
Some of you wanted to see more detail about concrete courses, so I added details ... So, the windows layer are inserted, the house will be covered with a flat slate and a packer has been made around the house, until the next summer ...
Now we continue about the outdoor work, after the expiration of the cold winter and spring ... the next summer.
When all the cabinets are ready, gradually, revealing each of the sides of the house from Zavalinka, we remove the rotten birch of the lower crown, dry-wind the waterproofing,

We set the formwork, lay the reinforcement, connecting it with the ends of the armature of the corner tumb and fill with concrete ...


