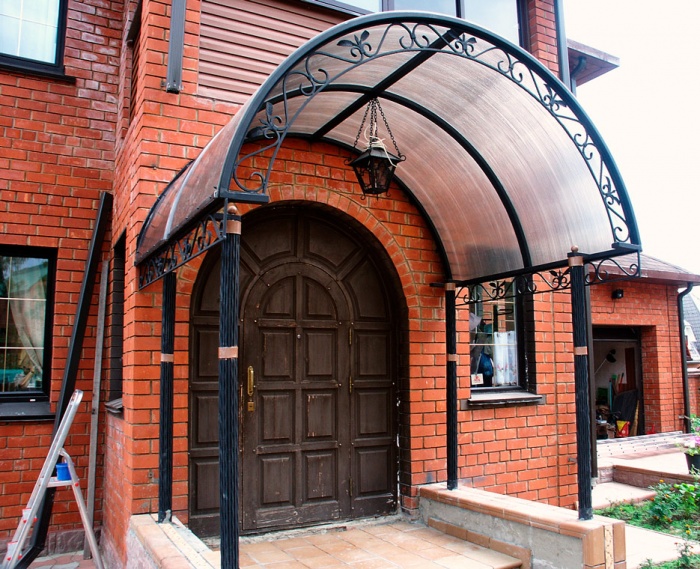
The entrance group is a dominant element of the building facade, so it is important to make a shed above the door. It should not be just aesthetic, but also practically, not to clutter the architectural, harmonize with it and add a highlight to the design of the exterior.
In the article, we will take a review analysis, what are visors and canopies over the entrance, the photo will help to demonstrate the most original and sought-after ideas. Let's tell about the materials and give detailed instructionsHow to make canopies for doors with your own hands.


Sheds Nad. entrance door May have different functionality. Small visors provide a comfortable entrance to the house, protect against precipitation, large and medium structures - can perform the role of a terrace or a small arbor, and sometimes these are large-scale structures connecting the wicket with the entrance to the house and serve as an indoor parking lot for the car.
By the type of support design, the canopy in front of the entrance to the house may be:

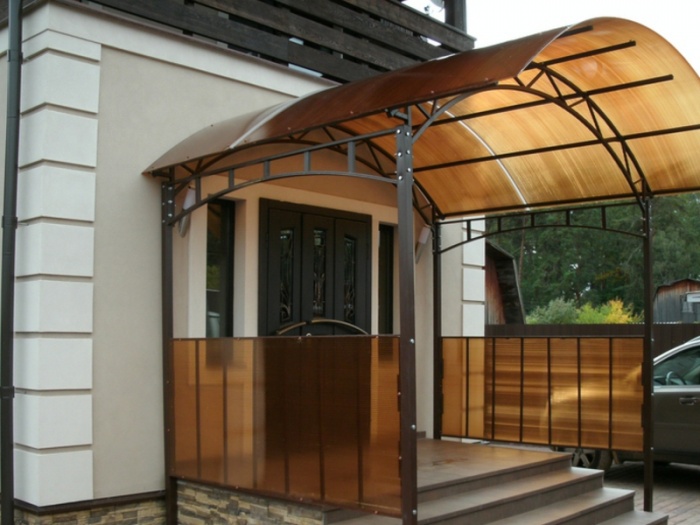
Canopy over the entrance to the house, photo of the reference design
The size of the visor above the entrance is determined by the size of the porch, optimally, if the canopy closes not only the top platform in front of the door, but also the steps. According to standards, the playground must be deeper door canvas one and a half times, if you consider that standard door 900 mm, then the depth of the site in front of it is 900 * 1.5 \u003d 1350 mm, it means that the depth of the canopy should be no less, ideally +300 mm.
So that the rain does not poured the steps on the side, canopy over the entrance door to the house should be wider than the site 200-300 mm on each side. Steps in front of the entrance on average have a width of 800-1200 mm, from here standard width Visor 1200-1800 mm.
Important: In order to properly design the input group, in addition to the sizes, wind and snow load should be taken into account in the region.
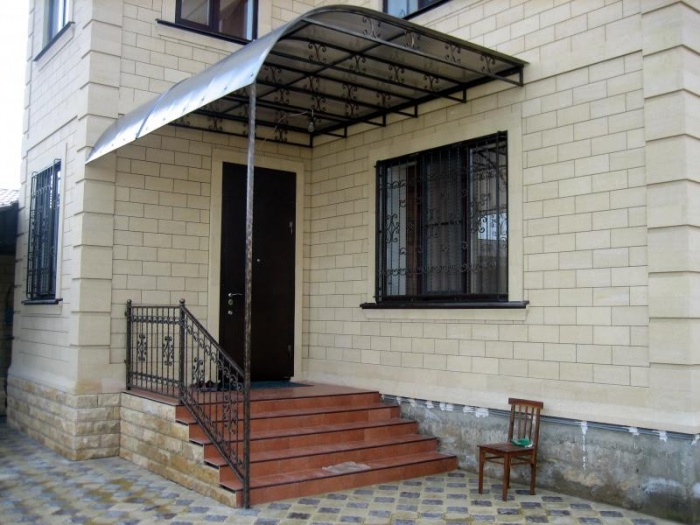
Visors and canopies above the entrance, photo of a practical asymmetric, covered building
Depending on the shape of the roof of the canopy above the door in front of the entrance there are:

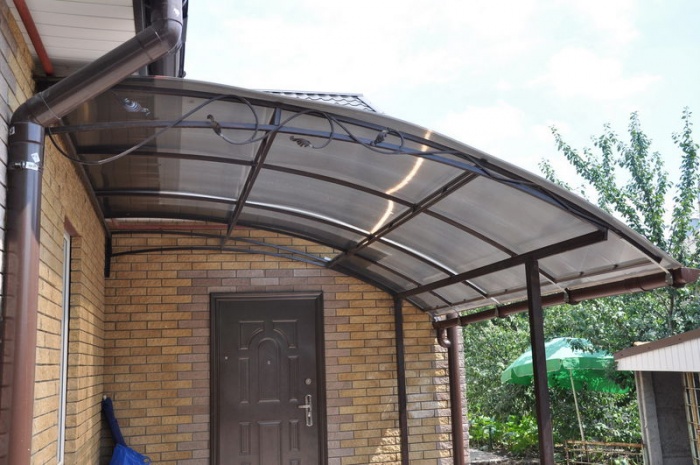
Canopy in front of the entrance to the house, photo of the adhesive design with a bartal roof of polycarbonate

Schemes of canopies above the door with different species rafter system
Sheds above the entrance door should elaborate with a common structure of the structure. The frame for the visor is made of wood, metal, concrete columns are sometimes arranged for large attacks.
For private houses from a log or bar, it is advisable to build a wooden canopy over the entrance. Nothing can compare with beauty and perfection natural material. The frame for small attached visors above the door is made from a bar with a cross section of 40 * 40, 50 * 50, 60 * 60 mm, for the buildings more as a support, the timber 100 * 100, 150 * 150 mm is suitable. Wooden carving, openwork lattices, curly balasins will help to decorate a canopy over the entrance door.
The tree is easily processed by household instruments, no professional skills are required for work. But wooden farms poorly tolerate the negative impact of the environment, humidity, fungi and small insects are reduced to no aesthetics of the construction, and over time they destroy it.
Tip: To extend the service life, wooden canopies above the entrance door must be treated with antiseptics and fire-resistant impregnations, the protective finishing layer must be durable and moisture-resistant, but vapor-permeable, nicely suitable varnishes and colored oil.
Stylish wooden single-table construction from a bar and cutting board above the door
Metal canopies above the door - the largest and most sought-after group of structures:

A glass visor above the door is almost invisible on the facade

The finished visor over the door from forged stamping will cost $ 200-300
Metal canopies - a universal view of buildings over the entrance door, suitable for private cottages from different materialsand for commercial buildings.
There is not only metal and wooden door canopies, the types of visors are numerous, for example, marquises, stationary and retractable - these are prefabricated aluminum or steel structures With a tent roof. To large houses above the door often make capital extension on concrete, stone, brick columns Under the massive roof.

Combined construction above the door - columns and marquise are successfully combined with each other and make space in front of the house more functional
The most popular group - visors and canopies above the entrance from polycarbonate, the material is lightweight, practical, durable, well tolerate chemical biological and mechanical loads. Huge color palette Allows you to choose a panel with different translucentness, so such structures are relevant both on the solar side of the building and in the shade.

The roof of the milk polycarbonate, which is considered the best protection from the Sun
The roof of galvanized iron and the proflist is inexpensive, reliably, beautiful. Suitable for frames from different materials, the color range allows you to choose sheets under the color of the roof of the main building. The protective coating is durable, but over time burns into the sun, and with the slightest damage to the sheets affects rust.

Double-sided Galvanized Iron Roof
The soft roof and metal tile is relevant for wooden visors and large buildings in front of the house, but sometimes used for metal frames. Under such roof, a solid doomle is required - moisture-resistant plywood, and it is visible from below, so it will be necessary to rinse the ceiling.
At the cottage, visors above the door can be covered with rubberoid, slate, special dranco and even straw, the main thing is that the stylistics of the building correspond to the house.
Visors and canopies above the entrance do it yourself better to build from wood or metal. We will make a simple single carport over the door from profile pipe, with a rebier 40 * 40 mm. The slope of the roof is 20 o, roofing - polycarbonate.

Scheme with sizes of a simple canopy over the entrance door
Cut a profile in size and cook metal carcass According to the scheme, as in the photo above. From the profile 20 * 40 mm we weld the crate to the roofing material. For the decoration of the sides and the front, we will weld standard forged parts that can be bought in a construction store.

Forging will decorate even the simplest product
When the basis is ready, we clean it with abrasive, rinse with solvent, soil and paint.
Installing a frame over the entrance is performed on a long anchor. By contour, evenly at a distance of 300 mm we make holes, and fix the mount. Tin skews so that all metal parts are protected from atmospheric influences. We drag the crate with polycarbonate with a thickness of 6 mm, fastened on the thermoshaba, the external ends are closed by a special profile.
Be sure to look at the learning video, how to make a roof over the front door of the finished brackets.
In our gallery you will find a lot original ideasHow to issue an entrance group with your own hands inexpensively and beautiful.
Canopy over the front door of polycarbonate or simply "visor" performs two main functions:
The material for the roof, as a rule, use wood, metal, glass, PVC, etc., but the most popular remains polycarbonate.
Plastic visor has a number of benefits:
The panels made from the material of the first type are hollow two-layer sheets that are filled with longitudinal jumpers. As a rule, it is this type that is used in the manufacture of canopies, visors, greenhouses and other construction.
The advantage of monolithic polycarbonate is its exceptional strength. Polymer plastic sheets are transparent and reminded glass, but are able to withstand the load 200 times large. In this case, the weight of the design will be twice as much.


The shape of a visor from polycarbonate primarily depends on the number of skates:
The most common shapes of canopies for the entrance group:
With certain skills and skills you can easily. To make the simplest visor located above the entrance door, you will need the following materials and tools:
If the front canopy racks are relying on the ground, then you need to dig two pits, the depth of which is 1-1.5 m. The distance between the pitches of no more than 2 meters. It should be borne in mind that the width of the canopy should be greater than the door width over which it is constructed by about 60 cm (30 cm on both sides). Supports are inserted into the pits and concrete.
The distance between the frames of the frame is selected according to what the snow load for this region will be. It is also necessary to take into account the manufacturer's recommendations.
According to selected distances on the bearing beams, brackets are attached. In the pipes, the arches are drilled by holes with which they are fixed on the brackets. Must happen the design shown in the photo.

After the frame for the visor is ready, it is necessary to cut blanks from the polycarbonate sheet according to the size of the roof of the canopy. Plastic panels Fixed upper presser aluminum lid.
It is also important to choose the desired sheet thickness: too thin polycarbonate can be deformed under load, and too thick will make the entire design too heavy. It is recommended to use sheets with a thickness of 6 - 8 mm.

If you install polycarbonate with your own hands, do not remove the packaging. This will protect the material from possible damage. Packaging is removed only after the canopy is fully installed.
On the edges of plastic sheets, an end profile is installed, which will ensure its waterproofing and prevents mechanical damage to the edges. If this is not done, then dust and dirt, falling inside the cellular polycarbonate, reduce its lighting properties. Water, freezing inside the sheet, gradually destroys it.
The resulting canopy one side is attached to the facade of the building, and the other - to the racks. The mount is made using metal brackets or welding.
Homemade visor above the door or balcony, this is not a standard design, regulated by SNIP or GOST, and the element with unlimited possibilities For design. Of course, the initial and main goal of such a canopy is protection against precipitation and to some extent from sunlight, but for the exterior it is one of the most important elements. Due to the fact that various materials can be used for a visor, it is possible to change not only its appearance, but also cost.
When designing, it should be borne in mind that a visor over the entrance door or a balcony, it is not a carport for the car, therefore, its size is much smaller. That is, above the entrance door it will overlap only the porch or its upper part, and above the balcony - only the protruding plate or several centimeters further.
Steel profile, Wire and polycarbonate design

Without a perforator when installing can not do
Since the canopy above the door or balcony is made from different materials, then the installation tool is also somewhat different, although not essential. From the list below, you can choose what is more suitable for one or another option:

Polycarbonate visor drawing
All kinds of visors above the entrance door or a balcony are divided into two main types - straight and bent. The choice of material for the roof and supporting structure depends on this factor:
queue, you need to understand the principle of its attachment. When this side of the question becomes clear, then you can design the carrier frame for a direct or bent coating, as well as choose the roofing material.

Polycarbonate canopy mockup

The simplest construction of the carrier frame
In the drawing, the above is shown the simplest basic structure For a canopy, but, thanks to her, it can be sought with a way of fastening. Anchors into the wall are screwed through the rear horizontal bar and the rear vertical sidewall profile. As a rule, two anchors need for horizontally, and for verticals - one by one.
For fasteners, select spacer dowels from plastic, but in no case molly (umbrella) be it plastic or metal. Length here depends on the thickness of the profile and the density of the wall (plaster), but in most cases 150 mm is quite enough for reliable fixation. For the porch there is enough four fasteners, but for the balcony horizontally, they should be made after 50-60 cm.
Before talking about how to make a visor on a balcony or porch, you should choose the most suitable form of design. The configuration here is defined not only by the design of the exterior, but also by technical capabilities.
For example, when a small distance between the door and the roof is a small distance (30-40 cm), then the frame in the form of a dome or half a century is simply not placed in size, and nothing will do with it.

Possible configurations of Karkasov
If you collect a frame from a metal profile, then the compounds should be made by electrical welding - the design is discernted, but this is not necessary. When there is a need to cook a canopy for a balcony, it will have to do directly at the place of installation, which can cause some inconvenience due to lack free space for work. It will have to put up with this - raise the finished assembly to the floor much more difficult.
To make a straight design, enough welding machine and Bulgarian - according to a predetermined drawing or sketch cut profiles and weld into the frame. To compile such a plan, it is not necessary to be a drawer at all - you just need to measure the length and width of the porch (balcony), and then, relying on this data, make sketch on the paper sheet.

To bending a profiled pipe will be needed sand.
In order to make a visor over the entrance door or a balcony rounded, such as arch, dome or "marquise", it is necessary to encourage some of the tubular profiles, which is not completely simple. The complexity here lies in the fact that the bend should be done with a certain radius, and in addition, it must be symmetrical to other elements. For such a directional deformation, two things are used - river sand and pipe bender (manual or electric).
Such machines cost a lot, especially with an electric drive, so it makes no sense for the manufacture of one design to buy them - the tool is better to rent. If working on manual machine, despite the lever, there must be considerable physical efforts, so the processed profile is best warmed. It is more convenient to make it gas welding, but most often it is not available, so the heating is produced in the usual bonfire.

Manual pipe bending machine with set of nozzles
A round or profiled tube during processing of this type can bend asymmetrically, even in the heated state, which will spoil the appearance of the finished design - this is due to the difference in the thickness of the walls (factory marriage). To avoid unpredictable defects, river sand fall inside the profile and shuffle its ends - sand creates density in emptiness and the bending passes smoothly, only under the pressure of roller nozzles.
As a rule, for frames, cheaper suture material is used - but if you install the profile in the machine rollers not the same side, then this seam can disperse. Therefore, when disinfecting a round or profiled tube, install it so that the seam is from the inside of the circle. So the connection will experience a smaller load, and the probability of the discrepancy of the joint is practically reduced to zero.

Polycarbonate canopy over a balcony
At the top photo of the visor over the inlet door of the cuned type balcony - here you should pay attention to the grinding of arc profiles that support polycarbonate. If we talk about the general capabilities of pipe bending machines, then with their help you can make a turn by 30-179ᵒ, that is, almost unfold in reverse side. But should not be abused - too cool turn, most likely, will cause the discrepancy of the seam on the profile, even if you fill with sand and warm up.
For each manual or electric machine, the manufacturer included a set of nozzles in the package, thanks to which you can select the desired angle. Therefore, if you need to symmetrically bend a few profiles, then this uses one specific nozzle. On frame samples (examples are in the section "The design of the carrier frame with its own characteristics") radii and length of pipes exactly coincide with each other.

Semi arched visor design over the entrance
It is quite natural that figure visors from polycarbonate above the door, as in the photo above, are more complex when assembling, but, both in direct and curved structures, the coating is attached equally - screws. To fix other roofing materials, slate nails, self-tapping screws or with a press washer (with a rubber seal without it), bolts with nuts and aluminum rivets can be used.

Multicolored self-tapping screws for professional flooring
Fasteners are chosen according to roofing materialFor example, special self-tapping screws with multi-colored heads are sold for professional flooring and metal tiles - they are selected in the color of the roof. But if color polycarbonate is used for a canopy, then in this case it is also advisable to use one-picture screws, and since they are not specifically produced for PCs, you can use fasteners intended for a profile.
In the case of installation of transparent visors from polycarbonate over the front door, as in the photo below, you can use white screws with a press washer, but they are without rubber gasket - it is better to add it separately. These screws, but already without rubber, well fix galvanized tin - sheet and corrugated. Slate is needed slate nails with an aluminum washer to compensate for thermal deformation, or screws with a rubberized press washer.

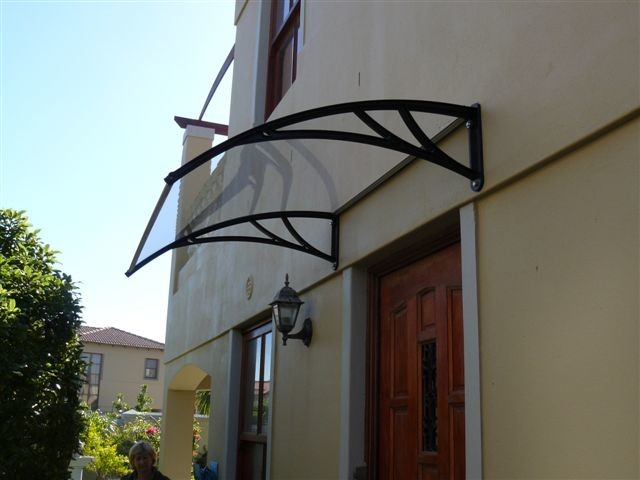
Direct transparent visor from PC
It should be borne in mind that the wooden carrier design is designed only for direct roof, but it costs much cheaper. In the event that a wooden profile is involved, it should be treated with an antiseptic before painting work.
Taking the photo of the visors above the door and balcony, will not be difficult to find your design version. When choosing, it is important to take into account the architecture of the house, the roofing material of the main roof, the facade finish, and if it comes to the balcony - then the style of the whole building.

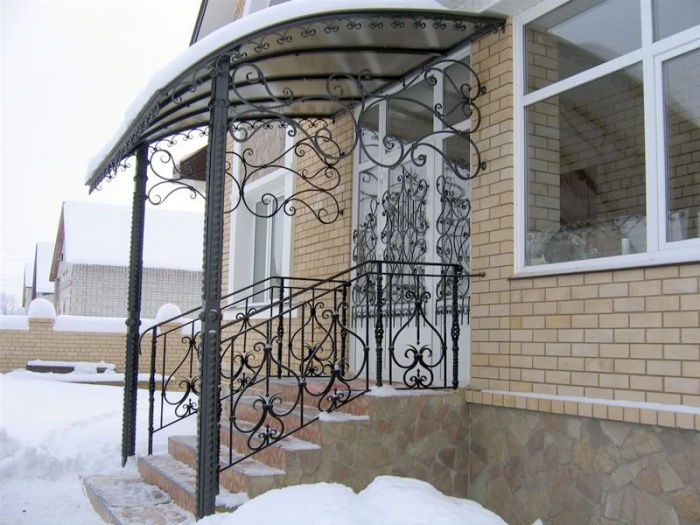
Forging - Eternal Classic

Mini-canopy over the entrance door

Option for wooden house

Balcony in a private house


Metal design

Design B. modern style


Stylish minimalism
Of course, a professional who knows how to make a visor over a door or a balcony from any material, will cope with the work better and faster. If the goal of saving is not worth it, it is better to immediately contact the masters.
We all know well that the theater begins in the hanger (wardrobe), but in a private house this function is performed by a visor. With this classic element, you can not just protect the entrance to the house, but also give your country mansion a beautiful and original look.
The photo presents an option to design a porch. A canopy over the entrance door (in the photo) to make not only professional engineers, but also beginner builders.
Tip! Before proceeding with the structure of the porch, consider which materials it is better to use, so as not to break the style design of the entire structure.
As it should look modern canopy Above the porch of a private house? The design option depends on the taste preferences of the house owner, as well as on which material was used in the construction of the building.
In any case, the porch must have such a canopy that would protect it from negative impact natural conditions (rain, snow, hail). The stylish and durable visor, offered in the photo, will be a genuine decoration of the porch. How to choose the materials for him?
Attention! For visor, only durable and practical materials are suitable. Special attention is paid to their continuous operational service life.
In order to make a high-quality and reliable canopy for the porch, you need to act on a clear plan.
First step. First you need to choose the material from which you will create a canopy for the porch.

Tip! Preferences give to those materials that are not subject to corrosion. A good option will be aluminum alloys. Of these, you can create a design for a canopy.
There are many roofing materials on the modern building market, you only need to carefully read their main technical specifications to find perfect option For the design of your entrance to the house.
If you decide to use polycarbonate visor to cover, keep in mind that it will be inappropriate for a wooden house. Polycarbonate is perfectly combined with a metal frame, it is suitable for brick and block structures. The demand for this material is explained by its excellent performance, as well as excellent appearance.
Among positive properties Such modern material, as polycarbonate, you can mention its plasticity. Exactly this physical property Allows you to create visors from polycarbonate for the porch of any geometric shape. Note high strength this material to mechanical shocks. If a polycarbonate canopy is made above the porch, the material will endure heavy rain, hail, abundant snowfall.
Special attention will be paid to the wonderful fire resistance of polycarbonate. Despite such a number of advantages, there are polycarbonate and certain disadvantages. The material does not withstand ultraviolet irradiation.

If the coating does not have a protective layer, then two years after the start of operation, the polycarbonate will become muddy, all the initial aesthetic characteristics of this roofing material are lost.
Metal use as roofing It is considered acceptable (budget) option. But for working with roofing metal, certain skills will be required. Among the advantages of this type of finishes, we allocate a long operational period, reliability. But metal sheets selected as a roof will require additional protection against corrosion.
Tip! Purchase alloys visor to design with anti-corrosion characteristics.

A distinctive feature of such roofing surface is a unique appearance. The visor from metal tile will have an unlimited service life. Its installation is completely able to fulfill even those who have no needed construction skills.
List of positive characteristics of metal tiles supplement and simple care for the finished coating. This material harmoniously fits into any design selected to decorate the porch. Are there any shortcomings of this roofing material? The main mines of the tiles are the lack of noise insulation. All rain sounds will be clearly audible on the porch. With increasing air temperature, there is a significant heating of metal tiles.

Working with these common roofing material is much easier than with metal tile. His demand can be explained by acceptable cost, ease of installation. The finished design has an aesthetic appearance, does not require additional painting. The main disadvantage of this roofing is the lack of resistance to mechanical damage.

The second step. After you decide on the source materials, you can move to the following action, think over the design option, and also select the shape of a visor for the porch. In order to solve such a complex task, you can contact a professional designer. Interesting options Visrats are presented in the video fragment
What parameters will affect the design option? First of all it is important to decide on the installation method. For example, if your plans include the creation of a massive design, it will be necessary for its additional strengthening metal pipes or wooden beams. Suspended design It does not need such a support, you can restrict ourselves to the fixation of the frame on the wall.

Selecting the overall stylistics of this decorative and protective element, it is important to take into account the shape of the canopy used.
The simplest is considered flat option. It is an open visor, which is capable of protecting the porch only from vertical threads of rain and snow. Considering that mainly snow and rain are always associated with wind gusts, such a design can be considered as a decorative element.
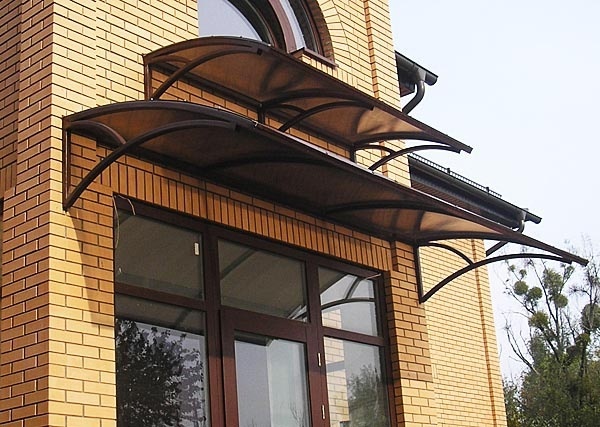
More complex will be the installation of a double visor. With it, you can protect the entrance to the house from the shower and the PURGI, strong gusts of the wind. To create such a design, you can choose any materials with corrosion resistance.

Three-tight canopies are suitable for metal frames, they are considered the most reliable and efficient professionals.
In order to give the porch a beautiful appearance, you can use artistic forging. A similar technique gives the product an additional ease, turns the porch into a real work of art. Exclusive forged canopies and visors have a presentable appearance, so all material and physical efforts spent on the construction of such a design will be fully rewarded.
Whatever material is chosen by designers to design the entrance to the house, in addition to aesthetic characteristics, its durability and reliability is paid special attention.

Currently, considerable attention is paid not only to the inner design of the premises, but also decorating the entrance to the house. Selecting the option for a visor or a canopy, be sure to think whether the option you like to be combined with the house. If K. wooden house Make a metal entrance, the impression of the created image will be hopelessly spoiled.
With the need to build a canopy over the porch often face owners of private houses. The species and modifications of this architectural detail are very much - from elegant visors above the entrance to the house to the spacious indoor terrace along the entire facade. Build an independently simple design for even a novice builder. The main thing is to choose the right materials and drawing, and also securely attach the construction to the house so that it does not collapse under the weight of snow in the winter.
Canopy protects the porch from snow and rain and serves as a harmonious facade decoration
Although these two designs are very similar, there are still some technical differences. If vertical beams are usually installed for canopy, the visor is attached directly to the wall of the house. Therefore, you need to pay attention not only to the form and materials of the extension itself, but also on what the main building is built and whether it is possible to securely attach the frame to the wall or need additional supports.

Visor over the entrance door
It is worth considering where it is planned to place an extension, and what is more important for you - aesthetics or functionality. After all, a beautiful and elegant forged visor can look inappropriate over the entrance to the Hozblock, and the bulky wooden canopy will spoil the exterior of the front entrance to the house. Also, when planning, check in advance whether the selected design sizes correspond and is there an affordable place for construction.

Single supports become a harmonious detail of the exterior of the house
In the question of how to make a canopy over the porch, the first thing, with which it will have to determine what material the framework will be made and what to use for the roof. In house construction for the frame most often take wooden bar. and metal pipes or profile, but each of the options has its pros and cons:

Drawing of a metal canopy with polycarbonate roof
Polycarbonate, roofing iron, metal tile, professional flooring, ondulin, slate, glass - almost any available material are suitable for roof. Often in home construction for the visor over the porch use the remnants of the material that the roof was overlapped. It is worth considering that the weight of the entire structure depends on the roofing material, and hence the fastening method.
Tree is one of the most affordable building materials. In addition, it is easy to work, and with the proper processing, the design of wooden bars can become a real decoration of the house. Therefore, it is not surprising that many owners who have decided to establish a visor over the porch independently choose the wood for construction.

Tree - Available Material for Construction
Before making your own hands, make a canopy over the porch of the tree, you must prepare the drawing and correctly calculate all the dimensions of the details. It is very important to test all the corners and the length of the beam in advance, since in the process of construction, even a minor error will lead to a strong distortion.
The extension dimensions are calculated individually. The height of the structure should be sufficient so that the adult can stand on the porch, without being flexing. The corner of the roof skate must be within 25-35 °. When calculating the length and width of the structure, it is worth focusing on the size of the porch - you can add to the initial dimensions of 50-60 cm on the sides and the free edge.
Council. To clarify the sizes of the canopy, you can decompose the slate or professional flooring on Earth, taking into account the adolescents and measure the resulting rectangle. This will be the sizes of the roof of an extension.

Approximate carport drawing with supports
For the construction of a canopy over the porch, it is necessary to prepare the following materials:
Before attaching a carport to the house, you need to clear the place for construction, note the installation sites of the supports and handle the wooden parts for protection against moisture and rotting.
Installation of the support beam on the wall above the porch:
Installation of vertical supports:
Council. In order for the snow to be delayed on the roof of the canopy, experts recommend to calculate the height of the free edge using the formula - 10 cm on each meter of length. That is, if the length of the porch is 2 m, then the height of the structure should be 20 cm above the free edge.

Supporting beam with brackets for rafters
Installation of crates:

The rafters are attached by U-shaped brackets
Laying roofing material:

Ready wooden canopy with supports
Another option, how to make a canopy over the porch with your own hands - build a wooden visor. A small design is easily assembled independently and then fasten over the porch on the wall. Such visors can be the most diverse form - single-sided, arched, duplex, curly. But for a novice wizard, it is better to stop your choice on a simple single-sided frame.

Single wooden visor
Before starting construction, it is necessary to calculate the sizes of all parts. The width of the facade should be 50 cm larger than the width of the porch, and the length of the slope is at least 70 cm. For consoles, it will take a wooden bar with a cross-section of 75x75 mm, the racks of the thread - 40-50 mm will be suitable for the crate. The angle of the shock is better to do about 30 °. All items before assembly must be treated with oil or paint.
The console of such a frame consists of three bars:

Wood visor
Rear supporting timber is attached to the ends of vertical bars. For fastening the crates, you can choose in the slots of the groove or simply cut off at the desired angle ends of the rivers and fasten with screws on top to the rafters. It is possible to block such a canopy with a slate, galvanized iron, professional flooring or onnulin. To reduce the noise from the rain under the roofing material, it is recommended to packeroid or mineral wool.
Anchor bolts are used to attach a wooden visor to the wall. It is worth considering that the fasteners should be at least 2/3 of their length to enter the wall - then the canopy will not go away from the wall and will be securely fixed on the facade. For durable fixation, it is better to attach not only the console to the wall, but also the top reference crossing of the crate.
Polycarbonate designs are highlighted not only by beauty. It is strong, reliable and durable structures, collectively assembled even in highly angry builders. Therefore, it is not surprising that many owners of private houses want to install a canopy over the porch of polycarbonate instead of an old wooden visor.

Polycarbonate is well suited for the manufacture of visors and canopies
To mount with your own hands canopy from polycarbonate, materials and equipment will be required:

Simple Console Type Spectacle Scheme
The dimensions of the visor from polycarbonate should not be highly large, it is enough if the roof will perform on each side of the porch by 25-30 cm. Polycarbonate for the arched canopy is better to take a cellular, from 6 mm thick. Monolithic polycarbonate More suitable for straight designs. The size of the polycarbonate sheet is calculated on the skeleton dimensions - the roofing material should perform from the side of the sides by 10-15, by the free edge - by 20 cm.
Independently make a visor from polycarbonate on a metal frame easy. The main thing - to have necessary equipment and experience with welding. The frame is going on Earth and is then attached over the porch.

Approximate drawing for the arched canopy under polycarbonate

Ready metal frame for canopy
Before heating the frame with roofing material, it is necessary to determine how to attach a canopy to the wall of the house. If you plan to use anchor, then on the supports of the consoles and the closed arc, you must drill holes for the bolts, attach the frame to the facade, mark the place of attachment on the wall, and then drill the wall to the labels.
For mounting brackets on the facade, the location of the canopy mark the brackets and the framework is fixed on them.
Last bar remains - Polycarbonate. This material is well bended, it is easy to attach it yourself. Polycarbonate fasten to extreme and central crossing screws with thermoshaba. Experts recommend holes for the screws to do 5 mm more than the diameter of the fastener - it will be possible to avoid breaks and deformation of the visor.

Polycarbonate fastening scheme
Information on how to build a canopy over the porch will be incomplete if you do not consider the installation of the design to the wall of the house. From right fastening The frame of the wall depends on the reliability of the extension itself and its life. Several options:

Fastening scheme wooden shed To the wall to facing work
With built-in fittings, everything is simple - the segments of the steel pipe or rods are laid in the wall during the construction of the house, and the framework is welded to them. But other options need to be considered in more detail, as it is precisely them most often used for lungs over the porch. The figures below shows how to fasten the canopies directly to the wall of the house already built.

Fastening rafted a canopy brackets and on the beam
The figure (B) shows how rafters attached to the braces to the support beam fixed on the wall with long anchor bolts. In fig. (a) A U-shaped bracket is depicted, such used for light canopies. Figure (b) is a mounting scheme of a rafted in the pizes of the support beam (1 - the supporting beam, 2 - the shed rafyled, 3 is an anchor bolt, 4 grooves of the support beam, 5 and 6 options for fixing rafters with a pin and nail).
Important! If the length of the canopy exceeds 2 m or there is no confidence that the wall will endure the weight of the roof, then the pillars are required under the supporting beam.

The rafters are fixed to the wall brackets
Examples are considered above. simple canopies. But such structures can be more comprehensive. The photo shows that the design of canopies in the yard depends on their purpose - for economic purposes (storage of firewood, hay) is chosen simple formsBut for recreation and decor, the most real works of art are erected.

The visor over the porch is not only the protection of the entrance door from the weather. This is also a decorative element, underlining the architectural style of the whole building. Elegant and massive, metal and wooden, plastic and forged - the design of canopies in a private house in the photo is diverse and depends only from the fancy of the master.
As you can see, make it over the porch with your own hands, even inexperienced master. But if you are not sure own power Or you need an exclusive visor option, it is always possible to contact professionals who not only develop a project specifically for you, but also help with installing a ready-made canopy.


