Everyone is used to storing a wide variety of things on the balcony, which it’s a pity to throw away, and you can’t leave in the apartment. But so that the balcony does not look like the Plyushkin house, it is best to make a closet on the balcony with your own hands, so that you always have the opportunity to beautifully arrange things. Making a cabinet is actually not difficult, you just need to buy the material and have a minimum of tools. And at the same time, if you do everything yourself, you will not only save money, but also make a cabinet that will ideally suit you in terms of its functionality.

If you decide to make a wardrobe on the balcony with your own hands, then you need to start work with the drawings. You can find drawings in open sources, but it's best to draw them yourself, depending on what kind of material you want to use. In addition, size and location play a role, as everyone has their own balcony and their own needs.
If you do not have this experience, then you can take the drawing that suits you best and simply change the dimensions in it. Please note that for a corner cabinet on a balcony, the drawings will differ significantly from simple option, so be careful not to mix up the sizes.

When the drawings are ready, you need to calculate the amount of material that you will need to make a wardrobe for the balcony. It is better to buy materials with a small margin, so that later you do not have to go to the store again. In addition, remember that on the balcony or loggia always high humidity and temperature changes, so the material must effectively resist their effects, or it must be additionally protected. If you make furniture from lining with your own hands, then after the work is finished you need to additionally protect it with antiseptic impregnations and varnish. Therefore, they should also be added to the shopping list.
To make a wooden wardrobe on the balcony, you do not need a lot of tools. You must have only the simplest tool available. In most cases, if desired, you can do without hand tool, except for a drill, which is needed to drill holes and tighten screws.
How to make a beautiful wardrobe on the balcony with your own hands, you can learn from our article, as well as see detailed photos.
We have selected a budget and convenient option that anyone can handle.
Of course, you can make a rack without doors, it will be cheaper, but still much more neat and aesthetically pleasing when everything is closed.
In contact with
classmates

Cabinets are of two types:
A free-standing cabinet (not built-in) is assembled in parts and does not take up all the space, since its size does not match the wall height, width, etc.
Built-in wardrobes are much more convenient. They use space more rationally, and less material will be spent on them, since it is not spent on invisible walls.
Such a wardrobe will ideally fit into the place of your choice, as it is created individually. But in the future it will not be possible to move it to another place if desired.
The main materials for cabinets are:
In addition, the tree is heavy, which makes the structure more bulky and heavy. It is also necessary to take into account the humidity, because if moisture enters it, it can be deformed..
To take into account all the nuances, you need to draw an approximate drawing. In it, calculate all dimensions and think over details, such as shelves and doors. When calculating the dimensions, the thickness of the materials should also be taken into account.

After you have drawn an exact sketch, match it in size with a balcony. If everything fits, then mark with a pencil the approximate placement of the design details.
Pro tip: due to temperature changes, the cabinet can be deformed, so it is better if the balcony is glazed.
It is not necessary to level the floor, since it will also be the bottom of the cabinet, so stability does not depend on this. But the walls will have to be leveled, as shelves will be attached to them.

First of all, install the rails. They can be:
There is no difference as such, in both cases you must first outline their location, and then fix them with screws. Next, we proceed to the suspensions and attaching vertical profiles to them.
If your material is drywall, then all installed components should be carefully fixed to increase strength.
Note: the frame should be assembled from the wall to the corners.
This step is very simple. All you have to do is attach the drywall sheets to the frame and install a coupler that will hold the sheets together and prevent them from moving apart when using the cabinet.

Best fit water-based paint, it is first necessary to prime the surface and seal all joints and gaps.
Putty is applied in two layers. Each layer must dry completely and be properly sanded. The paint is applied after the complete drying of two layers of putty.
If there is no desire to bother with paint, then there is an option to simply paste over with wallpaper that matches the general interior of the loggia or balcony. This is a fairly budget option.
After doing all these steps, you can safely install shelves finished to match the closet.
The most practical option is sliding doors. All that is needed for their installation is to fix the hangers with guides and the drywall sheets themselves with rollers, thanks to which the door will move apart.

Also an excellent material for self-manufacturing closet on the balcony can become . The most durable and reliable material is wooden lining. It is not recommended to take a lining of lower quality, as it is not quite suitable for sheathing.
A lining cabinet is made in almost the same way as it is made of wood or drywall. The inner wall can be made of fiberboard, which will increase the service life by increasing moisture resistance.
If the cabinet is built-in, then lining with clapboard consists only in installing doors. In this case, the material should not be heavy.

Also, as an option, you can consider a cabinet located in the corner. Its undoubted advantage is that the cost of the materials spent on it will be lower, and there will be more space on the balcony or loggia.
Please help us make the site better! Leave a message and your contacts in the comments - we will contact you and together we will make the publication better!
It is necessary to have a kind of storage “for any junk” in the apartment. This is not a debatable issue. But in the mezzanine, if there is one, because of its modest size, much will not fit. Yes, and in the garage, albeit located next to the house, you don’t run into every little thing. It is somehow customary for us to use a balcony as a mini-warehouse - it is convenient and not expensive. But in order not to turn it into a banal dump, installing a closet on it is a completely rational solution to the problem.
Buying is not a fact that it will be possible to find a suitable size. Order - will be quite expensive; In addition, the finished product may not be to your liking. For someone who knows how to hold a hacksaw, hammer and use household tools, best option- make a closet on the balcony or loggia with your own hands. There is nothing difficult in this. And if everything is carefully thought out and "put your soul" into the work, it will turn out cheap and beautiful.
If the balcony is “open”, then it is hardly worth making a wardrobe on it without preliminary glazing. Someone may have a different opinion, but the author considers it necessary to express his own.
Firstly, the influence of the atmosphere (changes in temperature, humidity), direct contact with water (precipitation) and ultraviolet light will lead to structural changes in wood. Simply put - the cabinet will “lead” pretty soon. As a result - problems with drawers, skewed doors and a number of others.
Secondly, in such conditions, what will be in the closet will not last long. The fabric will rot, the metal will rust. Consequently, such storage loses its meaning - it is easier to immediately landfill.
Thirdly, on an unglazed balcony, the cabinet is unlikely to look spectacular from the outside, especially since its rear part (rear wall) cannot be constantly put in order without disassembling the structure.
Before proceeding with the presentation of instructions for making a cabinet, you should figure out which options you can implement with your own hands. Considering that home master is not a professional in this matter, but only a household tool. And already based on the chosen model, focusing on the dimensions of the balcony, it is easy to determine the dimensions of the "furniture".
Model sectional composite. How many compartments there will be depends on their desired capacity and dimensions of the future cabinet. This option makes it possible to combine with the cell sizes in each pencil case.For example, if a long one is not filled with anything at all (left empty), then for the summer you can put children's sleds, clubs and other Sports Equipment. And for the winter - a bicycle. Not a bad solution, and you won't have to constantly stumble over all this in narrow hallway apartments.

For example, the same racks that are also battens of the crate. Well, how to divide it into compartments is easy to solve. Or as indicated above, or choose your own, more original version.

You can also experiment here. For example, divide the cabinet into levels, and install shelves in each compartment so that you get “cells” of different capacities - for overall things, jars of pickles / jams, some household (household) stuff and so on. The specific solution will prompt your own imagination.

As an option - a modification of the wardrobe, corner, in which door leafs move apart easily. But making it is much more difficult.
There are enough models of cabinets on the balcony, besides, these are just tips. The main thing is that there is something to focus on, and coming up with your own scheme, determining the required dimensions of all structural elements is not so difficult. In principle, for storing property that is not constantly needed in the apartment, shelves, racks, and so on are also suitable. The fact that it will turn out cheap is undoubted, but whether it’s beautiful or not, opinions differ here.
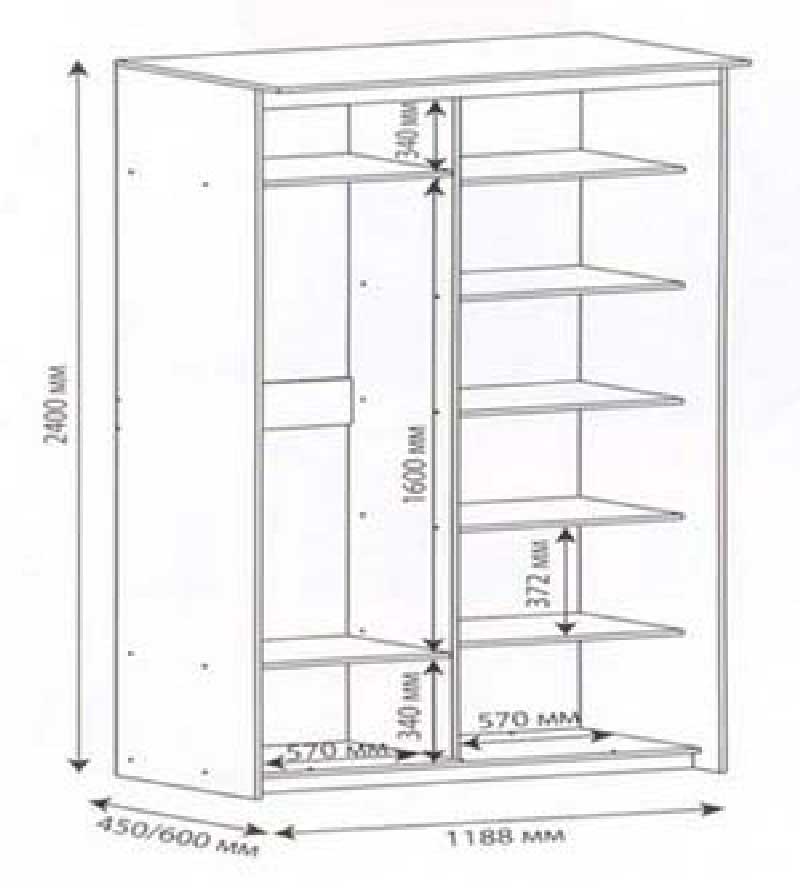
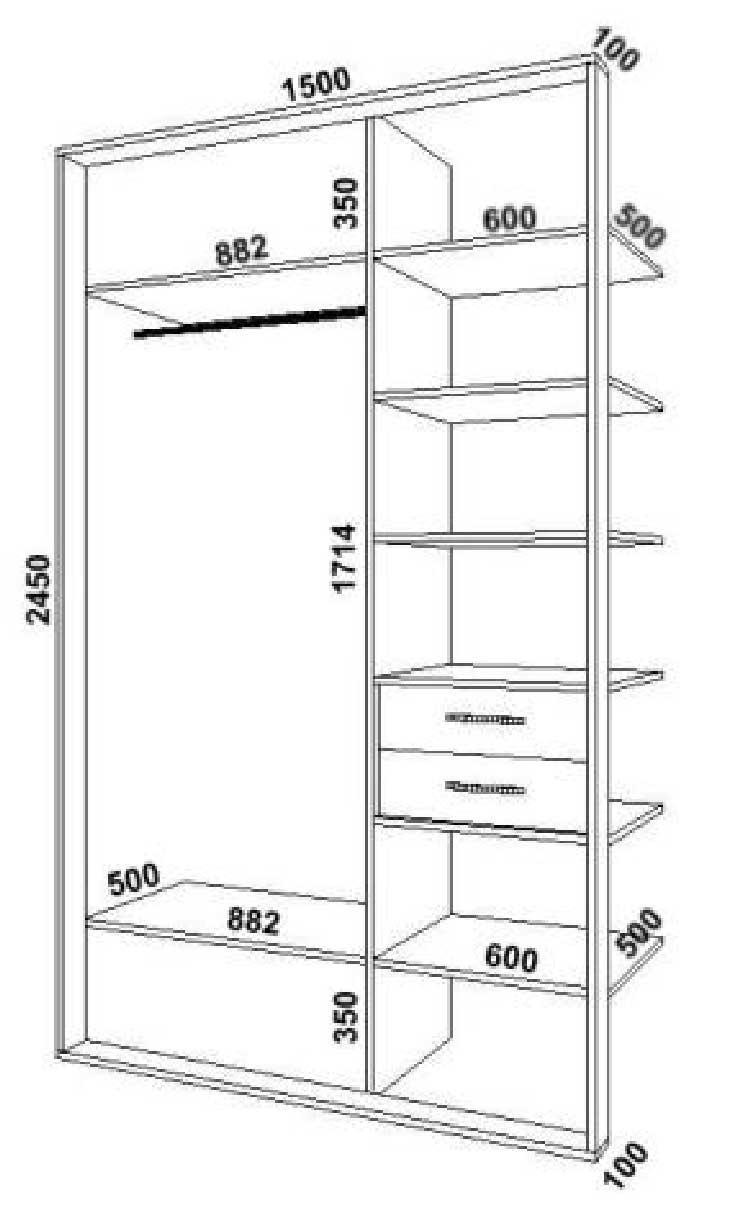
Examples of drawings and sketches of cabinets that can be placed on a typical balcony will help in self-design.

It is worth dwelling on such a nuance as to what the cabinet should be - stationary or mobile (mobile). With your own hands, the first option is much easier to do. And not so much on the balcony free space to regularly rearrange the furniture on it. Therefore, it is advisable to mount a rigidly fixed structure.
A section of 4 x 4 is enough. Recommendations for using a metal profile (although it is easier to work with it) are not entirely correct. A balcony, even a well-insulated one, is, first of all, dampness and temperature changes. Therefore, all materials must be selected according to the coefficient of expansion. The combination of wood + metal in a balcony is not the best solution. Such a design will definitely “lead”.

The question is no less important. Firstly, not every wood or sample based on it (sheet, slab) is easy to cut and process with your own hands. Secondly, the durability of the cabinet is also important, since not every material has a long service life when used in such conditions. For a balcony, you will have to select the most suitable ones.
Unfortunately, all recommendations miss one point. It refers to the weight of the cabinet. Few will argue with the fact that as soon as the structure is fully assembled and lined, it will be filled almost to the top in a matter of days (if not hours). For the loggia, this may not be so important. And in relation to the balcony, which differs in that its plate has only one "point" of support (along the line along the wall), it is more than relevant. Whether the balcony can withstand such a load (glazing + decoration + wardrobe with all contents) is a big question. Especially if the house has been standing for more than a dozen years.
In this regard, it is worth thinking about acceptable materials for the cabinet. If we focus on the maximum possible reduction in the weight of the structure, then it is advisable to dwell on combined version. For example, supporting elements (racks) made of solid wood; shelves, canister doors - from. It's up to you, reader, but you should consider.

Based on the fact that it turned out a lot, and the samples need to be taken in the “moisture resistant” category, the choice is small - FC or FSF. Since the closet will be on the balcony, there is no fundamental difference - this can already be considered outdoor work. For information, FK plywood is more “environmentally friendly”, since there are practically no toxic components in the glue used in the production. And if you purchase some of the sheets with lamination (more expensive, but not much), then you won’t have to deal with the exterior finish of the cabinet.
For sashes, it is not advisable to use them due to the mass of the products. But for shelves, bottoms drawers, cabinet walls is a good option. From the point of view of service life on the balcony, the optimal solution is OSV boards. They are easy to cut with your own hands, and they are less susceptible to atmospheric factors.

These panels have a significant limitation in use due to low strength. Just how exterior finish closet on the balcony; for anything else (shelves and so on) they will not work.

When choosing bars, it is undesirable to save. It is better to purchase lumber at a higher price, but even. The use of a "slab" will eventually create so many problems (for example, when installing sashes, cladding) that its cheapness will result in additional costs and loss of time.
What not to buy. In principle, the list of materials that are not suitable for making a wardrobe on the balcony, although in an apartment they are often used for furniture, is relatively small.

The main question is how to fix the details. The fact that the structural elements will have to be reinforced with brackets (plates, corners) is one thing. But what hardware to use?
Nails - since the wood is mounted only dried, they can easily split the workpiece. In addition, the maintainability of the design is highly questionable. But the upside is that the nails won't interfere with the wood when it starts to "play" a little. And on the balcony, this is exactly what will happen - changes in humidity, temperature will have their effect. Self-tapping screws - only for wood. If necessary, it is easy to dismantle, replace a rotten part. In addition, fixation is provided "tightly". Here you should focus on the type of wood. If it is soft, then this solution is better. For dense wood - nails, with pre-drilling of the landing channels.
Everything else is at your own discretion (baskets, hangers, handles, decorative strips, etc.).
Wood processing issues are a separate issue. Read in detail the list of drugs to protect it from "enemies" and their approximate cost.
It is probably more correct to deal with some of the nuances, since the list of technological operations and their alternation largely depend on the chosen option for balcony furniture.
In the area where it is planned to place the cabinet, if the balcony has not yet been finished from the inside, it is necessary to clean all surfaces (wall, stove) with high quality and inspect. Pay special attention to mold and mildew. If there are any signs of them, you should start processing this segment. Otherwise, they will safely move to wood with all the consequences. Significant defects (cracks, crevices, chips) are eliminated immediately, using a mortar or putty composition.

Having a hand-drawn drawing, or at least a sketch of a cabinet, this is easy to do. First of all, the places for attaching the racks are outlined. Everything else depends on how well the frame is located and assembled on the balcony.
It is advisable to immediately decide on the "pedestal". Installing a cabinet on a bare stove is undesirable. The reason is the same - dampness. A good option is to lay a piece of p / e film (or linoleum remaining after repair), and on top - a fragment of the OSV plate. It practically does not absorb moisture, and the strength is sufficient to withstand the weight of the cabinet along with the contents.
We should not forget about the ceiling. If a cabinet scheme is chosen for the entire height of the balcony, then it is desirable to fix the upper ends of the racks on the slab. On it, the crossbars of the frame are also “fastened”. In this case, the markup is from top to bottom. That is, first fixation points are determined on the slab above the balcony, and then they are projected onto its floor with the help of a plumb line.
What to consider:
Here it is short - at first only one is needed. After checking it in place, it can serve as a model by which the rest are made. The argument is simple - it's better to ruin one if something is wrong than to redo everything later and spend lumber. After they are fully fitted, processed, they can be fixed in place.

All the same. But how best to make connections, it's worth figuring out. In this case, the traditional "furniture" technology (thorn groove or notch) is hardly suitable. It is enough to fix the jumpers on the wall, and additionally fasten them to the racks with metal elements. The same corner. It is much easier to do it yourself.

From the point of view of expediency, it is desirable to make them removable. In this case, the cabinet on the balcony will be universal, since, if necessary, the dimensions of the compartments inside it can be easily changed. It is enough to either simply remove one of the shelves, or reinstall it. But for this, additional guides (supports) should immediately be provided.

Ways of fastening door leaves, external design of the cabinet - all this is determined independently. By the way, the order of its assembly on the balcony is the same. Having a drawing in hand, installation is not difficult. The main recommendations are outlined, examples of cabinets are given. Everything else is up to you, reader. Watch, think, evaluate and decide.
Good luck in arranging the balcony, home masters!
Balcony furniture can be made independently, using a minimum of tools and materials. A hand-made wardrobe will fully comply design idea loggia owner. In addition, it serves as a guarantee of the quality of the finished product, since the process of creating furniture is controlled from start to finish.

The design of the wardrobe depends on the chosen interior of the room. When a workshop is located on the loggia, the furniture should be spacious, have many shelves for storing small items, but less attention will be paid to aesthetic characteristics.
In contrast, when the balcony is furnished in a vintage or modern style, the look of the closet will come out on top.
Used to make furniture different types materials on which the functional features of the product, its color, texture and service life will depend. The furniture made of natural wood looks the most noble and solid.
Budget option there will be a cabinet made of lining, chipboard or plastic.

The material has the best performance characteristics and lasts longer. The tree is environmentally friendly, does not emit into the air harmful substances. Thanks to excellent appearance boards do not require additional processing, they will look good even without paint or varnish. However, the material also has a number of disadvantages. These include high cost, massiveness, heavy weight. The wood burns, swells under the influence of moisture, mold may appear on it.

Ease of installation is one of the main advantages of the material, allowing the implementation of complex design solutions. Drywall bends well, so it is suitable for creating furniture with rounded corners or cylindrical decorative elements. Sheets weigh little, so they are easy to carry, and finished furniture can be moved without problems. The cost of the material is lower than that of wood, which makes it popular with consumers.
The disadvantages include the low strength of fasteners and the relative fragility of finished products.


The practicality of the material is expressed in low weight and ease of maintenance: when dirt appears, it is enough to wipe the surface of the furniture.


Modern plastic is UV-resistant and retains color saturation even when exposed to sunlight. Moisture is not terrible to material, on it there are no scratches at insignificant mechanical influences. The advantage is the low weight of the finished furniture. The plastic cabinet can be easily disassembled for transportation to another location.


A plate consisting of sawdust, shavings, crumbs. The advantages of the material include strength, reliability and density. The panels are easy to mount and also have a low price. The special structure of the plates allows you to create from them furniture of any shape and size and unique design. Products made of this material are easy to transport, they take up little space during storage. The panels are resistant to temperature extremes, moisture and sunlight.
Building materials are not as combustible as natural wood, guaranteeing good sound and thermal regulation.


Construction material, consisting of several layers of wood 0.5-10 mm thick. There are several types of plywood depending on its performance characteristics and specifics of panel manufacturing. In particular, moisture-resistant, laminated and bakelite building materials are distinguished. Due to its structure, plywood is resistant to external influences. The panels are easy to work with, with the same tools that are used for natural wood. Details of any size and shape are cut out of plywood; if necessary, it can even be bent.
The material is resistant to high low temperatures, he is not afraid of exposure to humidity.

It is primarily used for interior and exterior decoration. outdoor spaces, however, the material can also be used for the manufacture of furniture. In this case, doing wooden frame, which is sheathed with clapboard. The advantage of the panels is strength and high aesthetic characteristics. Wooden lining looks good even without paint and varnish, so you can save on the stage finishing works. To make the material resistant to moisture and temperature extremes, it is coated with special solutions.


When creating furniture, a combination is permissible different materials. It can be based on wood or chipboard, which complement glass shelves and inserts. This option is also suitable for plastic - it can be decorated with metal elements.
Before proceeding with the manufacture of the cabinet, it is necessary to assess the general condition of the loggia and pre-plan its layout and interior. If the room will be used as residential, it is pre-insulated, sheathed, and finished.
Furniture is created only after graduation repair work: determine the model of the cabinet, purchase materials and prepare tools.

What equipment is needed to make furniture for the balcony:

The development of a model of the future cabinet is consistent with its purpose, based on this, functional and decorative elements are selected. If they plan to grow flowers and seedlings on the balcony, some of the shelves are made open, since the plants need the sun. For the workshop, a simple cabinet with a minimum of decor is suitable. The practical component is also important when the loggia is combined with the dining room: the furniture will become part of the kitchen set.


The purchase of building materials begins with the measurement work. It is required to decide on three values: height, width and depth of the cabinet. For these purposes, the area of \u200b\u200bthe balcony is measured using a ruler, pencil and tape measure and deciding which part of the loggia will be occupied by the future product. The depth of the shelves should also be taken into account: the spaciousness of a piece of furniture depends on this.
If another wardrobe previously stood on the balcony, you can take its dimensions as a basis.


At this stage, a list of fasteners, their number and size is also determined. Accessories, as well as materials, are sold in hardware stores. If possible, it should be indicated on the diagrams in order to subsequently assemble the locker correctly.
Furniture on the balcony can be open or equipped with doors. The last elements occupy the entire height of the cabinet or only part of it. Sometimes the sashes are located only in the lower part, and the fans modern style and non-standard shapes may prefer asymmetric doors. Based on the design features, they are divided into several types:

This design allows you to save space due to the fact that the doors do not block the passage.


Door material can also be different:
In the conditions of limited space on the balcony, every centimeter is taken into account, so you have to give preference to compact furniture. Corner cupboard will save space and not occupy part of the window opening. The advantage is the fact that this way there will be more light in the room.
Corner furniture has a non-standard shape: on the one hand, the model is narrower than on the other. You can make a cabinet in the shape of a triangle, polyhedron or square with a beveled side. The wide part is located against the wall, the narrow one adjoins the balcony facade. A winning option would be to equip the wardrobe with sliding doors, as this will save even more space.

Stages of manufacturing a corner cabinet:


At the last stage, the selected type of sashes is mounted, if necessary, the surfaces are painted or varnished. It is recommended to use special impregnations to make furniture resistant to high temperatures and exposure to moisture.
System sliding doors saves space, allows you to effectively use niches and recesses. In preparation for the creation of a cabinet, the same operations are performed as in the manufacture of other pieces of furniture: they carry out measuring work, draw a diagram, determine the exact number and size of parts. The manufacture of the frame, its sheathing and the installation of shelves are also done in a similar way.


