If there is no possibility to buy finished furniture, you can make a kitchen headset with your own hands. it favorable solution For small rooms, which are difficult to choose sets of modules from manufacturers. 
Similar articles:
Many consumers are confident that the cabinet furniture is manufactured in large shops under the control of complex equipment. But in reality, the overwhelming majority of inexpensive modular kitchens Produce private traders. There is nothing complicated in this process. Therefore, there are no obstacles in order to make your own hands a kitchen set at home.
In large shops, we cut off the canvas, from which the modules are subsequently collect. You can and independently make a sawing with an electrolybiz. In this case, it is unlikely to achieve the high accuracy of the dimensions of the parts. But this method allows you to get the furniture is not worse than purchased. How to make a kitchen headset with your own hands, will prompt step-by-step instructions.
The first stage in the design of the module design is to perform the kitchen measurements in which it will be installed. For this purpose will be required:
All distances are measured in the kitchen and write them down. Take into account the location of plumbing and sewer pipe, ventilation hole. These data will subsequently need to compile furniture drawings. Without them, it is impossible for the quality of the kitchen headset with their own hands. All distances measure up to a millimeter. Laser rangefinder will have great help.
No matter how you yourself will cut the items or order their manufacture on furniture manufacturingYou will need drawings and schemes. They are necessary for cutting material. Schemes can be drawn by hand, but the more correct solution will be the use of 3D modeling programs. With their help create a full-fledged design headset for the kitchen.
When designing the bottom line table, the dimensions of the equipment will be taken into account, which will be located under the tabletop or built-in. At the design stage, the question is also solved with the method of mounting the drawing and withdrawing it into the ventilation system.
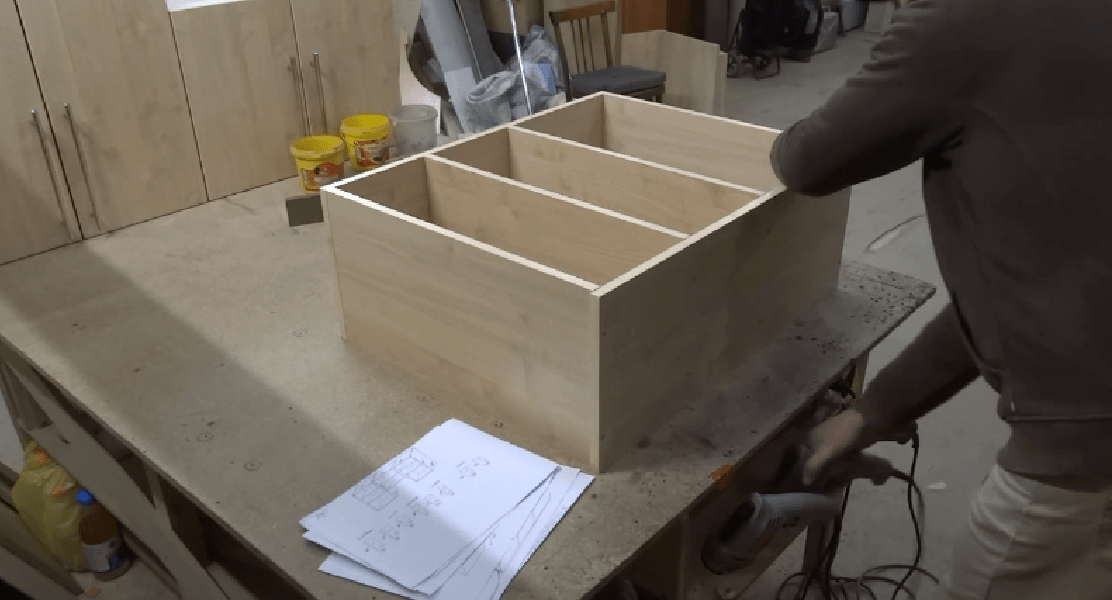
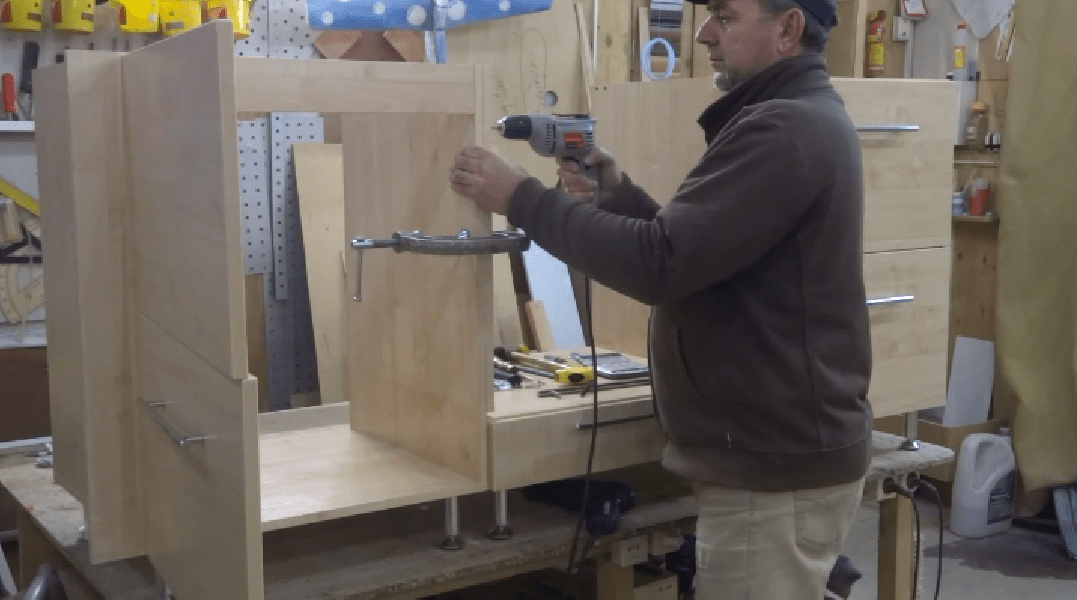
The kitchen headsets are collected with their own hands from individual parts that are cut on the specified dimensions. Those who have no experience in making cabinet furniture, it is recommended to first perform a draft assembly. For this, thin black screws are suitable, which are 1-2 cm less selected as fasteners. After that it becomes clear how to properly perform sawing, manufacturing items, and which errors were allowed.
Step-by-step instructions will help not be mistaken in the sequence of work during self-assembly.
Teaching equipment:
Installation of upper lockers is similar:
The rear walls are made of Fiberboard sheets and are not fixed on the self-tapping screw, but on the brackets. You can use fine nails and hammer for these purposes. If the design is massive, the rear wall is fixed on screws.
Any furniture salon can offer a wide range of kitchen furniture. But not always the purchase of a kitchen headset falls on the pocket of the owner of the apartment. In addition to the high cost of kitchen furniture, many have to deal with such a task as its large dimensions that do not appropriate small apartment. Solving such questions can be independent manufacture Kitchen furniture. With the help of ready-made components, which can be easily found in almost any specialized store, it's easy to cope with this task. The cost of an independently manufactured kitchen, as you understand, will noticeably differ from the one that is purchased in the store.
Figure 1. The first stage of creating a kitchen with their own hands -samers and creating a kitchen drawing.
The process of manufacturing furniture for the kitchen with their own hands is not really as folded as it may seem at first glance. As for the tools that you need to work, they are so primitive that they certainly have in your home. Acquisition of fittings can be very busy business, since various loops, handles and guides for boxes are inspired to create kitchen furniture with their own hands.

Figure 2. Furniture accommodation drawing must be done in order to clearly make sure the kitchen set will fit into the size of the kitchen.
Armed with a roulette and a simple pencil, you can begin the 1st stage of work - perform measurements and creating a drawing (Fig. 1). First you should make accurate kitchen measurements and record them on paper. It is recommended to display the room at a certain scale, thus the finished kitchen furniture will fit the most profitably in it. The drawing of furniture accommodation in the kitchen is depicted in fig. 2.
At this stage of work, it is worth deciding about the location of the washing and stove. If their location does not suit you, in the drawing, you should specify the place where you are going to install them. As for the sink, the question is not particularly important here, but the place of installation of the slab must be thought up to the smallest detail, since the dimensions of future furniture for your kitchen will depend on it. In addition, given the large size of the refrigerator, it is important to determine the place of its location in advance. At the same time, do not forget about the free access to it.
The next stage in the resulting sizes of the space fits furniture for the kitchen. In addition to the lower row of future cabinets, the upper part of the furniture is also taken into account, and do not forget about the placement of the hood over the stove. In the process of performing calculations of the width of the cabinets, keep in mind that the resulting dimensions will have a direct connection with the width that standard furniture facades have.
If you have such an opportunity, you can place all components of the kitchen room, while the specified dimensions will be taken into account, including furniture facades. When calculating furniture dimensions, a separate attention is paid to the size of the boxes, which according to your idea will be advanced. In addition, you should decide where the inner shelves will be located.

Figure 3. Drawing of kitchen furniture based on chipboard sizes.
Correctly calculating the sizes of the boxes, you will provide convenient use of them, in addition, it will depend on this, which sizes of decorative facades will be required. Based on where you decide to arrange the shelves, you can determine in what quantity they need. This calculation is desirable to produce so that in the finished locker it was possible to freely arrange household appliances.
By specifying all the sizes in the drawing, you should decide on the material that is ideal for the manufacture of furniture for the kitchen. If you want to meet the minimum costs, you can give your preference to LDSP plates, the rear walls in this case are made of fiberboard. At the same time, the most optimal option will be furniture facades made from MDF material, as they differ in their practicality and durability. In addition, the material has a wide variety of colors. There are no special recommendations for the choice of countertops, it should take into account only its material opportunities and rely on your own taste. In fig. 3 shows a drawing of a kitchen headset, taking into account the chipboard sizes.
Back to the category

Figure 4. Corner drawing kitchen sofa.
Considering the fact that you can buy ready-made details that have the dimensions you need, you can not, such a service can provide any firm that does. Immediately it is worth noting that for the manufacture of high-quality parts, home conditions are absolutely not suitable. The electrolovka in this case is capable only to spoil the material, because by using them, you risk getting chips and other defects.
By contacting any relevant company, you will receive an ideal sawd material, taking into account all sizes with already processed edges. If you wish, you can save, having finished with your own hands. But in this case you will need a melamine film, which, as practice shows, does not differ in its durability.
The melamine film should be glued to the end side of the part, for this applies the usual iron. Surplus material is trimmed with a stationery knife. It is impossible to call such a process, due to the fact that the basis of this finishing material Serves paper, work with it is very convenient.
The kitchen will serve much longer if you stop your choice on the plastic edge of the ABS. Skin it with specially designed equipment. In the case of other types of seating for them, the corresponding handling of the end part of the part is required.
Making the order of details, be prepared for the fact that you will need all their measurements that should be listed in millimeters. It is very important that the dimensions of the facades be about 3 mm less than the size of the lockers. In addition, keep in mind that the height of them must be calculated so that the doors do not touch the floor. It is recommended that the height of the legs makes about 80-100 mm. The drawing of the corner block of the kitchen sofa is depicted in fig. four.
Many companies receiving similar orders provide the opportunity to purchase accessories here. In this case, it makes no sense to go to specialized stores.
Back to the category

Figure 5. Drawing with dimensions of a m-shaped mounted kitchen cabinet.
Back to the category
Assembling furniture, which will stand in your kitchen, is carried out in stages. It should be valid using the drawing. First of all, lockers are collected. For fastening parts it is necessary to apply confirmates (special furniture ties). Pre-for their installation you need to drill holes, for this purpose you will need a drill, the diameter of which is 5 mm.
To the finished body of the locker should be attached to the rear wall, which is better to use the laminated material Fiberboard. After assembling lockers, the installation of adjustable legs remains. In fig. 5 shows a drawing of a g-shaped angular mounted kitchen cabinet

Figure 6. Design of the side wall of the kitchen cabinet - Penal.
The countertop must be put so that she lay on the lower lockers. For its attachment, use self-drawing. The sink should be mounted in a pre-cutting hole in the tabletop the hole you need. In order for the hole exactly corresponding to your car wash, install it on top of the table top, the bottom should look up. Via simple pencil Outline her contour. After removing the sink, along the inside of the resulting drawing, swipe the line so that it retreats from the previous line by 1.5 cm.
Then, using the electric bike, cut the hole you need.
The cut must be processed well by applying silicone sealant for this.
So you protect the worktop from negative impact moisture, significantly extended the time for its operation. In fig. 6 shows the drawing of the side wall of the kitchen foam.
Before proceeding with the installation and fastening of the washing, its lower part is also treated by applying all the same silicone sealant. This will prevent water from entering the sink.
At the next stage of operation, guide boxes are installed, as well as fasteners for the shelves. Self-tapping screws must have a length corresponding to the thickness of the LDSP. For shelves in which you are going to store heavy items, it is desirable to use metal corners.
Designer products for home are expensive, but sometimes you want to decorate the apartment something unusual. IN small rooms Kitchen furniture collected from priest materials with their own hands, can be not only an element of decor, but also a successful solution in the organization of space. It can be saved on buying a headset.
Similar articles:
Before starting work on the independent creation of furniture for the kitchen, you need to think about it. Even in the standard urban apartment, the room can be issued not just homemade furniture, but by design things.
For decoration of the kitchen in fashionable loft styles or Industry, non-standard and comfortable pallets are suitable: to connect the finished pallets with their own hands. Without additional processing, you can make a table, seat or soft corner. For the manufacture of cabinet furniture, pallets will have to be disassembled. In the decor of such unusual kitchen Metal parts can be used (for example, car spare parts).
Furniture in the kitchen can be done in rustic style. So called interiors using slightly processed natural materials (Stumpy, Wood, Stones, Stones, etc.). To harmoniously combine functionality and beauty in the product, you will have to independently create sketches of each piece of furniture.
The easiest way with your own hands at home to create furniture in Provence styles, Country, Shebbi-chic and similar naive rustic directions. For the manufacture of lockers, buffets, tables are suitable and the Soviet furniture of chipboard, and old items that will have to restore and re-separate. You can equip them with homemade shelves, stuffing or benches from the wood array (boards, pallets, unusual drawers).
An important detail of the kitchen interior is the system of hinged and floor cabinets in which you can integrate the stove and sink, install dishwasher and refrigerator. This is the largest object in the kitchen, so the production of the sketch should be started with its development. Cabinet kitchen furniture with your own hands can be made linear or corner, and in a large kitchen installed and island.
To drafting the scheme, you need to measure the length of the wall, where the headset will be. The height of the shelves or mounted cabinets is selected individually, given that the headset must be comfortably handed over to the top item. The bottom of the mounted cabinet should be above the tabletop at an altitude of at least 50 cm, and the height of the floor items should be 85-90 cm.
In the drawing or scheme, you must mark the location of sockets and communications. They are tied washing, gas or electric stove, refrigerator. On the free places You can arrange desktops.
When drawing up the upper tier circuit, it is necessary to take into account the need and place of installation of the exhaust, designate the tubes of communications or other unreasonable details of the interior. When assembling furniture, it will have to make holes and recesses in the corresponding details of the cabinets. The diagram of each individual cabinet takes into account its size in length, width and height, as well as the number of internal shelves and distances between them.
In addition to the drawing headset, it is worth making a common kitchen plan. It is noted on the location of other furniture items: dining table., racks, shelves, etc. At the same time, it should be borne in mind that from Tumba of the lower tier headset to another furniture item should be at least 1.5-2 m. In a small kitchen, you can make folding and retractable countertops and seats.
Homemade furniture can be made of a variety of materials:
Special diversity differs decor homemade furniture. For decoration of items made from old furniture Do with your own hands, use and unusual fittings. Handles and overhead moldings can be removed from the old items, use for this purpose the car parts or independently chopped, painted out parts of the tree.
The surfaces of the furniture are separated by self-adhesive film, they are drawn up with the help of decoupage or painting, paint and lacquer. On the countertops put tiles, plastic, decorated them with mosaic. The tabletop decor can be repeated on the apron headset, and use for the design of empty walls and doorways.
To make furniture for the kitchen with your own hands, you will need:
Depending on how the surface is decorated, they may additionally require a brush, construction spatula, files, etc.
The cabinets and hinged lockers are collected in such a sequence:
Before installing independently made furniture, you need to complete repairs in the kitchen. First you need to install the bottom tier of the kitchen headset. The linear option is started to mount from any extreme block. For the installation of the M-shaped headset, the first is the corner tube. The remaining cabinets are placed according to the plan.
At this stage it is important to align all the blocks so that the countertops form a solid surface. It is desirable that no drops arose with the edges of the plate, if it is not built into the tube. Blocks to combine between themselves with screeds.
If you plan to install a common countertop, then the cabinets are mounted without it, and this element is placed on only after connecting the Tumb. The door of the facade needs to be lowered and align them in height.
After installing the lower tier to hang up the top lockers. To maintain the same distance between them and the tabletop, measure the convenient height, on which the bottom of the suspended elements will be located, and spend directly, aligning it in terms of level. Determine the places for holes under the hooks, attach accessories to the wall. For concrete walls The safest and most reliable fastening - dowels, but in wooden house It is better to prefer nails with a length of about 10 cm. After mounting the hooks, the cabinets are hanging onto the wall and attach the doors to them.
The remaining elements of the updated kitchen put on advance planned places. Shelves and racks are attached to the wall as well as hinged cabinets.
What do you do with old furniture?
Today the kitchen is the place where the whole family is most common. For a long time, there were those times for a long time when the entire population of the apartment was going to the living room in front of the TV. The fact is that it is now more convenient to find all movies and programs to your liking on computers or tablets. Nevertheless, a common breakfast, dinner, and just the evening gatherings with tea remained, that is, the importance of this room is impossible. Naturally, all of the above does not apply to those people, in whose apartments there is a separate dining room. In addition, cooking and storage of all utensils are also very important, and in this regard cannot be neglected convenience and comfort.
Now we will not disassemble the situation when the room intended for the kitchen is generally not prepared for this purpose - that is, there are no pipes, electricity and other things.
It will be best to take the reality room with which you can work. It has already built walls, laid flooringMade the ceiling and communications were performed.
First of all, on paper, you should draw the room plan. First, a general is created, since it will be necessary to measure the height and width of the walls, any simpleness, gaps of the windowsill and other (the latter, by the way, can be subsequently used as part of the table top). In addition to the above, household communications should also be included in the plan. You should specify where there is a wiring where the gas pipe is coming out, as well as note the water supply line and other.
But before wondering how to make the kitchen with your own hands, you need to decide on its shape. It can be linear, that is, built along one wall, M-shaped or angular, or P-shaped. The last species is usually chosen when the kitchen highlighted a room with a separate entrance.
Already, decide where you will store dishes, where to put the fridge, where they place the work surfaces, plate, sink, and also how lockers will stand. Naturally, the slab must be placed closer to gas pipe, refrigerator or electric stove - to outlets, and sink is closer to the water supply. It is logical, so you can avoid unnecessary costs.
Here you need to display all products that will be used. That is, each bedside table, locker and sink should be drawn. Dimensions also need to be stailed - it allows you to avoid confusion. Particular attention should be paid to the height of the tabletop. It is determined by the growth of the person who will most often work in the kitchen. You also need to correlate the sizes of future bedside tables, boxes, tables and stoves with a worktop.

It should be displayed in the drawing, from which materials there will be future furniture items, not only their facades, but also frameworks. Again, the countertop need to pay special attention. Then, separately, choose household appliances.

There is a way to facilitate your choice. It will come in handy, because on a two-dimensional drawing it is not always possible to determine how those or other devices, surfaces and so on will look. Therefore, you can use fashionable magazines, or ask familiar whose existing design options you like how to make the kitchen with your own hands. Photos from magazines will help you deal with many difficulties. Suitable design is accurate. In addition, today there is a sufficient number of programs, working with which, you can create a volumetric, even interactive, drawing of the kitchen. Special skills are not required here (if you have enough adult children who disassembled in computers, instruct it. Thus, it will be possible to save time and give children to understand what they trust them).
How to make a kitchen with your own hands so that it turns out a durable, comfortable and high-quality? In fact, nothing complicated here. The easiest way will be with cabinets, which, in fact, you need to do yourself.

The sidewalls are best made from 16-mm MDF - it is suitable for both lockers and shelves or a tumb. The side walls of the boxes can be made from the half-channel Fiberboard. The main thing is to purchase a laminated version. The rear walls can be performed from plywood - they are the most unused, and indeed remain almost invisible. In addition, if any problems occur, they are easy to remove or replace. Doors, if you do not have good experience, it is better to buy separately - they are sold in construction supermarkets, and therefore it will not be a special problem (and it is better to pick up the doors first, and then make cabinets, instead of customized all at the last moment).
Separate question - countertop. It is also best to purchase it separately. It will be good here a natural stone or close in composition and properties material. If you want to do it yourself, you can use a thick chipboard, approximately three centimeters (but better a little more). Before installing, you need to cover it with several layers of protective agents so that the tree does not damage due to excess moisture.
In addition, you will need any fittings - the list is quite long. Here and the Eurovints, and hinges with handles, balls or roller guides, legs for cabinets, edges, as well as poders, and, of course, corners. The most important thing here is not to forget to buy something. It's all the little things, but they can be determining on how to make cozy kitchen do it yourself.

More importantly, only the acquisition household appliances - Make a sink or slab on your own under the power of a little people, and therefore they should be bought separately. It is better to start choosing immediately, since the size of the same slabs must coincide with the rest of the working surfaces, otherwise it will look pretty funny.
These tools will be needed not only to those who are going to make the whole room from beginning to end on their own, but also people who annoy small defects and other troubles. How to make repairs in the kitchen with your own hands? This question is found much more often than the above. But "Assistants" you need here are quite different - from the power tools this drill and a surnupture, as well as an electrolybiz (the latter - for those who will cut the purchased tree itself). In addition, you will need a roulette, pencil, construction level and a square. The construction knife will also be unnecessary, wood hacksaw, as well as sandpaper. In addition, there is still important moment In the form of screwdrivers and spanners - doors, as well as some other details must be carefully screwed to the walls or semi.
In fact, the action plan, which is described above, is suitable for an angular kitchen. But they are spread more linear simply because for small spaces it is the only way to build a comfortable and large working surface.
Differences begin exactly where you thought - in the corner. It is this place that will have to think more carefully than the rest, simply because if you do just a straight angle, most of The working surface will be unavailable. So you have to rolling and work on these places longer, making a smooth transition from one surface to another. In addition, it should be done in the same way with hinged, as well as with outdoor cabinets.
Naturally, in the country, she will be a little different from its city analogues, but not so much that the work plan becomes completely different. So the usual country cuisine will be almost the same as that that stands in your apartment, and therefore you just need to follow the plan described above. But the summer room is something completely different.
So how to make the kitchen in the country do it yourself? It is usually distinguished by the lack of walls, as well as what stands right in the yard, on the plot. There is not hot, and therefore such a design is ideal for a period of time from the end of spring and until the middle of the autumn. Naturally, both building and layout will differ significantly.
The first difference here is the foundation. It must be reliable enough to withstand weight not only design, but also all people. Sometimes this quantity can reach a dozen or even a dozen, which together has a considerable weight. Therefore, the foundation is better to do from stone. The construction itself is erected from the tree - it is easy and when processing protective compositions can withstand both weather and climatic conditions and working features like heat and abundance of moisture.
Walls, even if they are erected, closed the kitchen not from all sides - usually from three. In addition, they are solid somewhere before the middle (this is done to cover the furniture), and then you can already equip the wooden grid or use the columns, leaving the open space. From above, a duplex light roof is usually fitted with appropriate supplements in the form of water and other effluents.
With furniture here, too, it is not necessary to do places for storage of utensils. So everything will consist of a working surface, a plate (more often electric), a mangala, which can be removable, as well as in extravagant versions, furnaces. In addition, if the summer room is large enough, it can also perform the functions of the arbor and the external veranda.
How to make children's cuisine with your own hands? In fact, it is difficult to realize the relationship between the real and children's cuisine. Nevertheless, it is. Children are developing, and therefore they have new interests. If you want to attract them to cooking in the future, it will be wisply to give them children's cuisine. In addition, such a toy will take them for a while.
So, such kitchens are on sale, but with their own hands it is best to make them from an old chest or a large class. Doors need to be removed here. Everything else depends on your imagination and ingenuity.
For example, you can make something resembling a reduced version of the kitchen. That is, take as the fact that the presence of a large chest. The doors have already been removed, and all the shelves are removed - you can proceed to work. It is necessary to put one central shelf somewhere at a height of a third of the general height of the chest. On the right will be plane - you will need to make curly switches, similarity of the burners, the door for the oven, and so on. Left we have the sink. Between them remains the surface where you can make a locker. All this is painted, decorated and driven into a divine appearance. If you have a daughter, and you wonder how to make a kitchen for dolls with your own hands, then the same plan will fit. Only in the reduced version, naturally.
Well, in this matter you need to understand that it is quite difficult to make an extract yourself - here we need certain special skills that most of us have no one. Therefore, an exhaust installation option will be considered. It is not so easy - the main part is located above the slab, and it is it that works, pulling the air. The air duct itself is usually done from corrugation in the form of a pipe. It is he who takes the air to the street through the outer wall ventilation.

If you still worry the question of how to make a hood in the kitchen with your own hands, then you will need the same corrugated pipe and several fans. In addition, it will be necessary to carefully cut holes for the pipe, because everything should be tightly.
How to make a ceiling in the kitchen with your own hands? Before switching to work on it, it will be necessary to determine quite a long time with what type is best to choose. It's not easy because perfect option Simpar no. The problem here is that humidity and temperature in the kitchen fluctuate in a rather wide range. In addition, it is necessary to take into account as much as easily the ceiling will be laundered - at least several times splashes and there. Yes, I also need a material that minimally absorbs odors.

The first option here is plaster. It is possible to do with a pair of workers hands. Wash the plaster can be quite often, it does not burn. True, when flooding such a ceiling, you will not protect you at all: at best, it will be stains, and in the worst - the falling parts of the finish. Next comes the suspended ceiling. Here you need to remember that the wooden doom is not suitable. If you use a cassette structure, then moisture and temperature can not be afraid. In addition, you can install convenient lighting. There are also disadvantages - there will be nothing to die from such a ceiling. But the undoubted plus here in a light replacement, so the question of how to make repairs in the kitchen with your own hands, will not arise at all. It will only be necessary to purchase several panels and put into place spoiled. Latest View - stretch ceiling. This is very a good option - They do not burn, but only melted, which increases fire safety. In addition, such ceilings will protect you from flooding - if it is not very large. This can be considered a closed question about how to make the kitchen repair with your own hands. The photo presented in the article will help you deal with this issue.
In general, you have already had to understand what is really realistic to make the kitchen, let it be very simple. The emerging issues can be solved with our article.
The most important thing when repairing the kitchen is careful planning. This avoids multiple problems and resolve the question of how to make the kitchen with their own hands.
Design and build a kitchen headset with your own hands is not so difficult and problematic, as it may seem from the first minute. Collect the facade of furniture quality, of course, it will not be possible, for this you need considerable experience and special equipment, but make a kitchen set for giving with your own hands is quite real. The question rests only in the presence of a sufficient number of resources and free time.
Before making your own hands, the first kitchen set will be useful, first of all, evaluate your strength. The fact is that kitchen furniture can be made in two ways:
Frame options for headcases are distinguished by a huge bearing capacity. Due to the frame and the absence of adjustable legs, kitchen furniture is very durable and stable. On the shelves and boxes can be laid twice-three more kitchen utensils than in a classic typical or modular headset. And even after 20 years of operation, the lockers will not be saved, and the lower tier in the kitchen headset will not deposit the arc due to the progenic or uneven load on the worktop.
But the modular scheme has its advantages. For example, if the skeleton in the event of a breakdown is very long and difficult to repair, then for a typical scheme problem, how to repair your kitchen headset, is solved in a couple of hours. It is enough to disclose the screed and pull the cabinet or a cabinet requiring repair.
Regardless of which method is chosen for the manufacture of furniture, before making a kitchen headset with your own hands, you need to pick up the drawings on the product or make them yourself, preferably with the maximum degree of detail.
One of the options, how to make a sketch and calculate the size of the kitchen with your own hands, is given on the video
Included in the drawings should be three main documents:
It is best to use a simple and deficienate firing glued panel, with dimensions of 600x1200 mm, a thickness of 30 mm. For a frame circuit, you can use any bar and the same spruce panel, but more modest sizes, 400x600 mm. Of course, before starting work, the material must be impregnated with anti-tree protection and cover with protective varnish.

Traditionally embedded models kitchen Garniturov Made in the corner execution. This allowed to increase the design and at the same time increase the support area of \u200b\u200bthe kitchen facade.
The kitchen sets are assembled in the following order:
With dimensions of 200x250 cm, the average cost of manufacture is about 50 thousand rubles. Skeptics can declare that for this amount you can buy something similar to any of the firms manufacturing furniture from chipboard. But in practice, to independently make a kitchen headset with their own hands, a photo, means quality guarantee and the minimum risk of alterations.
For frames, we use a pine timber, carefully dried and treated with lacquer impregnation. First of all it will be necessary to assemble upper Yar, Cut from a bar 50x50 mm a piece of 90 cm in size and sew it with a dowel vertically, along the angular line of the wall.
The second side of the left and right horizontal framework of the frame. In order to keep the worktop headset, it is necessary to use a starting bar, a thickness of at least 20 mm and 10 cm wide. Next, the lower box is assembled from the board 20x100 mm, it can be put directly on the floor, provided that, of course, that the tile or any other floor covering, to which the kitchen headsets will be relying, have a waterproofing sublayer.
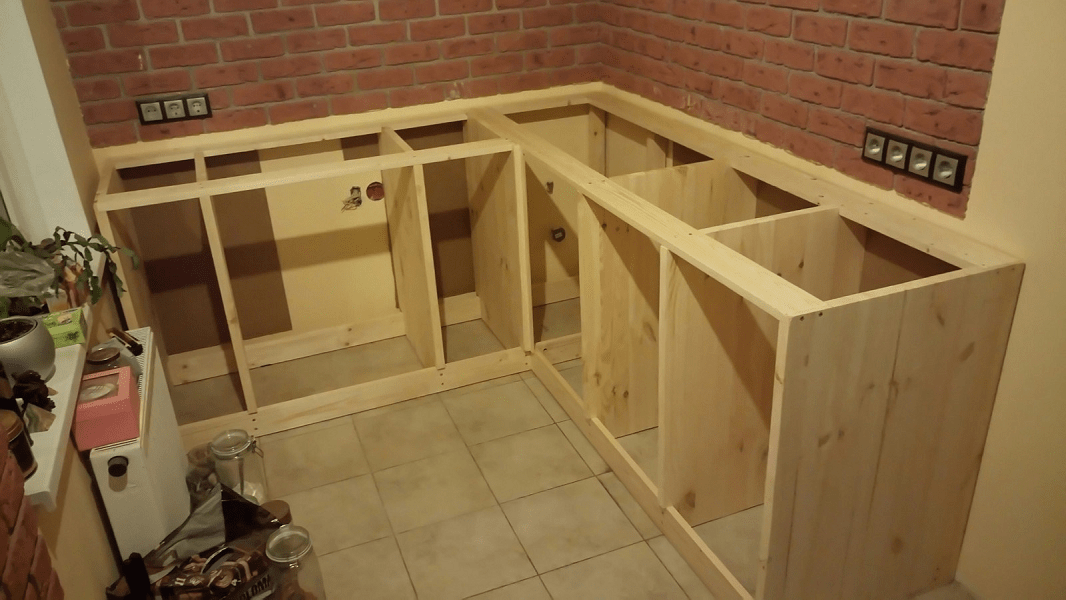
The next action on the assembled M-shaped box is vertically installed partitions from spruce panels, which will further make up the power frame of the lower tier of the kitchen headset. To sew the partitions to previously installed starting plars, at the corners of the panels perform an angular cutout or drank in the form of a rectangle 60x20 mm.
After aligning the panels, the second pair of horizontal planks are stuffed. The frame of the kitchen headset is ready, you can go to the styling of the table top.
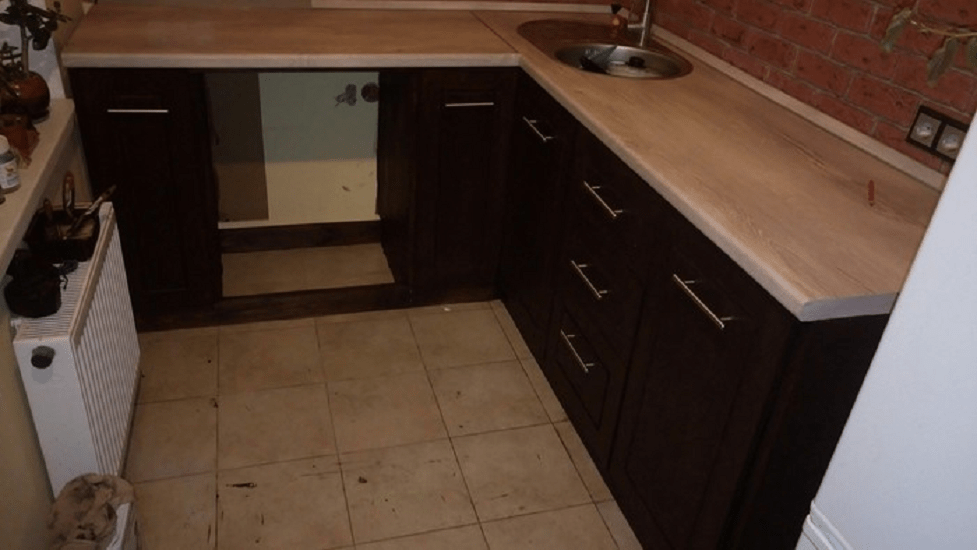
The most expensive part of the homemade kitchen headset. The cost of one set will cost approximately 15-20 thousand rubles. For frame design It is best to use a laminated chipboard with missed ends.
Bought in advance plate 60 cm wide and 4.5-5 m long is placed for cutting into two equal parts. The first part of the frame is stacked with a left side of 2.5 m long. The plate can be fixed on self-drawing on the inside, or to be placed on the headset on silicone sealant, without mechanical fasteners.

The second part of the kitchen countertop is placed in the end of the letter L, with the line of the render can not even be cleaned. The junction line, like all similar parts in the headset, will be sealed and closed with overhead molding.
While the main elements are not installed on the frame headset - the boxes and shelves must be performed mounting work with washing, connection of water supply and sewer plum. Of course, while the frame set will not be fully assembled, all communications remain in a muted form.
The sink is installed on the kitchen countertop last. In order not to disrupt the thin laminated film, the transparent tape is glued along the laid outline line.

To install working boxes, the headset must be pre-fill the wooden railway racks, along which the boxes with kitchen utensils will be extended from the body headset.

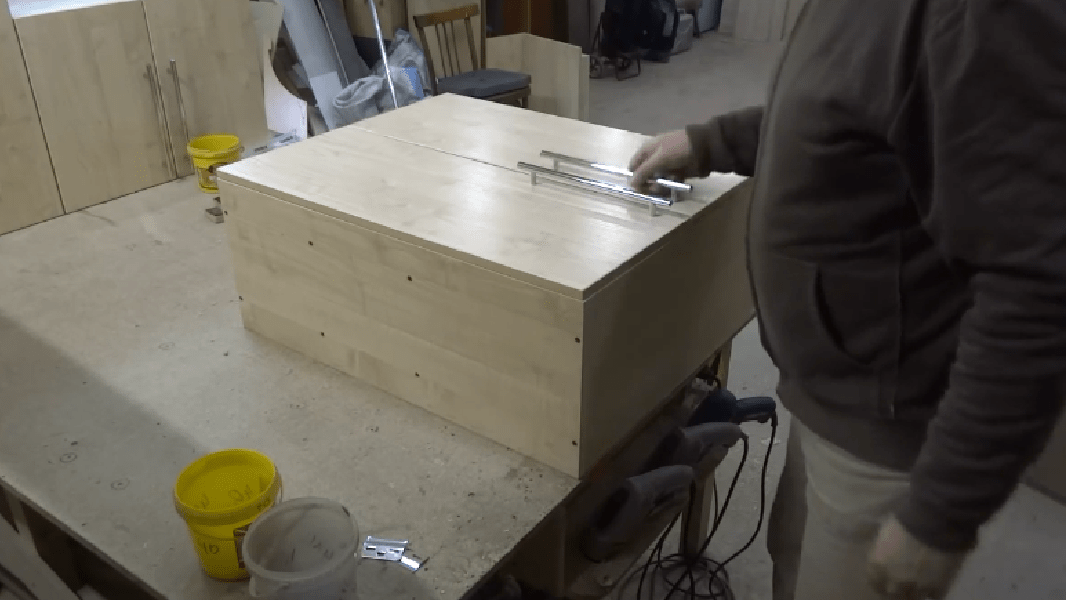
Each box is assembled on a prepared pre-rectangular pattern, sidewalls and rear walls are made of wooden planks, bottom of plywood. The only difficulty with which you can face, manufacturing the frame kitchen set, is the need for the manufacture of facades-doors and front panels of drawers.
It is beautifully cut by hand, so that the homemade kitchen headsets look at the factory level, it will not be possible to order this part of the detail or buy in a finished form.
11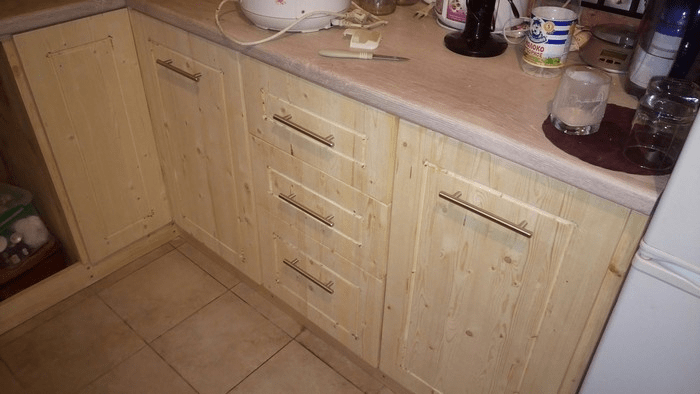
The kitchen headset is built much longer and harder. If the kitchen furniture includes a lower support tier and a set of hinged boxes, it will take at least 5-10 days, depending on the size and complexity of the decoration headset.
Before entering and coloring purchased panel Material On the headset, you need to perform the rejection of the plates, throw away all the knocked, the panel curves. Material with small cracks is sent to auxiliary purposes, for example, on the cutting of the inner shelves of the kitchen headset.
The rest of the panels are reusable according to the existing sketches and drawings. Upon completion of the cutting of the blanks, the ends of the front parts of the future kitchen headset are sealed with a polyurethane ribbon, and the surface is polished to the matte gloss.
One of the best auxiliary materials, how to make a kitchen headset with your own hands, is given on video
If the cutting of the blanks is performed correctly, without deviations from the calculated dimensions, then the assembly operations in the manufacture of lockers and Tumbers turn out to be not more difficult than collecting the purchase factory kitchen set.

For example, the mounted kitchen box is manufactured in the following order:
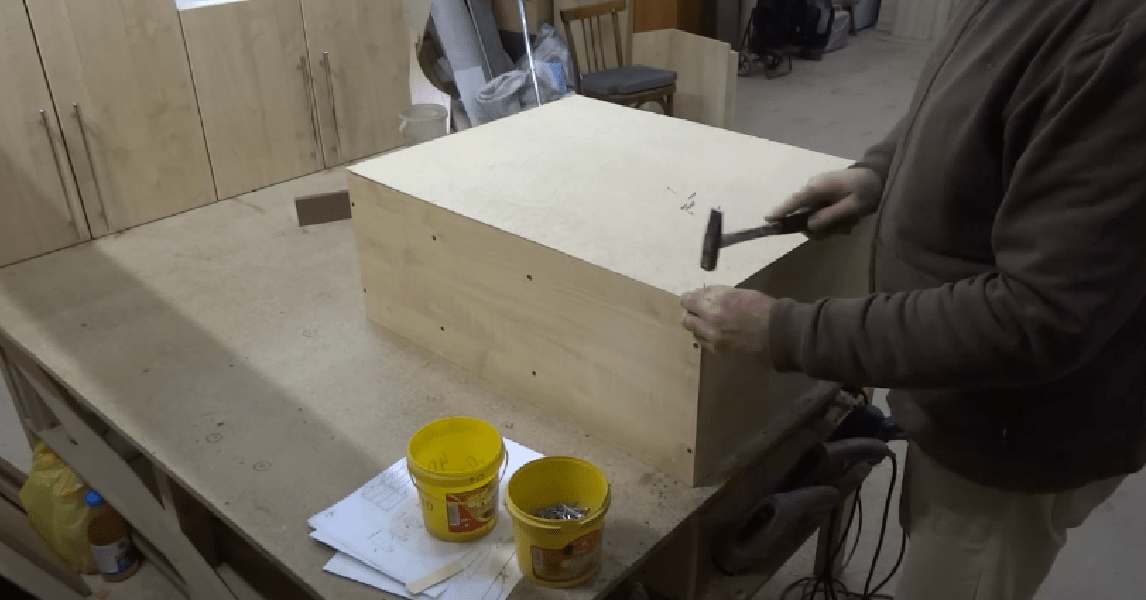
After assembly, the angular edges must be carefully cleaned with shallow sandpaper, in order to avoid the appearance of sizards and remove the protruding edge of the sidewalls.
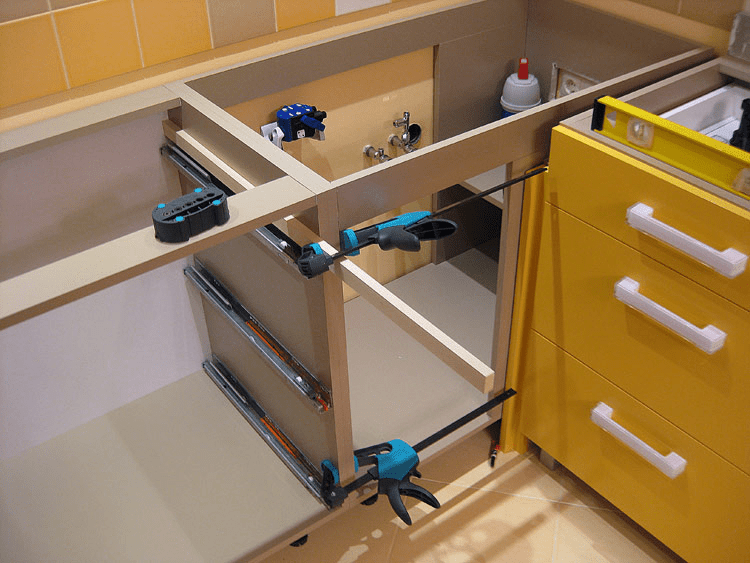
Details of the lower tier are assembled similarly to the cabinet, but the assembly works have their own nuances. Most kitchen headcards are equipped with dryers or drying cabinets for dishes. Manufacturing dryer for kitchenware requires proper Installation Extra snap-in - grid and pallet.
The case of the drying cabinet is assembled on self-drawing. Since the kitchen set should be installed with a ten-grant gap from the floor, the support legs are fastened to the bottom of the box, the front - from the chrome steel, the rear - from shockproof plastic.
The dryer itself can be made by your own steel mesh, but this option is not always suitable. If you do a kitchen set on professional level, It is best to use a ready-made set of details for a dryer with a closer.
The principle of operation of such a device is not much different from the drawer. The only difference is that instead of a wooden box, put forward-rushing metal grid With Cookware Cells, and the built-in mechanical closer helps to shake a heavy loaded dryer to the cabinet.
The first action is placed on the inside of the vertical walls two lines of the attachment of polozov with the closer and secure the support parts on the walls.
For your information! The closer is used for inertial convection of the box and the unstressed closure of any retractable object built into the kitchen set.

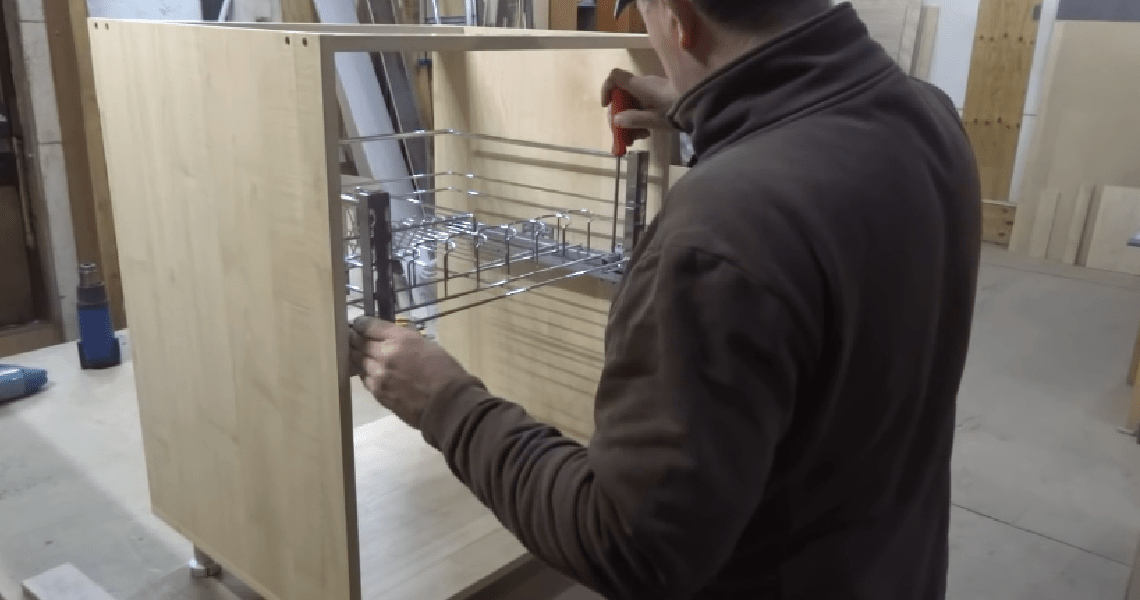
And in the conclusion of the assembly on the front of the retractable dryer, Krepim facade panel.
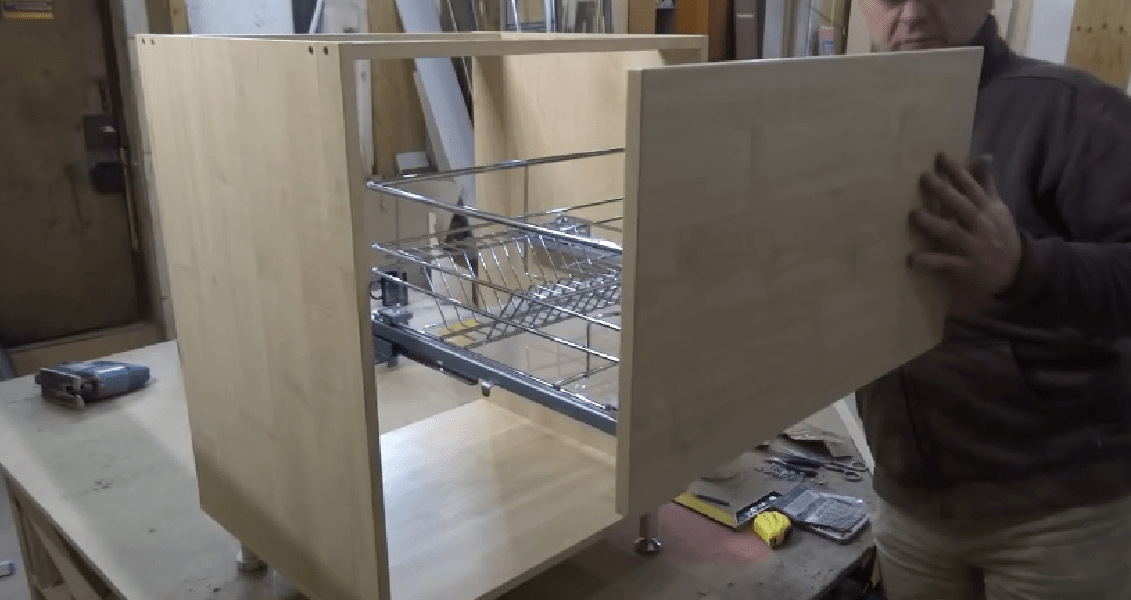
As a result, a drying compartment is obtained in the kitchen headset, no different from the factory dryer.
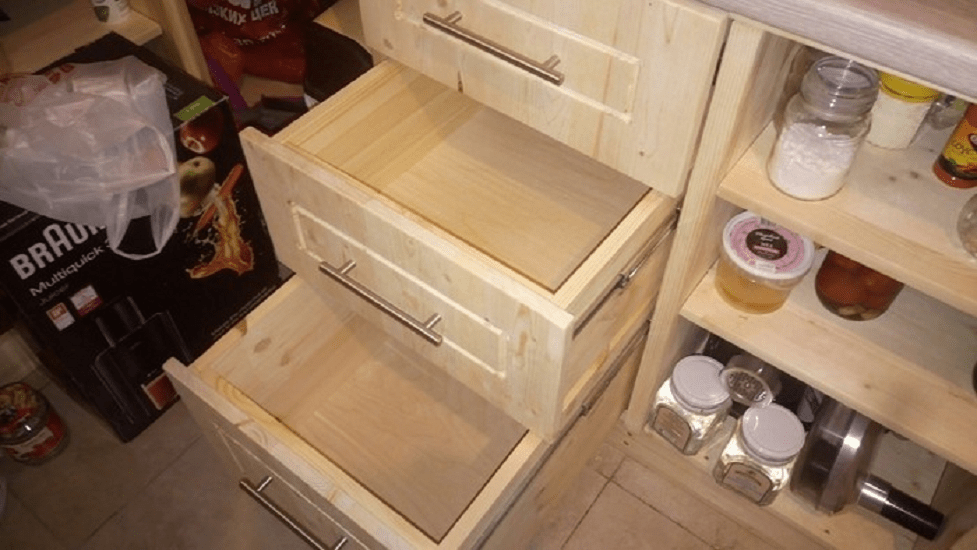
Most of all kitchen utensils are stored in the headset precisely in drawers. Therefore, it is difficult to imagine how, manufacturing the kitchen set, you can do without a dryer with a retractable box office.
For the dryer, the improved version of the drawer is best suited, referred to as the metabox or metal box. In fact, this is a regular box with metal sidewalls and roller supports.
The basis for metabox is the plywood bottom cut-cut. The back wall of the box is fixed to the back edge of the workpiece, also from plywood.

The fastening is very simple, but it should be extremely carefully and carefully, so as not to go beyond the border of the box, otherwise the metabox curve will spoil all the impression from the beautiful facade of the kitchen headset.
The next step with the help of self-samples is secure metal sidewalls with roller supports. At the bottom of the bedside tables in which the metabox will be inserted, we establish the guides of the force. It remains to perform one of the thinnest operations, manufacturing the kitchen set. It will be necessary to fasten the facade panel of metabox so that it closes the lower edge of the bottom part of the couch. In this case, the slot between the top edge of the metabox panel and the facade of the dryer was no more than 2 mm.
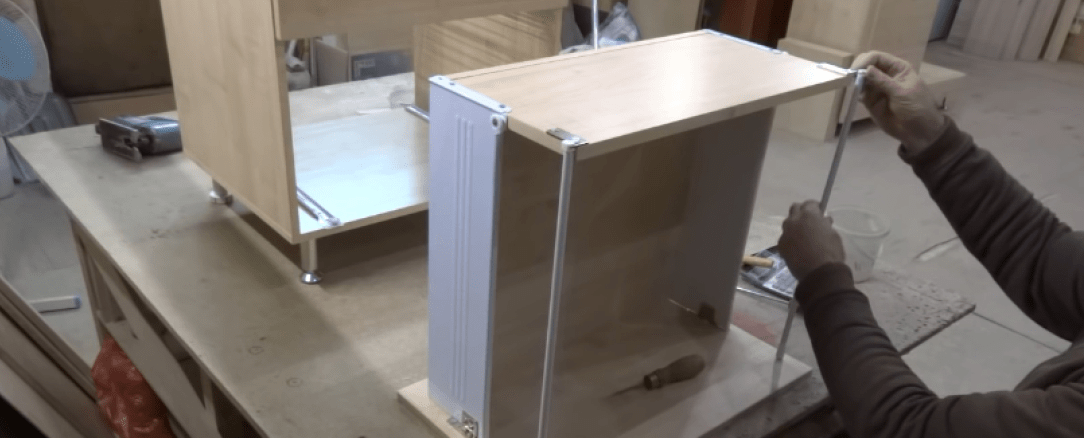
A couple of several suspended boxes in one monoblock is used to give a kitchen headset with a higher rigidity. Preparation and marking is performed "on Earth", the screed itself is carried out at the time of hanging boxes on the wall.
Pre-top tier kitchen headset is laid out horizontally on smooth surface Table.

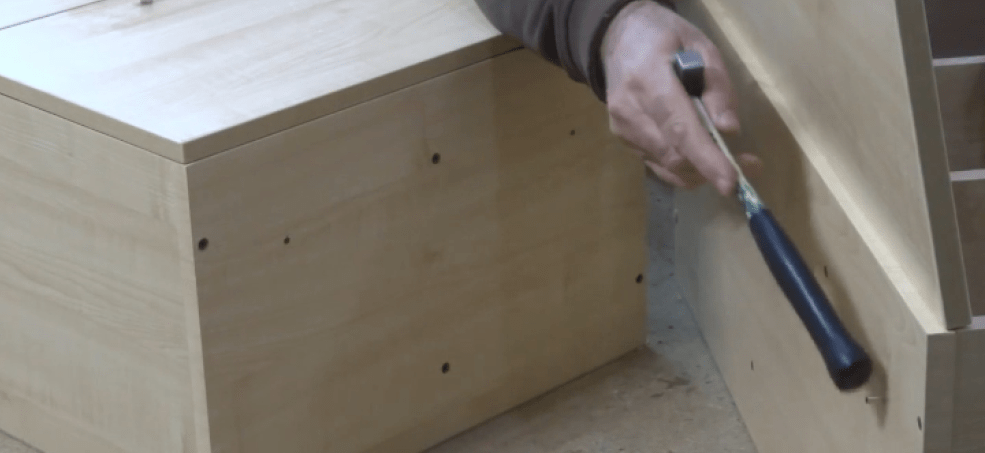
Significantly more laborious remains assembly and screed of the bottom tier of the kitchen headset. The assembly process begins with the installation of all Tumb and cabinets on a flat horizontal surface.
At first, the rotation of the supporting legs of the headset is aligned. No distortion is controlled by building level. Once all the cabinets accepted the right position, the whole design is fixed by several construction clamps.
After final alignment and fixation in the adjacent walls, the holes M5-M8 are drilled, tie pairs are installed and tightened to the operating state. The whole kitchen set in design turns into a monoblock.

The tabletop installation is needed only after the stove will be adjusted and installed without sizing in the draft version. For homemade kitchen heads, only the option of manufacturing tabletops based on laminated wood-chip or waterproof plywood is possible. Cut the installation window in the sink and cooking headset only after the installation of water and gas communications is completed.
Planted and make a kitchen headset with your own hands, quite by the forces of the usual joiner-lover of secondary qualifications. Despite the fact that some components for kitchen headset have to acquire in the finished form, economically building cabinets and tables is more profitable than buying a finished factory furnishing for the kitchen.


