The question of how to remove the stretch ceiling occurs for various reasons and sometimes becomes a real problem. It is quite difficult to solve it without damage to the canvas, and therefore it is recommended to entrust work to those skilled in the art. At the same time, you can do everything yourself, but with great care and knowledge of the case.
The stretch ceiling can please the eye for a long time, but circumstances occur when it must be temporarily dismantled. At the same time, the design is in good condition and is capable of listening for a long time. In such cases, it is necessary to decide how to remove the stretch ceiling with their own hands so as not to damage it and put it back after the completion of unforeseen work without additional costs for replacing the main parts.


Before starting a rather complicated event, it is necessary to actually assess the situation. Carefully remove the stretch ceiling with the subsequent installation of the same web appropriate in the following circumstances:
Analysis of the status of the tensioning system allows you to determine its further fate. If it can be renovated for full operation, then disassembly with the preservation of the web. A similar need may occur if it is necessary to remove the structure for reasons that are not associated with the stretch ceiling: overlap repair, insulation or noise insulation of the room, replacing the electrical wiring or installing new lighting equipment, carrying out communications.
The order of work on the dismantling of the stretch ceiling depends on its constructive features. The following factors must be taken into account:
In addition, it is used by a wedge (stroke) method.
It is used for both types of ceilings. It is extremely difficult to remove the ends of the cloth from such an attachment without damage (almost impossible). Wedges are tightly clogged into the metal profile channel to provide the stretch, and therefore it cannot be removed without a special tool. At the same time, during the edge damage to the web during dismantling, its installation is not possible.
The design of the tension system determines the order of work and the demonstration principle itself. Before removing the canvas, it is necessary to clearly deal with the design and outline the plan.
Depending on the reasons, the dismantling of the ceiling can be provided in different volumes:
It should be borne in mind that the reverse stretch with a partial dismantle to ensure much easier. However, the required amount of work should be established, based on the complete analysis of the situation and the design of the ceiling.


After studying and analyzing the problem, you can proceed to dismantling the ceiling. When work is planned with your own hands, step-by-step instructions are different for each type of tensioning web. The preparatory stage includes the preparation of the working area for unhindered access to the baguette.
Particular attention is required when working to eliminate the effects of the Flood.
The main feature of the removal of the PVC film is the need for its heating. In general, work is carried out in this order:
When partial disassembly is sufficient, the repair work begins after providing access to the problem area, and the canvas is removed only in one or two corners. If a complete dismantling is carried out, it is released in all corners and gradually removed throughout the perimeter. Stacking the removed canvas must be made with marginal caution.


It is fundamentally possible to remove the PVC film from the strooper fastener. To do this, it will be necessary to gently bend the wall of the aluminum profile of the baguette so that the post is released. This fastening element is carefully removed from the profile with pliers and screwdrivers. After removal of the canvas, you will have to dismantle the bent profile and return its wall to the previous position by richt. If the plastic stapper after its first use has changed the form and dimensions, then it will have to replace the new one.
The dismantling of the tissue differs from the removal of the polymer film by the absence of the need for heating. The release of the canvas begins in the middle part of the baguette on the wall with gradual movement to the corners. Fabric extraction is provided by pliers with long sponges.
In the process of working with the tissue web, it should be remembered that the clips mount when removing the fabric in one place is relaxed throughout the perimeter. This circumstance does not allow partial dismantling. To ensure a qualitative subsequent stretch, you will have to make a complete dismantling of the canvas in any case.
The ability to reuse the tissue ceiling after dismantling largely depends on the trimming of the edges during the primary installation. The fabric stretches badly, and therefore in the absence of stock in length, it is extremely difficult to provide reliable capture in the fastening element. This condition should be considered when installing the tissue ceiling.
One of the main reasons for temporary dismantling of the stretch ceiling is a flood, "provided" by neighbors from above. Remove the accumulated fluid can be in several ways.


In any case, it is necessary preparatory stage. Before carrying out work, it is important to ensure complete safety and, above all, to exclude electric shock. To do this, you will have to remove all the lighting equipment and turn off the electricity. It is necessary to prepare water tanks in advance, as well as bring things out of the room, which may be damaged when liquid gets into them. It is recommended to take measures and from the flooding of neighbors from the bottom. The floor should be seen with a plastic film.
Easily get rid of the water in the presence of chandeliers or lamps on the ceiling. After their removal, the linen opens a hole where the aqueous stream should be directed. Works are held with a partner. One person holds the container under the hole, and the other manually or with the help of the mop rolls the liquid, raising the wireless canvas. If wrinkles remain on the polymer cloth after removing water, then such a plot is heated using a construction dryer. Defects after cooling smoothed.
In the absence of any mounting holes in the canvase, you will have to make partial disassembly.
To do this, it is enough to remove the cloth in the nearest corner, bend it, and through the resulting opening remove the water in the same way as the case described.
To dismantle the stretch ceiling, you should take care of such a tool and devices in advance: ladder-stepping, pliers with elongated sponges, knife, scissors, screwdriver, hammer, spatula. When removing the PVC web, the heat cannon will be required, construction Fen Or a thermal fan, and the room should be warm with the help of a household heater. If you need to disassemble and permutations, the baguette needs a perforator and a screwdriver. If the effects of the flood are eliminated, the water containers and the usual fan should be prepared for drying space between the web and overlapping, as well as the rag.


The need to remove the stretch ceiling may occur in different circumstances. If it is in good condition, the dismantling should be done without damage to the web, which will allow you to install it again. Such an event can be done with your own hands, but it is necessary to correctly appreciate your capabilities. With insecurity in their abilities, it is better to invite specialists who make dismantling and subsequent installation of the design.
I like
If a stretch ceiling is arranged in the room, how to remove it and not damage at the same time? This issue is given by many premises that are interested in preserving the material, as they simply pave additional communications under the ceiling, repair the wiring and eliminate other problems that require dismantling the design.
The history of stretch ceilings roots go into ancient Rome. At that time, a fabric was used to drapery, the color of which was careful, as it was supposed to coincide with a shade of the wall. A significant minus was that the service life of such material was very low.
The second hint on the stretch ceiling in a later historic period is the use of Bosi, impregnated with chalk, in Armenia in the 17th century. This material Tensioned on the frame, so as a result, a perfectly smooth ceiling was obtained.
The appearance of a modern stretch ceiling occurred 30 years ago in France.
Stretch ceiling is smooth surfaceobtained by tensioning a special polyvinyl chloride film. As often use polyester tissue. IN modern designs Often use the first option.
Tensioning a thin film or tissue is made on a special frame (baguette), the fastening site of which is the base ceiling. As a result, it turns out perfectly even and homogeneous surface, similar to a solid ceiling.
It has a lot of advantages compared to other finishing materials:
Before answering the question about how to remove the stretch ceiling, you should decide on it. These information is usually contained on the letterhead of the company that has been installed.
So, the canvas can be:
So, the stretch ceiling - how to remove it? The solution of this issue depends largely on what type of fastener was used when installed:

Answering the question about Tensioning the ceiling how to remove, you need to keep in mind that it should be stock in with such instruments:
What exactly to choose a way to disassemble the stretch ceiling, you need to decide on the basis of its design.
How to remove this type of ceiling? First you need to decide on the type of fastening. If when installing used the harpoon method, the disassembly and the reverse assembly of the ceiling is possible, and if the design can be forgotten on the repeated installation of the design.

Below is a step-by-step instruction describing how to remove the stretch ceiling with your own hands:
How to remove, install a stretch ceiling, the material for the manufacture of which served seamless fabric? If the mount is a vigor or wedge, then in the same manner as with a PVC web. The difference consists only that there is no need to use a heat gun, and the dismantling begins from the middle of the wall, and then gradually shifts to the corner.
Dismantling the canvas, for attaching clips baguettes, has the following feature: partially replaced the material will not work, since the stretch ceiling will have to be removed completely. If this is not done, sooner or later the clip will pop up, which will lead to the forced replacement of the entire ceiling.
How to remove, install a stretch ceiling? This question may touch any, because the cut and puncture is damage to which stretch ceilings are most often exposed.

In the case of such trouble, each owner begins to think how to correct the situation and at the same time to spend the minimal. It all depends on which material was used for the manufacture of the canvas, and on the size of the "wound".
How to remove and put a stretch ceiling? If a tissue canvas suffered from cutness, then repair work It is quite possible to spend yourself. The detected damage you need to just be sealed with a piece of glasses or particles of the material remaining after installation work. A transparent glue is usually used for gluing a patchwork from the back. At the end, the repaired area is recommended to be covered with a suitable paint.
If the location of the core or puncture of the PVC film is next to the wall (the distance is no more than 15 cm), then the dismantling of the canvas should be started from the damage side, cut off the affected area over the entire length, re-stretch the film and fill it into the frame. Such an order of work will not change the appearance of the surface.

If the damage is somewhat removed from the wall, then the ceiling pulling should not be engaged, as it will simply spoil it. In this situation, it is better to use the following hectares:
To eliminate the puncture on the PVC ceiling, the size of which does not exceed 1-2 mm, quite sufficiently special glue. He will not only hide damage, but will not give the canvas to diverge on. But to get rid of a large puncture, you will need to perform the same actions as with a cut.
It is not necessary to forget that if the installation of the ceiling canvase was made by specialists, then for repair, too, it is necessary to cause them, and not invent the method of sealing a cut or puncture. The fact is that unsuccessful is canceled by the warranty on the installation done earlier, due to the elimination of any negative consequences We'll have to pay.
Information, how to independently remove the stretch ceiling, can come in handy in several situations. For example, in the event of damage to the web. It is also relevant when repairing wiring, or its first gasket when it is necessary to completely remove the design. A partial dismantling may still be necessary in case of flooding to merge water. If you do not want to seek help to professionals, then with the help of our recommendations you will know how to correctly remove the stretch ceiling with your own hands.
In this work, the main thing is to accurate accuracy, because our first goal is to preserve the integrity of the canvas. It is also important that specialists installing the ceiling make it not back in size, but left a little material so that you do not have difficulty with re-tensioning, and all the holes for point lamps and chandeliers agreed. This idea does not take much time, since the tight ceiling itself is quite realistic. First you need to decide what material you have, and on what fasteners it is installed.
Dismantle materials are divided into two types:

Also before dismantling, you must familiarize yourself with the types of profiles and determine which one was installed with you. Profiles, or baguettes, are used when installing stretch ceilings as a support for fabric or film material. Fastening of baguette mortgages occurs to the wall. They are divided into two types.

When you first order a new web, consult with installers about which profile will be involved when installing. Perhaps they will offer to make a choice to you. The best decision - Aluminum profile with which you can make dismantling at home without any problems. It is better to overpay once on a high-quality material than then spend money on a new ceiling again.
In addition, exist different types fasteners. It is important that on the tissue tensioning systems fastenings differ from those that are installed on vinyl. There are universal, which are used for both species. In this case, the accession to the profile is created by the strokes that are quite problematic to remove in the case of flooding - it will take more patience and accuracy to not damage the canvas, nor the stroke. It will be difficult to do without appropriate experience, so this method of fastening can be called one-time, but at the same time the most popular due to low cost.
There are systems that facilitate the process of removing and re-tightening the web, and for each type of its own. For PVC, a harpoon method is used, for fabric - plastic clips. It is important that with a clips attachment it is impossible to remove part of the web, only the entire ceiling.
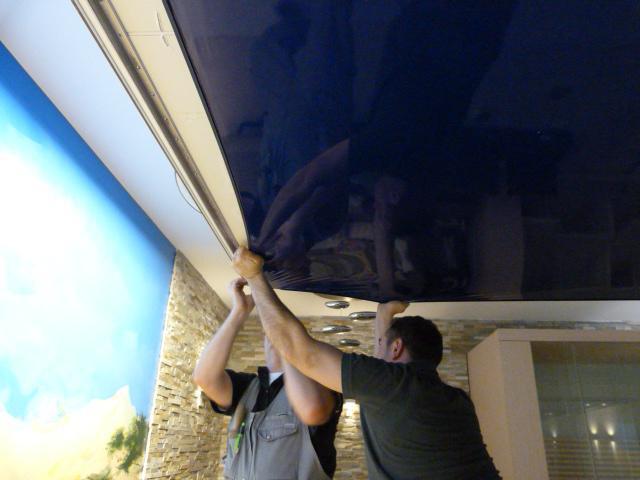
After our article, it will be useful to get acquainted with the video on the Yutuba channel in order to more accurately understand how to carefully remove the stretch ceiling. This process is similar to installing the design, only you need to act in the reverse order. Pre-in the room you need to remove everything, especially stitching objects, eaves, and shoot all the light bulbs, plafoons, flooring and other lighting devices, so as not to damage the canvas.
To begin with, you should independently remove the rubberized insert between the ceiling and the wall. This is a simple event in which the main task is to find the joint of two connected details. It is reliably hidden if the installation produced experienced specialists. It is easiest to find it in straight stretch structures, since here the joints are usually located in the corners of the room. But if you installed a complex designer model with numerous decorative elements, you will need to attach a little more effort.
The next step will be heated the room as a whole and the canvas individually with a gas gun. If you ignore this action, it threatens damage to the stretch ceiling and its unsuitability of further operation. Works spend parts starting from the place that are going to dismantle at the moment. Thoroughly warm this plot.

On the video at the end of the article will be shown how the tension ceiling is removed correctly: in the case of a standard rectangular web - start disassembling from the angle. With curvilinear (for example, oval), you can not limit yourself in choosing and start from any convenient place. The best way The one where you can carefully hook the edge of the film (well or textile material). To determine it, you will need a stepladder and a little attentiveness. Thoroughly examine the perimeter in search of protruding canties for which you can easily grasp passages with long sponges. If there is no such place, then try to start with an angle or from its similarity - depending on the choice of design.
Life-hack!To avoid damaging stretch cloth pliers, you can appreciate the outer corners of the tool (better to use for these purposes old tool). Get perfect smoothness with rounded and polished edges, and you can not worry about possible punzes.
Next should be jewelry - you need to pull out the suspension material from the profile so much so that there are no uniform scratches on it, regardless of whether PVC is or tissue. It should be done neatly, without unnecessary movements, and only in where the canvas is good. Since it is not always possible to remove the tension ceiling on the video on their own, it is better to familiarize yourself with the terms of dismantling and unquestioning to follow all instructions. It will not be superfluous and acquired by the assistant, which will move the gas gun as it moves to the edge. Or will you have to do it yourself that it is not very convenient.
For the tissue web, the process is the same only without preheating. To properly start the fabric, observe the alternateness of actions, then you will not have difficulty to pull the removed stretch ceiling. The main thing is that when dismantling all materials, including mounts, remained integer.
Now you know how to remove and wear a stretch ceiling yourself. The main thing is not to be afraid to experience your knowledge in practice. If you do not want to risk an expensive material, seek help to professionals that will do everything quickly and at a bargain price.
Before dismantling, we recommend to decide on to do work yourself or call specialists. Dismantling of the stretch ceiling costs 200-250 rubles per meter perimeter or about 5-8 thousand depending on the room. But if necessary, a temporary dismantling, it is better to produce all work independently. It is simple enough. To figure out how to remove the stretch ceiling with your own hands, will help the video below, and valuable advice in the article.
For competent actions, you need to know the minimum of information about the design of stretch ceilings. First of all, it is necessary to find out the type of stretch ceiling in the room. It is possible to learn from the papers that you received when installing. If the documents for the installation are lost, then find the type of material and the method of its attachment can be from the description below.
In production, 2 types of material are used:
In vinyl structures, there are several ways to fastening:
Stretch ceilings fixtures
To remove the ceiling itself, you need to prepare a number of tools and materials in advance:
As you can see, you will need a lot of things that are not in the house. They must be purchased in advance, so think again, is it possible to remove the stretch ceiling yourself or better call the workers brigade. A special problem can create a heat gun, buying which only to dismantle the ceiling is expensive.

They are electrical and gas. It is better to purchase gas thermal guns, since the electrical requires special wiring, and without it you risk de-energize the whole house. For a gas gun, a cylinder with gaseous fuels will also be required.
There are three main rules when removing the ceiling:
Then you need to prepare tools for work. They must be smooth, without any sowing or sharp corners and absolutely clean. Spatula clean, remove the lime of the lime, then clog the reinforced tape. The gaps between the clips on the pliers and clips are poured under the adhesive point, so the smooth surface is created. After that, they also need to be slaughtered with scotch.
Before dismantling, it is necessary to clean the room, it is especially important to make all plastic objects and plants. Windows are driven dense clothThe door is closed, the gap between the door and the floor can be closed with rags. After sealing the room it is heated to 70cº.
To fully watch the dismantling of the stretch ceiling with your own hands on the video below:
Initially, you need to remove one angle of the stretch ceiling, and then go along the wall to another corner. When working, you need to constantly warm up those sites on which you work, it will save the cloth from damage. The technique for different mounts is somewhat different.
First, it is necessary to remove the decorative plinth, which closes the gap between the web and the wall. To do this, the spatula is inserted into the slot between the web and the plinth, and then the corner of the profile is moved. The purpose of these manipulations is to give the space for the plinth so that it can be removed, as it holds on the profile with the help of teeth.
After you have bent the corner of the profile, the plinth can easily go. Of course, if it does not hold onto glue or screws. Taking the plinth, you will provide easy access to hooks on which the stretch ceiling is held. It is impossible to get it, pulling over the canvas, so you easily break the design. It is necessary to get the hooks themselves, it is done with the help of the taps.
The technique is somewhat similar to the previous way. A part of the cam is rejected, located on the wall, pre-heats the canvas so that it is not damaged during the procedure. Usually builders when mounting the ceiling on cam mount leave a small allowance to dismantle it was convenient. It is for this hanging end that needs to be pulled out the canvas.

Clip mount scheme
This is the simplest attachment in order to freely remove the stretch ceiling and put back. But in the absence of free allowance, the process is significantly complicated. Initially, try to find an angle where the hanging end is still available, and start disassembling from this angle. If a suitable place For a start no, you have to suffer to free at least one corner.
The process is similar to dismantling with a harpoon mount. This time, too, you need to bend the edge of the fittings, after which it is possible to remove the decorative plinth. The problem can be created if the plinth covers the adjusting angle of the accessories. In this case, the required edge is moved by a spatula, but the plinth itself, for this, picing it from the wall side. Then try to get at least one corner of the wedge.

Chair of stroke mount
After removing the plinth, you need to get a stroke. Despite the fact that it can get easily, before dismantling, do not forget to warm the cloth so that it does not crack when extracting. Picking the stroke can be curved dumplings, keep it with taps and do not pull the canvas itself when you take.
Not required to dismantle the tissue ceiling of high temperatures. With a wedge-shaped or cam mount, the canvas is removed just like a PVC film, only the tissue design should be removed, ranging from the wall and following the corners.
There are also several features:
1. Before dismantling, you need to view the canvas for additional centimeters. Since the fabric, unlike PVC, is not stretched, then the tissue canvas without a reserve material to reinstall into manual will not be possible. Professional workers leave an excess cloth so that the owner can be removed and reinstall it independently.
2. If you take off the cloth with wedge-shaped mounts, then keep in mind that it will have to dismantle the entire design. Remove the angle of the stretch ceiling and conflict with it will not work. Otherwise, you risk damage to the canvas.
3. More often, the fabric ceiling is simply glued to a special beam - Baghet. Such accessories can be wooden, aluminum, plastic, or from other artificial materials. In this case, it will be better to tear off the cloth along with glue, and then glue it again.
4. Since the tissue design is sufficiently light, sometimes a foam is used as fittings. In this case, remove the web without damage to the frame will not work. However, it is not necessary to worry about it, as the foam designs of their cheaps, and you can always buy them.
The suspended ceiling system, like any other, may need to be repaired, for which it has to be partially or completely dismantled. You can invite masters or try to make everything with your own hands. We'll figure it out how to independently remove not spoil the cloth.
Before proceeding with work, you need to decide whether to deal. The principle of fastening directly depends on the material from which the canvas is made. This may be one of two varieties:
Regardless of the method of fixing the installation suspended system Starts with the installation of profiles. It is they who subsequently will hold the stretch cloth. For its fixation, three ways are used:
Before removing start with the preparation. First of all, you need to pick up a stepladder. It should be stable and high enough to remove the cloth it was convenient. In addition to her, you will need tools:
After all the tools are prepared, you need to cook workplace.
The dismounting technology depends on the method that was selected for installation. Let us wonder each of them in detail.
Used only for PVC coating. Fasteners are very convenient because it allows you to repeatedly disassemble the design without damage to the panel. Remove the film starts from the angle. Actions are carried out in such a sequence:
If subsequently it is supposed to pull the coating back, it cannot be deformed.
Used for all types of ceilings. To dismantle it is necessary to remove the fastening elements-staps from the profile. Offer step-by-step instructions.
As in the previous case, fasten it on the clips not to deform.
If the stroke mount is dismantled, it will be possible to put a tensionable cloth in the case if the installers left a sufficient stock of the material. Otherwise, stretch the canvas is not possible.

Designed for mounting weakly tensile coatings, which are fabrics with polymer impregnation. The clip is a type of fastening, the inside of which the edge of the coating is refilled. To remove it yourself, you need to remove the edge from the retainer. We start disassembling from the middle of the wall.
On the section of the compounds of ceiling and wall surfaces, click on the cloth. At the same time, carefully reveal the fastening of the pliers or a screwdriver. Fixation of fabric weakens and can be removed from the clip. We do everything carefully to keep the canvas. It will be needed for subsequent installation. True, it is possible only if the fabric was not cut too short when installed.

Many fear for preserving the integrity of the tissue when dismantling, since it is not enough elastic. Fears are in vain if the work is performed correctly. It is necessary to take into account several rules:
To eliminate the remaining questions, we suggest watch a video on the topic.
As you can see, if such a need arose, you can remove and put back. How to do it right, we told. This is a rather complicated procedure that needs to be performed with accurate technology compliance. Alone can hardly work out. It is advisable to find helpers who will provide security and high quality work.


