Laying a solid board begins with evaluating the substrate and choosing a method for preparing it. Installation can be carried out different ways depending on the specific circumstances. Although the work requires the involvement of a significant amount of time and effort, they can be done exclusively with your own hands without the involvement of specialists.
Before laying massive board, you need to prepare the selected material:

Attention! Together with the solid floorboard, all materials involved in the installation procedure are maintained in similar conditions.
Laying a solid board is necessary on a carefully prepared base that meets the following requirements:

If the necessary conditions are met, you can proceed to the next stage.
There are two main ways of mounting: with secure fixation to different types bases, where glue, screws and staples act as fasteners, or by the floating method - when only the locking system is used for connection.
 Most of solid board models are connected by two types of locks
 On a note! It is necessary to carefully approach the choice of glue for a solid board. So, for a concrete base, a special two-component composition with high adhesion is required, and a one-component one is suitable for a wooden flooring, but not water-based (subject to additional fixation on staples or screws).
Work with a cement or concrete screed begins after the base has dried; for this, the percentage of residual moisture is initially determined. It is easier to do this using a special device, but it is impractical to purchase it for one-time use, so you can use another method.
 The exact moisture level of concrete can only be given by special equipment.
At a short distance, 4 holes are drilled in the form of a square, they are immediately covered with dense polyethylene and pressed from all sides. After 24-48 hours, the presence of condensation is checked: even a small amount of it indicates a residual moisture of more than 6%, which implies the use of waterproofing. The floor should not be equipped with additional heating.
The process of laying an array on a screed without plywood is as follows:

Trimming is done with an electric drill or saw, the edge is processed with a file.
This option is used in situations where the base has significant unevenness. Also, the method is suitable for laying on logs of material from valuable species of trees, which does not have the required thickness.
The process of preparing a screed with serious irregularities for laying an array is as follows:

The screed must be pre-treated with antiseptics, and, if necessary, waterproofing is applied.
 After installation, the plywood flooring must be well sanded
 If the coating is in good condition, then the preparation takes place according to the scheme:
 Old wood flooring should be leveled with plywood decking
 Once the preparation is complete, the solid parquet can be glued and screwed into place.
This technology is used if there is a need to install additional insulation or communications. Also this a good option for apartments with very uneven rough screed.
You can independently prepare the base for the array as follows:
 Installation of flooring on logs allows you to insulate the floor and carry out communications under it
 In exceptional cases and with a significant thickness of the boards, installation can be carried out directly on the joists. But it will take a longer and more complex preparation, and the process itself requires appropriate experience, therefore it is not suitable for doing it yourself.
 Mounting scheme for a solid board on logs
 Regardless of the preparation method, laying a solid board on plywood has general technology:

 When joining, the planks are tightly knit in rows
 In order to beautifully perform the laying, the scheme is thought out in advance, but it will be extremely difficult to perfectly combine the drawing of the tree.
Floating decking is carried out in the presence of installed system underfloor heating or if the room humidity can change by more than 5–10%. The technology of the method consists in the fact that the fragments are placed on a special substrate and fixed only to each other. Also, gaps of 5-10 mm are left from the wall.
Algorithm of actions:
 Floating mounting means a soft backing
 This technology provides ultimate flexibility, but a perfectly flat base is required.
If the material used has not been processed earlier, then after a week the following actions are additionally performed:
 If necessary, the solid board is varnished
 You should know! Only products installed on glue and self-tapping screws are processed; the process is not suitable for the "floating" method.
A combination of oils and varnish is not allowed; it is applied only as an independent protective and decorative layer or after a stain.
Solid wood flooring resembles parquet in appearance, but differs from it in its structure. The floorboards consist entirely of natural wood... Such a coating is strong, practical, durable, resistant to external influences, withstands a greater number of loads, grinding. Laying of a massive board is carried out at the end of the finish, taking into account the characteristics of the material and the room in which the floor is being installed.
The first thing to do before proceeding with the installation of the floor is to unpack the material, inspect the floorboards for visible defects. Finding defects is not a reason to return an item because it was already accepted at the time of purchase. This is followed by sorting the floorboards by color, the nature of the pattern. Laying the solid wood means cutting the board. Set aside the material to be used for this.
Unpacked, selected massive dies should lie for three days in the room where the floor will be laid. The same applies to all building materials that will be used in the installation of the coating. Before you start finishing the room, turn on the heating, air conditioning. For 7-10 days before laying in the room, you need to maintain a stable temperature - 20-22 degrees.
Laying the parquet flooring is carried out using conventional carpentry tools used to install a wooden floor. For work you will need:
The array is laid on the most flat surface. The permissible difference in the height of the base is no more than two millimeters at a distance of two meters. Unevenness of the rough surface is fraught with consequences for the quality of a massive coating. Often, after a few years, the board starts to squeak due to misalignment. In this case, the deformation is caused by an uneven rough surface and not by the poor quality of the floorboards. The base for the array can be a sub-floor made of wooden planks. Other options are the creation of plywood or concrete screed flooring, log construction.
The rough base must be prepared, dust, dirt, fine debris must be removed. Remove sawdust, glue, shavings, grease stains, remnants of fasteners, building materials from the coating. Make sure the base is solid and free of wobbly elements. If the strength of the floor is insufficient, additional reinforcement is required.
 Preparing the rough floor
 The moisture content of the sub-surface should be measured. The indicator should not exceed 12%. The admissible difference in humidity between solid boards and the floor is 4%. If this condition is not met, postpone the installation, identify and isolate the source of moisture.
Laying the array begins at the far wall, along a straight line drawn in advance. A gap is left between the walls and the covering, which is necessary for the preservation of the flooring during temperature fluctuations. The technology of laying solid boards implies alternating dies from different packages, because the floorboards often differ in color. The second row is done in a run-up, starting at a third of the length of the board. The evenness of the installation of the floorboards is controlled by the building level.
 Start of laying
 Work in problem areas (niche, corner, any hard to reach place) is best done first without using glue. It will be difficult to correct mistakes after the installation is finished. The floorboards are fixed with a special two-component water-based adhesive. The composition is spread with an ordinary spatula, then leveled with a notched trowel.
At the end of the laying of the row, you need to carefully knock out the dies with a hammer or wooden blank. The floor covering is fixed with screws or nails at an angle of 40-60 degrees.
The laid is fixed different tricks... The floating method involves fixing the floorboards to each other. The same happens when attaching the dies to the staples. Installation of a coating on a structure from a log does not require application cement mix... The adhesive backing provides additional sound and heat insulation.
Wooden strips are fixed apart, not attached to the base. The floating styling technology is simple. The nature of the substrate, be it concrete, tiles or plywood, does not matter. Laying floorboards from different manufacturers can have their own nuances of the locking system. Nevertheless, the installation is carried out according to the general scheme.
 Floating laying
 The coating, mounted in this way, is able to withstand significant drops in humidity levels, heavy physical exertion due to the lack of contact with the rough surface. To reduce the likelihood of deformation, it is recommended to use self-tapping screws with anti-corrosion protection as the main fasteners. With the floating method, it is possible to install floor heating.
The use of staples saves the time required for work, significantly reduces the cost of laying a solid board. This installation method is characterized by simplicity and high speed of execution. The method does not require the use of glue, impregnation, or primer. The laid floor is environmentally friendly and does not pose a health hazard.
 Fastening with staples
 The flooring is resistant to external influences due to the absence of fastening between the solid floorboards and the base. Professional installation with the use of aluminum brackets, silicone expansion joints provides a strong connection between the ends. Metal spring-loaded fasteners securely pull the floorboards together. A tight connection reduces the likelihood of creaking, crevice formation.
Long bars with cross section are called lags. The beams are fixed on concrete floor screws. The fixing step is 50 cm. Another way to fix the lag is to use bitumen or glue mastic. The latter option is preferable if there is a possibility of damage to the hidden communication.
 Installation on lags
 The fixed bars are leveled with a measuring tool. Excess wood is removed from the surface of the log with a plane, chips are placed for lifting. When installing a solid floor on the ground floor, it is recommended to use thermal insulation. The material is placed in the voids between the lags. A plywood sheet is laid on top of the beams (see how to do it) or OSB plate 1.8-2 cm thick.If the thickness of the canvas is less than 1.5 cm, the distance between the logs should not exceed 40 cm.
This method has become much more accessible with the invention of elastinol, a homogeneous adhesive web. The underlay not only holds the floorboards securely, but also provides good sound and heat insulation. The joints between solid boards remain invisible. Underlayment reduces the possibility of wood swelling.
 Adhesive backing
 Mounting wood covering dispenses with glue, staples. The construction of the base is also not required. To install the floor, it is enough to spread the underlay on concrete surface so that the sticky side falls on the dies. This is followed by the installation of solid boards.
The array is mounted on a previously prepared screed. A concrete, cement-sand base should have a perfectly flat surface. The technology of laying a solid board on a screed involves the use of a special adhesive solution that is resistant to temperature changes. This property of the binder makes it possible to use it for the construction of heated flooring.
 Belon screed as a base
 Before you start laying a massive board on a screed without plywood, you need to check the strength of the rough surface, inspect for obvious defects. The humidity level should not exceed 6%. To establish the indicator, several holes should be drilled with a punch in different areas. If the humidity level exceeds the norm, it is required to create additional waterproofing with a film.
Installation of wooden floorboards on a plywood sheet with additional waterproofing is a common solution in a domestic climate. First, the canvas is sawn into rectangles measuring 50 by 70 cm or into squares with sides of 50 cm. Then the plywood is laid on mastic or adhesive, fixed with dowels. Each cut requires 5-6 pieces of fastener. The moisture content of the plywood sheet should not exceed 10%.
 Plywood base
 Wooden strips are attached to the laid sheet with two-component glue. Each 25 cm, lateral fixation is made with pneumatic pins. Laying a massive board on plywood is carried out with strict adherence to the technology - on a cleaned screed, taking into account the level of humidity, without shifting the plywood sheets. Errors when laying a solid board entail not only a violation of the shape of the floor, but also a change in the shade of the coating.
The floorboards are laid on the old wooden floor, provided that the surface is strong and even. The coating is processed with a belt sander on which an abrasive belt is installed. Maximum leveling of the floor is required, removal of excess paint, remaining varnish. Then the wooden surface is thoroughly cleaned.
When installing solid floorboards, the direction of the old subfloor is repeated. A waterproofing material is laid between the dies and the old floor. If the new coating will be laid in a different direction, the rough surface should be covered with a waterproof plywood sheet 1.2-1.5 cm thick. This is followed by grinding the flooring surface, removing dust from the surface.
If the array used for stacking has a factory topcoat, the floor can be used immediately after installation. Boards without a special coating should "lie down" for a week. Then the floor is sanded and varnished in several layers. This measure prevents drying out, excessive moisture of the tree. Grinding the parquet floor is mandatory if the height difference between two adjacent floorboards is more than 0.5 mm. Processing is carried out along the grain using an abrasive belt with a grain of 0.15 mm.
When defects, dents, burrs appear, putty and grinding are required. This is followed by the application of varnish or impregnation with a composition made on the basis of wax and oils. The latter penetrates the entire thickness of the massive floorboard, creating a thin protective film at the top. Such processing effectively emphasizes the natural texture of the wood, makes the parquet floor resistant to pests, mold and mildew.
 Finishing
 Laying solid wood is a complex process that includes the preparation of the existing floor surface. In addition to installing the floorboards themselves, it may be necessary to level the screed, create additional waterproofing, install supporting structure for laying solid boards. The price per m2 depends on the condition of the existing flooring. The cost of installation is also affected by the complexity of the technology used, the cost of the material.
Solid planks are strong and durable flooring materials. Outwardly, they look like parquet, but this is where their similarity ends. The main difference is in the structure. The basis of massive boards is natural wood. Due to this, the material is distinguished by high characteristics and presentable appearance.
Solid wood products are stacked exclusively at the last stage renovation works... It is recommended to carry out their installation after the work on the preparation of the subfloor, the installation of windows with doors and the putty of the walls have been carried out. It is necessary that before starting installation works the primer, plaster on the walls and plaster on the ceiling have dried thoroughly.
When installing the material, it is important to observe a certain level of humidity in the room. His optimal value is no more than 60%. The installation process of products depends on the base on which they are laid. The technology of laying a solid board has its own nuances.
Solid boards are made with grooves and ridges at the edges. Thanks to this, the products fit tightly. There is a chamfer on the outside of the solid boards. For this reason, after laying a solid board, small distances arise between the joints. These areas are filled when various material damages appear.
The strength of the material is due to the fact that there are transverse notches and longitudinal cuts on the inner side of the boards. Thanks to them, the material experiences minimal stress, and the tension of its fibers is reduced. The minimum length of products is 50 cm, and the maximum is 3 m.The width of a solid board can be from 12 to 20 cm.
Several types of wood are used as the basis for the solid wood. The place of origin of the wood does not greatly affect the technology of laying the material on the floor. Of greater importance is the type of room where the boards are supposed to be placed, and their color. When choosing solid boards, the moisture content of the wood from which they are made is of decisive importance.
The optimum value is considered to be a moisture content of 9%. The maximum allowable value is 12%. A product that is too wet after installation dries out quickly, as a result of which gaps appear between the boards, and the joints between them are fragile.
For the manufacture of massive boards, wood is used:
European timber is represented by larch, alder, beech, ash. These are light breeds. Of the exotic species, sucupira, hevea, and elm are used. Oak floor products are highly durable.

Properties of oak
Its deformation resistance is higher than that of beech. Oak, together with ash, are excellent as coatings for hallways and corridors where there is a constant load on the floor. Solid oak boards withstand temperature and humidity changes well.
Light-colored breeds do not tolerate high humidity very well, and products made from pears and sweet cherries with cherries are considered the most problematic in operation. Planks made of such wood need constant control of the humidity in the room.
There are several methods by which the array is packed:

The first option is used most often. Installation of boards is carried out using glue that can withstand the action high temperatures... The method of laying on a screed made of concrete or a mixture of cement and concrete is suitable for those cases when a heating system is supposed to be installed on the future floor.
Before installation, it is required to check the quality of the screed for damage. Special attention should be paid to the moisture level of the concrete. The normal moisture content is no more than 6%. If it is exceeded, then it will be necessary to cover the concrete with a waterproofing film.
Laying a solid board on plywood has its own characteristics. The moisture content of the plywood base should be no more than 10%. Before installation, the plywood sheets are cut into squares or rectangles measuring 50 by 70 cm.
The sheets are fixed on a concrete base with glue, additionally ensuring a snug fit due to dowels. The edges of the plywood sheets are fixed with an air gun with 30 cm long studs.
The laid plywood tiles are thoroughly cleaned and sanded. Massive boards laid on such a base do not need grinding. What matters is the condition of the screed and the tightness of the plywood sheets to the base.
An uncleaned screed and poorly fixed plywood sheets lead to a violation of the integrity of the floor and discoloration of the massive material.
The array is also attached to the existing wooden floor. It is important that the old coating does not have cracks and sagging. Before installation, you will need to check the floor for strength, clean it with a grinder.

It is especially necessary to remove the old varnish coating, if any. After cleaning the surface of the old base, you can proceed to laying the array. It is laid in the same direction as the old base.
Laying solid oak boards
In addition to the above, alternative methods of laying wood arrays are used:
If the laying of a massive board is used in a floating way, then it is required to control the base and boards. They must be separated from each other. Fastening is carried out by means of solid planks. It is important that the solid material does not bond with the base coat. With proper adherence to the technology, the floor will withstand serious loads and drops in humidity.
The floating method is ideal when installing underfloor heating systems. It is recommended to use special self-tapping screws with an additional protective coating that prevents the development of corrosion as fasteners for such a floor.
The adhesive mounting option is considered a new method.

An adhesive backing will help in the installation of solid wood
It became widespread thanks to the emergence of elastinol. It is a one-sided adhesive backing that resists strong swelling of the array. It has a number of other advantages:
Installation of the substrate is not difficult. On a pre-prepared concrete base, lay the substrate with its adhesive side to the plates. Then wood arrays are laid.
Mounting arrays on lags is considered in a convenient way when it is required to make the floor layer even in a short time. Lags are actively used in the reconstruction of buildings, as well as in the creation of podiums in apartments and offices. To do this, use lags from the bars. A waterproofing coating based on polyethylene is placed under the logs. Penofol is also used as waterproofing.

Installation of the base takes place according to the following scheme:
Solid wood flooring is laid according to a certain technology, including the procedure:
After completing the work, you will need to wait until the floor is dry.
The floor covering is installed at the final stage of the renovation. At least two months before the start of installation, all internal work causing an increase in humidity in the room. At the time of installation, the relative humidity should be 40 - 60% at a temperature of 18 - 24 ° C.
Laying a solid board on a screed without plywood, a plank floor or chipboard in a floating way is suitable for small rooms, the main thing is that the base is even, strong and dry. It should also be borne in mind that heavy furniture can deform the floor.
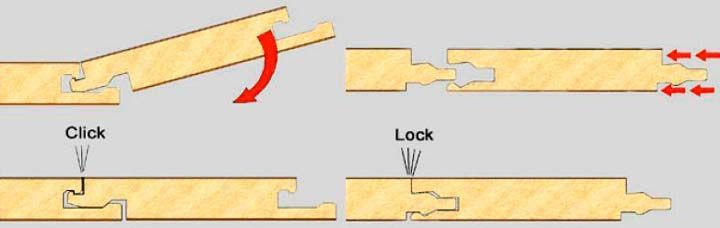
The presence of a tongue and groove or a "Click" lock simplifies the installation of a solid board. This allows the floor to be laid "floating" without being connected to the subfloor. Laying the array can be done independently, armed with knowledge on the Internet or taking advice from familiar pros.The advantages of this styling:
For self-installation, the following tools are required:
Before laying a solid board, it is necessary to assess the condition of the screed.
IMPORTANT: natural flooring requires an absolutely flat, clean surface. All internal work should be completed before installing the board.
The basis is required check for moisture. For this, there is a device that measures its performance in percent. To ignore the measurement at the first stage means to get soon:
- fungus (it can easily start in a humid environment);
- warpage (under the influence of moisture, the floor can swell and deform).
The best solution is to invite a specialist. The moisture meter should show - no more than 2%. It was believed that it is possible to do without the device. It is necessary to leave a piece of polyethylene pressed against the screed overnight. In the morning, inspect the place under it and if perspiration appears, then the humidity is increased. German scientists, after conducting such a study, found out: in the place where perspiration did not come out - the moisture meter showed 6%.
Test of strength will give a guarantee for the long-term use of the coating. You can conduct the research yourself:
For laying a wooden floor, the following base indicators will be excellent: for compression - 25 MPa, for shear - 7 MPa. The exact indicators will be recorded by a device - Schmidt's hammer, which calculates a shock impulse under an applied load (another name is a sclerometer).
Additionally, a two-component epoxy primer will help to strengthen the base.
In addition to strength and moisture, it is worth paying attention to how smooth the base is. Allowable rate height difference - 2 mm per 2 running meters. An upward deviation from the norm will change the geometry of the floor. Check the evenness of the base will help a two-meter rail or building rule(what will be at hand). They need to be carried along the base and check the tightness of the strip to the floor. Revealed grooves should be putty, and protrusions should be sanded.
ATTENTION. After graduation preparatory work debris, sand, dust should be removed. Thoroughly vacuum and prime the surface. At the exit, the screed must be level and clean before laying.
 The next stage of work is the laying of the substrate. It compensates for minor flaws, protects against moisture penetration and creates additional sound insulation. For "floating laying" the following types of substrates are used:
 A floor made of natural wood, laid in a floating way, reacts much more to temperature and humidity indicators than. It is important to leave gaps around the perimeter of the room, taking into account all the elements that come into contact with the board (heating pipes, doors). When expanding, the board will have a place to "move". In their absence flooring swell. The gaps are 10 - 15 mm per meter. With a width of 3 meters, 3 * 10 = 3 cm should be left. For ease of installation and prevention of displacement, wedges are used. They are placed over the entire adjoining area. After that, all the gaps will hide under the decorative skirting board.
Before installing the floor, it is necessary that the material lie in the room for 2 - 3 days. It is undesirable to open the package. A sharp fluctuation in temperature will cause a change in the massif. First of all, you need to cull. Do not stack boards damaged during transportation. They must be returned or replaced before starting the installation of the solid board.
Spread - from the far left corner deck or diagonal way, perpendicular to the window. This technique is important technologically and aesthetically. 
REFERENCE. Butt seams must be offset at a specific pitch to reinforce the joints. For an array, the gap should be at least 40 cm.
The first board is placed with a comb against the wall. The following boards are inserted into the groove and tapped with a hammer. The blows should not be strong, only knock on the bar. After three rows have been laid, spacer wedges are placed between the wall and the edge of the parquet field. Having planted the board in the center, move smoothly, tapping, to the edges. Additionally, the dies are attached one to one with glue.
 The last row to be laid after measuring the distance to the wall. Since the walls always have a certain curvature, the values will differ. Each board should be trimmed separately with a longitudinal cut to the required size at the installation site (remember about expansion gaps). For the convenience of working near the wall, where there is always little space, you need to use a mounting foot. It will help to firmly press one board against another.
We remove the spacer wedges and. His should be fixed directly to the wall. Then it will not interfere with the free movement of the floor when narrowing or expanding.
Necessary materials:
Plywood is a good base for natural boards. It is attached to a screed, logs, wooden floor. If concrete base v poor condition it is necessary to fill it again, for evenness. Allowing time for shrinkage and drying of the self-leveling screed, carefully grind it. All the smallest irregularities should be eliminated. Remove dust with a construction vacuum cleaner. Cover the entire surface with an epoxy primer. Pause to dry completely. 
Cut plywood sheets into rectangular pieces to cover the entire surface. Before laying, for a firm adhesion of the sheets, glue is applied to the screed... Then the plywood is attached to the cement base with dowels.
Particular attention should be paid to the corners. It is also recommended to leave temperature gaps here: 1.5 cm around the perimeter, 2-3 mm between the rectangles themselves.
Grind the surface, remove dust and you can start laying the array on plywood. Before laying a massive board, plywood is coated with two-component glue to the width of one board.
Fit universal glue for consisting of polyurethane mixtures and hardener. We recommend choosing a glue without odor, water and solvent. Which does not cause allergic reactions when it comes into contact with human skin, dries quickly and holds natural wood coatings firmly. German manufacturers adhere to such a high bar. 
CAREFULLY. When installing with glue, you need to be extremely careful. Putting in a lot of glue can ruin the floor - it will come out from above when the dice are tapped with a hammer. At first, small spots on the surface are invisible. Daylight will "reveal" them. It is difficult to remove dried blotches. A special cleaner will be required. It should be used during work.
How to lay a solid board
In contact with
Such floor material, as a solid board, is very popular today. It has a large number positive aspects ranging from high strength to a very presentable appearance. In external design, it is similar to a parquet board, but, unlike it, it is solid wood. When choosing a way to lay a massive board on the floor, first of all you need to think about whether it is worth it. Costs! With this design, the floor will last much longer, and its operation is practical.
Solid wood boards are environmentally friendly, strong and durable material.
Such a floor covering is not afraid of the influence of aggressive factors, moreover, it is easy to work with it by grinding, and the load on such a material can be absolutely any.
To do it yourself, you should first of all decide on the method. In addition, this process is carried out already when the repair is almost completed. To make it easier for yourself, it is recommended to study in more detail the features of such a board and how to choose it correctly.
In order for the floor to serve properly, special attention should be paid to the finishing material. Its quality directly depends on how much the result will satisfy its owner.
Therefore, there are points that it is advisable to pay more attention to when buying a solid board:

Back to the table of contents

When laying a massive board, you should thoroughly prepare the base. The selection of the way of work will depend on this.
Boards can be placed on the base of several types:
The first option is most often used, that is, a screed. In order to carry out the installation, glue is used, which has a high indicator relative to temperature differences, but at the same time is absolutely non-toxic to humans.
When laying a solid board on a cement-concrete or concrete screed, check its strength and see if there is any damage in the form of irregularities, cracks or chips. It is best if such a surface has 6-7% moisture, otherwise you will have to take care of waterproofing.
As for plywood, this method is also often used. But there is also a nuance here.
To lay a massive board on plywood, remember about the vapor barrier.
The moisture content of the material should not exceed 10%, and two-component glue is used for the installation itself. To secure the edges, you will need an air gun with 30 cm studs.

The convenience of the method of laying on logs lies in the speed of installation work. In this case, there is no need to worry about cement mortars... Under the logs, a waterproofing material is laid, which it is desirable to use on the basis of a polyethylene or foam foil film.
A few words about staples. Builders call this method "floating". Using it, it is possible to save 30-40% on the laying work.
The technology of laying aluminum products implies installation together with silicone expansion joints, which provide improved edge bonding.
It also happens that a massive board is laid on top of an old wooden covering. But in this case, you should be sure that it has still retained its reliability and strength, and the moisture level of the material has an indicator of 8-10%.
If the old base has a varnished coating, then it must be removed, after which the surface is carefully sanded. This is done in order to eliminate any irregularities. It should also be noted that when installing a solid board, the direction should be the same as that of the previous coating. To fix them, you should stock up on self-tapping screws with an anti-corrosion coating.
Having familiarized yourself with each method, you can, after weighing all the pros and cons, choose the one that is most convenient for you in a particular case.
Back to the table of contents
In addition to the fact that the workspace must be prepared, you should stock up on the necessary tools:

Rows between solid boards are fastened with staples or glue placed in the groove.
With regard to fasteners, there is next recommendation: self-tapping screws are better to take those that have an anti-corrosion galvanic coating. This type of elements does not rust, moreover, they tend to smooth out the effects of seasonal influences. Some people think that it is possible to use nails that are specifically designed for parquet, but this is not the case.
Stainless brackets are used on the underside. They are used to fix two elements, by snapping them into the grooves or fastening by screwing in self-tapping screws.
As noted above, if the method of laying on a screed is chosen, then in no case should they contact each other. An intermediate layer should be created, for which a primer mastic and a vapor barrier film are used. All the resulting gaps in the joints are glued.


