In Moscow, you can buy a wide variety of fishing nets, which differ in volume, size and type of material used. In addition, drying for drying fish can be folding and frame, mobile or stationary. There are also catch-only and universal products that are used to hang mushrooms, fruits and vegetables.
All types of dryers are made with mesh walls to allow air to pass through and protect the product from insects. Inside the product can be equipped with shelves and hooks for hanging the catch. You should choose a hanging net for fish, taking into account the place where it will be placed. For example, compact dryers can be hung on a balcony or loggia, while large models are more suitable for an attic or shed in the yard.
Well, if the design has several individual shelves. You can opt for a camping wire framed fish dryer. The presence of a plastic coating will provide protection against corrosion and mold. The polyethylene mesh should have cells of small diameter so that insects cannot get inside. At the bottom of the dryer, it is necessary to equip a double bottom to accommodate the pallet. If zippered doors are used, they must be unfastened on both sides. In the upper part there should be a long and strong enough rope for hanging food.
In our store you can order catch dryers at the best prices in the Moscow region. We have been selling equipment and accessories for fishing enthusiasts for a long time. Choose the necessary products on the site, place an online application or call the indicated numbers! Managers will contact you during the day, answer your questions and quickly place an order with delivery.
Dryer for fish, dryer for drying the catch
For every fisherman, it is important not only to catch a fish, but also to properly save the catch. Drying for fish is very useful for you in any conditions, even if you are going to dry fish in urban conditions on the balcony. We offer a variety of types of dryers, from compact hanging dryers for hanging on a balcony, terrace, tree, to prefabricated frame dryers that can be installed outdoors, in the country. All dryers are easy to assemble so they are easy to carry, do not take up much space and are packed in waterproof cases, which will be very convenient if you are traveling by car. Dryers are washable, washable, do not fade in the sun, and are also protected from moisture and damage.
What are dryers?
The Dom Rybalki online store offers three types of dryers for drying fish:
Suspended frame made of polypropylene mesh. It is presented in various sizes, has three horizontal shelves for fish, a fine mesh of 3 mm, which prevents insects from getting inside. Also, this model has an additional lower compartment, due to which the lower shelf with fish does not come into contact with objects in any way and is protected from insects. The arched entrance with a zipper allows you to lay out the fish on the shelves and hermetically fasten the dryer. It is suspended on a special device from the cords that are included in the kit. Made in China.
Dryer prefabricated NPO KEDR St. Petersburg. It is a dryer for fish made of small-mesh nylon with mosquito net inserts. The frame is made of metal, mounted on flat surface or suspended depending on the desire of the fisherman. It has from 3 to 6 chains for hanging fish vertically and drying it. Hooks are not included. This model very convenient to use, as it does not require turning the catch to dry, it is easy to wash.
Dryer team made of ECO-material. domestic production dryer, which has a convenient cube shape, can be hung, equipped with crossbars with hooks for drying fish, which is hung vertically in rows. The dryer is made of solid wood, which is why it has gained popularity among lovers of environmentally friendly products. Your catch in reliable dryers! The frame is covered with breathable thin breathable fabric and protects the fish from insects and damage. Packed in a box.
Large Round Drying Rack predatory fish, herbs, mushrooms and roots. It has large shelves to accommodate large items for drying. Well ventilated and protected from direct sunlight thanks to fine mesh.
Dryers are very popular not only in summer, but also in winter, as the safety of the catch is an important component not only of pride in the past fishing, but also safe way preparing fish for further consumption. Long gone are the days when the fish was dried on a newspaper, thereby often spoiling the catch or being subjected to laying eggs of the larvae.
Choose convenient, modern dryers for fish on the website of the Dom Rybalki online store. We will deliver dryers to every fisherman in any corner of Russia: delivery by mail and transport company.
Fish dryers various variations, of course, are sold in the store. But to do something with your own hands is a pride for a real man, and even more so for a fisherman. It is possible to dry the catch without a special design, however, all the “old-fashioned” options (on clotheslines, on a balcony, attic) do not exclude the possibility of product contamination.
First of all, you need to decide what kind of dryer you need, and what materials you have for its manufacture. The “insides” of the dryer are strings, hooks are not difficult to manufacture. They can be quickly built from:
It is much more important to properly make the body of the dryer itself, which will prevent flies and wasps from getting inside.
For the manufacture of such a dryer, absolutely any plastic box, of any shape and size, will fit. Insofar as given material does not let air through, then this structure will need to be equipped with an exhaust hood. In addition, you will need:
Of the tools enough:
The advantages of this design are that it is very easy both to operate and to assemble. In addition, it is easy to disassemble and wash.
 The construction of such a dryer is similar in some respects to the installation of the model described above. The only difference is that in the first case we take a ready-made box, and in the second case we make it ourselves according to the dimensions we need.
For the design you will need:
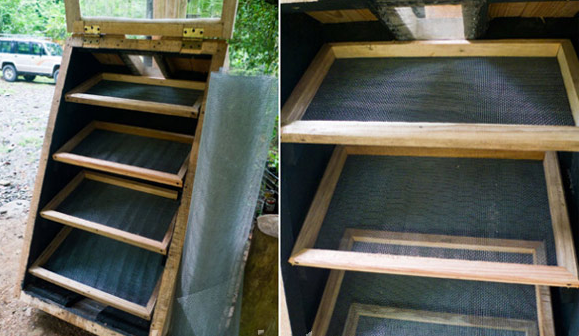
The simplest and most reliable is a fish dryer made of wood blocks. For its manufacture you will need:
List all possible options constructs make no sense. But to get you up to speed a little, let's just divide the dryers into categories:
Practically any of them can be built with your own hands.
Let us analyze in more detail the assembly of the dryer from a plastic box:

Assembling the dryer plastic panels and corners requires the following actions:
Assembling a dryer from wooden bars involves the following steps:

Any dryer for fish can be made at home. The main thing is the presence necessary materials and tools. When choosing a model, be guided by how it will be used: on the balcony, in the garage, in the open. It depends on this whether the dryer will have any additional structures: legs, hanging mounts, a fan, etc.
A dehydrator, or dryer for fish or meat, is a must-have item for many fishermen and hunters to use as one of the ways to process their prey. In order not to spend money on an industrial design, you can make a fish dryer with your own hands with minimal financial costs.
Of course, the most inexpensive option for a dehydrator is an ordinary clothesline, on which a fish is strung and placed somewhere under a roof or on a balcony. With all its simplicity, this option does not exclude infection of fish during drying with larvae of various insects, as well as from infestation by flies. Therefore, the most practical and reliable dryers for food always have a design with walls that protect prey from flies, other insects and pollution from the street, but somehow promote free air circulation. According to their design, dryers for fish or meat are different:
Hanging dryers differ from stationary dryers in that, in accordance with their name, they are suspended from the wall, thanks to which their height and position can be adjusted, which is convenient when choosing the most good place by the amount of sun or wind. Collapsible dryers very convenient in that they can be disassembled for compact storage at a time when they are not in use. In addition, they are mobile, and during long-term fishing, the catch can be immediately placed in the dryer right on the shore of the reservoir. All these dryers are adapted to dry fish outdoors. What to do if there is no such possibility, or dehydration of fish needs to be done in winter? In this case, a dryer for meat and fish with a fan will help, which is quite simple to do with your own hands.

In order to make a dryer with a fan, you will need the following materials:
The sequence of work on the manufacture of the dehydrator is as follows:

Such a dehydrator is universal, since it is used not only for drying fish, but it is also a dryer for meat, vegetables or fruits. In addition, if thick parchment is placed on the rods, you can dry small products - berries and mushrooms. The dryer from the container is quite capacious, airtight, protects products from the penetration of any insects. How fast the food will dry will depend on the outside temperature of the dehydrator. You can modify such a dryer if you install a special adapter-timer to set the operating time, as well as a device that supplies warm air inside.
A dehydrator is a device that is a dryer for products (greens, fish, meat, mushrooms, nuts, vegetables and fruits). Also, this device can be used to cook healthier (dried, without any other processing) food, such as various desserts, sprouted cereals, cookies, chips and more. Handicraft lovers create dry flower bouquets, papier-mâché objects, herbarium and other decorative crafts using the device. Dehydration of products in the device occurs due to the action of warm air, infrared or sunlight.
Store-bought appliances are quite expensive. They allow you to maintain a constant set temperature inside the drying chamber. Making a dehydrator with your own hands is an opportunity available to everyone to save on the device and get a device that allows you to quickly dry products in the required quantity.
A homemade dryer can be made from an old refrigerator. This will make a good dehydrator for fruits and vegetables.
The process of manufacturing a drying plant from a refrigerator occurs according to the following scheme.
The final design is shown in the photo below.

The inner lining and insulation are removed, because plastic and foam plastic decompose when heated, releasing harmful substances.
The insulation should be dismantled with gloves and a respirator to protect against glass wool (if it served as a heater).
Since the remaining tin cabinet is not particularly rigid, it may be necessary to increase its degree by installing spacers or a galvanized inner casing.

For blowing products, it is allowed to use a conventional exhaust fan power 18 W, diameter 125 mm, only installed to blow air inside. Installing a fan heater will significantly speed up the whole process, increasing the productivity of the installation. Instead, one or two can be attached to the back wall. electric heating elements with a total power of up to two kW - then the device will work as an electric dryer. In this case, a second exhaust fan should be installed in the upper part of the box.
The created unit can be used all year round. But if a conventional fan is installed, then painting the case black, as well as placing the device in the sun in the warm season, increases the temperature inside, which speeds up the entire process of drying products.
In order for the created dryer to work efficiently, it is necessary to provide good blowing of the product laid on the sheets. This is achieved by leaving a gap of 2 cm between the box and the door on one side, and the back wall of the box on the other.
When using a refrigerator with conventional fans without installing heating elements, it is enough to remove only the compressor with freezer and radiator. Thus, the grooves for installing shelves on them remain, but if necessary, you need to add more. as shelves can be applied:

It is easy to come up with a variety of options for creating shelves for vegetables and other products on your own and make them from improvised materials.
If the compressor is in working condition, and the cooler circulation system is not damaged, then these parts may be useful for creating.
Creating a dryer from a refrigerator takes several hours with the necessary parts and tools. Design can be improved different ways, equipping, for example, with temperature sensors and the simplest system automation, or experimenting with the location of the fans. To prevent insects from getting inside the dryer, ventilation holes close counter mosquito net or gauze folded in 2 or 3 layers.
A dehydrator can be made from homemade wardrobe in a manner similar to the previous one. Only instead refrigerator compartment here is a plywood cabinet. For this you will need the following materials:
It is better to use a fan heater instead of a separate heating element. The other fan will be normal, while working on the hood.
The cabinet must be designed in such a way as to provide unobstructed air circulation. It is collected in this order.

Fans can be connected in parallel and switched on with a switch. Also, the design can be additionally equipped with light bulbs showing the operation of the installation. The fan heater is equipped built-in thermostat. It will automatically turn on the heater heating. If necessary, you can turn off one spiral to reduce the power of the installation.
The solar dryer can be made in various ways. Wherein no electricity costs: vegetables or fruits are dried by the energy of the sun's rays. Suitable for summer residents simplest design, which can be done with a hammer, saw, stapler and scissors. The work on creating the installation is performed in the following sequence.
Also, the created design can simply be supported on something. Possible appearance shown in the photo below.
In such a cabinet, by heating the metal sheet, temperature 40-50 degrees. Ventilation ensures the removal of moisture released from the fruit.
A more complex version of the solar dryer (shown in the photo below) consists of two departments:

The front parts of both zones are covered with a transparent material, for example, glass, polycarbonate.
Collector is a box, the bottom of which is covered with a thin sheet of metal painted black. A heat insulator is laid under it ( mineral wool or sawdust) to minimize heat loss. Air enters the heating zone through the ventilation openings. Then it enters up through the shelves with products and exits.
By installing black tubes as an absorbent, for example, painted aluminum corrugation, you can increase the temperature of heating the air with a collector.
For the device to work effectively, it must be constantly kept with a directional collector towards the sun.. If the collectors are installed on three sides, then there is no need for rotation, such a drying unit will work all day. All cracks are sealed with sealant.
To create a working automated model with a length of 1 m, a height of 0.6 m and a width of 0.53 m, the following materials will be needed:
The scheme of the apparatus is shown in the photo below.

The construction algorithm is as follows.

The door must be hermetically sealed so that insects do not enter inside.
The stabilizer is needed to maintain a constant voltage at the fan contacts of 12 V. Further improvement of the created design is possible by fan speed control. It is recommended to rotate the device so that the collector and the battery are constantly illuminated by sunlight.
Suitable for mushrooms, vegetables, nuts and fruits infrared dryer. Making it yourself is pretty easy. For this you will need the following materials:
The installation is created in the following sequence.
As a result, after all the manipulations, you will get an installation similar to that shown in the photo below.

The side parts of the box can serve as a lid, or it can be made separately from the same cardboard. If you want to automate the design, then you should use temperature sensor. Under his control, the light bulb will turn on automatically.
Also, in the created design, you can use an incandescent lamp (its sufficient power is 60 W) or heating film used to create underfloor heating. In the latter case, at home, a piece of 50 by 100 cm with a power of 110 watts is enough. In the general case, the length of the fragment is chosen according to the box used.
When using the film, you will also need:
PVC tape is laid on top of the bituminous insulation. To connect the film, you will need to solder wires and contacts.

This dryer allows temperatures around 60 degrees. It can be rolled up and laid on the bottom of a box made in the previously indicated way.
Dryer for meat and fish is easy to make from plastic container. For this you will need:
The whole process of making a dehydrator for drying fish, meat and drying other products from a plastic container is shown in the video:
It is easy to assemble a dehydrator for fish, meat, vegetables, fruits and other products from improvised materials: plywood, boxes, a refrigerator. Various working old fans are suitable for blowing. In each case, it will be necessary, of course, to think over a way to secure them, but economic costs will be reduced. In small installations, you can use a fan from a computer, having previously provided the desired supply voltage. If you automate the dryer, then in terms of functionality it will be able to compete with factory counterparts. When drying meat and fish, be sure to prevent flies from entering the interior of the appliance so that they do not spoil the food.


