The method is based on the capillary rise of liquid (molten solder) along the thinnest gap between the pipe walls. There are two types of brazing for copper pipes: low and high temperature brazing. The difference in soldering is mainly related to the melting point of the solder. For high-temperature rations, refractory rod solders are used, for low-temperature ones - soft solders rolled into coils. Accordingly, acetylene and propane burners are used to heat pipes during high-temperature brazing, for low-temperature ones, sometimes it is enough, fire from a blowtorch. High-temperature brazing can be used for all types of copper wiring, including solar heating collectors, where pipes can be heated up to 250 ° C, low-temperature brazing is more demanding on pipe heating temperatures, however, it is successfully used in hot water supply and heating systems. There are no structural differences in these types of brazing, however, high-temperature brazing is more often used for socket joints of pipes, and low-temperature brazing is used on pipe joints with fittings with solder fused in them, although it is also possible vice versa.
For the installation of copper pipelines, three types of pipes are used: soft (R 220), semi-hard (R 250) and hard (R 290). Tensile strength in MPa (N / mm²) is suggested as a parameter of hardness (stiffness). Soft pipes are sold rolled into coils, semi-hard and hard pipes are sold with straight rods. The fundamental difference in these types of pipes is the pressure of the transported medium, which the pipes can withstand. Hard pipes withstand the highest pressure (290 N / mm²), the lowest - soft pipes (220 N / mm²). The pressure that is created in apartment and even cottage pipelines will successfully withstand any of these pipes. And if you need to build a steam boiler room or mini-production, then you cannot do without calculating and drawing up a project, but this is another topic.
For socket brazing (fig. 36), soft, semi-hard or hard copper pipes with a pre-annealed end. One of the ends of the pipe with an expander is given the shape of a bell, similar to the bell of sewer pipes, the end of the other pipe will be inserted into it. It must be remembered that when annealing the ends of hard pipes, you release the metal and the pipe at the junction acquires the properties of a soft pipe. This circumstance must be taken into account when designing a pipeline according to pressure criteria.
Rice. 36. Connection of copper pipes by socket soldering
To make a socket, you need to use only those heads on the expander that are designed for a given pipe diameter, then the socket diameter will automatically turn out to be slightly larger than the outer diameter of the pipe. Usually the gap between the inner walls of the socket and outer walls the pipe to be inserted into the socket is approximately 0.2 mm. This gap ensures that the molten solder is “drawn in” and evenly distributed over the entire inner surface of the socket at any position of the pipe. In other words, pipes can be brazed in any position, even with the socket down, the capillary gap between the pipes will still "suck" into itself the molten solder, which will be evenly distributed over the soldering point. The use of the "correct" expander head is 80% of the success of soldering - the gap between the pipes and the socket depth are set by this particular tool.
Today, pipe manufacturers produce prefabricated fittings and couplings that already have sockets (fig. 37). The use of such parts makes the pipeline more expensive, but it completely eliminates the "human factor" present in self-made bell expander.
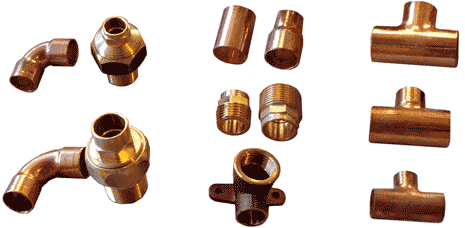 Rice. 37. Fittings made of copper and its alloys for socket brazing
 The pipes in the place of the solder are covered with flux (Fig. 38), which will act as a lubricant for the solder and "etching" (cleaning the metal) for copper. For high-temperature brazing with silver or bronze solders, borax is used as a flux. It is mixed with water until a viscous slurry is obtained. The flux is applied without surplus only to the collar of the pipe, which will be mated with the fitting or socket, and not inside the fitting or socket. After applying the flux, it is recommended to immediately join the parts to prevent foreign particles from entering the wet surface. If, for some reason, the soldering will occur a little later, then it is better for the parts to wait for this moment already in the articulated form. It is recommended to rotate the pipe in the fitting or socket, or, conversely, the fitting around the pipe axis in order to make sure that the flux is evenly distributed in the mounting gap and feel that the pipe has reached a stop. Then it is necessary to remove visible flux residues from the outer surface of the pipe with a rag.

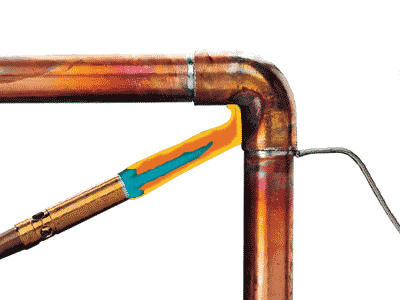 Rice. 38. Coating pipes with flux and brazing
 For brazing copper pipes, solder rods with a diameter of 3 mm from alloys of copper and silver or bronze are used. After making a socket or using a ready-made socket fitting, the pipes are inserted into each other. The connection is heated on all sides with a propane or acetylene torch. Heating is carried out until the solder bar brought up and pressed against the socket begins to melt. With the acquisition of experience, the heating time of the pipes is determined by the change in the color of the pipe - until the "red glow" is reached. Threaded fittings for connecting them to other pipelines or to plumbing fixtures are made of bronze and brass and require longer heating during brazing. To determine the consumption of solder per joint, they usually use the following method: the solder bar is bent in the shape of the letter G, making the bend slightly larger than the diameter of the socket. As soon as the soldering point is warmed up to the desired temperature, the solder is pressed against the gap between the socket and the pipe inserted into it and lead it around the pipe, without stopping the heating of the joint. The solder melts and flows into the gap. It is necessary to melt the entire bent end of the solder into the gap, no more and no less. An increase in the consumption of solder leads to the fact that it can flow through the gap and weld the inner section of the pipes; a decrease in the consumption of solder leads to non-soldering of the joint.
When brazing pipes, it is necessary to observe basic safety measures for working with an open flame. You need to work in tarpaulin gloves, it is better to be together with an assistant, hold the pipe away from the heating place. When working alone, use pipe clamps to temporarily secure the pipes.
After cooling, the unit is ready for operation - this is the most reliable connection copper pipes and quite uncomplicated. The experience of brazing copper pipes comes quickly, and for those who already own the technique of gas welding, it is immediately clear. However, gas welding equipment is needed to heat pipes. Sometimes (for soldering joints of small diameters), you can use the hot air of a powerful construction hair dryer using the hot air cone restriction nozzle in order to heat up faster. Another way of heating without a flame is electrical contact devices. Outwardly, they resemble large pliers with replaceable copper heads to cover pipes of different diameters.
At the end of the soldering of the assembly or the entire pipeline, it must be flushed in order to free the internal cavities from the flux residues. As already mentioned, the flux works not only as a lubricant for solder, but also as an etchant for copper, that is, in fact, it is an aggressive oxidizing agent. And if so, then there is nothing else for him to do inside the pipes, he needs to be removed from there by rinsing with water. Leaked flux is removed from the outer surface of the pipes with a rag.
Butt soldering of pipelines is not allowed. If it is necessary to connect the parts end-to-end, then they do not solder the pipes, but welding. In principle, almost the same operations are done as in high-temperature brazing, except that the use of a flux is not required, and the heating of pipes and fittings increases to the melting temperature of the metal.
For low-temperature rations, fittings with solder melted in them are used. Outwardly, these are the same fittings for socket soldering, but a girdle is extruded along the surface of the socket (Fig. 39), inside which the manufacturers poured solder at the stage of manufacturing the fittings. Both refractory and low-melting solder can be poured into the fitting, thanks to which both types of soldering can be performed. However, most often, low-melting solder is poured into the fittings, therefore the connections on such fittings are classified as low-temperature rations.
 Rice. 39. Fittings with fused solder in them
 The technology for joining copper pipes with braze fittings is even easier than with conventional fittings. Pipes and fittings are processed in the same way as described above. The pipes are then inserted into fittings or couplings. The fittings are heated by the fire of a blowtorch or the hot air of a building hair dryer, the solder embedded in the fittings melts and spreads along the socket, soldering the parts (Fig. 40). That's the whole technology: I stuck the cleaned and flux-treated parts into each other, warmed up the assembly with a blowtorch and allowed it to cool.
 Rice. 40. Connection of copper pipes with fittings with brazed solder in them
 The connection of copper pipes on low-temperature brazing can be used for all types of house pipe distribution, with the exception of pipelines with high temperatures (about 150-250 ° C), which in ordinary house can not be.
During plumbing work, as well as when laying sewer pipes for a house, it is often necessary to connect various segments made of copper pipes. It is about this difficult procedure that we will talk about further.
First you need to cut the pipes the right size for which the special tool shown in the following figure is used.
How to cut a rigid copper pipe. The cut is made with a special tool, the clamp of which must be tightly tightened, and then start rotating around the pipe, repeating it until the pipe is cut.
The principle of cutting a pipe is very simple. The cutter is put on the desired end of the pipe and moved to the place where the cut will be located. The clamp of the torch must fit snugly against the pipe by tightening the screw (clamp). Next, you need to start rotating the cutter around the pipe, gradually tightening the screw, and so on until the pipe is cut.

Classic use of a copper pipe cutting tool
Of course, you can use a hacksaw to cut the copper pipe, but with this cut, the edges of the pipe will be too uneven and will have to be smoothed separately.
The pipe has been cut, now you can start sanding the edges.
First of all, the edges of the pipes should be cleaned, removing all possible irregularities. For this, a file or a semicircular file is usually used.

Carefully remove any irregularities left after the cut from the edge of the pipe. To do this, you need a file or a rounded file.
Now we take a thin skin and proceed to sanding the outer surface of the edge. Polish it until it shines. Next, the inner plane of the pipe is processed right at the edges. For this, as a rule, you can purchase special brushes at your nearest hardware store.

Sanding the edges of a copper pipe with sandpaper is not at all difficult.
Do not overdo the pipe surface cleaning - if you remove too much material, then there will be problems with subsequent soldering.

The edges of the pipe, both outside and inside, must be carefully cleaned with a thin sandpaper.
Next, we need a brush with which a thin layer of flux is applied both inside and outside the pipe. Since flux is a reactive etching agent, use it carefully to avoid possible pipe corrosion.

It is advisable to use a brush to apply a layer of flux. Do not try to do it with your fingers - the flux is very poisonous and harmful not only to the fingers, but also to the eyes.

Apply flux to copper pipe with a brush
Insert the pipe into the fitting as tightly as possible. Rotate this fitting to spread the flux evenly. If any drops remain outside the pipe, remove them.

When the edges of the pipe are greased with flux, slide the fitting over the pipe and rotate it so that it is more evenly distributed throughout the pipe. Be sure to remove the remnants of the flux that leaked out.
We start working with the burner. Light it and bring the burner fire to the edge of the pipe joint. Heat the end of the fitting and fire a flame around its surface in sequence.

Both the pipe and the fitting must be heated with a torch to the temperature at which the solder begins to melt.

Copper pipe joint treatment with propane torch
When the joint is sufficiently heated and the solder begins to melt, touch the end of the solder to the point where the fitting and the pipe join. Walk around this junction in a circular motion. After the entire edge is closed with solder, and you are sure that there are no gaps, you need to wait until the joint has cooled down. Also note that the torch flame must touch the pipe when applying the solder.

The end of the solder must be attached to in addition to the fitting and held with fire along the joint. The solder will then melt and fall directly into the gap between the pipe and fitting. Preheat the fitting throughout the entire process to maintain the melting temperature of the solder.

Using solder to weld copper pipe
How does the solder get directly into the space between the pipe and the fitting, will it not remain outside? In fact, the solder will enter the gap due to the action of capillary forces, and it can flow both vertically and horizontally. This process is illustrated in the following figure.

The mechanism of action of capillary forces on the solder.
To select a solder, you need to be guided by the pressure of the liquid in the pipeline being laid, as well as the melting point of the solder. According to existing standards, in fluxes and solders intended for sewerage systems, the lead concentration should not exceed 0.2%.
It is not for nothing that a soft copper pipe is called that way - it is not difficult to bend it with your hands. However, there is a high risk that the pipe will be bent incorrectly. Therefore, we strongly recommend using a pipe bender.
If the pipe is too kinked, water will not be able to fully pass through the kinked zone, not to mention the appearance of cracks. If a bend of a sufficiently large radius is required, then the flexible shell of an ordinary water supply hose, made of a spring, is perfect as a pipe bender. It is only necessary that this shell corresponds to the diameter of the copper pipe.

If you need to bend a long soft copper pipe, you can use the spring jacket of a regular hose. Bend the pipe carefully, without applying too much force. Then, simply by rotating, remove the pipe.
To bend the pipe, you can gently push it down with your knee. Moreover, the larger the bending radius of the pipe, the less likely it is that the pipe will be too bent.

The simplest method of bending soft copper pipe: using a regular steel corrugated hose and a plastic bottle
If you need to bend the pipe within a smaller radius, then you cannot do without a manual pipe bender. Rotate the handles 180 degrees before inserting the pipe into this tool.
When the pipe is inserted, you need to lift one handle so that it forms a right angle with the other handle. It is difficult to make a mistake here, since there is a corresponding mark on the pipe bender roller, which must be aligned with the bending point.
This video demonstrates how to properly use a pipe bender in order to bend copper pipes intended for sewage or air conditioning systems.
Now just push the bender handles together until you get exactly the bend you want. Before bending the pipe, make sure that the bender fully matches its diameter.
The Lever Pipe Bender is the ideal tool for bending copper pipe. In this case, the minimum bending radius depends on which pipe diameter you are bending.

Classic lever tube bender for bending copper (and not only) pipes
To connect a soft copper pipe, a coupling is often used, into which the pre-flared end of the pipe is embedded. A joint of this type has many advantages, in particular, it is quite easy to dismantle it if necessary and fix it again.
Usually, a flared joint is used when it is impossible to use a propane burner, or if it is impossible to drain the water from the old pipe. To fasten the coupling, it is enough to put it on the pipe, after which you need to flare the end of the pipe using the appropriate tool.

The photo shows a flare and clamp with a set of calibration holes. All this together are the tools for the correct flaring of a copper pipe.
The flaring of a copper pipe is as follows.

The end of the pipe should be clamped in the calibrated hole. The flaring tool is then moved onto the clamp and the cone is inserted into the pipe. Flaring is carried out by turning the screw.
The pipe is removed from the calibrated hole, after which the coupling is brought close to the previously flared edges.

A coupling is used to connect the flared ends of copper pipes.

Standard Coupling for Copper Pipe
To wrap around the threads of the coupling, use a sealing tape and then tighten the corresponding nut tightly. The clutch is now fully assembled and we can admire it in the next picture.

The assembled clutch looks like this.
Sometimes copper pipes are cut at the factory with an allowance of 2-2.5 cm. This is done so that in case of unsuccessful flaring, the end of the pipe could be cut off and flaring done again.
A self-explanatory self-instruction manual for flaring copper pipes with your own hands. You can see for yourself - there is nothing complicated in this process.
To connect a copper pipe with taps and valves, an element such as sleeve with gasket .
In fact, this is a regular nut with a gasket. In this case, the fitting that is connected to the coupling must have a thread corresponding to the thread of this nut.

This coupling has a special fixing gasket, which exactly fits into the nut with an internal thread, and then is inserted into the hole of the valve, which, in turn, has an external thread.
Installing such a clutch is easy. Initially, a nut is put on the pipe, then a sealing gasket.

Typical Gasket Coupling for Copper Pipe
Next, the pipe is inserted into the fitting, it must be exactly perpendicular to the fitting hole. This is very important point, because if the pipe is installed into the fitting even at a slight angle, then leakage is almost inevitable.
The gasket is now pressed against the fitting edges. It remains to tighten the nut on the valve, and you do not need to tighten it too much, about a quarter of a turn.
Copper pipes and fittings are in demand due to their high durability and strength, as well as a number of others technical characteristics that ensure the smooth operation of various communication networks.
Russian and foreign companies are currently producing high quality copper fittings and pipes. Such products meet the requirements of European standards (ISO 9002, BS2, DIN), they are characterized by increased resistance to pressure of working media flowing through pipelines, to high and low temperatures, to external influences during transportation and storage.
Copper engineering networks are not afraid of sunlight (this distinguishes them for the better from the now popular polymer structures), rust does not appear on them over time, which always forms on metal and steel pipelines. Their service life is at least a hundred years, you must admit that it is very difficult to find a better and practically "eternal" material for the arrangement of household and industrial communications.
They are used for the construction of the following systems:
Individuals tend to use copper pipes when they install reliable and durable water supply networks in their homes. It is clear that the connecting elements for such tubular products are most often also made of copper. Copper fittings are considered to be much more economical than metal fittings as they require less material to make.
The bottom line is that in the production of, for example, cast iron parts, their walls are designed initially thick - engineers leave a "margin" for metal losses as a result of corrosion. But connecting elements made of copper can be made much thinner, because rust does not touch them even after decades of operation.
The demand for copper pipelines is also due to other reasons:

In addition, if the water in the pipes freezes, the line is only deformed, and not torn, as is noted when steel and other products freeze. The destruction of copper structures is recorded only when they are exposed to a load of more than 200 atmospheres (there simply cannot be such a pressure in household systems).
Modern fittings for copper networks are of the following types:

Press fittings for copper pipes are now almost never used for connecting elements of copper pipelines. Firstly, their installation is carried out using a special press, which costs a lot. Secondly, such fittings were originally created to connect plastic and metal-plastic structures. It makes sense to use press parts for copper pipes only if it is impossible to perform high-quality soldering of pipes or mount them with other types of connecting elements.
In this article, we will consider in detail other fittings (compression, threaded, and so on), but first, we note that when installing copper products, you must always use materials of a homogeneous structure. In this case engineering network will be guaranteed to serve as long as possible and without breakdowns. In other words, the connection of copper pipes should be made with copper fittings, and other materials should be used only as needed.

If dissimilar materials are used, the following piping installation rules must be adhered to:
It is recommended to mount such connecting elements when the structure engineering system involves its periodic disassembly, repair (replacement of parts that have failed) and assembly. A threaded connection is characterized by the presence of an internal or external thread on it, designed to create a single line.
In terms of reliability and long-term operation, threaded fittings are less practical than compression or capillary fittings. They must be regularly checked, dismantled and installed new elements. For this reason, such fittings are allowed to be installed in those parts of the system that are easy to reach.

Options for threaded elements for arranging copper pipelines:

When installing new networks, it is advisable to use crimp fittings, but the modernization of pipelines and their overhaul it is better to perform with threaded elements.
Such connecting parts, which are called crimp or collet, are good replacements for open flame fittings. Push-in fittings consist of a set of gaskets and rings, as well as a special ring for crimping the pipe. A completely sealed connection of pipe products made of different materials is ensured by tightening the compression ring with a wrench. Compression fittings can be made of steel, reinforced plastic, brass or copper.
Crimp (collet) parts are indispensable for water supply systems, which consist of pipes of various cross-sections. They are also in demand for the construction of networks from different materials. Although lately the classic compression fittings began to be replaced by self-locking parts, since they are more preferable in terms of their operational capabilities.

Self-locking collet fittings are structures within which a whole system of rings is installed. Moreover, one ring is necessarily equipped with teeth. When pressed with a special assembly wrench on this toothed element, it is fixed in the adjacent ring, as a result of which a truly strong connection is obtained.

Dismantling such crimp fittings is as easy as installing with the same key. Please note - compression products for copper pipes are always made of copper. Moreover, they are suitable for arranging pipelines from any other metals and plastic.
The most popular way of really reliable and durable connection of copper pipe structures is their soldering. This operation is based on the capillary effect. It states that the liquid is able to rise up the capillary, overcoming the arising force of gravity in cases where there is a certain distance between the two surfaces.
In practice, this phenomenon allows the used solder to be evenly distributed over the entire area of the joint surface. Moreover, it does not matter in what spatial position the pipeline element is located. It is not difficult to apply the solder not from the top, but from the bottom.

The technology of the capillary technique is as follows:
This is now complete - the system is ready to perform its tasks! Copper and metal pipes are installed using capillary technology. If a steel fitting is used, a special flux must be applied to the soldering site in advance. The role of the solder material is played by a very thin tin or copper wire, which is placed under the thread of the fitting. In some cases, silver wire is also used.

Another important point. Collet connections are mounted without preliminary preparation of the connected products. But soldering can be done only after thoroughly removing dirt and dust from the edges of the pipes, as well as after degreasing the surface.
When arranging pipelines from copper products by means of detachable joints, a special device called rolling is often used. Its second name is also widespread - flanging. Using this tool, it is possible to perform rolling - an operation that makes it possible to modify the shape and geometric parameters of copper and other plastic materials without losing their operational properties.
Elementary rolling is an ordinary conical blank that is placed in a pipe and then turned until it is bent to the desired shape. It is clear that such a device is unrealistic to use when arranging modern pipelines, since it does not provide uniform pressure on the walls and does not allow choosing a specific rolling force.

More efficient is rolling with clamps and a cone, which wrap around their own axis. It is such a tool that is recommended to be purchased for laying communications in your home. It is inexpensive, but the quality of work guarantees a fairly high one. The clamp of such a flange is equipped either with several holes suitable for certain pipe diameters, or with one universal type hole, into which pipe products of a wide variety of cross-sections can be inserted.
On the other hand, professional specialists involved in the construction of pipelines usually use rolling with a safety ratchet and an eccentric. Before you start working with it, you will need to put on the nuts on the pipe to be connected (it is they that make it possible to carry out the required connection). Professional rolling deforms the metal by rolling the pipe (its inner surface) with an eccentric - a device with an offset center.

And the ratchet determines the greatest force that can be applied to the structure without the formation of the phenomenon of pipe wall thinning and its punching. Strict adherence to the deformation force of copper is ensured by rolling the eccentric. This device does not leave small grooves and dents on the inner surface of the pipe. This means that the system will serve you for a very long time, because it is the presence of these flaws that significantly reduces the service life of the communication (grooves and dents are those areas where there is a high probability of leaks).
Thus, rolling with eccentric and safety ratchet is rightfully considered ideal tool for the installation of copper pipelines at an impeccable quality level. And most importantly, the whole process goes quickly and without excessive expenditure of physical strength.
Even with the fact that polymer pipes are used more and more often, metal products are still enjoying considerable success. Typically, copper, brass and steel are used as metal. For the better in terms of corrosion resistance and high temperatures different copper. Actually, about the connection of copper pipes, and will be discussed in this article.
Even despite the fact that copper pipes are distinguished by their high cost, taking into account all the characteristics of the material, their use is quite justified.
First of all, before connecting copper pipes, it is worth deciding how to connect them, by soldering or otherwise.
Consider connecting copper pipes with fittings followed by brazing, which can be low and high temperature. In the first method, soldering is carried out at a temperature of 300 ºC. The second method is used in the arrangement of systems with high loads for industrial purposes.
Couplings act as connectors for copper pipes; tin-lead solder and flux are additionally needed.

The pipe brazing technology will be as follows:
In addition, it is worth noting that, despite the fact that the connection of pipes by soldering is considered the most reliable method in most cases, there are still situations when it is not possible to use this method. In such cases, you can resort to the connection of copper pipes without soldering. Special fittings will be required to ensure a secure connection due to the clamping effect that occurs when threaded connections.
In this case, the connection is made in the following sequence:

Usually, such fittings are equipped with detailed instructions, which must be followed without fail, otherwise the work performed will be of poor quality.
It is worth noting that before connecting copper pipes without soldering, it is worth realizing all the risks, since it is rather difficult to obtain a high-quality connection. Minimal distortions of the parts to be connected are not allowed at all, otherwise the technology is grossly violated. To make the threaded connection extremely tight, it is advisable to additionally seal it with special threads. In this case, it is worth making sure that they do not end up on the inside of the pipe, since subsequently the water may not pass through the system properly.
For any type of connection, the list of work carried out will look like this:

In conclusion, it will not be superfluous to note that the connection of copper pipes is technologically a process of medium complexity. If you are engaged in such work for the first time, then you need to be prepared for the fact that some nuances may arise. In order to understand the process, and get as much of an idea as possible about it, it will not be superfluous to get advice from professional workers, or, at least, to familiarize yourself with the available video materials.
Solder joints are more reliable, simpler and cheaper. There are two types of soldering: high temperature and low temperature. For high-temperature brazing, brazing alloys of copper and other non-ferrous metals are used. Previously, even silver was sometimes soldered. But I have never done high-temperature soldering, and even watched it only once briefly, so I will not powder your brains.
Low temperature brazing is performed with lead-tin solder. The outer surface of the pipe and the inner surface of the fitting are cleaned. A flux is applied to the outer surface of the pipe. It is not worth smearing the flux inside the fitting, because then, when inserting the pipe, you will squeeze out part of the flux into the fitting, which is undesirable. Immediately insert the pipe into the fitting and turn it back and forth a little so that the flux is evenly distributed. I advise you to solder immediately after preparation so that the flux does not dry out or leak out.
The junction is heated by a burner or a special electric powerful heater. The end of the solder wire is applied to the gap between the parts. The wire melts and flows into the gap. The capillary effect is said to be the cause. I don’t know, but the fact remains - in the space between the pipe and the fitting, the flux is replaced with solder melt without additional effort.
When brazing, you need to use a special flux for brazing copper pipes. The fact is that a universal flux is not suitable here. I was convinced of this in my sad experience. The soldering technology is such that the flux must withstand temperatures up to 350 degrees (not burn out). Only then will the solder melt and begin to flow into the space between the parts. Universal flux loses fluidity at temperatures below 200 degrees.
Soldering also has some serious drawbacks. Firstly, everything looks very good in theory, in practice, imagine yourself with a gas burner in a room saturated with elements unstable to heat ( wall panels, pipe fittings, sewer pipes etc.). You try to heat the joint evenly from all sides, but the pipe is fixed to the wall, it is very difficult to crawl to it from the side of the wall, and you need to heat it carefully, if overheated, the flux will burn out and nothing will be soldered. You also need to hold the elements to be connected in a strictly defined position relative to each other so that the gap between them is the same on all sides. Otherwise, the solder will not leak and the junction will not disappear from all sides. As my mentor, who taught me this business, said, ah, why am I not a multi-armed Shiva?
Secondly, the solder contains lead and the seam is in contact with water. For hot water and heating is not critical, but drinking water I would not pass through such a pipe.
Thirdly, It is not always possible to ensure complete removal of flux residues. And the flux is corrosive and can eat through copper pipe.
Therefore, recently I glue copper pipelines. I use cyanoacrylate (superglue) (its version with metal bonding additives) or poxypol depending on my mood. Cyanoacrylate holds very well, but sets in one second, so it is difficult for them to glue. Poxipol holds a little worse, but you have 5 minutes for mutual positioning of the pipe and fitting.
Brazing fittings are used. The fitting from the inside and the pipe from the outside are sanded with sandpaper. Care should be taken to ensure that small grooves from the sandpaper across the pipe remain on the pipe and fitting. This will increase the strength of the joint. Further, the parts are degreased with acetone. The adhesive is applied in a thin layer to both the end of the pipe and the inner surface of the fitting where the pipe is inserted. Before applying Poxipol, you must prepare: mix the two components according to the instructions. Apply a little glue, but in an even layer. It should not squeeze out of the gap too much. Better to practice first on a table with a pipe cut. Now we insert the pipe into the fitting, turn it back and forth a little so that the glue is evenly distributed, and wait for the glue to rise.
The connection is surprisingly strong and neat. I have been using this technology for several years with excellent results.
My colleagues complain that such a connection is not separable. But this is not true. It is collapsible to the same extent as soldering. It is enough to drain the water, heat the fitting with a soldering torch. Poxypol or cyanoacrylate will melt and the connection will be disassembled with a little effort. Parts can be cooled, cleaned from glue residues, degreased and glued again. Soldering parts with solder residues after disassembly is also possible, but more difficult.
Be very careful when disassembling. When heated, cyanoacrylate vapors are released, which are very toxic. This is another argument in favor of poxypol.
By the way, there is a special two-component adhesive for metal on sale. Try it, it should hold even better.
If the soldered or glued joint leaks a little (dripping - 2 drops per minute or less), then it is not necessary to disassemble and redo it. The water always contains suspended impurities. Such a small hole will quickly become clogged with these small particles. The flow will stop. You can substitute a container so that the water does not flow to the floor and wait a week. The flow should stop. In an autonomous heating system, it is even easier to eliminate leaks, see the link.
Unfortunately, errors are periodically encountered in articles, they are corrected, articles are supplemented, developed, new ones are being prepared.
How to assign responsibilities while hiking ...
Tips for organizing a hiking trip, selection of participants, optimal co ...
Soup preparation - gravilat puree. Ingredients, composition. Diet ...
How to make a soup - puree from gravilat. Personal experience... Advice. Detailed instructions ...
Clapboarding of walls and ceilings ....
How to sheathe clapboard to look beautiful and professional. Practical experience ...
Auchan is a chain of stores and hypermarkets. Buyer feedback, pre ...
Let's talk about Auchan. What I like to buy in it, what I prefer to buy ...


