Design solutions in some cases, they may be unexpected, but they always bring zest to the interior or exterior. It's more common to see flooring in place, but in some cases it looks great on the wall too. This, for example, can be said about laminate flooring. It is not difficult to complete such a finish on your own, but it is important to know the technology of how to lay the laminate on the wall. The advantages of this option, as well as the installation method, will be discussed in the article.
Laminate has been used for decoration for a long time and there are several simple and convincing reasons. Among them are:

On the market, you can find an abundance of solutions that imitate a variety of wood species. You can choose from representatives that are considered rare or very expensive. Together with the texture, it is easy to choose the color of the laminate. It can be soft beige or flashy orange. Everything will depend on the general picture that is planned for a particular room. Laminate is originally a floor covering, so it perfectly withstands mechanical stress, which can be shock. Under proper conditions, the laminate will last more than 20 years without any difficulties and will require replacement due to the desire to update something. With proper skill, the installation of the flooring can be done independently. Installation can be carried out without special tools. Care of the laminate on the wall is carried out in the same way as on the floor. Moreover, its cleaning is easier, since there are no strong polluting factors. Among the disadvantages that should be considered when solving wall decoration, you need to know:

Laminate has a fibrous layer in its composition, which is the reason for sensitivity to changes in temperature and humidity. The consequences of such an impact can be loss of shape of the laminate lamellas. This leads to a violation of the integrity of the seams and the need for replacement. Inexpensive laminates can contain resins that release phenol or other substances. The latter represent serious harm to the human body.
When choosing a laminate like flooring, special attention is paid to its strength and durability, therefore they buy a middle or high strength class. For walls, the picture is a little different. Since there is no special load on the laminate flooring, you should not overpay for a high class. You can stop at options 21, 22 and 23 classes. The main criterion is the texture and color of the finishing material. In big cities, you can still find such varieties of laminate, but in small cities you will have to do additional order because sellers rarely keep slow-moving items.

Another problem that can be faced when choosing a low grade laminate is the lock connection. Some manufacturers produce this type only with a Lock lock, which implies the use of glue when performing installation works... Such a product is easier to install, but in some cases it is difficult to achieve perfect seams between the planks. In this case, you will need a special glue, which must be applied both to the lock itself and to the seamy side of the panel. More difficult to install, but more reliable in operation, is the Click type lock. When joining two separate laminate planks, they must be held at a certain angle in order to fit into the groove. At the same time, a characteristic sound is heard, indicating the successful completion of the work. Additionally, metal brackets or clamps hold the strips in place. In some cases the best solution will use glue in the form of liquid nails.

Wall-mounted laminate will good decision not for every room. For example, it cannot be used in the kitchen. Due to constant cooking, a large amount of water vapor is released, which will surely settle on the surface of the laminate and seep into the seams, causing it to deform. In addition, there are significant temperature changes in the kitchen, which also have a detrimental effect on the flooring. The same fate befell the bathroom, where the vibrations can be even greater.
Note! Some types of laminate are not wooden, but plastic. It is insensitive to changes in humidity, so such a laminate can be considered as an option for installation in the kitchen, but its price is too high for such purposes.

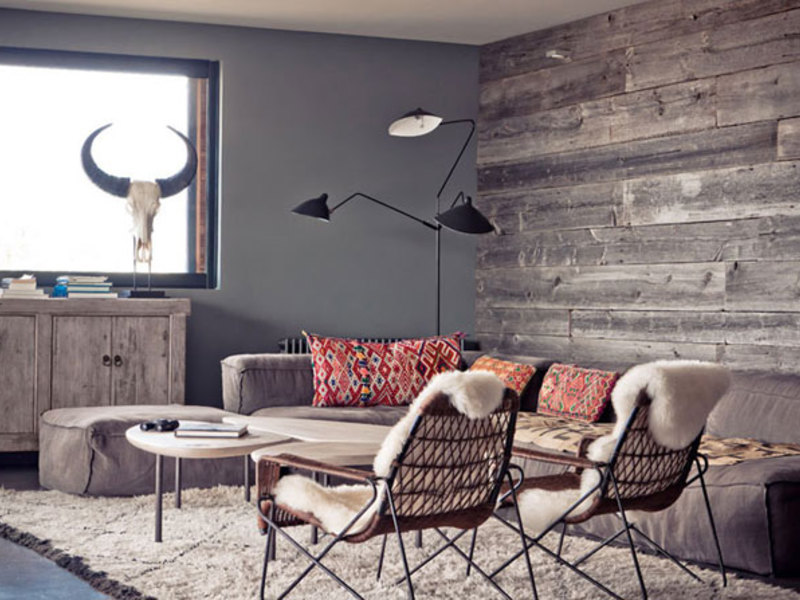
Laminate on the wall looks great in a bedroom. For example, they can lay out small area behind the bed, which will visually highlight the sleeping area. Laminate is used to protect the walls in the hallway, so it is laid out above the waist. You can fragmentarily highlight the area in the living room where there is a sofa or TV. An excellent solution will use a shade different from that used on the floor. This will prevent the areas from merging.
The process of laying the cladding on the wall will depend on the condition of the wall. If it is flat and putty, then you can install it directly on the wall, but if the surface is not ideal, then you will have to resort to the help of the lathing. Each method will be discussed in more detail below.

The preparatory stage includes calculation work and tool preparation. To calculate the required amount of laminate, it is necessary to determine the area of the area on which the laminate will be laid. If it will be the shape of one of the geometric shapes, then it is necessary to apply the corresponding formula. In some cases, the shape is complex, so it will need to be scaled onto paper and divided into simple shapes. After that, their areas are calculated and the results are summed up. The next step is to calculate the plank area of the selected laminate for the wall. To do this, the length of one laminate plank is multiplied by the width. The total area is divided by the area of the laminate plank. This will reveal the number of laminate planks that will be needed. Their number must be divided by the number in the package and it will become clear how many packages are required.
Advice! The material should be purchased with a margin of several strips to compensate for miscalculations or unforeseen situations.
For high-quality laminate flooring, you will need the following tool:
A hammer drill and a screwdriver will be needed when the laminate is mounted on the wall using the lathing. It is also worth taking care of a sufficient number of dowels and screws.

Laying laminate flooring on a perfectly flat wall is a pleasure, but you have to work hard before installation. Before carrying out work, it is necessary to clearly mark the area on the wall where the strips will be mounted. Better to start from the bottom and move up. Before fixing the first plank, it is necessary to cut a spike from it in order to ensure a better abutment to the floor. To do this, you can use a construction knife or hacksaw. It can be resting directly on the floor if the installation will be carried out from its plane. In another version, it is important to set it horizontally in level and fix it to the wall with a self-tapping screw or rest on a stand, the height of which will correspond to the initial level of mounting the strips on the wall.

The reverse side of the laminate plank is coated with liquid nails. This must be done evenly, preferably in a zigzag manner. The plank is applied to the wall and pressed down well. The adhesive should be evenly distributed between the plank and the wall. Claymers cannot be used, because for each one would have to drill a hole in the wall and mount a dowel under a small self-tapping screw. Thus, the first row is mounted. The second must be started with half the plank. This is important to ensure that the seams are intertwined. If the glue method of wall mounting is used, then the seams are covered with glue. In the case when mounting without glue is used, then it is better to cover the locks with a special silicone grease. It facilitates the joining of the seams and also makes them elastic. To facilitate the task, you will need to use a rubber mallet or hammer and pad.
Advice! If laminate flooring is to be installed on the entire wall plane, then you can pre-install moisture-resistant plywood. Adhesion of the glue will be better with it, and it is also easy to hammer the cleats into it with the help of small nails. This method of editing can be seen in the video below.

An uneven wall can always be leveled with plaster or putty. But it will take time not only to work, but also to dry the composition. When there is no desire to spend money on additional work or the deadlines are tight, then it is better to carry out installation on the wall using the crate. The option of how to lay the laminate on the wall using the lathing is very similar to how the lining is mounted indoors. It can act as a crate wooden plank or aluminum profile. When buying wood for a crate, you should make sure of it good quality... It should be well dried and free from pests, since subsequent difficulties will not take long.

The next step is to determine the difference that the wall plane has. For these purposes, you can use a laser level. A beam is projected, which is parallel to the wall. From it, it is necessary to take measurements at various points and calculate the difference. The lathing is mounted with a step that will not exceed the size of half of the laminate plank. If the laminate on the wall will be located horizontally, then the battens should go vertically and vice versa. It is in this case that the required emphasis will be provided. The space between the posts of the lathing can be filled with insulation material in the form mineral wool for additional thermal and sound insulation.

The lathing strips are attached taking into account the difference in the wall. Wooden ones are grinded with a plane, and metal ones are leveled using fastening brackets. Installation of the laminate on the crate is carried out in the same way as in the previous version. In this case, each laminate plank is fixed with a cleaimer, which is fixed in the crate. It is important to remember that a 5 mm gap must be made from the side walls, floor and ceiling. It is required for temperature compensation. As the temperature changes, the laminate planks may expand or contract slightly, which will be compensated for by the gap. The gap between the walls and the laminate can be closed with a skirting board.
As you can see, wall-mounting laminate flooring is an interesting task. The laminate does not have to be perpendicular to one of the walls. The diagonal arrangement of the laminate on the wall looks interesting. In this case, it is not necessary to combine the arrangement of the furniture with the seam lines of the laminate. If desired, the laminate on the wall can be laid out with a rhombus or other geometric figure. For fragmentary placement on the wall, it is easy to make a backlight along the edge of the LED strip.
Laminate wall decoration is an unusual way of decorating, as it has long established itself as a strong and durable floor covering. Nevertheless, laying laminate on the wall is increasingly replacing wall decoration with plastic or MDF panels, clapboard or drywall. In addition, the technology and methods of installation are quite simple, you can do them yourself if you follow the photo examples and video instructions.
Laying laminate on the wall
If you are wondering what arguments exist for laying laminate flooring on walls, it is worth listing its advantages:
However, there are some disadvantages:
There are three types of laminate: tongue-and-groove, click and adhesive.

It can be used for wall cladding, but only if it is perfectly flat.
Before choosing how to lay the laminate with your own hands, you should deal with two questions:
 lathing for laminate
 The first question reflects the ways of fastening - with glue or by arranging the lathing on the wall. The glue method is quite simple, it is suitable for all types of laminate, but it makes high demands on the quality of the wall surface - it must be uniform and even, otherwise gaps and joints will be visible, and the panels will not be able to hold out on such a wall for a long time. But this method is very simple, the installation is easy to do with your own hands. The method of creating the lathing has advantages in the sense that it is not necessary to spend time and money on leveling the walls, and it also creates additional sound and heat insulation of the surfaces. If, when decorating the walls with laminate, the ceiling is additionally decorated, this will serve as a good sound insulation from the neighbors on top.
 vertical laying of laminate on the wall
 The second question reflects whether the laminate is laid in vertical or horizontal stripes. The horizontal method, at first glance, seems to be the simplest - the panels are stacked in horizontal rows one above the other. But all the joints must be covered with plinths, which are attached to the wall with dowels. They need to be installed every meter - one and a half, otherwise the entire cladding, without additional fasteners, will fold like an "accordion". To give strength to the laminate with this method of laying, you need to alternate half, i.e. shorter panels, with long ones, stacking them one above the other (see photo). Shorter panels will evenly distribute the load on the attachment points.
The vertical way of laying the laminate will create original design walls, the design of which will also affect the ceiling, if at the same time, for example, you combine different shades or sizes of panels (see photo).
When laying laminate on walls and ceiling with your own hands, you will need the following tools:

In order to make the installation process and technology more understandable, you can watch the video at the end of the article for clarity.
 laying laminate on the wall
 The article was prepared with the support of the online store
As you know, laminate is a floor covering. But what ideas do not come to minds of designers to create unique interior premises. One of these original solutions was the use of laminate for wall decoration.
This innovation is gaining more and more popularity, which is why many home craftsmen began to think about how to mount laminate flooring on the wall.
This article will show you how to mount laminate flooring to walls.
It is no secret that PVC and MDF panels are most often used for simple and quick wall decoration.
If we consider the laminate from this point of view, then it has some advantages over them:
Against the background of these advantages, there is only one drawback - the cost, which is almost 2 times higher than that of the panels.

Before you start attaching the laminate to the wall, you should familiarize yourself with some of the nuances of this process.
In order to avoid problems that sometimes arise during installation, you need to know what they can be:
On the one hand, such a fastening provides good joint rigidity, but on the other? the head of a nail or self-tapping screw falling on such a lock will prevent it from tightly closing, which will lead to gaps.
Based on the above, we draw the following conclusions:
Useful advice! In rooms with high humidity, such as bathrooms and kitchens, it is not recommended to use laminate flooring as wall decoration.
This finish is only suitable for rooms with constant and moderate humidity levels (bedrooms, living rooms, hallways).
You can fix laminate boards on the walls with your own hands different ways... The technology of this process depends on the characteristics of the surface on which they are installed.
The easiest way- fastening the laminate to a plastered surface or sheathed with drywall sheets. Such a surface is quite flat, so the laminate is attached to it with liquid nails. This adhesive bond, even after hardening, has good elasticity and, moreover, is quite strong.
The following instructions will assist you in your work:

Useful advice! If you need to cover a small area with a laminate, then you can assemble a shield from it on the floor and stick it on the wall in this form.
To fasten the laminate to a wall with irregularities, a crate is used.

Laminate can be attached to walls not only with adhesives. There is a very simple and proven method - fastening with clamps.
These are galvanized brackets specially designed for fixing lining and laminate to walls or ceilings.
For such fastening, two types of clamps are used:
Self-tapping screws are used to fasten the cleats to a wall or board.
Laminate is a reliable and durable finishing material that gives any interior a beautiful and modern look... It is not for nothing that they began to use it for finishing many surfaces.
We examined all the subtleties of laying laminate on the walls, fully covering the specifics of such works. These recommendations will help you avoid the main problems encountered during installation and carry out it efficiently with your own hands without much difficulty.
Additional information and step by step process installation of the laminate you can find in this video.
There are many varieties of laminated wall panels. They are made from different materials and in different formats, auxiliary profiles are produced for them. But no less popular for wall decoration is a laminate designed as a floor covering. Although because of this, its installation takes place according to different rules.
For the most part, the interlocking laminate, as a floor covering, is not intended for rigid attachment to the base. This is a floating floor type, the main feature of which is the reliable fixing of the floorboards to each other. Typically, a firm grip is provided by an end lock connection with a complex snap-on profile. Of course, you can also find an adhesive bond, but rarely.

Finishing with wall panels requires the opposite - rigid attachment to the base, and the profiled end is an additional option, providing a hidden type of installation.
The most common type of slatted panels is a lining with a regular tongue-and-groove end. Therefore, often the laminate is also mounted to the walls - through the groove, fixing it to the lathing with fasteners. But this is not the only type of installation.

There are three ways to fix the laminate to the wall:
Laminate flooring can in essence be considered a type of fiberboard, therefore, an anhydrous glue is needed to fix it. This is especially important if the leveling of the wall surface is carried out using gypsum board or plywood - with prolonged contact with a humid environment, either the base or the panels themselves can swell and "lead".

You can use parquet glue, but not dispersion, but solvent-based or two-component.
The surface of the wall should be nearly perfect. If small irregularities of the subfloor can be compensated for with a substrate, then for a wall this is not possible. The glue is quite expensive, it is applied in a thin layer, therefore the uneven surface of the wall will lead to a decrease in the adhesion area spot, which will affect the reliability of the fastening.

After leveling the wall (with plaster, putty, using drywall), it must be primed and dried.
Then, using a level, lines are applied to the surface, which will be guided during the installation of the laminate.

The most common laying pattern is offsetting adjacent rows by half the length of the plank.
The first row starts from half. They smear its seamy surface and the contact spot on the wall. Press for a short time, then "tear off" and allow the glue to weather, then press again until the initial setting. In principle, this is a technology for working with fast-drying adhesives, which can differ in the holding time at each stage. In this algorithm, the first row of laminate is glued, and then all the others.

The second row starts with a whole panel, and the third row again with a half. The technique of joining panels between rows depends on the type of laminate lock.
The advantage of this installation method is the minimum loss of useful volume.

There are more disadvantages: significant labor intensity, high consumption of expensive glue, low environmental friendliness of quick-drying anhydrous adhesives. In addition, walls that have been leveled with plaster and putty may not have sufficient topcoat strength to support the weight of the laminate.
Mounting the laminate to the wall on the lathing has the same sequence of operations as when finishing with clapboard:

An adhesive laminate with a smooth spike-groove profile is mounted to the lathing in the same way as the lining: with a thin nail through the bottom wall of the groove or using cleats.

For fastening castle laminate kleimers are usually used for the crate, but under them you will have to:
Among all types finishing materials wood-based laminate is one of the most expensive (only more expensive parquet board and parquet). Previously, it would be possible to save on the class, but below 31 classes are no longer released. Most cheap laminate domestic production with a thickness of 6-8 mm will cost about 400 rubles. per sq. meter. Therefore, there is no need to talk about the availability of this type of finish.

The high wear resistance of the laminate, the use of HDF in the base layer and the complex profile of the tool joint are all redundant qualities for wall panels that will not "work" and will not affect the durability of the finish.
Installation of laminate on walls is more difficult than for wall panels. Even with battens, more materials, fasteners and more time are required.

The only thing that justifies the funds and efforts spent is high decorative properties and the possibility of creating harmonious interior... Moreover, it is not necessary to sheathe all walls (or the entire wall) with laminate - usually it is enough to select a separate area.


