Today there will be a simple article about how to connect two luminaires from one two-block switch. For electricians, this is a very simple thing, but I know for sure that more than half of the male population of Russia when the chandelier is connected easily confused in three wires. No offense is said. For them, this article is just.
In detail, step by step, with the schemes will consider all aspects of the installation and connecting two ceiling lamps With 2 lamps.
For which it took the alteration of lighting in this case. The apartment was a small renovation with redevelopment, and the configuration of the hall changed - he became more square, and the chandelier, who previously hanging the middle of the room, now became from the edge.
Therefore, it was decided to install another chandelier (lamp). This solution has the following advantages:
Of the minuses, only costs can be distinguished construction works and buying a lamp.
Anticipating comments about aluminum wiring, I will say that it makes no sense to change all the wiring in the apartment. In the boxes of aluminum, high-quality welded, sockets and switches are connected personally, and the whole apartment is broken into two lines, which are 16a. And yes, minus is that the sockets and lighting hang in parallel, now no one does.
To begin with, we will understand the terminology. What is a chandelier, and what is a lamp?
The lamp is the most widespread concept, it can be any in design, fastening and on the light source. It may be a ceiling, point, wall-mounted (at the place of installation), LED, halogen (by type of lamps), indoor, street (according to the type of execution).
The chandelier is a lamp that has two features that highlight it in a row of lamps:
Drive list of my articles in which are considered different kinds Lighting devices and a variety of photos are given:
I lead it to the fact that there is not much difference between the chandelier and the lamp from an electric point of view. Just the concept of "chandelier" is included in the concept of "lamp".
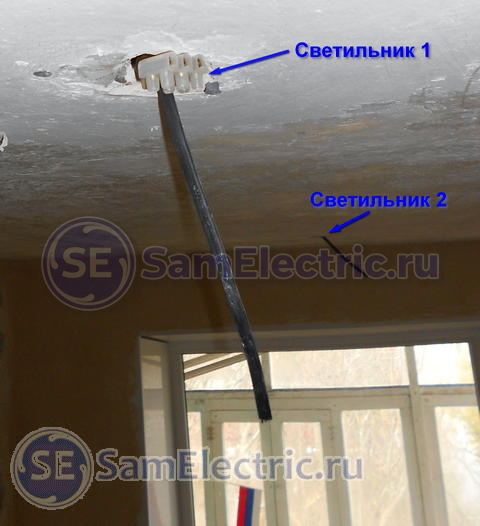
So, we have to start installing two chandeliers the next picture:
What black things are screwed to the terminal bar parallel to the light bulbs, described in detail in the article ". By the way, switches - backlit;)
For completeness of the picture (if someone has subsided for the school course), I will give a classic scheme, which shows a lamp with two lamps (two light bulbs in parallels), which turns on through a single block switch:

Scheme 1. How to connect a chandelier with two lamps, a connection diagram over a single block switch
The lamp is conditionally shown by a dotted line, zero on the lamps is permanently, and the phase is switched by the switch.
Here is a chandelier circuit with two lamps, which was at the start of repair:

Such schemes are usually used in large rooms To include chandeliers containing two and more light bulbs, to save electricity and resource lamps.
I remove the old chandelier, that's what remains on the ceiling - a terminal bar (zero marked with a marker), a dowel for fastening the chandelier to the ceiling, and a folded hook, which hung a previous chandelier:

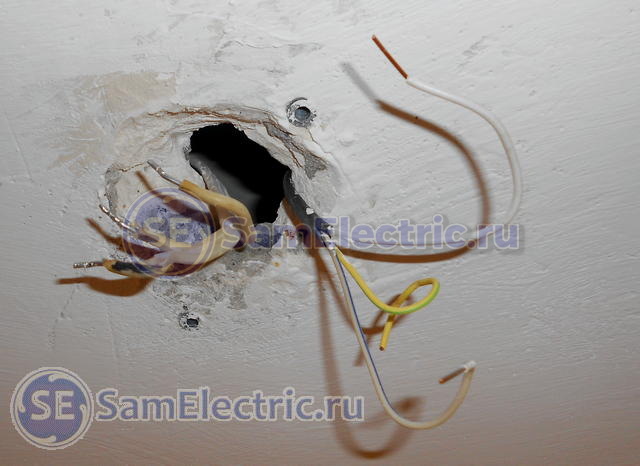
Having placed a hole with a perforator and throwing out the old hook, we get such a hole:

Here we need to return to theory again. Ceiling plates of overlappings are arranged in such a way that they have emptiness, at a distance of 185 mm from each other:

In these voids and pave food to all lamps in the apartment, and sometimes the power wires are laid there.
A hole is drilled in a stove of a 12-16 mm brown to which the cable is from the wall, and goes where the chandelier should be. The wire, which I freed from the old plaster, looked freely in the hollow plate.
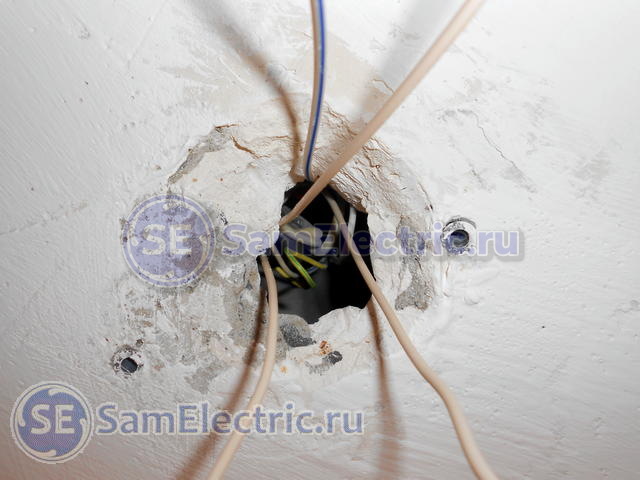
Now you need to make a hole in which the cable for the second chandelier will go. This helped me, as always, my reliable friend and assistant - perforator . On one line along the plate we make a hole:

Hole in the ceiling plate for cable new lamp
That's how two points look like; New and right away - old:

Cable WG-NG 3x1.5 enters the slab with a whistle:

Even when the third wire is not planned, I try to use a three-in-room cable. Many times it was already that the backup wire turned out to be very by the way!
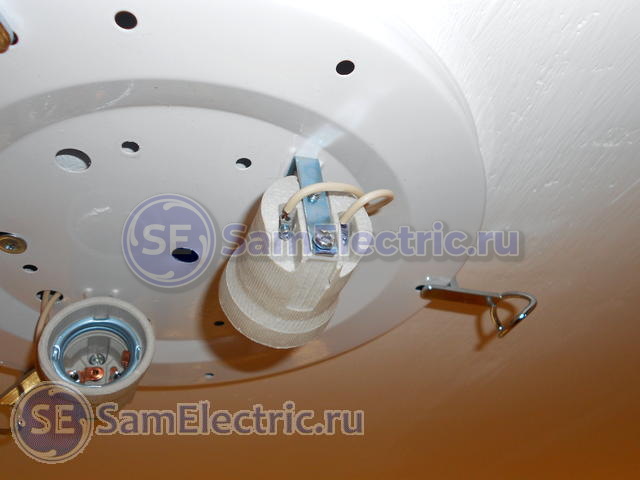
Place a new lamp:

While it lasted in the room, I temporarily connected old cartridges with lamps. And, of course, I used my favorite. Quickly, reliably and simple.

Light bulb at a new place:

Closer, connection through Vago:

It is time to connect two new luminaires on the ceiling. Disconnect old temporary light bulbs:
Such, for example, were used when connecting aluminum to copper when.

To simplify life, zero wires apply blue (with a blue stripe), the phases are white. Lenten choose with a reserve!
Here you need to insert a connection diagram of two new lamps:

As can be seen from the scheme, now each key turns on its lamp with two lamps. Thus, the room is obtained by lighting zone.
Carefully hide our terminals in the canal in the stove, and only copper comes out. Two phases and two zero, each for its light bulb of this lamp.
Despite the fact that the scheme shows that two wires (zero and phase) include two lamps (zero and phase), in this case it is easier to make a wiring to the lamp, and start 2 phases and 2 zero in it, even if both lamps are turned on in parallel .

It was decided not to hang onto the ceiling cumbersome elderly mesh chandelier, but to install compact neat lamps in minimalist style.
This earlier in pious houses was fashionable to hang in the hall with a chandelier with many plafoons, glass and bangol, which dust, and the children who were sitting on their shoulders. And I beat me, and I beat :)
Krepim on the 2 screw lamp. Fortunately, there are a lot of holes in it, and you can choose so as not to work perforator.
- The first rule, before performing any work: think that you can do to do this work.
- The second rule: think about how this work is easier, faster, high quality
- Third Rule: think about how to get a buzz from performing work.
The point is not in laziness, but in optimizing labor. ;)

Near the terminals of both cartridges we derive a phase and zero that we connected in advance. Connect so that the phase is on the central contact of the lamp cartridge, zero on the lamp thread.
Screw light bulbs:

May the light be!


Connecting a chandelier to the lighting wiring is an integral part of any repairs both in the apartment and in a separate room. And although this operation is associated with the works in electrical circuits, absolutely any person can cope with it. We just need to follow certain rules, and then the work will be performed quickly, qualitatively and the question will not arise how to connect the chandelier.
The most important requirements when working with electrical wiring - compliance with the rules of security and installation rules of electrical devices. It makes no sense to learn the "Bible" of electricians: "Rules safe operation Electrical installations of consumers "(PBEEP) and" Rules of electrical installations "(PUE). Such documentation is necessary mainly to people for whom work with electricity is the main relationship. For home repairs to connect the chandelier with a switch, it is enough to know and comply with simple rules.


Connection diagram chandelier with double switch
As can be seen from the drawing, three wires are suitable for a double switch, one of which goes from the junction box, and the other two are used to connect the lamp. Therefore, when installing a new wiring, you need to use a cable with 3 wires.
Connect the chandelier to the double switch is made according to the same rules as the connection of a conventional lamp.
Quite often you can hear from nonprofessional advisers that the installation of the switch can be made on any wire. Like, what's the difference, because with open contacts, the current through the lamp does not go and this is enough. This is not true. The fact is that if the switch bursts the zero conductor, then the chandelier lamps current does not flow, but the phase potential will be present on all wires, which threatens the current when working.
A less dangerous, but unpleasant feature of such switching - luminescent lamps and lamps - "housekeeping" can slightly glow or flicker even in the off position.
To connect a chandelier or another lamp, the following will be necessary:
The purpose of most tools is understandable without comment. Why do you need a knife? In some cases, namely, when removing isolation from single-core conduits of an electrical cable, side-by-side and passatages cannot be used, since the transverse incision of the cores on the plug-in will lead to its fracture. This is especially true for aluminum wires.
Insulation must be cut off with a sharp knife like the pencil sharpening. Longitudinal scratches on the veins of the wire are not terrible.
The indicator screwdriver is used to search for a phase conductor. And although its end provides for the possibility of using as a screwdriver, it is not necessary to do this, since the mechanical strength of the indicator is very small and normally tighten the screw without breaking the tool almost unreal (it is possible, but the tool will serve very long).

Read more to stay on the measuring instruments. They are digital and shooting. Most parameters are preferable to digital. They have high accuracy, are not afraid of shocks and drops from height, protected from overload.
The switch must be used only in the position for which it is provided (most of the portable devices need to be horizontally), a drop from a height with a probability of 100% will disable it, as well as overload with incorrectly set regulator positions. Undoubted advantage of the arrow instrument - the voltage measurement can be made without a built-in power source.

Note to all types of instruments: the operating range should provide for the measurement of alternating voltage of at least 500 V.
To facilitate the wires of wires and error exceptions, color marking of insulation of conductors in the cable is used. The generally accepted standard is the marking of the grounding conductor yellow With a green stripe.
You can never use a conductor with such a coloring for connecting devices! This conductor is used only for grounding.
For zero (neutral) conductor, veins with blue or blue colors are used. Phase conductors may have different colors other than those listed.

Problems arise when working in homes with old wiring. Sometime, the insulation of the wires was done the same for everyone, therefore, before starting work, it is necessary to perform a wire transvelon.
First you need to check the correct switching of the switch. In the open position, the indicator screwdriver should show the presence of a phase on one of the conductors. If the phase is not found, it means that the switch is connected incorrectly or have problems in the junction box.
In the place of the ceiling, where the lamp will be installed, there must be at least two wires - zero and phase from the switch. In the case of a multi-mass chandelier, the number of wires can be large. One of them remains neutral, the number of others corresponds to the number of keys on the switch.
Determine the purpose of each wire is very simple. When the switch is turned on, only one of the wires should not be voltage. The rest should cause the lighting of the indicator. Turning off the turn of the light switch keys, you can determine which wire corresponds to a specific key.

When checking the measuring device, you need to find a wire relative to which voltage will be present on the rest of the wires. This wire will be zero. Between the rest of the wires, the device will show no voltage. Next, leaving one of the apparatuses connected to zero-zero, alternately turn off the switch keys to determine the belonging of the wires.
Attaching the wires of the lamp to the lighting wiring can be performed using soldering, twist and using special transient terminal blocks.
The soldering is the most reliable way, but it is quite difficult to perform at a height in a limited space between the base of the chandelier and the ceiling. Therefore, this method is practically not applied.
An twist can only be used when twisting the conductors of about one diameter. You can not twist together single and stranded wires.
Such a connection forms an electrochemical pair and in the presence of even traces of humidity in the room quickly oxidized, causing a violation of contact and disintegration of the connection location. Most fires occur due to bad conductor connections.
The seat of the twist must be carefully wrapped with an insulating tape in such a way that the tape can be insulated both of the connected wires. It is better to take advantage of special insulating caps.

The most optimal method of compound is the use of connective terminals. You can find a wide variety of types of terminals - from simple screw to spring.

It may happen that the old chandelier had several lamp groups and turned on from a two-block switch, and after repair, it was decided to establish a conventional one-headed. Or vice versa, instead of a simple chandelier installed the extrietary. How to connect the lamp?
If there are more wires from the double switch (and from the ceiling, respectively, the chandelier (most often four, one of which is ground), the most radical way is to replace the switch, and leave part of the wires free.
And you can connect a simple chandelier to a double switch. You can combine the wires coming from different key keys. The connection can be performed on the ceiling in front of the chandelier connections or in the switch itself (in this case, the second wire to the chandelier must be left free). Then the chandelier will turn on any key, and it is necessary to shut down so that all the keys are in the off position.

If you do not repair the wiring, then connect the chandelier into two horns and more than two wires is possible only with one option - by combining all separate groups of lamps into one.
In extreme cases, if you allow wiring, you can use two switches.
A completely different situation when connecting a modern chandelier with a remote control. Regardless of the number of light bulb groups, the chandel connection is carried out to the switch with two wires, and the switching of various lamp groups is performed by the control unit placed in the lamp.
Buying a new three-rod chandelier, everyone pays attention to many wires inside and ask a question how to connect wires in the chandelier?
Many chandeliers, especially brought from China, do not have inside required connections. Therefore, for example, before connecting the chandelier with three lamps to the switch with two keys, you need to decide how many separate bulbs groups will be. Lamps included in one group must be connected in parallel. As a rule, from the cartridge of each light bulb there is a pair of wires of two colors, usually blue or black and brown. For example, a three-zero chandelier inside will have 6 wires. Wires of the same color need to twist together. This is done with every group of bulbs.
Further blue wires Each group is also connected together and output one wire from them, which will then be connected to zero conductor. Separate wires are also displayed from other connections, and connect them to wires from the switch.
Connect the five-clothes chandelier is not more difficult than connecting any chandelier with a two-block switch.
Connecting a five-zone chandelier with 5 lamps usually implies a split into two groups with 2 and 3 lamps in each. And then the connection circuit will not differ from the installation of the chandelier with three wires.
Connecting wires inside the chandelier with a twist, you must be carefully insulated. Installation is greatly simplified when using special terminals. WAGO terminals can be called the most common.

The figure shows that the blue wire connected together is connected to a zero wire, brown wires separated into two groups - to separate wires from a two-block switch.
When connecting multiple lamps to one switch, they are also connected in parallel.
New buildings for compliance with existing norms are mandatory equipped with electrical wiring with grounding conductors. As already mentioned, such wires are marked with yellow-green colors. In this case, for chandeliers with two groups of lamps from the ceiling, 4 wires will be outlined: grounding, zero and two phase, from the switch.
On lamps with metal parts, a terminal is usually provided for connecting ground. Therefore, when the lamp is connected, you also need to forget also about grounding on the chandelier. If the ground terminal is missing, then the ground wire can not be connected. It is only necessary to exhibit it and hide under the lamp casing.
Connecting electrical lighting devices does not look difficult if there are only two outputs. If more, the task turns out to be more complex. In this case, various connection schemes can be applied. The article discusses various situationswhich may occur when the chandelier is connected.
To hang and connect the lamp, the tools will be required:
Connection
A stepladder is also needed having a suitable height.
Before working, it is advisable to read the instructions for the lighting device. It typically describes the connection in detail.
The installation process of the lamp may be different depending on the amount of outputs on the ceiling and keys on the switch.
If there are only two outputs on the ceiling, then one of them is a phase, the other is zero. In this case, the ground is missing. When the chandelier is connected, one of them attach to any contact, the other to the remaining. If necessary, all chandeliers corresponding to the phase voltage must be combined.

Double switch
To connect a chandelier, which has 3 wires or more, you need to see if there is grounding. If it is, connected to the appropriate chandelier output. If it is not provided in it, it is required to isolate it.
When there is zero and two phases, it is necessary to determine where they are, and mark them with a marker. If one switch is used, then options are possible:
The second situation is convenient in the case when the owner does not require light from all light sources.
In the first case, both phases chandeliers are connected from the phase of the power supply, zero - with zero. Now all lamps will be lit when turned on.

Marking
Each of the phase outputs is connected to certain lamps in the luminaire. In the second situation, choose which lamps should be lit, and the corresponding contact is connected to the power supply. The remaining outlet isolate.
The lighting equipment in the house must be safe, and this, as a rule, depends on the question, how to connect the chandelier correctly in compliance with all conditions. Of course, any owner is ready to state that such a procedure is quite simple, but at the beginning of the installation, difficulties often arise.
A lot in the safe connection of lighting depends on the correct connection of the electrical wiring with the instrument itself, therefore, you need to be as attentive as possible. After all, even the simplest chandelier connection, has a number of nuances that must be properly implemented.
The result depends on the exact choice of lighting equipment designer design. Therefore, the light source must be convenient and perfectly fit into the interior, and before buying, learn several rules regarding the selection of the design:
Thanks to such an uncomplicated nuances, you make a purchase correctly.
We turn directly to the question how to connect the chandelier. This procedure is not costly, but still requires execution according to the instructions. There are several possibilities for connecting the lamp at home, some of which many have not yet known.
This option does not provide for the complexity to connect the device to the overall housing power system. To implement such a connection, you must only connect the pairs of conductors, but it is important to determine whether the color of the insulation corresponds to. To do this, take a indicator screwdriver and check the conductors on the ceiling, in the wire where the diode will turn on the indicator and is a phase conductor.

Connecting chandelier chandeliers with two wires
In such a case, it is necessary to connect the zero wire from the chandelier to the neutral in the ceiling leaving the distribution box, and the brown conductor (phase) connect with a phase in the ceiling, which fits the switch. Connect the chandelier in this way is elementary, as it does not require additional knowledge in the electrics.
Attention! All work with electricity should be performed only after the network is de-seated. Thus, you comply with the rules of electrical safety.
Often the reason for the release of three conductors from the ceiling is the presence of an entry with a ground or a chandel connection to a two-block switch. What needs to be done in such a situation:

Do not forget that, checking the conductors in a similar way, you need to bring both the switch key to the working position. Next, we perform a connection using terminal clamps. Fix in the clamp that we found by the conductor and any other coming out of the ceiling. Then you need to connect to the terminal a pair lived from the chandelier.
Important! If there is a need to turn the chandelier with two keys at the same time, you can two contacts from the ceiling to put a jumper or connect them between themselves in the terminal block.
Typically, the chandelier can have several wires due to the presence of several sockets in it connecting light sources. But before you do this installation, you should study a separate scheme for such devices. You can familiarize yourself with it below.

In such a situation, if you do not have a two-block switch, it should be bought. When all the equipment is properly prepared, you can install chandeliers. Initially, we find a general conductor in the ceiling, we use the technique that was used in the last method. To the found housing you need to connect one of the wires coming from each cartridge, respectively, the isolation color.
Two ceiling conductor connect with two veins from each cartridge. To strengthen contact, it is better to use the twist and spike of wires, but perfectly fix connections with caps.
When planning to establish lighting in the overall room, you often have to fix several lamps, but rationally use them with a single switch. Consider tips on its connection.

Important! Sometimes they resort to the possibility of using a single switch with multiple keys to use a group of lighting devices.
Most people prefer to accompany the ceiling zone in suspended tensioning versions. This is a disadvantage for lamps, especially if they were not previously installed. However, this minus will easily repaid, as electricians advise correctly lengthen the conductors.
At first glance, the task may be difficult. Since it is impossible to get to contacts in the ceiling after finishing, without disrupting the integrity of the material.
Important! IN hard to reach places The connection and elongation of the wires is made as securely as possible, so it is not recommended to use terminal blocks and spring clamps.
Ideally correct to build electrical cablesUsing the combination method with special insulating caps that meet high fire safety qualities or apply heat shrink tubes that reliably connect the tips of the bare wires and after a while do not break down. About the details of the connection in a similar way, read.
For home arrangement, chandeliers with light bulbs are more suitable. In the lamp, several light bulbs can be turned on at the same time, but at the same time they will be powered by a stable voltage of 220 volts, and the strength of the current will be 3 A. for such sources of illumination of sufficient conductors with a cross section of 0.5 mm2.
Speaking of traditional power grid, it is performed by a cross section of a wire of at least 2.5 square meters. mm. This allows connecting chandeliers, even if their overall need is 2000 watts. Therefore, it can be safely argued that the issue of changing the wiring, which has a higher section, can not be conceived.

Note, connecting lamps with halogen lamps, it is advisable to revise the cross section of electrical conductors, since such devices consume much more power. Be sure to calculate the estimated cross section of the wires and compare it with existing ones. Such events you can produce, using an online calculator, it is very important to carry them out correctly.
As lighting devices in residential premises, chandeliers are most often used - multilapampous lamps intended for mounting on the ceiling.
The chandelier is a construction that connects several lighting elements with each other - light bulbs, which allows you to provide good lighting in the room.
If you use a regular light in the room, then to ensure proper lighting, the installation of a powerful lighting element will be required, and then, with significant volumes of the room, it will not be enough.
But this light is not always needed, so more optimal option is the use of several lamps.
But in the case of using conventional light bulbs to power each of them, you will have to lay your wire or carry out branching from the junction box.
But if you install a chandelier, the design of which implies the installation of several light bulbs, the complexity connection will be the same as one or more light bulbs.
But at the same time, all the lighting elements included in the design will be powered, and from one wire.
And all because the branching of the wiring occurs at the entrance to the chandelier, and not in the junction box.
Well, do not discount the aesthetic side of the question. Lonely hanging on the ceiling light bulb looks sadly, whether it is a beautiful chandelier.
To get good lighting in the room with a wonderful combination of the lighting device with the interior, it is not enough only to purchase a suitable chandelier, you still need to hang and connect correctly.
The wires when installing the lighting set on the ceiling surface are found both on the ceiling itself and in the device. If the premises are already laid, then two, 3 or 4 wiring can be on the ceiling plane. Regardless of their quantity, one will appear "zero", the remaining phase. Sometimes there is a ground wire.
But it is a rarity and a similar conductor either in new-armed houses, or after the capital repair work, during which the electrical wiring changed completely. According to the available standards, the grounding is painted with yellow-green tone. It connects to exactly the same conductor on the chandelier. If there is no ground in the lighting kit, the wire on the ceiling should be well to isolate well and leave unused. It is impossible not to isolate it - it can navigate.
After the ground is found, you need to deal with the remaining veins and determine where zero and phase elements. As a rule, all wiring are painted black, therefore, for recognition, where what better to call them.
The transclon is possible in two ways:
If three conductions are displayed on the ceiling canvase, and the switch has 2 keys, then there are two phase wires to each of the keys, and one common zero lived.
Connect the chandelier with a pair of conductors, easier than simple: one must be connected to the "phase", the second to "zero". At the same time it does not matter where and what will fall.
With a situation where there are two "phases" on the ceiling canvas, and the switch has a pair of keys, that is, several options:
In the case of threelympic and other extrietary chandeliers, we have more than two wires. If they are yellow-green among them, that is, grounding, then if there is the same on the ceiling, you need to connect them together. Three wires have lamps with one working light bulb.

Since all contacts are defined and marked, all zero conductors coming from a separate cartridge are initially combined in the center. In this case, the "phases" remain divided into 2 groups in the form 1 2. Where Contact 2, they must be twisted with a single pair. When the power is turned off, the contacts of the device itself are connected to the ceiling.
The standard chandelier connection situation to a double switch with 4 ceiling is the presence of the lamp itself, a two-block switch and three contacts emerging from the ceiling overlap. Sometimes, especially in new buildings, there is a fourth contact in the form of grounding, which is used if there is the same in the lighting device.
Connect a similar device with two options:
When you click immediately, the pair of keys will light up all four horns on the chandelier.
To connect the 4-wheel chandelier to the double switch, you need a phase contact moving from the network through the distribution panel, connect to the wire that goes to the switch. After you can connect it to the input contact, where it is always and is located. The second conductor, which is connected to the key conductor, is assigned to the distribution box, where it is connected to the contact, which is connected to the instrument installation site. Here the contacts of the device and network must be connected to each other. By the same scheme, contacts are connected on the adjacent key.
The difference between these two keys is reduced to a different number of "phase" wires connected to network cores.
The scheme of the device for connecting the device, where there are five light bulbs quite complicated. This is due to a large number of conductors, with each of which must be understood. Lamps when working on a two-layout switch promotes energy savings, working in the appropriate mode.
Before starting work, determine the general wire leaving the device. It will be a zero contact that is marked with colored tape. It must be done to continue it to not be confused with other veins. There is similar contact on the ceiling surface, while it is also marked with an extent of the corresponding color.
Those contacts that, after checking on an indicator screwdriver, showed voltage, are called phase. They are overlooking the ceiling hole, and in each horn.
When all the veins are found and marked, the five-clothes chandelier is suspended on the hook, and the contacts begin to connect. The zero, and then phase veins are primarily combined. You can distribute the light bulbs on the circuit 2 3 or 1 4. The first option is optimal, in which one key turns on two lamps, and the second remaining three. Also, all the bulbs can work simultaneously.
The intensity of light flows in the room depends on the specific type and the power of the light bulbs used in the lamp.
If you plan to connect a multilapampous hexeline lamp, then the wiring must respectively be suitable. In this case, a two-block model of the switch will be able to provide only three working modes:
Most of the devices with the 6th bulbs have a propheted part of the electrician. If not, the man in the street will meet 12 contacts in the lamp (2 per horn). Six zero lives should be combined in one terminal. The remaining six phase contacts are combined into two terminals by groups (2 4).
On the ceiling, all contacts are also nicknamed to highlight "zero" and "phases." Next are defined which conductor corresponds to the key. To do this, one key is translated into "off" mode and check the availability of electricity. If the indicator shows the missing current, the conductor correspondingly turned off the key is selected.
After all the preparations for each switch key, contacts with chandeliers are connected. The zero ceiling core is connected to the "zero" in the chandelier terminal box, phase cores are combined with groups of phase contacts of the device.
Immediately we define several key moments that should be considered:

And yet - one thing is to simply remove the old lighting device and instead connect a new one, and completely different - to completely create a lighting line, which includes the wiring gasket from distribution shield, installation of switches, distribution boxes and lighting appliances with a subsequent connection to one network.
Divide in particular self-laying There will be no chandelier feed branches, because only only ways to connect lighting elements are more interested, although some points relating to the wiring will be addressed.
Immediately point out some of the features that can help:


