Many interesting and original plastic crafts are made by masters for decorating the interior of premises and garden plots. The material is easy to use and inexpensive. You can create crafts from and waste material, and from the new, depending on what the work is being done for.
In the course go plastic cups and used bottles, spoons and forks of different colors, and what functional items are made of pipes made of PVC plastic. Crafts can be simple, which can be done by children, and quite complex, which can only be done by experienced craftsmen.
In the article, we will consider several finished products from different plastic, how to work with it, what wonderful and useful things you can create. We will give detailed instructions for the manufacture of each element, we will present photographs of the finished product. So how to make crafts out of plastic?
In order to create such an apartment decoration for a holiday, you need to purchase several PVC pipes different diameters. They must be cut into thin cylinders of equal length. To cut plastic, they use a specially designed tool - pipe cutters, a cordless pipe cutter, there is also a roller-type pipe cutter. If you are doing such plastic crafts for the first time and do not have these devices in the closet, then do not be discouraged, because you can always use a hacksaw for metal.
The only drawback of such a tool is that it leaves burrs on the plastic. But this does not matter, it is enough to process the edge with sandpaper or clean it with a knife. For the trunk of the Christmas tree, you need to leave a piece of 30-40 cm from the pipe of the largest diameter, depending on the size of the plastic craft.
Then you need to prepare the base for the wall panel. It can be a panel made of plywood or fiberboard, you can buy a colored one. Further on the floor, all pipe sections are located - from the smallest to the largest - in such a way that it turns out triangular shape... It is more convenient to first lay out large elements, and already between them to fill the voids with small details.
For attaching the elements to the base, the strong Moment Plastic glue is used. It is transparent, so it won't spoil the decor item visually.
After completing the main part of the work on the manufacture of New Year's crafts from plastic, start filling each cylinder. As for a regular Christmas tree on New Year, for design, Christmas tree decorations are also used. A star of any color is attached to the top. Further, decorative elements are distributed depending on the size of the cylinder.
You can do a lot with your child homemade toys and nicely place them in round voids. Angels, balls look beautiful. If a child wants to put toys there, then do not scold him, because this is also his holiday. You need to decide how to decorate plastic crafts with your own hands together, with the whole family. This brings family members together, and the creative process of doing this kind of work captivates both children and adults.
If you are seriously interested in making ribbon crafts, for example, working on making bows, gift wrapping or, for example, decorating glasses and bottles for a wedding, then this comfortable stand helps you avoid desktop chaos. All coils with tapes are placed on a plastic PVC pipe, access to them is free, the tape is pulled out without effort, you can immediately see where what color is placed.
Pieces of tapes are cut without removing the roll from the stand. If you need to add ribbons of other colors for work, then the replacement is done simply by pulling a piece of pipe from the corner. When a new roll is put on, the plastic tube is simply inserted back into place.
Such a stand looks very neat, it can always be washed with detergent. If any one element is damaged, you do not have to throw out the plastic craft with your own hands, it will be enough to replace one element by cutting the pipe along the right size.

For the manufacture of a frame from plastic pipes you need to buy the material itself and additionally 8 corners with three inlets located at an angle of 90 °. Cut with a hacksaw or pipe cutter 4 identical segments, 50-60 cm in size. They will be located in the length of the craft from above and below. Then the pipe is cut for the sides. The length of each is also the same and is approximately 25-30 cm.
It remains only to insert the pipes into the holes of the corners and assemble the plastic craft. The photo clearly shows what such a stand is. The finished product turns out to be light, clean, it is not a shame to place it on the desktop. If you want to add additional details to the stand, such as a scissor cup or a needle pillow, you can hang them with an elastic band or a plastic hook. It is attached to double-sided tape.
Once in the article we touched on the New Year theme and considered how you can do wall panel in the form of a Christmas tree made of PVC plastic pipes, now let's make a do-it-yourself plastic craft for novice craftsmen. After all, this is a Christmas tree made of disposable forks. It is small in size and can be installed on a New Year's table or on a shelf in the room. Also, such a Christmas tree can be made for the school New Year's exhibition.
As a base, you can use a foam cone or a dense piece of foam foam, cutting out of it similar form... To decorate the top, prepare a package of ear cotton swabs, which are placed in the shape of the rays of the sun, in a circle. In order for them to hold firmly in this position, you must first cut off the cotton wool from one end. Plastic sticks are placed on a piece of plastic, cut in the shape of an asterisk, and attached with Moment Plastic glue, or using a glue gun.

A longer stick is glued to the bottom of the top, which will hold the entire structure. Then, at the junction of all parts (in the center), another star is attached. The top is ready, work begins on the do-it-yourself plastic craft itself (photo is available above).
To create such a prickly beauty, you need 30-40 forks, depending on the height and width of the cone. Each fork is clipped at the base. Leave a small even segment 1-1.5 cm long. Glue will be applied to it. Begin gluing the cone from below, moving in a circle. Each next row is shifted by half of a disposable fork so that the "branches" of the Christmas tree do not look like rows, but are "fluffy" from all sides.
The top is inserted into the top of the cone with a simple indentation, you can apply a little more glue on the stick so that the top of the tree does not fall off when carrying the craft, for example, to school. During the preparation of materials for making crafts from plastic (photo above), you can look for green forks on sale. After creating a bright and original masterpiece from plastic forks, you can cover them with a layer of glue and sprinkle with sparkles or tinsel cut into small pieces.
Thin craft plastic allows you to create artwork without glue. For example, from plastic disposable cups you can assemble such a wonderful snowman for the New Year holidays. This product is able to decorate not only the home environment, but also applicable in child care facilities, offices and other organizations.
The inside of a snowman made of plastic glasses has a void, so there are often bulbs or colored lights of garlands placed there. After turning on such lighting, the room will instantly transform, and during a dance party, such a snowman will play the role of a light effect.
Do-it-yourself plastic craft (photo below in the article) consists of two main elements. This is the character's torso and his head. They are performed in the form of a torus, that is, they are not completely spherical, but with flat parts from below and above. This is done so that there is good adhesion of the elements to each other. And the bottom of the figure turns out to be flat and can stand confidently on the floor or table, without rolling onto its side.
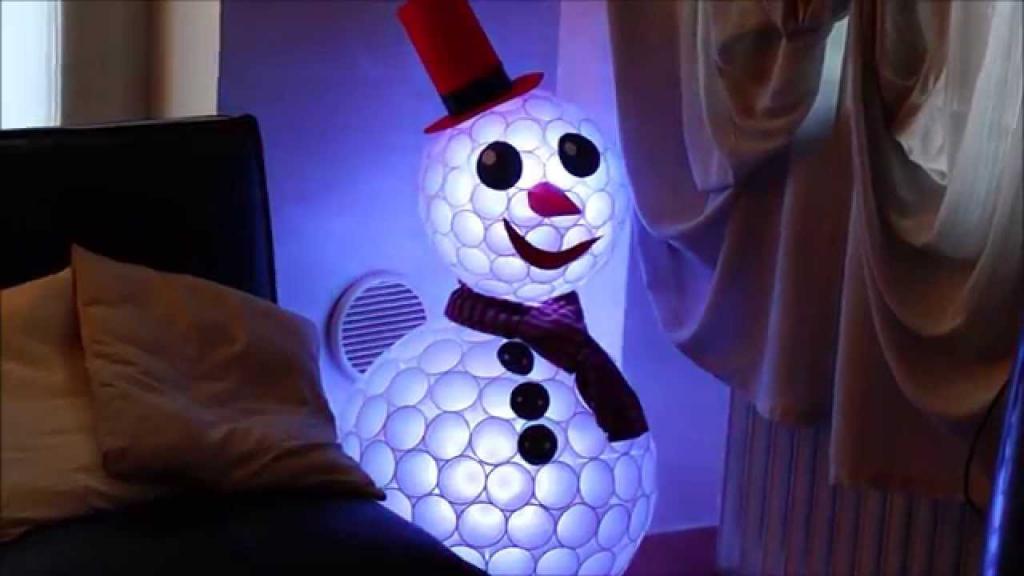
White glasses are taken for work, laid out with the open part outward and fastened with a stapler to each other. Due to the fact that the cup is not even, but has the shape of a truncated cone, after fastening, you will get the shape of a "donut" or a geometric figure of a torus.
In order for the next row to be wider than the previous one, an additional glass is added. When you reach the desired diameter, you can subtract one element in each next row. This is done until the initial number of glasses is reached. For example, if we took 8 tbsp on the first layer, then the work ends on a layer with eight glasses. All layers are fastened together according to the same principle, that is, with a stapler.
When making a head, the figure turns out to be smaller, but the principle of operation is the same. It remains to attach the head and torso with paper clips. Then the work continues, because you need to decorate the figure. It can be done different ways, at the request of the master. A scarf is usually tied around the neck, you can put a hat on your head, make a bucket out of paper or sew a cap out of fabric.
The carrot nose is simply inserted into the empty cup at the desired level. You can do this with other details as well.
The second life of plastic is crafts made from it. Therefore, do not rush to throw away empty bottles or cans from detergent... After all, you can create wonderful objects from them. Let us further consider how from plastic bottles to make such a beautiful set - a cup and a teapot. You will need material of different sizes. For example, it is better to create a cup from a small half-liter bottle, buy a two-liter container for the bottom of the kettle, a smaller one - 1.5-liter - useful for making a lid.

Do not throw away the scrap from the bottles. Thin strips for pens are cut from them. They are glued on transparent glue "Crystal" or "Moment Plastic". For the spout of the kettle, find a small tube made of thin plastic and, having cut a hole with a knife, insert it tightly into the kettle.
Now let's start decorating the dishes. For painting, you can use acrylic paints. They are odorless and adhere well to plastic. You can think of a different drawing. The only caveat! It is better to melt each cut a little with a hot iron, then the child will not be able to cut himself on the sharp edge of the bottle. DIY crafts made of plastic are easy to do, and you can come up with an infinite number of products, especially for children's play activities and for the interior garden plot.
The time-lapse image of the process of making a vase from a plastic bottle clearly shows all the stages of work. First, the height and color of the vase is thought out, because the bottles come in different colors. If the product is thought to be wide, then you need to take a two-liter bottle. The narrowed neck is cut off and thin strips are cut to one level, try to keep them the same width.

After that, you need to bend all the strips into reverse side at an angle of 90 °. Then the most difficult and painstaking part of the work begins - weaving the strips together. As you can see in the photo above, the elements are folded in turn. We skip the next strip, and weave the first element into the next two.
So the work continues until all the strips are beautifully bent and intertwined. You need to do this work clearly, smoothing the fold lines well. If the craft is done correctly, the vase will have a beautiful and even edge. If at least one element is not made accurately, or the fold is poorly smoothed, then the whole harmonic structure of the vase decor will be disrupted.
From plastic devices, namely, spoons or forks, you can make such beautiful candlesticks as in the photo below. Making them is easy. In one work, you can combine one and the other dishware. In one flower, utensils are located face up, in the other - down.
A cardboard circle is taken as the basis of the flower. If you don't have white, you can take any, even corrugated, and glue it on both sides with plain white paper. Further spoons and forks are cut. In this case, the leg is completely cut off. Begin gluing cardboard with spoons or forks along the outer circle, the second row is shifted slightly to the side so that each layer is clearly visible.

Plastic parts are smeared with superglue. After a candle is inserted into the middle, the circle is framed with foam balls around it. You can make a craft "Flowers" from plastic different color... For example, make the first row of green forks - this is the green of the water lily. Then there is a row of white, draw the middle in yellow.
If such flowers are glued to polystyrene, then you can run the resulting crafts into a pond or pool, they adhere perfectly to the surface of the water and do not sink.
To make such an original craft, you will need to prepare 2 or 3 green plastic bottles. The size of the container must vary. Outside will be located most of, two others are inserted inside it, for example, take a 1.5-liter, a liter and a half-liter plastic bottles.

You will also need: a candle or a lighter, superglue, a decorative insert in the middle of the flower. It doesn't have to be the same color as the flower itself. You can use a contrasting effect. Also, the bottles will look beautiful in different colors... All containers are cut to the level of the bottom.
Then petals are cut out of its parts. They have straight and unattractive edges immediately after production. This can be fixed with fire. You need to act carefully, it is necessary to hold the bottom by the edge so as not to burn yourself. The edge of the petal is passed over the fire several times until it is curved and wavy. In this way, all petals are processed.
In the end, it remains only to attach all the parts to each other, applying superglue to the central part. The second bottom is positioned with a shift to the side, so the flower will look lush and more voluminous.
Other simpler flowers can be made from plastic bottles, which are placed mainly in the garden, in the garden or in the front garden. To make them, you can collect several bottles of the same volume. The color does not really matter, since you still have to paint the craft. The best remedy acrylic paints are considered to give colors to bright shades.
First you need to cut off the top of the neck bottle. Do not throw away the lid, as it will still be useful to us in our work. Stems of future flowers must be made of wire. To do this, take a thin metal rod and bend one side down. The other, even part of the rod, is buried in the ground by indentation.

If you want to have a whole bush of plastic flowers, then prepare more twigs. After the stem is buried in the ground, a green bottle is put on top. Its neck is directed downward, and the upper part is cut into thin leaves. By pressing, lower the neck below ground level.
Further work is underway on attaching the prepared flowers. They are already cropped as in the photo, painted, the edges are rounded. You can make them rounded, details with corners or cut into noodles will also look beautiful.
A hole is made in the caps of plastic bottles, you can use a drill or a sharp awl. After the lid is pushed onto the rod, it bends slightly and holds the flower in one place. For reliability, you can fix it with plasticine. Everything, do-it-yourself plastic craft for the garden is ready!
The article presents several interesting crafts using plastic. As seen from detailed instructions and photographs offered to the reader's attention, it is not difficult to make such products, you will not have to spend too much money on materials, but to create beautiful and original crafts it will turn out easily.
Among needlewomen, such material as plastic is gaining popularity. For sculpting dolls, flowers, jewelry, crafts with children, and so on - you can use this material everywhere. We invite you to familiarize yourself with it better.
With your own hands you can make crafts from different materials: wood, fabric, clay, salt dough, wire, beads and so on. For modeling today are the most popular plasticine, salty dough and plastic.
Plastic is, in other words, Very comfortable material for modeling. The plastic dries up and becomes as strong as plastic. When used for the first time, it resembles a very elastic dough or plasticine. You can make toys, crafts, jewelry, decorative elements and much more from it. Dry the finished craft in the air or in the oven.
The advantages of plastics:

There are many places where to buy plastic for sculpting:
DIY plastic is sold in different shades, but it is not cheap.
If you do not want to go to the store, then we offer you an alternative option.

Plastic at home is made as follows:
DIY plastic is ready!
If you want to make the material multi-colored, then divide the dough into portions and add to each desired shade oil paints, for fabric or food coloring.
There are many types of flowers that a beginner in plastic sculpting can make. For example, violets, cornflowers, peonies, daisies, roses and so on.

Basically, the modeling of flowers from plastic is as follows:
If desired, you can add leaves and a stalk.
Plastic for modeling dolls should have a snow-white color or a slightly pinkish tint.

Features of work:
The second way to make a doll out of plastic:

A lot of opportunities to get interesting, original, various pieces of mosaic are provided by the use of polymer clay - a model, which is very easy to work with because it is soft, easy to sculpt from, the colors are varied. In this lesson, we will teach you how to sculpt a cane face, you can make faces with a variety of expressions, reflecting all kinds of emotions and moods.
You, in turn, will be able to mold, in addition to the face, other interesting details that you can find on our website, for example, in polymer clay master classes and arrange them in the photo frame at your discretion.
To create a plastic mosaic you will need:
Polymer clay in several colors - white, black, green, flesh, blue, pink, red, milky, dark and light brown.
... Pasta machine (a machine for rolling out polymer clay or a plastic roller).
... Universal glue for decoupage.
... Olive acrylic paints.
... The sharp blade of a clerical knife.
. Ceramic tile.
... Brush.
... Putty.
... Scapula.
... Case.
... A rag.
Plastic preparation
Step one
Face start shaping eyes. Cut off a black plastic cutter, warm it in your hands and roll it into a thin roller.
Step two
Roll out a lump of blue polymer clay in a pasta machine, or you can do it with a regular plastic roller. Trim one edge of the rolled blue model with a sharp blade and wrap it around the black roller. Since you need two eyes, divide the entire twisted roller into two parts.

Step three
Roll a roller out of the white model and cut it to form four triangular prisms. Press these prisms on both sides of the blue eyes.

Step four
In order for the do-it-yourself mosaic to work well for its main element - the face, you need to form eyelashes. Using a pasta machine, roll out a piece of dark brown modelin and wrap both eyes with it.
Step five
Place a thin layer of skin-modeler, rolled out with a paste machine, over the eye. Make eyebrows out of the dark brown rolled out model.


Step seven
For the lips, cut off the pink modeline and a small piece of red. Knead them in your hands until the colors merge and the modelin turns pale pink. Roll out a small lump of black plastic thinly. Form a roll of the prepared pink model cylindrical, cut it lengthwise and insert a strip of black modelin into the gap. Squeeze the resulting plastic well, give the roller not a round, but an oval shape,
Press the upper part of the roller a little and put a thin roller from the flesh model in the middle. This will give the model the shape of the lips.

Step eight
Attach eyes on both sides of the nose. Gently squeeze all parts so that they stick together. Place a flesh-colored roller over your nose. Roll out a larger piece of the body model with a pasta machine and cover the top of the head with it.

Step nine
Form the cheeks from the flesh-colored model. Next to the corners of the eyes, press in pieces of the modelin in the form of a triangular prism, below the eyes - pieces of the same shape, but larger. Place a small layer of flesh under the nose and attach the lips, below the chin.

Step ten
Using a pasta machine or a plastic roller, roll out a larger piece of the body model and wrap the already prepared face with it. Squeeze everything properly.

Step eleven
For hair, roll out chunks of dark brown and light modeler thinly. Fold the rolled plastic alternately one on top of the other. Squeeze all the layers so they stick together. Divide the finished hair layer into two parts, one larger and the other smaller. Squeeze their ends. On the top of the forehead, stick a piece of flesh-colored model in the shape of a triangular prism, and to it - the hair. Squeeze well so that all the rollers stick together. While pressing, try not to spoil the shape of the eyes and lips.

Cut the ready-made cane-face into slices of the desired thickness and bake in the oven according to the manufacturer's instructions.
Mosaic background
If you first encountered this type of mosaic, then you can study all the nuances in the article about for beginners.
Step twelve
For the mosaic background, choose green plastic. Roll it out with a pasta machine into a 2mm thick cake. Cut a small strip from the whole cake and divide it into small pieces. different shapes... Burn them in the oven according to the instructions. So you get a master class mosaic, which is very simple, as you have already seen.
Step thirteen
Decorate the inside of the mirror frame or photo frame with small rollers. For the spiral rollers, cut off the green and brown models (you can use more colors). Roll them thinly with a pasta machine and, folding one on top of the other, roll them into a roller. Roll the roller until it is a suitable thickness, cut it into slices and bake in the oven according to the manufacturer's instructions.
The videos may be the same, but let yourself be imaginative, play with colors, shapes and make a few different ones.

Step fourteen
Grease the frame universal glue for decoupage. Put your face down, press it down, then do-it-yourself mosaic goes, put it around. Leave gaps between these pieces. Decorate the edge with different rollers. Fill the seams between the pieces with ordinary tile filler. Please select suitable color and prepare the mass according to the manufacturer's instructions. Apply the prepared mixture with a spatula and wait for it to dry. Remove excess filler with a damp cloth.

The final stage of work
Step fifteen
Paint the outer edge of the frame acrylic paint olive color. Fix the work on top with acrylic varnish. Thus, you have a do-it-yourself soft plastic mosaic. The master class, which we hope helped you.

You can also create your own composition by decorating the frame with hand-made elements and placing them on a mosaic that you already know how to create or you can make out of paper, but see how to make it here.

I wish you creative success!


