Life of present homemade Masters Not conceivable without a large number of manual and mechanical assistants used for wood processing, metal, execution different species work. To storing the tools, various adaptations of industrial production and independent manufacture. Among the most common storage and carrying methods, the toolboxes occupy a special place.

To independently create similar products, timber or artificial wood materials can be used - chipboard, plywood or OSB plates.
The process of performing such a product allows you to obtain a capacity for the sizes of specific tools, in contrast to the purchased finished boxes. The following readers will be asked to describe the sequence of work on the manufacture of similar boxes.
The product shown below can be used for temporary storage and transfer to the place of work of some tools.

Or stationery, which are often widespread when performing markup.

Making a drawer will require the preparation of the following materials:
From the tools it is necessary to prepare a ruler, pencil, an electrolovka, a drill, a screwdriver and grinding of any kind.

Work is starting with the markup of the details. To do this, on the prepared rigged board we appline the contours of future parts - end and lateral walls, bottom.

We cut the parts by the electrolybiz, setting the pre-pink for pure cut. The edges and planes of the obtained parts carefully process the emery paper.
In the end walls in the center at an equal distance from the bottom edge, place the center and we turn the deaf hole with a depth of about ten millimeters, the diameter of which is equal to the diameter of the round rod. Along the side and lower edges we drill three through holes with a diameter of 4-5 millimeters to install screws. In the same way, we make two holes at the bottom of the future box.
After preparing holes, you can start assembling the product. To ensure the maximum strength of the edge of the side walls and the bottom, smear the glue, applies to it with a thin layer. The ends of the round rod also pre-cover with glue.
Install the side walls and the bottom of one of the ends to the curly walls and attach the parts with self-draws. Install in the prepared hole of the rod one of the ends. After that, perform the same operations with the second curly wall. To protect the drawer material, treat the surface with a transparent varnish on oil or nitrosnov.

The design of the second drawer for tools is more complimentary, has increased compared to the first dimensions. For its manufacture, they will need plywood or OSB plates with a thickness of 15 and 10 millimeters. It is also necessary to prepare the following tools: a ruler and pencil for performing markup, an electrolovka for drinking parts and handles, a screwdriver, self-tapping screws for assembling a length of 30 millimeters, sandpaper or grinding machine for performing the finishing of wet and planes of parts.
Product dimensions 600 × 400x200 millimeters. Inside at the top of the tank, two boxes are installed for small parts and tools glued from a thinner plywood. Two guides made in the form of a thickness of no more than three centimeters are attached to fix them along the side walls.
The process of making a drawer for tools is starting with the markup of parts of large and small plug-in boxes. If necessary, each wizard can vary the intended product size depending on the destination. The marked parts are muffled with an electrolybiz and are cleaned with grinding paper. Details of small boxes are collected using glue. For a better connection of the inner walls, separating space into separate sections, you can perform shallow grooves in the thickness of the material. Clamps and other fixtures for clamp will help facilitate gluing work.
Build parts of a large drawer We carry out using self-tapping screws. To improve the quality of the assembly of the self-tapping screw, insert in advance drilled and splashed holes.

Do not forget to secure the two guides parallel to the box to which small containers will be relying.
For the manufacture of the handle, you can use the option proposed in the design indicated above, or install a round rod on the self-drawing of sufficient length. As a workpiece, a cutting cut for agricultural inventory can be approached for him, which is not difficult to purchase in any economic store.

Plywood does not apply to moisture-resistant materials. To protect the product when working on the street, it is necessary to impregnate all the details of the box with any protective composition, a mourn or varnish.
Thus, after performing several simple operations, each can make a convenient device for transferring and storing tools. The use of such a box will greatly facilitate the process of performing repair and construction work Not only indoors, but also in the territory of the land.
Dear readers, comment on the article, ask questions, subscribe to new publications - We are interested in your opinion :)
A large and comfortable drawer under the tools - the dream of any wizard. It is clear, because in such a repository you can compact all your toolkit. They are not so expensive today, so one of the options is to purchase it in the store or create a similar masterpiece yourself. What option will be acceptable for you? Of course, the purchase has certain sizes, but the tools may be much more than it can fit into it. But one way or another, you will have to put up with it or run to the store again and buy a new one. It is quite another thing - to make himself: I picked up the necessary material and calculated under all the existing tools and even with the prospect. Conveniently? Most likely, you will agree with this argument. Therefore, let's talk in this article on how at home to make such a box.
If it is a home box, then it can be a regular box with a handle. Well, if you, for example, plumber, it is clear that you will need a box more functional, spacious and durable. This role will be successfully implemented by the Organizer. However, in this article, as an example, consider a simple home option - a box with a handle. So, we assume that we have decided on the type of box, where we will keep all the tools you need or almost everything.
Why start? To begin with, we will select the material. It can be plywood, wood or even metal, then make calculations. Only after that you can proceed to the preparation of a detailed drawing. This can be done in a classic way, that is, on Watman, with the help of a well-sharpened pencil, ruler, circulation, square, etc.


Non-classical way - with the help of special computer Program. "Autocad" and "Compass" just "sharpened" to make a professional accurate drawing. The advantage of such programs is that they will help to avoid errors in the calculation and, moreover, it is possible to see what you have from all this.
These programs will serve good service if you have certain skills to work with them.
The material was picked up, and now it remains to collect the entire tool that we will need. Of course, the types of tools are individually. It all depends on what box you want. They are too different. But, anyway, there are universal tools. They are always needed. This is the measuring instrument:

Take traditional material - cutting board coniferous rocks. As for processing, this is the easiest and most affordable material with good strength properties.
As idea, it will be a wooden box, and our task is now to materialize the drawing itself in the material. To do this, we need a ruler and pencil. After that, we carry out the markup on the material and the hacksaw or the electrolovka weeping the components of the product. If we planned the usual unlockable option, then we need to make five planes: four walls and bottoms.

When assembling, as a rule, it is better to use carpentry glue. The connection location must be cleaned, and only then apply glue, after which it is firmly compressed the parts between themselves. Be sure to give a completely dry glue.
After this operation, we can additionally strengthen the drawer fastener - self-tapping. Passed. Now you need to make a handle. It may be an ordinary wooden rail that we need to be knit or fasten to the upper faces of the side elements.


Following the principle of "from simple to complex", let's talk about the organizer now. It is clear that in an open-top box, which was written above, you can put a large tool: manual hacksaw, hammer, and many more many more.
And where to give a small one? All sorts of screws, bolts, wrenches, etc. This small fastener has a leaning property or not to be at the moment when especially needed. Here we will need an organizer.

As already noted, this type of boxes in its design is the most functional in operation. What does he represent? It is a kind of like a box on the box, or rather, a lot of boxes in one section for storing not only medium-sized tools, but also all the little things. Of course, at first glance, it may seem to make such a design will not be easy. But it only seems. Basically, difficulties occur in the manufacture of a sliding mechanism. Everything else should be done much easier. Now in more detail about manufacturing technology.

Let's talk now about the metal case of homemade manufacture. Do not immediately conclusion that it is impossible. Of course, it is possible to independently make a metal organiser for only experienced locksmother and in the presence of special tools and the corresponding material. Factory metal boxes are usually made of light metal species, such as aluminum, so that in itself such a box is not heavy. At home, working with aluminum is difficult.

In principle, the metal box for is loudly said. Metal will be made, rather, a regular box. Material that will be needed for the manufacture of such a box - the usual soft galvanized (thickness of about 0.3 mm). From the tools we need:
Further, all on the same scenario: drawing, markup. The most interesting thing is that all this can be done right on the galvanized sheet with a sharp core (or marker), as you like. We then mark the places that we have to delete the marker on the metal.

After that, we proceed to trimming using the metal scissors.

After trimming, we have such a complex geometric figure ("Winged Rectangle").

Now we will work a little for the blacksmiths. For this case, we have an anvil, and knocking the hammer, we will turn the rap of our workpiece. It is better to do this not chaotic, but in a certain order.

First, bend one sidewall, and then bend the other.

Now the sidewalls are in turn.

After that, we will deal with the bending of sticking petals. They will make the stringent design itself, and it will not "play".

Passatii can use to wrap sticking parts on the top of the box.
After such manipulations, it is necessary to walk with a hammer through the whole product, denying it.
In this case, it turned out a small box. But after all, this principle can be made similar - more, and in the end it will turn out such a metal box for the instrument.

So, if desired, everything is possible.
We hope that this article will be useful for you, dear readers. If in your instruments, then add it to the manufacture of a conventional toolbox. If your tools do not have a permanent "place of residence", then think about building a two-storey "house-transformer" for him. Try to do it, and your tool will always be in place, and you yourself will be pleased to use the product in your farm yourself.
In this video, it is shown how you can make a box for tools and from girlfriend:
See how you can make caisis-organizers for the tool:
Tools must be in the house for everyone. When there are too many of them, you can make a drawer for tools with your own hands. This is an integral attribute for storing tools, because it is important that everything is in their places. In such a case, you can store tools. You can take them with you, if required.
Figure 1. Drawing of the toolbox.
Cases for storing tools can be made of various materials:
For the manufacture of a box with their own hands most often use Paneur. This is the easiest and affordable material.
For the manufacture of case, the following tools and materials will be required:

Figure 2. Build a drawer for tools.
Before proceeding to work, you need to create a product project; The drawing can be made on paper or computer (Fig. 1). Calculations are made, the main dimensions are recorded. Further, all the measurements should be transferred to the plywood sheet. This can be done using a roulette, a conventional line, pencil or marker. Billets for future design are cut along the drawn lines. It is also necessary to note all the grooves, cut them on the blanks. All irregularities should be cleaned with the help of the chisel. Thanks to the groove, the design of the box will be stronger.

Figure 3. The handle for the toolbox is attached using glue or screws.
The next stage is a construction assembly. To glue the items, you need joiner glue. The main sides of the box are sampled among themselves. When gluing, they need to be kept very hard. It is best to pull the box with special strips of rubber and not to remove them until the glue is dry (Fig. 2). On the doors need to round the corners.
In addition, the handle can be made from MDF. The layout is drawn on the tree, then cuts out. After the handle is cut, it is necessary to handle the surface, and then with the help of glue and screws to attach the handle (Fig. 3). If there is no desire to cut a handle from plywood, you can buy ready-made in the store. The main selection criterion is strength.
The next stage is an assembly, fastening of the outer cover of the case, doors. You need to attach all the details, and then with the help of a pencil, mark the place for the loops, secure them.
To attach the outer cover, you need to prepare a hole for the screw.
To organize order in the box you need to make small compartments. Composite parts of the compartments are cut into the same principle as the box. Grooves are made, glued together. Place for screwdrivers, other tools can be made on one side of the case. To do this, you need to make an insert with plywood slots. Velcro can be glued to the other wall to attach the cable and extension. You can take special velcro on a self-adhesive basis or glue the usual with hot glue. The final stage is to fill the box tools.

Figure 4. For making a box instead of plywood, plastic canisters can be used.
If it is not possible to make a case for tools from plywood, you can use the usual plastic canister (Fig. 4).
Materials required for work:
The packaging should be rectangular and with a handle located in the center. In addition, there should be a wrapped lid that will serve as a lock.
The process of making a box is completely simple. With the help of the hacksaw, the canisters are made in several directions. The first cutter is performed in the center of the neck and the container of the container, the cork should be removed, and the upper wall is to cut through.
The second cutter is performed in a horizontal direction. It must be done at the top of the canister, on the end sides. The container must be cut from the upper wall at a distance of 3 cm, and on the sides - at a depth of 2 cm.
After cuts are made, the canister can be revealed. To do this, you need to bend the side parts of the top cover with halves of the handle. Here you can store a variety of materials for fasteners: nuts, nails, bolts, screws. The top cover must be closed, folding the handles together. Everything is fixed with the wrapped cover.
To the drawer is durable, additional constipation is made on the end walls. In the walls or lid, you need to drill holes, insert hooks in them, nuts with nuts.
Make a drawer for tools with your own hands is quite simple. The main thing is to comply with all stages of work so that the correct design is.
Making a case independently, you can significantly save money.
This article is about how to make a wooden box for tools. If you have a lot of tools and you want to keep them in order, the best thing you can do is create a simple tree drawer. From our experience, we consider them very useful, as they are easy, durable and give a lot of places to store tools Do not forget that you can adjust the size and design, according to your needs.
The main components of the toolbox are made of 20 mm boards, as they have a beautiful appearance, and very durable. In addition, we recommend that you glue offices of connections and copold everything by itself by cuts. Try to screw the screws as you symmetrically as possible.
Upon completion of the assembly, it will be necessary to open the entire surface of the box. Make sure all the edges are smooth. Otherwise, you can damage your hands about sharp edges. Also, do not forget to check that the caps of all the screws are at a level with a wooden surface. Get rid of dust and chips before painting.
In order to make a wooden tool box, you need the following:
Materials
Instruments
Advice
Time
Creating the simplest wooden toolbox - one of those projects that can be done in less than an hour. But it can make your life easier, especially if you work a lot with tools.
Smart Tip: Before connecting parts, add some glue into the joints. Immediately remove excess glue with a dry cloth, otherwise it will be difficult to remove it after drying.
The first step of the project is the markup. As you will see in the next stage of the project, we will use 1 × 8 boards to make a box for tools. Therefore, you must use a joinery pencil and a carbon line for marking lines on wooden boards.

In order to get accurate cuts, we recommend using an electric qq or a good circular saw. Make sure that the saw has smooth teeth, otherwise it can tear the edges.
Smart Tip: In addition, check that the blade will pass exactly along the section line before sawing.

In the picture, all the components needed for the drawer. The circular machine can simplify work, since many cuts must be made at an angle.

You must use this drawing in the manufacture of components for a box. Make sure you checked all measurements twice, otherwise the components may not match each other.

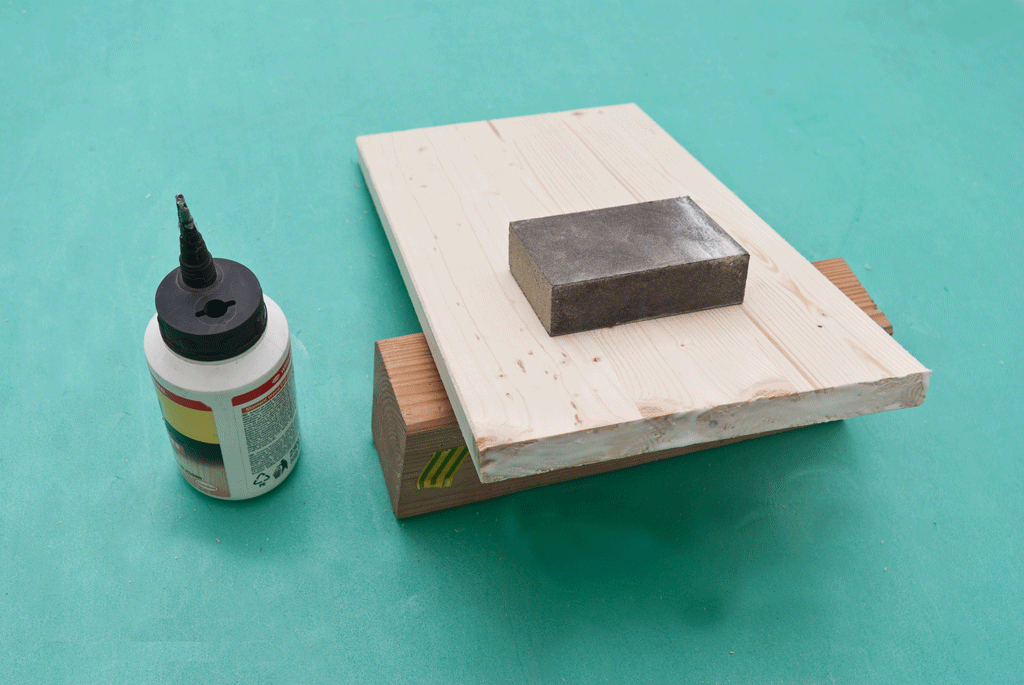
After creating wooden parts, you need to drill holes across the edges. As you can see in the picture, you need a plank on wooden barberTo prevent damage to the surface. Drill three holes at the bottom and two holes on the sides.
Smart Tip: If you do not have experience in wood processing, you must figure out the guidelines for pilot lines. Make an indent from the edges to prevent wood cleavage.

If the edges of the lower part are not smooth, you must carefully paint them with 120 sandpaper before assembly.
Bottom ends Mix the joinery glue to strengthen the connection. Excess glue Remove with a dry cloth, otherwise you will spend time to clean it.
Press the components strongly and leave half an hour. If you use good glue, it will sprinkle the joints of the joints well.
Nevertheless, tighten the screws in the drilled holes.

To receive you need to sturdy constructionWe recommend using self-tapping screws. Work carefully to prevent damage to the wooden components.
Smart Tip: Align all parts before twist. As you can see in the picture, the edges must be smooth.

After installing all components together, the tool box should be similar to the one that is depicted in the photo below.

Make a handle from a cylindrical wooden rod. The diameter of the handle is about 20 -25 mm.
Smart Tip: Use the ruler to cut the rod of the desired length.

Add some carbon black glue to both ends of the rod before installing it in place. Then drill the hole and tighten the screws. Hold the handle while spinning, otherwise it can be shifted.
Smart Tip: Leave about 15 mm from the top edge to a wooden handle.

Do not forget to smooth out the edges of the wooden components with emery paper.
Smart Tip: Clean the drawer from dust and chips before painting.

After completely skill the entire surface of the box with sandpaper.
Smart Tip: Apply several layers of paint, varnish or verse to improve the appearance of wood and protect the materials from rotting.

If you want your drawer to have the same dimensions as in our article, we specify that 1 inch is 2.54 cm.
The wizard always has its own tool at hand. It allows him to quickly cope with the tasks. Tools do not happen much. Sooner or later, they are so much that there are no pockets to decompose all screwdrivers and rules. Need a box. It is impossible to store them in disarray. Strokes, friction - drills are stupid and quickly fail. In the process of work, there is no time to look for the desired screwdriver, so the space of a roomy wooden storage must be involved, and the entire volume is distributed to separate compartments.
It is easiest to buy a container made of plastic or iron. Inside the finished models, the storage location of the tools is already thought out in advance, divided into several compartments. But the homemade box is going under each particular wizard, taking into account the storage locations for the tools, supplies and fasteners. Some suitable simple modelsThe other will need a multifunctional portable case. It makes sense to find out which types of portable storages exist to choose a suitable model, and then construct such a hand.
In the form of manufacturing and destination, instrument boxes are classified:
Portable containers for carpentry tools - compact models, inside which is placed a small amount of things in the work. Cases of Case depends on the specialization of the master. Its design involves a strong lock, which will not open during long-term transportation. The portable box is constantly in motion, so it is important that several types of fastenings be thought out inside it, in which you can, for example, lay screwdrivers and consolidate so that they do not hang out and did not knock.
A stationary box for tools with their own hands make it quite difficult. And all because it has a much harder design than that of portable. Inside no need to think through the device of fasteners. The main thing is to form certain compartments and divide them into groups.
Special case is manufactured under strictly individual needs.. It can, for example, stored only drills for a drill or wrenches of various sizes. Such a box for small tools is more convenient than universal storage. To perform work, sometimes a master needs to take several special cases with him. Before you begin to make the storage facility, you need to decide which options most suitable for work.
For this you need:
Then it will immediately become clear which box is best done for tools. The article has several instructions that will help solve this problem. It is first important to choose the material with which it will be easiest to work.
The most difficult to make a metal tool box. For a portable design, such a material will not fit - the case will be too heavy. For stationary models in which iron keys or heavy components will be stored, suitable. While working will need welding. If you have skills and skills to use it, you can try. If there is no, replace the metal is capable of a plywood with a thickness of 8-10 mm.
It only seems fragile, but it is very durable material. The details are fastened with each other with screws and additionally misses PVA glue, as they quickly break. For the construction of the frame, it is better to use bars from solid wood. The walls of the housing must be thicker - at least 10 mm. Boxes with cells for carpentry tools is better made from plywood with a thickness of 8 mm.
The mobility of stationary plywood boxes will increase significantly, if to attach the rollers that can be bought in the furniture store.
Drawers for different tools made of wood - carpentry classic. This material allows you to create any models.
If you need to have a set of small tools at hand, you can do the simple drawer with the handle. The process of its manufacture should be divided into several stages:

Before you start, you need to make a drawing.

All parts with hacksaw cuts are cut on plywood blanks. Then the edges of the blanks are sanded by sandpaper. From the biggest details the box is collected, its sidewalls are missing with PVA glue, then fasten with additional carnations (it does not make sense to use the bolted fastening). The holder handle (it is also partition) is made according to the following scheme:

The plywood is selected 5 mm thick. The hole for the handle is cut with an electrollized. The billet is inserted into the grooves made, which are pre-labeled PVA glue. So that the handle does not cut the hand, it is necessary to take the bar of the cross section 20x45 mm. The plane is rounded the edges of Bruck. In the whole width, a slot is made in which the plywood blank is simply inserted. In the end, it should be like this.

At the edges of the plywood handle (in the photo it is clearly visible) the wooden rails are attached, in which the removal holders for the passage, ticks, wrench or screwdrivers were pre-made. Toolbox is ready. So that it does not get dirty, you need to paint in several layers with a varnish for wood.
Using the same Phaneur, you can make a large box with your own hands, which turns into a stable stool with a slight movement. Invented this masters working with carpentry tools. As a basis, you can take such a drawing.

These details require four legs with dimensions of 375x50, with bevels at the ends performed at an angle of 15 degrees. And another 660 mm long handle and a width of 40 mm. At the edges - the same SCOS. But the visual plan of his assembly.

A stool is collected by the proposed scheme, the parts are fastened with screws of 4.5x60 mm, and not self-drawing. At the finish stage, it turns out such a box. Make it with your own hands - simple, as a result - a multifunctional storage for tools. If you turn it over, it turns out a steady stool.

There is the easiest option of making a box that is suitable for a conventional homeowner. Externally, it will look like the photo.

A detailed drawing is attached to the model:

Figure 1 denotes the sidewall, the number 2 - the bottom of the wooden box, the number 4 is the handle rack. Handle itself - bar sizes 382 by 30 mm. Another part is the holder - a rectangle with a width of 118 mm and a length of 55 mm. In the holder it is necessary to make three identical holes. For this, the drill is applied. The assembly of the large drawer begins with the bottom and sidewall connection, then the handle rack is mounted. The photograph shows all the stages of the coming work.

Then the second rack is installed, and at the same time, the holder park is inserted into the deaf hole. Then mounted fasteners for screwdrivers. That's what should eventually turn out.


