Hi friends. In this article I will tell and show you how you can make an acoustic screen (or acoustic panel) with your own hands very inexpensively. And for some it is possible and generally cheap.
I personally spied on the method of making such an acoustic screen on YouTube, and I will honestly attach this video at the bottom of this article. I will share it with you.
A small digression: in relation to the acoustic screen, you can also use the name "acoustic panel" - the essence is the same, so in this article I will use a double terminology.
In my course on high-quality voice recording on a computer, in the lesson about preparing a room for recording, I talked about such acoustic panels. If you are planning or have already tried to record your voice on a computer (perhaps even purchased), then most likely you have noticed that not every room is suitable for these purposes.
If we take an ordinary room for consideration and try to make a recording, then in 95% of our listening to the recording we will hear a background echo. And if you are not a cocaker and it is really important for you to do your job efficiently, then you will look for ways to get rid of the echo when recording a voice.
By the way, in my course, I shared a couple of clever ways how very simple and easy it is to solve this problem with improvised means. But this is also not always convenient. Especially if you not only write your own voice, but also the voices of other people who come to you, then it is important to observe the aesthetic component as well.
The echo in the room appears naturally from the reflection of our voice by all sound-reflecting surfaces, of which the room is full (floor, table, walls, cabinet surface).
By the way, while writing the article, I remembered that I had previously raised this topic in, which I had to whip up at work. If you're interested, take a look. There, of course, also not perfect option, but by 75 percent I was able to cut off the echo.
Recording studios solve this problem by using acoustic foam rubber, which is used to sheathe the studio walls, and sometimes the ceiling.

But for us (mere mortals), this method in most cases will not work for at least two reasons:
Actually, the acoustic panel was invented to solve our problem. They are installed behind the microphone and try to protect it from echo as much as possible.
Here are some sample photos of acoustic panels:

These acoustic screens have their pros and cons.
Here you and I understand that it would be nice to have such an acoustic panel, but how would you assemble it yourself? Yes or no?
But I somehow thought about it and even made my own acoustic screen. Itself. But, I must admit, I was tired.
This method has its undeniable advantages, but there are also disadvantages - I will not hide it. If I knew about them earlier, I would have avoided some trouble.
Therefore, I'd better warn you about them in advance!
But I will tell you about everything in detail below. So, my version of making an acoustic panel with your own hands.
And I decided to make a super budget acoustic panel, i.e. with the most minimal investment of funds for the purity of the experiment.
So, we need to make a homemade acoustic screen:

2. Piano hinges by the number of connections:

3. Foam rubber 4 or 5 centimeters (preferably 5).

But I disheveled the backrest of the ottoman (I still plan to change it, so why feel sorry?). My cats, however, did not quite understand me. :)

4. Knife with a thin replaceable blade. I warn you: immediately buy a couple more packs of replacement blades - they dull very quickly against foam rubber.

5. Door seal (but you can do without it):

6. Black color scheme for water-based paints- take several at once. 4 was enough for me and then half of the idea.
7. Glue - I took the "Moment Crystal".
So, I made a frame from PVC panels in accordance with my idea:

And around the edges of each of component parts pasted over with brown tape:

A cat helped me, I could not have done it alone.


Now we cut the squares obliquely (from corner to corner) so that we get two triangles from each square:

Well, I also cut off the resulting triangles along the edges, so that it would be more convenient to attach them to each other, well, so that the base of the sound-reflecting foam-rubber surface was higher:

I warn you right away that if you choose for yourself the same method with cutting foam rubber, you will have to cut a lot and a long time, having changed more than one blade!
After that we take the color scheme for water-based paints (not everyone can paint over foam rubber, and we cannot clog the pores either). I had this:

We breed the color scheme one to one, i.e. 1 can of color for 1 liter of water. If you add more water, then the color will end up not saturated, but a dirty gray.
In general, we saturate the pieces of foam rubber with black aqueous solution and lay out to dry. Don't forget to buy thick latex gloves! It is quite difficult to wash the color afterwards.


We glue the seal on top, but you can do without this step.

And glue the Moment to the base of the painted over and dried foam rubber, or rather the foam triangles, putting them tightly one to one:


Thus, we glue over all parts of the base and connect them together with piano loops ... Although it is possible in the opposite order.
I planned to make an acoustic screen of a rather impressive size in this way, but, to be honest, I had the patience to do it just like this:

Well, my friends, it would seem easy like this, we made an acoustic screen for recording a voice on a computer.
But this method of making a screen has its pluses and minuses. Pros:
But it also has its disadvantages, and I'll tell you about them! Minuses:
Well, here, by the way, is the consequence of the work I have done:

My findings: if I had to make an acoustic screen again, I would still spend the money on the purchase of acoustic foam rubber: in the end, paint is not taken, and we significantly save time. With his help, I would not have been making a screen for a month, but only one or two evenings.
So think about it before you start. self-production acoustic screen with your own hands!
Oh yes, and here is the promised video, from where I ripped off the idea:
How much time did it take for a person? ..
Well, that's all for me. Write if something remains unclear in the comments below. I wish you success!
Your Victoria Senokosova
That's all for today. Develop, create and may success overtake you!
Application:
Note:
Installation process:
 1. We mark the places on the surfaces of the walls or ceiling based on the area of the panels;
2. The glue must be applied to the finishing area evenly spreading with a spatula;
3. Next, you need to press the panels and hold for 40 seconds. During this time, the glue will have time to be absorbed into the panel.
It is necessary to purchase "liquid nails" and a special dispenser gun for
its application.
This glue is well suited for long-term installation of many materials, including sound-absorbing panels. To apply the glue, you need to use a special dispenser gun, which is sold in many hardware stores.
 Installation process:
1. Prepare the surface on which we will mount the material from dirt and dust;
2. We put marks on the surface to match the size of the panels;
3. Slowly, gently apply glue to the area in strips;
4. Press the panel to the plane and hold it for 40 seconds.
We will need: glue sticks and a heat gun for them.
Hot melt glue application is one of the fastest and simple ways gluing panels made of acoustic foam rubber. The advantage is that the panels can be installed on any hard surface.
This method is suitable mainly for panels that are not large in area, because hot melt glue has a lower degree of adhesion in contrast to acrylic glue.
Installation process:

1. Insert the glue pin into the thermo-gun;
2. After connecting, the device should heat up for 10-15 minutes;
3. While the device heats up, it is necessary to prepare the surface by cleaning it from dust with a napkin;
4. We expose marks for the dimensions of the panels;
5. Hot glue is quickly applied to markings;
6. We press the material.
This is a very convenient, but not the cheapest way to install acoustic panels.
Installation process: 
1. Wipe the original plane;
2. Make notes;
3. Spray the glue gently on the plane;
4. You need to press and hold for about 40 seconds, during which time the glue will set well.
Anyone who is engaged in sound engineering and arrangement in an acoustically unprepared room sooner or later comes to the idea of the need to "drown out" the room. There are many "folk" and, by the way, effective means:
However, in most cases this turns out to be insufficient. For example, when recording a voice, even in a filled “living” room, “echo”, resonances (“bank”) are felt, which often makes it impossible to further process and use the recorded material.
There are at least 2 ways out of this situation:
As inquisitive and greedy minds, we will not go the way 1. (about 700 euros per 1 m2 of space), although it is the most faithful. We will try to "on the knee" collect the acoustic design of a living room with little material costs.
We need:
The cost of materials is from 30 to 40 thousand rubles. (except 7.8)
It is better to work with two people, this increases the assembly speed by 3-4 times. If the area of the room allows - (more than 30 m2) - then three of us.
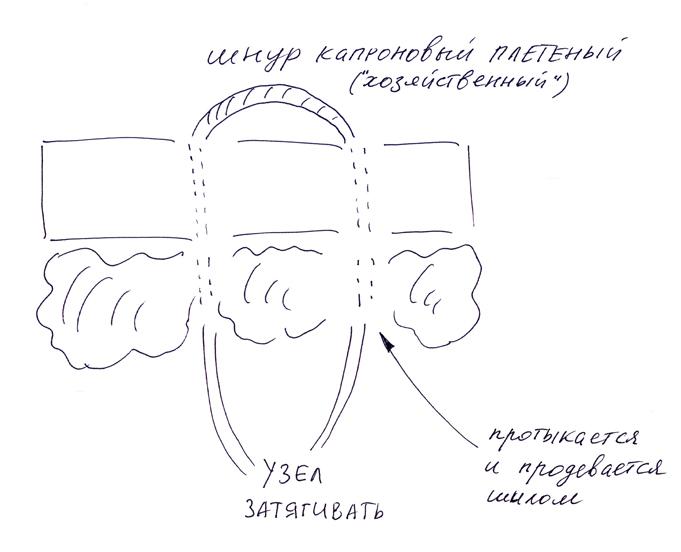
Those. in fact, we hang the panels on the walls like curtains, and on the ceiling we simply lay them on cables. Why can't foam rubber be glued to the ceiling - because foam rubber does not normally stick to anything without changing its structure (primer, chemical soldering, etc.).


For better dispersion, the fact that the foam comes in waves and sags a little is in our hands, in any case, it is important to avoid excessive stress on the foam rubber at the attachment points!
When using dark foam, the room will become very dark - use additional lamps and light curtains.
In the room, it is desirable:
In the room, you can now enjoy listening to music on acoustics up to 100 W, noticeably less echo, voice recording is an order of magnitude better, comparable to studio recording. It is important - the ceiling is not damaged, theoretically - the panels can be installed elsewhere.
With blankets, everything is clear - they are hygienically safe. With foam rubber - this approach: you need to buy "furniture" foam rubber and require a hygienic certificate. It is also important that the room has normal humidity, because this noticeably affects the quality of the tear-resistant foam rubber.
Acoustic foam is an acoustic treatment material widely used in automobiles. The material itself with open cells is capable of attenuating the vibrations of sound waves in the air, regardless of their frequency.
The acoustic foam rubber pyramid, as it is also called, thus reduces the amplitude of the waves, converting energy into heat. From this publication you will learn what the main purpose of acoustic foam rubber is, what types it is and what are its features.
Note. We note right away that this material is universal. It can be attached to doors, ceilings, or even entirely in the trunk of a car.
Pyramid acoustic foam rubber can be used in cars to improve sound quality.
It's simple:
Note. It is necessary to use acoustic foam rubber skillfully, not forgetting about the correct placement of panels in the car interior.
You can use this material for various specific purposes, but main task is an:
Note. Foam rubber migrated to cars from large and small recording studios, where it is often used as a material for noise insulation. In such rooms, foam rubber in the form of large panels in the form of triangles is placed on the walls.
In cars, in order for the material to cope better with absorption, especially low frequencies, it is also recommended to use it in large pieces, and most importantly, the material must be thick.
Note. Large pieces of acoustic foam placed in a car or other room create so-called acoustic traps or bass traps.
Bass Traps work by capturing the energy of the bass, which tends to bunch up in the corners of rooms, in this case in the corners. After that, the bass starts to deafen.
If you use bass traps, you can get an amazing effect of reducing unnecessary reverb. The bass will have more clarity and punching speed, which will allow you to control the low frequency energy.
As mentioned above, there are many types of acoustic foam rubber. Cars use special foam rubber - automotive.
Note. Usually, automotive foam rubber is combined with a carpet. Together, these two materials create excellent sound insulation and take your car audio to a whole new level.
To glue a car with these materials in a complex manner, you will have to do the following:
Note. As a rule, in the process of soundproofing car doors, materials are used, the basis of which is foam rubber. In this case, the foam rubber is on the substrate, and with front side it is covered with foil or polyethylene terephthalate film.
Note. A material based on acoustic foam is always applied to a dry, grease-free surface. On top, you can glue another material, for example, polyethylene or acoustic felt.
So:
Note. As you know, an acoustic lens is able to equalize the sound output of the speakers, and together with the foam rubber, it will be a "explosive" mixture.
More detailed information on how door sound insulation is carried out can be found in other articles and instructions on our website. In the process of doing work with your own hands, we highly recommend watching a video, studying a photo.
As a rule, the price of acoustic foam rubber is low, but this material gives an incredible effect.


