Modern world dictates its own rules. Gadgets are replacing the previously familiar things that were part of our everyday life. If earlier photographs were stored in photo albums, now they are most often stored on hard disks, flash drives, in online stores. You can view thousands of images at once, but the charm of the process is lost. Compare with reading books online and in real binding, with paper pages. The book and photo album that you hold in your hands have their own magic, unique energy. Photo frames can also be classified as an endangered class, but with a big amendment: if they are ordinary products from the store. DIY creative frames are out of fashion. They are always relevant, effectively decorate the interior, and become an original addition to a gift. Consider ways of making unusual frames, with which a special atmosphere appears in the house.
The advantage of this method is that you can use any colors. Cardboard sets are sold in 8, 10, 16, 20 and more shades. Or, it is best to create your own range by covering the surface with paint that perfectly matches the furnishings of your room.
Now more about the process itself:

An important point: choose a good glue that will ensure reliable fixation of the decor elements.

Read magazines become a useless pile, a dust collector, which is a pity to throw out, but also useful applications can not found. Colorful glossy pages are an excellent basis for decorating an original photo frame. The process itself is also fascinating, which often develops into a hobby. The products are bright, interesting, unique - it will be difficult to find analogues. Now step by step.


An ideal gift - given with a soul. Of course, store presents often take a lot of time to choose, but they do not have the energy of hand-made. Supplement the main gift with a handmade photo frame, and the hero of the occasion will be pleasantly surprised and moved.

The process is not complicated at all:
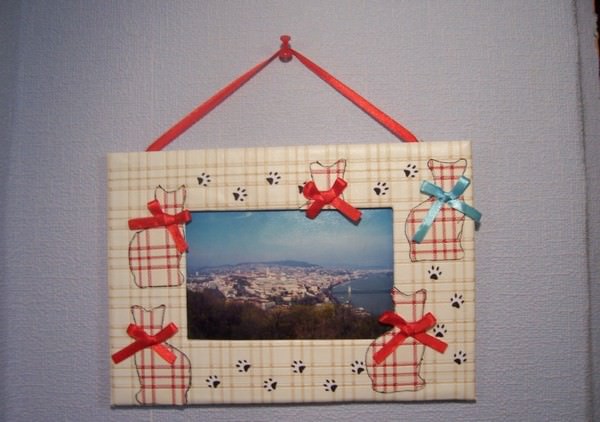
We select a piece of fabric. Color, print - to your taste. The most winning options that look bright and impressive: contrasting peas, multi-colored stripes, patterns on a white background. It is better to choose a picture by age and situation. Children - cartoon motives, women - floral prints, men - restrained style.


Flowers can become not only the basis for a bouquet. Floristic compositions from varieties that become beautiful dried flowers without water are a great decor for a photo frame.

We will tell you in detail how to make a masterpiece out of a regular frame:

We make a back pocket for a photo and a mount (for a wall - a loop, for a shelf - a leg-support). A beautiful frame of flowers is ready.
DIY photo frames made of threads
What to do with thread if you don't know how to sew? Craft an original photo frame that will effectively decorate your home. The colors of the threads can be chosen in harmony with the shades of the interior. It will look stylish and conceptual. About the process step by step:

There are buttons in every home. You can easily create a bright set for a photo frame. In addition to the buttons, you will need three more items: super glue, heavy cardboard, and scissors.


Whichever method you choose, the frame will turn out to be original and unique. Feel free to fantasize, try new materials and decor elements. Try yourself in hand-made. The process is creative and fun, often developing into a hobby. How nice it is to admire the frames made with your own hands and soul!
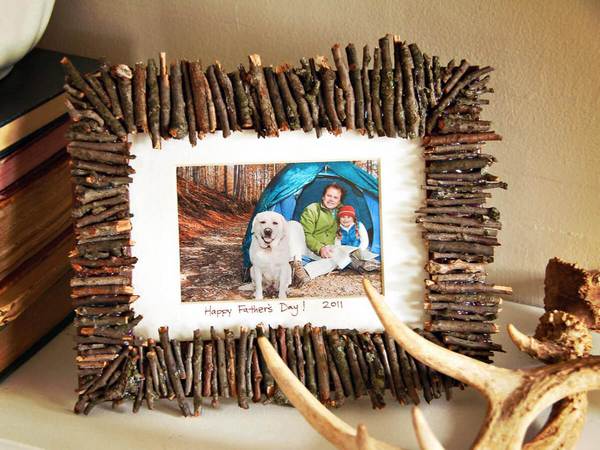
In the days of digital technology, the value of the paper-based image has dropped markedly. And in vain, photography is primarily a memory from the past. People are used to keeping things dear to their hearts next to them. But storing photos in digital media is not always convenient, and the presence of an attractive frame with a favorite image on the table automatically attracts the eye and, accordingly, brings back pleasant memories. You can make a photo frame with your own hands from improvised means, using natural materials for decoration.
You can make a photo frame with your own hands from improvised means
To be able to make photo frames on your own at home is quite useful - sometimes you need a frame of non-standard sizes to hang on the wall, for example, a poster from your favorite computer game, or a large photo, and buying a large frame can be quite expensive, and it can be suitable for a photo by color and texture can not always be found. A homemade frame will come to the rescue if you decide to hang a do-it-yourself picture on the wall, or a certificate of honor, or a page of prefabricated handwritten text - at weddings and anniversaries, guests often write such congratulations and wishes as a keepsake to newlyweds or anniversaries. Photo from kindergarten, or from the school line on September 1, a wedding or just good photo from a walk - are there not enough reasons to hang on the wall or put one of the happy moments on the table? Let's take a step by step how to make a suitable frame for them.
You will need:

Such a photo frame will be very budgetary.
How to do:
After drying, the craft is carefully easy to varnish.
Necessary:
A cardboard photo frame can be very simple
How to do:
The frame support leg is made of cardboard. Cut out a thin rectangle, fold it in half, and glue the base to the craft.
A very delicate and beautiful frame is obtained when decorated with artificial flowers, wallpaper, pieces of lace or braid.
Necessary:
The photo frame can even be decorated with debris
How to do:
Photo frame design options:

Photo frame can be decorated as you like
If desired, crafts can be decorated with decorative small flowers, knitting threads, pieces of wool, dry herbarium, dyed pasta or seeds.
If you plan to hang a framed photo on the wall, it is better to take lightweight material for making - ceiling plinth, cardboard, paper.
You can involve a child in creating a dough frame. A fascinating activity will amuse the little fidget, and the product will turn out to be unusual.
After drying, paint the craft with gouache and open it with colorless nail polish.
A well-taken picture is able to preserve pleasant life moments in memory. Your favorite photo, placed in an original frame, will become a decoration of any interior. A good alternative to purchased frames, the choice of which is huge on the market, can be made by a unique, one-of-a-kind product that you make with your own hands.
As a basis for a future masterpiece, you will need thick cardboard, as well as scissors, a brush and a pencil, paints (acrylic, gouache or oil), universal glue and polished peas (whole or in halves).
It is best to start creating a cardboard photo frame with your own hands by determining the size of the future frame, which will be 1.5-3 centimeters larger than the picture itself. Cut two identical blanks out of cardboard. Place the photo in the center of one of them and trace around the perimeter with a pencil. Make the inner window slightly smaller than the picture: mark by about 0.5 centimeters along each edge and cut it out. You need to glue the peas on the resulting blank (in any convenient way), then paint the frame in the selected colors and varnish it. From the same cardboard, make a leg for support or an eyelet if the photo will be placed on the wall and glue the prepared element to the back of the frame. Then the two halves (upper and lower) must be carefully glued together.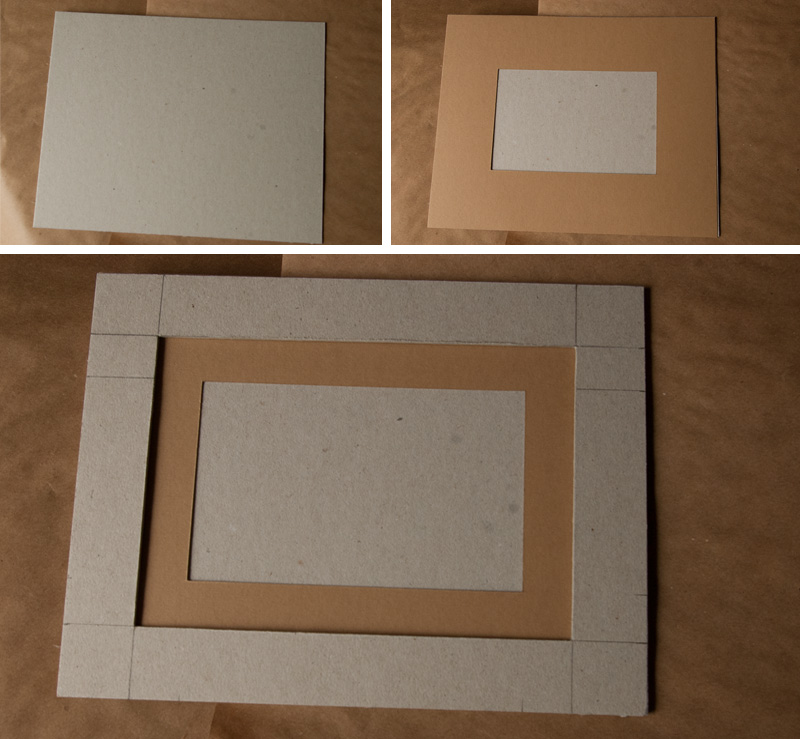
Many needlewomen are interested in: how to make a photo frame from scrap materials? After all, this is a very necessary thing, but shop frames made of plastic look exactly the same. Therefore, it will be very interesting and useful to learn how to make these things with your own hands, our today's MK for beginners will help you with this.


These stylish items can be crafted from any old and unnecessary items. You just need to connect your imagination and not be afraid to create.
The base for a photo frame is usually made of cardboard. In addition, you can use the blanks sold in the store for this purpose.
How to decorate a cardboard base? Here you can only be limited by your imagination. We suggest paying attention to the master class of the original product decorated with eggshells.

1) Cut out the base for a 4 cm wide frame from cardboard. The inner perimeter of the frame must match the size of the photo.


2) Making a stand for the photo frame. Cut out such a figure from cardboard.

3) From the rectangular uncut side, measure a two-centimeter strip and bend it.
4) Cut out a rectangle for the back of the frame. We will glue the details.

5) Glue the leg. To do this, smear the bent two-centimeter strip with glue and glue it to the middle of the back wall of the frame.


6) We start the design. Let's paint the frame with blue acrylic paint.


7) Boil 5 eggs, peel the shells from them in large blocks. Paint it in different shades of blue paint.

8) When the paint is dry, crush the shells.

9) Now glue the frame with eggshells in random order, but tightly to each other.


10) Here's a nice decor.

You can use broken eggs instead of eggshells. seashells or another kind of decor.
It is very simple to make a photo frame out of paper, but always beautiful and embossed, for example, from wallpaper.

You will need:

Sequencing:
1) On back side draw two rectangles for the wallpaper. The perimeter of the inner must be equal to the size of the photo. The width between the inner and outer perimeter should be 3 cm.

2) In the center rectangle, draw diagonal lines and mark 1.5 cm from them.


3) Draw another inner rectangle through these points.

4) Cut the inner rectangle diagonally with a breadboard knife.

5) Bend the corners inward.


6) Peel back the side of the outer rectangle.

7) Fold the outermost 3-centimeter strip in half.

8) There are small squares in each corner. We cut one fold.


9) Fold the frame into a box.


10) We cut it off with a stapler.

11) Cut out a rectangle from cardboard and glue it to the frame. This is the back wall.


It is easy to make such a frame, it will be very interesting for children.
Handmade items for the home are a kind of amulet, a symbol of comfort and prosperity. Because the things in which a person has put his work and his love have a very strong positive energy.
Handmade gifts are especially appreciated all over the world. They will surely bring peace and warmth to the homes of your friends, relatives and friends. Your young man will certainly be delighted with your joint photo in the original frame. And children will be delighted to receive a color photo in a bright frame as a gift.
Let's look at very simple and quick ways making frames.
Make a voluminous base and paste over with details of your choice.


Cut the rolls into rings with a diameter of 1.5 - 2 cm, bend them with a petal. Glue the petals together with good glue, paint in suitable color and the frame is ready!


Cut all the same rolls, connect them together, glue them with sequins or rhinestones and the royal frame is ready!


Literally all materials that come to hand can be used here: beads, coins, shells, coffee beans, etc. It is better to glue the details with a hot glue gun.
In this thematic section you can find hundreds of interesting ready-made solutions to create original photo frames and frames.
How to create with your own hands a truly exclusive frame for a bright frame of life or a worthy piece of art is shown in the illustrated step by step master classes... Desktop and wall frames, classic shapes or in the form of flowers, suns, hearts, boxes and others. Made from cardboard, salt dough, pasta, plastic utensils, etc. waste material... As well as unusual jewelry that will help turn any, even the simplest, frame into an exclusive one.
Showing publications 1-10 of 379.
All sections | DIY photo frames and frames
C spruce: craft with moms photo frame"Pussy" from napkin lumps. Tasks: to cultivate love and respect for the mother, a sense of gratitude. Promote the rapprochement of children and parents, the development of positive emotions, a sense of mutual assistance. Stroke Events: The word "mom is one of ...
 Senior children preschool age I like to be engaged in making functional gifts (Christmas tree decorations, pincases, decorations for a flower pot, etc. Such things are in plain sight, they are actively used and it brings joy to the child. This year, on Mother's Day, we are ...
Publication "Master class" Photo frame "Musical note" from wooden clothespins ... "  Truly interesting things come from wooden clothespins. These crafts will delight children every day or they will come in handy as a beautiful gift. The main thing that we need to master is the decor of clothespins, and the rest will be done for us by our imagination. What do we need ...
 Library of images "MAAM-pictures"
 In December, in the framework of the weekend club "Tsvetik - seven-color", the group "Rainbow" visited the Fire Department. The children were met by the duty officer. Under his leadership, the children walked around the territory of the unit, examined the fire engine, the necessary accessories for extinguishing the fire. Getting to know ...
 A frame for congratulating children on their birthday I wanted to make something like this for a long time, since the established tradition of posting birthday greetings to children in the locker room, in full view of the parents, and writing the name and surname of the birthday person seemed to me wrong. Rather, in relation to ...
Master class for parents "Making a photo frame from pasta" Master class for parents "Making a photo frame from pasta." Purpose: to teach parents how to make a photo frame from pasta. Tasks: to form knowledge about the technology of making a photo frame from pasta; show the ways of dyeing pasta; Do you think they can ...
 Our group is located on the second floor. We decided to decorate the flight of stairs leading to it with photographs of children. To make it look bright and beautiful, parents and children were invited to the master class “Do-it-yourself photo frame”. Prepared for them necessary materials, talked about ...
 "Play. Learn. Learn" Didactic games are carried out with kindergarten kids, starting from the very early age... There are a large number of fascinating games through which teachers introduce young pupils to objects of nature and objects, their color, shape ...


