Do you throw out the cardboard because it takes up a lot of space? But it can become a material for your creativity. For example, you can build a house ...
Do you throw out the cardboard because it takes up a lot of space? But it can become a material for your creativity. For example, you can build a cardboard house for children or for a pet. Look for ideas for such crafts below.
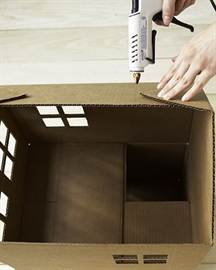
Do you have a little daughter? Then make a do-it-yourself dollhouse for her from cardboard. Any girl will be delighted with such a present. If you have a lot of free time, then build a home for the Barbie, and if you are running out of time, then make a small shelter for miniature toys. How to assemble a house? The first step is to draw a pattern. It should consist of three walls, one pediment, a floor, a roof and a partition between floors. Let's start creating. Cut out the details. There are two ways to fasten the workpieces together. One is to glue the cardboard with a hot gun, and the other is to create grooves in the parts. You can combine the two mounting methods for reliability. First connect the walls together, then attach the floor to them. After that, insert the partition between the floors, and the last action is to attach the roof. You can decorate the front of the house with cardboard, which will act as a pediment.

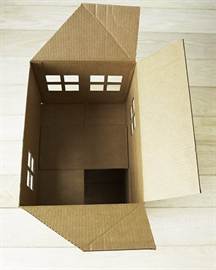
Do you want to make a stable structure and at the same time not spend a lot of time on creating crafts? Build a large open cardboard house. Before starting work, you need to draw a pattern. It will consist of two side walls aligned with the pediments, a rectangle connecting the two parts of the future building, and three partitions between the floors. We transfer the pattern to cardboard and cut out the details. In accordance with the photo attached above, cuts need to be made in the blanks. They will play the role of grooves. Thanks to this fastening, the structure will stand steadily, and if necessary, it will be easy to assemble. When the grooves are made, you can start cutting out the windows. They can be of any shape and can be located in any part of the building. To make your home prettier, frame each window with a curly frame. For this purpose, use multi-colored gouache mixed with PVA glue.

Children like to do such crafts for the New Year holidays. A cardboard house can play the role of a candlestick or become one of the decorative details of a room. How to assemble a similar craft? You need to start with a sketch. Draw the house you want to design. If you do not often do prototyping, then you need to start by making a one-story structure of a simple structure. The drawing is ready, now you should draw its scan. Contrary to popular belief, this is done simply. If spatial thinking does not work well for you, first mold your project from plasticine. When the pattern is ready, transfer it to cardboard and then cut it out. Glue the parts with a hot gun. Color the craft with gouache or immediately make a layout out of white cardboard. Complement the project with trees and a fence, and then sprinkle the craft with artificial snow or fine foam.

It is always pleasant to make not only beautiful, but also utilitarian products. One of them is a cardboard tea house. A master class for making such a product is given above. The roof of this craft is removed and the base is filled with tea bags. Such a house can be placed on the table or used to decorate one of the shelves in the kitchen. How to make a do-it-yourself tea house out of cardboard? Above is a pattern, you need to print it or redraw it. First, let's put together the base. It consists of four long rectangles and one small square. First we fasten the walls of the structure together, and then glue the floor. The cutout for the door must be made immediately. At this stage, you need to check whether the bags are removed from the hole, if necessary, the hole can be enlarged. We glue the base with beautiful paper with a suitable print or paint the house by hand. Now you can assemble the roof. We glue two rectangles together, and insert a bar between them. We make gables and make a floor near the roof. You can decorate the part with rectangles bent on both sides. Cover the roof with colored paper or paint the detail.

Do you want to please your child? Make a cardboard house for children with your own hands. The best fun for toddlers is to hide in a hiding place. The cardboard house will become a permanent place for the child to play. How to make such a gift to your child? Make a pattern. You can draw it on the wallpaper that was left after the repair. You need to design the structure with a margin so that your child can enjoy his shelter for more than one season, but several years. The two side walls must be combined with the gables. Long walls are rectangles. And for the stability of the structure, the roof must be made of rectangles rolled up with the letter "P". Such large "clips" will cling to the protrusions that need to be created in the pediment. Cut through the windows in the long walls of the house, and cut out the door in one of the side parts. You can attach it using springs or an old door mechanism.

Do you have any pets? Make a cardboard house for your cat. This design will be very primitive, but your pet will be able to appreciate the work. What should an animal house look like? Take 8 old cardboard boxes. The first row of the structure will consist of four boxes. Connect them together with tape or glue. Cut through holes in a chaotic manner. But don't touch the floor of the house. The second row will have three boxes. Arrange them in a corner on the first tier. Make slots in each wall, and also several holes that will lead to the lower tier. Glue the rest of the box with the third layer. Cut through the moves in it. The house is ready. You can decorate it in any way so that it looks good in your interior.

Holidays are coming soon and you decided to give your friends sweet gifts? Then make a house out of cardboard. Such packaging can be filled with purchased sweets or sweets made by yourself. How to make a house? Above is a template. You need to print the pattern and then cut out the stencil. Take colored cardboard and transfer the drawing to it. Now cut out the workpiece and glue it. It remains to decorate the craft. You can paint your creation or make an applique out of colored paper. If you fill the box with homemade sweets, be sure to wrap them in foil or cellophane. This is necessary so that the product does not become saturated with oil and does not lose its presentable appearance.
With your own hands - in the material you will find templates and simple step-by-step instructions with photos.
Even super-cool store toys never outperform those made by mother's caring hands. In addition, children can also be involved in work - then it will be even more fun and creative! Make a dollhouse with your own hands out of cardboard, and so that it is not empty, put it in it.
To get started, print or draw and cut out the parts following the example template. Two walls with a ledge for the roof, two walls without, two parts for the roof and one door.


Then trace the details on the fabric. Leaving an allowance of 1-1.5 centimeters. Cut out the details. Cut the corners as shown in the photo.

Fold the fabric around the perimeter, glue it to the cardboard parts.

To do in cardboard house windows - cut through the fabric with the letter X where the windows are located on the cardboard part, wrap the resulting shreds inward and glue them.


When all the details of the cardboard house are completely ready, we glue them together, as shown in the photo.

Every little girl dreams of the biggest and most beautiful dollhouse for Barbie. And every house cat dreams of his cardboard house, where he can retire, without getting in the way under the feet of the owners. Having learned how to make cardboard houses with your own hands, you can not only please your children and pets, but also decorate the interior in an original way. This article shows the most requested do-it-yourself cardboard house schemes with mk.


Materials and tools do not require additional costs, everything you need can be found in the household of any family:
- cardboard boxes of different sizes;
- glue gun or super glue;
- knife and scissors;
- pencils, markers, markers;
- watercolor paints, gouache;
- sequins and other decorations for decoration.

Helpful hints:
- when creating a box, it is better to use corrugated cardboard;
- only adults should cut cardboard;
- for the stability of the product, it is better to take cardboard pipes;
- in a house for children, it is advisable to make a door that opens outward. This will provide more space for games;
- do not throw away small cardboard boxes.
A cardboard house for cats can be built by the whole family in a very small amount of time. The first thing to do is draw doors and windows according to the templates.

Start picking up the bottom of the box. Bend the opposite flaps, apply glue on them and bend the rest of the flaps from above. Press them together until the glue dries. At the top end of the box, cut off two wide flaps. Next, cut off half of the one remaining sash and bend it. Do the same for the second whole sash. Secure them with glue in this position.

The next step is to create the roof. On the top of the second box, on a small flap, draw lines from the center of the top to the bottom corners. Do the same with the second sash. Then cut out one large flap. Cut off the edge along the first drawn line, and bend the second. Repeat the same steps with the second sash.
Cut off wide flaps at the bottom of the second box, and cut exactly half from the first smaller one so that when gluing two boxes there is a hole. Glue the boxes together. Then take the first cut off wide flap and glue it to the bottom of the second tier to strengthen it.
A roof will be made from the second box. To do this, cut a piece measuring 45 x 115 centimeters. Bend it along the long side in half. Glue the triangles of the small flaps on the top of the second box with glue and glue them to the wide flap. Apply glue on top and glue only the first side of the roof so that the cat can look out from under it.
The house is ready!

You can make this wonderful gift for children yourself from ordinary cardboard boxes.
The house will consist of two floors and two rooms. First, connect the boxes together. Glue on the bottom, side and sides on a sheet of thick cardboard. Strengthen the structure of the house with adhesive tape and let the glue dry.

To make the structure more durable, strengthen the walls with thin cardboard.

The next stage is decorating rooms and appearance house. Decorate the walls with colored paper applications, add mirrors, window curtains, toy furniture. In order for the dolls to "climb" to the second floor, the house will need a staircase, which will consist of two parts.
Cut out the steps for the end of the staircase from thin paper. Cut the same out of cardboard. Choose the required width and height of the steps.

Cut out a couple more pieces from a thick sheet of cardboard. You will need a couple of rectangles for the steps and the bottom.

Glue the sides of the ladder together and squeeze with your hands to make them tighter.
If you think about it a little, then from the simplest and most ordinary materials, which are quite often at our fingertips, you can make great things. with my own hands.
One such example is a wooden house made of paper.
But as for the ideas that arise to create such a miracle, it appears for a variety of reasons. Sometimes, inspiration just comes and it's not bad at all.
For this we need
Cocktail tubes
A4 paper
Multicolored cardboard
Glue
Scissors
Step 1


Step 2

You can never calculate how many such tubes are needed in the exact amount. That is why, do them in the process. It will be easier this way.
Step 3

Step 4


Step 5

Step 6


Step 7


Step 8

Need an unusual gift wrap? Do you need a craft in the form of an architectural structure? If you like to be creative with children, you can make a cardboard house together. The execution technologies will be similar, but choose the size and design in accordance with your individual idea.
A cardboard house can be made in the following options:
As you can see, there are several possibilities. Choose the one that suits you best. Make the game of children more interesting and developing by the means available.

To make a house out of you need to prepare the following:
The set and amount of materials will depend on what kind and for what purpose you will make a house. For a growth structure, a strong frame is needed, and thin cardboard or thick paper is also suitable for packaging. The packaging design can be fully developed on a computer or a ready-made template can be printed. Big house will have to be tinkered by hand.

If you want to make a small cardboard house with your own hands, it is better to use a ready-made template that can be printed directly on the sheet for the product. It would be better to draw a blank on thick cardboard. A small house is easy to build like a box from a whole sheet of cardboard with fold lines.

If you are going to make a large growth house for children, it is better to cut out all the parts separately, although if the size of the material allows, it is not difficult to make a blank also in the form of a sweep, like for a box. The scheme is quite suitable as a sample. small house... It is enough to increase the size of the constituent elements proportionally. If there is a large box suitable size, it's good to use it. Then you just need to cut out the doors, windows, perhaps strengthen the structure, build a roof on top (more conveniently a gable) and, of course, decorate the frame.
This section contains a general sequence of steps. Each case will have its own nuances. So, to make a house out of cardboard with your own hands, work as follows:
When the whole structure is assembled, start decorating. Internal walls, especially if the connecting elements are visible, it is better to cover with decorative paper or cloth. It is enough to paint the outer walls of the house.

Although you can lay out the lower part from stones or applique elements (paper parts). In a word, arrange the entire decor at your discretion. The main thing is that it turns out to be appropriate, and it is important to securely fix it so that during the game the house does not immediately lose its attractive appearance.
The frame manufacturing technology will be similar to that already described. The only difference is that the facade wall is either not executed at all, or it is made opening, like a hinged door. This can be done on tapes, cardboard strips. When creating a playroom, it is important to do it in proportions suitable for dolls, commensurate with them, so that they fit there and feel comfortable (sitting, standing).

Particular attention is paid to the organization and design interior space... It is imperative to complete several partition walls between rooms. They will also fulfill the role supporting structure... It is important to make furniture (or place a purchased dollhouse). Pay attention to the wall decoration. If you think over everything properly, the house will turn out to be very realistic, and the design process itself will turn into an interesting activity for young craftswomen.
This option will have some peculiarities. If you are going to create a simple craft for a competition or interior decoration, it is enough to make it on the basis of a cardboard box. Such a product may not be openable, and the decoration (windows, doors) will be drawn or made in the form of an applique.
If you want to make gift wrapping, like a cardboard house, the product diagram should be such that the opening part is present. It should be convenient to take out the contents of the gift, and the packaging should not be deformed. At the box-house, the roof can be removed, one of the roof slopes can be opened, the base can be removed or moved.

So, do beautiful house made of cardboard with your own hands, you can both for play purposes in a natural, comfortable size for a child, and as a souvenir gift (packaging or a doll's dwelling).


