After I got an agricultural motor-winch, made by my own hands, which is used for plowing a vegetable garden, the question arose: buy a plow or make it on my own? Walking through the shops and bazaar of Smolensk, there is a strange feeling that the plows for the walk-behind tractor produced by the industry are a sad sight. And these industrial creations are suitable only for "picking" and not for plowing the land, and even with a seam turnover, but about the depth and width of plowing, we can conclude that for planting potatoes with a distance between rows of 60 cm, not one of the proposed in the plow trade. Either our manufacturers are saving, or the power of the most popular motoblocks is not enough to work with a normal plow with a working width of 30 cm.When planting potatoes, do not plow one furrow three times. And the price wants to leave the best - under 2 thousand. rubles (for a couple of pieces of iron from the scrap metal collection point). The next step to finding something sensible is to search the Internet. To my surprise, 3-4 original descriptions with drawings float in the vastness of the Russian-language network (this fact surprises me very much). The next step is to look at what others are using. It was not possible to buy a suitable plow, it was decided to make a plow with our own hands. Based on the fact that the plow was supposed to be used for planting potatoes with a winch for plowing, the following requirements are imposed on it:
1. Plowing width - up to 30 cm.
2. Depth of plowing -10-20cm.
3. The plow must keep the furrow by itself, not burrowing or jumping out of the furrow. The geometry of the plow must ensure movement with the specified parameters without the help of a plowman.
4. Availability of the possibility of adjusting the depth and width of plowing.
5. Minimum weight and sufficient strength.
My uncle has been using his homemade motor winch for plowing for more than 10 years and has tried several options, for the last few years he has settled on an option optimized for a homemade motor winch for a vegetable garden, and specifically for planting potatoes with a row spacing of 60 cm. There is also a homemade hiller. for motor winch and potato digger. made by hand, all this can be viewed on the corresponding pages of the site .
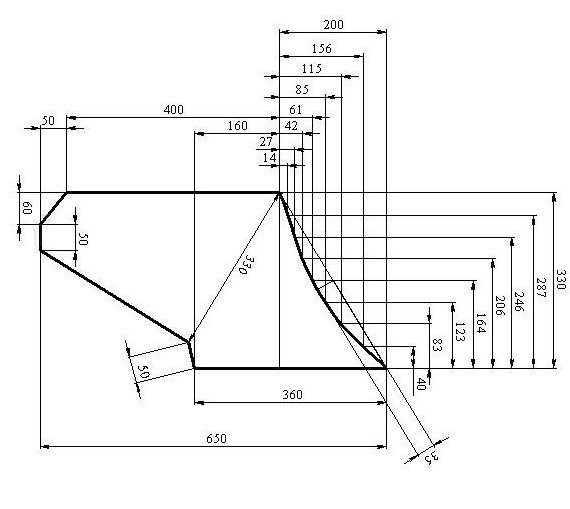
Field board drawing.
The blade bends according to this template, until the two profiles coincide, and then it is welded at an angle.

Using a drawing of a home-made plow, it is necessary to draw a plow pattern on thick paper, and then transfer the picture to metal and cut out the workpiece with a grinder. Personally, I used 1.8 mm stainless steel material. Many people often use a sheet of 2-3 mm. The cutting edge of the plow is reinforced with a strip of thicker metal. Someone proposes to use a disk from a circular for these purposes, someone from a "Muscovite" spring. From personal experience, if country cottage area for a family of 4 people to plow in the spring and autumn, cultivating six acres, it is not worth chasing super strength. It is more profitable to make a lightweight, but strong enough plow for its tasks. It is better to repair or replace something in 10 years, and then, if necessary, than to carry a weighted structure of a homemade plow for all 10 years. Excess weight to nothing.
This is what the plowing width adjustment system looks like. By rearranging the large wheel, you can change the plowing width within significant limits. When I plant potatoes, I set a grip of 30 cm, in two passes, a distance of 60 cm is obtained between the rows. For autumn plowing of a vegetable garden or when plowing virgin lands, I do the grip less. The small wheel is made so wide that the plow does not press into the ground.


Questions, comments, discussion are available on the website Pahalka.ru
If you need to make a plow for a winch with your own hands, the drawings of this tool must first be considered.

It is worth understanding before starting work that the plow is used as a working element of the plow, which cuts the layer of the lower part of the soil. Among other elements, there is also a blade, which is designed for crumbling and wrapping the earth. It is used in the construction and the field board, which acts as a support for the tool. It rests against the bottom of the furrow. The field board, blade, fur, as well as the rack, with the help of which the plow element is fixed, make up the body of the structure. In the ground, the body moves in the direction of the horizon, cutting off the soil, and then deforming it and turning it over.

A do-it-yourself plow for a winch, the drawings of which must be drawn up independently, can only be completed after you have studied the principle of the tool. Before that, you need to make sure that you are able to work with metal, you will have to bend the blade using bending rollers. You can choose for yourself one of the proposed options for manufacturing the body blade.

When a do-it-yourself plow for a winch is made, the drawings of which will allow you to complete the work without errors, it will be necessary to form a body, taking into account that the layer of earth should rise 25 centimeters up. This indicates that the tool will be under significant stress. In addition, the surfaces of the body will become exposed to abrasive wear, which entails the need to use steel for the manufacture of working elements of the structure, the thickness of which is equal to 5 millimeters.

The ploughshare must be removable in order to be able to sharpen it. The manufacture of this element should be carried out using alloy steel, it can be a circular saw blade. Steel that has not been hardened can be used. If only regular grade carbon steel that has not been heat treated is available, it can also be used, but the cutting surface of the share will need to be beaten off with a cold anvil before use. After the element should be sharpened.

When you make a do-it-yourself winch plow, the drawings of which will allow you to complete the work more easily, you need to prepare the bending rollers. They will allow you to give the workpiece the desired shape. For this, the blade blank, the thickness of which is 4 millimeters, must be brought to the rollers at an angle of 23 degrees. The element must be bent, and then brought to the desired shape with a hammer.
Initially, you need to prepare the drawings of the plow for the winch with your own hands. Only then can you start making a blade, which can be made from steel pipe, its diameter should be equal to 600 millimeters, while the wall thickness should vary within 45 millimeters. In this case, initially, an element template must be made from a fairly dense cardboard, and then applied to the pipe, thus, an angle of 23 degrees should be obtained between the bottom of the moldboard and the pipe cylinder. The contour of the element must be marked with chalk, and then the oval is cut out using gas welding, then the workpiece is processed on emery. If necessary, the shape can be modified with a hammer.

You first need to make drawings of the plow for the winch with your own hands. The third manufacturing option will be the most time consuming. The blank for the blade will need to be heated using a forge. After the part must be bent along the matrix, as the latter, you can use a blade borrowed from a tractor plow. The plow body must be made of sheet steel, the thickness of which is 3 millimeters.
When making a plow for a winch with your own hands, the drawings, the photo of which you should study in advance, you can first perform structural elements using thick cardboard, after the templates are glued together. If the design layout suits you, you can use it as a basis for making a tool. When the main plow blanks have been prepared, a steel sheet should be used to mount the body, the thickness of which should be equal to 3 millimeters, while the dimensions of this blank are 500 x 500 millimeters. Using a steel sheet, 40 millimeters must be retreated from its edges. A ploughshare must be installed on a metal sheet and fixed by welding on both sides. Next, you need to bring the flap under the ploughshare, given that its location should be vertical, in addition, it should go over the edges of the ploughshare by 8 millimeters. In this case, the stand guard should be located 10 millimeters above the plowshare blade, only in this way it will be possible to exclude the fact that it will interfere with the blade. The shield also needs to be tacked by welding to a steel sheet and a ploughshare.
When making a plow for a winch with your own hands, how to make a tool, you must find out in advance. At the next stage, you need to try on the blade to the plowshare, which should be connected to this element tightly enough, there should be no gaps. The angle between the share blade and the blade edge should be approximately 8 degrees. If an inconsistency in the angles is found, the blade must be reworked with a hammer. After the blade is fitted to the share, it must be tacked by welding. At the next stage, a spacer bar is attached to this shield, as well as a base plate. The latter must be reinforced to the support corners. The tool must be inspected and finally all elements must be welded. The coulter support corners must be welded to the base plate.
Performing a plow for a winch with your own hands, at the next stage you need to clean the seams well, and process the share and blade with a sanding cloth. In order to ensure self-propelled plow, a block with two wheels must be adapted to it.
The furrow wheel should be selected so that it has a diameter of 320 millimeters, while its width should be equivalent to 50 millimeters. It can be made from a metal sheet, the thickness of which is 4 millimeters. After it was possible to make a plow for the winch with your own hands, it will be necessary to make a field wheel, the diameter of which is 200 millimeters, while its width should be equivalent to the width of the base wheel. Manufacturing must be made from the same material. The wheel axle is formed from 3/4-inch tube. After carrying out these works, you can safely start using the tool. As its positive feature, one can single out the fact that in the event of a breakdown, you can easily repair it, since you will know its device well.

Our ancestors slept differently from us. What are we doing wrong? It's hard to believe, but scientists and many historians are inclined to believe that modern man sleeps quite differently from his ancient ancestors. Initially.

How to look younger: the best haircuts for those over 30, 40, 50, 60 Girls in their 20s do not worry about the shape and length of their hairstyles. It seems that youth is created for experiments on appearance and daring curls. However, already the last.

Top 10 Busting Stars It turns out that sometimes even the loudest fame ends in failure, as is the case with these celebrities.

7 parts of the body that should not be touched with your hands Think of your body as a temple: you can use it, but there are some sacred places that should not be touched with your hands. Research showing.

13 signs that you have the most best husband Husbands are truly great people. What a pity that good spouses don't grow on trees. If your significant other does these 13 things, then you can.

Unforgivable mistakes in films that you probably never noticed There are probably very few people who would not like to watch films. However, even in the best cinema there are mistakes that the viewer can notice.
Some do-it-yourselfers try to make a plow with their own hands, copying it from a tractor or horse plow. Often, such an attempt ended in failure, and not because the masters did not have enough patience and will, but because of the lack of necessary knowledge about the geometry of the plow body.
In order to have a clearer idea of the plowing process and the purpose of the individual elements of the plow, first consider the interaction with the soil of a simple wedge. Under the influence of the wedge, deformation of the soil occurs, the nature of which depends on the technological properties of the soil and the angle alpha (α) of setting the working edge of the wedge to the horizon.
Interaction of wedge with angle alpha with soil
A two-sided wedge with an alpha angle separates the layer from the bottom of the furrow, raises it, compresses it into vertical plane and splits into separate pieces. The larger the alpha angle, the more the wedge bends and crumbles the separated layer. However, when the alpha angle is increased to 45 °, the soil stops sliding along the upper edge of the wedge and begins to "load" in front of the wedge. A double-edged wedge with a gamma (γ) angle, oriented vertically, separates the layer from the furrow wall, takes the earth to the side and compresses it in the horizontal plane.
Interaction of the gamma wedge with the soil
A dihedral wedge with a beta angle (β) is designed to deflect the formation to the side, turning it over.
Interaction of Beta Angle Wedge with Soil
However, in order to move the formation from a horizontal to an inclined position and turn it over, the angle of the beta wedge must change from 25 ° to 130 °, that is, it is necessary that the surface of the wedge be curved. The complex action of three two-sided wedges on the formation will replace one triangular wedge, which is an AMBO tetrahedron with three mutually perpendicular faces of PTO, AOM and AOB.
Interaction of the triangular wedge with soil
When the triangular wedge moves in the direction of the X axis, the AB edge cuts off the layer from the bottom of the furrow, the BM edge - from the furrow wall, and the ABM edge removes the layer to the side, crumbles and wraps it.
To ensure plowing of the soil, the triangular wedge is transformed into a curvilinear ploughshare-moldboard surface of the plow body, which is characterized by continuously changing angles alpha, gamma, and beta.
Plow body working surface
Let us remind that the working bodies of the plow are: a ploughshare cutting the layer from below; dump for wrapping and crumbling the seam, field board - plow support, abutting against the bottom of the furrow. The blade, the share, the field board, as well as the stand, with the help of which the previously listed plow bodies are attached, make up the plow body. Moving in the soil in the direction of the X axis, the plow body with a curved surface cuts the seam, lifts it, deforms, crumbles, wraps and throws it into the open furrow. Of the many technological operations performed by the plow, the main one, from the point of view of agricultural technology, is the turnover and crumbling of the seam, the intensity of which is determined by the values and intensity of changes in the angles alpha, gamma, and beta, that is, the actual shape of the working surface of the plow body blade.
The process of turnover of the layer of the earth:
a - plowing depth; b - width of seam coverage by the plow body
Dump surfaces can be cylindrical, cylindrical (resembling cylindrical) and screw. A plow with a cylindrical surface crumbles and mixes soil layers well, but poorly wraps the layer, which does not meet the requirements of agricultural technology. Therefore, plows with cylindrical body surfaces are not used for plowing the land. Of greatest interest is the plow with a cylindrical surface of the body blade. This surface is characterized by an intense increase in both the crumbling angle alpha (from α 0 = 25 ° to α max = 130 °) and the wrap angle of the beta layer (from β 0 = 25 °. 35 ° to β max = 100 °. 130 ° ). The gamma shift angle varies within small limits from (from γ 0 = 35 °. 42 ° to γ max = 45 °. 50 °).
Now that we have gotten to know a little about the theory of the plow device, we move on to making a homemade plow. So that the plow can be made by everyone (who is familiar with metalworking), and even those who do not have the ability to bend the blade on the bending rollers, below are three options for making the plow body blade. When forming the plow body, it is necessary to take into account the fact that raising a layer of soil 20-25 cm high, the plow experiences very significant loads, and the surfaces of its body are subject to abrasive wear, therefore, steel 3-5 mm thick must be selected for the working parts of the plow.
Ploughshare... The plow share must be removable (for sharpening before starting plowing), it is better to make it from alloy steel 9XC (circular saw blade). Steel 45, hardened to a hardness of HRC 50-55, is also suitable. If there is only carbon steel of ordinary quality, for example, St. 5, which is not "heat-treated", it can also be made to satisfactorily cut the layer of the earth if, before plowing, the cutting part of the ploughshare is beaten off on an anvil in a cold state, like a scythe, and sharpened.
The first option for making a blade... As mentioned above, the working surface of the blade should have a cylindrical surface. If you have bending rollers, it will not be difficult to give the workpiece the desired shape. To do this, a blade blank with a thickness of 3-4 mm, cut from steel (gas-electric welding, scissors), is fed to the rollers at an angle of 20 ° -23 °, bend it, and then a hammer is carried out according to a template.
Drawing of a plow blade made of sheet steel 3 mm
Second option... The dump can be made from a steel pipe with a diameter of 550-600 mm, the wall thickness of which is 4-5 mm. In this case, first, a moldboard template is made from thick cardboard, then the template is applied to the pipe, making sure that there is an angle of 20-23 ° between the lower generatrix of the moldboard and the generatrix of the pipe cylinder. The contour of the dump is outlined with chalk, then the dump is cut out by gas welding and processed on emery. If necessary, the shape of the blade is modified with a hammer, focusing on the template.
Blade shape from a pipe with a diameter of 550-600 mm (wall thickness 4-5 mm)
The third option... The most time-consuming method of obtaining a dump is when its workpiece has to be heated in a forge (or in another way), and then bend over a matrix (the dump from a tractor plow is suitable as the latter).
The plow body is made of sheet steel St.3-St.10 with a thickness of 3 mm.
Plow parts drawing:
a - ploughshare, alloy steel; b - side plate of the rack, St3; в - spacer plate, St3; g - plow base plate, St3; d - field board, corner 30x30 mm; e - stand, pipe with a diameter of 42 mm
It is recommended to first make the elements of the plow from thick cardboard, glue them together, keeping the appropriate angles. So, the value of the alpha and beta angles in different parts of the hull will be from 25 ° to 130 °, the gamma angle - from 42 ° to 50 °. If a homemade cardboard plow satisfies you in all respects, feel free to grab the metal.
When the metal elements of the plow are ready, to assemble the body you will need a metal (steel) sheet 2-3 mm thick and 500x500 mm in size, and you will also need a welding machine. On a metal sheet, stepping back 40 mm from the edges, set aside the angle γ 0.
Plow assembly: 1 - share; 2 - side plate of the rack; 3 - metal sheet 2-3 mm
Using wedges with an angle α 0 = 25 °, we install the plowshares on the metal sheet and attach it to the sheet by welding from both sides. We bring the side flap of the stand under the share, making sure that it is located vertically and goes over the edge of the share by 5-8 mm, while the flap of the stand should be located above the blade of the share (that is, above the sheet) by 6-10 mm, so that do not interfere with the blade of the plowshare to cut the layer of the earth. The shield is also lightly tacked by welding both to the ploughshare and to the metal sheet.
Then we try on the dump to the plowshare, which must fit tightly with the plowshare, without gaps, so that the surfaces of the mouldboard and the plowshare are one whole. The angle between the share blade and the top edge of the blade is equal to the difference between the angles γ max and γ 0 and should be 6-8 °.
Share attachment:
1 - share; 2 - countersunk screw M8; 3 - blade; 4 - base plate; 5 - corner 30x30x90 mm; 6 - nut М8
If inconsistencies in angles and / or surfaces are found, the blade is modified with a hammer. Having adjusted the blade to the share, it is welded to the share (behind), as well as to the side shield. Next, a spacer bar and a base plate are welded to the side shield, and the stop corners for the plowshare are again grabbed to the latter. The plow is inspected again and finally welded, while the metal sheet on which the plow was going is detached from the body using a chisel or "grinder" with a cutting disc. The thrust corners of the ploughshare attachment are thoroughly welded to the base plate. Then the welded seams are cleaned, and the blade and the share are treated with abrasive paper.
In order for the plow to be "self-propelled" and "keep the furrow" itself, it is necessary to adapt a 2-wheel unit to it.
Plow with wheel unit:
1 - field wheel; 2 - bean; 3 - furrow wheel; 4 - plow body; 5 - handle; 6 - wheel axle; 7 - plow adjustment plate from channel
A furrow wheel with a diameter of 320 mm and a width of 40-50 mm is made of steel sheet 3-4 mm thick. A field wheel with a diameter of 200 mm and a width of 40-50 mm is cut from the same material. The wheel axle is made of 3/4 ”tube. On one side, the pipe is bent at an angle of 90 ° and a sleeve is welded to the folded end to install the furrow wheel. A field wheel is attached to the other end of the pipe. The wheel axle is also made composite (the figure above shows the composite axle). The pipe itself is welded to the plow beam (pipe with a diameter of 42 mm).
The plowing depth will be 200-240 mm, that is, it will be approximately equal to the vertical distance from the share tip to the field wheel (see the figure above). The plowing width, equal to 220-250 mm, depends on the distance (horizontally) from the share tip to the furrow wheel. Those who want to make the plow adjustable in terms of the plowing depth and the width of the seam of the soil (downward), it is necessary to provide that the field wheel can be moved vertically, and the furrow wheel horizontally, as well as fix the wheels in the desired position. For the stability of the plow during plowing, it is necessary to provide for the adjustment of the point of attachment of the plow to the cable (if the plow is moved using an electric winch) or to the hook (if the draft force is a horse). To make it easier to find the optimal attachment point for the plow, the easiest way is to take a steel plate 6-8 mm thick (or even better a channel) measuring 120x160 mm, drill a number of holes with a diameter of 10 mm in it and weld the plate to the plow beam. The illustration below shows an adjustment plate that is attached to a wheel unit with a split axle for wheels.
Adjustment plate:
a - plate; b - fastening the plate (channel) to the bead; in - loop
The plow works best with an electric winch, because the cable pulls the plow strictly horizontally. When the plow is pulled by the horse, a vertical component of the pulling force appears, which lifts the wheel block upward. Moreover, the taller the horse and the closer the plow is attached to it, the greater this vertical component of the force. When initially attaching the plow to the pulling unit, tie the cable to the adjustment plate 60-90 mm away from the beam towards the furrow wheel. The first furrow on arable land is made at half the plowing depth to reduce bending forces. When passing the second furrow, after passing 5 m, it is necessary to stop and look at the cut of the furrow, the field board should leave a clear mark on it, which will indicate that the plow is correctly interacting with the soil. If the track is not visible, move the attachment point to the left wheel 30-60 mm, if the track is excessive, move the point to the furrow wheel. If you do not want the plow to go deep, move the attachment point above the bead by 30-60 mm, and if it is too deep, lower the attachment point of the plow.
When using the content of this site, you need to put active links to this site, visible to users and search robots.
A homemade plow is not only economically profitable, but also not difficult in terms of production. You will always be confident in the reliability of such equipment, but let's figure out how to build it.

The plow is used in agriculture for plowing the land.
If you have read newspapers and magazines intended for a villager at least once, you probably noticed an abundance of advertising for the sale of mini tractors and motoblocks. Not surprisingly, the land has to be cultivated. But attachments for such equipment on sale are not always of high quality. The most demanded unit is the plow. And when buying it, the future plowman gets a lot of problems: one cannot always expect high-quality plowing from such a device, although the cost of an industrial plow is quite impressive. A homemade plow can be an excellent alternative to a low-quality product.
Before we start making a plow, let's figure it out design features. Its main parts are: a ploughshare, a blade and a field board.

Types of plow dumps: 1 - cylindrical; 2 and 3 - cultural; 4 - semi-screw; 5 - screw.
The ploughshare is the main cutting part of the plow. It is located under the dump. The angle of inclination of the share cutting edge should be about 40 degrees. At a lower angle, the product will rush upward. When working on a walk-behind tractor, you will constantly have to raise the handles, which will lead to quick fatigue of the employee. A homemade plow for a mini-tractor with the mentioned share must be kept in the soil all the time by hydraulics. The share is made of high-strength steel grades. It can be difficult to find such material at home, so it is recommended to use an industrial-made share from old technology. A part from a skimmer may be ideal. In the old days, agricultural machinery was not very powerful, therefore, for heavy soils, equipment was used, in front of which plow plows were installed - small plows of preliminary soil cultivation, due to which the sod was loosened.
The plow blade plays an important role. His work is based on the shape of the leaf. The better the sheet is bent outward, the easier it is for the product to reverse the plowed land. A blade is made of low-carbon steel with a thickness of 3 mm (this is the critical thickness that is suitable for a walk-behind tractor). The tractor will require a blade with larger area sheet and greater material thickness.
The plow board is needed to ensure its stability in the soil. If your walk-behind tractor has wheel locking, then if you have a properly installed field board, you will not have to experience great physical exertion. It is enough for the block to "show" the direction and set the deepening, and then it will work on its own until the end of the plowing strip.

Plow parts drawing.
And now let's move on to the direct manufacture of the plow. We will start with mathematical calculations, taking into account technical characteristics your walk-behind tractor. If your equipment is provided with a good coefficient of adhesion to the soil, then you can take as a basis any drawings of attachments for mini equipment. Otherwise, take your time to make a plow with a wide grip and a large depression. For a conventional walk-behind tractor, the following proportions must be observed: 8 kg of equipment weight per 1 cm of recess and 0.5 cm of plowing width.
To assemble the plow you will need:

Method for determining the center of gravity of the plow: 1- plow body; 2 - bean; 3 - plow handles; 4, 5 and 6 - ropes; 7 - hook; 8 - plumb line.
On a flat horizontal surface, we install the stand vertically, on the left side along the course of the intended movement, place the field board, with right side the share is located. Sometimes you can find advice that all parts must be welded to the rack. If you also conceived to do this, then give up this thought: the plow must be collapsible. Then, in the event of damage to any element, it can be easily replaced, which will reduce the forced downtime.
In order for the plow to be easily disassembled and assembled, weld the base for it, the product will include triangular shapes designed to ensure the rigidity of the entire structure. On this base we fasten the ploughshare and the field board in the previously marked directions. The blade must be secured above the share. It needs to be given a certain roundness, which can be done on a special machine or by forging. Cold forging will not work here for two reasons:
It will be better if the metal is heated, forged and immediately hardened. The holes in the moldboard (3 of them are needed) can be made directly in the forge, but do not be mistaken with the accuracy in the marking.
Now fix the blade on the body. It is necessary to use bolts for fasteners with a head that is tightly immersed in the hole. All protrusions will interfere with the work of the plow, so they must be cut off under the base and the places must be sanded.
If you work for personal plot on a tractor, then you need to have paired plows that are fixed on an axis that goes at an angle to the vehicle.
Here, fasteners are made using strong metal clamps (do not use welded fasteners - they will break under load!). The position of the bearing axle must not be stationary. Here it is necessary to provide at least a small angle of rotation so that you can adjust the position of the plows.
If desired, the master can also make a reversible plow by placing a hydraulic drive for turning between the axle and the tractor. But such a design is recognized by the people as irrational: it breaks down too quickly. Better to use the factory plow turning elements. If they are available, then there is no problem; there is no need to make such a complex device on your own. It will cost you a waste of time and nerves, and the result of your efforts will be short-lived.

This is my third self-made model of a plow with an electric winch. Taking into account the previous experience, I made it according to the principle "the simpler, the more reliable" - from scrap materials at the lowest cost.
The plow structure (photo 1, fig.) Consists of 5 main units.


Dump. I cut it out with a grinder from sheet metal 2 mm thick (photo 2). I welded a ploughshare from a spring from "Moskvich". He bent the blade along the radius so that his front part came close to the front part of the field board (PD), cut from steel sheet 3 mm thick. I welded the blade to the PD with an overlap with the expectation that its cutting part would be 2-3 cm lower than it. From a corner of 50 × 50 cm I cut a 50 cm long runner. I attached it with a MB bolt with a countersunk head to the PD.
Rack. Used a profile of 20 × 40 mm. Attached from the bottom with one M8 bolt simultaneously to the runner and the PD, and at the top with a similar bolt to the PD, taking into account the fact that in this place the angle of inclination of the plow can be adjusted. At the end of the runner, I welded a piece of tube d 20 mm - a spacer for the blade (photo 3). With a stand attached to the drawbar, the plow can be raised and lowered, thereby adjusting the plowing depth.
Drawer. Together with the transverse axis made of water pipe d 42 mm. The drawbar hitch box with the stand was welded from the corners from the 30 × 60 mm profile. When moving up and down, it is fixed on the stand with a hairpin (nail) in the holes drilled at intervals of 50 mm (photo 4).
Coupling unit. Designed to move the drawbar along the transverse axis (photo 5) when adjusting the width of the furrow. Nearby, I attached a bracket through which a cable runs from an electric winch (photo 6). With the help of a shackle, I regulate the force required to hold the plow along the furrow width (partly and in depth).
At the ends of the transverse axis, wheels made of 2-mm tin are fixed. One is flat, the other is in the form of a plate. To make it more convenient to bend, I made slots around the perimeter of the circle. The hubs made of pieces of pipe d 20 mm were reinforced with spacers made of metal strips 20 mm wide (photo 7). I trimmed the wheel rims with the same strips so that they would not fall into the ground.
Slightly above the dump, I tied a piece of wire d 4 mm to the rack. He pulled it through the hole in the bracket on the transverse axis and bent the loop at the other end. This S-hook is used to engage the plow with the winch cable (photo 8).

Usually, when working with a winch, the most time consuming operation is transporting the plow to a new furrow. With my construction weighing less than 15 kg and with wheels, it turns into a walk: I lifted it by the strut and rolled it with one hand to the right place.
1-2 initial furrows I go through, pressing the plow from above to get the desired depth... After that, I only control the process - the plow itself keeps the required width (pressing the convex wheel against the edge of the furrow) and depth.
On a note
Ideally, the S-hook should bend when the winch pull is much higher than the working force - for example, when the plow meets big Stone... This will prevent the motor from burning out.
Manual plow "Vyatsky plowman" (shovel of father Gennady) do it yourself (drawings and diagrams)
The manual plow "Vyatsky Plowman" (shovel of Gennady's father) is a tool for quickly digging up the earth. Increases plowing productivity by 4 times compared to a conventional shovel. Due to the rotary method of work, it does not load the lower back at all. Efforts are applied only to the "rudder".
The shovel of monk Gennady is adjustable in height, which allows it to perfectly fit the growth of the tiller. Bucket width 30 cm - 1.5 times wider than a normal shovel. Plowing the land is quick and easy! Suitable for virgin land, dense soil, soddy soil.
Father Gennady's shovel "Vyatka plowman":
Increases the speed of digging up the earth by about 4 times;
Unlike a conventional shovel, it does not require you to bend over and crouch;
In one step, it pulls out the volume of earth 2 times more than a shovel;
Makes planting of potatoes quick and easy thanks to the side tilting of the soil.
Several years ago, it was shown on television how a priest in the Russian provinces deftly dug an area with a strange shovel, in the upper part of which was ... a bicycle handlebar. This interested me very much (I myself did not see that transmission), and according to my wife, who saw that transmission, I constructed a miracle shovel, which can easily dig up the ground twice as fast and without bending at all, thereby not loading my back.
The materials for the manufacture of the shovel were used by the handymen:
1. The steering wheel is from an old bicycle, I put pieces of hose on the handles, so it is more convenient to work
2. Stainless steel pipe with a diameter of 22 mm.
3. A shovel made of cold-rolled stainless steel 2 mm thick
4 Pin with spring or steel movable (adjust to the ground).
Abroad, as well as in our country, every year they come up with something new in loosening the soil, so that the microflora is not disturbed, and the microorganisms remain at their level: the lower ones are at the bottom, and the upper ones are at the top, which is very important for future harvests in homestead and summer cottages. plots.
When you dig with such a shovel, you get one pleasure: you want to work and work, and you don't get tired at all. It is very good for the elderly with sciatica and other diseases of the spine.
For digging grass or cereals, it is not suitable, because the ground needs to be turned upside down, and it turns the soil only 180 degrees, and with a sharp movement, 100-120 degrees is enough
You can also use material from a miner's shovel. From the height of a person (namely, the lever of the hand), I derived the formula:
Thus, I determined the height of the miracle shovel - from the steering wheel (upper part) to the cutting part (I sharpened the shovel at the bottom).
The steering wheel is aligned in a straight line. The pin enters the pipe and is locked with a 2.11 M8 bolt and serves to turn the miracle shovel.
You need to start digging from right to left or right back
I add drawings for the manufacture of a miracle shovel. Such an instrument of labor satisfies me, I work hunting and not straining too much. I advise everyone to make such a wonderful shovel in order to facilitate their difficult work.
For plowing the land, a motor winch is usually used self-propelled plow... While driving, the plow keeps itself in the furrow, a little support is required during the first furrow and when plowing heavy and virgin soils.  The design of the plow allows you to adjust the furrow width and plowing depth. With the help of the removal of the furrow (large) wheel, the working width is adjusted, the plowing depth is adjusted by adjusting the wheel height. A normally adjusted self-propelled plow holds itself well and firmly in the furrow, gives an even turnover of the layer along the entire length of the furrow.
  When plowing light sandy soils, the working width can be set up to 20 cm, when plowing loam 5-15 cm. The plowing depth is usually about 20cm.
  When plowing a plot with a motor winch using a self-propelled plow, the land over the entire area of the plot rolls over to one side, therefore, the next time the plowing is done, the winch must be placed on the other side of the plot. This can be difficult, so plows with a left-hand blade are used. With each subsequent plowing, the plow with the opposite blade is used, then the soil remains in place. Usually, in practice, in the spring they plow with one plow, in the fall with another.
  Transport plow for motor winch to the beginning of the furrow by the handle, while the share is raised above the ground, and the plow rolls on wheels.
  The length of the handle should be such that the ploughshare does not hit the legs, it is better when the handle is long. But when plowing from the fence (and until lunchtime), the handle does not allow you to get close, it also interferes with transportation, so often the handle is also made adjustable. Previously, there were copies of titanium plows, their weight made it possible to simply carry them in your hands.
Most of the motor-winch plows available on the owners are home-made plows.  Successful homemade plow It is difficult to do, but those who do it all the time have their own drawings and patterns, and the plows turn out to be quite working.
  The photographs (photo 1 - photo 4) show four right-hand plows. They differ slightly in the design of the plows, the attachment of the plowshare with the plow and the adjustment of the wheels. The layout of the units themselves is approximately the same. On the first plow (photo 1) there is an adjustment of the length of the handle, it can be seen that there used to be an adjustment of the height of the plowshare stand, but it was welded as unnecessary.
  The photographs (photo 5 - photo 6) show left-handed plows. Their design is similar, only mirrored to the right.
For hilling potatoes and for cutting rows, they are used hillers for motor winches(photo 7, photo 8). On light soils, manual hillers are practiced, where the strength of one person is enough for its movement. On heavier soils, the hiller is dragged with the help of a motor winch, and two people are required for hilling, one stands on the winch, the other works with the hiller.  Photo 9 shows potato digger for motor winch... When moving along a row with potatoes, it digs it out, passing the earth through itself.
  Some gardeners are adapting to dig up potatoes with a hand plow, filling it up a little when passing through the row. Basically, in their gardens, potatoes are dug by hand with a shovel or special pitchfork.
Very interesting land cultivation devices presented in photos 10-12. The hiller for a motor winch (photo 10) can be replaced with a disc hiller (left) or a flat-cut ripper (right). On the vertical racks of the flat cutter, there are flat triangular knives at the bottom.  For harrowing, a heavy harrow (photo 11) with wheels for easy transportation is used, or a light harrow original design with chains for breaking lumps (photo 12). When the harrow is turned over, it is used as a grab to level the ground. This complex is used in one of the private households together with an electric winch (photo 7a, b) from the previous article. It is possible to work as a hiller with an electric winch for one person only if there is a remote control of the winch, and most of the work, as a rule, has to be done alone.
For many years, a small garage hoisting winch, powered by a 220-volt electrical network, has been gathering dust in my farm for many years. Its carrying capacity was not high and was only 250 kg. Although I had a walk-behind tractor in my agricultural arsenal, I still dreamed of getting a real, plow-like tool. At the beginning of my career as a collective farmer, I invited equipment with a plow to cultivate the land, but over the years I filled everything with buildings, fruit trees and bushes, and the tractor on the site did not turn around. I had to come up with something.
A walk-behind tractor is self-deception.
I have known for a long time that some do-it-yourselfers tried to use electric winches for their plows. But all the examples known to me were based on the fact that the winch is fixed motionlessly at the end of the cultivated area, and the plow stretches towards it with cables, turning over the layers of soil. I didn't like this technology at all. First, under such a scheme, two collective farmers must be present and participate in the process. One is on the switch and the other is on the plow. Secondly, it is necessary not only to drag the winch as the plowing progresses, but also constantly think about how to fix it, no matter what the plow would drag it onto itself, and not vice versa.
There was only one thing that stopped my winch from using it, and that was its low lifting capacity. I was afraid that she would not pull the plow. But I decided to take a chance, especially since I didn't have to buy anything.
To do this, I used a meter piece of 50 mm pipe, on which I fixed the winch. At the ends of the pipe, using electric welding, fix the M 20 nuts. Using these nuts and M 20 bolts with a length of 120 mm, I installed small wheels.
At a distance of 0.8 meters from the winch with wheels, install the plow itself so that, in working mode, it is located 20 centimeters below the wheels themselves. This will be the plowing depth. It is ideal to make this knot adjustable, but I was in a hurry and did not really believe that everything would work out and put this work aside for later. I attached the plow to the axis using corners 33 by 33 mm and electric welding.
Everything else is a matter of technology. The handle was bent from a small diameter pipe. Everyone bends to their height.
I had to, a little, tinker with the start button. The fact is that the telpher works only when the switch is pressed. If you let go a little, the electric motor turns off. The first tests showed that this is not terribly convenient. There are frequent non-sanctioned shutdowns. I had to disassemble the control unit and convert everything to a conventional electrical circuit breaker.
Surprisingly, everything worked out the first time. In just a couple of hours I plowed several hundred square meters of a vegetable garden. Everything is very attractive and interesting. It was amazing to watch how this tiny engine flips entire layers of earth. Not only turns it over, but neatly places it with a top layer, with all the vegetation that has already appeared, downwards, and not upward with contaminated soil, exposing all the roots of the weeds in the soil. Dooming them to certain death.
It is easy for one person to operate the plow, since the winch is on the same platform with the plow and the switching system. The winch is not permanently attached to the axle (on the pipe). The final installation location can only be determined during operation. If the structure will lead to one side or the other, then a correction should be made.
Everything would be fine, but it is constantly necessary to solve the problem of fixing the free end of the cable. Exactly this weakness devices. The simplest and most tedious thing is to hammer a crutch into the ground and cling to it. But it is most convenient to cling to the hitch of your car. It is possible for a trailer, etc.
So that the power cable does not fall into the working area, it is enough to fix the cable at a sufficient distance from the structure from any convenient side.
There are small nuances when working. The main thing is to securely fasten the free end of the winch cable.When buying a mini-tractor for processing a small plot of land, the package often does not include all the attachments, so they have to be purchased separately. And the retail price of any spare parts is much higher and depends on the manufacturer and quality.
Equipment that meets all the requirements of the business executive is not always available on the market. therefore the best option- to make a home-made plow, which at the same time will cost significantly less than factory equipment, sometimes of dubious quality.
To make a plow yourself, you need to know well its design and the functions of its individual elements. Usually on private land plots are used arable attachments for general use. In the design of such a plow, two main parts can be distinguished: working and auxiliary.
The working elements of the equipment include:
Auxiliary structural elements:
 The skimmer is designed to remove the top layer of soil when plowing a land plot. He turns over a layer of soil with weeds, lays it on the very bottom of the furrow, made by a body that is equipped with special devices. It cuts and flips some of the soil from the furrow side. At the same time, the body with the tooling loosens the soil and distributes it evenly over the weed layer laid by the skimmer. To level the furrow wall, the plow is equipped with special knife, which is mounted in front of the extreme body of the attachment.
Plows are subdivided, depending on the number of bodies, into single-, double-body and multi-body devices.
The body structure includes the following parts:
 The type and quality of plowing of the land plot depends on the last two structural elements. The ploughshare cuts the soil layer, which then rises along it towards the dump, then turns over and crumbles. The angle of rotation of the earth layer depends on the design of the dump. A field board is mounted at the bottom of the body, which prevents the plow from moving in the direction of the plowed land.
If you are interested in how to make a plow with your own hands, drawings of its design should be selected based on the type of cultivated soil with these attachments for an MTZ tractor or a motor cultivator.
Plow body options:

Important! If you plan to make a plow with a support wheel for a walk-behind tractor in a domestic environment, it is recommended to select the body design depending on the type of soil.
The choice of housing depends on the type of crop being grown. Root crops need thoroughly loosened soil, for which none of the above options for agricultural attachments is suitable. In this case, it is recommended to use a combined design. The body is equipped with a shortened blade, a ploughshare and a rotor, which additionally crushes the soil during the processing of the land plot.
Dumps can be:

Important! When choosing a plow design, it is necessary to take into account a significant point: the share with the dozer should be of practically the same thickness (1 mm is the permissible value of the "step", no more than 0.5 mm is the gap between the dozer blade and the share).
To make a plow with your own hands, drawings of a plow for a minitractor must be selected according to the type of soil to be cultivated and the complexity of the device itself. First you need to decide on the design of the share.
A ploughshare is a part of a plow that cuts a layer of soil. The soil further rises along the plowshare to the dump. For the manufacture of this structural element of the plow, hardened steel of increased strength is used. It is possible to make such an element of the construction of a plow in a domestic environment from an ordinary steel pipe.
Shapes of a share:

Of the listed options for a share, the most popular is a chisel-shaped product for a reversible plow. They are considered the most stable during operation, the plow can be freely deepened to the required depth.
Before you make a plow handmade for a walk-behind tractor, you need to choose the right attachment design diagram. If there is old instrument, you can make new details based on it. If the old plow is missing, you can use Zykov's drawings to make it. But it is imperative to take into account the parameters of agricultural machinery, on which further use of independently manufactured attachments is planned.


